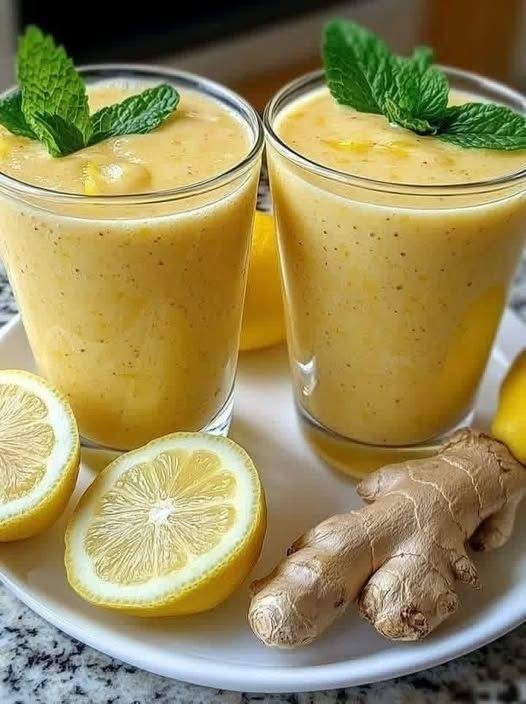
Ginger Lemon Water

Ginger Lemon Water

A refreshing, metabolism-supporting drink that helps reduce bloating, curb cravings, and support overall fat loss when paired with healthy habits. This simple ginger water is hydrating, soothing, and easy to prep for the whole week.

 Description

Ginger water is a natural wellness drink made by infusing fresh ginger (and optional lemon) into water. It’s known for supporting digestion, reducing inflammation, easing bloating, and gently boosting metabolism — which can help with fat loss over time, especially in stubborn areas like the abdomen, arms, back, neck, and thighs when combined with balanced nutrition and movement.


 Ingredients

  • 1–2 inches fresh ginger root, peeled and sliced

  • 1 liter (4 cups) water

  • ½ fresh lemon, sliced or juiced (optional, but recommended)


 Instructions

  1. Prepare ginger
    Peel and thinly slice fresh ginger.

  2. Boil water
    Bring water to a boil, add ginger, and simmer for 10–15 minutes.

  3. Cool & strain
    Remove from heat, let cool slightly, then strain.

  4. Add lemon (optional)
    Stir in lemon juice or add lemon slices.

  5. Store
    Pour into bottles and refrigerate for up to 3 days.

Serve warm or cold.

 Notes & Tips

  • 🌿 Stronger flavor? Simmer longer or add more ginger

  • 🧊 Great cold for summer, warm for digestion

  • 🍯 Add a small drizzle of honey if needed (optional)

  • ❄️ Shake before drinking if infused overnight

 Servings

  • 4 servings (1 cup each)

 Nutritional Info (Per Serving – Approx.)

  • Calories: 5–10

  • Carbs: 1–2g

  • Fat: 0g

  • Protein: 0g

  • Sugar: 0g

  • WW Points: 0

 Benefits

  • Supports digestion and gut health

  • Helps reduce bloating and water retention

  • Anti-inflammatory properties

  • May support metabolism and appetite control

  • Naturally detoxifying and hydrating

  • Caffeine-free and sugar-free

 Q & A

Q: Does ginger water burn belly fat?
Ginger water doesn’t burn fat on its own, but it supports fat loss by improving digestion, reducing bloating, and helping control appetite when paired with a healthy lifestyle.

Q: When should I drink it?
Best times are morning on an empty stomach or between meals.

Q: How much can I drink daily?
1–3 cups per day is ideal.

Q: Can I drink it every day?
Yes, most people can safely enjoy it daily.

Q: Who should avoid it?
If you’re pregnant, on blood thinners, or have gallbladder issues, check with a healthcare professional first.

Sugar-Free Oatmeal and Apple Energy Dessert

Sugar-Free Oatmeal and Apple Energy Dessert

Ingredients

  • Rolled Oats: 1 cup

  • Warm Milk: ⅔ cup (150 ml)

  • Apples: 2, grated or finely diced

  • Butter: 2 tablespoons, melted

  • Eggs: 2 large

  • Vanilla Extract: ½ teaspoon

  • Walnuts or Almonds: ½ cup, chopped (optional for added texture)


Detailed Instructions

  1. Hydrate the Oats: In a large mixing bowl, combine the 1 cup of rolled oats with the ⅔ cup of warm milk. Stir well and allow the mixture to sit for 10 minutes so the oats can soften and absorb the liquid.

  2. Prepare the Fruit and Nuts: While the oats are soaking, peel and either grate or finely dice the 2 apples. If using walnuts or almonds, chop them into small pieces to ensure even distribution.

  3. Create the Batter: Add the 2 eggs, 2 tablespoons of melted butter, and ½ teaspoon of vanilla extract to the soaked oats. Mix thoroughly until the eggs are fully incorporated. Fold in the prepared apples and nuts.

  4. Fill the Molds: Lightly grease a silicone mold or muffin tin. Using a spoon, fill each cavity nearly to the top with the batter, as these bites do not rise significantly.

  5. Bake: Preheat your oven to 180°C (350°F). Bake for 25–30 minutes until the tops are golden brown and the centers are firm.

  6. Cool and Serve: Let the dessert cool in the mold for at least 5 minutes before removing. This helps the structure set, making them easy to grab as a portable energy snack.


Why This Works

  • Natural Sweetness: Grated apples provide moisture and sweetness without the need for refined sugar.

  • Satiety: The combination of fiber from the oats and protein from the eggs helps keep you feeling full and energized.

Lemon Garlic Butter Chicken & Creamy Parmesan Pasta

Lemon Garlic Butter Chicken & Creamy Parmesan Pasta

Ingredients

For the Chicken:

  • Chicken: 2 boneless, skinless chicken breasts

  • Olive oil: 1 tablespoon

  • Unsalted butter: 2 tablespoons

  • Garlic: 3 cloves, minced

  • Lemon juice: 1 tablespoon

  • Seasoning: Salt, black pepper, and paprika to taste

For the Pasta:

  • Pasta: 250g spaghetti or linguine

  • Heavy cream: 1 cup

  • Parmesan cheese: ½ cup, freshly grated

  • Garlic: 2 cloves, minced

  • Lemon zest: 1 teaspoon

  • Fresh parsley: 2 tablespoons, chopped


Detailed Instructions

1. Prepare the Chicken

  • Slice and Season: Cut the chicken breasts into bite-sized pieces. Season generously with salt, pepper, and a dash of paprika.

  • Sear: Heat 1 tablespoon of olive oil and 1 tablespoon of butter in a large skillet over medium-high heat. Add the chicken and cook until golden brown and cooked through (about 6–8 minutes).

  • Finish with Flavor: Reduce the heat to low. Add the remaining 1 tablespoon of butter, minced garlic, and 1 tablespoon of lemon juice to the pan. Toss the chicken to coat it in the garlic butter sauce, then remove the chicken from the pan and set it aside.

2. Cook the Pasta

  • Boil: Cook your pasta in a large pot of salted boiling water according to the package instructions until al dente.

  • Reserve Water: Before draining, save about ½ cup of the starchy pasta water.

3. Create the Creamy Parmesan Sauce

  • Sauté Garlic: In the same skillet used for the chicken (don’t wash it—those brown bits add flavor!), add a little more butter if needed and sauté the minced garlic for 30 seconds.

  • Simmer Cream: Pour in the heavy cream and bring to a gentle simmer.

  • Melt Cheese: Whisk in the ½ cup of Parmesan cheese until the sauce is smooth. If it’s too thick, add a splash of the reserved pasta water.

  • Add Zest: Stir in the lemon zest for that bright, zesty finish.

4. Combine and Serve

  • Toss: Add the cooked pasta to the skillet and toss thoroughly to coat every strand in the creamy sauce.

  • Plate: Serve the pasta topped with the lemon garlic chicken. Garnish with fresh parsley and extra Parmesan if desired.


Cooking Tip

To keep this meal balanced, try serving it with a side of steamed broccoli or a fresh green salad.

Homemade Bread in a Bag

Homemade Bread in a Bag

Ingredients

  • All-purpose flour: 3 cups (divided)

  • Sugar: 3 teaspoons

  • Rapid-rise yeast: 1 packet

  • Warm water: 1 cup (essential for activating yeast)

  • Olive oil: 3 tablespoons

  • Salt: $1\frac{1}{4}$ teaspoons


Detailed Instructions

  1. Combine Initial Ingredients:

    Open a large (gallon-sized) heavy-duty freezer bag. Pour in 1 cup of flour, the sugar, the packet of yeast, and 1 cup of warm water. Seal the bag tightly, pushing out the excess air.

  2. The “Shake” Phase:

    Squeeze and shake the bag with your hands until the ingredients are well blended. Let the mixture rest for about 10 minutes; you should see bubbles forming as the yeast activates.

  3. Add Remaining Ingredients:

    Open the bag and add the olive oil, salt, and the remaining 2 cups of flour. Reseal the bag and continue to knead and squish it from the outside until a dough ball forms and pulls away from the sides of the bag.

  4. Knead the Dough:

    Lightly flour a clean surface. Remove the dough from the bag and knead it by hand for about 5–8 minutes until it is smooth and elastic.

  5. First Rise:

    Place the dough in a lightly greased bowl, cover it with a damp cloth, and let it rise in a warm spot for about 30–45 minutes, or until it has doubled in size.

  6. Shape and Second Rise:

    Gently punch the dough down to release air. Divide it into smaller portions if using mini loaf pans (as seen in the image) or keep it as one large loaf. Place the dough into greased baking pans. Cover again and let rise for another 20 minutes.

  7. Bake:

    Preheat your oven to 190°C (375°F). Bake for 25–30 minutes or until the crust is a deep golden brown and the bread sounds hollow when tapped on the bottom.

  8. Cool:

    Remove from the pans and let the bread cool on a wire rack before slicing to ensure the center stays fluffy.

Zesty Lemon Apple Cake

Zesty Lemon Apple Cake

Ingredients

  • Apples: 4-5 medium, peeled and thinly sliced

  • Eggs: 2 large

  • Wheat flour: ⅔ cup (80g)

  • Milk: ⅓ cup (100ml)

  • Unsweetened applesauce: 1 ½ tablespoons

  • Lemon: Zest of 1 lemon and juice of ½ lemon

  • Baking powder: 1 teaspoon

  • Stevia: 1 teaspoon (adjust based on your brand’s sweetness level)

  • Salt: A pinch


Detailed Instructions

  1. Prepare the Apples: Peel and thinly slice your apples. Immediately toss them with the juice of ½ lemon in a bowl. This prevents browning and adds a bright base flavor.

  2. Mix the Wet Base: In a separate large bowl, whisk the 2 eggs with a pinch of salt and the 1 teaspoon of stevia until the mixture is slightly frothy. Stir in the 100ml of milk, 1 ½ tablespoons of applesauce, and the lemon zest.

  3. Incorporate Dry Ingredients: Sift the 80g of wheat flour and 1 teaspoon of baking powder into the wet mixture. Whisk gently until the batter is smooth and there are no large lumps.

  4. Combine: Fold the sliced apples into the batter. Ensure every slice is well-coated; this is what creates the “layered” look in the finished cake.

  5. Prepare for Baking: Preheat your oven to 180°C (350°F). Grease a round cake pan or line it with parchment paper. Pour the apple and batter mixture into the pan, smoothing out the top.

  6. Bake: Bake for 30–35 minutes. The cake should be golden on top and firm to the touch. Because of the high fruit content, it will remain moist and custard-like inside.

  7. Final Touch: Let the cake cool completely before slicing. This allows the fruit layers to set. If you like, you can lightly dust the top with a tiny bit of powdered stevia or cinnamon before serving.

Oatmeal and Apple Snack Bites

Oatmeal and Apple Snack Bites

Ingredients

  • Rolled oats: 1 cup

  • Warm milk: ⅔ cup (150 ml)

  • Apples: 2, grated or finely chopped

  • Butter or margarine: 2 tablespoons

  • Eggs: 2

  • Vanilla extract: ½ teaspoon

  • Walnuts or almonds: ½ cup, chopped

  • Vegetable oil: For greasing the pan


Detailed Instructions

  1. Soak the Oats: In a large mixing bowl, combine the 1 cup of rolled oats with the 150 ml of warm milk. Stir and let the mixture sit for about 10 minutes. This softens the oats, ensuring a better texture for the final snack.

  2. Prepare the Apples and Nuts: While the oats soak, peel and then either grate or finely chop your 2 apples. Chop your ½ cup of walnuts or almonds into small, crunchy pieces.

  3. Combine Ingredients: To the soaked oats, add the 2 eggs, 2 tablespoons of butter (melted), and ½ teaspoon of vanilla extract. Stir well. Fold in the prepared apples and the chopped nuts until the mixture is uniform.

  4. Prepare the Pan: Lightly grease a muffin tin or a silicone rectangular mold with a small amount of vegetable oil.

  5. Bake: Preheat your oven to 180°C (350°F). Spoon the mixture into the prepared molds, filling them nearly to the top. Bake for 25 to 30 minutes, or until the bites are firm to the touch and a light golden brown on top.

  6. Cool: Allow the snacks to cool in the pan for 5–10 minutes before removing them. This helps them set so they don’t break apart.


Tips for Success

  • Texture: If you prefer a smoother snack, you can use “quick oats” instead of rolled oats.

  • Flavor Boost: Feel free to add a pinch of cinnamon or nutmeg to the batter to complement the apples.

Oatmeal and Apple Bites

Oatmeal and Apple Bites

These bites are a great way to enjoy a fiber-rich snack using simple, whole ingredients.


Ingredients

  • Oatmeal: 1 cup (90g)

  • Warm milk: 150 ml (about ⅔ cup)

  • Apples: 2 large, peeled and diced

  • Butter: 20g (1 ½ tablespoons), melted

  • Vanillin: 1/2 teaspoon (or vanilla extract)

  • Eggs: 2 large


Instructions

  1. Soak the Oats: In a medium mixing bowl, combine the oatmeal and the warm milk. Let it sit for about 10 minutes until the oats have absorbed the liquid and softened.

  2. Prepare the Apples: While the oats soak, peel and dice your apples into small, uniform pieces.

  3. Mix the Base: Whisk the eggs in a separate bowl, then add them to the oat mixture along with the melted butter and vanillin. Stir until well combined.

  4. Fold in Apples: Gently fold the diced apples into the oat mixture so they are evenly distributed.

  5. Fill the Mold: Spoon the mixture into a silicone baking mold (rectangular or muffin-shaped). Fill each cavity nearly to the top as these will not rise significantly.

  6. Bake: Preheat your oven to 180°C (350°F). Bake for approximately 25–30 minutes, or until the tops are golden brown and the center is set.

  7. Cool and Serve: Allow the bites to cool in the mold for a few minutes before removing them to ensure they hold their shape.

Zesty Lemon-Ginger Glow

The Recipe: Zesty Lemon-Ginger Glow

  • Prep time: 5 minutes

  • Servings: 1 large or 2 small smoothies

  • Equipment: High-speed blender

Ingredients

  • 1 cup Frozen mango chunks (provides creaminess without dairy)

  • 1/2 cup Greek yogurt or coconut yogurt (for a vegan option)

  • 1/2 inch Fresh ginger root, peeled and roughly chopped

  • 1/2 Organic lemon, juiced (plus a pinch of zest for extra punch)

  • 1/2 tsp Ground turmeric (optional, for color and anti-inflammatory boost)

  • 1 cup Unsweetened almond milk or coconut water

  • 1 tsp Honey or maple syrup (optional, to taste)

Instructions

  1. Prep the Ginger: Peel the ginger using the edge of a spoon—it’s the easiest way to get around the bumps!

  2. Combine: Place the liquid base into the blender first, followed by the yogurt, ginger, lemon juice, and finally the frozen mango.

  3. Blend: Start on a low speed and gradually increase to high. Blend for 45–60 seconds until completely smooth.

  4. Taste Test: If it’s too tart, add a touch more honey. If it’s too thick, splash in a little more almond milk.

  5. Serve: Pour into a chilled glass and top with a sprinkle of lemon zest or a thin slice of fresh ginger.

## Nutritional Information (Per Serving)

Estimated values based on standard ingredients:

Nutrient Amount
Calories 185 kcal
Protein 8g
Fiber 4g
Sugar 22g (natural)
Vitamin C 65% DV

## Benefits & Why It Works

  • Digestion Hero: Ginger contains gingerol, which aids digestion and helps soothe an upset stomach.

  • Immune Support: High levels of Vitamin C from the lemon and mango help bolster your body’s defenses.

  • Natural Energy: Unlike coffee, the natural sugars and electrolytes provide a steady lift without the caffeine crash.

## Pro Tips for Success

  • Freeze Your Lemons: If you have lemons about to go bad, juice them into ice cube trays. Toss 2 cubes into the blender instead of fresh juice for an extra-cold texture.

  • Smooth Ginger: If you don’t have a high-speed blender, grate the ginger first to avoid finding spicy “chunks” in your straw.

  • Add Greens: Want to make it a meal? Add a handful of baby spinach. It will turn the smoothie bright green, but the lemon and ginger will completely mask the flavor.

## Common Q&A

Q: Can I use bottled lemon juice?

A: You can, but fresh is much better. Bottled juice often has preservatives and lacks the bright, floral aroma of a freshly squeezed lemon.

Q: Is the ginger too spicy for kids?

A: Ginger has a “slow burn.” If serving to children, start with a pea-sized amount and work your way up.

Q: Can I prep this the night before?

A: Smoothies are best fresh. However, you can prep “smoothie packs” by putting the mango, ginger, and lemon zest in a freezer bag. In the morning, just add the liquid, yogurt, and juice, then blend!

Doctors Reveal That Eating Beets Causes… (5 Powerful, Science-Backed Effects)

That humble, deep-red beetroot sitting in your produce aisle? It’s not just a side dish—it’s nature’s performance enhancer, blood pressure balancer, and gut healer, all in one vibrant package.
Once dismissed as “just another root vegetable,” beets are now celebrated by doctors, athletes, and longevity experts for their remarkable, research-backed benefits. And the best part? No pills. No jitters. Just real food with real results.
Here’s what happens when you make beets a regular part of your diet.
🌱 What Makes Beets So Special?
Beets are uniquely rich in:
Dietary nitrates → converted to nitric oxide (a vasodilator)
Betalains → potent anti-inflammatory and antioxidant pigments
Fiber → both soluble and insoluble for gut health
Folate, iron, potassium, and manganese → essential for energy and cell function
💡 Fun fact: The red pigment in beets (betacyanin) is so strong, it can temporarily turn urine or stool pink—harmless, but startling!
1. Naturally Lowers Blood Pressure:✅ 5 Remarkable Effects of Eating Beets Regularly

1. Naturally Lowers Blood Pressure

Beets are one of the most effective dietary tools for supporting healthy blood pressure.

Nitrates → nitric oxide → relaxed blood vessels → improved circulation

Studies show 5–10 mmHg drop in systolic BP within hours of drinking beet juice

Best results with daily consumption (e.g., 1 cup roasted beets or 8 oz juice)

❤️ Ideal for: Those with prehypertension or on heart-healthy diets

2. Boosts Stamina & Energy—Without Caffeine

Elite athletes drink beet juice before races—and you can too.

Enhances oxygen delivery to muscles

Delays fatigue during physical activity

Reduces perceived exertion (“makes hard things feel easier”)

🏃‍♀️ Even walking up stairs feels lighter!

3. Supports a Happy, Healthy Gut

Struggling with bloating or irregularity? Beets offer gentle relief.

Fiber adds bulk and feeds good gut bacteria

Natural sugars act as prebiotics

Betaine supports liver detox and digestion

🌿 Unlike harsh laxatives, beets work with your body—not against it.

4. Sharpens Brain Function

Nitric oxide doesn’t just help your heart—it helps your brain too.

Improves blood flow to the frontal lobe (responsible for focus and decision-making)

May slow age-related cognitive decline

Linked to better executive function in older adults

5. Fights Inflammation & Oxidative Stress

Betalains (those red-purple pigments) are powerful antioxidants that:

Neutralize free radicals

Reduce markers of inflammation (like CRP)

May lower risk of chronic diseases (heart disease, cancer, arthritis)

🥗 How to Eat Beets for Maximum Benefit

Method

Benefits

Tip

Raw (grated in salads)

Highest nutrient retention

Pair with citrus to boost iron absorption

Roasted

Sweet, caramelized flavor

Toss with olive oil, salt, and thyme

Juiced

Fast nitrate delivery

Mix with apple or carrot to mellow earthiness

Steamed or boiled

Gentle on digestion

Don’t overcook—keep them firm

Pickled

Probiotic + fiber combo

Great on sandwiches or grain bowls

⚠️ Note: Cooking reduces nitrates slightly—but boosts antioxidant availability. Eat beets both raw and cooked!

⚠️ Important Considerations

Kidney stones: Beets are high in oxalates—limit if prone to calcium-oxalate stones

Blood pressure meds: If on medication, monitor levels—beets can enhance effects

Soft Milk Cookies

Soft Milk Cookies

Ingredients

  • ½ cup butter (room temperature, soft)
  • ½ cup powdered sugar
  • 2 tbsp oil
  • ¼ cup milk
  • 1 tsp vanilla essence
  • 1½ cups all-purpose flour (maida)
  • 2 tbsp cornflour
  • 1 tsp baking powder
  • 2–3 tbsp milk powder (optional, for extra softness)
  • Extra powdered sugar (for coating)

👩‍🍳 Step-by-Step Detailed Recipe

🔹 Step 1: Cream Butter & Sugar

  1. In a bowl, add soft butter and powdered sugar.
  2. Beat for 3–4 minutes until light and creamy.
  3. Add oil and mix well.

🔹 Step 2: Add Liquid Ingredients

  1. Add milk and vanilla essence.
  2. Mix until smooth and combined.

🔹 Step 3: Mix Dry Ingredients

  1. In another bowl, sift:
    • Flour
    • Cornflour
    • Baking powder
    • Milk powder (if using)
  2. Gradually add dry mixture into butter mixture.
  3. Mix gently to form a soft dough.
    • Dough should be soft but not sticky.

💡 If sticky, add 1–2 tbsp more flour.

🔹 Step 4: Shape the Cookies

  1. Take small portions of dough.
  2. Roll into small logs or rectangles (like in picture).
  3. Lightly roll in powdered sugar.
  4. Place on baking tray lined with parchment paper.

🔹 Step 5: Bake

  • Preheat oven to 170°C (340°F).
  • Bake for 12–15 minutes.
  • Bottom should turn light golden.
  • Top should remain pale (do not overbake).

🔹 Step 6: Cool

  1. Let cookies cool completely on tray.
  2. They will firm up as they cool.

✨ Tips for Extra Soft Cookies

✔ Use soft butter (not melted)

✔ Do not overmix dough

✔ Do not overbake

✔ Store in airtight container

Morning Citrus Detox Drink –

Morning Citrus Detox Drink –

This refreshing lemon-ginger morning drink is designed to boost hydration, support digestion, and gently energize your body before breakfast. The ingredients are natural and commonly used for digestive wellness. Drink it on an empty stomach for 5 days to feel lighter, refreshed, and less bloated.

🌿 Ingredients

  • 1 cup warm water (not boiling)

  • 2 tablespoons fresh lemon juice

  • 1 tablespoon freshly grated ginger or ½ teaspoon ginger powder

  • 1 tablespoon raw honey (optional but recommended)

  • 1 teaspoon apple cider vinegar (optional)

  • 1–2 slices of lemon or lime for garnish

 How to Prepare
  1. Warm 1 cup of water until it is pleasantly warm — not too hot.

  2. Add fresh lemon juice and stir.

  3. Add grated ginger; let it steep for 2 minutes.

  4. Stir in raw honey until melted.

  5. (Optional) Add apple cider vinegar for a stronger detox effect.

  6. Strain if you want a smooth drink.

  7. Pour into a glass and garnish with lemon or lime slices.

Drink 1 cup before breakfast every morning.

 Benefits (Realistic & Safe)

  • Hydrates the body after overnight fasting

  • Supports digestion and reduces bloating

  • Ginger may help soothe the stomach

  • Lemon provides vitamin C

  • Honey offers mild energy and antioxidants

This drink can support overall wellness, but no drink alone burns fat; healthy eating and activity matter too.

Q&A Section

1. Can this drink reduce belly fat?

It cannot “melt fat,” but it helps reduce bloating, improves digestion, and may support weight-management efforts when paired with healthy habits.

2. Should I drink it hot or cold?

Warm is best — it activates digestion gently.

3. Can I drink it more than once a day?

Once daily is enough. Too much lemon or ginger may irritate the stomach in some people.

4. Can diabetics drink this?

Yes, but skip the honey and consult a healthcare provider if unsure.

5. Can I prepare it at night?

Fresh is best, but you can prepare it up to 8 hours ahead and store it in the fridge.

6. How long should I use it?

You can drink it for 5 days or even daily as a general morning wellness ritual.

Mulberry Smoothie

Mulberry Smoothie

Description

This Mulberry Smoothie is a creamy, antioxidant-rich drink that highlights the naturally sweet and slightly tart flavor of fresh mulberries. Blended with protein-packed Greek yogurt and smooth almond milk, it creates a balanced, refreshing smoothie perfect for breakfast, a midday energy boost, or post-workout recovery.

Mulberries are rich in vitamin C, iron, fiber, and powerful plant compounds like resveratrol, making this smoothie both delicious and nourishing.

Ingredients (1 Serving)

  • 1 cup fresh mulberries (or frozen)

  • 1/2 cup plain Greek yogurt (or dairy-free yogurt for vegan option)

  • 1/2 cup almond milk (or milk of choice)

  • 1 tablespoon honey or maple syrup (optional)

  • 1/4 teaspoon vanilla extract

  • 1/2 cup ice (optional, for extra chill)

 Instructions

  1. Prepare the Mulberries

    • Rinse fresh mulberries gently under cool water.

    • If using frozen, no need to thaw.

  2. Blend

    • Add mulberries, yogurt, almond milk, sweetener (if using), vanilla extract, and ice to a blender.

    • Blend until smooth and creamy (about 30–45 seconds).

  3. Adjust Consistency

    • Too thick? Add 1–2 tablespoons more milk.

    • Too thin? Add more yogurt or a few ice cubes.

  4. Serve Immediately

    • Pour into a glass.

    • Garnish with fresh mulberries or a drizzle of honey if desired.

 Recipe Notes

  • Frozen mulberries create a thicker, colder smoothie.

  • If mulberries are very sweet, you may not need added sweetener.

  • For extra creaminess, use full-fat Greek yogurt.

  • Strain after blending if you prefer fewer seeds.

 Tips for Best Results

  • Use ripe, dark purple mulberries for maximum sweetness and nutrients.

  • Add 1 tablespoon chia seeds or flaxseeds for extra fiber.

  • For a protein boost, add 1 scoop vanilla protein powder.

  • For a tropical twist, add 1/4 banana or a few mango chunks.

  • Blend in spinach for a hidden nutrient boost (taste remains mild).

 Servings

  • Makes: 1 large smoothie

  • Can easily be doubled or tripled for multiple servings.

Nutritional Information (Approximate Per Serving)

(Based on Greek yogurt and almond milk, with honey)

  • Calories: 220–260 kcal

  • Protein: 14–18 g

  • Carbohydrates: 30–35 g

  • Fiber: 4–6 g

  • Fat: 6–8 g

  • Vitamin C: ~25% DV

  • Calcium: ~15% DV

  • Iron: ~10% DV

Values vary based on ingredient brands and substitutions.

Health Benefits

1. Rich in Antioxidants
Mulberries contain resveratrol and anthocyanins that help combat oxidative stress.

2. Supports Immunity
High vitamin C content helps strengthen the immune system.

3. Gut-Friendly
Fiber supports digestion and gut health.

4. Protein-Packed
Greek yogurt adds protein to keep you full longer.

5. Heart Health
Mulberries may help reduce cholesterol levels and support healthy blood pressure.

 Q & A

Q: Can I make this smoothie vegan?
A: Yes! Use dairy-free yogurt and maple syrup instead of honey.

Q: Can I use dried mulberries?
A: Yes, but soak them in warm water for 10 minutes first to soften. The flavor will be sweeter and less tart.

Q: How do I store leftovers?
A: Store in an airtight jar in the refrigerator for up to 24 hours. Shake or stir before drinking.

Q: Can I turn this into a smoothie bowl?
A: Absolutely! Reduce the milk slightly to make it thicker and top with granola, nuts, and fresh fruit.

Q: Is this smoothie good for weight loss?
A: It can be part of a balanced diet. For fewer calories, skip the sweetener and use low-fat yogurt.

Savory Golden Rounds


Savory Golden Rounds

Prep time: 10 mins | Bake time: 15–20 mins | Yields: 6–8 rounds

Ingredients

  • 3 large Eggs (separated into whites and yolks)

  • 3 tbsp Cream cheese (softened to room temperature)

  • 1/4 tsp Cream of tartar (this provides the essential lift and structure)

  • 1/2 tsp Garlic powder

  • A pinch of sea salt

  • Optional: 1 tbsp melted butter and a sprinkle of fresh parsley for a bakery-style finish.


Step-by-Step Instructions

  1. Preparation: Preheat your oven to 300°F (150°C). Line a large baking sheet with parchment paper. This step is vital because the batter is delicate and requires a non-stick surface to rise and release perfectly.

  2. Mix the Savory Base: In a medium bowl, whisk together the egg yolks, softened cream cheese, garlic powder, and salt. Continue whisking until the mixture is silky smooth with no visible lumps of cheese.

  3. Whip the Whites: In a separate, scrupulously clean glass or metal bowl, combine the egg whites and the cream of tartar. Using a hand mixer on high speed, whip the whites until stiff peaks form. They are ready when the foam stands straight up and doesn’t move when you tilt the bowl.

  4. The Gentle Fold: Carefully fold the egg yolk mixture into the whipped whites using a spatula. Use a slow “under-and-over” motion. Do not stir or whisk, as the goal is to keep the air bubbles intact so the rounds stay fluffy.

  5. Form the Rounds: Spoon the mixture onto your prepared baking sheet to form 6 to 8 even circles. You can use the back of the spoon to gently shape them into rounds.

  6. Bake to Perfection: Bake for 15–20 minutes. They are done when they have reached a beautiful golden-brown color and feel firm but springy to the touch.

  7. The Final Touch: While still warm, you can lightly brush the tops with melted butter and a sprinkle of fresh parsley. Allow them to cool for about 5 minutes to let the texture set before serving.


Why You’ll Love This Recipe:

  • Soft & Fluffy: The texture is uniquely light, making it a wonderful base for any meal.

  • Simple Ingredients: Using mainly eggs and cream cheese makes this a satisfying, protein-focused snack.

  • Endless Options: These make excellent “buns” for sandwiches or can be served alongside a bowl of soup.

Garden Fresh Veggie Cream Cheese Spread

Garden Fresh Veggie Cream Cheese Spread

Prep time: 10 mins | Total time: 10 mins | Yields: ~2 cups

Ingredients

  • 16 ounces Cream cheese (softened to room temperature)

  • 1 packet (1 ounce) Ranch seasoning mix

  • 1/2 cup Broccoli (very finely chopped/minced)

  • 1/4 cup Red bell pepper (finely diced, for color and crunch)

  • 1/4 cup Carrots (shredded or finely minced)

  • 2 tbsp Green onions or chives (thinly sliced)


Detailed Instructions

  1. Prep the Veggies: Wash and dry your vegetables thoroughly. The key to a great spread is a fine dice—chop the broccoli, bell pepper, and carrots into very small, uniform pieces. This ensures you get a bit of “garden crunch” in every single bite.

  2. Soften the Base: In a medium mixing bowl, add the softened cream cheese. Using a hand mixer on medium speed (or a sturdy spatula), whip the cream cheese for 1–2 minutes until it is light, airy, and easy to spread.

  3. Season: Sprinkle the ranch seasoning packet over the whipped cream cheese. Fold it in gently until the seasoning is evenly distributed throughout the base.

  4. Fold in the Garden: Add the chopped broccoli, peppers, carrots, and green onions. Use a spatula to fold the vegetables into the cream cheese until they are well incorporated.

  5. Let the Flavors Marry: While you can serve this immediately, the flavor is even better if you cover the bowl and let it chill in the refrigerator for at least 30 minutes. This allows the dry seasonings to hydrate and the veggie flavors to blend.

  6. Serve: Spread generously over toasted bagels, use it as a filling for tortilla wraps, or serve it in a bowl as a dip for crackers and fresh cucumber slices.


Why this recipe is a keeper:

  • Customizable: Feel free to swap the broccoli for spinach or add a little diced jalapeño if you like a bit of warmth.

  • Make-Ahead Friendly: This stays fresh and delicious in an airtight container in the fridge for up to 5 days.

  • Crowd Pleaser: It’s an easy, colorful addition to any brunch spread or party platter.

Golden Crispy Cabbage Fritters

Golden Crispy Cabbage Fritters

Prep time: 15 mins | Cook time: 15 mins | Serves: 4

Ingredients

The Fritter Base

  • 500 g Cabbage, finely shredded

  • 2 Onions, finely chopped

  • 3 cloves Garlic, minced

  • 3 Large eggs

  • 4 tbsp (60 g) All-purpose flour

  • 1 tsp Baking powder (for extra fluffiness)

  • Salt and pepper to taste

  • Optional: 1/2 cup shredded cheese (mozzarella or cheddar) or fresh dill

For Frying

  • 3–4 tbsp Olive oil or vegetable oil

The Recommended Dip

  • 1 cup Greek yogurt or sour cream

  • 1 clove Garlic, minced

  • 1 tbsp Fresh herbs (parsley or dill)

  • A squeeze of lemon juice


Detailed Instructions

  1. Soften the Cabbage: Place your shredded cabbage in a large bowl. Sprinkle with a pinch of salt and massage it with your hands for 1–2 minutes. This helps soften the cabbage and releases excess moisture, ensuring your fritters aren’t soggy. Squeeze out any extra water and discard it.

  2. Sauté the Aromatics: In a small skillet, sauté the onions and garlic with a teaspoon of oil until they are soft and translucent (about 3–5 minutes). Let them cool slightly.

  3. Create the Batter: In a large mixing bowl, whisk the 3 eggs together. Stir in the sautéed onion and garlic, the shredded cabbage, and any optional cheese or herbs.

  4. Bind the Mixture: Add the flour and baking powder. Season generously with salt and pepper. Stir until the cabbage is well-coated and the mixture forms a thick, scoopable batter.

  5. Fry until Golden: Heat the oil in a large non-stick skillet over medium heat. Drop large spoonfuls of the cabbage mixture into the pan, flattening them slightly with the back of the spoon.

  6. Flip: Cook for 3–4 minutes per side. You are looking for a deep golden-brown crust and a tender interior.

  7. Drain and Serve: Place the finished fritters on a plate lined with paper towels to absorb any excess oil. Serve them warm with the garlic-yogurt dip.


Why this recipe is a favorite:

  • Texture: The cabbage retains a slight “crunch” while the egg and flour create a soft, pancake-like middle.

  • Versatility: You can add shredded carrots or zucchini to the mix to pack in even more vegetables.

  • Budget-Friendly: Cabbage is one of the most affordable and nutrient-dense ingredients in the grocery store.

Refreshing Ginger Lemon Wellness Water

Refreshing Ginger Lemon Wellness Water

Prep time: 10 mins | Steep time: 2–4 hours | Yields: ~1 Liter

Ingredients

  • 1-2 inches Fresh ginger root (peeled and thinly sliced or grated)

  • 2 large Fresh lemons (one sliced, one juiced)

  • 4 cups (1 Liter) Filtered water

  • Optional: 1-2 tbsp Raw honey or maple syrup (for a touch of natural sweetness)

  • Optional: A pinch of cayenne pepper or a few sprigs of fresh mint


Detailed Instructions

  1. Prepare the Ginger: Peel the ginger root using the edge of a spoon. Slice it into very thin rounds or grate it directly to release as much flavor and gingerol as possible.

  2. Boil and Steep: In a small pot, bring 2 cups of the water to a gentle boil. Add the ginger slices and let them simmer for about 5–8 minutes. This creates a concentrated “ginger tea” base.

  3. Combine: Remove the pot from the heat and let it cool slightly. Pour the ginger tea (you can strain out the pieces or leave them in) into a large glass pitcher. Add the remaining 2 cups of cold water.

  4. Add Citrus: Stir in the fresh lemon juice and drop in the lemon slices. The Vitamin C in the lemon pairs perfectly with the spicy notes of the ginger.

  5. Sweeten (Optional): If the drink is too spicy for your palate, stir in your natural sweetener while the water is still slightly warm so it dissolves completely.

  6. Chill and Infuse: For the best flavor, let the pitcher sit in the refrigerator for at least 2 hours. This allows the ingredients to fully infuse the water.


Why This Drink is a Great Choice:

  • Hydration: It makes reaching your daily water goals much more flavorful.

  • Digestion: Ginger has been used for centuries to help soothe the digestive system and reduce occasional bloating.

  • Antioxidants: Lemons are a great source of Vitamin C, which supports a healthy immune system.

Golden Cloud Bread Rounds

Golden Cloud Bread Rounds

Prep time: 10 mins | Cook time: 15–20 mins | Yields: 6–8 rounds

Ingredients

  • 3 large Eggs (separated into whites and yolks)

  • 3 tbsp Cream cheese (softened to room temperature)

  • 1/4 tsp Cream of tartar (essential for holding the “cloud” shape)

  • 1/2 tsp Garlic powder or onion powder

  • 1 pinch Sea salt

  • Optional: 1 tbsp melted butter and fresh parsley for brushing on top


Detailed Instructions

  1. Preparation: Preheat your oven to 300°F (150°C). Line a large baking sheet with parchment paper. This is a very delicate batter, so the parchment paper is a must to prevent sticking!

  2. The Egg Yolks: In a medium bowl, whisk together the 3 egg yolks, the softened cream cheese, the garlic powder, and the salt until the mixture is completely smooth and creamy.

  3. The Egg Whites: In a separate, very clean glass or metal bowl, whip the 3 egg whites and the cream of tartar using a hand mixer or stand mixer. Whip on high speed until stiff peaks form (this means when you lift the beaters, the points of the foam stand straight up).

  4. The Folding Process: This is the most important step! Gently fold the yolk mixture into the whipped whites using a spatula. Do not stir. Use a slow “under-and-over” motion so you don’t deflate the air bubbles you just created.

  5. Form the Rounds: Spoon the mixture onto the prepared baking sheet into 6 to 8 even circles. Use the back of the spoon to lightly flatten them into a pancake shape.

  6. Bake: Place in the oven for 15–20 minutes. They are done when the edges are golden brown and the tops feel firm to the touch.

  7. The Finishing Touch: Brush the warm rounds with a tiny bit of melted butter and a sprinkle of fresh herbs. Let them cool for at least 5 minutes to allow the texture to firm up.


Why this recipe is a keeper:

  • Light & Airy: It has a unique, melt-in-your-mouth texture that is totally different from traditional bread.

  • Perfect for Sandwiches: You can use two rounds to make a gluten-free breakfast sandwich or a mini-burger.

  • Protein-Focused: Since it’s made primarily of eggs and cheese, it’s a satisfying way to fuel your body.

4-Ingredient Cheesy Garlic Pull-Apart Loaf

4-Ingredient Cheesy Garlic Pull-Apart Loaf

Prep time: 5 mins | Bake time: 15 mins | Serves: 4-6

Ingredients

  • 1 Loaf of crusty bread (like Sourdough or a French baguette)

  • 1/2 cup Unsalted butter, melted

  • 3-4 cloves Garlic, finely minced

  • 1 1/2 cups Shredded cheese (Mozzarella or Monterey Jack work best for the pull)

  • Optional: Fresh parsley or chives for a pop of color.


Detailed Instructions

  1. Prep and Slice: Preheat your oven to 375°F (190°C). Using a serrated knife, cut the bread in a grid pattern (lengthwise and crosswise) about 1 inch apart. Be sure to cut deep, but do not cut through the bottom crust, as the base needs to hold everything together.

  2. Infuse with Flavor: In a small bowl, mix your minced garlic into the melted butter. Use a pastry brush or a spoon to drizzle this golden mixture into all the cracks of the bread, ensuring the garlic is evenly distributed.

  3. Stuff and Bake: Generously stuff the shredded cheese into the crevices. Wrap the loaf loosely in foil and bake for 10 minutes. Then, open the foil and bake for another 5 minutes (or until the cheese is melted, bubbly, and slightly golden).


Why this recipe is a favorite:

  • Speed: It takes only a few minutes to assemble but looks like it came from a professional bakery.

  • Customization: You can easily swap the garlic for Italian seasoning or add red pepper flakes for a little warmth.

  • Texture: The combination of the crunchy crust and the soft, cheesy interior makes it the perfect side dish for any meal.

Golden Cloud Bread Rounds

Golden Cloud Bread Rounds

Prep time: 10 mins | Cook time: 15–20 mins | Yields: 6–8 rounds

Ingredients

  • 3 large Eggs (separated into whites and yolks)

  • 3 tbsp Cream cheese (softened to room temperature)

  • 1/4 tsp Cream of tartar (essential for holding the “cloud” shape)

  • 1/2 tsp Garlic powder or onion powder

  • 1 pinch Sea salt

  • Optional: 1 tbsp melted butter and fresh parsley for brushing on top (as seen in your photo)


Detailed Instructions

  1. Preparation: Preheat your oven to 300°F (150°C). Line a large baking sheet with parchment paper. This is a very delicate batter, so the parchment paper is a must to prevent sticking!

  2. The Egg Yolks: In a medium bowl, whisk together the 3 egg yolks, the softened cream cheese, the garlic powder, and the salt until the mixture is completely smooth and creamy.

  3. The Egg Whites: In a separate, very clean glass or metal bowl, whip the 3 egg whites and the cream of tartar using a hand mixer or stand mixer. Whip on high speed until stiff peaks form (this means when you lift the beaters, the points of the foam stand straight up).

  4. The Folding Process: This is the most important step! Gently fold the yolk mixture into the whipped whites using a spatula. Do not stir. Use a slow “under-and-over” motion so you don’t deflate the air bubbles you just created.

  5. Form the Rounds: Spoon the mixture onto the prepared baking sheet into 6 to 8 even circles. Use the back of the spoon to lightly flatten them into a pancake shape.

  6. Bake: Place in the oven for 15–20 minutes. They are done when the edges are golden brown and the tops feel firm to the touch.

  7. The Finishing Touch: If you want that beautiful golden glow from your photo, brush the warm rounds with a tiny bit of melted butter and a sprinkle of fresh herbs. Let them cool for at least 5 minutes to allow the texture to firm up.


Why this recipe is a keeper:

  • Light & Airy: It has a unique, melt-in-your-mouth texture that is totally different from traditional bread.

  • Perfect for Sandwiches: You can use two rounds to make a gluten-free breakfast sandwich or a mini-burger.

  • Protein-Focused: Since it’s made primarily of eggs and cheese, it’s a very satisfying way to fuel your body.

Small-Batch Pumpkin Protein Muffins

Small-Batch Pumpkin Protein Muffins

Prep time: 10 mins | Bake time: 20–23 mins | Yields: 4 Muffins

Ingredients

The Wet Base

  • 1/2 cup Pumpkin purée (ensure it is 100% pure pumpkin, not pie filling)

  • 1/2 cup Low-fat cottage cheese (blended for a smoother texture, or leave as-is for moisture)

  • 1 large Egg

  • 2 tbsp Your preferred sweetener (monk fruit, stevia, or maple syrup)

  • 1 tsp Pure vanilla extract

The Dry Ingredients

  • 1/3 cup Vanilla whey protein powder

  • 1/4 cup Blanched almond flour

  • 1 tsp Baking powder

  • 1 tsp Pumpkin pie spice (or a mix of cinnamon, nutmeg, and ginger)

  • 1 pinch Sea salt

The Topping (Optional)

  • 1 tbsp Chopped pecans or pumpkin seeds


Detailed Instructions

  1. Prep the Oven: Preheat your oven to 350°F (175°C). Line 4 cups of a standard muffin tin with paper liners or lightly grease them with non-stick cooking spray.

  2. Mix the Wet Ingredients: In a medium mixing bowl, whisk together the pumpkin purée, cottage cheese, egg, sweetener, and vanilla extract. Whisk until the mixture is well-combined and bright orange.

    • Pro Tip: If you prefer a completely smooth muffin texture, pulse the wet ingredients in a blender for 30 seconds.

  3. Add the Dry Ingredients: Gradually stir in the vanilla whey protein, almond flour, baking powder, pumpkin spice, and salt. Fold the mixture gently with a spatula until the flour streaks disappear. Avoid over-mixing, as this can make protein-based muffins a bit rubbery.

  4. Fill the Cups: Divide the batter evenly among the 4 prepared muffin cups. They should be filled about 3/4 of the way full to allow for rising.

  5. Add Texture: Sprinkle the chopped pecans on top of each muffin for a satisfying crunch.

  6. Bake: Place in the center rack of the oven and bake for 20–23 minutes. To check for doneness, insert a toothpick into the center; it should come out clean or with just a few dry crumbs.

  7. Cooling: Allow the muffins to cool in the tin for 10 minutes. This is a crucial step for protein muffins, as they “set” while cooling.


Nutritional Profile (Per Muffin)

Calories Protein Carbs Fat
~128 kcal ~12 g ~6 g ~6 g

Storage Tip

Because of the high moisture content from the cottage cheese and pumpkin, these muffins stay incredibly soft. Store them in an airtight container in the refrigerator for up to 5 days, or freeze them for a quick grab-and-go breakfast later!

The 90-Calorie Creamy Yogurt Cake

The 90-Calorie Creamy Yogurt Cake

Prep time: 5 mins | Bake time: 35–45 mins | Serves: 6–8

Ingredients

  • 2 cups (500g) Greek yogurt (plain or vanilla)

  • 4 large Eggs

  • 4 tbsp (40g) Cornstarch (this provides the structure)

  • Optional Sweetener: 3–4 tbsp of honey, maple syrup, or your preferred granulated sweetener (if using plain unsweetened yogurt).

  • Optional Flavor: 1 tsp vanilla extract or a squeeze of lemon juice.


Instructions

  1. Preparation: Preheat your oven to 340°F (170°C). Line a 6-inch or 7-inch round cake pan with parchment paper. To make the paper fit better, scrunch it into a ball first, then flatten it out—it will mold to the pan much easier!

  2. Mix the Base: In a large mixing bowl, whisk the Greek yogurt and eggs together until the mixture is completely smooth and there are no streaks of yellow.

  3. Incorporate the Starch: Sift in the cornstarch. Add your sweetener and vanilla extract if you are using them. Whisk gently until the batter is silky and lump-free.

  4. Bake: Pour the batter into your prepared pan. Bake for 35 to 45 minutes. The cake should be set on the edges but still have a slight “jiggle” in the very center.

  5. The Secret Step (Chilling): Once baked, let the cake cool to room temperature in the pan. Do not skip this: Place the cake in the refrigerator for at least 2 hours (or overnight). This allows the proteins to set, transforming the texture into a creamy, cheesecake-like consistency.

  6. Serve: Gently lift the cake out using the parchment paper. Slice and enjoy as is, or top with fresh berries.


Why this works for a nightly treat:

  • High Protein: Using Greek yogurt makes this much more satisfying than a traditional flour-based cake.

  • Simplicity: With only a few minutes of active work, it fits easily into a busy evening routine.

  • Customizable: You can experiment by adding cocoa powder for a chocolate version or folding in blueberries before baking.

The Ultimate Garlic Cheese Pull-Apart Bread

The Ultimate Garlic Cheese Pull-Apart Bread

Prep time: 10 mins | Bake time: 15–20 mins | Serves: 6–8

Ingredients

  • 1 loaf Sourdough or Italian boule (crusty bread works best)

  • 1/2 cup Unsalted butter, melted

  • 2-3 cloves Garlic, finely minced

  • 1 tsp Sea salt

  • 1 tbsp Fresh parsley, finely chopped

  • 1 1/2 cups Shredded cheese (a mix of Monterey Jack and Sharp Cheddar is best for the “pull”)

  • Optional: 2 green onions, thinly sliced


Instructions

  1. Preheat & Prepare: Preheat your oven to 350°F (175°C). Line a baking sheet with foil or parchment paper for easy cleanup.

  2. Cut the Bread: Using a serrated knife, cut the bread in a 1-inch diamond pattern. Cut deep into the loaf, but be careful not to cut all the way through to the bottom crust. You want the loaf to stay together as one piece.

  3. Mix the Garlic Butter: In a small bowl, whisk together the melted butter, minced garlic, sea salt, and fresh parsley.

  4. Butter the Cracks: Use a pastry brush or a small spoon to drizzle the garlic butter into every crevice of the bread. This ensures every bite is flavorful.

  5. Stuff with Cheese: Use your fingers to gently pull the cracks open and stuff plenty of shredded cheese inside. Don’t be shy—the more cheese in the cracks, the better the result!

  6. Wrap and Bake: Wrap the entire loaf loosely in foil. This allows the cheese to melt without the crust burning. Bake for 10 minutes.

  7. Crisp it Up: Remove the foil from the top and bake for another 5–10 minutes until the cheese is bubbly and the top of the bread is golden and crisp.

  8. Serve: Sprinkle with sliced green onions if desired. Serve immediately while the cheese is gooey.


A Tip for Success

If you want to prep this even further in advance, you can cut and butter the bread a few hours early, wrap it tightly, and simply add the cheese and bake right before your guests arrive.

No-Bake Fruit, Nut & Chocolate Oat Bars

No-Bake Fruit, Nut & Chocolate Oat Bars

A dense, chewy energy-style bar topped with a smooth chocolate layer.

Ingredients

For the Chewy Oat Base:

  • 2 cups Rolled Oats (Old-Fashioned): Provide heart-healthy fiber.

  • ½ cup Creamy Almond Butter or Peanut Butter: Adds healthy fats and protein.

  • ⅓ cup Sugar-Free Maple Syrup: A mindful alternative to traditional sweeteners.

  • ½ cup Slivered or Chopped Almonds: For essential crunch.

  • ½ cup Dried Fruit Mix (Raisins and Dried Cranberries): Natural sweetness.

  • 1 tsp Vanilla Extract and a pinch of Salt: For flavor depth.

For the Chocolate Layer:

  • 1 ½ cups Dark Chocolate Chips (at least 70% cacao): Lower in sugar than semi-sweet.

  • 1 tbsp Coconut Oil (or Butter): Ensures the chocolate stays soft enough to slice.

For the Topping (Garnish):

  • Whole Raw Almonds

  • Dried Cranberries

  • Large Raisins or Dried Cherries


Detailed Instructions

1. Prepare the Base

  • Line an 8×8 inch square baking pan with parchment paper, leaving some overhang on the sides for easy removal.

  • In a large microwave-safe bowl, combine the nut butter and sugar-free syrup. Heat for 30 seconds and stir until smooth.

  • Stir in the vanilla extract and salt.

  • Fold in the oats, slivered almonds, and the dried fruit mix. Stir until everything is thoroughly coated and sticky.

2. Press and Set

  • Transfer the oat mixture into your prepared pan.

  • Use a spatula (or the bottom of a flat measuring cup) to press the mixture down firmly into an even layer. This ensures the bars don’t crumble when cut.

  • Place the pan in the freezer for 10–15 minutes to firm up while you make the topping.

3. The Chocolate Layer

  • In a small bowl, combine the dark chocolate chips and coconut oil.

  • Melt in the microwave in 20-second intervals, stirring in between, until completely smooth.

  • Pour the melted chocolate over the chilled oat base and spread it evenly with a spatula.

4. Garnish and Chill

  • While the chocolate is still wet, artistically arrange your whole almonds, cranberries, and raisins on top.

  • Refrigerate for at least 1–2 hours until the chocolate is set.

  • Lift the bars out using the parchment paper edges and slice them into 16 even squares.


Storage Tip

Keep these bars in an airtight container in the refrigerator for up to a week, or freeze them for a quick grab-and-go snack later!

Refreshing Celery & Lime Hydrator

Refreshing Celery & Lime Hydrator

A crisp, nutrient-dense drink to support hydration and wellness.

Ingredients

  • 1 bunch Fresh Celery: Look for bright green, crisp stalks.

  • 1-2 Fresh Limes: Adds vitamin C and a bright, citrusy flavor.

  • 1 small handful Fresh Parsley (Optional): For an extra boost of antioxidants.

  • 1/2 cup Cold Filtered Water: To help with the blending process.


Detailed Instructions

1. Prepare the Vegetables

  • Separate the celery stalks and wash them thoroughly under cold running water to remove any soil.

  • Chop the stalks into small, 1-inch pieces to make them easier for your blender to process.

  • If using parsley, give it a quick rinse and remove any thick, woody stems.

2. Blend

  • Place the chopped celery and parsley into a high-speed blender.

  • Add the filtered water.

  • Blend on high for 60–90 seconds until the mixture is completely liquefied and looks like a bright green smoothie.

3. Strain (Optional)

  • If you prefer a smooth juice, pour the mixture through a fine-mesh strainer or a nut milk bag into a glass pitcher.

  • Weight Watchers Tip: If you enjoy the texture, drinking it unstrained keeps all the beneficial fiber, which helps you feel full longer!

4. Add Citrus & Serve

  • Squeeze the juice of 1 to 2 fresh limes into the celery juice.

  • Stir well and serve immediately over ice for the most refreshing flavor.


Why this works for your plan

  • Zero Points: Celery and lime are generally zero-point foods, making this a perfect “anytime” drink.

  • Hydration: High water content helps keep your skin glowing and your energy levels up.

  • No Added Sugars: Unlike store-bought juices, this version has no hidden sweeteners.

Cheesy Potato & Meatball Bake

Cheesy Potato & Meatball Bake

A hearty, protein-packed French-inspired dish that uses clever layering for a stunning presentation.

Ingredients

The Base & Meatballs:

  • 3 Large Potatoes: Boiled until tender but firm, then sliced.

  • 1 lb Lean Ground Beef or Turkey: (At least 93% lean to stay point-friendly).

  • 1 chopped White Onion: For sweetness and depth.

  • 2 cloves Garlic, minced: A fresh alternative to processed powders.

  • 1/4 cup Fresh Parsley, chopped: For brightness and color.

  • 1 Egg: To bind the meatballs.

  • Salt and Black Pepper: To taste.

The Topping:

  • 1 cup Low-Fat Mozzarella or Light Shredded Cheese: To get that melted, golden finish.

  • Optional: A pinch of nutmeg or paprika for a warm, savory aroma.


Detailed Instructions

1. Prepare the Potatoes

  • Place the whole potatoes in a pot of salted water.

  • Bring to a boil and cook for about 15–20 minutes until they are “al dente” (soft enough to slice, but not falling apart).

  • Drain, let them cool slightly, then peel and slice them into uniform rounds.

2. Mix the Meatballs

  • In a large bowl, combine the ground meat, chopped onion, garlic, parsley, and egg.

  • Season with salt and pepper.

  • Mix by hand until just combined. Roll the mixture into small, even-sized meatballs (roughly the size of a golf ball).

3. Assemble the Dish

  • Preheat your oven to 200°C (400°F).

  • In a round baking dish, begin arranging the potato slices and meatballs.

  • The Technique: Place a potato slice vertically against the edge of the dish, then a meatball, then another potato slice. Repeat this in concentric circles until the dish is full and the meatballs are “cradled” by the potatoes.

4. Bake and Melt

  • Cover the dish with foil and bake for 20 minutes.

  • Remove the foil. Top the entire dish evenly with the shredded cheese.

  • Return to the oven for another 10–15 minutes, or until the meatballs are fully cooked through and the cheese is golden and bubbly.


Serving Suggestion

This dish is quite filling on its own, but it pairs beautifully with a large green salad tossed in a light vinaigrette to keep your points low while adding volume to your meal.