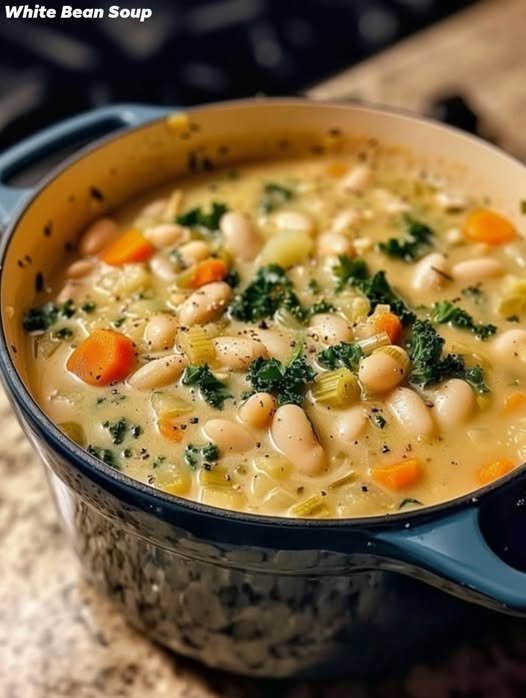
Creamy Walnut & Pistachio Smoothie

Creamy Walnut & Pistachio Smoothie.

Ingredients

  • 1/4 cup Raw Walnuts: Provides a rich, earthy base and essential Omega-3s.

  • 2 tbsp Shelled Pistachios: Adds a subtle saltiness and a hint of green hue.

  • 1 Frozen Banana: This is the secret to the “milkshake” consistency without using dairy.

  • 1 1/2 cups Oat or Almond Milk: Use unsweetened varieties to control the sugar content.

  • 1-2 Medjool Dates: Pitted, for natural caramel-like sweetness.

  • 1/2 tsp Ground Cinnamon: Adds warmth and aids in balancing flavors.

  • A pinch of Sea Salt: To make the nutty flavors pop.

  • Optional: A scoop of vanilla protein powder or a tablespoon of hemp seeds for extra nutrients.


Instructions

  1. Prep the Nuts: For the smoothest possible texture, soak your walnuts and pistachios in warm water for about 15 minutes before blending. This softens the fibers. Drain and rinse them before adding to the blender.

  2. Combine: Place the frozen banana chunks, soaked nuts, dates, cinnamon, and salt into a high-speed blender.

  3. Liquify: Pour in your choice of plant milk. Start with 1 cup if you prefer a thicker, bowl-like consistency, or the full 1 1/2 cups for a sippable drink as shown in the image.

  4. Blend: Start on a low speed to break up the frozen fruit and nuts, then gradually increase to the highest setting. Blend for 45–60 seconds until the mixture is completely homogenous and frothy.

  5. Adjust: Taste the smoothie. If you want it sweeter, add another date. If it’s too thick, add a splash more milk and pulse again.

  6. Serve: Pour into a chilled glass. Top with a few crushed pistachios or a sprinkle of cinnamon for a professional finish.


Why This Works

The tannins in the walnut skin can sometimes be bitter, but the natural sugars in the banana and dates neutralize that perfectly. By using frozen fruit instead of ice, you ensure the flavor remains concentrated and the texture stays creamy rather than watery. Enjoy this drink immediately to get the best of its frothy, aerated texture!

Creamy Peanut Butter & Banana Oat Smoothie

Creamy Peanut Butter & Banana Oat Smoothie

Ingredients

  • 1 medium banana: Preferably frozen for a thicker, milkier texture.

  • 1/4 cup rolled oats: These provide fiber and a satisfying “staying power.”

  • 1 to 2 tablespoons peanut butter: Creamy or crunchy both work great.

  • 1 cup milk of choice: Dairy, almond, oat, or soy milk all pair beautifully.

  • 1/2 teaspoon vanilla extract: For a hint of warmth and aroma.

  • A pinch of cinnamon: To enhance the natural sweetness.

  • 1 teaspoon honey or maple syrup (Optional): If you prefer a sweeter drink.

  • Handful of ice: Only necessary if your banana isn’t frozen.


Instructions

  1. Prepare the Oats: For a smoother consistency, you can pulse the dry oats in the blender first until they reach a flour-like texture. If you enjoy a bit of texture, you can skip this and add them with the other ingredients.

  2. Combine Ingredients: Place the banana (peeled and sliced), oats, peanut butter, milk, vanilla, and cinnamon into your blender jar.

  3. The Blend: Start the blender on a low speed to break up the larger chunks of fruit, then gradually increase to high. Blend for about 45 to 60 seconds until the mixture is completely smooth and creamy.

  4. Adjust Consistency: If the smoothie is too thick, add a splash more milk and pulse again. If you prefer it thicker, add a few more ice cubes or a tablespoon of Greek yogurt.

  5. Taste and Season: Give it a quick taste. If you feel it needs more sweetness, add your honey or maple syrup now and blend for a final 5 seconds.


Pro Tips for the Best Results

  • Use Overripe Bananas: The spottier the banana, the sweeter your smoothie will be without needing added sugars.

  • The “Oat Soak”: If you have five extra minutes, let the oats soak in the milk inside the blender jar before blending. This softens them and creates a velvety mouthfeel.

  • Boost It: Feel free to add a teaspoon of chia seeds or flaxseeds for extra nutrients.

Pour into a tall glass, sprinkle a little extra cinnamon or a few oat flakes on top for garnish, and enjoy immediately!

Put a Clove of Garlic on Your Feet Before Bed: What Really Happens the Next Day?

Have you ever heard of putting a clove of garlic on your feet before going to sleep? This unusual home remedy has gone viral online, with many people claiming it can detox your body, boost your immune system, and even help fight colds overnight.

But does it actually work—or is it just another internet myth?

In this article, we’ll explore what really happens when you put garlic on your feet, what science says about it, and whether you should try it yourself.


Why Do People Put Garlic on Their Feet?

Garlic has been used in traditional medicine for centuries due to its powerful natural compounds—especially allicin, which has antimicrobial and anti-inflammatory properties.

The idea behind this remedy is based on two popular beliefs:

  • The soles of the feet can absorb nutrients into the bloodstream
  • Garlic can “detox” the body and fight infections overnight

Some people even claim that after sleeping with garlic on their feet, they wake up tasting garlic in their mouth—believing this proves it traveled through the body.


What Happens If You Try It?

If you place crushed garlic on your feet and leave it overnight, here’s what you might notice the next day:

1. A Strong Garlic Smell

Garlic contains sulfur compounds that can penetrate the skin slightly, sometimes causing a lingering odor on your feet—or even your breath.

2. Warm or Tingling Sensation

Some people report warmth or tingling due to garlic’s active compounds interacting with the skin.

3. Possible Skin Irritation

This is the most common effect. Raw garlic can cause:

  • Redness
  • Burning sensation
  • Blisters or chemical burns

Medical experts warn that applying raw garlic directly to the skin can be harmful, especially if left on for hours.


Does It Really Detox Your Body?

This is where the biggest myth lies.

There is no scientific evidence that garlic on your feet can detox your body. The human body already removes toxins through the liver and kidneys—not through the feet.

  • The skin on the soles of your feet is thick and resistant to absorption
  • Garlic compounds are unlikely to enter the bloodstream in meaningful amounts

Can It Cure Colds or Boost Immunity?

Garlic can support the immune system—but only when consumed, not applied to the feet.

Experts agree:

  • Eating garlic may have health benefits
  • Putting it on your feet does not help treat colds or infections

Are There Any Real Benefits?

There are limited situations where garlic might help—but not in the way viral posts suggest:

  • Garlic has antifungal properties and may help with mild skin infections if used properly
  • However, direct application on feet is not recommended due to irritation risks

Is It Safe to Try?

Short answer: It’s not recommended.

Doctors and dermatologists advise against using raw garlic on your skin because it can cause:

  • Burns
  • Allergic reactions
  • Skin damage

If you still want to try natural remedies, safer options include:

  • Eating garlic
  • Using medically approved antifungal creams
  • Consulting a healthcare professional

Why This Trend Became So Popular

This remedy spreads quickly online because:

  • It’s simple and cheap
  • It feels like a “natural detox.”
  • Some people experience placebo effects

In reality, feeling better after using it may have nothing to do with garlic itself.


Final Verdict: Myth or Miracle?

Putting garlic on your feet before bed is more myth than medicine.

While garlic is a powerful natural ingredient, using it this way:

  • Has no proven health benefits
  • Can damage your skin
  • Doesn’t detox your body or cure illnesses


👉 If you want the real benefits of garlic, the best way is still the simplest: eat it as part of a healthy diet.

Tropical Green Mango Smoothie

Tropical Green Mango Smoothie

Ingredients

  • 1 ½ cups Frozen mango chunks (for that thick, frosty texture)

  • 1 large handful Fresh baby spinach (provides the color without the “veggie” taste)

  • 1 cup Unsweetened coconut milk or almond milk

  • ½ cup Greek yogurt (or coconut yogurt for a vegan option)

  • 1 tablespoon Chia seeds or ground flaxseeds (optional for extra fiber)

  • A squeeze of fresh lime juice to brighten the flavors

  • Honey or maple syrup to taste (optional)


Instructions

  1. Layer the Liquid: Start by pouring your chosen milk and yogurt into the blender base. Adding liquids first helps the blades spin freely and prevents the motor from straining.

  2. Add the Greens: Add the fresh spinach next. If you want an exceptionally smooth texture, you can blend the milk and spinach together first until no green flecks remain.

  3. Toss in the Fruit: Add the frozen mango chunks and your optional seeds or sweeteners.

  4. Blend: Secure the lid and blend on high speed for 45–60 seconds. If the mixture is too thick, add an extra splash of milk until it reaches your desired consistency.

  5. Serve: Pour into a tall glass. For that “pro” look, garnish with a few small mango cubes or a sprinkle of hemp hearts.


Why It Works

The natural sweetness of the mango perfectly balances the earthy notes of the spinach, while the yogurt provides a silky, indulgent mouthfeel. It’s a nutrient-dense treat that tastes like a vacation in a glass. Enjoy immediately while chilled!

Mocha Protein Smoothie

 Mocha Protein Smoothie.
 Ingredients
  • 1 cup Milk of Choice: Dairy, almond, oat, or soy all work beautifully.

  • 1 Frozen Banana: Peel and freeze your banana ahead of time for maximum creaminess.

  • 1/2 cup Cold Brew Coffee: Or a chilled shot of espresso for a stronger punch.

  • 1 scoop Chocolate Protein Powder: This provides the bulk of the flavor and nutrition.

  • 1 tbsp Unsweetened Cocoa Powder: For that extra-dark chocolate richness.

  • 1/2 cup Ice: Optional, depending on how thick you like your shakes.

  • 1 tsp Honey or Maple Syrup: Only if you prefer a sweeter profile.


Preparation Steps

  1. Layer the Liquids: Start by pouring your milk and cold brew coffee into the blender base. Adding liquids first helps the blades spin freely and prevents the powder from sticking to the bottom.

  2. Add the Solids: Drop in the frozen banana chunks. If you have a high-powered blender, you can leave them in larger pieces; otherwise, smaller chunks blend faster.

  3. The Flavor Boosters: Add the chocolate protein powder and the extra cocoa powder. If you’re feeling adventurous, a pinch of sea salt or a drop of vanilla extract can really make the chocolate “pop.”

  4. The Blend: Start your blender on the lowest speed and gradually increase to high. Blend for about 45–60 seconds until the mixture is completely smooth and no ice chunks remain.

  5. Adjust the Texture: If the smoothie is too thick, splash in a little more milk. If it’s too thin, add a few more ice cubes and blend again.


Serving Suggestions

Pour the smoothie into a tall glass, just like the one pictured. For an aesthetic touch, sprinkle a tiny bit of instant coffee granules or cocoa powder on top. Serve with a glass straw to enjoy that thick, chilled texture.

Pro Tip: To make this even more indulgent, you can swirl some chocolate syrup around the inside of the glass before pouring in the smoothie.

Enjoy your energizing, chocolatey treat!

No Bake Lotus Biscoff Cheesecake Cups

🧾 Ingredients

  • 🍪 1 cup crushed Lotus Biscoff biscuits
  • 🧈 3 tbsp melted butter
  • 🧀 1 cup cream cheese (softened)
  • 🍚 ¼ cup powdered sugar
  • 🍦 1 tsp vanilla extract
  • 🥛 1 cup whipped cream
  • 🍯 ½ cup Lotus Biscoff spread

👩‍🍳 Instructions

  • 🍪➡️ Mix crushed biscuits with melted butter.
  • 🥄 Press a layer into serving cups (this is your base).
  • 🧀➡️ Beat cream cheese, sugar, and vanilla until smooth.
  • 🍦➡️ Fold in whipped cream gently to keep it fluffy.
  • 🍯➡️ Warm Biscoff spread slightly and mix half into the cream mixture.
  • 🥄➡️ Layer the cheesecake filling over the biscuit base.
  • 🔁 Repeat layers if you like (base + cream).
  • 🍯➡️ Drizzle remaining Biscoff spread on top.
  • ❄️ Chill for 2–3 hours until set.

🌟 Tips

  • Use clear cups for a beautiful layered look 😍
  • Chill overnight for best texture ❄️
  • Add extra biscuit crumbs on top for crunch 🍪

No-Bake Banana Split Cake

🧾 Ingredients

  • 🍪 2 cups crushed biscuits (or graham crackers)
  • 🧈 ½ cup melted butter
  • 🧀 1 cup cream cheese (softened)
  • 🍚 ½ cup sugar
  • 🍦 1 tsp vanilla extract
  • 🍌 3–4 bananas (sliced)
  • 🍓 1 cup strawberries (sliced)
  • 🍍 1 cup crushed pineapple (drained)
  • 🥛 2 cups whipped cream
  • 🍫 Chocolate syrup (for topping)
  • 🌰 Chopped nuts (optional)

👩‍🍳 Step-by-Step Recipe

  • 🍪➡️ Mix crushed biscuits with melted butter and press into a dish to form the base.
  • ❄️ Chill in the fridge for 15–20 minutes to set.
  • 🧀➡️ In a bowl, beat cream cheese, sugar, and vanilla until smooth.
  • 🥄 Spread this creamy layer evenly over the chilled base.
  • 🍍➡️ Add a layer of crushed pineapple.
  • 🍌➡️ Arrange banana slices evenly on top.
  • 🍓➡️ Add fresh strawberry slices for a fruity layer.
  • 🍦➡️ Spread whipped cream generously over everything.
  • 🍫➡️ Drizzle chocolate syrup on top.
  • 🌰➡️ Sprinkle chopped nuts (optional).
  • ❄️ Chill for at least 3–4 hours before serving.

❓ Q & A

Q: Can I skip pineapple?
👉 Yes, you can replace it with mango or just keep it banana-strawberry.

Q: How long does it last?
👉 Up to 2 days in the fridge (best fresh).

Q: Can I use store-bought whipped cream?
👉 Yes, it works perfectly and saves time.


🌟 Tips

  • Use ripe bananas for better sweetness 🍌
  • Keep it chilled until serving for best texture ❄️
  • Add cherries on top for a classic banana split look 🍒

Enjoy your creamy, fruity, no-bake dessert 😋✨!

3-Ingredient Cherry Cream Cheese Bake

This simple, crowd-pleasing dessert is one of those recipes you’ll come back to again and again. With just three main ingredients, it delivers a rich, creamy texture with bursts of sweet-tart cherry flavor in every bite. Perfect for potlucks, family gatherings, or when you need a quick dessert without the hassle.

Ingredients:

  • 1 can (21 oz) cherry pie filling
  • 8 oz cream cheese, softened
  • 1 can (14 oz) sweetened condensed milk

Instructions:

  1. Preheat your oven to 350°F (175°C). Lightly grease a medium-sized baking dish (about 8×8 or 9×9 inches) to prevent sticking.
  2. In a large mixing bowl, add the softened cream cheese. Using a hand mixer or whisk, beat it until smooth and creamy with no lumps. This step is important to ensure a silky texture.
  3. Slowly pour in the sweetened condensed milk while continuing to mix. Blend until the mixture becomes thick, smooth, and well combined. It should have a rich, pourable consistency.
  4. Pour the cream cheese mixture evenly into the prepared baking dish. Use a spatula to spread it out smoothly.
  5. Spoon the cherry pie filling over the top. Gently spread it across the surface, but don’t fully mix it in. You can lightly swirl it with a knife for a marbled effect or leave it layered for a more defined look.
  6. Place the dish in the preheated oven and bake for 30–35 minutes. The edges should be set, and the center slightly firm but still creamy.
  7. Remove from the oven and allow it to cool at room temperature for about 20–30 minutes. Then refrigerate for at least 2 hours to fully set and enhance the flavor.

Serving:

Serve chilled for the best taste and texture. You can cut it into squares or scoop it into dessert bowls. The creamy base pairs beautifully with the sweet cherry topping, making every bite indulgent and satisfying.

Tips:

  • For extra flavor, add a teaspoon of vanilla extract to the cream mixture.
  • You can substitute cherry filling with blueberry, strawberry, or peach for variety.
  • Serve with whipped cream or crushed biscuits for added texture.

This dessert is proof that you don’t need complicated ingredients to create something delicious. Simple, quick, and always a hit—once you make it, you’ll understand why it becomes a go-to favorite!

The Vitamin Your Body May Be Missing When Your Legs and Bones Hurt

The Vitamin Your Body May Be Missing When Your Legs and Bones Hurt

Persistent pain in your legs and bones can be more than just a sign of fatigue or aging. In many cases, it may point to a nutritional deficiency that your body is trying to signal. One of the most common and overlooked causes of bone discomfort and leg pain is a lack of vitamin D. This essential nutrient plays a crucial role in maintaining strong bones, supporting muscle function, and helping your body absorb calcium effectively.

Vitamins & Supplements

Vitamin D deficiency is surprisingly widespread, affecting millions of people worldwide. Despite its importance, many individuals do not get enough of it due to limited sun exposure, poor diet, or lifestyle habits. Understanding how this vitamin impacts your body can help you take the right steps toward relief and better health.

Vitamin D is often called the “sunshine vitamin” because your body produces it when your skin is exposed to sunlight. It helps regulate calcium and phosphorus levels in the blood, which are essential for building and maintaining healthy bones. Without sufficient vitamin D, your bones can become weak, brittle, or even painful.

When your body lacks vitamin D, it may struggle to absorb calcium properly. This can lead to a condition known as osteomalacia in adults, which causes bone softening and discomfort. Common symptoms include aching bones, muscle weakness, and pain in the legs, especially after standing or walking for long periods.

In addition to bone pain, vitamin D deficiency can also affect muscle strength. Weak muscles can put extra strain on your bones and joints, leading to discomfort in areas like the knees, hips, and lower legs. Some people even experience frequent cramps or a heavy, tired feeling in their legs.

Health

There are several reasons why people may develop low levels of vitamin D. One of the most common causes is insufficient sunlight exposure. People who spend most of their time indoors, live in colder climates, or use heavy sunscreen regularly may not produce enough vitamin D naturally. Skin tone also plays a role, as individuals with darker skin require more sunlight to produce adequate levels.

Diet is another important factor. While some foods contain vitamin D, it is not naturally abundant in many diets. Fatty fish such as salmon, mackerel, and sardines are excellent sources. Egg yolks, fortified dairy products, and certain mushrooms can also help increase your intake. However, it can still be difficult to meet your daily needs through food alone.

Age can also influence vitamin D levels. As people get older, their skin becomes less efficient at producing vitamin D from sunlight. This makes older adults more vulnerable to deficiency and its related symptoms, including bone pain and an increased risk of fractures.

Food

If you suspect that your leg or bone pain may be related to a vitamin deficiency, it is important to consult a healthcare professional. A simple blood test can determine your vitamin D levels and help guide appropriate treatment. In many cases, supplementation is recommended to restore healthy levels.

Vitamins & Supplements

Vitamin D supplements are widely available and can be very effective when taken correctly. The dosage varies depending on your individual needs, so it is best to follow medical advice rather than self-prescribing. Taking too much vitamin D can also cause health issues, so balance is key.

In addition to supplements, increasing your exposure to natural sunlight can make a significant difference. Spending 10 to 30 minutes in the sun several times a week, depending on your skin type and location, can help your body produce more vitamin D naturally. Combining this with a balanced diet rich in calcium and other nutrients will further support bone health.

Health

Maintaining healthy bones and reducing leg pain is not just about one vitamin, but vitamin D plays a central role. Ignoring its importance can lead to long-term discomfort and more serious health conditions. By recognizing the signs of deficiency early and taking simple steps to address it, you can improve your overall well-being and reduce pain effectively.

Taking care of your body starts with understanding what it needs. If your legs and bones are hurting, it might not just be fatigue—it could be your body asking for the support of an essential nutrient like vitamin D.

3-Ingredient Cherry Cream Cheese Bake

This simple, crowd-pleasing dessert is one of those recipes you’ll come back to again and again. With just three main ingredients, it delivers a rich, creamy texture with bursts of sweet-tart cherry flavor in every bite. Perfect for potlucks, family gatherings, or when you need a quick dessert without the hassle.

Ingredients:

  • 1 can (21 oz) cherry pie filling
  • 8 oz cream cheese, softened
  • 1 can (14 oz) sweetened condensed milk

Instructions:

  1. Preheat your oven to 350°F (175°C). Lightly grease a medium-sized baking dish (about 8×8 or 9×9 inches) to prevent sticking.
  2. In a large mixing bowl, add the softened cream cheese. Using a hand mixer or whisk, beat it until smooth and creamy with no lumps. This step is important to ensure a silky texture.
  3. Slowly pour in the sweetened condensed milk while continuing to mix. Blend until the mixture becomes thick, smooth, and well combined. It should have a rich, pourable consistency.
  4. Pour the cream cheese mixture evenly into the prepared baking dish. Use a spatula to spread it out smoothly.
  5. Spoon the cherry pie filling over the top. Gently spread it across the surface, but don’t fully mix it in. You can lightly swirl it with a knife for a marbled effect or leave it layered for a more defined look.
  6. Place the dish in the preheated oven and bake for 30–35 minutes. The edges should be set, and the center slightly firm but still creamy.
  7. Remove from the oven and allow it to cool at room temperature for about 20–30 minutes. Then refrigerate for at least 2 hours to fully set and enhance the flavor.

Serving:

Serve chilled for the best taste and texture. You can cut it into squares or scoop it into dessert bowls. The creamy base pairs beautifully with the sweet cherry topping, making every bite indulgent and satisfying.

Tips:

  • For extra flavor, add a teaspoon of vanilla extract to the cream mixture.
  • You can substitute cherry filling with blueberry, strawberry, or peach for variety.
  • Serve with whipped cream or crushed biscuits for added texture.

This dessert is proof that you don’t need complicated ingredients to create something delicious. Simple, quick, and always a hit—once you make it, you’ll understand why it becomes a go-to favorite!

Soft & moist Raisin Glazed Cake

🧾 Ingredients

  • 🥚 3 eggs
  • 🍚 1 cup sugar
  • 🧈 ½ cup butter (softened)
  • 🥛 1 cup milk
  • 🌾 2 cups all-purpose flour
  • 🥄 1 tsp baking powder
  • 🧂 Pinch of salt
  • 🍇 1 cup raisins
  • 🍯 2–3 tbsp honey or apricot jam (for glaze)

👩‍🍳 Step-by-Step Recipe

  • 🔥 Preheat oven to 180°C (350°F) and grease a round cake pan.
  • 🥣 In a bowl, beat eggs and sugar until light and fluffy.
  • 🧈 Add softened butter and mix until smooth.
  • 🥛 Pour in milk and mix well.
  • 🌾 In another bowl, combine flour, baking powder, and salt.
  • 🔄 Gradually add dry ingredients into the wet mixture and mix gently.
  • 🍇 Fold in raisins evenly into the batter.
  • 🍰 Pour batter into the prepared pan and smooth the top.
  • ⏳ Bake for 35–45 minutes or until a toothpick comes out clean.
  • 🍯 While warm, brush honey or jam glaze on top for that shiny finish.
  • ❄️ Let it cool slightly, slice, and enjoy!

❓ Q & A

Q: How do I make the cake extra moist?
👉 Use full-fat milk and don’t overbake.

Q: Can I replace raisins?
👉 Yes, you can use chopped dates or mixed dried fruits.

Q: How to store it?
👉 Keep in an airtight container for up to 3 days at room temperature.


Enjoy your homemade sweet, glossy, and fluffy cake 😋🍰!

a carrot-cranberry loaf

🧾 Ingredients

  • 2 cups all-purpose flour
  • 1 cup grated carrots 🥕
  • ½ cup dried cranberries (or raisins)
  • ½ cup chopped nuts (walnuts or almonds)
  • 1 cup sugar
  • ½ cup oil (vegetable oil)
  • 2 eggs 🥚
  • 1 tsp vanilla extract
  • 1 tsp baking powder
  • ½ tsp baking soda
  • 1 tsp cinnamon powder
  • Pinch of salt

🍯 Glaze

  • 1 cup powdered sugar
  • 2–3 tbsp milk
  • ½ tsp vanilla extract

👩‍🍳 Step-by-Step Instructions

🥣 Prepare the batter

  • 🔸 Preheat oven to 180°C (350°F)
  • 🔸 In a bowl, whisk together eggs, sugar, and oil until smooth
  • 🔸 Add vanilla extract and mix well

🥕 Add dry ingredients

  • 🔸 In another bowl, mix flour, baking powder, baking soda, cinnamon, and salt
  • 🔸 Gradually combine dry mix into wet mixture

🍒 Add fillings

  • 🔸 Fold in grated carrots, cranberries, and nuts
  • 🔸 Mix gently until evenly combined

🍰 Bake

  • 🔸 Pour batter into a greased cake pan
  • 🔸 Bake for 35–45 minutes or until a toothpick comes out clean
  • 🔸 Let it cool completely

🍯 Add glaze

  • 🔸 Mix powdered sugar, milk, and vanilla to form a smooth glaze
  • 🔸 Pour over the cooled cake
  • 🔸 Let it drip and set naturally

❓ Q&A

Q: Can I skip nuts?
✔️ Yes, you can omit them or replace with seeds.

Q: How to store this cake?
✔️ Keep in an airtight container for 2–3 days at room temp or refrigerate up to 5 days.

Q: Can I make it healthier?
✔️ Replace sugar with honey or brown sugar and use whole wheat flour.

Baked Blueberry Cottage Cheese Breakfast Bowls

🫐 Baked Blueberry Cottage Cheese Breakfast Bowls

Description

Baked Blueberry Cottage Cheese Breakfast Bowls are warm, lightly sweet breakfast bowls made with creamy cottage cheese, juicy blueberries, eggs, and oats. Once baked, they develop a soft, custard-like texture with bursts of blueberry flavor in every bite. High in protein, naturally sweetened, and incredibly satisfying, these bowls are perfect for meal prep, busy mornings, or a comforting weekend breakfast.

⏱️ Prep & Cook Time

  • Prep Time: 10 minutes

  • Bake Time: 30–35 minutes

  • Total Time: ~45 minutes

🍽️ Servings

  • Makes: 4 individual breakfast bowls

📝 Ingredients

  • 2 cups cottage cheese (full-fat or low-fat)

  • 2 large eggs

  • 1 cup rolled oats

  • 1½ cups fresh or frozen blueberries

  • 3 tablespoons honey or maple syrup

  • 1 teaspoon vanilla extract

  • 1 teaspoon cinnamon

  • ½ teaspoon baking powder

  • ¼ teaspoon salt

  • Optional toppings: sliced almonds, extra blueberries, chia seeds, or Greek yogurt

👩‍🍳 Instructions

  1. Preheat oven to 375°F (190°C) and lightly grease 4 ramekins or a small baking dish.

  2. In a large bowl, whisk together the cottage cheese and eggs until mostly smooth.

  3. Stir in oats, honey (or maple syrup), vanilla, cinnamon, baking powder, and salt.

  4. Gently fold in the blueberries.

  5. Divide the mixture evenly among prepared bowls.

  6. Bake for 30–35 minutes, until set in the center and lightly golden on top.

  7. Let cool for 5 minutes before serving. Add toppings if desired.

🧠 Notes

  • The texture is similar to a baked oatmeal meets cheesecake—soft, creamy, and comforting.

  • Using frozen blueberries is fine; no need to thaw.

  • Blending the cottage cheese first creates an ultra-smooth consistency if preferred.

💡 Tips for Best Results

  • For extra creaminess: Blend the cottage cheese before mixing.

  • For meal prep: Store baked bowls in airtight containers for up to 4 days.

  • For sweetness control: Start with less sweetener and adjust after baking.

  • For crisp tops: Sprinkle oats or nuts on top before baking.

🥗 Nutritional Information (Per Serving – Approximate)

  • Calories: 260

  • Protein: 18–20g

  • Carbohydrates: 28g

  • Fat: 7g

  • Fiber: 4g

  • Sugar: 12g

(Values vary based on ingredients used)

🌱 Health Benefits

  • High Protein: Supports muscle repair and keeps you full longer.

  • Gut-Friendly: Cottage cheese provides probiotics for digestion.

  • Antioxidant-Rich: Blueberries help fight inflammation and oxidative stress.

  • Balanced Energy: Oats deliver slow-release carbs for sustained energy.

  • Blood Sugar Friendly: Protein and fiber help prevent spikes.

❓ Q & A

Q: Can I make this dairy-free?
A: Yes—use dairy-free cottage cheese alternatives and plant-based milk yogurt.

Q: Can I freeze these breakfast bowls?
A: Absolutely! Freeze individually and reheat in the microwave or oven.

Q: Are these good for weight loss?
A: Yes—high protein and fiber make them filling and calorie-controlled.

Q: Can I add other fruits?
A: Definitely! Raspberries, chopped strawberries, or peaches work beautifully.

Q: Can kids eat this?
A: Yes—this recipe is kid-friendly, nutritious, and naturally sweet.

Homemade Creamy Irish Cream Liqueur

Got it! You want a full, beautifully written recipe profile for Homemade Creamy Irish Cream Liqueur, including all the detailed sections and without the wide line before the parentheses. Here’s your complete version:

Homemade Creamy Irish Cream Liqueur

Introduction

Homemade Creamy Irish Cream Liqueur is a luxurious blend of Irish whiskey, rich cream, chocolate, and coffee that captures the cozy warmth of the holidays in every sip. It’s smooth, velvety, and irresistibly decadent — perfect for gifting, celebrating, or savoring by the fire. Making it from scratch not only saves money but also allows you to customize the flavor to your exact taste.

Origin

Irish cream liqueur originated in Ireland in the 1970s when distillers sought a creative way to blend traditional Irish whiskey with cream. The result was the iconic beverage now known worldwide—Bailey’s Irish Cream. Over time, homemade variations have become popular for their fresher flavor and personal touch, often made with pantry staples and a good-quality whiskey.

Cultural Significance

Irish cream has become synonymous with comfort, hospitality, and festive cheer. It’s a holiday tradition in many homes, shared with family and friends as a gesture of warmth and togetherness. Beyond Ireland, it’s enjoyed year-round in coffee, desserts, or as an after-dinner treat. Bottled in charming glass containers, homemade versions often serve as heartfelt gifts that carry the spirit of giving.

Dairy & Eggs

Ingredients Quantity

  • 1 cup heavy cream
  • 1 teaspoon instant coffee granules
  • 1 teaspoon unsweetened cocoa powder
  • 1 (14 oz) can sweetened condensed milk
  • 1 teaspoon pure vanilla extract
  • 1 cup Irish whiskey (such as Jameson)
  • 1 tablespoon chocolate syrup (optional, for extra richness)

Optional Additions

  • ½ teaspoon almond extract for a nutty aroma
  • A dash of cinnamon or nutmeg for a warm spice note
  • 1 tablespoon caramel sauce for a buttery twist
  • Substitute part of the heavy cream with coconut milk for a tropical variation

Tips for Success

  • Use high-quality whiskey—it defines the depth and smoothness of your liquor.
  • Blend ingredients at low speed to avoid whipping the cream into butter.
  • Chill before serving for the best texture and flavor.
  • Store in tightly sealed bottles in the refrigerator; it stays fresh for up to 2 weeks.
  • Shake well before each use, as natural separation may occur.

Instructions

  1. In a blender, combine the heavy cream, instant coffee, cocoa powder, sweetened condensed milk, vanilla extract, and chocolate syrup.
  2. Blend on low for 30 seconds until smooth and well mixed.
  3. Slowly pour in the Irish whiskey and blend for another 20–30 seconds on low speed.
  4. Taste and adjust sweetness or flavor with more syrup or extracts if desired.
  5. Pour the mixture into clean, airtight bottles and refrigerate.
  6. Serve chilled over ice, in coffee, or as a dessert drizzle.

Description

This homemade Irish cream liqueur is luxuriously smooth and balanced — not too strong, not too sweet. The cream gives it a silky body, while the whiskey adds a subtle warmth. Hints of coffee and chocolate round out the flavor, making it both comforting and indulgent. It’s ideal for festive gatherings, cozy evenings, or as a thoughtful holiday gift in pretty bottles tied with ribbons.

Candy & Sweets

Nutritional Information (per 2 oz serving)

  • Calories: ~150
  • Total Fat: 6g
  • Carbohydrates: 12g
  • Sugars: 11g
  • Protein: 2g
  • Alcohol: ~10% ABV (varies by whiskey type and quantity used)

Conclusion

Homemade Irish cream liqueur is a celebration of tradition, craftsmanship, and comfort. It’s a simple pleasure that turns ordinary moments into something special. Whether poured into coffee or served over ice, its rich and creamy flavor never fails to charm.

Coffee

Recommendation

Keep a batch on hand during the holidays for spontaneous gatherings or to elevate your favorite desserts. It makes a wonderful homemade gift — elegant, personal, and absolutely delicious.

Embracing Healthful Indulgence

While this liqueur is undeniably indulgent, enjoying it in moderation allows you to savor the joy of balance. Made with real ingredients and love, it embodies mindful indulgence — a reminder that celebrating life’s sweet moments doesn’t require excess, just intention and appreciation.

Alcoholic Beverages

Would you like me to make a festive label text for these bottles (something like “Homemade Irish Cream – Made with Love”) to match the holiday vibe in your photo?

The Best Chocolate Chip Fatbomb Fluff

🍫 The Best Chocolate Chip Fatbomb Fluff

📝 Ingredients

  • 1 cup heavy whipping cream (cold)
  • 4 oz cream cheese (softened)
  • 3–4 tbsp powdered erythritol or any keto sweetener
  • 1 tsp vanilla extract
  • 2 tbsp unsweetened cocoa powder (optional, for chocolate flavor)
  • ½ cup sugar-free chocolate chips
  • Pinch of salt

👩‍🍳 Instructions

1. Whip the Cream

  • In a large bowl, whip the heavy cream until stiff peaks form.
  • Set aside.

2. Make the Cream Base

  • In another bowl, beat cream cheese until smooth.
  • Add sweetener, vanilla, cocoa powder (if using), and salt.
  • Mix until creamy and lump-free.

3. Combine

  • Gently fold the whipped cream into the cream cheese mixture.
  • Do this slowly to keep it light and fluffy.

4. Add Chocolate

  • Fold in sugar-free chocolate chips.

5. Chill (Optional but Better)

  • Refrigerate for 30–60 minutes for best texture.

🍽️ How to Serve

  • Scoop into a glass like the picture 🍨
  • Top with extra chocolate chips or cocoa dust
  • Enjoy straight from the fridge!

💡 Tips

  • Add peanut butter for extra richness 🥜
  • Freeze for 1–2 hours for a more ice-cream-like texture
  • Use mini chocolate chips for better distribution

⚡ Quick Info

  • Low-carb / keto-friendly
  • Super creamy & satisfying
  • Perfect sweet fix without sugar

3-Ingredient Sugar-Free Blueberry Loaf

3-Ingredient  Sugar-Free Blueberry Loaf

Moist • Low-Carb • No Sugar Added • 1 Bowl • Christmas Edition

Ingredients (Only 3!)

Base Recipe

  1. Almond flour – 2 cups (200 g)
    (Low carb, diabetic-friendly, keeps loaf moist)

  2. Eggs – 4 large
    (Provides lift since we use no baking powder)

  3. Fresh blueberries – 1 to 1½ cups
    (Natural sweetness)

Optional But Recommended (do NOT count toward 3 ingredients)

  • 1 tsp vanilla extract

  • 1 tsp lemon zest

  • 2–3 tbsp sugar-free sweetener (erythritol/stevia/monk fruit) if you prefer sweeter

  • A pinch of salt

Instructions

  1. Preheat oven to 350°F (175°C).

  2. Line a loaf pan with parchment or lightly grease it.

  3. In a bowl, whisk 4 eggs until frothy.

  4. Add almond flour and mix until a smooth batter forms.

  5. Fold in blueberries gently (reserve a few for the top).

  6. Pour batter into the loaf pan and top with extra berries.

  7. Bake 45–55 minutes until golden and a toothpick comes out clean.

  8. Let cool fully before slicing—this helps it firm up.

Description

This loaf is naturally moist thanks to almond flour and eggs, with bursts of juicy blueberries throughout. It has a tender, cake-like crumb and a subtle natural sweetness. Perfect for Christmas breakfast, diabetic-friendly dessert, or gifting to someone avoiding sugar.

Recipe Notes

  • Almond flour can brown quickly; cover the loaf loosely with foil in the last 15 minutes if needed.

  • If using frozen blueberries, do not thaw; toss in almond flour to prevent sinking.

  • Loaf tastes even better the next day after chilling.

  • To reduce carbs further, use ¾ cup blueberries instead of 1 cup.

Tips for Best Results

  • Whip eggs well for better rise.

  • Don’t over-mix after adding berries.

  • For extra moistness, add 2 tbsp sugar-free Greek yogurt (optional).

  • Use high-quality almond flour (fine blanched).

Servings

10 slices per loaf.

Nutritional Info (per slice — approx.)

(Using 1 cup blueberries, no added sweeteners)

  • Calories: 150

  • Net Carbs: 4–5 g

  • Fat: 12 g

  • Protein: 5 g

  • Sugar: 2–3 g (natural blueberry sugar only)

  • Fiber: 2 g

Diabetic-friendly due to low net carbs, almond flour base, and no added sugar.

Benefits

  • ✔ Suitable for diabetics / low-carb / keto-friendly

  • ✔ Only 3 ingredients

  • ✔ Gluten-free

  • ✔ No refined sugar

  • ✔ Bursting with antioxidants from blueberries

  • ✔ Quick holiday treat

Q & A About This Recipe

Q1: Can I replace almond flour with coconut flour?

A: Not 1-to-1. Coconut flour is too absorbent. You would need only ½ cup and 2 more eggs.

Q2: Can I make it sweeter without sugar?

A: Yes—add monk fruit, stevia, or erythritol to taste.

Q3: Will this spike blood sugar?

A: It is low carb and contains no added sugars, so it is generally diabetic-friendly. Always consider individual tolerance.

Q4: Can I use frozen blueberries?

A: Yes! Use straight from the freezer. Do not thaw.

Q5: How do I store it?

  • Fridge: 5–7 days (airtight container)

  • Freezer: Up to 3 months (slice before freezing)

Mediterranean Mini Beef Meatloaf Cups

Mediterranean Mini Beef Meatloaf Cups

Time & Servings

  • Prep Time: 15 minutes

  • Cook Time: 20–25 minutes

  • Total Time: 40 minutes

  • Servings: 12 mini cups (serves 4 people – 3 cups each)

 Ingredients

Meat Mixture

  • 1 ½ lbs lean ground beef (85–90% lean)

  • ½ cup finely diced onion

  • ½ cup finely diced bell pepper (any color)

  • 3 cloves garlic, minced

  • 1 large egg

  • ½ cup breadcrumbs (or almond flour for low-carb)

  • 2 tbsp olive oil

  • 1 tbsp Worcestershire sauce

  • 1 tsp dried oregano

  • 1 tsp smoked paprika

  • ½ tsp ground cumin

  • 1 tsp salt

  • ½ tsp black pepper

  • 2 tbsp chopped fresh parsley

Optional Toppings

  • Crumbled feta

  • Shredded mozzarella

  • Marinara sauce

  • Tzatziki

Instructions

1️⃣ Preheat

Preheat oven to 375°F (190°C).
Lightly grease a 12-cup muffin tin.

2️⃣ Mix

In a large bowl, combine all ingredients.
Mix gently with hands until just combined (do not overmix).

3️⃣ Fill

Divide mixture evenly among muffin cups.
Press gently to shape.

4️⃣ Bake

Bake for 20–25 minutes or until internal temperature reaches 160°F (71°C).

5️⃣ Rest

Let rest 5 minutes before removing from pan.

 Description Notes

  • Baking in a muffin tin ensures even cooking.

  • Smaller portions cook faster than traditional meatloaf.

  • The diced vegetables keep the meat moist and tender.

  • Mediterranean herbs add depth without heavy sauces.

Tips for Success

✔ Use lean beef but not extra-lean (prevents dryness)
✔ Dice vegetables very small for even texture
✔ Don’t overmix — keeps meat tender
✔ Let rest before removing to avoid crumbling
✔ Use silicone muffin pans for easy release

 Serving Ideas

  • Over cauliflower rice or quinoa

  • With Greek salad

  • In pita bread with tzatziki

  • Alongside roasted vegetables


Storage & Meal Prep

  • Fridge: 4 days in airtight container

  • Freezer: Up to 3 months

  • Reheat in microwave 1–2 minutes

Nutritional Information (Per 1 Mini Cup – Approximate)

  • Calories: 180

  • Protein: 14g

  • Fat: 13g

  • Carbs: 4g

  • Fiber: 0.5g

  • Sugar: 1g

(Values vary depending on ingredients used.)

Health Benefits

✅ High in protein for muscle support
✅ Iron-rich (supports energy levels)
✅ Contains healthy fats from olive oil
✅ Lower-carb option when using almond flour
✅ Portion-controlled for weight management

Q & A

Q: Can I make this low-carb?
A: Yes! Replace breadcrumbs with almond flour or crushed pork rinds.

Q: Can I use ground turkey instead?
A: Absolutely. Add 1 extra tbsp olive oil to prevent dryness.

Q: How do I keep them from sticking?
A: Grease pan well or use silicone muffin liners.

Q: Can I add cheese inside?
A: Yes! Press a small cube of mozzarella or feta into the center before baking.

Q: How do I know they’re done?
A: Internal temperature should reach 160°F (71°C).

*3-Ingredient Yogurt Cake* 🍰

*3-Ingredient Yogurt Cake* 🍰

This is the cake when you want dessert but have 3 things in the fridge. Looks fancy, takes 5 min to mix.

Fluffy, custardy, no flour, no oil. Viral for a reason. Tastes like cheesecake + soufflé had a baby.


_Serves 8 | Prep 5 min | Bake 40 min_


Ingredients*

– *Greek yogurt*: 1½ cups / 375g — plain, full-fat or 2% for best texture

– *Eggs*: 4 large, room temp

– *Cornstarch*: ¼ cup / 30g — or 3 tbsp if you want it less set


_That’s it. No sugar, no flour, no butter._


Optional but worth it:*

– *Sweetener*: ⅓ cup erythritol, sugar, or honey — if you want it sweet

– *Vanilla*: 1 tsp

– *Lemon zest*: 1 tsp — brightens it up

– *Pinch of salt*: Balances flavor


Method*


*1. Prep — 5 min*

Heat oven to 350°F. Line 8-inch round pan with parchment. High sides help.

Separate eggs. Yolks in one bowl, whites in another. Must be clean, no yolk in whites.


*2. Mix base*

Bowl with yolks: whisk in yogurt, cornstarch, vanilla + sweetener if using. Smooth batter.


*3. Whip whites*

Beat egg whites to stiff peaks, 3–4 min with hand mixer. Should hold a peak when you lift beater.


*4. Fold*

Fold ⅓ of whites into yolk mix to lighten. Then gently fold in rest. Don’t deflate. Batter should be airy.


*5. Bake — 35–40 min*

Pour into pan. Tap to release bubbles. Bake 35–40 min until top is golden and center jiggles slightly.

Don’t open oven first 30 min or it collapses.


*6. Cool*

Cool 30 min in pan. It sinks a bit — normal. Fridge 2 hours to set. Run knife around edge, flip out.


Why this works:*

1. *Whipped whites*: All the rise. No baking powder needed

2. *Cornstarch*: Sets the yogurt custard so it slices clean

3. *Greek yogurt*: Thick enough to hold structure. Regular yogurt = soup

4. *Room temp eggs*: Whip higher. Cold eggs = flat cake

5. *Cooling*: Sets the custard. Hot = falls apart


Texture reality:*

Not like flour cake. More like Japanese cheesecake or baked yogurt. Creamy, light, slightly tangy. If you want sweet dessert vibes, add sweetener + vanilla. Without it, tastes like plain baked yogurt.


Pro tips:*

1. *Cracks*: Normal. Dust with powdered erythritol to hide

2. *Water bath*: Set pan in larger pan with 1 inch hot water. Prevents cracking, extra creamy

3. *Don’t overbake*: Center should wobble. It sets as it cools

4. *Parchment up sides*: Cake rises then falls. High parchment keeps it from spilling

5. *Greek yogurt only*: Regular yogurt is too thin. Strain it overnight if that’s all you have


Easy swaps:*

– *Flavor*: 2 tbsp cocoa powder for chocolate, 1 tsp lemon zest for lemon

– *Protein*: Add 1 scoop vanilla protein powder, reduce cornstarch to 2 tbsp

– *Dairy-free*: Thick coconut yogurt + 1 extra tbsp cornstarch

– *Topping*: Fresh berries, SF jam, drizzle of honey, or that no-sugar peanut butter icebox topping


Nutrition — plain version:*

Per slice, 8 servings: ∼70 cal, 5g protein, 4g carbs, 3g fat.

With sweetener + vanilla: ∼85 cal.


Storage:*

Fridge 4 days covered. Gets denser/fudgier day 2.

Freezer 1 month. Thaw overnight in fridge.

Lemon Garlic Whipped Feta Chicken with Crispy Potatoes

Lemon Garlic Whipped Feta Chicken with Crispy Potatoes
🧾 Ingredients
For the crispy potatoes:
600–800g baby potatoes (halved)
3 tbsp olive oil
1 tsp salt
½ tsp black pepper
1 tsp paprika
½ tsp garlic powder
For the chicken:
2 large chicken breasts (or 4 thighs)
2 tbsp olive oil
4 cloves garlic (minced)
Juice of 1 lemon
Zest of 1 lemon
1 tsp oregano (dried or fresh)
½ tsp salt
½ tsp black pepper
½ tsp chili flakes (optional)
For the whipped feta:
200g feta cheese
½ cup (120g) Greek yogurt
1–2 tbsp olive oil
1 clove garlic
1 tbsp lemon juice
Black pepper (to taste)
Garnish:
Fresh parsley or dill (chopped)
Extra lemon zest
Drizzle of olive oil

🔥 Instructions
1. Roast the crispy potatoes
Preheat oven to 220°C (425°F).
Toss potatoes with olive oil, salt, pepper, paprika, and garlic powder.
Spread on a baking tray (cut side down).
Roast for 30–40 minutes, flipping halfway, until golden and crispy.
2. Prepare the whipped feta
In a blender or food processor, combine:
Feta
Greek yogurt
Olive oil
Garlic
Lemon juice
Blend until smooth and creamy.
Taste and adjust (add more lemon for tanginess or oil for smoothness).
Set aside (room temp is best for serving).

DIY Orange Candle Holder (Natural Air Freshener

DIY Orange Candle Holder (Natural Air Freshener)

🧾 What you need:

  • 1 fresh orange
  • Small knife
  • Star-shaped cutter (or any shape you like)
  • Cloves (optional, for decoration & smell)
  • 1 small candle (tea light)

🔪 Step-by-step method:

1. Cut the orange

Slice the orange in half horizontally (like in the picture).

2. Empty the inside

Carefully scoop out the pulp using a spoon.
👉 Keep the peel intact because it will be your candle holder.

3. Create the star shape ⭐

Take the top half of the orange peel.
Use a small knife or a cookie cutter to cut a star shape in the center.

Desserts

4. Decorate with cloves 🌿

Stick cloves around the outside of the orange peel.
👉 This gives a warm, natural fragrance and looks aesthetic.

5. Place the candle

Put the tea light candle inside the bottom half of the orange.

6. Assemble

Place the top half (with the star cut) over the candle.

7. Light it up 🕯️

Turn off the lights and enjoy the cozy glow coming through the star!

💡 Extra tips:

  • Use fresh oranges so the peel is strong
  • You can try other shapes (heart, circle, moon 🌙)
  • Perfect for home decor, relaxation, or romantic vibe


Crunchy Rainbow Cabbage Salad

A fresh, colorful, and super crunchy salad packed with crisp vegetables and a light tangy dressing! Perfect as a healthy side dish, lunch, or refreshing snack. 🌈🥕🥒


🛒 Ingredients

  • 3 cups shredded cabbage 🥬
  • 1 carrot, julienned 🥕
  • ½ cucumber, thinly sliced 🥒
  • ½ red onion, thinly sliced 🧅
  • 2 tbsp chopped parsley or cilantro 🌿
  • 2 tbsp olive oil 🫒
  • 1 tbsp lemon juice 🍋
  • 1 tbsp vinegar
  • Salt & black pepper to taste 🧂
  • Optional: chili flakes 🌶️

👩‍🍳 Step-by-Step Recipe

🥬 Step 1: Prepare the Vegetables

➡️ Wash all vegetables thoroughly under cold water.
➡️ Finely shred the cabbage into thin strips for the perfect crunchy texture.
➡️ Julienne the carrot into thin matchsticks.
➡️ Slice cucumber and red onion as thinly as possible.


🥒 Step 2: Combine Everything

➡️ Add cabbage, carrots, cucumber, onion, and herbs into a large mixing bowl.
➡️ Toss gently so all the colorful vegetables are evenly mixed.


🍋 Step 3: Make the Dressing

➡️ In a small bowl, whisk together olive oil, lemon juice, vinegar, salt, black pepper, and chili flakes.
➡️ Mix until the dressing looks smooth and slightly glossy.


✨ Step 4: Toss the Salad

➡️ Pour the dressing over the vegetables.
➡️ Toss everything well until all the veggies are lightly coated.
➡️ Let the salad rest for 5–10 minutes so the flavors blend beautifully.


🥗 Step 5: Serve Fresh

➡️ Transfer to a serving plate or bowl.
➡️ Garnish with extra herbs or a squeeze of fresh lemon juice. 🌿🍋
➡️ Serve chilled for the crispiest and freshest taste!


❓Quick Q&A

❓Can I make this salad ahead of time?

✅ Yes! Store it in the fridge for up to 2 days.

❓How do I keep it crunchy?

✅ Add the dressing just before serving for maximum crispness.

❓Can I add protein?

✅ Absolutely! Grilled chicken, chickpeas, or tuna work great.

❓What other veggies can I use?

✅ Bell peppers, radishes, or purple cabbage are delicious additions. 🌈

Rainbow Crunch Slaw (Fresh Cabbage Carrot Salad)

This vibrant, crunchy slaw is a refreshing mix of shredded cabbage, carrots, onions, and a light tangy dressing. It’s similar to a classic coleslaw but lighter, brighter, and more versatile—perfect as a side dish, taco topping, or healthy snack.

 Ingredients (Serves 4–6)

  • 3 cups green cabbage, finely shredded
  • 1 cup carrots, julienned or grated
  • ½ cup red onion, thinly sliced
  • ½ cucumber, julienned (optional)
  • 1 small bell pepper, thinly sliced (optional)
  • 2 tbsp fresh cilantro or parsley, chopped

 Dressing

    • 3 tbsp lemon  juice or vinegar
    • 2 tbsp olive oil
    • 1 tbsp honey or  sugar
    • ½ tsp salt (adjust to taste)
    • ¼ tsp black pepper
    • Optional: pinch of chili flakes or mustard
Juice

 Instructions

    1. Prep vegetables
      Finely shred cabbage and carrots. Slice onion thinly for best texture.
    2. Combine
      Add all vegetables into a large mixing bowl.
    3. Make dressing
      In a small bowl, whisk lemon juice, oil, honey, salt, and pepper until well combined.
    4. Toss
      Pour dressing over vegetables and mix thoroughly.
    5. Rest (important!)
      Let the salad sit for 10–15 minutes to soften slightly and absorb flavors.
    6. Serve
      Toss again before serving. Serve chilled or at room temperature.
Food

 Tips for Best Results

  • Use a sharp knife or mandoline for thin, even slices
  • Massage cabbage lightly with salt for softer texture
  • Add apples or raisins for a sweet twist
  • For creamy version, add 2 tbsp mayo or yogurt
  • Chill for 30 minutes for deeper flavor

 Servings

    • Serves: 4–6 people
    • Serving size: ~1 cup
Fruits & Vegetables

 Nutritional Information (per serving, approx.)

    • Calories: 120
    • Protein: 2g
    • Carbohydrates: 12g
    • Fiber: 3g
    • Fat: 7g
    • Vitamin C: ~60% DV
    • Vitamin A: ~70% DV
Juice

 Health Benefits

  • Cabbage: Supports digestion and gut health
  • Carrots: Rich in beta-carotene for eye health
  • Onions: Provide antioxidants and anti-inflammatory compounds
  • Low calorie & high fiber: Great for weight management

 Q&A

Q: Can I make this ahead of time?
Yes! It actually tastes better after sitting for a few hours in the fridge.

Q: How long does it last?
Up to 2–3 days refrigerated in an airtight container.

Q: Can I use red cabbage?
Absolutely! It adds extra color and nutrients.

Q: How do I make it vegan?
Just replace honey with maple syrup or skip it.

Q: What can I serve it with?
Great with grilled meats, sandwiches, tacos, or as a light standalone dish.

Peanut Butter Banana Chia Pudding

Peanut Butter Banana Chia Pudding

Ingredients

  • Chia Seeds: 1/4 cup

  • Milk of choice: 1 cup (almond, oat, or dairy)

  • Peanut Butter: 2 tablespoons (creamy works best)

  • Maple Syrup or Honey: 1 tablespoon

  • Vanilla Extract: 1/2 teaspoon

  • Cocoa Powder: 1 teaspoon (optional, for a chocolate twist)

  • Toppings: Sliced banana, a drizzle of peanut butter, and extra chia seeds.


Instructions

  1. Mix the Base: In a glass jar or medium bowl, whisk together the milk, peanut butter, sweetener, and vanilla extract until the peanut butter is mostly incorporated and the mixture is smooth.

  2. Add Chia: Stir in the chia seeds. If you are using cocoa powder, whisk it in now to ensure there are no dry clumps.

  3. The First Rest: Let the mixture sit for about 5–10 minutes, then give it another good stir. This prevents the seeds from settling at the bottom and ensures a uniform, creamy texture.

  4. Chill: Cover the container and refrigerate for at least 4 hours, though overnight is ideal to allow the seeds to fully hydrate.

  5. Serve: Before eating, give the pudding one last stir. If it’s too thick, add a splash of milk. Top with fresh banana slices, an extra drizzle of peanut butter, and a sprinkle of seeds as seen in the image.


Quick Tips

  • Texture: If you prefer a completely smooth texture, you can blend the entire mixture in a high-speed blender before chilling.

  • Storage: This stays fresh in the refrigerator for up to 4 days, making it excellent for meal prep.

Honey Banana “ice Cream

Honey Banana “Nice Cream.

Ingredients

  • 3 ripe bananas (peeled, sliced, and frozen)

  • 1–2 tablespoons honey (adjust based on sweetness preference)

  • 1/4 cup splash of milk (almond, oat, or dairy)

  • 1/2 teaspoon vanilla extract

  • Pinch of sea salt

  • Extra banana slices and honey (for garnish)


Instructions

  1. Prep the Fruit: Ensure your banana slices are frozen solid (at least 4–6 hours). Using overripe bananas with brown spots will yield the sweetest results.

  2. Blend: Place the frozen banana slices into a high-powered blender or food processor.

  3. Combine: Add the honey, vanilla extract, and sea salt. Start with just a tiny splash of your chosen milk to help the blades move.

  4. Process: Pulse until the bananas look like small crumbles, then blend on high. Use a spatula to scrape down the sides as needed.

  5. Adjust Consistency: Continue blending until the mixture becomes smooth, thick, and velvety—similar to soft-serve ice cream. If it is too thick, add more milk one tablespoon at a time.

  6. Serve: Scoop the mixture immediately into a chilled bowl for the best texture.

  7. Garnish: Top with fresh banana slices and a generous drizzle of honey as seen in the image.


Quick Tips

  • Texture: If you prefer a firmer, scoopable ice cream, transfer the mixture to a container and freeze for an additional 1–2 hours before serving.

  • Flavor Variation: For a nutty twist, add a tablespoon of peanut butter or almond butter during the blending process.

Rustic Chicken & Potato Soup

Rustic Chicken & Potato Soup

Prep time: 15 mins | Cook time: 30 mins | Servings: 4

The Ingredients

  • Chicken: 2 large chicken breasts (poached and shredded) or rotisserie chicken.

  • Potatoes: 3 large Yukon Gold or Russet potatoes, peeled and cubed into bite-sized chunks.

  • Aromatics: 1 medium onion (diced), 2 carrots (sliced into rounds), and 2 stalks of celery (chopped).

  • Broth: 6 cups of high-quality chicken stock.

  • Seasoning: 2 cloves garlic (minced), 1 tsp dried thyme, salt, and black pepper to taste.

  • The Finish: Fresh parsley (roughly chopped) and red chili flakes for a gentle heat.


The Instructions

  1. Sauté the Base: In a large pot, heat a tablespoon of olive oil over medium heat. Add your diced onion, carrots, and celery. Cook for about 5–7 minutes until the onions are translucent and the vegetables begin to soften. Stir in the minced garlic and thyme, cooking for just another minute until fragrant.

  2. Simmer the Potatoes: Pour in the chicken stock and add the cubed potatoes. Bring the mixture to a gentle boil, then reduce the heat to low. Cover the pot and simmer for 15–20 minutes, or until the potatoes are fork-tender but not falling apart.

  3. Combine and Heat: Add your shredded chicken to the pot. Stir gently to incorporate. Let the soup simmer for another 5 minutes to ensure the chicken is heated through and has absorbed some of the savory broth flavors.

  4. Season to Perfection: Taste your broth. Add salt and freshly cracked black pepper as needed. If you want a richer base, you can mash a few of the potato cubes against the side of the pot to thicken the texture slightly.

  5. Garnish and Serve: Ladle the hot soup into deep bowls. Top generously with fresh parsley and a sprinkle of red chili flakes to match the vibrant look in your photo.


Pro Tip for Extra Flavor

For an even deeper “homemade” taste, add a splash of lemon juice right before serving. The acidity brightens the starchiness of the potatoes and makes the chicken flavor pop! Enjoy your cozy meal.