These cheesy toast sandwiches are incredibly easy and unbelievably delicious. Crispy and golden on the outside with perfectly melted cheese inside, they’re so good that you’ll want to make them again and again. Perfect for breakfast, snacks, or quick dinners — and made with only 3 ingredients!
Ingredients (3 Only)
8 slices of bread
1½ cups cheddar cheese or mozzarella (grated)
2–3 tablespoons butter
Instructions
Spread butter on one side of each bread slice
Place grated cheese between two slices (buttered side facing out)
Close the sandwich
Cook on a pan, grill, or air fryer over medium heat
Toast until both sides are golden brown and the cheese is fully melted
Cooking Options
Pan: 2–3 minutes per side
Air Fryer: 180°C (350°F) for 6–8 minutes
Oven: 190°C (375°F) for 10 minutes
Servings
Makes 4 sandwiches
Nutritional Information (Per Sandwich – Approx.)
Nutrient
Amount
Calories
280
Protein
9 g
Carbohydrates
26 g
Fat
16 g
Calcium
High
Sugar
3 g
Benefits
Quick and budget-friendly Loved by kids and adults Rich in calcium and protein No special equipment needed Ultimate comfort food
Notes & Tips
Mozzarella gives the best cheese stretch
Use garlic butter for extra flavor
Cook on low to medium heat so the cheese melts properly
Add a little butter on the outside for extra crispiness
Q & A
Q: Can I use brown bread? Yes, it works perfectly and is a bit healthier.
Q: Can I add extra ingredients? Yes, but the classic version tastes amazing with just 3 ingredients.
Q: Are these good for kids’ lunch boxes? Yes, best when packed fresh.
Q: How often can I make them? They’re best enjoyed in moderation — 2–3 times a week.
Clove steam inhalation is a simple, aromatic home remedy traditionally used to help clear nasal congestion, soothe the throat, and support easier breathing. The warm steam hydrates nasal passages while cloves release a strong, spicy vapor rich in natural compounds.
Description
This remedy combines hot water and whole cloves to create a soothing steam. The active compound in cloves, eugenol, is known for its warming aroma and natural antimicrobial properties. When inhaled safely, it may help:
Relieve sinus congestion
Ease cold and flu discomfort
Calm cough irritation
Support clearer breathing
Provide a relaxing, spa-like experience
Ingredients (1 Serving)
4 cups (1 liter) water
1–2 tablespoons whole cloves
Optional: 1 cinnamon stick or a slice of fresh ginger
Instructions
Bring water to a gentle boil. Add cloves (and optional ingredients). Simmer 5 minutes, then remove from heat. Carefully pour into a heat-safe bowl. Sit comfortably, lean over the bowl. Drape a towel over your head to trap steam. Inhale gently for 5–10 minutes (keep eyes closed).
Keep face 8–12 inches from the water to avoid burns.
Tips for Best Results
Do not use boiling water directly from heat — let it cool slightly.
Keep eyes closed to prevent irritation.
Use once daily during congestion.
Stay hydrated afterward.
Not recommended for young children without medical advice.
Servings
Makes 1 steam session
Can be repeated daily as needed
Nutritional Information
Since this is inhaled (not consumed), it contains no calories, fat, sugar, or carbs.
Potential Benefits
Helps loosen mucus
May ease stuffy nose
Clove contains natural antimicrobial compounds
Promotes relaxation
Warm steam supports sinus drainage
Note: This is a supportive home remedy — not a substitute for medical treatment.
Q & A
Q: Can I drink the clove water afterward? A: It can be strained and sipped like tea, but the flavor will be very strong and spicy.
Q: How often can I use it? A: Once daily during cold or sinus discomfort.
Q: Can I add essential oils? A: Only if labeled safe for steam inhalation, and use 1–2 drops max.
Q: Is it safe during pregnancy? A: Occasional steam inhalation is generally mild, but consult your healthcare provider first.
Q: Does it cure colds? A: No. It may help relieve symptoms but does not cure infections.
A refreshing, metabolism-supporting drink that helps reduce bloating, curb cravings, and support overall fat loss when paired with healthy habits. This simple ginger water is hydrating, soothing, and easy to prep for the whole week.
Description
Ginger water is a natural wellness drink made by infusing fresh ginger (and optional lemon) into water. It’s known for supporting digestion, reducing inflammation, easing bloating, and gently boosting metabolism — which can help with fat loss over time, especially in stubborn areas like the abdomen, arms, back, neck, and thighs when combined with balanced nutrition and movement.
Ingredients
1–2 inches fresh ginger root, peeled and sliced
1 liter (4 cups) water
½ fresh lemon, sliced or juiced (optional, but recommended)
Instructions
Prepare ginger Peel and thinly slice fresh ginger.
Boil water Bring water to a boil, add ginger, and simmer for 10–15 minutes.
Cool & strain Remove from heat, let cool slightly, then strain.
Add lemon (optional) Stir in lemon juice or add lemon slices.
Store Pour into bottles and refrigerate for up to 3 days.
Serve warm or cold.
Notes & Tips
Stronger flavor? Simmer longer or add more ginger
Great cold for summer, warm for digestion
Add a small drizzle of honey if needed (optional)
Shake before drinking if infused overnight
Servings
4 servings (1 cup each)
Nutritional Info (Per Serving – Approx.)
Calories: 5–10
Carbs: 1–2g
Fat: 0g
Protein: 0g
Sugar: 0g
WW Points: 0
Benefits
Supports digestion and gut health
Helps reduce bloating and water retention
Anti-inflammatory properties
May support metabolism and appetite control
Naturally detoxifying and hydrating
Caffeine-free and sugar-free
Q & A
Q: Does ginger water burn belly fat? Ginger water doesn’t burn fat on its own, but it supports fat loss by improving digestion, reducing bloating, and helping control appetite when paired with a healthy lifestyle.
Q: When should I drink it? Best times are morning on an empty stomach or between meals.
Q: How much can I drink daily? 1–3 cups per day is ideal.
Q: Can I drink it every day? Yes, most people can safely enjoy it daily.
Q: Who should avoid it? If you’re pregnant, on blood thinners, or have gallbladder issues, check with a healthcare professional first.
Walnuts or Almonds: ½ cup, chopped (optional for added texture)
Detailed Instructions
Hydrate the Oats: In a large mixing bowl, combine the 1 cup of rolled oats with the ⅔ cup of warm milk. Stir well and allow the mixture to sit for 10 minutes so the oats can soften and absorb the liquid.
Prepare the Fruit and Nuts: While the oats are soaking, peel and either grate or finely dice the 2 apples. If using walnuts or almonds, chop them into small pieces to ensure even distribution.
Create the Batter: Add the 2 eggs, 2 tablespoons of melted butter, and ½ teaspoon of vanilla extract to the soaked oats. Mix thoroughly until the eggs are fully incorporated. Fold in the prepared apples and nuts.
Fill the Molds: Lightly grease a silicone mold or muffin tin. Using a spoon, fill each cavity nearly to the top with the batter, as these bites do not rise significantly.
Bake: Preheat your oven to 180°C (350°F). Bake for 25–30 minutes until the tops are golden brown and the centers are firm.
Cool and Serve: Let the dessert cool in the mold for at least 5 minutes before removing. This helps the structure set, making them easy to grab as a portable energy snack.
Why This Works
Natural Sweetness: Grated apples provide moisture and sweetness without the need for refined sugar.
Satiety: The combination of fiber from the oats and protein from the eggs helps keep you feeling full and energized.
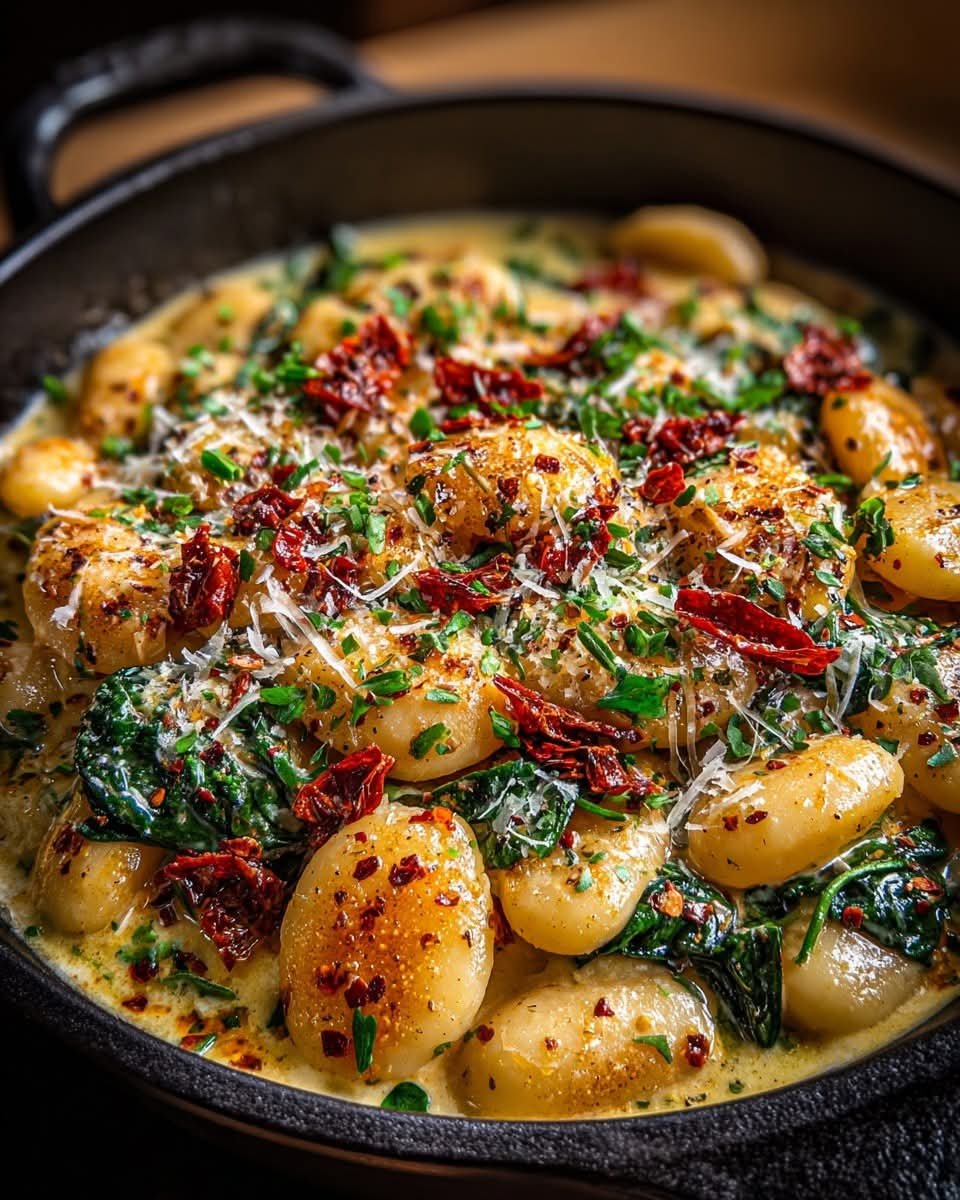
Lemon Garlic Butter Chicken & Creamy Parmesan Pasta
Ingredients
For the Chicken:
Chicken: 2 boneless, skinless chicken breasts
Olive oil: 1 tablespoon
Unsalted butter: 2 tablespoons
Garlic: 3 cloves, minced
Lemon juice: 1 tablespoon
Seasoning: Salt, black pepper, and paprika to taste
For the Pasta:
Pasta: 250g spaghetti or linguine
Heavy cream: 1 cup
Parmesan cheese: ½ cup, freshly grated
Garlic: 2 cloves, minced
Lemon zest: 1 teaspoon
Fresh parsley: 2 tablespoons, chopped
Detailed Instructions
1. Prepare the Chicken
Slice and Season: Cut the chicken breasts into bite-sized pieces. Season generously with salt, pepper, and a dash of paprika.
Sear: Heat 1 tablespoon of olive oil and 1 tablespoon of butter in a large skillet over medium-high heat. Add the chicken and cook until golden brown and cooked through (about 6–8 minutes).
Finish with Flavor: Reduce the heat to low. Add the remaining 1 tablespoon of butter, minced garlic, and 1 tablespoon of lemon juice to the pan. Toss the chicken to coat it in the garlic butter sauce, then remove the chicken from the pan and set it aside.
2. Cook the Pasta
Boil: Cook your pasta in a large pot of salted boiling water according to the package instructions until al dente.
Reserve Water: Before draining, save about ½ cup of the starchy pasta water.
3. Create the Creamy Parmesan Sauce
Sauté Garlic: In the same skillet used for the chicken (don’t wash it—those brown bits add flavor!), add a little more butter if needed and sauté the minced garlic for 30 seconds.
Simmer Cream: Pour in the heavy cream and bring to a gentle simmer.
Melt Cheese: Whisk in the ½ cup of Parmesan cheese until the sauce is smooth. If it’s too thick, add a splash of the reserved pasta water.
Add Zest: Stir in the lemon zest for that bright, zesty finish.
4. Combine and Serve
Toss: Add the cooked pasta to the skillet and toss thoroughly to coat every strand in the creamy sauce.
Plate: Serve the pasta topped with the lemon garlic chicken. Garnish with fresh parsley and extra Parmesan if desired.
Cooking Tip
To keep this meal balanced, try serving it with a side of steamed broccoli or a fresh green salad.
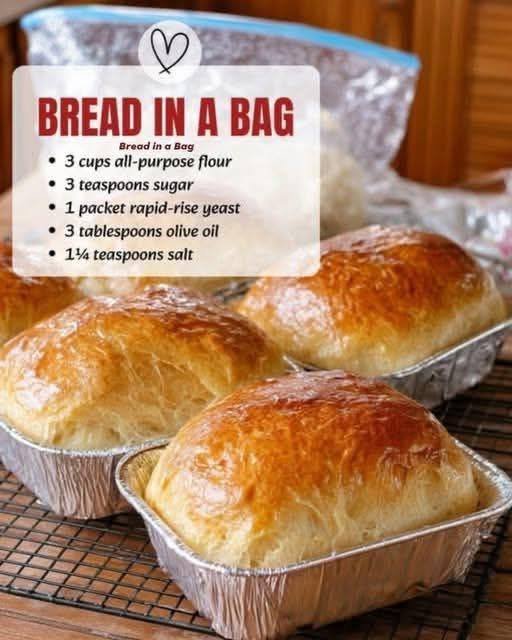
Warm water: 1 cup (essential for activating yeast)
Olive oil: 3 tablespoons
Salt:$1\frac{1}{4}$ teaspoons
Detailed Instructions
Combine Initial Ingredients:
Open a large (gallon-sized) heavy-duty freezer bag. Pour in 1 cup of flour, the sugar, the packet of yeast, and 1 cup of warm water. Seal the bag tightly, pushing out the excess air.
The “Shake” Phase:
Squeeze and shake the bag with your hands until the ingredients are well blended. Let the mixture rest for about 10 minutes; you should see bubbles forming as the yeast activates.
Add Remaining Ingredients:
Open the bag and add the olive oil, salt, and the remaining 2 cups of flour. Reseal the bag and continue to knead and squish it from the outside until a dough ball forms and pulls away from the sides of the bag.
Knead the Dough:
Lightly flour a clean surface. Remove the dough from the bag and knead it by hand for about 5–8 minutes until it is smooth and elastic.
First Rise:
Place the dough in a lightly greased bowl, cover it with a damp cloth, and let it rise in a warm spot for about 30–45 minutes, or until it has doubled in size.
Shape and Second Rise:
Gently punch the dough down to release air. Divide it into smaller portions if using mini loaf pans (as seen in the image) or keep it as one large loaf. Place the dough into greased baking pans. Cover again and let rise for another 20 minutes.
Bake:
Preheat your oven to 190°C (375°F). Bake for 25–30 minutes or until the crust is a deep golden brown and the bread sounds hollow when tapped on the bottom.
Cool:
Remove from the pans and let the bread cool on a wire rack before slicing to ensure the center stays fluffy.
Stevia: 1 teaspoon (adjust based on your brand’s sweetness level)
Salt: A pinch
Detailed Instructions
Prepare the Apples: Peel and thinly slice your apples. Immediately toss them with the juice of ½ lemon in a bowl. This prevents browning and adds a bright base flavor.
Mix the Wet Base: In a separate large bowl, whisk the 2 eggs with a pinch of salt and the 1 teaspoon of stevia until the mixture is slightly frothy. Stir in the 100ml of milk, 1 ½ tablespoons of applesauce, and the lemon zest.
Incorporate Dry Ingredients: Sift the 80g of wheat flour and 1 teaspoon of baking powder into the wet mixture. Whisk gently until the batter is smooth and there are no large lumps.
Combine: Fold the sliced apples into the batter. Ensure every slice is well-coated; this is what creates the “layered” look in the finished cake.
Prepare for Baking: Preheat your oven to 180°C (350°F). Grease a round cake pan or line it with parchment paper. Pour the apple and batter mixture into the pan, smoothing out the top.
Bake: Bake for 30–35 minutes. The cake should be golden on top and firm to the touch. Because of the high fruit content, it will remain moist and custard-like inside.
Final Touch: Let the cake cool completely before slicing. This allows the fruit layers to set. If you like, you can lightly dust the top with a tiny bit of powdered stevia or cinnamon before serving.
Soak the Oats: In a large mixing bowl, combine the 1 cup of rolled oats with the 150 ml of warm milk. Stir and let the mixture sit for about 10 minutes. This softens the oats, ensuring a better texture for the final snack.
Prepare the Apples and Nuts: While the oats soak, peel and then either grate or finely chop your 2 apples. Chop your ½ cup of walnuts or almonds into small, crunchy pieces.
Combine Ingredients: To the soaked oats, add the 2 eggs, 2 tablespoons of butter (melted), and ½ teaspoon of vanilla extract. Stir well. Fold in the prepared apples and the chopped nuts until the mixture is uniform.
Prepare the Pan: Lightly grease a muffin tin or a silicone rectangular mold with a small amount of vegetable oil.
Bake: Preheat your oven to 180°C (350°F). Spoon the mixture into the prepared molds, filling them nearly to the top. Bake for 25 to 30 minutes, or until the bites are firm to the touch and a light golden brown on top.
Cool: Allow the snacks to cool in the pan for 5–10 minutes before removing them. This helps them set so they don’t break apart.
Tips for Success
Texture: If you prefer a smoother snack, you can use “quick oats” instead of rolled oats.
Flavor Boost: Feel free to add a pinch of cinnamon or nutmeg to the batter to complement the apples.
These bites are a great way to enjoy a fiber-rich snack using simple, whole ingredients.
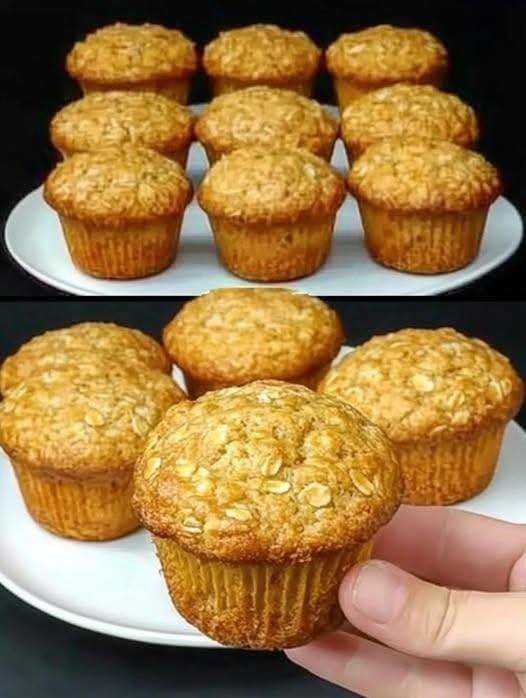
Ingredients
Oatmeal: 1 cup (90g)
Warm milk: 150 ml (about ⅔ cup)
Apples: 2 large, peeled and diced
Butter: 20g (1 ½ tablespoons), melted
Vanillin: 1/2 teaspoon (or vanilla extract)
Eggs: 2 large
Instructions
Soak the Oats: In a medium mixing bowl, combine the oatmeal and the warm milk. Let it sit for about 10 minutes until the oats have absorbed the liquid and softened.
Prepare the Apples: While the oats soak, peel and dice your apples into small, uniform pieces.
Mix the Base: Whisk the eggs in a separate bowl, then add them to the oat mixture along with the melted butter and vanillin. Stir until well combined.
Fold in Apples: Gently fold the diced apples into the oat mixture so they are evenly distributed.
Fill the Mold: Spoon the mixture into a silicone baking mold (rectangular or muffin-shaped). Fill each cavity nearly to the top as these will not rise significantly.
Bake: Preheat your oven to 180°C (350°F). Bake for approximately 25–30 minutes, or until the tops are golden brown and the center is set.
Cool and Serve: Allow the bites to cool in the mold for a few minutes before removing them to ensure they hold their shape.
There’s something irresistibly comforting about a casserole — especially when it stars sweet Vidalia onions in a rich, creamy base topped with buttery cracker crumbs. Sweet Onion Casserole is one of those simple Southern dishes that feels like home in every bite. It’s easy to prepare, wonderfully indulgent, and pairs beautifully with almost any main dish. Better yet, it often steals the spotlight all on its own.
The Quintessential Southern Ingredient
Vidalia onions are prized for their natural sweetness, making them the perfect foundation for this casserole. Unlike typical onion recipes that rely on caramelizing, this dish uses a surprising technique — boiling. This method softens the onions and removes any sharpness, leaving behind a mellow, sweet flavor that blends perfectly into the creamy mixture.
A Perfect Blend of Textures
Cracker crumbs and sharp cheddar cheese do more than fill space — they create balance. The crackers absorb the flavorful liquid while adding occasional crunch, and the cheese contributes richness and tang. Together, they elevate humble onions into a comforting, crowd-pleasing casserole.
That Buttery Crumb Topping
The finishing touch is a golden topping made from melted butter and crushed crackers. As it bakes, it forms a crispy crust that contrasts beautifully with the soft onion filling underneath.
Perfect Pairings
Serve this casserole alongside grilled chicken, roast turkey, steak, or baked ham. It works just as well for weeknight dinners as it does for holidays and potlucks.
4 large Vidalia onions, halved and sliced ¼-inch thick
1 (5 oz) can evaporated milk
1½ cups grated cheddar cheese
1 cup crushed Ritz crackers
For the Topping:
3 tablespoons melted butter
1 cup crushed Ritz crackers
Instructions
Preheat oven to 375°F (190°C). Grease a 9×13-inch baking dish.
Place sliced onions in a saucepan and add enough water to cover them. Bring to a boil, then reduce heat and simmer for 8 minutes. Drain well and toss onions with 2 tablespoons butter.
In a large bowl, whisk together eggs and evaporated milk.
Add buttered onions, 1 cup cracker crumbs, cheddar cheese, salt, and pepper. Mix well.
Pour mixture into prepared baking dish.
Combine melted butter and 1 cup crushed crackers for the topping. Sprinkle evenly over casserole.
Bake for 45 minutes, or until set in the center and golden brown on top.
1 cup Frozen mango chunks (provides creaminess without dairy)
1/2 cup Greek yogurt or coconut yogurt (for a vegan option)
1/2 inch Fresh ginger root, peeled and roughly chopped
1/2 Organic lemon, juiced (plus a pinch of zest for extra punch)
1/2 tsp Ground turmeric (optional, for color and anti-inflammatory boost)
1 cup Unsweetened almond milk or coconut water
1 tsp Honey or maple syrup (optional, to taste)
Instructions
Prep the Ginger: Peel the ginger using the edge of a spoon—it’s the easiest way to get around the bumps!
Combine: Place the liquid base into the blender first, followed by the yogurt, ginger, lemon juice, and finally the frozen mango.
Blend: Start on a low speed and gradually increase to high. Blend for 45–60 seconds until completely smooth.
Taste Test: If it’s too tart, add a touch more honey. If it’s too thick, splash in a little more almond milk.
Serve: Pour into a chilled glass and top with a sprinkle of lemon zest or a thin slice of fresh ginger.
## Nutritional Information (Per Serving)
Estimated values based on standard ingredients:
Nutrient
Amount
Calories
185 kcal
Protein
8g
Fiber
4g
Sugar
22g (natural)
Vitamin C
65% DV
## Benefits & Why It Works
Digestion Hero: Ginger contains gingerol, which aids digestion and helps soothe an upset stomach.
Immune Support: High levels of Vitamin C from the lemon and mango help bolster your body’s defenses.
Natural Energy: Unlike coffee, the natural sugars and electrolytes provide a steady lift without the caffeine crash.
## Pro Tips for Success
Freeze Your Lemons: If you have lemons about to go bad, juice them into ice cube trays. Toss 2 cubes into the blender instead of fresh juice for an extra-cold texture.
Smooth Ginger: If you don’t have a high-speed blender, grate the ginger first to avoid finding spicy “chunks” in your straw.
Add Greens: Want to make it a meal? Add a handful of baby spinach. It will turn the smoothie bright green, but the lemon and ginger will completely mask the flavor.
## Common Q&A
Q: Can I use bottled lemon juice?
A: You can, but fresh is much better. Bottled juice often has preservatives and lacks the bright, floral aroma of a freshly squeezed lemon.
Q: Is the ginger too spicy for kids?
A: Ginger has a “slow burn.” If serving to children, start with a pea-sized amount and work your way up.
Q: Can I prep this the night before?
A: Smoothies are best fresh. However, you can prep “smoothie packs” by putting the mango, ginger, and lemon zest in a freezer bag. In the morning, just add the liquid, yogurt, and juice, then blend!
That humble, deep-red beetroot sitting in your produce aisle? It’s not just a side dish—it’s nature’s performance enhancer, blood pressure balancer, and gut healer, all in one vibrant package.
Once dismissed as “just another root vegetable,” beets are now celebrated by doctors, athletes, and longevity experts for their remarkable, research-backed benefits. And the best part? No pills. No jitters. Just real food with real results.
Here’s what happens when you make beets a regular part of your diet.
🌱 What Makes Beets So Special?
Beets are uniquely rich in:
Dietary nitrates → converted to nitric oxide (a vasodilator)
Betalains → potent anti-inflammatory and antioxidant pigments
Fiber → both soluble and insoluble for gut health
Folate, iron, potassium, and manganese → essential for energy and cell function
💡 Fun fact: The red pigment in beets (betacyanin) is so strong, it can temporarily turn urine or stool pink—harmless, but startling!
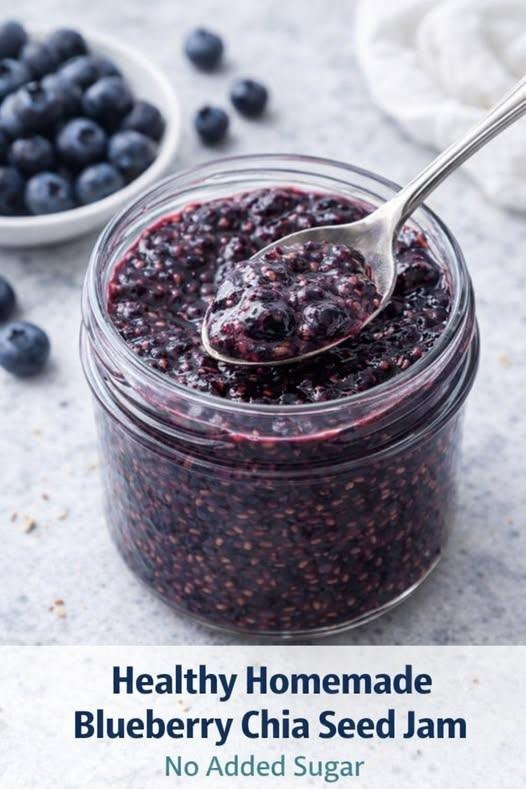
Servings: Makes about 1.5 cups (approx. 12 servings)
Ingredients
Blueberries: 3 cups (fresh or frozen)
Chia Seeds: 2 tablespoons
Maple Syrup or Honey: 1–2 tablespoons (adjust to taste)
Lemon Juice: 1 tablespoon (brightens flavor and helps preservation)
Vanilla Extract: ½ teaspoon (optional, for depth)
Instructions
Simmer: Place the blueberries in a small saucepan over medium heat. Cook for about 5–8 minutes, stirring occasionally, until the berries burst and release their juices.
Mash: Use a fork or potato masher to crush the berries to your preferred consistency (leave some chunks for texture or mash thoroughly for a smoother jam).
Sweeten & Brighten: Stir in the maple syrup (or honey) and lemon juice. Remove from heat.
Thicken: Stir in the chia seeds and vanilla extract.
Set: Let the mixture sit for at least 10 minutes. The chia seeds will absorb the liquid and thicken the mixture into a jam-like consistency.
Store: Once cooled, transfer to a glass jar. It will continue to thicken as it chills in the fridge.
Notes & Tips
The “Gel” Factor: If the jam isn’t thick enough after 10 minutes, stir in an extra teaspoon of chia seeds and wait a bit longer.
Sweetness Check: Taste the jam before adding the chia seeds. Depending on how ripe your berries are, you may want more or less sweetener.
Frozen vs. Fresh: Both work perfectly! If using frozen, you may just need an extra minute or two of simmering time.
Nutritional Info (Per 2-tablespoon serving)
Nutrient
Amount
Calories
35 kcal
Total Fat
1g
Fiber
2g
Sugars
4g (mostly natural)
Protein
1g
Benefits of This Jam
Omega-3s: Chia seeds are one of the best plant-based sources of alpha-linolenic acid (ALA).
Antioxidant Powerhouse: Blueberries are loaded with anthocyanins, which support heart health and brain function.
Low Glycemic: Unlike traditional jam (which is often 50% sugar), this version won’t cause a massive blood sugar spike.
Q&A
Q: How long does it last?
A: Because it lacks the heavy sugar used as a preservative in traditional jams, this stays fresh in the fridge for 7–10 days.
Q: Can I freeze it?
A: Yes! It freezes beautifully for up to 3 months. Just leave a little headspace in the jar so it can expand.
Q: Can I use other fruit?
A: Absolutely. This method works great with raspberries, blackberries, or strawberries (just chop the strawberries first).
This combination creates a creamy texture with a nice balance of sweetness and tartness.
Ingredients:
1 cup frozen mixed berries (blueberries, strawberries, raspberries)
1 medium banana (ripe, fresh or frozen for extra creaminess)
½ cup Greek yogurt (plain or vanilla)
¾ cup milk of your choice (dairy, almond, oat, or soy)
1 teaspoon honey or maple syrup (optional, adjust to taste)
Optional: A handful of ice cubes if you prefer a thicker, colder consistency.
Instructions:
Combine: Add the milk, yogurt, banana, and frozen berries into your blender.
Blend: Start on a low speed and gradually increase to high. Blend until the mixture is completely smooth and no large fruit chunks remain.
Adjust: If the smoothie is too thick, add a little more milk. If you prefer it sweeter, add a touch more honey or maple syrup and pulse again.
Serve: Pour into a glass, garnish with a few fresh blueberries and a sprig of fresh mint, just like in your photo!
Tips for success:
For a thicker smoothie: Use a frozen banana instead of a fresh one.
For a protein boost: You can add a tablespoon of chia seeds, flax seeds, or a scoop of your favorite protein powder.
Prep ahead: You can put the fruit and banana into freezer-safe bags ahead of time; when you’re ready to make it, just dump the bag contents into the blender and add the liquids.
1 block (200g) High-quality Greek Feta (sheep’s milk is best)
4 sheets Phyllo pastry (thawed)
4 tbsp Unsalted butter, melted
3 tbsp Honey (thyme or wildflower recommended)
1/4 cup Roasted pistachios, finely chopped
1 tsp Black sesame seeds or poppy seeds (optional)
Pinch of Chili flakes (optional, for a “hot honey” vibe)
Neutral oil for shallow frying (or cooking spray for baking)
Instructions
Prep the Feta: Cut the feta block into 8 equal rectangular batons. Pat them dry with a paper towel to ensure the pastry doesn’t get soggy.
Layer the Phyllo: Lay one sheet of phyllo on a clean surface. Brush lightly with melted butter. Fold the sheet in half.
The Roll: Place a feta baton at the bottom edge. Fold the sides inward and roll it up tightly, like a small burrito. Repeat for all 8 pieces.
The Sear: Heat 2 tablespoons of oil in a non-stick skillet over medium heat. Fry the rolls for 2–3 minutes per side until deep golden brown and crispy.
Alternative: Bake at 200°C for 12–15 minutes until golden.
The Caramelization: While the rolls are hot, drizzle the honey directly into the pan (or over the rolls on a plate) and toss quickly so the honey bubbles and coats the pastry.
The Crunch: Immediately roll or sprinkle the honeyed pastry with chopped pistachios and sesame seeds. Serve warm.
Notes & Tips
Dry the Feta: Feta is stored in brine. If you don’t pat it dry, the steam will make the phyllo burst or turn mushy.
Work Fast: Phyllo dough dries out and cracks within minutes. Keep unused sheets under a damp kitchen towel while you work.
Don’t Over-Butter: A light brush is enough. Too much butter makes the rolls greasy rather than crispy.
Nutritional Info (Per Roll)
Calories
Total Fat
Carbs
Protein
Sodium
185 kcal
12g
14g
5g
310mg
The Benefits
High Satiety: The combination of healthy fats from pistachios and protein from feta keeps you full longer than a standard sugary pastry.
Calcium Boost: Feta is an excellent source of calcium and contains lower lactose than many cow’s milk cheeses.
Antioxidants: Raw honey and pistachios provide a hit of polyphenols and vitamin E.
Q&A
Q: Can I make these in an Air Fryer?A: Absolutely! Spray them with a little oil and air fry at 190°C for 8–10 minutes, flipping halfway. Drizzle the honey after they come out.
Q: Can I prepare these in advance?A: You can roll them up to 4 hours ahead of time. Keep them covered in the fridge. However, do not fry or honey them until right before serving, or they will lose their crunch.
Q: My feta is too salty. What should I do?A: Soak the feta block in fresh water or milk for 30 minutes before slicing. This draws out the excess salt without ruining the texture.
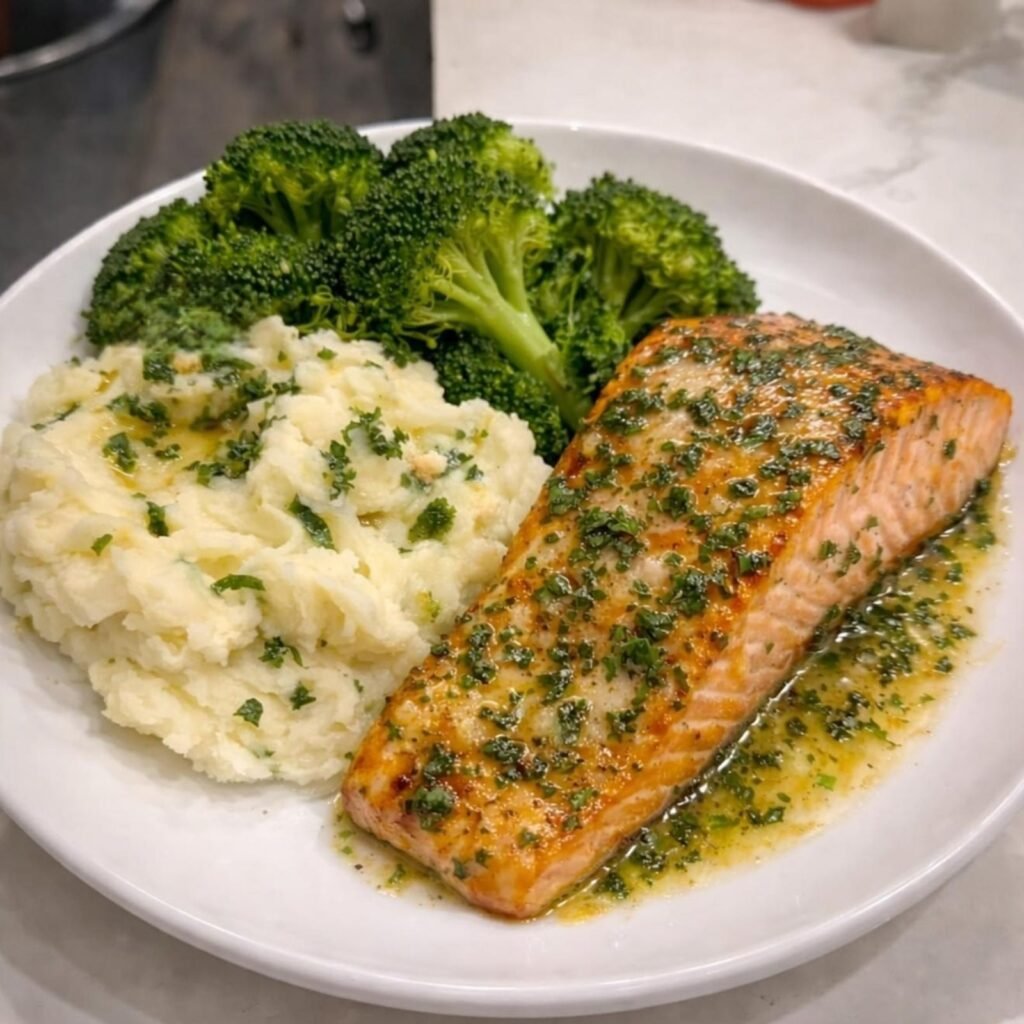
A high-protein, lower-calorie dinner featuring perfectly seared garlic butter salmon, creamy portion-controlled mashed potatoes, and lightly seasoned garlic broccoli — satisfying flavor without excess fat.
Recipe Card
Quick Description
A lighter take on the classic garlic butter salmon plate, keeping rich flavor while lowering fat and points — ideal for high-protein meals or a balanced weeknight dinner.
Servings & Timing
Servings: 1 plate
Prep Time: 10 minutes
Cook Time: 20 minutes
Total Time: 30 minutes
Dietary Badges
High-Protein | Lower Fat | Gluten-Free
Ingredients
Garlic Butter Salmon
2 salmon fillets (4 oz each)
1 tsp olive oil
1 tsp butter
2 cloves garlic, minced
1 tsp garlic herb seasoning (garlic powder, onion powder, paprika, parsley, black pepper)
Lemon juice, to taste
Chopped parsley, for garnish
Portion-Control Mashed Potatoes
1 russet potato, peeled and cubed
1 tsp butter
2 tbsp 1% or skim milk
Garlic herb seasoning, to taste
Black pepper, to taste
Garlic Broccoli
2 cups broccoli florets
Cooking spray or ½ tsp butter
Garlic herb seasoning, to taste
Instructions
1. Prepare the Salmon
Pat salmon fillets dry and season generously with garlic herb seasoning.
2. Sear the Salmon
Heat olive oil in a skillet over medium-high heat.
Place salmon skin-side down and sear 4–5 minutes until skin is crisp.
Flip salmon, add butter and minced garlic, and spoon lightly over the top.
Cook until the salmon flakes easily with a fork.
Finish with a squeeze of fresh lemon juice and garnish with parsley.
3. Make Portion-Control Mashed Potatoes
Boil cubed potato in salted water until fork-tender (about 10–12 minutes).
Drain thoroughly and mash with butter and milk.
Season with garlic herb seasoning and black pepper to taste.
4. Prepare Garlic Broccoli
Steam broccoli until bright green and tender (4–5 minutes).
Toss lightly with butter or cooking spray and garlic herb seasoning.
Additional Notes
Use room-temperature salmon for even cooking.
Spoon butter lightly over salmon to keep flavor while lowering fat.
For extra flavor, add a touch of lemon zest to the potatoes.
This plate is naturally gluten-free and high in protein.
A Balanced, Flavorful Plate
This garlic butter salmon plate delivers protein and flavor with mindful portioning. The salmon remains rich and buttery without excessive fat, the mashed potatoes are creamy but controlled, and the broccoli adds bright color and fiber. Ideal for anyone seeking a satisfying, nutrient-conscious dinner that doesn’t compromise on taste.
Step-by-Step Cooking Guide
Stage 1: Garlic Butter Salmon
Step 1: Dry and Season
Dry salmon thoroughly to ensure a crisp sear. Season on both sides generously.
Tip: If the fillets are cold from the fridge, let them rest 5–10 minutes for even cooking.
Step 2: Skin-Side Sear
Heat oil in the pan and sear skin-side down without moving for 4–5 minutes until golden and crisp.
Step 3: Flip and Baste
Add butter and garlic after flipping. Spoon lightly to coat. Reduce heat slightly to prevent garlic from burning. Cook until opaque and flaky.
Step 4: Finish
Add a squeeze of lemon and sprinkle parsley for brightness.
Stage 2: Portion-Control Mashed Potatoes
Boil Until Tender
Potatoes should break apart easily when pierced.
Mash While Hot
Mash immediately after draining. Use warm milk for creaminess.
Tip: Avoid over-mashing to prevent gluey texture.
Stage 3: Garlic Broccoli
Steam until broccoli is bright green and tender.
Toss lightly with butter or spray and season with garlic herb blend.
Tip: A quick steam preserves nutrients and keeps the broccoli crisp.
Ingredient Details & Substitutions
Salmon
Use fresh, center-cut fillets for even cooking. Wild-caught salmon is firmer, farmed is milder.
Substitutes:
Steelhead trout (similar texture)
Cod (leaner, milder flavor)
Butter
Provides flavor without overloading fat content.
Alternatives:
Ghee for lactose-free
Olive oil for lighter fat
Potato
Russets produce fluffy mashed potatoes.
Alternatives:
Yukon Gold for creamier texture
Cauliflower mash for lower carbs
Milk
Use warm milk to prevent lumps.
Alternatives:
Unsweetened almond milk
Low-fat Greek yogurt for extra protein
Equipment Alternatives
No steamer? Microwave broccoli with 1–2 tbsp water in a covered bowl.
No masher? Use a fork or hand mixer at low speed.
Recipe Variations & Serving Suggestions
Flavor Variations
Add a pinch of smoked paprika to potatoes for subtle warmth.
Stir ½ tsp Dijon mustard into the salmon butter for tang.
Add crushed red pepper flakes for mild heat.
Dietary Variations
Lower Carb: Replace potatoes with cauliflower mash.
Dairy-Free: Use olive oil instead of butter, and almond milk in potatoes.
Serving Suggestions
Garnish with lemon wedges and parsley.
Serve with a light side salad for fiber.
Pair with sparkling water or herbal tea for a refreshing finish.
Storage & Make-Ahead
Storage
Store salmon, potatoes, and broccoli separately in airtight containers.
Refrigerate up to 3 days.
Reheating
Gently reheat salmon in a skillet over low heat.
Add a splash of milk to mashed potatoes before reheating.
Steam or quickly microwave broccoli to avoid sogginess.
Make-Ahead
Potatoes can be mashed ahead and reheated with added milk.
Broccoli can be steamed earlier and quickly reheated.
Quality Notes
Salmon is best fresh but remains flavorful for 1–2 days refrigerated. Potatoes may thicken slightly over time.
Nutrition Per Full Plate (Estimated)
Calories: ~500 kcal
Protein: ~40 g
Carbohydrates: ~40 g
Fat: ~18 g
WW points: ~ 3–4 WW points
Dietary Highlights
High-Protein | Lower Fat | Gluten-Free
Allergens
Contains: Fish, Dairy
Frequently Asked Questions
Q: Can I bake the salmon instead?
Yes. Bake at 400°F for 10–12 minutes depending on fillet thickness.
Q: How do I know salmon is done?
The flesh should be opaque and flake easily with a fork. Internal temperature ~125–130°F for medium.
Q: Can I meal prep this?
Yes. Store components separately and reheat gently to maintain texture.
Q: My mashed potatoes are lumpy. What happened?
Likely undercooked or not drained properly. Mash immediately after draining.
Q: Can I freeze this meal?
Salmon and potatoes can be frozen up to 2 months; broccoli is best fresh.
The Story Behind This Plate
This garlic butter salmon plate was designed to deliver rich flavor and high protein while keeping calories and fat lower. It’s a practical, balanced dinner for anyone focused on nutrition without sacrificing taste. The lighter mashed potatoes and minimal butter still provide creamy satisfaction, and the bright broccoli rounds out a complete, mindful meal.
Try It & Share Your Results
Make this high-protein, lower-fat salmon plate and share your version. Did you tweak the seasoning? Substitute the potatoes? Add extra vegetables? Leave a comment or rating to help others enjoy this recipe and share your experience.
Servings: Makes about 1.5 cups (approx. 12 servings)
Ingredients
Blueberries: 3 cups (fresh or frozen)
Chia Seeds: 2 tablespoons
Maple Syrup or Honey: 1–2 tablespoons (adjust to taste)
Lemon Juice: 1 tablespoon (brightens flavor and helps preservation)
Vanilla Extract: ½ teaspoon (optional, for depth)
Instructions
Simmer: Place the blueberries in a small saucepan over medium heat. Cook for about 5–8 minutes, stirring occasionally, until the berries burst and release their juices.
Mash: Use a fork or potato masher to crush the berries to your preferred consistency (leave some chunks for texture or mash thoroughly for a smoother jam).
Sweeten & Brighten: Stir in the maple syrup (or honey) and lemon juice. Remove from heat.
Thicken: Stir in the chia seeds and vanilla extract.
Set: Let the mixture sit for at least 10 minutes. The chia seeds will absorb the liquid and thicken the mixture into a jam-like consistency.
Store: Once cooled, transfer to a glass jar. It will continue to thicken as it chills in the fridge.
Notes & Tips
The “Gel” Factor: If the jam isn’t thick enough after 10 minutes, stir in an extra teaspoon of chia seeds and wait a bit longer.
Sweetness Check: Taste the jam before adding the chia seeds. Depending on how ripe your berries are, you may want more or less sweetener.
Frozen vs. Fresh: Both work perfectly! If using frozen, you may just need an extra minute or two of simmering time.
Nutritional Info (Per 2-tablespoon serving)
Nutrient
Amount
Calories
35 kcal
Total Fat
1g
Fiber
2g
Sugars
4g (mostly natural)
Protein
1g
Benefits of This Jam
Omega-3s: Chia seeds are one of the best plant-based sources of alpha-linolenic acid (ALA).
Antioxidant Powerhouse: Blueberries are loaded with anthocyanins, which support heart health and brain function.
Low Glycemic: Unlike traditional jam (which is often 50% sugar), this version won’t cause a massive blood sugar spike.
Q&A
Q: How long does it last?
A: Because it lacks the heavy sugar used as a preservative in traditional jams, this stays fresh in the fridge for 7–10 days.
Q: Can I freeze it?
A: Yes! It freezes beautifully for up to 3 months. Just leave a little headspace in the jar so it can expand.
Q: Can I use other fruit?
A: Absolutely. This method works great with raspberries, blackberries, or strawberries (just chop the strawberries first).
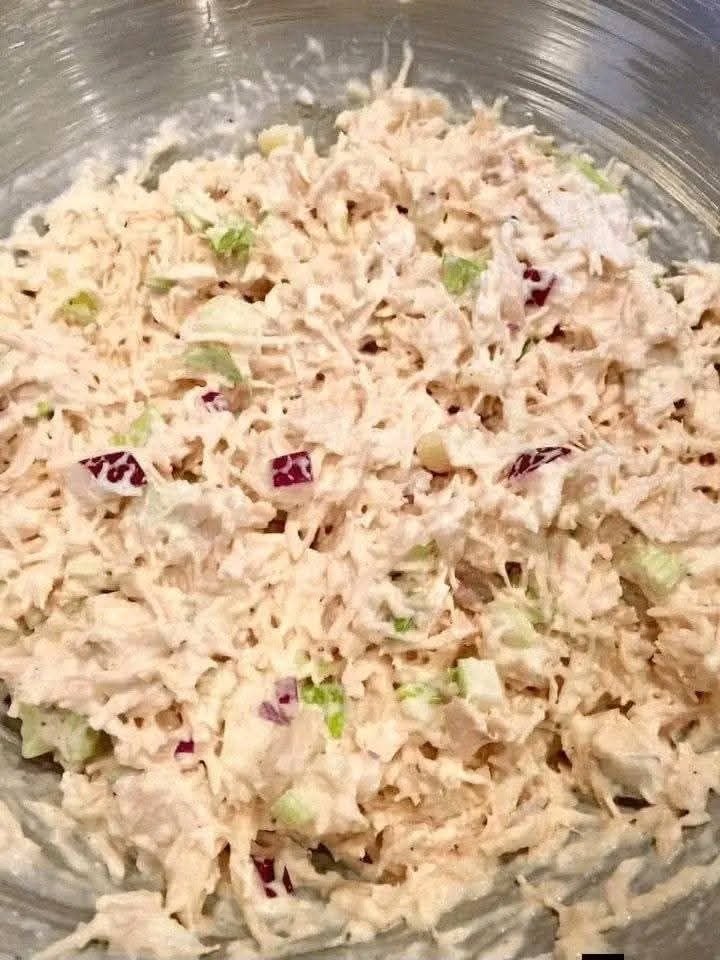
A light, protein-packed chicken salad that’s creamy, flavorful, and perfect for weekly meal prep. Made with lean ingredients and fresh herbs, it stays satisfying without feeling heavy—easy to enjoy again and again.
Description
This chicken salad swaps traditional mayo-heavy dressing for a lighter, protein-rich base while keeping all the comfort and flavor you expect. It’s creamy, savory, and versatile—perfect on lettuce wraps, sandwiches, or straight from the bowl. Ideal for meal prep, it stores well and tastes even better after chilling.
Ingredients
Base
3 cups cooked chicken breast, finely chopped or shredded
¾ cup plain non-fat Greek yogurt
2 tbsp light mayonnaise (optional but boosts flavor)
Flavor Boosters
1 tsp Dijon mustard
1–2 tsp lemon juice or apple cider vinegar
½ tsp garlic powder
½ tsp onion powder
Crunch & Freshness
¼ cup finely diced celery
2–3 tbsp chopped green onions or fresh parsley
Seasoning
Salt and black pepper to taste
Instructions
Prep the chicken Make sure the chicken is fully cooled, then chop or shred finely for a smooth, scoopable texture.
Mix the dressing In a large bowl, whisk together Greek yogurt, light mayo (if using), Dijon mustard, lemon juice, and seasonings.
Combine Fold in chicken, celery, and herbs until evenly coated.
Taste & adjust Add more salt, pepper, or acidity if needed.
Chill Refrigerate at least 30 minutes before serving for best flavor.
Tips & Notes
Extra creamy: Blend half the yogurt before mixing
More crunch: Add diced pickles or water chestnuts
Herb swap: Dill works great if you want a classic deli vibe
Meal prep friendly: Keeps well for up to 4 days refrigerated
Servings
Makes 4–5 servings
Serving size: ~¾ cup
Approximate Nutritional Info (per serving)
(Estimates vary by brand)
Calories: ~140
Protein: ~22g
Fat: ~2–3g
Carbs: ~3g
Many people consider this “zero-point style” when using non-fat yogurt and very lean chicken, depending on their tracking system.
Benefits
High protein for fullness
Lower fat than traditional chicken salad
Easy to prep ahead
Customizable flavors
Works for wraps, bowls, or sandwiches
Q & A
Q: Can I skip the mayo completely? A: Yes! It will still be creamy—just slightly tangier.
Q: Can I use rotisserie chicken? A: You can, but skinless breast meat keeps it lighter.
Q: Is this freezer-friendly? A: Not recommended—Greek yogurt can change texture when frozen.
Q: How long does it last in the fridge? A: 3–4 days in an airtight container.
1 tbsp vital wheat gluten (boosts protein and chewiness, optional)
Seeds for topping (sesame, flax, poppy, optional)
Instructions
Mix dry ingredients
In a large bowl, combine high-protein flour, instant yeast, salt (if using), and vital wheat gluten (if using). Stir to evenly distribute.
Add water and oil
Pour in warm water and olive oil (if using). Mix with a spoon or your hands until a sticky, shaggy dough forms.
Knead dough
Transfer dough to a lightly floured surface and knead 5–7 minutes until smooth and elastic. Alternatively, use a stand mixer with a dough hook.
First rise
Place dough in a lightly oiled bowl, cover with a clean towel or plastic wrap, and let rise in a warm spot for 1–2 hours or until doubled in size.
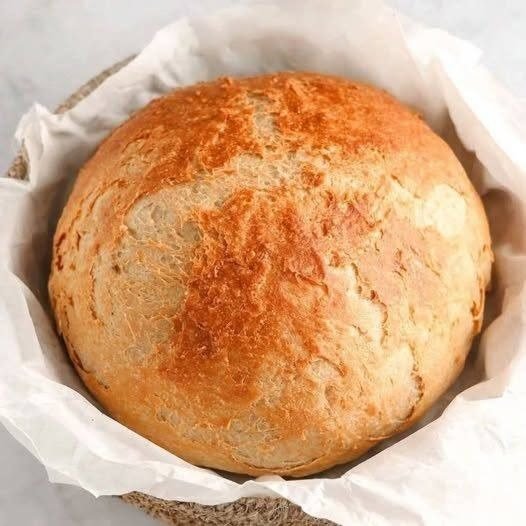
Shape loaf
Gently punch down dough, shape into a round loaf, and place on parchment paper. Cover loosely and let rest for 30 minutes.
Preheat oven
Preheat a Dutch oven (or heavy oven-safe pot with lid) in the oven at 450°F (230°C) for at least 30 minutes.
Bake bread
Carefully transfer loaf (with parchment) into the hot Dutch oven. Score the top with a sharp knife or razor. Cover with the lid and bake 30 minutes.
Finish baking
Remove the lid and bake an additional 15 minutes for a deep golden, crusty exterior.
Cool completely
Transfer bread to a wire rack and allow to cool fully before slicing. This step preserves the crust crunch.
Optional topping
Brush crust with olive oil or melted butter and sprinkle seeds before baking for added flavor and texture.
Ingredient Details & Tips
High-protein flour: Provides structure, chewiness, and extra protein.
Vital wheat gluten: Optional, but boosts protein and improves crumb texture.
Yeast: Warm water activates it, but avoid water over 110°F to prevent killing the yeast.
Olive oil: Adds softness but can be omitted for a lower-point loaf.
Seeds for topping: Add nutrition, crunch, and visual appeal; sesame, flax, or poppy seeds work well.
Substitutions:
All-purpose flour can replace high-protein flour, though protein content will be lower.
Skip olive oil for a denser, lower-fat loaf.
Replace up to 25% of flour with whole wheat flour for added fiber.
Equipment Alternatives:
Stand mixer instead of kneading by hand.
Baking stone instead of Dutch oven (cover loaf with a heatproof bowl for steam).
Recipe Variations & Serving Suggestions
Flavor twists: Add 1 tsp garlic powder or dried herbs to dough.
Seed mix: Sprinkle pumpkin or sunflower seeds on top for crunch.
Protein boost: Add 1–2 tbsp protein powder or extra vital wheat gluten.
Serving Ideas:
Slice for sandwiches or toast for breakfast.
Pair with soups, stews, or salads.
Storage, Make-Ahead & Reheating
Storage: Airtight container at room temperature for 2–3 days.
Freezing: Slice and freeze for up to 2 months; thaw at room temperature.
Reheating: Warm slices in a 350°F oven for 5–7 minutes or toast.
Nutrition Facts (per slice, 10 slices total)
Nutrient
Amount
Calories
90 kcal
Protein
5 g
Carbohydrates
16 g
Fiber
2 g
Fat
1 g
WW Points
1.5
Dietary Highlights: High-protein, low-point, vegetarian, low-fat option if oil omitted.
Frequently Asked Questions (FAQ)
Q: Can I use cold water instead of warm water? A: Warm water activates the yeast faster. Cold water may delay rising.
Q: Can I use regular all-purpose flour? A: Yes, but protein content and chewiness will be slightly reduced.
Q: Can I skip the Dutch oven? A: Yes, bake on a parchment-lined sheet; cover with an oven-safe bowl for initial steam if desired.
Q: How do I know when bread is done? A: Crust should be golden brown, and loaf should sound hollow when tapped underneath.
Personal Notes
This WW-friendly artisan bread was created to combine high protein, low points, and real bread texture. Optional vital wheat gluten and olive oil create a chewy, satisfying loaf with a crisp crust that feels bakery-fresh. Perfect for weekday breakfasts or healthy sandwiches.
If you want, I can also create a “15-minute quick version” of this WW-friendly bread with macros and WW points, so you can get a sandwich-ready loaf in under 20 minutes.
Add the grated ginger. Let it sit for 3–5 minutes so the flavor releases.
Add mint leaves and gently press them with a spoon to release the aroma.
Pour in cold water and mix well.
Add honey if you prefer a lightly sweet taste.
Drop in ice cubes and lemon slices. Stir and serve immediately.
How It Works (Healthy Explanation)
This drink hydrates the body, boosts digestion, increases vitamin C intake, and may support natural metabolism. Lemon supports detoxification, ginger may help digestion, and mint soothes the stomach. It’s not a miracle fat burner, but it can support a healthy routine when paired with a balanced diet.
Q&A (350 Words Total Including Recipe Above)
Q1: Does this drink really burn fat?
It can assist your body by improving hydration, digestion, and metabolism, but no drink alone burns fat dramatically. Sustainable weight loss comes from combining such drinks with healthy eating and activity.
Q2: How many times should I drink it?
Once daily is enough—preferably in the morning on an empty stomach or 30 minutes before breakfast.
Q3: Can I drink it at night?
Yes, but ginger may feel stimulating for some people. If you are sensitive, drink it earlier in the day.
Q4: How long should I use this drink?
You can safely use it for 2–4 weeks. Take a break afterward if needed.
Q5: Can it help reduce belly fat?
It may help reduce bloating and improve digestion. Real belly fat reduction requires a calorie deficit over time.
Q6: Who should avoid it?
People with citrus allergies, acid reflux, or stomach ulcers should limit lemon and ginger. Pregnant individuals should moderate ginger.
Q7: Can I store this drink?
Fresh is best. But you can prepare a larger batch and refrigerate for up to 24 hours.
Q8: Can I add cucumber?
Yes! Cucumber can improve hydration and enhance the detox effect.
If you want, I can also create a stronger version, a warm version, or a 7-day plan.
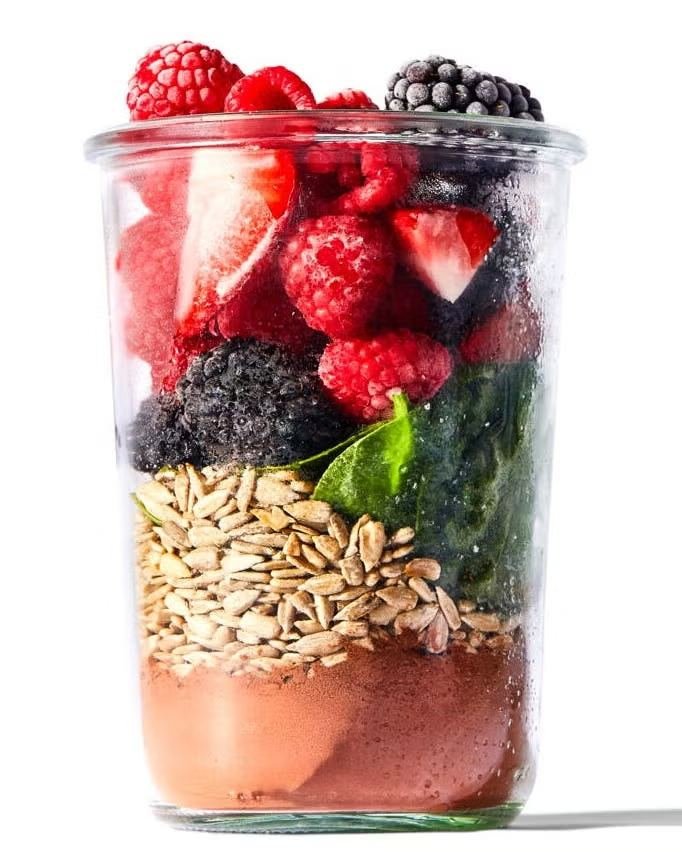
Based on the visual layers in the jar, this is a Chocolate Berry Power Smoothie prep. It is designed to be nutrient-dense, balancing antioxidants from berries with healthy fats and plant-based protein.
Here is the detailed recipe based on the ingredients shown.
Ingredients List
(Estimated for a 16 oz / 500 ml jar)
Top Layer: 1 cup mixed frozen berries (Raspberries, Blackberries, and Strawberries).
Middle Layer: ½ cup fresh baby spinach.
Crunch Layer: ¼ cup raw sunflower seeds (or sliced almonds).
Base Layer: 1-2 scoops chocolate protein powder (or 2 tbsp cacao powder + 1 tbsp chia seeds).
Liquid (Add when blending): 1 cup unsweetened almond milk, oat milk, or water.
Step-by-Step Instructions
1. Prep the Jar (As Pictured)
If you are meal-prepping this for later, layer the ingredients in this specific order to keep things fresh:
Powder first: Place your protein or cacao powder at the very bottom.
Seeds/Grains: Add the sunflower seeds; these act as a barrier between the powder and the “wet” greens.
Greens: Pack in the spinach tightly.
Fruit: Top with the frozen berries. The coldness of the berries helps keep the greens crisp.
2. Blend
When you are ready to eat:
Dump the contents of the jar into a high-speed blender.
Add 1 cup of your preferred liquid.
Optional: Add a half-frozen banana or ¼ avocado if you prefer a creamier, thicker texture.
Blend on high for 45–60 seconds until the seeds and spinach are completely pulverized.
Nutritional Highlights
Ingredient
Benefit
Mixed Berries
High in Vitamin C and fiber; low glycemic index.
Sunflower Seeds
Excellent source of Vitamin E and healthy fats for brain health.
Spinach
Rich in iron and Vitamin K without altering the flavor.
Cacao/Protein
Provides magnesium and essential amino acids for muscle recovery.
Pro Tip: If you find the smoothie isn’t sweet enough, add two pitted Medjool dates or a teaspoon of honey before blending.
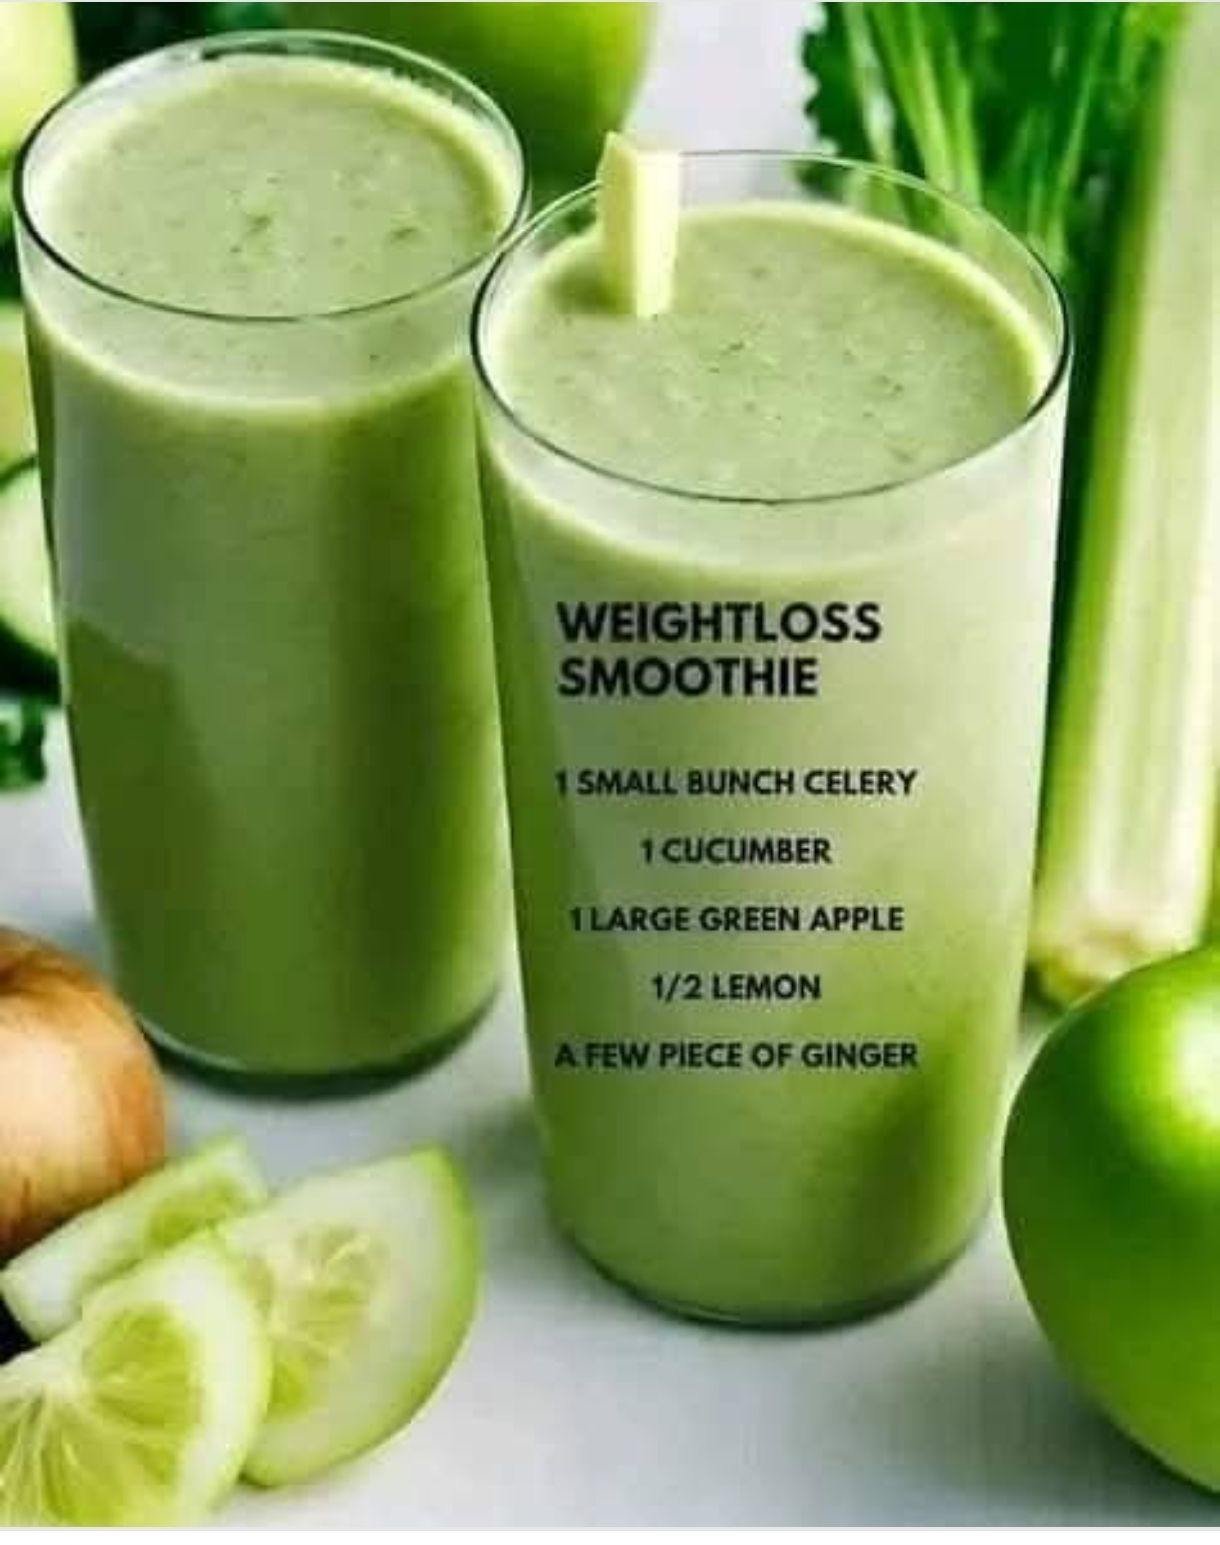
This refreshing green weight loss smoothie is a nutrient-rich, low-calorie drink designed to support digestion, hydration, and healthy weight management. Made with fresh vegetables and fruit, it is naturally detoxifying and perfect for starting your day or enjoying as a light meal replacement.
Ingredients
1 small bunch of fresh celery (washed and trimmed)
1 medium cucumber (peeled if desired)
1 large green apple (cored, skin on)
Juice of ½ fresh lemon
A few small pieces of fresh ginger (about ½ inch)
1 cup cold water or coconut water (adjust as needed)
Optional: a few ice cubes for extra freshness
Preparation Method
Begin by thoroughly washing all fruits and vegetables to remove any dirt or residue. Chop the celery into small pieces so it blends smoothly. Slice the cucumber and green apple into chunks. Peel the ginger lightly and cut it into small pieces to prevent overpowering the flavor.
Add the celery, cucumber, green apple, ginger, and lemon juice into a high-speed blender. Pour in cold water or coconut water to help blend the ingredients evenly. Blend on high speed for 30–60 seconds until the smoothie becomes creamy and smooth. If you prefer a thinner consistency, add more water and blend again.
Pour the smoothie into a tall glass and serve immediately for maximum freshness and nutritional value.
Health Benefits
This smoothie is packed with fiber, which helps keep you full for longer and reduces unnecessary snacking. Celery and cucumber are extremely low in calories and high in water content, supporting hydration and bloating reduction. Green apple adds natural sweetness along with vitamins and antioxidants. Lemon juice boosts metabolism and aids digestion, while ginger helps improve gut health and reduces inflammation.
When to Drink
For best results, drink this smoothie in the morning on an empty stomach or as a light lunch. It can also be enjoyed after exercise to refresh and rehydrate the body.
Tips
Avoid adding sugar; the apple provides enough natural sweetness
Drink fresh—do not store for long periods
Combine with a balanced diet and regular exercise for effective weight loss results
This green smoothie is simple, healthy, and ideal for anyone looking to detox naturally while supporting weight loss goals.

 Quick and budget-friendly
 Instructions
 Bring water to a gentle boil.
 Add cloves (and optional ingredients).
 Simmer 5 minutes, then remove from heat.
 Carefully pour into a heat-safe bowl.
 Sit comfortably, lean over the bowl.
 Drape a towel over your head to trap steam.
 Inhale gently for 5–10 minutes (keep eyes closed).
 Keep face 8–12 inches from the water to avoid burns.
 Helps loosen mucus
 May ease stuffy nose
 Clove contains natural antimicrobial compounds
 Promotes relaxation
 Warm steam supports sinus drainage
 Stronger flavor? Simmer longer or add more ginger
 Great cold for summer, warm for digestion
 Add a small drizzle of honey if needed (optional)
 Shake before drinking if infused overnight


 Recipe Overview
 Ingredients
 Instructions
 Notes & Tips
 Nutritional Info (Per 2-tablespoon serving)
 Benefits of This Jam
 Q&A
Q&A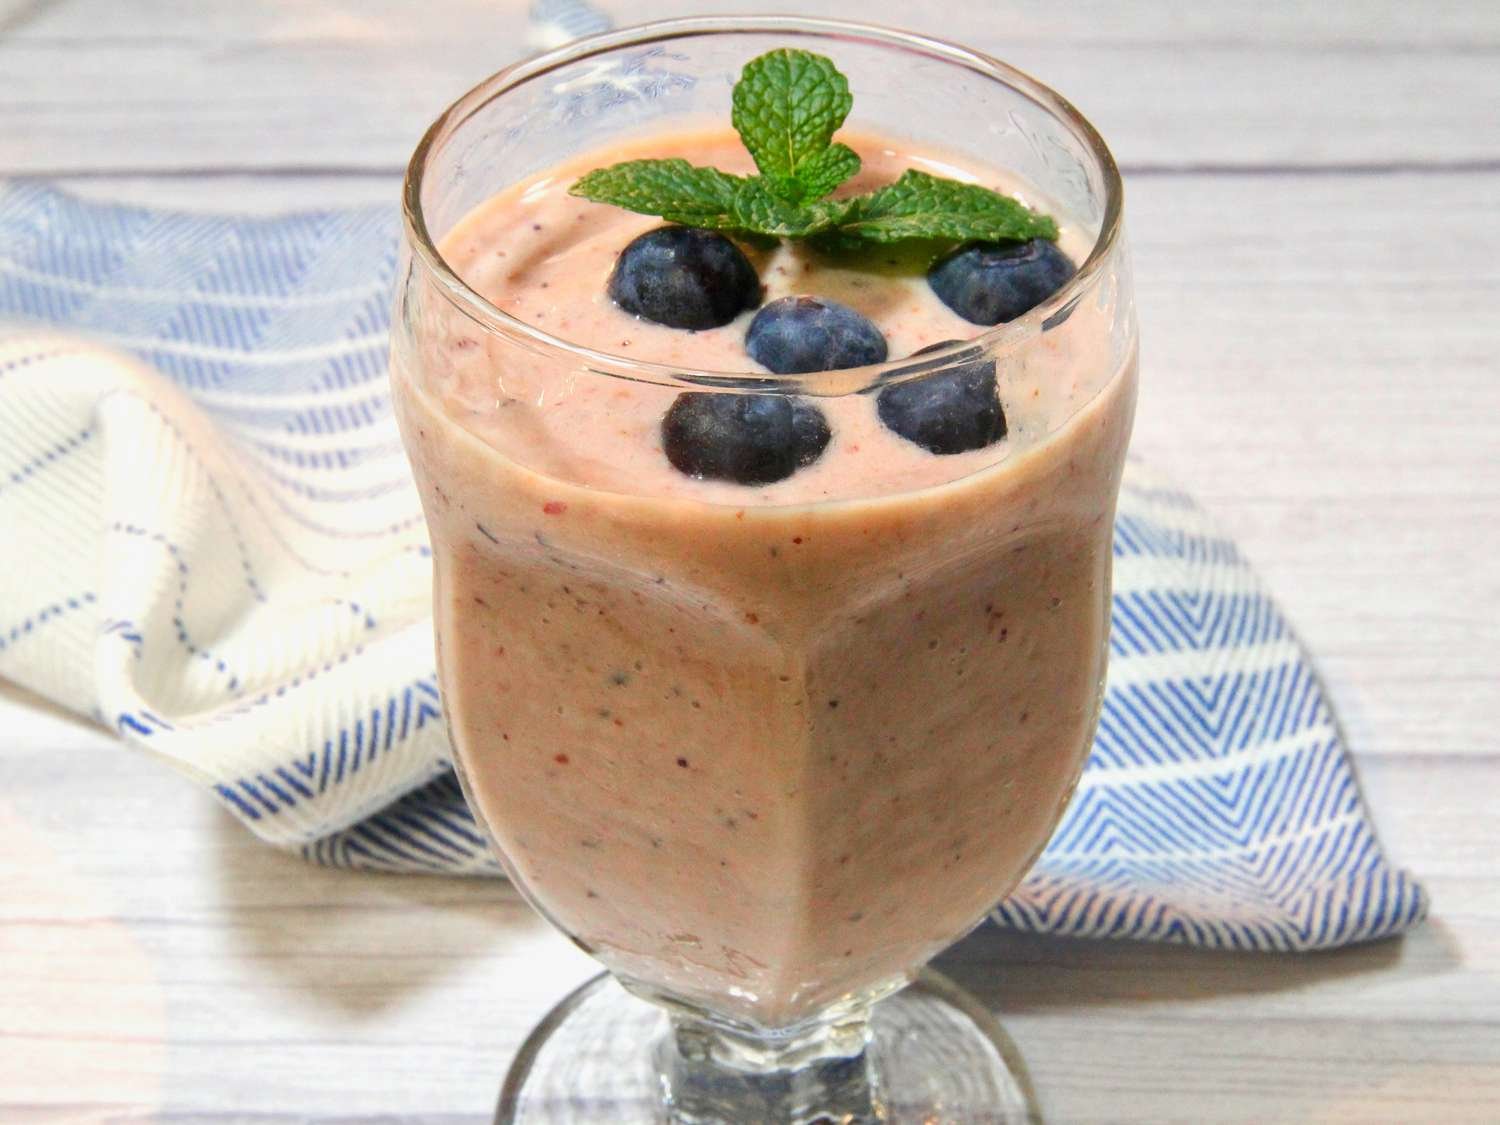


 Strong Fat-Burning Detox Drink — Full Recipe
 Q&A (350 Words Total Including Recipe Above)