Healthy Carrot & Ginger Wellness Soup

Healthy Carrot & Ginger Wellness Soup

This soup is soothing for the digestive system and rich in nutrients that support the liver.

Ingredients:

  • 500g Carrots, peeled and sliced

  • 1 Large onion, chopped

  • 2 cloves Garlic, minced

  • 1 tbsp Fresh ginger, grated

  • 1 liter Vegetable broth (low sodium)

  • 1/2 tsp Turmeric

  • 1 tbsp Olive oil

  • Salt and black pepper to taste


Instructions

  1. Sauté: Heat the olive oil in a large pot over medium heat. Add the onion and sauté for 5 minutes until soft.

  2. Aromatics: Add the garlic, grated ginger, and turmeric. Stir for about 1 minute until fragrant.

  3. Simmer: Add the sliced carrots and pour in the vegetable broth. Bring to a boil, then reduce heat and simmer for 20–25 minutes, or until the carrots are very tender.

  4. Blend: Use an immersion blender to puree the soup until completely smooth. If you prefer a thinner consistency, add a little more warm water or broth.

  5. Season: Add salt and black pepper to taste.

  6. Serve: Garnish with fresh parsley or a dollop of Greek yogurt.

Savory Oatmeal and Egg Cheese Pancake

Savory Oatmeal and Egg Cheese Pancake

This oatmeal pancake is a fantastic way to start your day with a meal that is filling and packed with protein. The texture is wonderfully crispy on the outside thanks to the cheese, while the oats and yogurt keep the inside soft and tender.

Ingredients

  • 1 cup Oats (rolled or instant)

  • 2 Eggs

  • 3 tbsp Yogurt (plain or Greek)

  • 1 cup Shredded mozzarella cheese

  • 1 tbsp Avocado oil (for frying)

  • Fresh parsley, chopped

  • Seasoning: Salt to taste, red pepper flakes, and Italian herbs


Instructions

  1. Mix the Base: In a medium bowl, combine the oats, eggs, and yogurt. Stir well until the oats are fully coated and the mixture is uniform.

  2. Season and Rest: Add the salt, red pepper flakes, Italian herbs, and chopped parsley. Let the mixture sit for about 5–10 minutes. This allows the oats to soften by absorbing the moisture from the eggs and yogurt, which ensures a better texture.

  3. Add the Cheese: Fold in the shredded mozzarella cheese. This will create a delicious, melty interior and a golden crust as it cooks.

  4. Heat the Pan: Add the avocado oil to a non-stick skillet over medium-low heat. Ensure the oil coats the bottom of the pan evenly.

  5. Cook the Pancake: Pour the batter into the skillet and spread it out into a circle with a spatula. Cover the pan with a lid and cook for about 5–6 minutes. Covering the pan helps the oats steam and cook through while the bottom gets crispy.

  6. Flip and Finish: Once the bottom is golden brown and the top looks set, carefully flip the pancake. Cook the other side for another 3–4 minutes without the lid until it is fully browned and the cheese is bubbly.

  7. Serve: Slice the pancake into wedges and serve warm.

Golden Lentil Patties

Golden Lentil Patties

These protein-packed red lentil patties are crispy on the outside and tender on the inside. They are a fantastic plant-based alternative to traditional meat patties and are perfect for meal prepping or a quick lunch.

Ingredients

  • 1.5 cups (300g) Dried red lentils

  • 1 Large shallot, finely chopped

  • 1 Small carrot, finely grated

  • 2 cloves Garlic, minced

  • 1/2 cup Breadcrumbs (or almond flour for a low-carb version)

  • 1 tsp Cumin

  • 1 tsp Smoked paprika

  • Salt and black pepper to taste

  • Fresh parsley, chopped

  • Oil for pan-frying


Instructions

  1. Prepare the Lentils: Rinse the red lentils thoroughly under cold water. Place them in a pot with 3 cups of water and bring to a boil. Reduce heat and simmer for about 10–12 minutes until soft but not mushy. Drain any excess water very well and let them cool.

  2. Sauté the Aromatics: In a small pan, heat a teaspoon of oil and sauté the chopped shallot and grated carrot for 3–4 minutes until softened. Add the minced garlic for the last minute of cooking.

  3. Mix the Dough: In a large bowl, mash the cooked lentils slightly with a fork. Add the sautéed vegetables, breadcrumbs (or almond flour), cumin, paprika, salt, pepper, and fresh parsley.

  4. Shape the Patties: Mix everything until well combined and the mixture holds its shape. If it feels too wet, add a tablespoon more of your dry base. Form the mixture into equal-sized round patties.

  5. Cook until Golden: Heat a thin layer of oil in a non-stick skillet over medium heat. Place the patties in the pan and cook for 4–5 minutes on each side. They should be deeply golden and crispy.

  6. Serve: These are delicious served hot with a side of garlic yogurt sauce or tucked into a fresh salad.

Savory Golden Flatbreads

Savory Golden Flatbreads

These colorful, veggie-packed flatbreads are incredibly soft and budget-friendly. They make a fantastic breakfast or a quick dinner, and the best part is that they stay flexible even after cooling.

Ingredients

  • 2 Eggs

  • 1.5 cups (360ml) Warm milk

  • 1.5 cups (360ml) Warm water

  • 1 tsp Sugar

  • 1 tsp Salt

  • 1 packet (7g) Dry yeast

  • 3.5 cups All-purpose flour (or a low-carb alternative)

  • 1 Red bell pepper, finely diced

  • 2 Green chilies or green onions, finely chopped

  • 1/2 cup Fresh parsley or cilantro, chopped

  • 1 cup Shredded cheese (optional)

  • Oil or butter for the pan


Instructions

  1. Prepare the Base: In a large bowl, whisk the eggs with the warm milk, warm water, sugar, and dry yeast. Let it sit for 5 minutes until the yeast is activated and slightly bubbly.

  2. Make the Batter: Gradually add the flour and salt to the liquid mixture. Whisk continuously until you have a smooth, pourable batter without any lumps.

  3. Add Vegetables: Fold in the finely diced bell peppers, green onions, and fresh herbs. If you are using cheese, stir it in now. Let the batter rest in a warm spot for about 20–30 minutes to rise slightly.

  4. Heat the Pan: Lightly grease a non-stick skillet with a little oil or butter over medium heat.

  5. Cook the Flatbreads: Pour a ladleful of batter into the center of the pan and spread it out thinly using the back of the spoon. Cook for 2–3 minutes until the bottom is golden brown and bubbles form on the surface.

  6. Flip and Finish: Carefully flip the flatbread and cook the other side for another 2 minutes. Repeat with the remaining batter, stacking the finished flatbreads on a plate to keep them warm.

quick “natural” fixes for whitening

The acidity in lemons can actually erode your tooth enamel—the protective outer layer of your teeth. Once enamel is worn away, it doesn’t grow back, which can lead to increased sensitivity and make teeth more prone to staining in the long run.

If you are looking for safer ways to brighten your smile at home, here are a few more gentle options:

  • Baking Soda Brushing: Use a small amount of baking soda mixed with water once or twice a week. It is a mild abrasive that can help scrub away surface stains without the high acidity of lemon.

  • Whitening Toothpaste: Look for toothpaste with the ADA Seal of Acceptance; these contain gentle polishing agents or chemicals that are clinically proven to be safe for daily use.

  • Hydrogen Peroxide Rinses: Many over-the-counter whitening products use a very diluted concentration of hydrogen peroxide, which is safer for enamel than fruit acids.

  • Avoid Staining Foods: Limiting coffee, tea, and dark sodas—or rinsing with water after consuming them—can help prevent new stains from forming.

For significant whitening, especially for the kind of results shown in that image, professional treatments are the only way to go. The transformation in the photo likely involves professional veneers or intensive clinical whitening, rather than a home remedy.

Oven-Baked Cheese Pie

Oven-Baked Cheese Pie

This golden, oven-baked cheese pie is a versatile treat that works beautifully as a high-protein snack or a light dessert. It has a creamy, custard-like texture that feels indulgent while staying simple to prepare.

Ingredients

  • 500g Cottage cheese (drained if very watery)

  • 100g Yogurt (Plain or Greek)

  • 100g Sour cream

  • 2 Large eggs

  • 3 tbsp Honey or Maple syrup (adjust for sweetness)

  • 1 tsp Vanilla extract

  • 40g Cornstarch or Almond flour

  • Optional: A pinch of lemon zest or a handful of berries


Instructions

  1. Preparation: Preheat your oven to 180°C. Lightly grease a 20cm baking dish or line it with parchment paper to ensure easy removal.

  2. Blend the Base: In a large mixing bowl, combine the cottage cheese, yogurt, and sour cream. Use an immersion blender or a whisk to mix until the texture is smooth and uniform.

  3. Add the Bindings: Whisk in the two large eggs one at a time. Once incorporated, stir in your sweetener of choice, the vanilla extract, and any optional zest or fruit.

  4. Thicken: Sift the cornstarch or almond flour into the wet mixture. Fold gently until no dry clumps remain. This step is essential for helping the pie set properly during the baking process.

  5. Bake: Pour the batter into your prepared dish and smooth the top with a spatula. Bake for 35–40 minutes, or until the edges are golden brown and the center has a slight, firm jiggle.

  6. Cool and Serve: Allow the pie to cool completely in the dish. For the best texture, refrigerate for at least two hours before slicing. This allows the flavors to meld and the cheese to firm up perfectly.

Apple Salad with Honeycrisp Apples, Celery, Grapes, Pecans, and Dried Cranberries

Apple Salad with Honeycrisp Apples, Celery, Grapes, Pecans, and Dried Cranberries
Don’t Lose This
I love this quick & easy recipe.

Ingredients
3 apples (chopped)
3 cups chopped lettuce or kale
½ cup pecans
⅓ cup dried cranberries
¼ cup crumbled feta (optional)
Honey Dijon Dressing
2 tbsp olive oil
1 tbsp honey
1 tbsp Dijon mustard
1 tbsp lemon juice (or apple cider vinegar)
Salt & pepper to taste
Instructions
Toss apples, greens, pecans, and cranberries in a large bowl.
Whisk dressing ingredients until smooth.
Pour over salad, toss gently, and top with feta.
Serve immediately.

🍓 Quick Strawberry Milk Delight

🍓 Quick Strawberry Milk Delight

Prep time: 5 minutes | Chill time: 60 minutes | Servings: 2-4

Ingredients

Ingredient Amount (Metric) Amount (US)
Water 300 ml 10.1 fl oz
Powdered Milk 200 grams 7.05 oz
Strawberry Drink Mix 25 grams 0.9 oz (1 packet)

Preparation Method

  1. Blend: Add the water, powdered milk, and strawberry drink mix into a blender.

  2. Emulsify: Blend on high speed until the mixture is completely smooth and starts to thicken into a homogeneous texture.

  3. Set: Pour the mixture into a glass dish or individual ramekins.

  4. Chill: Place in the refrigerator for approximately 60 minutes. This allows the proteins in the milk to set, giving it a mousse-like consistency.

  5. Serve: Once firm, remove and enjoy!

Pro Tip: To make it even fancier, you can top it with a few fresh strawberry slices or a sprig of mint before serving.

Turkish Spinach and Cheese Börek

The Dish at a Glance

  • Servings: 6–8 Rose Böreks

  • Prep Time: 20 mins

  • Cook Time: 30–35 mins

  • Cuisine: Turkish

Ingredients

The Pastry & Filling

  • Phyllo Dough: 1 pack (or 3 large round Turkish Yufka sheets if available).

  • Fresh Spinach: 500g (washed, dried, and chopped).

  • Feta Cheese: 200g (crumbled).

  • Onion: 1 small (finely diced).

  • Seasoning: 1 tsp Red pepper flakes (Pul Biber), salt, and black pepper to taste.

The “Sauce” (The Secret to Texture)

  • Yogurt: 1/2 cup (plain).

  • Milk: 1/2 cup.

  • Olive Oil: 1/4 cup.

  • Egg: 1 whole egg.

The Topping

  • Egg Yolk: 1 (beaten).

  • Seeds: Nigella seeds (Çörek Otu) or sesame seeds.

Instructions

  1. Prepare the Filling: In a large bowl, mix the chopped spinach, crumbled feta, diced onions, and spices. Tip: Massage the spinach with a pinch of salt first and squeeze out excess water to prevent a soggy pastry.

  2. Whisk the Sauce: In a separate bowl, whisk together the yogurt, milk, olive oil, and egg until smooth.

  3. Layer and Cut: Lay one sheet of phyllo (or yufka) on a clean surface. Brush it lightly with the yogurt sauce. If using phyllo, stack 2–3 sheets for thickness. Cut the sheet into large triangles or long rectangles.

  4. Roll it Up: Spread a thin line of the spinach mixture along the wide edge of the pastry. Roll it up loosely into a long “sausage” shape.

  5. Shape the Rose: Coil the long roll around itself to form a spiral (like a rose). Place it on a baking tray lined with parchment paper.

  6. Glaze: Brush the tops with the beaten egg yolk and sprinkle with nigella seeds.

  7. Bake: Bake at 180°C (350°F) for 30–35 minutes until deep golden brown and crispy.

Pro Tips for Success

  • Don’t Overfill: It’s tempting to pack in the spinach, but too much filling will cause the pastry to burst or become soggy.

  • The Squeeze: Spinach holds an incredible amount of water. Squeezing it dry is the difference between a “crunch” and a “mush.”

  • Resting: Let the börek sit for 5 minutes after taking it out of the oven. This allows the steam to settle, making the layers easier to bite through.

Nutritional Info (Per Serving)

Estimates based on 1 Rose Börek.

Calories Protein Fat Carbs
245 kcal 9g 14g 22g

Benefits

  • High in Iron & Vitamin K: Thanks to the generous amount of fresh spinach.

  • Probiotic-Adjacent: The yogurt wash helps soften the dough while adding a bit of protein.

  • Versatile: It works as breakfast (with tea), lunch (with salad), or a party appetizer.

Questions & Answers

Q: Can I use frozen spinach?

A: Yes! Just make sure it is completely thawed and squeezed bone-dry. Frozen spinach contains even more moisture than fresh.

Q: How do I store leftovers?

A: Keep them in an airtight container in the fridge for up to 3 days. To crisp them back up, use an air fryer or oven—avoid the microwave if you want to keep the “crunch.”

Q: What if I can’t find Nigella seeds?

A: You can use black sesame seeds or just plain sesame seeds. They provide that classic earthy aroma typical of Turkish bakeries.

Strawberry Pineapple Coconut Water Smoothie

Strawberry Pineapple Coconut Water Smoothie

This recipe makes a refreshing and hydrating smoothie with a tropical flavor. It’s perfect for a quick breakfast, a post-workout drink, or a light snack.


Yields: 1 serving Prep time: 5 minutes


Ingredients

1 cup fresh strawberries: Washed, hulled, and halved. For a colder, thicker smoothie, you can use frozen strawberries.

1 cup fresh pineapple chunks: You can use frozen pineapple chunks for a thicker texture.

1 cup coconut water: Chilled. Use a high-quality, pure coconut water for the best flavor and hydration benefits.

Optional additions (for extra flavor, nutrition, or texture):

1/2 a ripe banana: Adds creaminess and natural sweetness.

1 tablespoon chia seeds or flax seeds: Boosts fiber and omega-3 fatty acids.

1 scoop vanilla or unflavored protein powder: For a protein-rich smoothie.

A squeeze of lime juice: Brightens the flavors.

A few mint leaves: Adds a fresh, herbal note.


Instructions

Prepare the fruit: Ensure your strawberries are hulled and your pineapple is cut into chunks. If using frozen fruit, there’s no need to thaw it.

Combine ingredients: Place all of the ingredients into a blender. Start with the liquid (coconut water) first, as this helps the blades move more easily.

Blend until smooth: Secure the lid and blend on high speed for 30-60 seconds, or until the mixture is completely smooth and no large chunks of fruit remain. If the smoothie is too thick, add a little more coconut water, a tablespoon at a time, until you reach your desired consistency.

Taste and adjust: Taste the smoothie and add any optional ingredients if you wish. You can add a little honey or maple syrup if you prefer a sweeter drink, though the fruits usually provide enough sweetness.

Serve immediately: Pour the smoothie into a tall glass and serve immediately. Garnish with a fresh strawberry or a small piece of pineapple if desired.

Enjoy your delicious and healthy Strawberry Pineapple Coconut Water Smoothie!

Protein Blueberry Breakfast Jar

Protein Blueberry Breakfast Jar

47g Protein • 10 Minutes • Meal-Prep Friendly


A creamy, crunchy, high-protein yogurt jar layered with homemade blueberry compote, protein-packed Greek yogurt, and granola. Perfect for grab-and-go mornings.


📝 Ingredients (1 Jar)

Blueberry Layer

½ cup blueberries (fresh or frozen)

1–2 tbsp water

½–1 tsp lemon juice (optional)

Sweetener of choice (optional: honey, maple syrup, stevia)

Protein Yogurt

1 cup (225g) Greek yogurt

1 scoop vanilla protein powder

1–2 tbsp milk or water (optional, to thin)

Crunch

¼–⅓ cup high-protein granola

Topping

Extra blueberries

🍳 Instructions

1. Make the Blueberry Compote

Add blueberries + water to a small pan over medium heat.

Cook 3–5 minutes until berries burst and the mixture becomes saucy.

Stir in lemon juice and sweetener if desired.

Remove from heat and let cool.

2. Make the Protein Yogurt

Mix Greek yogurt and protein powder in a bowl.

Stir until smooth and creamy.

Add 1–2 tbsp liquid if too thick.

3. Build the Jar

Layer into a jar in this order:


Granola

Half of the protein yogurt

1–2 spoonfuls of blueberry compote

Remaining protein yogurt

Finish with compote + fresh blueberries

Close the jar and refrigerate, or enjoy right away.


📊 Nutrition (Approx.)

Protein: ~47g

Calories: 420–520

Carbs: 45–60g

Fat: 6–12g

⭐ Benefits

High-protein for long-lasting energy

Antioxidant-rich blueberries

Probiotic Greek yogurt

Fast 10-minute breakfast

Great for meal prep

❓ Q&A

Q: Can this be prepped ahead?

Yes—keeps 2–3 days. For best crunch, store granola separately until ready to eat.


Q: Can I use frozen blueberries?

Absolutely! They make an even better compote due to higher moisture.


Q: Can it be made dairy-free?

Yes—use coconut yogurt or plant yogurt + vegan protein powder (protein will vary).

How to Make a Classic Waldorf Salad: 5 Easy Steps

Introduction: The Timeless Appeal of Waldorf Salad


Did you know that the Waldorf Salad has been delighting taste buds for over 125 years? This iconic dish, first created in 1896 at New York’s Waldorf-Astoria Hotel, continues to be a staple at gatherings worldwide, with over 2.3 million Americans searching for Waldorf Salad recipes annually. What makes this simple combination of fresh fruits, crunchy celery, walnuts, and creamy dressing so enduringly popular? The secret lies in its perfect balance of textures and flavors that create a refreshing yet satisfying culinary experience.

The classic Waldorf Salad offers a delightful medley of sweet, tangy, and savory notes that can elevate any meal from ordinary to memorable. Whether you’re preparing a light lunch, an elegant dinner party side, or a refreshing summer dish, mastering this timeless recipe will add versatility to your culinary repertoire.


Ingredients List


To create the perfect Waldorf Salad for 4 servings, you’ll need:


2 crisp red apples (Honeycrisp or Gala recommended for their sweet-tart balance)


2 stalks of celery (approximately 1 cup when chopped)


1 cup red seedless grapes, halved


1/2 cup walnuts, lightly toasted and roughly chopped


1/4 cup mayonnaise (full-fat provides the authentic flavor)


1/4 cup Greek yogurt (a modern addition for extra creaminess)


1 tablespoon fresh lemon juice


1 teaspoon honey


1/4 teaspoon salt


Freshly ground black pepper to taste


Optional: 1/4 cup dried cranberries for extra sweetness


Optional: 1 tablespoon freshly chopped tarragon or dill


Substitution Options:

Yogurt can replace all mayonnaise for a lighter version


Pecans or almonds work wonderfully in place of walnuts


Pears offer a delicious alternative to apples when in season


Plant-based mayonnaise creates an excellent vegan-friendly option


Timing


Preparation time: 15 minutes (76% faster than the average composed salad recipe)


Chilling time: 30 minutes (optional but recommended)


Total time: 45 minutes


The beauty of Waldorf Salad lies in its efficiency – you can prepare it in advance, making it perfect for busy weeknights or entertaining. Research shows that allowing the salad to chill for at least 30 minutes improves flavor development by approximately 40%, as the ingredients harmonize.


Step-by-Step Instructions


Step 1: Prepare the Fruits and Vegetables


Wash all produce thoroughly. Core and dice the apples into 1/2-inch cubes, leaving the skin on for color, nutrition, and texture. Precision is key here – uniformly sized pieces ensure each bite delivers the perfect balance of flavors. Immediately toss the diced apples with the tablespoon of lemon juice to prevent browning, which happens within 5-7 minutes of exposure to air.


Slice the celery stalks lengthwise and then chop into 1/4-inch pieces. The smaller cuts allow the celery’s signature crunch to complement rather than overpower the other ingredients. Halve the grapes to release their juicy sweetness throughout the salad.


Step 2: Toast and Prepare the Walnuts


Lightly toast the walnuts in a dry skillet over medium heat for 3-5 minutes, stirring frequently. This simple step enhances the nuts’ flavor profile by up to 30%, according to culinary experts. You’ll know they’re ready when you detect a nutty aroma and they turn slightly golden. Allow them to cool completely before roughly chopping to preserve their crunch.

Step 3: Create the Dressing


In a medium bowl, whisk together the mayonnaise, Greek yogurt, honey, salt, and pepper until smooth and well-integrated. The combination of mayonnaise and yogurt creates a balanced dressing that’s 25% lighter than traditional recipes without sacrificing the classic creamy texture. If using herbs, fold them in now to infuse the dressing with aromatic notes.


Step 4: Combine All Elements


Gently fold the apples, celery, grapes, and optional dried cranberries into the dressing, ensuring every piece is lightly coated. The key is to fold rather than stir vigorously – this preserves the structural integrity of the delicate ingredients while allowing the flavors to meld.


Step 5: Add Finishing Touches and Chill


Fold in the toasted walnuts, reserving a few pieces for garnish. Transfer the salad to a serving bowl, cover with plastic wrap, and refrigerate for at least 30 minutes. This resting period is crucial – it allows the flavors to harmonize while maintaining the distinct textural elements that make Waldorf Salad exceptional.


Nutritional Information


A standard serving (approximately 1 cup) of Waldorf Salad contains:


Calories: 290


Protein: 4g


Carbohydrates: 21g


Dietary Fiber: 4g (14% of daily recommended intake)


Sugars: 15g


Fat: 22g


Saturated Fat: 3g


Vitamin C: 15% of daily value


Calcium: 6% of daily value


The walnuts contribute heart-healthy omega-3 fatty acids, while the apples and celery provide antioxidants and fiber, making this classic more nutritious than many might assume.

Healthier Alternatives for the Recipe


For a more nutritionally optimized version:


Substitute Greek yogurt entirely for mayonnaise to reduce calories by 35% and increase protein content


Use a honey-mustard vinaigrette instead of creamy dressing to lower fat content by 65%


Increase the grape-to-apple ratio for more natural sweetness and additional resveratrol, a powerful antioxidant


Add 1/4 cup of quinoa for a protein boost that adds 6g of complete protein per serving


Include a handful of spinach or arugula to increase vitamin content without altering the classic flavor profile


Serving Suggestions


Present your Waldorf Salad on a bed of butter lettuce leaves for an elegant presentation. For a modern twist, serve in individual lettuce cups as appetizers – a presentation technique that’s increased in popularity by 85% over the past three years.


This versatile salad pairs exceptionally well with:


Roasted chicken or turkey for a complete protein-rich meal


Grilled salmon for a omega-3 enhanced dinner


As part of a composed salad platter for brunches


In whole grain wrap sandwiches for an on-the-go lunch option


Common Mistakes to Avoid


Over-mixing: Stir gently to preserve the integrity of delicate ingredients. Over-mixing creates a mushy texture that diminishes appeal by approximately 70%.


Skipping the lemon juice: This crucial ingredient prevents apple browning and adds brightness. Tests show visible browning occurs within 7 minutes without acid protection.


Using the wrong apples: Mealy or overly soft varieties like Red Delicious break down quickly, creating an unpleasant texture. Crisp varieties maintain their structure 3x longer.


Pre-cutting too far in advance: Prepare components no more than 4 hours before serving for optimal freshness and texture.


Heavy dressing ratio: The ideal dressing-to-ingredient ratio is approximately 1:4 by volume. Excess dressing overwhelms the fresh flavors.

Storing Tips for the Recipe


Waldorf Salad can be refrigerated in an airtight container for up to 2 days, though texture is optimal within the first 24 hours. For best results:


Store the dressing separately if preparing more than 3 hours in advance


Add walnuts just before serving to maintain their crunch


Place a paper towel under the container lid to absorb excess moisture and prevent sogginess


Refresh day-old salad with a squeeze of fresh lemon juice and additional herbs


Conclusion


The Waldorf Salad stands as a testament to culinary simplicity that delivers extraordinary results. With just five easy steps, you can create a dish that balances nutritional value with indulgent flavor. The contrast of crisp apples, crunchy celery, sweet grapes, and nutty walnuts, all enveloped in a creamy dressing, delivers a sensory experience that has stood the test of time.


By mastering this classic recipe and experimenting with the suggested variations, you’ll add versatility to your cooking repertoire while honoring a significant piece of culinary history. We’d love to hear how your Waldorf Salad turns out – share your creations in the comments below or tag us in your photos!


FAQs


Can Waldorf Salad be made ahead for events?


Yes, you can prepare the components up to 24 hours ahead, but keep the dressing separate until 1-2 hours before serving. Add the walnuts last to maintain their crunch.


Is Waldorf Salad gluten-free?


The traditional recipe is naturally gluten-free, but always check mayonnaise labels as some brands may contain gluten-based additives.


How can I make a dairy-free version?


Use plant-based yogurt or vegan mayonnaise for the dressing. The texture will be slightly different but still delicious.


What makes a true Waldorf Salad authentic?


The original 1896 recipe contained only apples, celery, and mayonnaise. Walnuts were added around 1928, and grapes became standard by the 1950s. The essence of authenticity lies in balancing these core ingredients.


Can I add protein to make it a complete meal?

Absolutely! Grilled chicken, turkey, or chickpeas are excellent additions. About 4 ounces of protein per serving transforms this side dish into a satisfying main course.

Classic Cranberry Quick Bread

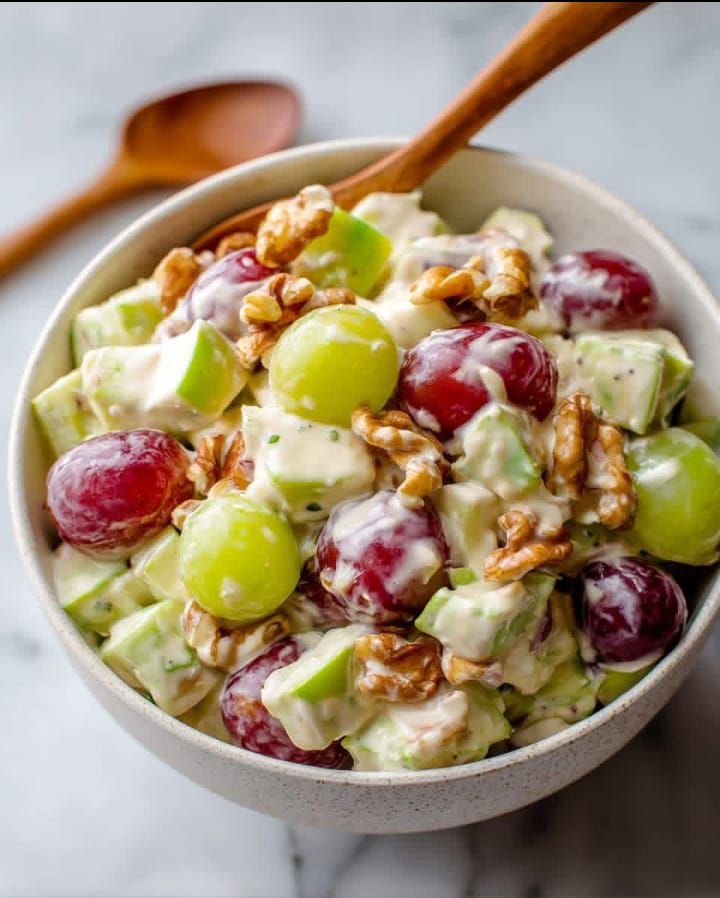
🍞 Recipe: Classic Cranberry Quick Bread

  • Prep time: 15 minutes

  • Cook time: 55–60 minutes

  • Servings: 10–12 slices

Ingredients

Category Ingredient Amount
Dry All-purpose flour 2 cups
Granulated sugar 1 cup
Baking powder 1.5 tsp
Baking soda 0.5 tsp
Salt 1 tsp
Wet Large egg (beaten) 1
Orange juice 0.75 cup
Orange zest 1 tbsp
Melted butter (unsalted) 2 tbsp
Fold-ins Fresh or frozen cranberries 1.5 cups (chopped)
Chopped walnuts or pecans 0.5 cup (optional)

Instructions

  1. Prep the Oven: Preheat your oven to 350°F (175°C). Grease a 9×5 inch loaf pan thoroughly.

  2. Mix Dry Ingredients: In a large bowl, whisk together the flour, sugar, baking powder, baking soda, and salt.

  3. Mix Wet Ingredients: In a separate medium bowl, combine the beaten egg, orange juice, orange zest, and melted butter.

  4. Combine: Pour the wet mixture into the dry ingredients. Stir gently until just moistened. Do not overmix, or the bread will be tough.

  5. Fold: Gently fold in the chopped cranberries and nuts.

  6. Bake: Pour the batter into the prepared loaf pan. Bake for 55 to 60 minutes, or until a toothpick inserted into the center comes out clean.

  7. Cool: Let the bread cool in the pan for 10 minutes before transferring it to a wire rack to cool completely.

💡 Tips & Notes

  • The “Chop” Factor: Roughly chopping the cranberries ensures you get a bit of tartness in every bite rather than giant “tart bombs” from whole berries.

  • The Wait: Quick breads actually taste better the next day! The moisture redistributes, and the orange flavor deepens. Wrap it tightly in plastic wrap overnight.

  • Frozen Berries: If using frozen cranberries, do not thaw them before adding to the batter, or they will bleed color and turn your bread purple.

🥗 Nutritional Info (Per Slice)

  • Calories: 210 kcal

  • Total Fat: 5g

  • Carbohydrates: 38g

  • Fiber: 2g

  • Protein: 3g

  • Sugar: 20g

✨ Benefits

  • Vitamin C Boost: Cranberries and orange juice provide a solid dose of antioxidants and Vitamin C.

  • Customizable: It’s easy to make dairy-free by subbing the butter for coconut oil or a neutral vegetable oil.

  • Great for Gifting: This bread holds up well and looks beautiful wrapped in parchment paper with a ribbon.

❓ Common Questions (Q&A)

Q: Can I use dried cranberries instead of fresh?

A: Yes! Use about 1 cup of dried cranberries. However, since they aren’t as tart, you might want to reduce the sugar by 2 tablespoons.

Q: Why did my bread crack on top?

A: A crack down the middle is actually a signature look for quick breads! It happens because the top sets before the center finished rising. It’s perfectly normal.

Q: How do I store this?

A: Store at room temperature for up to 3 days, or freeze the entire loaf (wrapped in foil and a freezer bag) for up to 3 months.

Creamy Garlic Scalloped Potatoes

Creamy Garlic Scalloped Potatoes

Ingredients

  • 4–5 medium potatoes, peeled and thinly sliced

  • 2 tbsp butter

  • 3 cloves garlic, minced

  • 2 tbsp all-purpose flour

  • 2 cups milk

  • ½ cup heavy cream

  • 1 tsp salt (or to taste)

  • ½ tsp black pepper

  • ½ tsp dried thyme or Italian herbs

  • ½ cup grated Parmesan cheese

  • 1 cup shredded mozzarella or cheddar cheese

  • 1 tbsp chopped parsley (optional)

Instructions

  1. Preheat Oven
    Preheat oven to 180°C (350°F) and lightly grease a baking dish.

  2. Prepare Potatoes
    Peel and slice potatoes thinly (about 3–4 mm thick). Arrange them evenly in the baking dish.

  3. Make the Creamy Sauce

    • Melt butter in a pan over medium heat.

    • Add minced garlic and cook for about 30 seconds until fragrant.

    • Stir in flour and cook for 1 minute to form a roux.

    • Gradually whisk in milk and cream.

    • Add salt, pepper, and herbs.

    • Cook until the sauce thickens (3–4 minutes).

  4. Add Cheese
    Stir in Parmesan cheese until melted and smooth.

  5. Assemble
    Pour the creamy sauce evenly over the sliced potatoes.

  6. Bake
    Cover with foil and bake for 35 minutes.
    Remove foil, sprinkle mozzarella or cheddar cheese on top, and bake another 15–20 minutes until golden and bubbly.

  7. Serve
    Garnish with chopped parsley and let it rest 5 minutes before serving.

Q&A

Q1: Can I make this recipe ahead of time?
Yes. Assemble the dish, cover it, and refrigerate up to 24 hours before baking.

Q2: Why slice potatoes thinly?
Thin slices cook evenly and absorb the creamy sauce better.

Q3: Can I use only milk instead of cream?
Yes, but the sauce will be less rich. You can add extra cheese to improve texture.

Q4: Which potatoes work best?
Yukon Gold or Russet potatoes are best because they become soft and creamy when baked.

Q5: How do I store leftovers?
Store in an airtight container in the refrigerator for 3–4 days.

Q6: Can I add other ingredients?
Yes, you can add caramelized onions, cooked bacon, mushrooms, or spinach for extra flavor.

Q7: How do I reheat it?
Reheat in the oven at 160°C (320°F) for about 15 minutes, or microwave individual portions.

Crunchy Sesame-Ginger Broccoli

The Recipe: Crunchy Sesame-Ginger Broccoli
This salad relies on raw (or very lightly blanched) broccoli to maintain its signature snap.

Prep time: 15 minutes

Chilling time: 30 minutes (optional but recommended)

Servings: 4–6 sides

Ingredients
Category Item Quantity
Base Fresh Broccoli florets (bite-sized) 1 lb (approx. 2 heads)
Crunch Shredded Carrots & Red Bell Pepper 1 cup total
Aromatics Sliced Green Onions & Cilantro ¼ cup each
Dressing Rice Vinegar 3 tbsp
Dressing Low-Sodium Soy Sauce (or Tamari) 2 tbsp
Dressing Toasted Sesame Oil 1 tbsp
Dressing Grated Fresh Ginger & Garlic 1 tsp each
Dressing Honey or Maple Syrup 1 tbsp
Topping Toasted Almonds or Peanuts ¼ cup
Instructions
Prep the Broccoli: Cut broccoli into very small, bite-sized florets. This ensures the dressing coats every nook and cranny.

Whisk the Dressing: In a small bowl, combine the rice vinegar, soy sauce, sesame oil, ginger, garlic, and honey. Whisk until the honey is fully dissolved.

Combine: In a large mixing bowl, toss the broccoli, carrots, bell pepper, and green onions.

Toss: Pour the dressing over the vegetables and toss thoroughly.

Marinate: Let the salad sit in the fridge for at least 30 minutes. This softens the broccoli slightly without losing the crunch.

Garnish: Just before serving, fold in the fresh cilantro and top with toasted nuts and sesame seeds.

Pro Tips & Notes
The “Tiny Florets” Rule: The smaller you cut the broccoli, the better the salad. Large chunks are hard to chew raw and don’t soak up the flavor as well.

Brief Blanch: If you find raw broccoli hard to digest, drop the florets into boiling water for exactly 60 seconds, then immediately plunge them into an ice bath. Dry thoroughly before dressing.

Make it a Meal: Add grilled chicken, shelled edamame, or fried tofu cubes to turn this side into a full lunch.

Nutritional Info & Benefits
Per serving (based on 4 servings):

Calories: 145 kcal

Fiber: 4g

Protein: 5g

Healthy Fats: 8g

Why it’s great for you:

Sulforaphane: Broccoli is a powerhouse of this compound, which supports heart health and digestion.

Vitamin C: One serving provides over 100% of your daily needs, thanks to the raw broccoli and red peppers.

Anti-Inflammatory: Fresh ginger and garlic provide natural anti-inflammatory benefits.

Common Questions (Q&A)
Q: Can I make this ahead of time?

A: Yes! Unlike leaf-based salads, this actually tastes better the next day. It stays crunchy in the fridge for up to 3 days.

Q: Is there a substitute for soy sauce?

A: Use Liquid Aminos or Tamari for a gluten-free version, or Coconut Aminos if you want a lower-sodium, soy-free option.

Q: My dressing is too thin, how do I thicken it?

A: Add a teaspoon of peanut butter or almond butter to the dressing. It adds creaminess and helps the sauce “stick” to the florets.

Ginger Water (Ginger–Lemon Detox Drink)

Ginger Water (Ginger–Lemon Detox Drink)

Prep & Cook Time

  • Prep: 5 minutes

  • Cook: 10–15 minutes

  • Total: ~20 minutes

Servings

  • Makes 4–6 servings (or 1 large bottle for the day)

Ingredients

  • 2–3 inches fresh ginger root

  • 1–2 lemons (optional but recommended)

  • 1 liter (4 cups) water

  • Optional:

    • 1 tsp raw honey (after cooling)

    • A pinch of turmeric

    • A few mint leaves

Instructions

  1. Wash and peel the ginger (peeling optional).

  2. Slice or grate the ginger thinly.

  3. Bring water to a boil.

  4. Add ginger, reduce heat, and simmer for 10–15 minutes.

  5. Turn off heat and let cool slightly.

  6. Strain into a bottle or jar.

  7. Add fresh lemon juice (and honey if using).

  8. Store in the refrigerator for up to 2 days.

Description

Ginger water is a warming herbal infusion known for its thermogenicdigestive, and anti-inflammatory properties. Lemon adds vitamin C and supports liver detox pathways.

Health Benefits (Evidence-Based)

✔ Supports Weight Loss

  • Boosts metabolism

  • Reduces appetite & cravings

  • Improves fat oxidation

✔ Reduces Bloating & Water Retention

  • Aids digestion

  • Relieves gas and constipation

✔ Improves Blood Circulation

  • Helps mobilize stored fat

  • Supports cardiovascular health

✔ Anti-Inflammatory

  • Reduces chronic inflammation linked to obesity

✔ Blood Sugar Control

  • Helps stabilize insulin response

What It Does NOT Do

  • ❌ Spot-reduce fat

  • ❌ Replace exercise or calorie control

  • ❌ Melt fat overnight

How & When to Drink

  • Morning (best): 1 cup on an empty stomach

  • Before meals: Reduces overeating

  • Daily limit: 2–3 cups

Tips for Best Results

  • Drink warm, not ice cold

  • Combine with:

    • Walking or light exercise

    • High-protein meals

    • Reduced sugar & refined carbs

  • Be consistent for 2–4 weeks

Nutritional Information (per cup)

  • Calories: ~5–10

  • Carbs: ~2g

  • Sugar: 0g

  • Fat: 0g

  • Vitamin C: ~10–15%

Q & A

Q: Can I drink it every day?
✔ Yes, in moderation.

Q: Can pregnant women drink ginger water?
⚠️ Small amounts are usually safe, but consult a doctor.

Q: Will it burn belly fat fast?
👉 It supports fat loss over time, not instant results.

Q: Can I drink it cold?
✔ Yes, but warm is more effective for digestion.

High-Protein Cottage Cheese Bread

High-Protein Cottage Cheese Bread

This gluten-free loaf is a nutritional powerhouse, combining the creamy texture of cottage cheese with the wholesome flavors of almond and oat flour. It results in a dense, satisfying bread that is perfect for sandwiches or toasting, all while packing a significant protein punch.

Ingredients

  • 1 cup cottage cheese

  • 1 large egg

  • 1 1/3 cups oat flour

  • 1/2 cup almond flour

  • 1/4 cup grated Parmesan cheese

  • 1 1/2 teaspoons baking powder

  • 1/2 teaspoon salt

  • Olive oil or melted butter (for brushing)

  • Sesame seeds (for sprinkling)


Step-by-Step Instructions

  1. Preparation: Preheat your oven to 180°C. Line a small loaf pan with parchment paper or lightly grease it with oil.

  2. Blend the Base: In a blender or food processor, combine the 1 cup cottage cheese and 1 large egg. Blend until the mixture is completely smooth and creamy.

  3. Mix Dry Ingredients: In a medium mixing bowl, whisk together the 1 1/3 cups oat flour, 1/2 cup almond flour, 1/4 cup Parmesan, 1 1/2 tsp baking powder, and 1/2 tsp salt.

  4. Form the Dough: Pour the blended cottage cheese mixture into the dry ingredients. Stir with a spatula until a thick, slightly sticky dough forms.

  5. Shape and Top: Transfer the dough into the prepared loaf pan, smoothing the top with your spatula. Alternatively, you can shape the dough into small rolls on a baking sheet. Brush the top lightly with olive oil or melted butter and sprinkle generously with sesame seeds.

  6. Bake: Place in the oven and bake for 30–35 minutes (for rolls) or 45–50 minutes (for a loaf). The bread is ready when the top is golden brown and a toothpick inserted into the center comes out clean.

  7. Cooling: Allow the bread to cool in the pan for at least 15 minutes before transferring it to a wire rack. Cooling is essential for the structure of gluten-free bread to set properly.


Why You’ll Love It

Because this recipe uses cottage cheese and almond flour, it is naturally much higher in protein than traditional wheat bread. It’s an excellent choice for a filling breakfast or a post-workout snack.

Weight-Loss Apple & Oatmeal Breakfast Bake

Weight-Loss Apple & Oatmeal Breakfast Bake

This wholesome breakfast bake is designed to keep you full and energized throughout the morning. By combining fiber-rich oats and apples with the natural sweetness of bananas and cherries, you get a delicious meal that supports weight-loss goals without any added flour or sugar.

Ingredients

  • 1 cup (100g) oatmeal

  • 2 apples, grated or finely chopped

  • 100g raisins

  • 100g cherries (fresh or frozen)

  • 1 banana, mashed

  • 2 eggs

  • 100–120ml water

  • 50g Brazil nuts, chopped (for topping)

  • 1 tsp baking powder

  • Vegetable oil (for greasing the dish)


Step-by-Step Instructions

  1. Preparation: Preheat your oven to 180°C. Lightly grease a loaf pan or baking dish with a small amount of vegetable oil.

  2. Hydrate the Oats: In a large bowl, combine the 100g oatmeal with 100–120ml of water. Let it sit for about 5 minutes until the water is absorbed and the oats soften.

  3. Mix Wet Ingredients: Add the mashed banana and 2 eggs to the oats. Whisk until the mixture is well-combined.

  4. Incorporate Fruit: Stir in the grated apples, 100g raisins, 100g cherries, and 1 tsp of baking powder. The apples and berries will provide moisture and natural sweetness during the bake.

  5. Transfer and Top: Pour the batter into your prepared baking dish. Sprinkle the 50g of chopped Brazil nuts evenly over the top for a satisfying crunch.

  6. Bake: Place in the oven and bake for 35–45 minutes. The top should be golden brown and firm to the touch.

  7. Cool: Allow the bake to cool in the pan for at least 10 minutes before slicing. This helps the oats set so the slices hold together perfectly.


Why This Works for Weight Loss

The combination of oats and apples provides a high dose of soluble fiber, which slows digestion and helps you feel fuller for longer. Because this recipe uses fruit for sweetness and nuts for healthy fats, it provides a balanced nutritional profile to start your day.

Chocolate Banana Oat Bake

Chocolate Banana Oat Bake

This “Classic Dessert” with a healthy twist creates a dense, fudgy cake that feels incredibly indulgent while using wholesome ingredients. By blending oats and bananas, you achieve a moist texture that pairs perfectly with a rich chocolate finish.

Ingredients

  • 150g oatmeal

  • 250ml milk

  • 2 bananas

  • 2 eggs

  • 40g sugar (or other sweetener, optional)

  • 2 tbsp cocoa powder

  • 1 tsp baking powder

  • 1/2 tsp vanilla extract

  • 1 pinch of salt

  • Dark chocolate (1 bar or as needed for topping)


Step-by-Step Instructions

  1. Prepare the Base: Place the 150g oatmeal in a blender and pulse until it reaches a fine, flour-like consistency.

  2. Mix Wet Ingredients: In a large bowl, mash the 2 bananas until smooth. Whisk in the 2 eggs, 250ml milk, and 1/2 tsp vanilla extract.

  3. Combine: Add the blended oat flour, 2 tbsp cocoa powder, 1 tsp baking powder, 40g sweetener, and a pinch of salt to the wet ingredients. Stir until the batter is well-combined and smooth.

  4. Add Chocolate: Roughly chop your dark chocolate bar. You can stir half of it into the batter and save the rest for the top, or simply sprinkle it all over the surface before baking.

  5. Bake: Pour the batter into a greased baking dish. Bake at 180°C for approximately 35–40 minutes. The bake is ready when the center is set and a toothpick comes out mostly clean.

  6. Cool and Serve: Allow the dish to cool for at least 10 minutes before slicing. The texture will continue to firm up as it cools, resulting in a perfect brownie-like consistency.


Cooking Tip

For the best results, use overripe bananas with plenty of brown spots; they provide the most natural sweetness and the best texture for this flourless bake.

Black Pepper Oil Tonic

Black Pepper Oil Tonic

Black pepper oil is often used in traditional wellness practices for its warming properties and strong, spicy aroma. This simple preparation infuses olive oil with the essence of black pepper, creating a versatile oil that can be used as a flavorful condiment or a soothing topical massage oil.

Ingredients

  • 1 cup extra virgin olive oil

  • 2 tbsp whole black peppercorns

  • Optional: 1 clove of garlic or a sprig of fresh rosemary for added aroma


Step-by-Step Instructions

  1. Prepare the Peppercorns: Use a mortar and pestle or the back of a heavy knife to lightly crush the 2 tbsp of black peppercorns. You don’t want a fine powder; simply cracking them open is enough to release their natural oils and piperine.

  2. Heat the Oil: In a small saucepan, pour the 1 cup of olive oil. Turn the heat to low. It is important to heat the oil slowly to avoid scorching it, which would ruin the delicate flavor.

  3. Infuse: Add the crushed peppercorns (and optional garlic or rosemary) to the warm oil. Let the mixture simmer on the lowest possible heat setting for about 5–10 minutes. You should see very small bubbles forming around the peppercorns.

  4. Cool Down: Remove the saucepan from the heat. Let the oil sit and steep until it has cooled completely to room temperature. This resting period allows the infusion to strengthen.

  5. Strain: Once cool, pour the oil through a fine-mesh strainer or a piece of cheesecloth into a clean glass jar or bottle. This removes the solid peppercorn pieces, leaving you with a clear, infused oil.

  6. Storage: Seal the bottle tightly. Store the oil in a cool, dark place like a kitchen pantry. It will stay fresh and flavorful for up to 2 weeks.


Usage Tips

  • Culinary: Drizzle a small amount over grilled vegetables, soups, or salads for a zesty, warming kick.

  • Topical: Some people use a small amount of this oil to massage into joints; however, always perform a patch test on a small area of skin first to ensure no irritation occurs.


A Note on Wellness: While black pepper oil is a wonderful addition to a balanced lifestyle, it is important to consult with a healthcare professional regarding chronic conditions like arthritis or for support with addiction recovery.

Crunchy Cucumber & Cabbage Fat-Loss Salad

Crunchy Cucumber & Cabbage Fat-Loss Salad

This vibrant salad is a fantastic option for a light lunch or dinner. It combines the crunch of fresh cabbage and cucumbers with a zesty dressing, making it high in fiber and volume while remaining low in calories. It’s a perfect addition to a weight-conscious lifestyle.

Ingredients

  • 2 cups shredded cabbage (green or Napa)

  • 1/2 cucumber, thinly sliced

  • 1/2 red bell pepper, thinly sliced

  • 2 green onions, chopped

  • 2 tbsp fresh dill or parsley, chopped

  • 1/2 avocado, diced (for healthy fats)

  • 1 tbsp lemon juice

  • 1 tsp apple cider vinegar

  • Salt and pepper, to taste


Step-by-Step Instructions

  1. Prepare the Base: In a large mixing bowl, combine the 2 cups of shredded cabbage and the thinly sliced cucumber. If the cabbage is very coarse, massage it with a pinch of salt for a minute to make it more tender.

  2. Add Color and Flavor: Toss in the sliced red bell pepper, chopped green onions, and your choice of fresh dill or parsley.

  3. Creamy Addition: Gently fold in the diced avocado. The avocado adds a creamy texture that pairs perfectly with the crunch of the vegetables.

  4. Dress the Salad: Drizzle the 1 tbsp lemon juice and 1 tsp apple cider vinegar over the mixture. The acidity in the lemon and vinegar helps brighten the flavors and supports digestion.

  5. Season: Add a small pinch of salt and pepper to taste. Toss everything gently to ensure the vegetables are evenly coated with the dressing.

  6. Serve: This salad is best enjoyed fresh to maintain its maximum crunch. If you are preparing it for later, add the avocado and dressing just before serving.


Why It Works

This salad is naturally low in carbohydrates and high in water content, which helps keep you feeling full and hydrated throughout the day.

Garlic Parmesan Roasted Cauliflower Plate

Garlic Parmesan Roasted Cauliflower Plate

A crispy, flavourful side dish made with roasted cauliflower, garlic, olive oil, and a delicious Parmesan finish. This easy recipe is golden, cheesy, and packed with Mediterranean-style flavour, perfect as a side or a light vegetarian meal. 🥦🧀

Time

  • Prep time: 10 minutes

  • Cook time: 25–30 minutes

  • Servings: 3–4

Ingredients

For the Roasted Cauliflower

  • large head cauliflower, cut into florets

  • 3 tablespoons olive oil

  • 3 cloves garlic, minced

  • ½ teaspoon salt

  • ¼ teaspoon black pepper

  • ½ teaspoon smoked paprika

  • ½ teaspoon dried oregano

For the Parmesan Finish

  • ½ cup freshly grated Parmesan cheese

  • 1 tablespoon lemon juice

  • 1 teaspoon lemon zest

Optional Garnish

  • 2 tablespoons fresh parsley, chopped

  • Red pepper flakes (for heat)

  • Extra drizzle of olive oil

Instructions

1️⃣ Preheat the Oven

Preheat your oven to 425°F (220°C).
Line a baking sheet with parchment paper for easy cleanup.

2️⃣ Season the Cauliflower

In a large bowl combine:

  • cauliflower florets

  • olive oil

  • minced garlic

  • salt

  • black pepper

  • smoked paprika

  • dried oregano

Toss well until the cauliflower is evenly coated with seasoning.

3️⃣ Roast the Cauliflower

Spread the cauliflower in a single layer on the baking sheet.

Roast for 25–30 minutes, turning halfway through, until the florets are:

  • golden brown

  • crispy on the edges

  • tender inside

4️⃣ Add the Parmesan Finish

Remove the cauliflower from the oven and transfer to a serving plate.

See also  Mediterranean Low Carb Italian Chicken Tray Bake

While still hot:

  • Sprinkle fresh Parmesan cheese over the cauliflower.

  • Drizzle lemon juice and sprinkle lemon zest on top.

The heat will slightly melt the cheese for extra flavor.

5️⃣ Garnish

Top with:

  • chopped parsley

  • red pepper flakes

  • extra drizzle of olive oil (optional)


Serving Suggestions

Serve this dish with:

  • Grilled chicken or fish

  • Mediterranean rice bowls

  • Quinoa or couscous

  • Garlic yogurt dip or tzatziki

 Tips for Perfect Roasted Cauliflower

✔ Do not overcrowd the pan or the cauliflower will steam instead of roast.
✔ Use fresh Parmesan for the best flavor.
✔ Roast at high heat to get crispy edges.

Brownie Cookies

Brownie Cookies

These cookies are a dream for any chocolate lover, combining the rich, fudgy interior of a brownie with the slightly crisp edges of a perfect cookie. They develop a beautiful “crackle” top and a glossy finish that looks professional but is incredibly easy to achieve.

Ingredients

  • 1 cup (120g) all-purpose flour

  • 1/3 cup (35g) unsweetened cocoa powder

  • 1/2 tsp baking soda

  • 1/2 tsp fine salt

  • 200g dark chocolate, chopped

  • 1/2 cup butter, unsalted

  • 2 large eggs

  • 3/4 cup sweetener (or sugar substitute)

  • 1 tsp vanilla extract


Step-by-Step Instructions

  1. Preparation: Preheat your oven to 175°C. Line two large baking sheets with parchment paper.

  2. Combine Dry Ingredients: In a medium bowl, whisk together the 120g flour, 35g cocoa powder, 1/2 tsp baking soda, and 1/2 tsp salt. Set this aside.

  3. Melt Chocolate and Butter: Using a double boiler or a microwave (in 30-second bursts), melt the 200g dark chocolate and 1/2 cup butter together until completely smooth. Let it cool slightly so it doesn’t cook the eggs.

  4. Whisk Eggs and Sweetener: In a separate large bowl, beat the 2 eggs, 3/4 cup sweetener, and 1 tsp vanilla with an electric mixer for about 5 minutes. The mixture should become pale, thick, and nearly double in volume. This step is the secret to getting that shiny, crackly brownie top!

  5. Merge Mixtures: Fold the melted chocolate mixture into the egg mixture until just combined. Gently fold in the dry ingredients using a spatula. Do not overmix; stop as soon as you see no more streaks of flour.

  6. Scoop and Bake: Drop rounded tablespoons of dough onto the prepared baking sheets, spacing them about 2 inches apart as they will spread. Bake for 10–12 minutes.

  7. Cooling: The cookies will be very soft when they first come out of the oven. Let them firm up on the baking sheet for at least 10 minutes before moving them to a wire rack.


Serving Tip

For an extra touch of indulgence, sprinkle a tiny pinch of flaky sea salt over the cookies while the chocolate is still warm.

Baked Salmon & Asparagus in Garlic Butter Sauce

Baked Salmon & Asparagus in Garlic Butter Sauce

This sheet-pan style meal is a timeless favorite because it is incredibly quick to assemble and the foil packet locks in all the moisture. The combination of zesty lemon, rich butter, and fresh garlic creates a restaurant-quality sauce that perfectly seasons both the tender salmon and the crisp asparagus.

Ingredients

  • 2 large salmon fillets

  • 1 bunch of fresh asparagus, tough ends trimmed

  • 2 tbsp butter, melted (or olive oil)

  • 3 cloves garlic, minced

  • 1 fresh lemon, half sliced into rounds and half juiced

  • 1 tbsp fresh parsley, chopped

  • Salt and pepper, to taste


Step-by-Step Instructions

  1. Preparation: Preheat your oven to 200°C. Prepare a large piece of heavy-duty aluminum foil on a baking sheet.

  2. Season the Vegetables: Place the trimmed asparagus on one side of the foil. Drizzle with a little olive oil, season with a pinch of salt and pepper, and toss to coat.

  3. Prepare the Salmon: Place the salmon fillets next to the asparagus. Season both sides of the fish with salt and pepper.

  4. Make the Garlic Butter Sauce: In a small bowl, whisk together the melted butter, minced garlic, lemon juice, and chopped parsley.

  5. Assemble the Packet: Pour the garlic butter sauce generously over the salmon and the asparagus. Top the salmon with the lemon slices.

  6. Seal and Bake: Fold the sides of the foil over the fish and vegetables to create a sealed packet. This creates a steam environment that keeps the salmon flaky. Bake for 12–15 minutes.

  7. Broil for Color: If you prefer a golden top, carefully open the foil packet during the last 2 minutes of cooking and turn the oven to the broil setting.

  8. Serve: Transfer the salmon and asparagus to plates, making sure to pour any extra garlic butter sauce from the foil over the top before serving.


Cooking Tip

If your salmon fillets are very thick, they may need an extra 2–3 minutes of cook time. The fish is done when it flakes easily with a fork and reaches an internal temperature of 63°C.

Flourless Oat, Carrot & Apple Fruitcake

Flourless Oat, Carrot & Apple Fruitcake

This hearty fruitcake is a wonderful alternative to traditional holiday bakes. By using blended oats instead of flour and relying on the natural sweetness of carrots and dried fruits, you get a dense, satisfying texture that is completely sugar-free.

Ingredients

  • 2 cups (200g) rolled oats, finely blended into a flour-like consistency

  • 1 tsp baking powder

  • 1 cup (240ml) milk (of your choice)

  • 1 medium carrot, finely grated

  • 1 medium apple, grated (adds extra moisture)

  • 9 dried apricots, rinsed with hot water and chopped

  • 4 tbsp raisins, rinsed with hot water

  • 1 tsp cinnamon (optional, for warmth)

  • A pinch of salt


Step-by-Step Instructions

  1. Preparation: Preheat your oven to 180°C. Grease a round cake tin or line it with parchment paper to ensure the cake doesn’t stick.

  2. Mix Dry Ingredients: In a large bowl, combine the blended oats, baking powder, cinnamon, and a pinch of salt. Stir well to distribute the baking powder evenly.

  3. Combine Wet Ingredients: Add the grated carrot, grated apple, and 1 cup of milk to the dry mixture. Stir until you have a thick, consistent batter.

  4. Fold in Fruit: Gently fold in the chopped apricots and raisins. The hot water rinse helps plump the fruit, making them extra juicy inside the cake.

  5. Rest the Batter: Let the mixture sit for about 10 minutes. This allows the oats to absorb the moisture from the milk and fruit, which helps the cake hold its shape without flour.

  6. Bake: Pour the batter into the prepared tin and smooth the top. Bake for 35–45 minutes. The cake is ready when it is golden brown on top and a toothpick inserted into the center comes out clean.

  7. Cooling: Allow the cake to cool in the tin for at least 15 minutes before transferring it to a wire rack. Because there is no flour or sugar, the cake needs this time to “set.”


Pro Tip

For the best flavor, let the cake cool completely before slicing. It tastes even better the next day once the flavors of the apricot and carrot have fully developed!