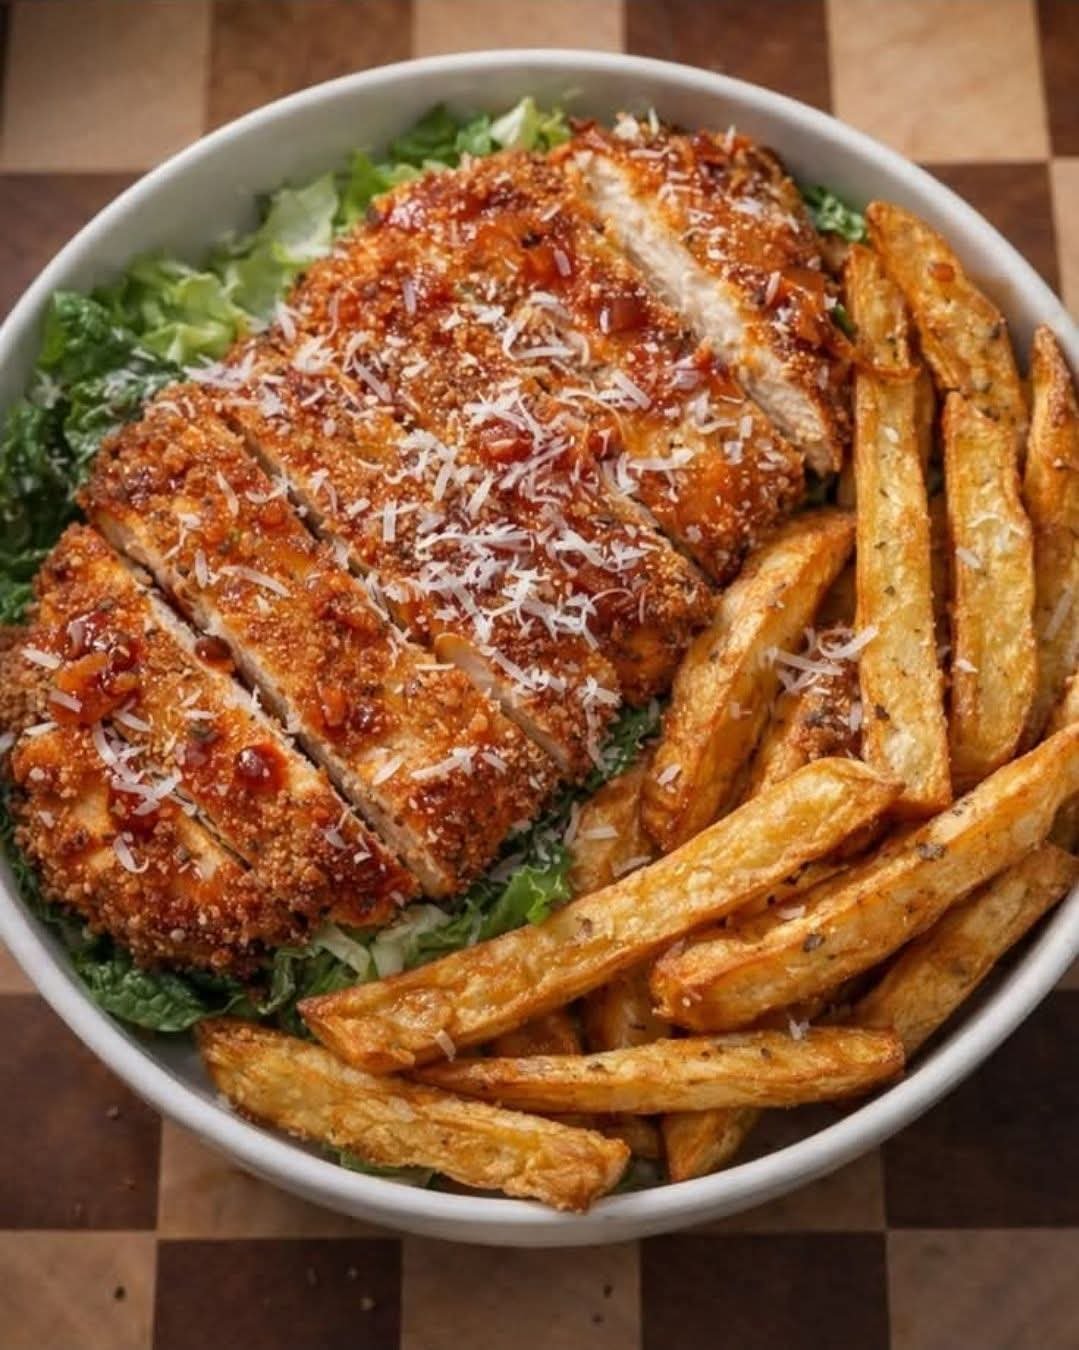
​The Breakfast Tortilla Triangle ​Ingredients

The Breakfast Tortilla Triangle

Ingredients

  • 1 Large Flour Tortilla (Burrito size works best)
  • 3 Breakfast Sausage Links (Pre-cooked or browned)
  • Shredded Mozzarella (or a pizza blend)
  • 1 Fresh Egg
  • Toppings: Sliced red chilies (optional) and fresh spinach
  • Egg Wash: 1 egg yolk whisked
  • Garnish: Black sesame seeds or Nigella seeds

Step-by-Step Instructions

  1. Prep the Crust: Place your tortilla on a baking sheet lined with parchment paper. Position your three sausages in a triangle shape in the center of the tortilla.
  2. Fold and Secure: Fold the edges of the tortilla over each sausage to create a “rim.” Use toothpicks to pin the corners together so the triangle holds its shape during baking.
  3. Fill the Center: * Layer a small bed of fresh spinach at the bottom.
    • ​Add a generous layer of shredded cheese.
    • ​Sprinkle your sliced chilies on top.
  4. The Centerpiece: Crack a fresh egg directly into the center of the cheese nest. (If you prefer it extra cheesy, you can add a little more cheese over the egg whites).
  5. The Golden Touch: Brush the “rim” (the folded tortilla parts) with the egg yolk wash. This gives it that deep golden, pastry-like finish. Sprinkle with black sesame seeds.
  6. Bake: Pop it into the oven at 180°C (350°F) for about 10–12 minutes. You’re looking for the cheese to be bubbly and the tortilla to be crisp and golden.
  7. Serve: Remove the toothpicks before serving! Slice it down the middle for that epic cheese pull and a perfectly runny yolk.

Pro-Tips

  • Sausage Choice: If you use raw sausage, make sure to pan-fry them first. The oven time isn’t quite long enough to cook raw meat thoroughly.
  • Crispy Bottom: For an even crispier base, you can lightly brush the bottom of the tortilla with oil or melted butter before assembling

🥔 Air Fryer Roasted Potatoes

🥔 Air Fryer Roasted Potatoes

Air fryer roasted potatoes are one of the easiest and tastiest side dishes you can make. They turn out crispy on the outside, soft on the inside, and are ready in about 20 minutes. They use just a small amount of oil and are perfect for breakfast, lunch, or dinner.

They’re also very customizable—you can change the seasonings, add herbs, garlic, cheese, or a little spice to suit your taste.


📝 Ingredients

  • 3 medium potatoes, diced (Yukon gold, red, or baby potatoes work well)

  • 1–2 tablespoons olive oil

  • 1 teaspoon garlic powder

  • 1 teaspoon paprika (optional)

  • ½ teaspoon dried herbs (rosemary, thyme, or Italian seasoning)

  • Salt and pepper, to taste

  • Optional: chopped fresh parsley or grated Parmesan cheese


👩‍🍳 Instructions

1. Wash and Cut

Scrub the potatoes clean.
Cut into even 1-inch cubes. Peeling is optional.


2. Season

Place potatoes in a large bowl.
Add olive oil, garlic powder, paprika, herbs, salt, and pepper.
Toss until all pieces are evenly coated.


3. Preheat Air Fryer

Preheat air fryer to 400°F (200°C) for 3 minutes.


4. Air Fry

Place potatoes in the air fryer basket in a single layer.
Cook for 15–20 minutes, shaking the basket halfway through.
Check at 15 minutes and cook longer if you want them extra crispy.


5. Garnish & Serve

Remove from air fryer and sprinkle with parsley or Parmesan, if using.
Serve hot.


🍽 Serving Ideas

  • With fried or poached eggs

  • With grilled chicken or steak

  • With salmon or baked fish

  • With a fresh salad

  • In breakfast bowls or wraps


✨ Tips & Tricks

  • Do not overcrowd the basket—air circulation makes them crispy.

  • For extra crispiness: soak diced potatoes in cold water for 20 minutes, then dry well before seasoning.

  • Try different seasonings: Cajun spice, taco seasoning, smoked paprika, or ranch seasoning.

  • Baby potatoes can be halved instead of diced.


🧊 Storage

  • Store leftovers in the fridge for up to 3 days.

  • Reheat in the air fryer at 375°F (190°C) for 4–5 minutes.


📌 Recipe Card Version

Air Fryer Roasted Potatoes
Crispy, golden potatoes made quickly in the air fryer.

Total Time: 20 minutes
Serves: 2–3

Ingredients:
3 medium potatoes, diced
1–2 tbsp olive oil
1 tsp garlic powder
1 tsp paprika (optional)
½ tsp dried herbs
Salt & pepper
Optional: parsley or Parmesan

Instructions:

  1. Dice potatoes into 1-inch cubes.

  2. Toss with oil, garlic powder, paprika, herbs, salt, and pepper.

  3. Preheat air fryer to 400°F (200°C).

  4. Air fry 15–20 minutes, shaking halfway through.

  5. Garnish and serve hot.

Marinated Mushrooms Recipe!

Marinated Mushrooms Recipe

Marinated mushrooms are a flavorful and versatile dish that’s perfect as a snack, appetizer, or a salad topping.

Ingredients:

  • For the Mushrooms:

    • 1 lb (450g) button mushrooms, cleaned and sliced (or whole)

  • For the Marinade:

    • 1/2 cup olive oil

    • 1/4 cup red wine vinegar (or white wine vinegar)

    • 2 tbsp lemon juice

    • 1 tsp Dijon mustard (optional, for a little tang)

    • 2-3 cloves garlic, minced

    • 1 small shallot or onion, finely chopped

    • 1 tbsp fresh thyme (or 1 tsp dried thyme)

    • 1/2 tsp red pepper flakes (optional, for a hint of heat)

    • Salt and pepper, to taste


Instructions:

  1. Prepare the Mushrooms:

    • If you’re using whole mushrooms, simply clean and trim the stems. If you prefer sliced mushrooms (as shown in the image), slice them evenly.

    • Pat the mushrooms dry with a paper towel to remove any moisture. This helps the marinade absorb better.

  2. Make the Marinade:

    • In a medium bowl, whisk together olive oil, red wine vinegar, lemon juice, Dijon mustard (if using), garlic, shallots, thyme, red pepper flakes, salt, and pepper until everything is well combined.

  3. Combine the Mushrooms and Marinade:

    • Place the cleaned and sliced mushrooms into a large jar or airtight container.

    • Pour the marinade over the mushrooms, making sure they are all covered with the marinade.

    • Seal the jar or container and refrigerate for at least 24 hours. The mushrooms will absorb the flavors better if marinated for 2-3 days.

  4. Serve:

    • After marinating, the mushrooms are ready to serve. You can serve them chilled or at room temperature. They’re great on their own, mixed into salads, served with crackers, or as part of a charcuterie board.


FAQs:

1. Can I use other types of mushrooms?

Yes, you can use different types of mushrooms like cremini, portobello, or oyster mushrooms. Just make sure to clean them thoroughly before marinating. If you’re using larger mushrooms, slice them to ensure the marinade soaks in well.

2. Can I make these mushrooms spicy?

Yes! You can increase the amount of red pepper flakes for a spicier kick. You could also add a bit of hot sauce or finely chopped fresh chili for extra heat.

3. How long should I marinate the mushrooms?

The mushrooms should marinate for at least 24 hours, but ideally for 2-3 days. The longer they marinate, the more the flavors will develop. Just be sure to store them in the fridge.

4. How long do marinated mushrooms last?

In the refrigerator, they’ll last for about 1-2 weeks. Make sure they’re kept in an airtight container to maintain freshness.

5. Can I make the marinade ahead of time?

Absolutely! You can prepare the marinade in advance and store it in the fridge for a few days. When you’re ready to marinate the mushrooms, just pour the prepared marinade over them.

6. Can I make these mushrooms vegan?

Yes, this recipe is already vegan-friendly! The marinade doesn’t include any animal-based products, so it works perfectly for a plant-based diet.

7. Can I use this marinade for other vegetables or meats?

Yes! This marinade is versatile and can be used for other vegetables like artichokes, bell peppers, or carrots. You can also use it to marinate meats or tofu if you’re looking for a flavorful marinade for grilling or roasting.

8. How do I store these marinated mushrooms?

Keep them in an airtight jar or container in the refrigerator. If you use a glass jar, make sure it’s sealed tightly to prevent air from affecting the flavor and freshness.

Easy Mango Dessert: 3 Ingredients and Yields a Lot

Hello everyone! Welcome to our food blog, your favorite place to find delicious recipes. Here you will find desserts, snacks, breakfast, appetizers, fresh salads. Let’s get started!


Meal Prep: Easy Mango Dessert

Learn how to prepare for Dessert step-by-step recipes inspired by top online culinary schools. Whether you’re an aspiring chef or just love gourmet cooking at home, these professional recipe ideas are perfect for busy days and high-quality meals.

Recipe Ingredients:

395 grams/14 oz of sweetened condensed milk

200 grams/7 oz of heavy cream

1 packet of mango-flavored powdered drink mix

Instructions:

First, add all the ingredients to the blender, then blend until you achieve a homogeneous mixture (about 2 minutes).

Next, pour the mixture into individual glasses (or a glass dish) and refrigerate for approximately 3 hours.


After the time has passed, remove from the refrigerator, decorate as desired, and serve.

Chicken Spinach and Mushroom Low Carb Oven Dish

Full Recipe>>> This low-carb oven dish is a savory powerhouse. It combines tender, seared chicken breast with earthy sautéed mushrooms and a bed of nutrient-dense spinach, all tied together by a blanket of bubbly, melted mozzarella and a hint of garlic cream.


Prep time: 15 minutes


Cook time: 20–25 minutes


Servings: 4


Dietary: Keto-friendly, Gluten-free, Low-carb


Ingredients

Chicken: 1.5 lbs chicken breast or thighs, cut into bite-sized chunks.


Vegetables: 8 oz sliced mushrooms (cremini or white button) and 5 oz fresh baby spinach.


Cheese: 2 cups shredded mozzarella cheese and ¼ cup grated Parmesan.


Cream Base: ½ cup heavy cream and 2 cloves minced garlic.


Seasoning: 1 tsp Italian seasoning, ½ tsp paprika, salt, and black pepper to taste.


Fats: 2 tbsp olive oil or butter for sautéing.


Instructions

Preheat & Prep: Heat your oven to 400°F (200°C). Grease a 9×13 inch baking dish.


Sear the Chicken: In a large skillet over medium-high heat, add 1 tbsp oil. Season chicken with salt, pepper, and paprika. Sear until golden brown (it doesn’t need to be cooked through yet). Move chicken to the baking dish.


Sauté Mushrooms & Spinach: In the same pan, add the remaining oil and mushrooms. Sauté until browned. Add the garlic and spinach, tossing just until the spinach wilts.


Assemble: Layer the mushroom and spinach mixture over the chicken.


Sauce & Cheese: Pour the heavy cream evenly over the dish. Sprinkle with Italian seasoning, Parmesan, and finally, a generous layer of mozzarella.


Bake: Place in the oven for 15–20 minutes, or until the cheese is bubbly and starting to brown on top.


Notes & Tips

Drain the Spinach: If you use frozen spinach, make sure to squeeze every drop of water out first, or your dish will be watery.


Broil for Color: For those perfect golden-brown spots seen in your photo, switch to the broiler for the last 2 minutes of cooking.


Texture: If you prefer a thicker “sauce,” whisk 2 oz of cream cheese into the heavy cream before pouring it over.

🥔 Herb Chicken Thighs with Gravy, Buttery Mashed Potatoes & Roasted Carrots 🥕🍗

🥔 Herb Chicken Thighs with Gravy, Buttery Mashed Potatoes & Roasted Carrots 🥕🍗

Prep time: 20 minutes

Cook time: 40 minutes

Servings: 2

Calories per serving: ~720 kcal


Ingredients 🛒

For the Chicken & Gravy:


2 bone-in, skin-on chicken thighs 🍗


1 tbsp olive oil 🫒


Salt & pepper to taste 🧂


1 tsp dried thyme


1 tsp garlic powder


1 tbsp butter 🧈


1 tbsp flour


¾ cup chicken stock


2 tbsp heavy cream (optional)


1 tbsp chopped parsley 🌿


For the Mashed Potatoes:


400g potatoes, peeled and cubed 🥔


2 tbsp butter


2–3 tbsp milk or cream


Salt to taste


For the Roasted Carrots:


200g baby carrots 🥕


1 tbsp olive oil


½ tsp honey or brown sugar


Salt & pepper


Chopped parsley for garnish


Instructions 👩‍🍳


Preheat oven to 400°F (200°C).


Roast the carrots: Toss carrots with olive oil, honey, salt, and pepper. Spread on a baking sheet and roast for 25–30 minutes, turning once, until tender and caramelized.


Cook the chicken: Season chicken thighs with salt, pepper, thyme, and garlic powder. Heat olive oil in a skillet over medium-high heat. Sear chicken skin-side down for 5–6 minutes until golden. Flip and sear the other side for 4–5 minutes. Transfer to oven and roast for 20 minutes or until internal temperature hits 165°F (74°C).


Boil potatoes: Meanwhile, boil potatoes in salted water for 15–18 minutes or until fork-tender. Drain, mash with butter and milk/cream. Season to taste.


Make the gravy: In the same skillet used for chicken, melt butter over medium heat. Stir in flour and cook for 1 minute. Gradually whisk in chicken stock and cook for 3–4 minutes until thickened. Stir in cream if using, and add chopped parsley.


Assemble & serve: Plate mashed potatoes, top with chicken thigh and spoon over gravy. Add roasted carrots on the side. Finish with a sprinkle of parsley.


Notes & Variations 📝


Use boneless chicken thighs if preferred—reduce oven time by 5–7 minutes.


Swap carrots for roasted parsnips or green beans.


Gravy can be made dairy-free by omitting cream and using olive oil.

Banana Pineapple Mango Yogurt Almond Milk Smoothie

Q: What is this smoothie made of?

This tropical smoothie is made with ripe banana, fresh pineapple, sweet mango, plain yogurt, and almond milk. The combination creates a naturally sweet, creamy, and refreshing drink packed with vitamins, minerals, and natural energy.

Q: What ingredients do I need (1–2 servings)?


1 ripe banana, sliced


½ cup fresh or frozen mango cubes


½ cup fresh or frozen pineapple chunks


½ cup plain yogurt (Greek or regular)


¾ to 1 cup unsweetened almond milk

Optional: 1–2 teaspoons honey or dates (if extra sweetness is needed)


Optional: a few ice cubes (for a thicker, chilled smoothie)


Q: How do I prepare this smoothie step by step?

First, peel and slice the banana. Cut the mango and pineapple into small cubes if using fresh fruit. Add the banana, mango, and pineapple to a blender. Next, add the yogurt and pour in the almond milk. If you prefer a colder or thicker texture, add ice cubes. Blend on high speed for 30–60 seconds until smooth and creamy. Taste and adjust sweetness if needed, then blend again briefly. Pour into a glass and serve immediately.

Q: What does this smoothie taste like?

This smoothie has a naturally sweet, tropical flavor. The banana adds creaminess, mango provides rich sweetness, pineapple gives a light tang, and yogurt balances everything with a mild, creamy texture. Almond milk keeps it light and dairy-free-friendly.

Q: Is this smoothie healthy?

Yes, it’s very nutritious. Bananas provide potassium and energy, mango and pineapple are rich in vitamin C and antioxidants, yogurt adds protein and probiotics, and almond milk is low in calories and lactose-free. It’s ideal for breakfast, a post-workout drink, or a healthy snack.


Q: Can I customize this recipe?

Absolutely. You can add chia seeds or flaxseeds for extra fiber, protein powder for muscle recovery, or spinach for added greens without changing the taste much. Coconut milk can replace almond milk for a richer flavor.


Q: How should it be served?

Serve chilled in a tall glass. You can garnish with fruit pieces or seeds if desired. Enjoy fresh for best taste and nutrition.


Homemade Lemon Water

Homemade Lemon Water


Ingredients

2 Large Lemons: Choose firm, bright yellow lemons.


4–6 Cups Water: Filtered or spring water works best.


Ice: Optional, for serving.


Optional Sweetener: A small amount of honey or stevia if you find it too tart.

Instructions

Wash the Lemons: Since you are putting the slices directly into the water, scrub the skin thoroughly to remove any wax or residue.


Slice: Cut one lemon into thin rounds.


Juice: Squeeze the juice of the second lemon into your pitcher.


Combine: Add the lemon slices to the pitcher and fill with water.

Infuse: Let the pitcher sit in the refrigerator for at least 30 minutes before drinking. This allows the lemon oils and juice to blend with the water.


Healthy Tips for Use

Protect Your Teeth: The acid in lemons can soften tooth enamel. It is best to drink this through a straw or rinse your mouth with plain water afterward.

Temperature: Many people prefer drinking this warm in the morning to help wake up their digestive system, or ice-cold for refreshment.


Manage Expectations: While staying hydrated can reduce bloating and help you feel better, sustainable body changes come from a balanced diet and regular physical activity.

Carrot & Banana Smoothie

Carrot & Banana Smoothie


Ingredients

1 cup Carrots: Roughly chopped or sliced (as seen in the glass). For the smoothest texture, you can lightly steam them first, or use a high-powered blender if they are raw.


1 large Banana: Sliced. Using a frozen banana will make the smoothie extra thick and cold.


Liquid Base: 1 cup of your choice (Water, Coconut Water, Almond Milk, or Orange Juice).

Optional Boosters: A pinch of cinnamon, a squeeze of lemon juice, or a small knob of fresh ginger.


Instructions

Prepare the Carrots: If you don’t have a high-speed blender, grate the carrots or steam them for 5 minutes until slightly soft to ensure there are no “crunchy” bits in your drink.


Layer the Blender: Add your liquid base first. This helps the blades move freely. Add the sliced bananas next, followed by the carrot pieces.

Blend: Start on a low speed and gradually increase to high. Blend for about 45–60 seconds until the mixture is completely vibrant orange and smooth.


Adjust Consistency: If it’s too thick, add a splash more liquid. If you want it colder, add a handful of ice cubes and blend again.


Serve: Pour into a tall glass and enjoy immediately while fresh.


Why this combo works

Carrots provide beta-carotene and fiber.


Bananas provide natural sweetness and creaminess, eliminating the need for added sugars.

Citrus Sunrise Smoothie

This Citrus Sunrise Smoothie is a vibrant, nutrient-rich drink packed with vitamin C, antioxidants, and natural hydration. It’s perfect for breakfast, a mid-day refresher, or a light detox drink. The combination of sweet oranges, slightly bitter grapefruit, and a hint of lemon creates a beautifully balanced flavor that is both refreshing and energizing.

Ingredients (Serves 2)

2 medium oranges, peeled and chopped


1 large grapefruit, peeled and segmented


½ lemon, peeled and deseeded


½ cup cold water or fresh orange juice


½ cup ice cubes


1 teaspoon honey or maple syrup (optional)


A small pinch of turmeric (optional, for anti-inflammatory benefits)

Preparation Method

Start by thoroughly washing all citrus fruits before peeling. Remove as much of the white pith as possible to avoid bitterness. Chop the oranges and grapefruit into medium-sized pieces so they blend smoothly.


Place the orange chunks, grapefruit segments, and lemon pieces into a high-speed blender. Add cold water or fresh orange juice to help the blending process. If you prefer a thicker smoothie, reduce the liquid slightly; for a lighter, juice-like consistency, add more.


Add ice cubes to give the smoothie a chilled, refreshing texture. If you like a touch of sweetness, include honey or maple syrup. For extra health benefits, add a pinch of turmeric.

Blend on high speed for 45–60 seconds until the mixture becomes smooth, creamy, and vibrant orange in color. Check the consistency and taste. Adjust sweetness or liquid as needed, then blend again briefly.


Serving Suggestions

Pour the smoothie into tall glasses and serve immediately for maximum freshness and nutrition. Garnish with a slice of orange or grapefruit if desired. This smoothie tastes best when freshly prepared.


Health Benefits

Boosts immunity with high vitamin C content


Aids digestion and hydration


Naturally detoxifying and energizing


Low in calories and rich in antioxidants


Tips & Variations

Add a banana for extra creaminess


Include ginger for a spicy kick


Replace water with coconut water for electrolytes


This Citrus Sunrise Smoothie is simple, delicious, and perfect for a healthy lifestyle. 🌞🥤

Flaxseed Microwave Bread

Flaxseed Microwave Bread

This bread is hearty, slightly nutty, and holds up perfectly to being toasted or loaded with avocado. Because it relies on flaxseed meal rather than flour, it’s naturally gluten-free and packed with Omega-3s.


Prep time: 1 minute


Cook time: 90 seconds


Servings: 1 (makes 2 slices when cut in half)


Ingredients

1/4 cup Ground flaxseed meal (golden or brown)


1/2 tsp Baking powder


1 large Egg


1 tsp Melted butter or Avocado oil


1 tsp Water (optional, for a softer crumb)


Pinch Salt


Instructions

Prep the Mug: Grease a microwave-safe mug or a small square glass container with a little oil or butter. (A square container makes “bread-shaped” slices!)


Mix: Add the flaxseed meal, baking powder, and salt to the container. Stir to combine.


Combine: Add the egg and the melted butter/oil. Whisk with a fork until completely smooth and no dry clumps remain.


Microwave: Cook on high for 90 seconds.


Cool & Slice: Let it sit for 30 seconds before sliding it out. Slice it in half and—this is the pro move—toast it in a pan or toaster until golden brown.


Nutritional Info (Per Serving)

Values are approximate based on standard ingredients.


Metric Amount

Calories 225 kcal

Net Carbs 1g

Fiber 8g

Protein 10g

Healthy Fats 18g

Benefits & Tips

Why It’s Good For You

Digestive Health: With 8g of fiber, this is an excellent way to keep your digestion moving.


Brain Power: Flaxseeds are a top plant-based source of alpha-linolenic acid (ALA), an essential Omega-3 fatty acid.


Blood Sugar Friendly: Since it contains almost zero net carbs, it won’t cause the insulin spike typical of white bread.


Pro Tips

The “Toast” Factor: Straight out of the microwave, the texture can be a bit “spongy.” Slicing and toasting it in a skillet with a little butter transforms it into a crispy, artisanal-style toast.


Golden vs. Brown: Golden flaxseed meal has a milder, more buttery flavor. Brown flaxseed is more “earthy.” Use golden if you want it to taste more like traditional wheat bread.


Flavor Boost: Add a pinch of garlic powder or dried herbs for a savory bread, or a dash of cinnamon and stevia for a “French toast” vibe.


Q&A

Q: Can I make this without an egg?

A: You can try a “flax egg” (1 tbsp ground flax + 3 tbsp water), but the bread will be much denser and may not rise as well. The egg provides the essential structure here.


Q: Why did my bread come out rubbery?


A: This usually happens if it’s overcooked. Microwaves vary in power; try 70–80 seconds next time if 90 was too much.


Q: How do I store leftovers?


A: It’s best fresh, but you can store it in an airtight container in the fridge for up to 3 days. Always toast it when reheating to fix the texture.

Crustless Feta & Spinach Quiche

Crustless Feta & Spinach Quiche

Prep time: 15 minutes


Cook time: 35–40 minutes


Servings: 6 slices


Ingredients

8 large eggs


1 cup whole milk (or half-and-half for extra richness)


10 oz frozen chopped spinach, thawed and squeezed completely dry


1 cup feta cheese, crumbled


1/2 small yellow onion, finely diced


1 clove garlic, minced


1/2 cup shredded mozzarella (optional, for a golden top)


1/2 tsp salt (be careful, feta is salty!)


1/4 tsp black pepper


1/8 tsp ground nutmeg (the “secret ingredient” for spinach dishes)


Instructions

Preheat & Prep: Heat your oven to 375°F (190°C). Grease a 9-inch pie dish or quiche pan thoroughly with butter or non-stick spray.


Sauté Aromatics: In a small skillet over medium heat, sauté the onion and garlic until soft (about 3–4 minutes). Let them cool slightly.


Whisk the Base: In a large bowl, whisk together the eggs, milk, salt, pepper, and nutmeg until well combined.


Combine: Stir the dried spinach, crumbled feta, and sautéed onions/garlic into the egg mixture.


Bake: Pour the mixture into your prepared dish. Sprinkle the mozzarella on top if using. Bake for 35–40 minutes, or until the center is set and the edges are lightly golden.


Rest: Let the quiche sit for 5–10 minutes before slicing. This is crucial for a clean cut!


Nutritional Info (Per Serving)

Estimates based on using whole milk.


Nutrient Amount

Calories 185 kcal

Protein 13g

Fat 12g

Carbs 5g

Fiber 1g

Pro Tips for Success

The Squeeze Test: The biggest mistake people make is leaving moisture in the spinach. If you don’t squeeze it dry using a kitchen towel, your quiche will be watery.


Dairy Swap: For a dairy-free version, use unsweetened almond milk and a vegan feta alternative.


Meal Prep: This freezes beautifully! Slice it up, wrap the slices individually, and microwave for 60-90 seconds for a grab-and-go breakfast.


Health Benefits

Lutein & Zeaxanthin: Found in spinach, these are powerhouses for eye health.


High-Quality Protein: Eggs provide a complete amino acid profile to help with muscle recovery.


Low Glycemic Index: Since there is no flour crust, this won’t cause the mid-morning blood sugar spike and crash.


Q&A

Q: Can I use fresh spinach instead of frozen?


A: Yes! Sauté about 5–6 cups of fresh spinach until wilted, then squeeze out the liquid just as you would with frozen.

Q: My quiche puffed up like a balloon in the oven, is that normal?


A: Totally. It’s the air in the eggs expanding. It will settle down into a flat, dense custard as it cools.


Q: How long does it stay fresh in the fridge?


A: It’ll stay delicious for up to 4 days if kept in an airtight container.

Snicker Peanut Buster Parfait

🍫🥜 Keto Snicker Peanut Buster Parfait

This Keto Snicker Peanut Buster Parfait is a rich, layered dessert inspired by the classic Peanut Buster Parfait and the flavors of a Snickers bar. It combines creamy chocolate mousse, smooth vanilla cream, sugar-free caramel, and crunchy peanuts for a satisfying low-carb treat.

Perfect for keto and low-carb lifestyles, this dessert is also great for make-ahead treats, special occasions, or when you want something indulgent without traditional sugar and flour.


📝 Why You’ll Love It

  • Low in carbs compared to traditional parfaits

  • Rich and creamy texture

  • Simple ingredients

  • Customizable layers

  • Great for meal prep

  • Elegant enough for guests


🧾 Ingredients (Makes 4 Parfaits)

Chocolate Layer

  • ½ cup heavy whipping cream

  • 2 tbsp unsweetened cocoa powder

  • 1½ tbsp powdered erythritol or monk fruit sweetener

  • ¼ tsp vanilla extract

  • Pinch of salt

Vanilla Cream Layer

  • ½ cup full-fat cream cheese, softened

  • ¼ cup heavy cream

  • 1 tbsp powdered erythritol

  • ¼ tsp vanilla extract

Caramel Sauce

  • ¼ cup unsalted butter

  • 2 tbsp powdered allulose (or erythritol)

  • 2 tbsp heavy cream

  • ¼ tsp xanthan gum (optional, for thickening)

  • Pinch of sea salt

Additional Layers

  • ¼ cup salted roasted peanuts, chopped

  • 2 tbsp sugar-free chocolate chips, melted

  • 1 tbsp coconut oil (for melting chocolate)


🧰 Tools Needed

  • Hand mixer

  • Mixing bowls

  • Saucepan

  • Parfait glasses or small jars

  • Spatula

  • Microwave-safe bowl


👩‍🍳 Instructions

Step 1: Chocolate Mousse

Whip heavy cream until soft peaks form.
Add cocoa powder, sweetener, vanilla, and salt.
Whip until thick and smooth.
Refrigerate for 10–15 minutes.


Step 2: Vanilla Cream

Beat cream cheese until smooth.
Slowly add heavy cream and whip until creamy.
Add sweetener and vanilla; beat until fluffy.
Chill until ready to use.


Step 3: Caramel Sauce

Melt butter in a saucepan over medium heat.
Stir in sweetener and cook 1–2 minutes.
Add cream and stir until combined.
(Optional) Add xanthan gum for thickness.
Add salt and remove from heat.
Cool slightly before using.


Step 4: Assemble

In each glass:

  • 2 tbsp chocolate mousse

  • 2 tbsp vanilla cream

  • 1 tbsp caramel sauce

  • 1 tbsp chopped peanuts

Repeat layers once more.
Drizzle with melted chocolate on top.


🍽 Serving Tips

  • Serve chilled

  • Garnish with extra peanuts or a pinch of flaky salt

  • Use clear glasses to show layers


🧊 Storage

  • Refrigerate up to 5 days

  • Best assembled shortly before serving

  • Freezing not recommended (texture may change)


🧮 Estimated Nutrition (Per Serving)

  • Calories: ~320

  • Fat: ~30g

  • Protein: ~5g

  • Net Carbs: ~5–6g

(Values vary by ingredients used.)


🔄 Ingredient Swaps

  • Sweeteners: Monk fruit, erythritol, or stevia blends

  • Dairy-free: Coconut cream and dairy-free cream cheese

  • Nut-free: Omit peanuts or use seeds

  • Lower fat: Use light cream cheese and reduce peanuts


🎉 Perfect For

  • Dinner desserts

  • Meal prep

  • Holidays

  • Special occasions

  • Low-carb lifestyles


⚠️ Important Notes (Removed Harmful Claims)

❌ Not a medical food
❌ Not a blood sugar treatment
❌ Not a ketosis guarantee
❌ Not a weight-loss product

✔ Simply a low-carb dessert option
✔ Enjoy in moderation
✔ Works within many low-carb plans


💬 Final Thoughts

Desserts don’t have to disappear when you cut carbs. This Keto Snicker Peanut Buster Parfait gives you rich chocolate, creamy vanilla, sweet caramel, and crunchy peanuts in every spoonful—without traditional sugar or flour. It’s indulgent, elegant, and easy to make.

Creamy Lemon Bliss Dessert Cups


Creamy Lemon Bliss Dessert Cups

This creamy lemon dessert is light, smooth, and wonderfully refreshing. It combines the bright taste of fresh lemon with soft, fluffy cream to create a spoonable treat that feels both comforting and elegant. Served in individual glasses, it looks beautiful and tastes even better, making it perfect for gatherings or a quiet moment of enjoyment at home.


Ingredients

1 cup fresh whipping cream, well chilled


½ cup thick cream cheese, softened


½ cup sweetened condensed milk


⅓ cup fresh lemon juice (strained)


1 tablespoon lemon zest (finely grated)


1 teaspoon pure vanilla essence


1 cup plain crushed biscuits or cookies


2 tablespoons melted butter


Extra lemon zest or small lemon jelly cubes for topping (optional)


Preparation Method

Start by preparing the base. In a bowl, combine the crushed biscuits with melted butter. Mix until the texture resembles soft crumbs that hold together when pressed. Spoon this mixture evenly into serving glasses and gently press it down using the back of a spoon. Place the glasses in the refrigerator while you prepare the creamy layer.


In a separate large bowl, whip the chilled cream until soft peaks form. Take care to whip slowly at first, then increase speed, stopping as soon as the cream becomes fluffy and smooth.


In another bowl, beat the softened cream cheese until silky and lump-free. Add the condensed milk gradually, mixing until fully combined. Pour in the fresh lemon juice, vanilla essence, and lemon zest. Stir gently; the mixture will naturally thicken and become creamy with a lovely pale yellow color.


Now, fold the whipped cream into the lemon mixture in batches. Use a light hand and gentle strokes to keep the texture airy. This step gives the dessert its cloud-like softness.


Remove the glasses from the refrigerator and spoon the creamy lemon mixture over the biscuit base. Smooth the tops neatly. If desired, add a few lemon jelly cubes or a sprinkle of zest on top for a bright finish.


Cover and chill the dessert for at least 3–4 hours, or overnight for the best texture and flavor.


Serving Tips

Serve cold straight from the refrigerator. This dessert pairs beautifully with fresh fruit or a simple cup of tea. The balance of creamy richness and fresh citrus makes every bite feel light, smooth, and satisfying.


If you’d like, I can also share variations, storage tips, or a no-bake version using different flavors. 🍋✨

The Loaded Club Melt


The Loaded Club Melt

Prep time: 15 mins | Cook time: 10 mins | Servings: 3 large sandwiches


Ingredients

Bread: 3 thick slices of sourdough or brioche.


Proteins: 1 lb thinly sliced deli turkey and 12 strips of thick-cut bacon (cooked until crispy).


Produce: 2 large beefsteak tomatoes (sliced), 1 head of iceberg lettuce (shredded very fine), and fresh parsley (chopped).


Cheese: 6 slices of sharp cheddar or colby jack.


The Spread: 1/2 cup mayonnaise, 1 tbsp Dijon mustard, and a pinch of black pepper.


Instructions

Prep the Base: Toast your bread slices in a pan with a little butter until golden brown on both sides. Place them on a baking sheet.


Layer the Melts:


Spread a generous layer of the mayo-mustard mix on each slice.


Add 2 slices of cheese to each.


Pile the turkey high (fold the slices to create volume rather than laying them flat).


Place under a broiler for 1–2 minutes just until the cheese is bubbling and the turkey is warm.


The “Loaded” Toppings:


Add a layer of crispy bacon over the warm turkey.


Place two thick tomato slices on top. Season the tomatoes with a tiny bit of salt and pepper.


Add more bacon (because why not?).


The Finishing Touch:


Top with a massive mountain of shredded lettuce.


Garnish the entire tray with freshly chopped parsley and a drizzle of the remaining mayo mix or a light vinaigrette if you like extra zing.


Pro Tips for that “Deli Look”

Shred the Lettuce: Use a very sharp knife to cut the iceberg lettuce into paper-thin ribbons. This gives it that light, airy texture seen in the photo.


The Fold: Don’t just stack the turkey; “ribbon” it. Scrunch each slice up before putting it on the bread to trap heat and create height.

Cinnamon Roll Apple Lasagna pure comfort you’ll crave again and again

🍎 Cinnamon Roll Apple Cream Cheese Bake

A warm, layered dessert made with soft cinnamon rolls, spiced apples, and a creamy cheesecake-style filling. Perfect for brunch, holidays, or cozy evenings.


📝 Ingredients

  • 2 cans refrigerated cinnamon rolls (with icing)

  • 4 cups apple pie filling

  • 1 teaspoon ground cinnamon

  • ½ teaspoon nutmeg (optional)

  • 8 oz cream cheese, fully softened

  • ½ cup powdered sugar

  • 1 teaspoon vanilla extract

  • 1 cup whipped topping

  • Caramel sauce, for drizzling


👩‍🍳 Instructions

1. Prepare the Base

Preheat oven to 350°F (175°C).
Grease a 9×13-inch baking dish.
Flatten half of the cinnamon rolls and press them tightly into the bottom of the dish to form a soft crust.


2. Apple Layer

Spread half of the apple pie filling evenly over the dough.
Sprinkle with cinnamon and nutmeg for extra flavor.


3. Creamy Layer

In a bowl, beat cream cheese, powdered sugar, and vanilla until smooth.
Gently fold in whipped topping until light and fluffy.


4. Build the Layers

Spread half of the cream mixture over the apples.
Repeat layers with remaining cinnamon rolls, apple filling, and cream mixture.


5. Bake

Bake for 30–35 minutes until the top is golden, edges are bubbling, and the center is slightly soft.


6. Finish & Serve

Let it rest 10–15 minutes.
Drizzle with reserved cinnamon roll icing and caramel sauce.
Slice and serve warm.


🕒 Total Time

About 50 minutes


✨ Tips for Best Results

  • Flatten rolls well: Helps them bake evenly and avoids doughy centers.

  • Use room-temperature cream cheese: prevents lumps.

  • Balance sweetness: Add a small splash of lemon juice or pinch of salt to apples.

  • Homemade option: Replace canned apples with sautéed fresh apples, butter, brown sugar, and cinnamon.

  • Avoid overbaking: The center should slightly jiggle; it firms as it cools.

  • Clean slices: Chill 20–30 minutes after baking, then reheat.

  • Crunch option: Add chopped pecans or walnuts between layers.

  • Extra flavor: Finish with caramel, maple syrup, and a pinch of flaky salt.

  • Make ahead: Assemble, cover, refrigerate overnight, and bake fresh the next day.


🍨 Serving Ideas

  • Top with vanilla ice cream or whipped cream

  • Pair with coffee, chai latte, or apple cider

  • Serve warm for gooey layers or chilled for cheesecake-style texture

Purple Onion Metabolic Support Salad

Purple Onion Metabolic Support Salad

A nutrient-rich side dish that may help support blood sugar and heart health when eaten regularly as part of a healthy lifestyle.

Description

This simple raw purple onion recipe preserves beneficial plant compounds like quercetinanthocyanins, and sulfur compounds. These antioxidants may help improve insulin sensitivity, reduce inflammation, and support cardiovascular health — not as a treatment, but as nutritional support.

Ingredients

  • 1 medium purple (red) onion, finely chopped

  • 1 tbsp lemon juice or apple cider vinegar

  • 1 tbsp extra-virgin olive oil

  • 1 small garlic clove, minced

  • Salt to taste

  • Optional: parsley, cucumber, tomato, or avocado

Instructions

  1. Soak chopped onion in cold water for 5–10 minutes (reduces harshness).

  2. Drain well.

  3. Mix with garlic, lemon juice (or vinegar), olive oil, and salt.

  4. Add optional vegetables if desired.

  5. Serve fresh.


Servings

2 servings

Nutritional Info (approx. per serving)

  • Calories: ~60

  • Carbohydrates: ~7 g

  • Fiber: ~1.5 g

  • Fat: ~4 g

  • Sugar: ~3 g

  • Glycemic load: Low

Potential Benefits (Evidence-Based, Not Miracles)

✔ May help support blood sugar regulation over time
✔ Rich in antioxidants (especially quercetin)
✔ May support heart health by reducing inflammation
✔ Low-glycemic and diabetes-friendly when portioned properly

These effects are gradual and supportive, not immediate or curative.

Tips

  • Eat raw or lightly cooked to preserve antioxidants.

  • Pair with protein or healthy fats to reduce glucose spikes.

  • Best consumed regularly, not as a one-time “fix.”

Q & A

Q: Can this replace diabetes medication?
❌ No. Never replace prescribed treatment without a doctor’s guidance.

Q: Will my blood sugar drop instantly after eating this?
❌ No. Blood sugar changes happen over hours to days, not minutes.

Q: Is purple onion better than white?
✅ Yes — purple onions contain more antioxidants.

Q: How often can I eat this?
✅ 3–5 times per week is reasonable for most people.

Cranberry Orange Bread

🍊 Cranberry Orange Bread Recipe

  • Prep time: 15 minutes

  • Cook time: 55–65 minutes

  • Servings: 10–12 slices

Ingredients

The Batter:

  • 2 cups All-purpose flour

  • 1 cup Granulated sugar

  • 1 ½ tsp Baking powder

  • ½ tsp Baking soda

  • 1 tsp Salt

  • 1 Egg, large (room temperature)

  • ¾ cup Fresh orange juice (about 2 oranges)

  • 2 tbsp Orange zest (finely grated)

  • ¼ cup Vegetable oil (or melted butter)

  • 1 ½ cups Fresh or frozen cranberries (halved if they are very large)

  • ½ cup Chopped walnuts or pecans (optional)

The Simple Glaze (Optional):

  • ½ cup Powdered sugar

  • 1 tbsp Orange juice

Instructions

  1. Preheat & Prep: Heat your oven to 350°F (175°C).  Grease a 9×5-inch loaf pan thoroughly with butter or non-stick spray.

  2. Mix Dry Ingredients: In a large bowl, whisk together the flour, sugar, baking powder, baking soda, and salt.

  3. Mix Wet Ingredients: In a separate medium bowl, beat the egg slightly.  Stir in the orange juice, orange zest, and oil.

  4. Combine: Pour the wet ingredients into the dry ingredients.  Stir by hand until just combined.  Do not overmix, or the bread will be tough.

  5. Fold: Gently fold in the cranberries and nuts.

  6. Bake: Pour the batter into the prepared loaf pan.  Bake for 55 to 65 minutes, or until a toothpick inserted into the center comes out clean.

  7. Cool: Let the bread cool in the pan for 10 minutes, then move to a wire rack.  If using the glaze, drizzle it over the bread once it has cooled completely.

💡 Tips for Success

  • Toss the berries: Toss your cranberries in a teaspoon of flour before adding them to the batter; this prevents them from sinking to the bottom of the loaf.

  • Zest first: Always zest your oranges before you juice them.  It is significantly harder to zest a squeezed, mushy orange!

  • Tent with foil: If the top is browning too quickly but the center isn’t done, loosely cover the pan with aluminum foil for the last 15 minutes.

🥗 Nutritional Info (Per Slice)

Estimates based on 12 slices.

Calorie Fat Carbs Fiber Sugar Protein
210 kcal 6 g 36 g 2g 20 g 3g

✨ Benefits

  • Vitamin C Boost: Thanks to the fresh orange juice and cranberries, this treat offers a nice dose of antioxidants.

  • Low Saturated Fat: By using vegetable oil instead of butter, the bread stays moist for days while keeping saturated fat levels lower.

  • Versatility: It freezes beautifully, making it a perfect “make-ahead” gift or breakfast prep.

❓ Common Q&A

Q: Can I use dried cranberries? A: Yes, but soak them in hot water or orange juice for 10 minutes first to plump them up; otherwise, they can be a bit chewy/tough in the bread.

Q: Why did my bread crack on top? A: Don’t panic! A longitudinal crack is a signature look for quick breads. It happens when the surface sets before the bread has finished rising. It’s perfectly normal.

Q: How do I store this? A: Wrap it tightly in plastic wrap. It actually tastes better the second day as the orange oils infuse the crumb. It stays fresh at room temperature for 3 days or in the freezer for 3 months.

Hawaiian Roll French Toast Bites


Hawaiian Roll French Toast Bites

Ingredients

1 pack (12 count) King’s Hawaiian Original Sweet Rolls (or any sweet slider rolls)


3 large Eggs


1/2 cup Whole milk or heavy cream


1 tsp Vanilla extract


1/2 tsp Ground cinnamon


2 tbsp Unsalted butter (for the pan)


Optional: Maple syrup, powdered sugar, or fresh berries for topping.


Instructions

Prep the Rolls: Keep the rolls connected or pull them apart into individual pieces. For the best texture, slice the rolls in half horizontally (like a sandwich) or leave them whole if you prefer extra thick, fluffy centers.


Make the Custard: In a wide bowl, whisk together the eggs, milk, vanilla, and cinnamon until the mixture is smooth and well-combined.


Soak: Dip each roll into the egg mixture. Let them sit for about 10–15 seconds per side. You want them to absorb the liquid without becoming so soggy they fall apart.


Cook: Heat a large non-stick skillet or griddle over medium-low heat and melt the butter. Place the rolls in the pan.


Brown: Cook for 2–3 minutes per side. Because Hawaiian rolls have a high sugar content, they can brown (or burn) quickly, so keep an eye on them! You want a golden-brown crust.


Serve: Pile them onto a plate and drizzle generously with maple syrup, just like in your photo.


Pro-Tips for Success

Stale is Better: If you have time, leave the rolls out on the counter for a few hours before cooking. Drier bread soaks up the custard better without getting mushy.


Don’t Rush: Keep the heat at medium-low. This ensures the center of the thick roll gets cooked through while the outside gets that nice caramelized finish.

Spinach, Ham, and Cheese Crustless Quiche


Spinach, Ham, and Cheese Crustless Quiche

Prep time: 10 mins | Cook time: 35-40 mins | Servings: 6-8


Ingredients

6 large Eggs


1 cup Heavy cream (or half-and-half for a lighter version)


1 ½ cups Fresh spinach, chopped and sautéed (or 10oz frozen spinach, thawed and squeezed very dry)


1 cup Cooked ham, diced


1 ½ cups Shredded cheese (Swiss, Gruyère, or Monterey Jack work beautifully)


2 Green onions, thinly sliced


½ tsp Salt


¼ tsp Black pepper


¼ tsp Nutmeg (the “secret ingredient” for any spinach/egg dish)


Instructions

Preheat & Prep: Heat your oven to 375°F (190°C). Generously grease a 9-inch pie plate or a round cake pan (like the one in your photo) with butter or cooking spray.


Sauté the Greens: If using fresh spinach, sauté it in a pan with a tiny bit of oil until wilted. Crucial Step: Squeeze out as much liquid as possible from the spinach using a paper towel or colander. This prevents the quiche from becoming watery.


Layer the Fillings: Spread the squeezed spinach, diced ham, and 1 cup of the cheese evenly across the bottom of your prepared pan.


Whisk the Custard: In a medium bowl, whisk together the eggs, cream, salt, pepper, and nutmeg until well combined and slightly frothy.


Assemble: Pour the egg mixture over the fillings in the pan. Use a fork to gently wiggle the ingredients so the egg settles into every nook. Top with the remaining ½ cup of cheese.


Bake: Place in the center of the oven for 35 to 40 minutes. You’re looking for the edges to be set and the top to be a beautiful golden brown, just like your picture.


Rest: Let it sit for at least 10 minutes before slicing. This allows the custard to fully set so you get clean, beautiful wedges.


Tips for Success

The Squeeze: I can’t stress this enough—spinach holds a lot of water. If you don’t squeeze it dry, you’ll end up with a “soup” at the bottom of the pan.


Mix it up: Feel free to swap the ham for crispy bacon or sautéed mushrooms if you want a different flavor profile.

Homemade Mozzarella Cheese

🧀 Homemade Mozzarella Cheese (Safe & Honest Recipe)

This Homemade Mozzarella Cheese recipe shows you how to make soft, fresh, stretchy mozzarella at home using simple ingredients. It’s perfect for pizza, salads, sandwiches, and baked dishes.


📝 Ingredients

  • 1 gallon (3.8 L) whole milk (not ultra-pasteurized)

  • 1½ teaspoons citric acid, dissolved in ¼ cup cool water

  • ¼ teaspoon liquid rennet (or ½ tablet), dissolved in ¼ cup cool water

  • 1 teaspoon salt, or to taste

  • Optional: ¼ teaspoon calcium chloride (for store-bought milk)


👩‍🍳 Step-by-Step Instructions

Step 1: Prepare the Milk

Pour milk into a large pot.
Stir in the citric acid solution slowly and evenly.
Let it sit for 5 minutes.


Step 2: Heat the Milk

Heat gently to 90°F (32°C), stirring slowly to avoid burning.
Remove from heat and stir in the diluted rennet for 30 seconds.
Cover and let rest 5–10 minutes until curds form (it should look like custard).


Step 3: Cut the Curds

Using a long knife, cut the curds into 1-inch cubes.
Let rest for 5 minutes.


Step 4: Cook the Curds

Heat slowly to 105°F (40°C) while stirring gently.
Turn off heat and let curds rest for 5 minutes.


Step 5: Drain the Whey

Transfer curds to a microwave-safe bowl or cheesecloth-lined colander.
Press gently to remove excess liquid.


Step 6: Heat & Stretch

Microwave curds for 30–60 seconds until hot and pliable.
Fold and stretch like dough until smooth and elastic.
Sprinkle in salt while stretching.

(If too firm, reheat 20 seconds and stretch again.)


Step 7: Shape & Cool

Form into balls or logs.
Place in cold water for 5 minutes to firm up.


🧊 Storage

  • Store in salted water or airtight container

  • Refrigerate up to 5 days

  • Can be frozen up to 2 months (texture may change slightly)


🍽 Serving Ideas

  • Caprese salad

  • Pizza topping

  • Baked pasta

  • Sandwiches

  • Snack with tomatoes & olive oil


⚠️ Important Corrections (Removed Harmful Claims)

❌ Not “zero carb”
❌ Not a fat-burning food
❌ Does not cause dehydration
❌ Not a weight-loss product

✔ It is fresh dairy food
✔ Provides protein and calcium
✔ Best enjoyed in moderation


🌿 Variations

  • Add herbs during stretching

  • Add garlic powder

  • Smoke lightly for flavor

  • Shape into mini balls (bocconcini)

Spiced Banana & Oat Breakfast Smoothie


Spiced Banana & Oat Breakfast Smoothie

Serves: 1 | Prep time: 5 minutes


Ingredients

1 large banana (frozen is best for a creamy texture)


1/4 cup rolled oats (provides that hearty “breakfast” feel)


1 cup milk of choice (dairy, almond, or oat milk work great)


1/2 teaspoon ground cinnamon (plus extra for dusting)


1/4 teaspoon ground cardamom (this gives it 그 unique, aromatic flavor)


1 teaspoon honey or maple syrup (optional, depending on banana ripeness)


1/2 cup ice (if using a fresh banana)


Instructions

Prep the Oats: For a smoother texture, you can pulse the dry oats in the blender first until they turn into a fine flour.


Combine: Add the banana, milk, cinnamon, cardamom, and sweetener into the blender.


Blend: Blend on high until completely smooth and creamy.


Garnish: Pour into a tall glass. Top with three thin banana slices, a dusting of cinnamon, and a cinnamon stick for the full “pro-smoothie” look.


Pro-Tips for the Best Results

Texture: If it’s too thick, add a splash more milk. If it’s too thin, add more frozen banana or a tablespoon of Greek yogurt.


Flavor Boost: Add a tiny pinch of salt or a drop of vanilla extract to make the spices “pop.”


Nutrient Boost: Toss in a tablespoon of chia seeds or flax seeds if you want some extra fiber to keep you full longer.

Tropical Sunrise Layered Smoothie


Tropical Sunrise Layered Smoothie

Serves: 2 | Prep time: 10 minutes


Ingredients

The Pink Layer (Bottom)


1 cup frozen pitaya (dragon fruit) chunks or 1 packet of frozen pitaya puree


1/2 cup frozen raspberries or strawberries


1/2 cup coconut water or apple juice


A squeeze of lime juice


The Yellow Layer (Top)


1 cup frozen mango chunks


1 cup frozen pineapple chunks


1/2 cup coconut milk (from a carton for creaminess)


1/2 frozen banana (optional, for extra thickness)


Toppings (As shown in image)


Fresh pineapple chunks (skewered)


Fresh kiwi slices


A sprinkle of granola or toasted coconut


Fresh pineapple leaves (for garnish)


Instructions

Blend the Pink Base: Add all ingredients for the pink layer into a blender. Blend until completely smooth and thick.


Tip: Use as little liquid as possible to keep it thick so the layers don’t mix immediately.


Pour: Divide the pink mixture between two tall glasses, filling them about halfway. Rinse the blender well.


Blend the Yellow Top: Add the yellow layer ingredients to the blender. Blend until smooth.


Layering: Carefully spoon the yellow mixture over the pink layer. To get that “swirl” effect seen in the photo, take a long spoon or straw and gently pull a bit of the pink layer upward into the yellow.


Garnish: Top with granola and a slice of kiwi. Skewer a few pineapple chunks and place them in the glass.


Pro-Tips for the Perfect Look

The “Cold” Secret: Using frozen fruit instead of ice keeps the flavors bold and the texture thick enough to support the toppings.


The Swirl: Don’t over-mix! One or two gentle “up-and-down” motions with a spoon is all it takes to get those beautiful streaks.

Creamy Grapefruit & Berry Smoothie


Creamy Grapefruit & Berry Smoothie

This recipe balances the natural tartness of grapefruit with creamy Greek yogurt and sweet berries to ensure it’s delicious, not bitter.


Prep time: 5 minutes | Servings: 2


Ingredients

Grapefruit: 1 large ruby red grapefruit (peeled and deseeded)


Frozen Fruit: 1 cup frozen raspberries or strawberries (for that pink color)


Creamy Base: 1/2 cup plain or vanilla Greek yogurt


Liquid: 1/2 cup unsweetened almond milk (or coconut water for a lighter finish)


Sweetener: 1–2 tbsp honey or maple syrup (adjust based on the grapefruit’s tartness)


Optional: 1/2 tsp vanilla extract


Toppings (As seen in your photo)

Fresh raspberries and blueberries


A spoonful of granola for crunch


Small wedges of fresh grapefruit


Instructions

Prep the Grapefruit: Peel the grapefruit thoroughly, removing as much of the white “pith” as possible, as the pith is where most of the bitterness lives.


Combine: Add the grapefruit segments, frozen berries, yogurt, liquid, and sweetener into a high-speed blender.


Blend: Start on low and gradually increase to high until the texture is completely smooth and creamy.


Adjust: Give it a quick taste. If it’s too tart, add a little more honey. If it’s too thick, splash in a bit more milk.


Serve: Pour into tall glasses and garnish with your fresh berries and granola.


Quick Tip for Best Results

To get that ultra-smooth “whipped” look from your photo, use frozen fruit instead of ice. Ice can dilute the flavor, while frozen berries keep it thick and vibrant.

🥤 Creamy Banana, Avocado & Almond Smoothie


🥤 Creamy Banana, Avocado & Almond Smoothie


Prep time: 5 minutes | Servings: 1


Ingredients


1 Ripe Banana (frozen slices work best for a thicker texture)


½ Ripe Avocado (makes it incredibly silky)


1 cup Milk of choice (Almond milk, oat milk, or dairy)

1 tbsp Almond Butter (or a small handful of raw almonds)


1 tsp Honey or Maple Syrup (optional, for extra sweetness)


A pinch of Cinnamon


Ice cubes (if using a fresh banana)


Instructions


Prep: Peel the banana and scoop the avocado flesh out of the skin.

Combine: Place the banana, avocado, milk, almond butter, and sweetener into a high-speed blender.


Blend: Start on a low speed and gradually increase to high. Blend for about 45–60 seconds until the mixture is completely smooth and no almond bits remain.


Serve: Pour into a tall glass. Top with a few whole or crushed almonds and a sprinkle of cinnamon, just like in your picture!

Pro-Tips for the Best Texture


For a colder drink: Use a frozen banana. It gives the smoothie a consistency almost like soft-serve ice cream.


Liquid first: Always pour your milk in first. This helps the blender blades move freely and prevents the thick avocado from getting stuck at the bottom.


Nutrient boost: You can add a scoop of vanilla protein powder or a tablespoon of chia seeds without changing the flavor profile significantly.