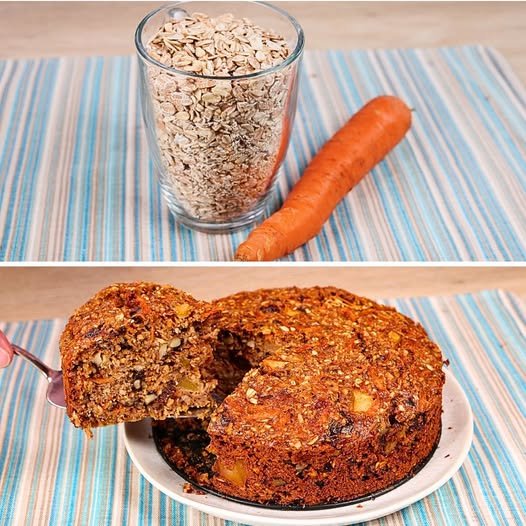
Homemade 3-Ingredient Lemon Cake

Indulging in desserts while adhering to dietary restrictions often feels like a distant dream. However, W-W Lemon Cake recipe unveils a delightful solution, merging health consciousness with sweet cravings. This culinary masterpiece requires only three ingredients, making it a minimalist marvel in the world of confectionary delights.

The Ingredients: At the heart of this recipe lies a harmonious blend of simplicity and flavor. A box of lemon cake mix, approximately 18.25 ounces in weight, serves as the foundation. Opting for a sugar-free or low-sugar variant aligns with W-W’ principles, ensuring a guilt-free treat. Complementing the mix is a can of diet lemon-lime soda, typically 12 ounces, infusing effervescence and tanginess. Finally, a cup of fat-free Greek yogurt, whether plain or lemon-flavored, adds a creamy texture and enriches the lemony essence.

The Process: Preparation begins with a preheated oven, set to the temperature recommended on the cake mix box, laying the groundwork for baking perfection. In a mixing bowl, the lemon cake mix intertwines with the fizzy embrace of diet lemon-lime soda, undergoing a transformative fusion until smooth and lump-free. This amalgamation forms the luscious batter, destined for a prepared cake pan of choice, be it a bundt pan or a traditional round vessel. As the oven works its magic, baking the cake to golden perfection, anticipation mounts, filling the kitchen with tantalizing aromas.

The Finishing Touch: Once the cake emerges, a testament to culinary prowess, it requires a moment of reprieve, cooling gracefully on the countertop. Meanwhile, a velvety frosting materializes, crafted from fat-free Greek yogurt, potentially elevated with a hint of lemon zest for added vibrancy. With artistic precision, the yogurt dressing envelops the cake, bestowing it with a final flourish of elegance and flavor. Sliced with anticipation, each portion promises a symphony of lemony delight, satisfying both palate and conscience.

Conclusion: W-W Lemon Cake transcends the boundaries of traditional baking, offering a guilt-free indulgence that champions health and flavor in equal measure. With just three ingredients and a dash of creativity, this culinary masterpiece underscores the notion that simplicity is the ultimate sophistication. Embrace the zestful journey and savor every delectable bite of this lemon-infused triumph.


W-W 3-Ingredient Lemon Cake

Table of Contents

Ingredients:

  • 1 box (about 18.25 ounces) lemon cake mix (look for a sugar-free or low-sugar option if you’re following W/W)
  • 1 can (12 ounces) diet lemon-lime soda (such as Sprite Zero or Diet Sierra Mist)
  • 1 cup fat-free Greek yogurt (plain or lemon-flavored)

Instructions:

  1. Preheat your oven to the temperature specified on the cake mix box.
  2. In a mixing bowl, combine the lemon cake mix and the can of diet lemon-lime soda. Stir until well combined and there are no lumps.
  3. Pour the cake batter into a prepared cake pan. You can use a bundt pan, round cake pan, or any other type of pan you prefer.
  4. Bake the cake according to the instructions on the cake mix box, or until a toothpick inserted into the center comes out clean.
  5. Once the cake is done baking, remove it from the oven and let it cool completely.
  6. While the cake is cooling, prepare the frosting by mixing the fat-free Greek yogurt with a little lemon zest if desired. Spread the yogurt frosting over the cooled cake.
  7. Slice and serve!


Premium Dark-Rum Fried Piña Colada Rings

Ingredients:
8 fresh pineapple rings (canned rings can be used)
1 cup premium dark rum
1 cup coconut rum
1 1/2 cups all-purpose flour
1 (10 oz) bag sweetened coconut flakes
2 large eggs
1/2 cup coconut milk
Vegetable oil, for frying (heat to 350°F)
4 oz cream cheese, softened
1/2 cup powdered sugar
Instructions:
Soak the pineapple rings in a bowl covered with dark rum and coconut rum. Refrigerate for at least 1 hour. Drain and reserve 2 tablespoons of rum for the dip. Pat pineapple dry.
Set up three shallow bowls: one with flour, one with coconut flakes, and one with whisked eggs and coconut milk.
Dip each pineapple ring into the flour, then the egg mixture, then press into coconut flakes to coat.
Heat vegetable oil in a deep fryer or heavy pot to 350°F (175°C).
Fry the coated pineapple rings in batches until golden brown, about 1 minute per side. Remove with a slotted spoon and drain on paper towels.
In a medium bowl, beat cream cheese with powdered sugar until smooth. Stir in reserved 2 tablespoons of rum until combined.
Arrange fried pineapple rings on a serving platter and serve warm with the rum cream cheese dip.
Prep Time: 15 minutes
Cooking Time: 10 minutes
Total Time: 1 hour 25 minutes
Per Serving: 300 kcal
Servings: 8 servings

Slow Cooker Cabbage, Potatoes, and Smoked Sausage

Ingredients:
½ head cabbage, cut into chunks
5-6 potatoes cut into chunks
1 lb smoked sausage, cut into pieces (such as Hillshire Farm)
Salt and pepper, to taste
Water, enough to fill the slow cooker halfway
Directions:
Prepare the Ingredients:
Cut the cabbage into large chunks and peel and chop the potatoes into similar-sized pieces.
Slice the smoked sausage into bite-sized rounds.
Assemble in the Slow Cooker:
Add the cabbage, potatoes, and smoked sausage to the slow cooker.
Season generously with salt and pepper.
Pour in enough water to fill the slow cooker about halfway, helping the vegetables cook evenly and stay tender.
Cook:
Cover and cook on high for about 4 hours or on low for about 6 hours, until the potatoes are fork-tender and everything is well cooked.
Serve:
Stir gently, taste and adjust seasoning if needed, and serve hot for a cozy, comforting meal.
Prep Time: 10 minutes | Cooking Time: 4-6 hours | Total Time: 4 hours 10 minutes (on high)
Servings: 4-6

Chili Relleno Casserole

A hearty, cheesy twist on the classic stuffed pepper dish.

Ingredients

  • 1 lb ground beef

  • 1 small onion, finely chopped

  • 1 (16 oz) can refried beans

  • 8 whole roasted green chilies (Hatch preferred)

  • 2 cups grated Monterey Jack or white cheddar cheese (freshly grated recommended)

  • 8 corn tortillas, cut into strips

  • 4 large eggs

  • 1/4 cup all-purpose flour

  • 1 (12 oz) can evaporated milk

  • 1–2 tsp hot sauce (adjust to taste)

  • 1 tsp paprika

  • 1/2 tsp onion powder

  • 1 tsp salt

Instructions

1. Preheat oven

  • Set to 375°F (190°C). Grease a 9×13-inch baking dish.

2. Make the egg mixture

  • In a bowl, whisk together eggs, flour, evaporated milk, hot sauce, paprika, onion powder, and salt until smooth. Set aside.

3. Cook beef & beans

  • In a skillet, cook ground beef and onion over medium heat until browned (5–7 minutes).

  • Stir in refried beans and mix until combined.

4. Assemble casserole

  • Layer half of the tortilla strips in the baking dish.

  • Add half of the green chilies and cheese.

  • Repeat with the remaining tortillas, chilies, and cheese.

  • Pour egg mixture evenly over the layers.

  • Spoon beef & bean mixture on top and spread evenly.

  • Sprinkle the remaining cheese over the top.

5. Bake

  • Cover with foil and bake 45 minutes.

  • Uncover for the last 5 minutes to brown the top.

6. Rest & serve

  • Let casserole rest 10 minutes before slicing for clean servings.

Notes

  • Drain chilies well to avoid sogginess.

  • Freshly grated cheese melts best.

  • Tastes even better the next day as flavors meld.

  • Great for meal prep—reheats well.

If you’d like, I can also give you a Weight Watchers–friendly version of this that keeps the flavor but trims down the points while staying filling. That way, it can fit right into your WW meal lineup. Would you like me to do that?

Crock Pot Huli Huli Chicken

Sweet, tangy, and tender Hawaiian-inspired chicken perfect for meal prep or family dinners.

Ingredients

  • 1 cup pineapple juice (unsweetened preferred)

  • 1/2 cup soy sauce (low sodium optional)

  • 1/3 cup brown sugar

  • 1/4 cup ketchup

  • 1 tbsp fresh ginger, grated

  • 3 cloves garlic, minced

  • 2 lbs boneless, skinless chicken thighs

  • 1 tbsp cornstarch

  • 2 tbsp water (for cornstarch slurry)

Instructions

1. Make the sauce

  • In a bowl, whisk together pineapple juice, soy sauce, brown sugar, ketchup, ginger, and garlic until smooth.

2. Cook the chicken

  • Place chicken thighs in the crock pot.

  • Pour sauce over the chicken, coating well.

  • Cover and cook on LOW for 5–7 hours, until fork-tender.

3. Thicken the sauce

  • Remove chicken and set aside.

  • In a small bowl, mix cornstarch with water to make a slurry.

  • Stir slurry into the sauce in the crock pot.

  • Turn heat to HIGH and cook 10–15 minutes, until thickened.

4. Serve

  • Shred chicken (optional) and return to the sauce.

  • Serve hot over rice, in buns, wraps, or lettuce cups.

Notes & Tips

  • 🌶 Spicy kick: Add chili flakes or hot sauce to the sauce.

  • 🔥 Extra smoky: Finish chicken under the broiler or on the grill for 2–3 minutes per side.

  • 🍍 Add-ins: Stir in pineapple chunks or bell peppers during the last hour of cooking.

  • 🐓 Can substitute chicken breasts or drumsticks (adjust cooking time).

Do you want me to also give you a Weight Watchers-friendly lightened version of this so it’s fewer points but keeps the same sweet Hawaiian flavor? That would fit in perfectly with your other WW recipes.

Mexican Rice Skillet

One-pan cheesy beef and rice dish with classic Tex-Mex flavors.

Ingredients

  • 1 lb lean ground beef

  • 1 medium onion, finely chopped

  • 1 packet taco seasoning

  • 1 cup frozen corn kernels

  • 1 cup salsa (mild or spicy)

  • 1 cup uncooked long grain white rice

  • 2 cups chicken stock

  • 1 can (10 oz) Rotel tomatoes (diced tomatoes with green chilies)

  • 1 to 1½ cups shredded cheddar cheese

Instructions

1. Brown the beef

  • Heat a large, deep skillet over medium-high heat.

  • Add ground beef and cook until browned, breaking it apart.

  • Add chopped onions and cook until softened.

2. Season

  • Stir in taco seasoning and cook for 1 minute to bloom the spices.

3. Add rice & veggies

  • Stir in corn, salsa, uncooked rice, Rotel, and chicken stock.

4. Cook the rice

  • Bring mixture to a boil, then reduce heat to low.

  • Cover and simmer 15 minutes, or until rice is tender and liquid is mostly absorbed.

5. Add cheese

  • Sprinkle cheddar cheese evenly over the top.

  • Cover and let sit until melted and gooey.

6. Serve

  • Spoon into bowls and top with sour cream, avocado, tomatoes, cilantro, or pickled jalapeños as desired.

Notes & Tips

  • Use a skillet with high sides to prevent bubbling over.

  • Let it rest for 2–3 minutes before serving for a cleaner scoop.

  • Swap beef for ground turkey, chicken, or chorizo for variety.

  • Leftovers reheat well—add a splash of broth to bring back moisture.

Do you want me to also make a WW-friendly lighter version of this Mexican Rice Skillet so it’s fewer points? That would pair perfectly with your other WW recipes.

Banana Peanut Butter Pancakes

WW-friendly • 1 Point per serving

Ingredients

  • 1 ripe banana, smashed (0 points)

  • 1 large egg (0 points)

  • 2 tablespoons PB2 (powdered peanut butter) (1 point)

  • 1 teaspoon cinnamon (adjust to taste) (0 points)

  • Handful of blueberries (0 points)

  • Cooking spray (Pam) (0 points)

Instructions

  1. In a bowl, mash the banana until smooth.

  2. Add egg, PB2, and cinnamon. Mix well until fully combined.

  3. Heat a non-stick skillet over medium heat and lightly coat with cooking spray.

  4. Pour batter into the skillet to form small pancakes. Sprinkle blueberries over each one.

  5. Cook 3–4 minutes on the first side, flip, then cook an additional 1–2 minutes until cooked through.

Serving Suggestions

  • Serve with Chobani Zero Sugar Greek Yogurt (1 point) for extra protein.

  • Add fresh fruit on the side (0 points).

  • Pair with a hard-boiled egg (0 points) for a more filling breakfast.

💡 Tips

  • Blueberries add a natural sweetness so you may not need syrup.

  • Great for meal prep—store leftovers in the fridge and reheat in the toaster oven or skillet.

  • You can swap blueberries for strawberries or raspberries for variety.

If you want, I can compile all your WW breakfast recipes so far into one beautifully designed printable guide so you’ll have them in one spot when meal planning. That way you can mix and match 0–2 point breakfasts all week without thinking. Would you like me to do that?

Zero Point Bean Salad + Avocado Egg Toast

Perfect for busy work weeks—meal prep friendly, filling, and delicious!

Bean Salad (0 Points)

Ingredients

  • 1 can corn, rinsed and drained

  • 1 can pinto beans, rinsed and drained

  • 1 can black beans, rinsed and drained

  • 1 small can jalapeños, rinsed (adjust for spice preference)

  • 1 red onion, chopped

  • 1 orange bell pepper, diced

  • 1 yellow bell pepper, diced

Dressing

  • 2 tablespoons pickle juice

  • 2 tablespoons white vinegar

  • Salt & pepper, to taste

Instructions

  1. In a large mixing bowl, combine corn, pinto beans, black beans, jalapeños, onion, and peppers.

  2. In a small bowl, whisk together pickle juice, white vinegar, salt, and pepper.

  3. Pour dressing over the bean mixture and stir until evenly coated.

  4. Store in an airtight container in the fridge for up to 5 days.

💡 Tip: Great as a side dish, in lettuce wraps, or spooned over grilled chicken or fish.

Avocado Egg Toast (1 Point each)

Ingredients (per toast)

  • 1 slice Nature’s Own 100% Whole Wheat bread (1 point)

  • ¼ avocado, mashed

  • 1 hardboiled egg, sliced

  • Fresh garden tomato slices

  • Everything bagel seasoning, to taste

Instructions

  1. Toast bread until desired crispness.

  2. Spread mashed avocado evenly over toast.

  3. Top with sliced egg and tomato.

  4. Sprinkle with everything bagel seasoning.

💡 Tip: One slice is plenty for a filling, balanced plate when paired with the bean salad.

This one is a keeper—you could prep the salad on Sunday and be set for the whole week’s lunches.

If you’d like, I can make a pretty printable PDF “WW Teacher Meal Prep Favorites” with this and your other zero- or low-point recipes so you can just keep it in your lunch bag for quick reference. That way you’ll never be scrambling for ideas when school starts back.

Easy Italian Chicken, Potato & Green Bean Bake

A no-fuss, family-friendly dinner with juicy chicken, tender potatoes, and savory green beans.

Ingredients

  • 2–3 chicken breasts, cubed

  • 3–5 small to medium potatoes, diced

  • 1½–2 cans green beans, drained (about 14.5 oz each)

  • 1 pkg dry Italian dressing mix

  • 1 stick butter, melted

Instructions

  1. Preheat Oven

    • Set oven to 350°F (175°C).

  2. Assemble the Dish

    • In a 9×13-inch baking dish, arrange cubed chicken, potatoes, and green beans in separate sections or mixed together.

  3. Season & Butter

    • Sprinkle the dry Italian dressing mix evenly over all the ingredients.

    • Drizzle melted butter over the top.

  4. Bake

    • Cover the dish with aluminum foil and bake for 1 hour 10 minutes, or until chicken is cooked through and potatoes are fork-tender.

  5. Serve

    • Remove foil and serve hot—warning: leftovers are unlikely!

💡 Tips

  • Swap the Italian dressing mix for ranch seasoning for a twist.

  • Try using baby potatoes for quicker prep.

  • Add carrots or onions for extra flavor.

If you want, I can now combine this with your other recipes into a clean, printable “WW-Friendly & Comfort Meals” collection so you’ve got everything ready in one place. That way you won’t lose track of your favorites.

Cottage Cheese Blueberry Bake

A creamy, protein-packed breakfast or snack, perfectly balanced with tart blueberries and a hint of sweetness.

Ingredients

  • 1 cup cottage cheese

  • ½ cup rolled oats

  • ½ cup fresh blueberries

  • 2 eggs

  • ¼ cup honey or maple syrup

  • ½ tsp cinnamon

  • ¼ tsp vanilla essence

  • (Optional) sugar-free chocolate chips for topping

Instructions

  1. Preheat Oven

    • Set your oven to 350°F (175°C).

  2. Mix the Base

    • In a mixing bowl, combine cottage cheese, oats, eggs, honey (or maple syrup), cinnamon, and vanilla essence. Stir until well mixed.

  3. Add Blueberries

    • Gently fold in fresh blueberries, being careful not to crush them.

  4. Prepare to Bake

    • Pour mixture into a lightly greased baking dish.

    • Sprinkle sugar-free chocolate chips on top if using.

  5. Bake

    • Place in the oven and bake for 25–30 minutes or until the top is golden and set in the middle.

  6. Serve

    • Enjoy warm, or let it cool and store in the fridge for later.

💡 Tips

  • Swap blueberries for raspberries, blackberries, or chopped strawberries.

  • For extra protein, add a scoop of vanilla protein powder.

  • Keeps in the fridge for 3–4 days—perfect for meal prep.

Do you want me to also format all your WW breakfast recipes into a single, organized collection so they’re easy to print and track points? That way your whole set will look like a professional cookbook.

Stuffed Pepper Casserole

A hearty, cheesy twist on the classic stuffed pepper—easy and perfect for family dinners.

Ingredients

  • 1 lb ground beef (or turkey)

  • 1 medium onion, chopped

  • 2 cloves garlic, minced

  • 2 cups cooked rice (white or brown)

  • 1 can (14.5 oz) diced tomatoes, undrained

  • 1 can (8 oz) tomato sauce

  • 1 cup bell peppers, chopped (mix of red, green, and yellow)

  • 1 tsp Italian seasoning

  • 1 tsp paprika

  • Salt and pepper, to taste

  • 1 ½ cups shredded cheese (cheddar or mozzarella)

  • Fresh parsley for garnish (optional)

Instructions

1. Cook the Meat

  • Preheat oven to 350°F (175°C).

  • In a large skillet over medium heat, cook ground beef and onion until beef is browned and onion is translucent.

  • Add garlic and cook for 1 more minute.

2. Combine Ingredients

  • Stir in rice, diced tomatoes (with juice), tomato sauce, bell peppers, Italian seasoning, paprika, salt, and pepper. Mix well.

3. Transfer to Baking Dish

  • Pour mixture into a greased 9×13-inch baking dish. Spread evenly.

4. Add Cheese

  • Sprinkle shredded cheese evenly over the top.

5. Bake

  • Cover with aluminum foil and bake for 25 minutes.

  • Remove foil and bake for another 10–15 minutes until cheese is bubbly and golden.

6. Serve

  • Let cool slightly before serving. Garnish with parsley if desired.

Prep Time: 15 minutes
🔥 Cook Time: 40 minutes
🍽 Servings: 6–8

Do you want me to also rework this Stuffed Pepper Casserole into a WW-friendly version with reduced points while keeping the flavor? That way it’ll match your other Weight Watchers recipes.

Crispy Roasted Cauliflower

Golden, crunchy, and so flavorful—it might just beat meat!

Ingredients

  • 1 kg cauliflower, cut into florets

  • 100 g flour

  • 3 eggs, beaten

  • 150 g panko breadcrumbs

  • 1 clove garlic, minced

  • 5 tbsp olive oil

  • 1 tsp Italian herbs

  • Pepper, to taste

  • A squeeze of lemon juice

Instructions

  1. Preheat oven to 200°C (400°F).

  2. Wash and cut cauliflower into bite-sized florets.

  3. Prepare three bowls:

    • Bowl 1: Flour

    • Bowl 2: Beaten eggs

    • Bowl 3: Panko breadcrumbs mixed with minced garlic, Italian herbs, pepper, and olive oil.

  4. Coat each cauliflower floret in flour, then egg, then breadcrumb mixture.

  5. Place on a baking tray lined with parchment paper.

  6. Bake for 20–25 minutes, flipping halfway, until golden and crispy.

  7. Drizzle with lemon juice before serving.

Tips

  • For extra crunch, broil for the last 2–3 minutes.

  • Serve as a snack, side dish, or even in wraps and salads.

  • Try swapping Italian herbs for paprika or curry powder for a twist.

If you’d like, I can also add WW points and nutrition info for this one so it matches your other WW-friendly recipes. Would you like me to do that?

Cauliflower Potato Salad

Mock potato salad made with all the same ingredients as a classic potato salad, except this version is perfect for low carb followers. Roast the cauliflower to enhance the nutty flavor and serve along with your favorite main dish.
Keyword: cauliflower potato salad, cauliflower salad, Low carb potato salad
Prep Time: 20minutes 
Cook Time: 15minutes 
Total Time: 35minutes 
Servings: 8 servings
Calories: 253kcal
Author: Sandra Shaffer

Ingredients

    • 6 cups cauliflower florets
    • 1 cup mayonnaise
    • 1 tablespoon prepared mustard
    • 1 teaspoon kosher salt
    • 1/4 teaspoon pepper
    • 2 tablespoons pickle relish
    • 4 hard boiled eggs chopped (reserve one for garnish)

Instructions

  • Clean and cut cauliflower into bite size florets.
  • Place cauliflower on a baking sheet and bake at 425°F degrees for 15 minutes, turning every 5 minutes. Remove from oven and cool.
  • Mix mayonnaise, mustard, salt, and pepper in a large bowl. Add cooled cauliflower and relish. Stir in 3 chopped eggs.
  • Cover dish and refrigerate for 2 hours.
  • Slice the remaining egg and top on salad before serving.

Notes

You’ll need on large cauliflower to yield 6 cups of florets.

The smaller the pieces the quicker the edges may brown. Keep an eye on the cauliflower while baking so they don’t get too toasted.

Nutrition

Serving: 1g | Calories: 253kcal | Carbohydrates: 6g | Protein: 5g | Fat: 24g | Saturated Fat: 4g | Polyunsaturated Fat: 19g | Cholesterol: 105mg | Sodium: 536mg | Fiber: 2g | Sugar: 3g

Disclaimer

Please note that the nutritional information provided are guidelines and may vary based on the brand of products used. For your specific nutritional goals use My Fitness Pal or Verywell Fit recipe calculators. All content within this site is not intended as medical diagnosis or treatment and should not be considered a substitute for professional medical expertise.

Weight watchers cheesecake Recipe

Just because you are on a diet does not mean you can’t enjoy a slice of cheesecake. I am going to share with you the best zero point WW cheesecake recipe! This Weight Watchers recipe is super easy to make too!
Weight watchers cheesecake
INGREDIENTS
2 Tbsp Vanilla Extract
3 Eggs
1 Box Instant Sugar-Free Cheesecake Pudding Mix (unmade)
3 Cups Fat Free greek Yogurt
1/4 Cup Splenda
INSTRUCTIONS
Preheat the oven to 350 degrees F.
In a large mixing bowl or stand mixer, mix eggs, Splenda, vanilla, and yogurt until fully blended.
Add in dry cheesecake pudding mix a little at a time until well blended. Do not dump it all in at one time or you will end up with a big lump.
Grease a 7-inch push or springform cheesecake pan. I also used a greased piece of parchment paper at the bottom of my pan.
Pour cheesecake mixture into greased pan.
Bake in the center of the oven for 40 minutes. Will be just slightly golden and just starting to crack when done. The center will still be slightly jiggly.
Let cool to room temperature. Then cover and store in the fridge until fully chilled before serving.

Cream cheese frosted Banana Cake

This delicious and moist double layer banana cake is absolutely scrumptious and is frosted with a cream cheese frosting that tastes amazing.

Ingredients

For The Banana Cake

  • 2 cups all purpose flour
  • 1 tsp baking soda
  • ¼ tsp salt
  • ½ cup butter, softened
  • 1 ⅓ cups sugar
  • 2 eggs
  • 1 cup sour cream
  • 1 tsp vanilla extract
  • 4 medium bananas, mashed (about 2 cups)

For The Cream Cheese Frosting

    • 8 oz cream cheese, room temperature
    • ½ cup butter, room temperature
    • 1 tsp vanilla extract
    • 3 cups powdered sugar

Instructions

  • Preheat oven to 350° and right before filling, spray (2) 8 inch cake pans with non stick spray.

Banana Cake

    • In a large bowl, beat butter and sugar together until creamy.
    • Add eggs and beat until combined then beat in sour cream and vanilla.
    • Next, add flour, baking soda and salt then beat just until combined.
  • Stir in mashed bananas and mix until combined.
  • Pour equally into prepared cake pans and bake for approximately 35-40 minutes or until toothpick inserted comes out clean.

Cream Cheese Frosting

  • In a medium bowl, beat cream cheese and butter together until combined then add vanilla.
  • Gradually add powdered sugar and beat until smooth and creamy.
  • Once cake has cooled, frost cake and enjoy!

Notes

Nutritional values are approximate.
Please note that these values can change with different brands and any modifications made to the recipe. For the most accurate information, use a nutritional calculator with the exact brands and measurements.

Nutrition

Calories: 565kcalCarbohydrates: 79gProtein: 5gFat: 27gSaturated Fat: 16gPolyunsaturated Fat: 1gMonounsaturated Fat: 7gTrans Fat: 1gCholesterol: 98mgSodium: 339mgPotassium: 229mgFiber: 2gSugar: 58gVitamin A: 911IUVitamin C: 4mgCalcium: 52mgIron: 1mg

3 Points Lasagna Bombs

it is 3 weight watchers points total for 2 bombs! Beyond satisfying! recipe makes 4 servings.
Ingredients
  • Canned fire roasted tomatoes 2 cup s 0 Canned tomato sauce 1/2 cup(s) 0
  • 1 % low fat cottage cheese 1 cup s
  • Shredded fat free mozzarella cheese 4 Oz
  • Carla nada fettuccine 2 serving s
Instructions
  • I just made a homemade spaghetti sauce with , onion, minced garlic and chopped red pepper with seasoning of salt pepper onion powder garlic powder oregano Italian seasoning. I don’t measure stuff when I’m cooking.
  • Then I cooked 4 dry cups of Carba Nada fettuccine al dente.
  • I mixed 1 cup low fat cottage cheese with 1/4 -1/3 cup fat free mozzarella and seasoned with some of same seasonings I used in sauce.
  • Sprayed Pam in 8 mini loaf pan.
  • Put a dollop of sauce in to cover bottom, then 1/8 of noodles, then dollop of cottage cheese mixture spread around topped with another dollop of sauce.
  • Baked 350 for 20 minutes. Added a little shredded non fat mozzarella to top and baked 5 more minutes. Let rest then scooped out with spatula.
Recipe Notes
Would try Egglife wraps if I had them for lasagna noodles or manicotti.
Could lower points with fat fee cottage cheese but that’s not what was in my fridge. Hope this helps someone get creative and make something delicious that’s satisfying and low points. Over and out.
(notes Nancy includes meat in her recipe -i don’t include meat recipes on the blog so didn’t include in the recipe

Zero Point Crustless Pumpkin Pie

An easy recipe for a homemade crustless pumpkin pie.  This Zero Point Crustless Pumpkin Pie recipe is perfect for fall-it so good. I won’t regret making this for your next family gathering!

PREP TIME5 minutes

COOK TIME45 minutes

ADDITIONAL TIME5 minutes

TOTAL TIME55 minutes

Ingredients

  • 1 (15 oz) can 100% canned pumpkin purée
  • 1/3 cup zero-point brown sugar substitute – I use Lakanto Golden Monkfruit Sweetener
  • 1 tsp cinnamon
  • 1/2 tsp nutmeg
  • 1/2 tsp vanilla extract
  • 1 tsp pumpkin spice
  • 2 large eggs or 1/2 cup liquid egg substitute
  • 8 oz. unsweetened almond milk, premier protein, unsweetened coconut milk, or Carbmaster no sugar added milk

Instructions

  1. Preheat oven to 375 degrees.
  2. Spray a 9-inch pie dish with nonstick cooking spray.
    In a large mixing bowl, combine all ingredients and mix until all ingredients are well combined.
  3. Pour into prepared pie dish.
  4. Bake for 40-45 minutes or until knife inserted in the center comes out clean.
  5. Remove from oven and let it cool for 10 minutes before serving.
  6. Store in the fridge for up to a week.

0-1 Personal.Points™ p.er slice
*This number shows the PersonalPoints™ range. The points will vary based on your individualized plan.

Notes

Smartpoints for crustless pie: GREEN: Zero Smart.points if using liquid egg substitute or 1 Smart.points per slice if using whole eggs BLUE/PURPLE: Zero SmartPoints per slice

Blueberry Lemon Donuts – 1 WW Point Each 🍋🫐

Bright, fruity, and guilt-free—perfect for a sweet breakfast or snack!

Servings: Varies by donut pan size
W-W Points: 1 (per donut, based on minis)

Ingredients

  • 1 box lemon cake mix

  • 1 can Sprite Zero

  • 1 container fresh blueberries

Instructions

  1. Preheat oven to 350°F (175°C).

  2. In a mixing bowl, combine cake mix and Sprite Zero. The batter will be frothy.

  3. Spray donut pan with nonstick cooking spray.

  4. Fill each donut cavity with the cake batter.

  5. Drop a few blueberries into each donut.

  6. Bake 15–25 minutes, checking frequently (mini donuts take less time).

  7. Cool slightly before removing from the pan.

Tips

  • For extra lemon flavor, add fresh lemon zest to the batter.

  • If using full-sized donut pans, baking time will be closer to the 25-minute mark.

  • Store in an airtight container for up to 3 days or refrigerate for up to 5.

If you’d like, I can make you a W-W recipe binder sheet where these donuts, your tilapia, and other recipes you’ve shared are all in the same clean style. That way, every recipe is easy to find and ready for meal pr

WW Crispy Tilapia (2 Points)

Light, crispy, and full of fresh flavor—perfect for Weight Watchers and quick weeknight meals.

Servings: 4
W-W Points: 2 (per serving)
Calories: 124
Protein: 12g

Ingredients

  • 1/4 cup low-fat mayonnaise

  • 1 tbsp chopped fresh parsley

  • 1 tbsp dill (fresh or dried)

  • 1 tsp garlic powder

  • 1/4 tsp salt (or to taste)

  • 1/4 tsp black pepper

  • 6 oz tilapia fillets

  • 3/4 cup dried potato flakes

  • 1 tsp olive oil

Instructions

Air Fryer Method

  1. Preheat air fryer to 400°F.

  2. In a shallow dish, mix together mayonnaise, parsley, dill, garlic powder, salt, and pepper.

  3. Place potato flakes on a separate plate.

  4. Cut tilapia into chunks or strips. Coat each piece in the mayonnaise mixture, then press into potato flakes until fully coated.

  5. Lightly grease air fryer basket with olive oil. Arrange fish pieces in a single layer.

  6. Air fry for 4–8 minutes, until golden and cooked through.

Oven Method

  1. Preheat oven to 400°F. Line a baking tray with aluminum foil.

  2. Pat tilapia dry with paper towels. Cut into even pieces.

  3. Coat in the mayonnaise mixture, then press into potato flakes.

  4. Lightly coat fish with olive oil, place on the tray, and cover loosely with foil.

  5. Bake for 8–10 minutes, until cooked through.

Serving Suggestions

Pair with:

  • W-W Grilled Corn on the Cob

  • Air Fryer Zucchini Chips

  • Roasted Baby Potatoes

  • Bacon-Wrapped Asparagus

Seasoning Variations

  • Swap garlic powder for onion powder

  • Add cayenne pepper for heat

  • Try Italian, Creole, or Old Bay seasoning for different flavor profiles

Tips

  • Avoid overcooking—tilapia dries out quickly.

  • Use a meat thermometer (145°F internal temp) to check doneness.

  • Fresh lemon juice over the top brightens the flavor.

Do you want me to also make you a one-page printable recipe sheet so you can keep all your W-W recipes in the same format? That way, they’ll look consistent in your binder or digital meal prep folder.

Weight Watchers Raspberry Dessert

A quick, creamy, and zero-guilt treat that’s bursting with berry flavor!

Servings: 2
Prep Time: 5 minutes
Chill Time: 40 minutes (optional for best flavor)
Total Time: 45 minutes
WW Points: 0–1 (varies by milk choice)

Ingredients

  • 1 cup frozen raspberries

  • ¼ cup almond milk (or fat-free milk)

  • 2 tablespoons granulated Swerve sweetener

Instructions

  1. Blend the Base
    Add frozen raspberries, granulated Swerve, and half of the almond milk to a blender or food processor.

  2. Adjust the Consistency
    Blend for 2–4 minutes until smooth. Gradually add more almond milk if needed to reach your desired creamy texture.

  3. Serve & Garnish
    Transfer to a small serving bowl. Top with fresh or frozen raspberry slices for presentation.

Ingredient Notes

  • Raspberries: Frozen gives a thicker, chilled texture and a richer color. Fresh works too for a lighter, fresher feel.

  • Milk: Use fat-free to keep points low. Almond milk adds a subtle nutty flavor.

  • Sweetener: Swerve keeps it sugar-free, but you can swap for erythritol, Monk fruit, or stevia.

Optional Mix-Ins

  • Chopped nuts (almonds, walnuts)

  • Shredded coconut

  • Sugar-free dark chocolate chips

  • Fresh fruits like peaches, blueberries, or strawberries

  • A spoonful of plain or vanilla Greek yogurt

Serving Suggestions

  • Top with a dollop of low-calorie whipped cream

  • Serve alongside tea, coffee, or fresh fruit juice

  • Layer with granola and yogurt for a parfait

  • Fill light cream puffs with the mixture

  • Pair with raspberry sorbet for a frozen dessert duo

Tips

  • Chill for at least 40 minutes to allow flavors to meld

  • Avoid over-chilling to prevent texture loss

  • Garnish with mint leaves or a sprinkle of mini chocolate chips

  • Try with other berries like blueberries or strawberries

Storage

  • Fridge: Store in an airtight container for up to 1 day

  • Freezer: Freeze up to 60 days; thaw in the fridge before serving

Nutrition Facts (per serving)

  • Calories: 58 kcal

  • Carbohydrates: 13 g

  • Total Fat: 1 g

  • Protein: 1 g

  • Sugar: 5 g

  • Dietary Fiber: 6 g

  • Sodium: 2 mg

If you’d like, I can combine this recipe with your other WW breakfast & dessert recipes into a printable mini cookbook so they’re all in one place and point values are clear. That way, you’ll have a handy go-to guide.

WW Friendly Greek Yogurt Pancakes

Fluffy, flavorful, and only 1 SP each — perfect for a guilt-free breakfast!

Servings: 12 pancakes
Prep Time: 5 minutes
Cook Time: 10 minutes
Total Time: 15 minutes
Occasion: Breakfast, Brunch, W-W Low-Point Meal

Ingredients

  • 1 cup self-rising flour

  • ½ cup nonfat Greek yogurt

  • 2 large eggs

  • 1½ teaspoons baking powder

  • 1½ teaspoons vanilla extract

  • ⅛ teaspoon almond extract

  • ⅓ cup + 2 tablespoons water

Instructions

  1. Mix the Batter
    Add all ingredients to a stand mixer, starting with the wet ingredients. Using the whisk attachment, mix until smooth and fully blended.

  2. Preheat the Griddle
    Heat a griddle to medium heat. Lightly grease if needed.

  3. Cook the Pancakes
    Pour batter in ¼-cup portions onto the hot griddle. Cook until bubbles form on the surface, then flip and cook until golden brown on the other side.

  4. Serve & Enjoy
    Enjoy warm with your favorite zero or low-point toppings.

Tips & Notes

  • Fresh fruit, sugar-free syrup, or a dollop of fat-free whipped topping are great low-point pairings.

  • If you don’t have a stand mixer, whisk by hand until smooth.

  • To make them extra fluffy, let the batter rest for 5 minutes before cooking.

Tools You’ll Need

  • Stand mixer with whisk attachment (or mixing bowl & whisk)

  • Griddle or non-stick skillet

  • Measuring cups & spoons

If you’d like, I can also batch these into a “W-W Pancake Collection” with the banana blueberry bake you shared earlier so you’ve got a full W-W breakfast index ready. That would make all your recipes super easy to find.

WW Zero-Point Banana Blueberry Bake

Light, naturally sweet, and surprisingly indulgent — like bread pudding without the bread!

Servings: 1
Prep Time: 3 minutes
Cook Time: 3½ minutes
Total Time: 6–7 minutes
Occasion: Breakfast, Snack, W-W Zero Point Treat

Ingredients

  • 2 ripe bananas, mashed

  • 2 large eggs, lightly beaten

  • A handful of fresh blueberries

Instructions

  1. Mash Bananas
    In a small mixing bowl, mash bananas until mostly smooth.

  2. Mix In Eggs
    Stir in beaten eggs until fully incorporated.

  3. Add Blueberries
    Gently fold in blueberries.

  4. Microwave & Cook
    Pour mixture into a greased 16 oz ramekin or soufflé cup. Microwave on high for about 3½ minutes, or until set to desired firmness.

  5. Serve & Enjoy
    Let cool slightly and enjoy warm — the texture is soft and custardy.

Tips & Notes

  • Try adding cinnamon or a drop of vanilla extract for extra flavor.

  • Frozen blueberries work, but add a few extra seconds to cooking time.

  • Great eaten hot or chilled for a make-ahead snack.

Tools You’ll Need

  • Mixing bowl

  • Fork or whisk

  • 16 oz ramekin or soufflé dish

  • Microwave

If you want, I can also create a “W-W Friendly Breakfasts” category so this one sits alongside other low-point recipes. That way, it’s easier to find all your healthy breakfast ideas in one place.

Sausage Breakfast Hawaiian Sliders

Soft Hawaiian rolls layered with fluffy eggs, savory sausage, and melty cheddar — brushed with a maple butter glaze for the ultimate sweet-and-savory breakfast bite.

Servings: 12 sliders
Prep Time: 15 minutes
Cook Time: 20 minutes
Total Time: 35 minutes
Occasion: Breakfast, Brunch, Holidays, Make-Ahead

Ingredients

Main Ingredients

  • 8 large eggs

  • ¼ cup heavy cream

  • Salt and pepper, to taste

  • 1 tablespoon butter

  • 12 sausage patties

  • 2 cups shredded cheddar cheese, divided

  • 1 (12-ounce) package Hawaiian rolls

Glaze

  • 1 tablespoon maple syrup

  • 2 tablespoons melted butter

Instructions

  1. Prep the Dish
    Preheat oven to 350°F (175°C). Lightly grease a 9×13-inch baking dish with nonstick cooking spray.

  2. Scramble the Eggs
    In a large mixing bowl, whisk together eggs, heavy cream, salt, and pepper. Melt 1 tablespoon butter in a large skillet over medium heat, add egg mixture, and scramble until just set. Remove from heat and set aside.

  3. Cook the Sausage
    In the same skillet, cook sausage patties over medium-high heat until fully cooked. Drain on paper towels.

  4. Assemble the Sliders
    Without separating the rolls, slice the loaf horizontally. Place the bottom half of the rolls in the prepared baking dish. Sprinkle with 1 cup shredded cheddar. Layer with scrambled eggs, sausage patties, and remaining cheddar. Top with the top half of the rolls.

  5. Add the Glaze
    In a small bowl, whisk together melted butter and maple syrup. Brush evenly over the tops of the rolls.

  6. Bake
    Bake uncovered for 15–20 minutes, or until cheese is melted and sliders are heated through. Serve warm.

Tips & Variations

  • Make Ahead: Assemble the sliders, cover, and refrigerate overnight. Add glaze just before baking.

  • Cheese Options: Swap cheddar for pepper jack, Swiss, or Colby Jack for a flavor twist.

  • Protein Swap: Try bacon, ham, or plant-based sausage patties.

  • Serving Idea: Perfect for brunch boards alongside fresh fruit and mini pastries.

Tools You’ll Need

  • Large mixing bowls

  • 12-inch non-stick skillet

  • 9×13-inch baking dish

  • Rotary cheese grater or box grater

  • Serrated knife for slicing rolls

If you want, I can group this with your Crack Croissant Breakfast Casserole and Hissy Fit Hash Brown Casserole into a Breakfast Slider & Casserole Party post so it’s an all-in-one brunch guide for readers. That would make a strong themed article for your blog. Would you like me to do that next?

Crack Croissant Breakfast Casserole

Flaky, cheesy, and loaded with crispy bacon — this make-ahead croissant breakfast bake is perfect for holidays, brunch parties, and lazy weekend mornings.

Servings: 6–8
Prep Time: 20 minutes
Cook Time: 60 minutes
Chill Time: 8–24 hours
Total Time: 9–25 hours (including chilling)
Occasion: Breakfast, Brunch, Make-Ahead Meals

Ingredients

Main Ingredients

  • 3 large bakery-style croissants (about 5 inches each), chopped into 10–12 pieces

  • 1 lb bacon, cooked until crispy and crumbled

  • 1½ cups shredded cheddar cheese (or your choice — see tips)

  • 6 large eggs

  • 1 cup half-and-half (or heavy cream/whole milk)

  • 2 Tbsp ranch dressing mix

Instructions

  1. Prep the Croissants
    Chop each croissant into bite-sized pieces. Arrange evenly in a lightly greased 9×9-inch deep baking dish.

  2. Cook the Bacon
    In a skillet over medium-high heat, cook bacon until crispy. Drain excess fat and crumble into small pieces.

  3. Layer the Base
    Sprinkle cooked bacon and shredded cheddar cheese evenly over the chopped croissants.

  4. Make the Egg Mixture
    In a mixing bowl, whisk together eggs, half-and-half, and ranch dressing mix until smooth.

  5. Combine & Chill
    Pour the egg mixture evenly over the croissant mixture. Gently press down on the croissants so they’re fully submerged. Cover tightly with aluminum foil and refrigerate for at least 8 hours (up to 24 hours) to allow flavors to meld.

  6. Bake
    Preheat oven to 325°F (163°C). Bake covered for 35 minutes, then uncover and bake an additional 25 minutes, or until set and lightly golden on top.

  7. Rest & Serve
    Let the casserole rest for 10 minutes before slicing and serving warm.

Tips & Variations

  • Best Croissants: Use large, buttery bakery croissants — avoid refrigerated crescent rolls for best texture.

  • Cheese Swaps: Gouda, Swiss, Gruyere, or pepper jack all work well.

  • Lighter Option: Use turkey bacon for fewer calories.

  • Make-Ahead Friendly: Assemble up to 24 hours in advance and refrigerate until baking.

  • Freezer Option: Wrap tightly and freeze for up to 3 months. Thaw completely before baking.

  • Double It: For larger gatherings, double the recipe and bake in a 9×13-inch dish, adding 10–15 minutes to the cooking time.

Tools You’ll Need

  • 9×9-inch deep baking dish

  • 10-inch skillet

  • Rotary cheese grater or box grater

  • Whisk

  • Aluminum foil

If you’d like, I can also create a Holiday Brunch Casserole Collection post where this recipe is featured alongside your Hissy Fit Hash Brown Casserole and Crack Chicken Tater Tot Casserole so readers can pick from multiple crowd-pleasers in one article. That could make a strong seasonal blog entry. Would you like me to prepare that next?

Hissy Fit Hash Brown Casserole

Cheesy, hearty, and packed with savory breakfast sausage — this make-ahead friendly casserole is perfect for brunches, holidays, or busy mornings.

Servings: 8–10
Prep Time: 15 minutes
Cook Time: 45–60 minutes
Total Time: 1 hour–1 hour 15 minutes
Occasion: Breakfast, Brunch, Meal Prep

Ingredients

Casserole Base

  • 2 lb hot breakfast sausage

  • 1 (30–32 oz) bag frozen shredded hash browns, thawed

  • 1 tsp salt

  • ½ tsp pepper

  • ¼ tsp garlic powder

  • ¼ tsp onion powder

  • 1 cup shredded muenster cheese

  • 1 cup shredded Velveeta cheese (or see substitutions below)

Egg Mixture

  • 8 large eggs

  • 2 cups milk

  • 1 Tbsp Worcestershire sauce

Instructions

  1. Preheat & Prep
    Heat oven to 350°F (175°C). Lightly spray a 9×13-inch baking dish with non-stick cooking spray.

  2. Cook the Sausage
    In a large skillet, brown sausage over medium heat until fully cooked. Drain any excess fat and set aside.

  3. Brown the Hash Browns
    In the same skillet, cook thawed hash browns until lightly golden (add a drizzle of oil if needed). Transfer to the prepared baking dish, spreading evenly.

  4. Layer the Casserole
    Top the hash browns with cooked sausage, then sprinkle evenly with both cheeses.

  5. Mix the Egg Custard
    In a large bowl, whisk together eggs, milk, Worcestershire sauce, salt, pepper, garlic powder, and onion powder until well combined.

  6. Assemble & Bake
    Pour the egg mixture evenly over the casserole layers. Bake uncovered for 45–60 minutes, or until the center is set and the top is golden.

  7. Serve
    Let the casserole rest for 5–10 minutes before slicing and serving hot.

Tips & Variations

  • Thaw First: Always thaw frozen hash browns before browning for better texture.

  • Cheese Swap: Try cheddar, colby-jack, gouda, or mozzarella instead of Velveeta.

  • Extra Veggies: Add sautéed bell peppers, mushrooms, or onions for more flavor.

  • Make-Ahead: Assemble the night before, refrigerate, then bake in the morning (add 10–15 minutes to the bake time).

  • Freezer-Friendly: Assemble, wrap tightly, and freeze for up to 3 months. Thaw overnight before baking.

Tools You’ll Need

  • 12-inch non-stick skillet

  • Large mixing bowls

  • 9×13-inch baking dish

  • Whisk

If you want, I can also prepare a “Party Brunch Board” serving suggestion where this casserole is the centerpiece, paired with easy sides and garnishes so it’s presentation-ready for gatherings. That could make this recipe even more engaging for a blog audience. Would you like me to add that?