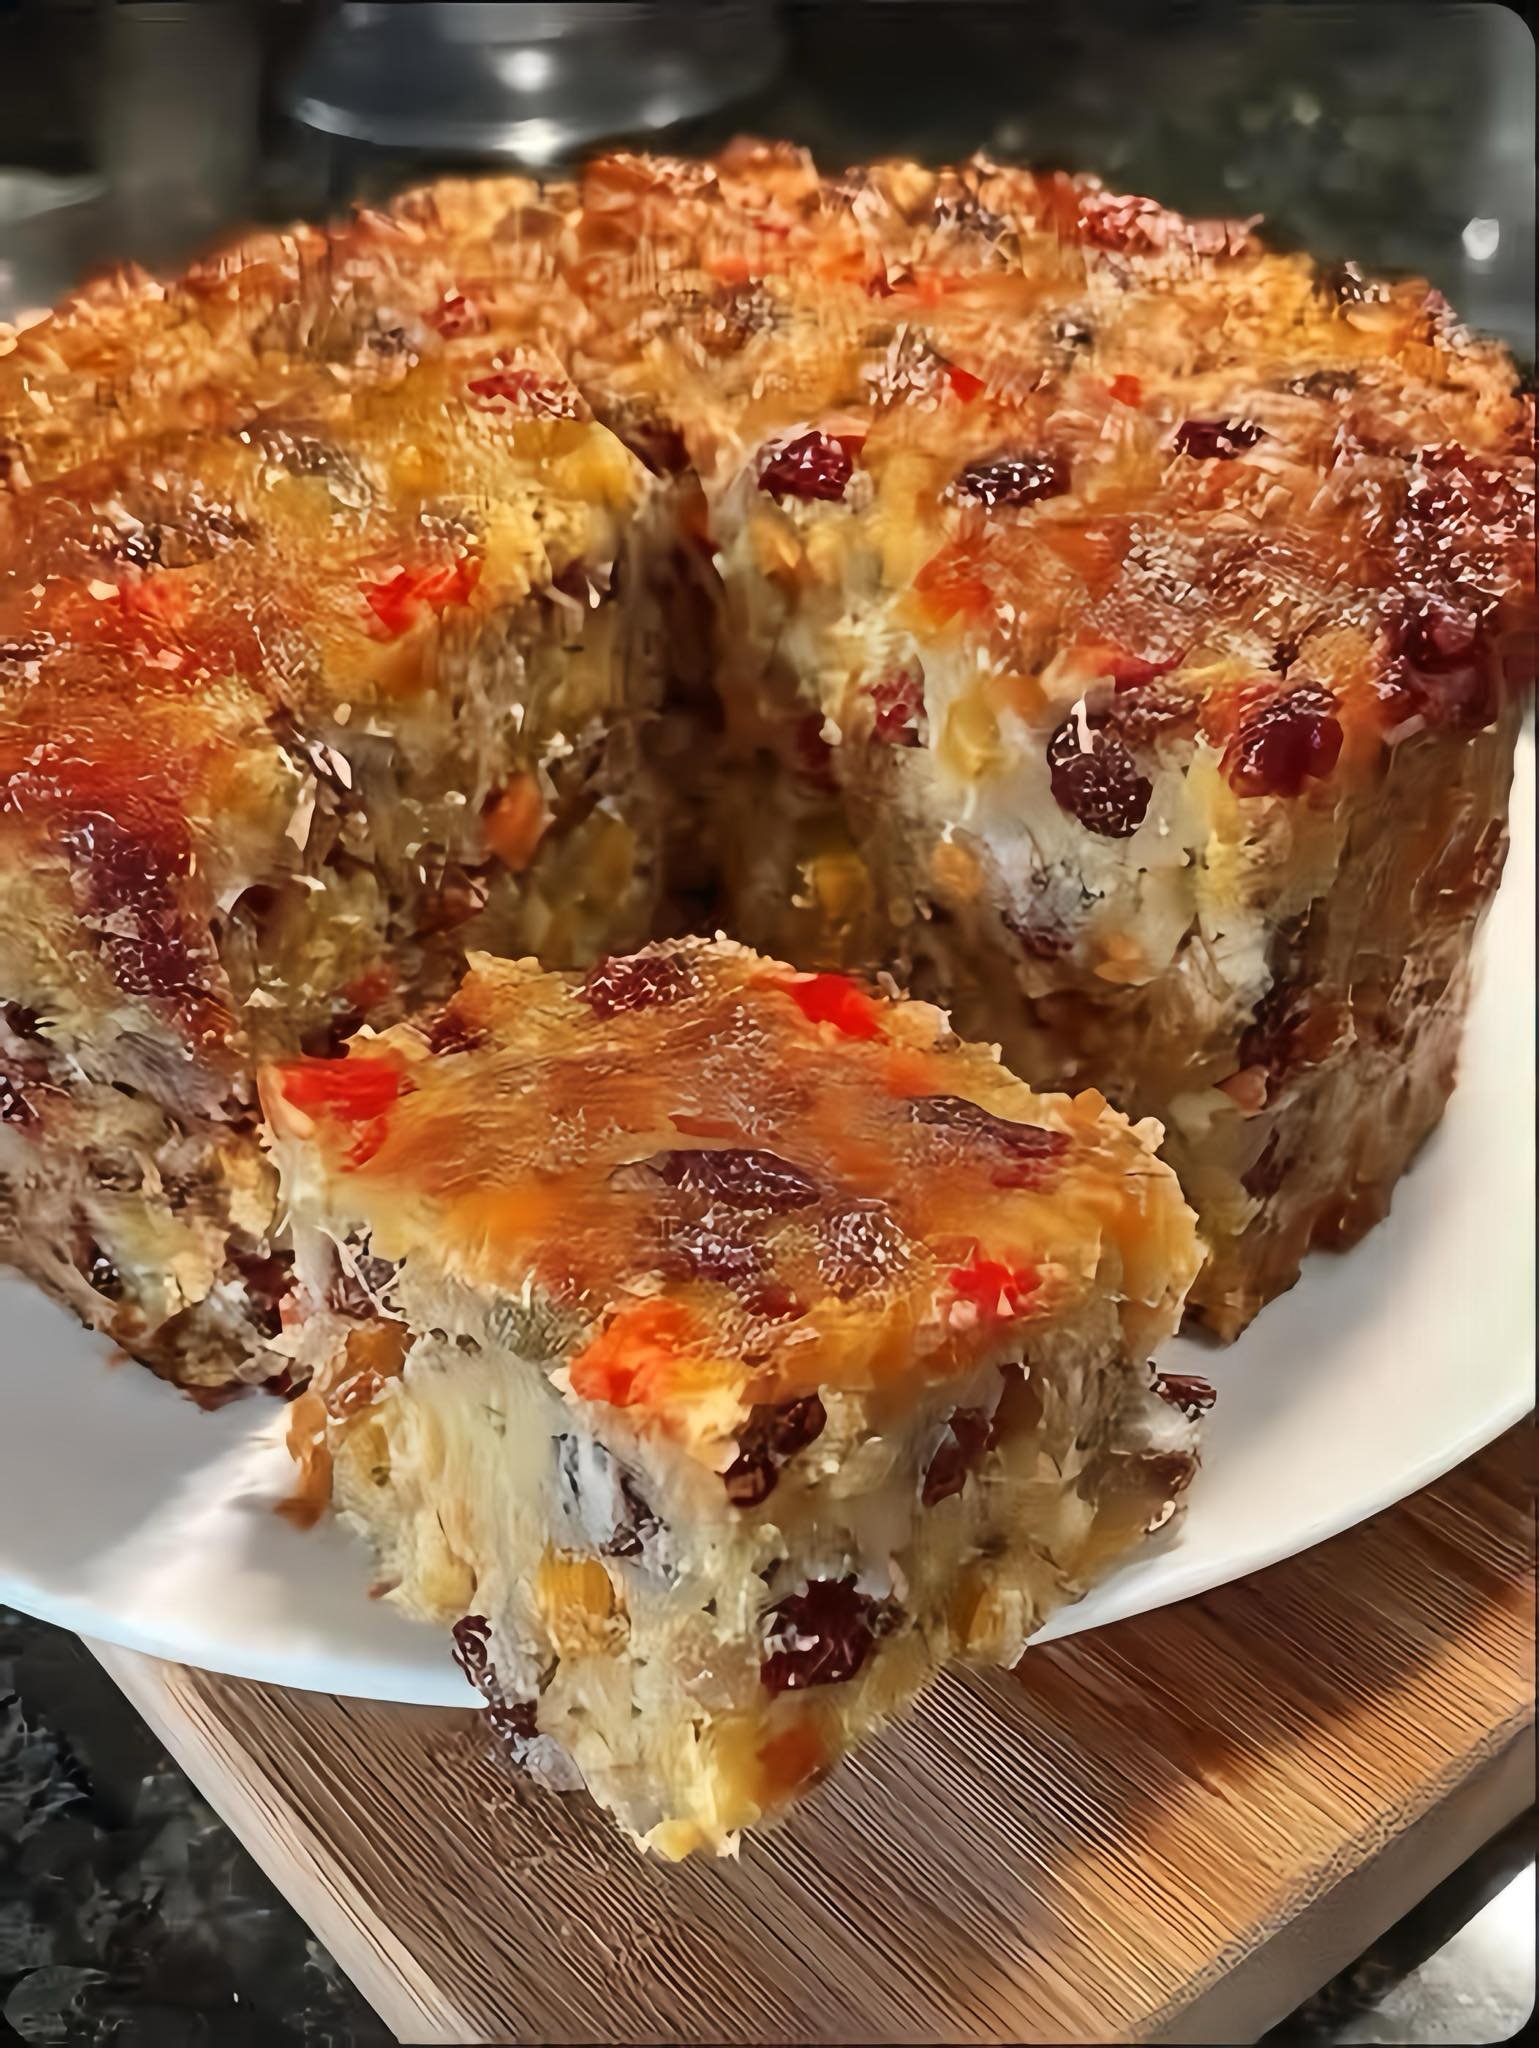
Baked Feta with Olives and Sun-Dried Tomatoes.


Baked Feta with Olives and Sun-Dried Tomatoes.

Ingredients:

1 block (8 oz) feta cheese

¼ cup extra virgin olive oil

½ cup mixed olives (Kalamata, green, or your choice)

⅓ cup sun-dried tomatoes, chopped (oil-packed or rehydrated if dry-packed)

2 cloves garlic, minced

Instructions

Preheat the oven to 375°F (190°C).

Place the block of feta in a small baking dish.

Drizzle with olive oil and scatter the olives, sun-dried tomatoes, and garlic around the cheese.

Bake for 25-30 minutes, until the feta is soft and slightly golden.

Serve warm, with pita, crusty bread, or veggies for dipping. Enjoy the Mediterranean flavors.

Griddle-Seared Beef Patties with House Dressing

Griddle-Seared Beef Patties with House Dressing


Why You’ll Love This Recipe

Quick Comfort Food: Dinner is ready in just 30 minutes, making it perfect for busy weeknights.

Family Favorite: This classic diner sandwich is an instant hit with kids (and picky husbands!).

Budget-Friendly Protein: Uses simple ground meat, making it easy on the grocery budget.

The Signature Sauce: The zesty, creamy dressing elevates the whole meal from basic to brilliant.

Maximum Crunch & Goo: A combination of two cheeses and perfectly buttered, toasted bread delivers the best texture contrast.

Ingredients You’ll Need

The protein base for forming the savory core.

A classic, dark, sturdy bread that can hold up to melting and toasting.

Aromatic powders used to infuse the meat with deep, savory flavor.

Fine seasonings to bring out the natural taste of the beef.

A mild, stretchy white cheese for the perfect melting texture.

A sharp, yellow cheese that adds a crucial layer of tang and richness.

The essential fat needed to create a crisp, golden, irresistible crust on the bread.

The creamy, neutral base for the signature dressing.

Salty, smoky pieces that add a punch of texture and depth to the sauce.

A sweet, classic red condiment that provides color and balance to the dressing.

Sweetener and tangy pickled vegetables to balance the creamy sauce with zesty brightness.

How It’s Made

The magic starts by shaping and seasoning the beef into flats that match the bread. Simultaneously, you’ll blend the creamy, tangy, and savory elements for the quick house dressing. The seasoned beef gets seared on the stovetop first. The final step involves layering the buttered bread, melting cheeses, and cooked patty, griddling the entire assembly until it’s toasted to a beautiful golden-brown on both sides.

Tips, Variations & Storage

Tip for Patty Shape: When forming the ground meat, press them flatter than you think you should! They’ll shrink a little on the pan, and you want them to mostly match the bread slice for the perfect melt.

Substitution for Bread: If you don’t have rye, you can use Texas Toast or even a thick-cut sourdough. The goal is a sturdy slice that won’t fall apart under the cheese and beef.

Add-in for Flavor: Sautéed caramelized onions are a classic addition to a Patty Melt. Cook them low and slow in a separate pan until they are deeply browned and sweet, then layer them on top of the beef patty before grilling.

Dietary Swap: For a leaner option, swap the ground beef for ground turkey, ensuring you add a bit more seasoning to keep the flavor profile strong.

Storage: The signature dressing can be made ahead of time and kept in an airtight container in the refrigerator for up to one week.

Freezer Notes: I don’t recommend freezing the assembled patty melt. However, you can freeze the seasoned, uncooked beef patties in a freezer bag for up to three months. Thaw them completely before cooking.

FAQ

What is the best way to melt the cheese quickly? Keep the heat on medium, not high. You want the bread to toast slowly while the heat conducts and melts the cheese from below. Placing a lid over the skillet for the last minute can help trap steam and speed up the melting process.


Can I use a single type of cheese? Absolutely! While the recipe calls for two for complexity, you can easily use all cheddar or all provolone. Swiss cheese is another traditional and delicious choice for a melt sandwich.


Can I make the sauce without bacon pieces? Yes, if you need a vegetarian or pork-free option, you can omit the bacon entirely. To replace the smokiness, consider adding a very small dash of liquid smoke or a pinch of smoked paprika to the dressing instead.


What kind of relish works best for the dressing? Use a classic sweet pickle relish. The tiny chunks of sweet pickle are essential for providing that characteristic tang and texture that helps balance the creamy and savory elements of the sauce.

I’m worried about the meat drying out. How do I prevent this? Be careful not to overcook the patties. Since they are thin, they cook quickly. Use a meat thermometer to ensure they reach a safe internal temperature, then remove them promptly to stay juicy.


What’s a good side dish for a Patty Melt? Keep it simple! You can’t go wrong with classic crinkle-cut French fries, a simple tossed side salad, or some dill pickle spears to cut through the richness of the sandwich.


Recipes

For the Griddle Melts:

1 pound Ground sirloin or chuck

6 slices Dark pumpernickel or marbled rye bread

½ teaspoon Dried granulated onion

½ teaspoon Dehydrated garlic powder

Fine salt and freshly cracked black pepper to season

6 slices Sharp yellow aged cheddar cheese

6 slices Mild white Italian provolone cheese

6 tablespoons Unsalted cultured dairy butter, softened for spreading

For the Signature House Dressing:

¼ cup Creamy salad dressing mayonnaise base

2 tablespoons Crispy cured pork belly bits bacon pieces

3 tablespoons Tomato condiment ketchup

1 teaspoon Granulated cane sweetener

1 teaspoon Sweet pickled cucumber relish

Instructions

Part 1: Preparing the Beef and Dressing

Divide the one-pound portion of ground meat into three equal sections. Press and shape each section into a thin patty, ensuring the dimensions closely match your slices of bread.

Season both faces of the formed meat patties with the dehydrated onion, granulated garlic, fine salt, and black pepper.

In a small mixing vessel, thoroughly incorporate all components for the signature house dressing: the creamy salad dressing, cured pork belly bits, tomato condiment, cane sweetener, and cucumber relish. Set this mixture aside.

Part 2: Cooking and Assembly

Heat a heavy skillet or frying pan over a medium-high setting. Place the seasoned patties into the hot pan and cook until they are done to your liking. Once finished, remove the cooked meat from the skillet.

Clean the skillet used for the beef, wiping out any residual grease. Return the pan to the burner and decrease the heat to a medium setting.

Using the softened dairy, evenly coat one exterior face of all six bread slices.

Place three of the buttered bread slices into the skillet with the buttered side facing down.

On top of each bread slice in the pan, layer two slices of provolone cheese, followed by one cooked beef patty, and finally two slices of cheddar cheese.

Apply a small amount of the prepared signature sauce onto the unbuttered side of the three remaining bread slices.

Place these sauce-coated slices on top of the assembled sandwiches, with the dressing facing down toward the cheddar.

Allow the sandwich to cook until the bottom slice is perfectly toasted and golden. Once toasted, carefully turn the entire sandwich over using a sturdy spatula.

Continue to toast the second side until it achieves a crisp texture and all internal cheeses are completely melted and gooey. Serve the griddle-seared beef melts immediately.

Baked Fowl and Savory Cornbread Crumble with Cream Gravy

Baked Fowl and Savory Cornbread Crumble with Cream Gravy


Why You’ll Love This Recipe

Pure Comfort Food: A warm, hearty, nostalgic meal that is incredibly satisfying.

Tender & Moist: The fowl stays juicy thanks to the creamy, liquid-soaked cornbread.

Fast Assembly: Prep takes only 15 minutes before it goes into the oven.

Delicious Flavor Base: Uses condensed soup and sautéed aromatics to build depth.

Make-Ahead Friendly: Can be prepped the night before to save holiday morning time.

Ingredients You’ll Need

Crumbled corn-based bread that absorbs the liquid and serves as the flavorful, savory “dressing” base.

Pre-cooked, shredded fowl meat that provides tender protein throughout the bake.

Solid dairy fat, chopped yellow bulb vegetable, and slender stalks that are sautéed to form the aromatic foundation.

Tinned condensed creamy bulb soup and savory clear fowl liquid stock that create the moistening liquid base for the crumble.

Savory dried fowl herb blend and dried aromatic leaf spice that give the dish its essential Thanksgiving-style flavor.

Universal refined grain powder and high-fat liquid dairy that are used to create the final, rich, creamy gravy.

How It’s Made

The preparation is split into two simple parts . First, the aromatic vegetables are sautéed in the dairy fat until softened. These, along with the shredded fowl, crumbled bread, creamy soup, stock, and seasonings, are combined and mixed vigorously before being baked. While the casserole bakes, a simple gravy is prepared by making a light roux with the dairy fat and refined grain powder, which is whisked with stock and high-fat dairy until thick. The hot gravy is poured over the finished, baked crumble and served.


Tips, Variations & Storage

Tip: Prepare the gravy while the casserole is baking to ensure that both components are hot when served. Gravy that cools down will thicken too much.

Substitution: The pre-cooked, shredded fowl can be replaced with shredded turkey or a different poultry cut. You can also swap the creamy bulb soup for a creamy mushroom soup.

Add-ins: For extra color and nutrition, try adding some chopped broccoli, spinach, or diced mushrooms into the cornbread mixture before baking.

Dietary Swap: To make the gravy slightly lighter, substitute the high-fat liquid dairy (heavy whipping cream) with whole milk, but the final richness will be reduced.

Make Ahead: Prepare the entire cornbread and fowl mixture and put it into the baking dish, covered with foil, in the refrigerator overnight. Do not add the gravy until serving.

Storage: Store cooled leftovers in the refrigerator, covered, for up to 5 days. Add a splash of stock when reheating to moisten the cornbread.

FAQ Section

1. What is the difference between cornbread “dressing” and “stuffing”? “Dressing” is generally cooked separately in a baking dish, often mixed with meat or vegetables. “Stuffing” is traditionally cooked inside the cavity of the bird. The ingredients are essentially the same.


2. Can I use store-bought cornbread crumbles? Yes, you can use any crumbled corn-based bread (cornbread or cornbread dressing mix) you like, whether it is homemade or store-bought. Just ensure it is dried out slightly so it can absorb the liquids.


3. Why do I need to cook the fowl meat beforehand? The fowl needs to be fully cooked before being added to the casserole mixture because the baking time is primarily for setting the cornbread and heating, not for cooking raw meat.


4. How can I moisten the cornbread crumble if the leftovers seem dry? Before reheating, add 1–3 tablespoons of savory clear fowl liquid stock or melted solid dairy fat (butter) over the top of the leftover portion and stir gently.


5. Can I prepare the gravy ahead of time? You can prepare the gravy base ahead, but it’s best to add the high-fat liquid dairy and reheat it slowly on the stovetop just before serving, as the dairy can sometimes separate when reheated from cold.


Recipes

Baked Casserole

4 C.: Crumbled corn-based bread Cornbread crumbled

4 C.: Pre-cooked shredded fowl meat (Chicken shredded)

1 C.: Chopped yellow bulb vegetable Onion chopped

⅓ C.: Chopped slender stalks Celery chopped

2 Tbsp.: Solid dairy fat Unsalted butter

1 Can: Tinned condensed creamy bulb soup Cream of onion soup

1 Tsp.: Savory dried fowl herb blend Poultry seasoning

½ tsp.: Dried aromatic leaf spice Dried sage

1 ½ C.: Savory clear fowl liquid stock Chicken broth

Crystalline minerals Salt and coarse ground peppercorns (Pepper) to taste

Cream Gravy

¼ C.: Solid dairy fat Unsalted butter

¼ C.: Universal refined grain powder All-purpose flour

2 C.: Savory clear fowl liquid stock Chicken broth

¼ C.: High-fat liquid dairy Heavy whipping cream

Crystalline minerals Salt and coarse ground peppercorns (Pepper) to taste

Instructions

Set the oven temperature to preheat at 375 degrees Fahrenheit.

Add 2 tablespoons of solid dairy fat, chopped yellow bulb vegetable, and chopped slender stalks to a skillet and sauté over medium heat until the vegetables begin to soften.

In a large mixing vessel, combine the crumbled corn-based bread, shredded fowl meat, the sautéed vegetable mixture, savory dried fowl herb blend, dried aromatic leaf spice, tinned condensed creamy bulb soup, and 1 ½ cups of savory clear fowl liquid stock.

Add crystalline minerals and coarse ground peppercorns to taste. Stir all ingredients thoroughly until fully combined.

Spread the mixture evenly into a well-greased 9×13 inch baking dish and bake for 45 minutes.

Gravy Preparation and Finish Method

While the casserole bakes, prepare the gravy. Add the remaining ¼ cup of solid dairy fat and the universal refined grain powder to a skillet over medium heat. Stir to combine and sauté for 1 to 2 minutes, stirring often (creating a roux).

Whisk in the 2 cups of savory clear fowl liquid stock. Add crystalline minerals and coarse ground peppercorns to taste. Continue to sauté until the mixture has thickened to a gravy consistency.

Stir in the high-fat liquid dairy.

Remove the finished casserole from the oven. Pour the prepared cream gravy over the top before serving.

Simple Overnight Chia Pudding

Simple Overnight Chia Pudding

Prep time: 5 mins | Chill time: 4+ hours or overnight | Yield: 1 serving

Ingredients

  • 3 tbsp Chia seeds

  • 1 cup Milk of your choice (Almond, soy, oat, or dairy)

  • 1/2 tsp Vanilla extract (optional)

  • 1 tsp Honey or maple syrup (optional sweetener)

  • Toppings: Fresh berries, sliced fruit, or a sprinkle of cinnamon


Step-by-Step Instructions

1. Combine the Ingredients

In a bowl or a glass jar (like those shown in your image), combine the chia seeds, milk, vanilla, and sweetener.

2. Stir Thoroughly

Whisk or stir the mixture vigorously. Chia seeds tend to clump together, so it is helpful to stir them once, wait about 5 minutes, and then stir again to ensure they are evenly distributed throughout the liquid.

3. The “Set” Time

Cover the container and place it in the refrigerator. Let it sit for at least 4 hours, though letting it sit overnight results in the creamiest, best texture.

4. Final Stir and Garnish

Before eating, give the pudding one last stir. If it is too thick, you can splash in a little more milk. Top with your favorite fresh fruit or nuts for added crunch and nutrients.


Why It Works for Wellness

  • High Fiber: Chia seeds are packed with fiber, which aids digestion and promotes a feeling of fullness.

  • Healthy Fats: They provide Omega-3 fatty acids, which are great for heart health.

  • Easy Meal Prep: You can make several jars at once, and they will stay fresh in the fridge for up to 4 days.

Would you like me to find a recipe for a chocolate-protein version of this chia pudding?

High-Protein Tropical Fruit & Yogurt Cups

High-Protein Tropical Fruit & Yogurt Cups

Prep time: 10–15 minutes | Servings: 4–6 cups

Ingredients (Per Cup)

  • ½ cup Pineapple chunks (fresh or canned in juice)

  • ½ cup Mango chunks

  • ¼ cup Sliced kiwi

  • ¼ cup Sliced strawberries

  • 2–3 tbsp Low-fat cottage cheese or Greek yogurt (plain or vanilla)

  • 1 tsp Unsweetened shredded coconut

  • 1 tsp Chia seeds or hemp hearts

Optional Upgrades:

  • Crushed almonds or walnuts for added crunch

  • A dash of cinnamon or vanilla extract for deeper flavor


Step-by-Step Instructions

1. Prepare the Fruit

Wash and slice all the fresh fruit (strawberries, kiwi, mango, and pineapple) into bite-sized pieces as needed.

2. Layer Your Containers

In each individual container, begin layering the fruit. Start with the pineapple and mango at the bottom, then layer the strawberries and kiwi on top.

3. Add the Protein

Place 2–3 tablespoons of your chosen Greek yogurt or cottage cheese directly on top of the fruit layer.

4. Garnish and Finish

Sprinkle the chia seeds (or hemp hearts) and shredded coconut over the top. If you are using nuts or cinnamon, add those now.

5. Seal and Store

Seal the containers tightly. They can be stored in the refrigerator for up to 4 days, making them an excellent choice for weekly meal prep.


Why This Recipe Works

  • Balanced Nutrition: The Greek yogurt or cottage cheese provides high protein to support muscle maintenance and keep you feeling full.

  • Fiber-Rich: Using a variety of fresh fruits and chia seeds ensures you get a good dose of fiber.

  • Portion Control: This recipe is specifically designed to be bariatric-friendly and easy to manage for those watching their intake.

  • Cost-Effective: You can easily use frozen or seasonal fruit to keep this recipe budget-friendly.

Blueberry Cottage Cheese Breakfast Bake

Blueberry Cottage Cheese Breakfast Bake

A creamy, protein-packed breakfast that tastes like dessert.

Ingredients

  • 1 cup Cottage cheese

  • 1/2 cup Rolled oats

  • 1/2 cup Fresh blueberries

  • 2 Large eggs

  • 1/4 cup Honey or maple syrup

  • 1/2 tsp Cinnamon

  • 1/4 tsp Vanilla extract


Step-by-Step Instructions

1. Preheat and Prep

Preheat your oven to 175°C (350°F). Lightly grease a small baking dish (about 6×6 inches or a small round pie dish) with a little bit of butter or coconut oil.

2. Blend the Base (Optional)

If you prefer a smooth, cheesecake-like texture, place the cottage cheese, eggs, honey/syrup, vanilla, and cinnamon in a blender and pulse until smooth. If you enjoy a more rustic, textured bake, simply whisk them together in a medium bowl.

3. Combine with Oats

Stir the rolled oats into the mixture. Let it sit for about 5 minutes; this allows the oats to soften slightly and ensures a better “set” once baked.

4. Add the Berries

Gently fold in half of the fresh blueberries. Pour the mixture into your prepared baking dish. Scatter the remaining blueberries over the top so they look beautiful once baked.

5. Bake

Place in the oven and bake for 30–35 minutes. You’ll know it’s ready when the edges are golden brown and the center is set (it should have a slight, firm jiggle but not be liquid).

6. Cool and Set

Allow the bake to cool for at least 10 minutes before slicing. This time is crucial for the cottage cheese and eggs to fully firm up.


Helpful Tips

  • Storage: This keeps well in the refrigerator for up to 3 days, making it an excellent meal-prep option.

  • Serving: You can enjoy this warm, but many people find the flavor and texture are even better when served chilled with an extra dollop of Greek yogurt.

Ginger, Onion, and Garlic Wellness Tonic

Ginger, Onion, and Garlic Wellness Tonic

Prep time: 15 mins | Infusion time: 7 days | Yield: Approximately 1 jar

Ingredients

  • 1 medium White or yellow onion (thinly sliced or grated)

  • 1 large bulb Garlic (all cloves peeled and crushed or finely minced)

  • 3-inch piece Fresh ginger root (peeled and grated)

  • 1 cup Raw, organic honey (or enough to fully submerge the ingredients)

  • 2-3 tbsp Freshly squeezed lemon juice


Step-by-Step Instructions

1. Prepare Your Ingredients

Ensure your jar is thoroughly cleaned and dried. Finely grate the ginger and onion to release their natural juices. Crush or mince the garlic and let it sit for about 5 minutes before adding to the jar; this helps activate its beneficial compounds.

2. Layer the Jar

Place the grated ginger, sliced onion, and minced garlic into the glass jar. Pour the lemon juice over the top.

3. Add the Honey

Pour the raw honey into the jar until all the solid ingredients are completely submerged. Use a clean spoon to stir gently, ensuring there are no air bubbles trapped at the bottom. The honey acts as the extracting agent and preservative.

4. The Seven-Day Infusion

Seal the jar tightly. Store it in a cool, dark place (like a kitchen cupboard) for 7 days. During this time, the honey will draw out the juices from the onion, garlic, and ginger, turning into a thin, potent syrup. You can flip the jar upside down once a day to keep the ingredients mixed.

5. Strain (Optional)

On the seventh day, you can either strain the solids out using a fine-mesh sieve or leave them in the jar. Storing the finished syrup in the refrigerator will help it last longer.


How to Use

  • Dosage: As requested, take one teaspoon a day starting on the seventh day.

  • Serving Tip: If the flavor is too intense, you can stir your teaspoon of syrup into a cup of warm (not boiling) water or herbal tea.


A Note on Safety

While these are natural kitchen ingredients, this tonic is a supplement and not a replacement for professional medical advice. Honey should never be given to infants under one year old. If you have specific health conditions or are taking medications, it is always best to consult with a healthcare provider before starting a new daily regimen.

Southwest Cheesy Enchilada Chili Deluxe

Southwest Cheesy Enchilada Chili Deluxe

A rich, creamy fusion of chili and cheesy enchilada flavors.

Ingredients

  • 1 lb Ground turkey (or beef)

  • 2 tbsps Taco seasoning

  • 1/4 cup Water

  • 1 jar Roasted poblano queso dip (or Salsa Con Queso)

  • 1 can Creamy potato soup

  • 1 cup Greek yogurt (or sour cream)

  • 1 can Fire-roasted diced green chilis

  • 1 1/4 cups Beef or chicken broth

  • 1/2 cup Smoky chipotle tomato sauce

  • 1 cup Frozen corn

  • 1 cup Black beans (rinsed and drained)

  • 1/2 cup Diced red bell pepper

  • 1/2 tsp Smoked paprika

  • 1 tsp Garlic powder

  • To taste: Salt and pepper


Instructions

1. Brown the Meat

In a large pot or Dutch oven over medium-high heat, cook the ground turkey (or beef) until fully browned. Drain any excess fat.

2. Season

Add the taco seasoning and 1/4 cup of water to the meat. Stir well and simmer for 2–3 minutes until the water has mostly evaporated and the meat is well-coated.

3. Build the Base

Turn the heat down to medium. Stir in the creamy potato soup, queso dip, and Greek yogurt. Mix until the base is smooth and creamy.

4. Add the Aromatics and Veggies

Stir in the green chilis, diced red bell pepper, corn, and black beans. Add the broth and chipotle tomato sauce to reach your desired chili consistency.

5. Season and Simmer

Add the garlic powder, smoked paprika, and a pinch of salt and pepper. Let the chili simmer gently for 15–20 minutes, stirring occasionally to prevent the cheese base from sticking to the bottom.

6. Serve

Ladle into bowls and top with cilantro, shredded cheese, or tortilla chips for a nice crunch.


Helpful Tips

  • Consistency: If you prefer a thicker chili, let it simmer for an extra 10 minutes. If it’s too thick, add an extra splash of broth.

  • Heat Level: For more kick, add extra diced jalapeños or a dash of cayenne pepper.

The Easiest “No-Everything” Bread

The Easiest “No-Everything” Bread

Prep time: 10 mins | Rise time: 1.5 – 2 hours | Bake time: 20 mins

Ingredients

  • 3 cups (375g) All-purpose flour or Bread flour

  • 1 ½ cups (355ml) Warm water (not hot!)

  • 1 tsp Active dry yeast

  • 1 tsp Salt

  • 1 tbsp Sugar (to help the yeast activate)

  • 2 tbsp Vegetable oil (optional, for a softer crust)


Step-by-Step Instructions

1. Mix the Dough

In a large bowl, whisk together the warm water, sugar, and yeast. Let it sit for about 5 minutes until it becomes slightly foamy. Add the salt and flour. Stir with a wooden spoon or spatula until a shaggy, sticky dough forms and no dry flour remains.

2. The First Rise

Cover the bowl with a damp cloth or plastic wrap. Let it sit in a warm, draft-free spot for 1.5 to 2 hours, or until the dough has doubled in size and looks bubbly.

3. Shape the Rolls

Don’t knead! Gently deflate the dough by folding it over itself a few times in the bowl. Heavily flour your work surface and your hands. Tip the dough out and divide it into 8 to 10 equal pieces. Gently tuck the edges under to form rectangular or oval rolls (like in your photo).

4. Second Rise

Place the rolls on a baking sheet lined with parchment paper. Cover lightly and let them rest for another 20–30 minutes while you preheat your oven to 200°C (400°F).

5. Bake

If you want a golden shine without eggs or butter, lightly brush the tops with a little water or milk right before baking. Bake for 18–22 minutes until the tops are golden brown and the rolls sound hollow when tapped on the bottom.


Tips for the Best Results

  • Steam is Key: For a professional “bakery” crust, place a small pan of water on the bottom rack of the oven while baking. The steam keeps the bread moist and helps it rise higher.

  • Don’t Over-Flour: The dough is supposed to be sticky! Use just enough flour on your hands to handle it; too much extra flour will make the bread dense.

Diabetic-Friendly “Cowboy” Cookies

Diabetic-Friendly “Cowboy” Cookies

A high-fiber, no-sugar-added twist on the classic hearty cookie.

Ingredients

  • 1 cup Almond flour (provides healthy fats and low glycemic index)

  • 1/2 cup Rolled oats (the “heart” of a Cowboy cookie)

  • 1/2 cup Granulated monk fruit sweetener or Erythritol (sugar-free)

  • 1/4 cup Unsweetened shredded coconut

  • 1/4 cup Sugar-free dark chocolate chips

  • 1 Large egg (room temperature)

  • 2 tbsp Melted coconut oil or grass-fed butter

  • 1/2 tsp Baking soda

  • 1/2 tsp Vanilla extract

  • Optional: A pinch of sea salt and 1/4 cup chopped walnuts.


Step-by-Step Instructions

1. Prep Your Station

Preheat your oven to 175°C (350°F). Line a large baking sheet with parchment paper or a silicone mat so the cookies don’t stick.

2. Mix the Dry Ingredients

In a large bowl, whisk together the almond flour, rolled oats, monk fruit sweetener, shredded coconut, and baking soda. Ensure there are no large lumps in the almond flour.

3. Combine the Wet Ingredients

In a smaller bowl, whisk the egg, melted oil/butter, and vanilla extract until well combined.

4. Form the Dough

Pour the wet ingredients into the dry ingredients. Stir with a spatula until a thick, tacky dough forms. Fold in your sugar-free chocolate chips and walnuts (if using).

5. Scoop and Flatten

Scoop about 1.5 tablespoons of dough for each cookie and place them on the tray. Since these don’t spread as much as traditional butter-heavy cookies, use the palm of your hand to gently press them down into thick discs.

6. Bake

Bake for 10–12 minutes until the edges are just starting to turn golden brown.

7. The “Cooling” Rule

Crucial Step: Let these cool on the pan for at least 15 minutes. Sugar-free cookies made with almond flour are very fragile while hot but firm up beautifully as they cool.


Important Nutritional Note

While these are much lower in carbohydrates and contain no refined sugar, they are not “zero calorie.” Almonds, oats, and coconut are nutrient-dense but do contain natural calories and healthy fats. Always check with your healthcare provider or nutritionist regarding portion sizes if you are managing a strict diabetic diet.

Fluffy Cloud Cupcakes

Fluffy Cloud Cupcakes

Prep time: 15 mins | Bake time: 20-25 mins | Yields: 10-12 cupcakes

Ingredients

The Egg Yolk Base:

  • 3 Large egg yolks

  • 20g Caster sugar

  • 40g Vegetable oil (or any neutral oil)

  • 45g Milk (room temperature)

  • 60g Cake flour (sifted)

  • 1/2 tsp Vanilla extract

The Meringue:

  • 3 Large egg whites (chilled)

  • 40g Caster sugar

  • 1/4 tsp Lemon juice or Cream of Tartar (helps stability)


Step-by-Step Instructions

1. Prepare the Oven and Pan

Preheat your oven to 150°C (300°F). Line a cupcake tray with paper liners.

2. Create the Yolk Mixture

In a medium bowl, whisk the egg yolks and 20g sugar until pale. Add the oil, milk, and vanilla, whisking until well combined. Sift in the cake flour and whisk gently until the batter is smooth with no lumps. Set aside.

3. Whip the Meringue

In a separate, clean, grease-free bowl, beat the egg whites and lemon juice on medium speed until foamy. Gradually add the 40g sugar in three batches. Continue beating until stiff peaks form (the peaks should stand straight up when you lift the beaters).

4. The Gentle Fold

This is the most important part! Take 1/3 of the meringue and stir it into the egg yolk batter to lighten it. Then, gently fold the remaining meringue into the batter using a spatula. Use a “cut and fold” motion so you don’t deflate the air bubbles. Stop as soon as the color is uniform.

5. Bake to Perfection

Scoop the batter into the liners until they are about 80% full. Tap the tray on the counter once to pop large bubbles. Bake for 20–25 minutes or until the tops are golden and spring back when touched.


Pro-Tips for Success

  • Don’t Grease: Don’t grease the paper liners; the cake needs to “climb” the walls of the liner to stay tall.

  • The Sift: Sifting the flour is mandatory for that “5-minute melt” texture shown in your photo.

  • Cooling: These may shrink slightly as they cool; this is normal for chiffon cakes!

Oven-Roasted Tuber, Onion, and Smoked Sausage Meal

Oven-Roasted Tuber, Onion, and Smoked Sausage Meal


Recipes


Base


2 Lb.: Small waxy tubers Baby red potatoes, sliced in half


2 : Large yellow bulb vegetables Onions, cut into thick wedges


1 Lb.: Pre-cooked smoked poultry link Smoked turkey sausage, sliced


Seasoning


2 Tbsp.: Cold-pressed fruit oil Olive oil


1 Tbsp.: Ground chili spice blend Cajun seasoning


1 tsp.: Bright red ground sweet pepper Paprika


Crystalline minerals Salt and coarse ground peppercorns to taste


Instructions


Cut both varieties of pre-cooked smoked links into uniform slices.


Combine the sliced pre-cooked meats, sliced waxy tubers, and bulb vegetable wedges in a generously sized mixing vessel.


Pour the cold-pressed fruit oil over the mixture. Season heavily with the ground chili spice blend, bright red ground sweet pepper, crystalline minerals, and coarse ground peppercorns. Toss all components thoroughly until they are evenly coated in the oil and spices.


Spread the entire seasoned mixture into a single, uncrowded layer onto a large baking sheet lined with parchment paper.


Place the sheet pan in the oven and bake for 45 minutes, or until the tubers are fully fork-tender and the meat and vegetables have achieved a desired level of caramelization.


Creamy Garlic Mushroom Salmon 

Creamy Garlic Mushroom Salmon

Rich, creamy, and packed with flavor — tender salmon in a garlic mushroom cream sauce that feels restaurant-quality but comes together fast 🍄🧄🐟

Ingredients

• 4 salmon fillets (4–6 oz each)

• Salt and black pepper, to taste

• 1 tablespoon olive oil

• 1 tablespoon butter

For the sauce

• 8 oz mushrooms, sliced (button or cremini)

• 4 cloves garlic, minced

• 1 cup heavy cream

• 1/2 cup chicken or vegetable broth

• 1/3 cup grated Parmesan cheese

• 1/2 teaspoon Italian seasoning or thyme

• Optional: 1/2 teaspoon paprika or chili flakes

• Optional garnish: fresh parsley

Instructions

Season salmon on both sides with salt and pepper.

Heat olive oil and butter in a large skillet over medium-high heat. Add salmon skin-side down and sear for 4–5 minutes until golden. Flip and cook another 2–3 minutes. Remove salmon and set aside.

In the same skillet, add mushrooms and cook for 4–5 minutes until browned and softened.

Add garlic and cook for 30 seconds until fragrant.

Pour in broth and simmer 1–2 minutes, scraping up any browned bits from the pan.

Stir in heavy cream, Parmesan, Italian seasoning, and paprika if using. Simmer 3–4 minutes until sauce thickens slightly.

Return salmon to the skillet and spoon sauce over the fillets. Simmer gently for 2–3 minutes until salmon is cooked through and coated in sauce.

Garnish with fresh parsley and serve warm.

Serving Ideas

• Pair with cauliflower mash, zucchini noodles, or rice

• Add spinach to the sauce for extra greens

• Great for low-carb and keto-friendly meals

Mediterranean Grilled Chicken & Broccoli Bowls with Creamy Garlic Sauce

Mediterranean Grilled Chicken & Broccoli Bowls with Creamy Garlic Sauce

These bowls are a wholesome and flavorful way to enjoy a balanced meal. Juicy grilled chicken and tender-crisp broccoli are paired with a tangy, garlicky yogurt sauce that ties everything together. Served over rice or quinoa, it’s simple enough for a weeknight dinner but tasty enough to feel special. The Mediterranean flavors come through with lemon, parsley, and paprika, making each bite bright and satisfying.


Time

Prep time: 15 minutes


Cook time: 20 minutes


Total time: 35 minutes


Ingredients

2 boneless, skinless chicken breasts


2 cups (200 g) broccoli florets


2 tbsp olive oil, divided


Salt & black pepper, to taste


½ cup (120 ml) Greek yogurt


2 garlic cloves, minced


1 tbsp lemon juice


1 tbsp chopped fresh parsley


¼ tsp paprika


Cooked rice or quinoa, for serving

Instructions

Prep the chicken: Season chicken breasts with salt, pepper, paprika, and 1 tbsp olive oil. Let sit for 10 minutes while prepping the other ingredients.


Make the sauce: In a small bowl, combine Greek yogurt, minced garlic, lemon juice, parsley, a pinch of salt, and a drizzle of olive oil. Mix until smooth. Chill in the fridge until ready to serve.


Cook broccoli: Toss broccoli florets with 1 tbsp olive oil, salt, and pepper. Grill or roast at 400°F (200°C) for 10–12 minutes until tender-crisp and lightly charred.


Grill chicken: Heat a grill pan or outdoor grill to medium-high. Cook chicken for 5–6 minutes per side, or until cooked through (internal temp 165°F/74°C). Let rest for 5 minutes before slicing.

Assemble bowls: Divide rice or quinoa into bowls. Top with sliced grilled chicken and roasted broccoli. Drizzle generously with creamy garlic sauce. Garnish with extra parsley if desired.


Tips

Rest the chicken: Let the grilled chicken rest a few minutes before slicing so it stays juicy.


Char for flavor: A slight char on the broccoli adds a smoky note that pairs nicely with the creamy sauce.


Double the sauce: It keeps well in the fridge for up to 3 days and works as a dip for veggies or spread for wraps.


Meal prep friendly: Cook the chicken, broccoli, and grains ahead of time and store separately. Add sauce just before serving.


Variations

Protein swap: Use grilled salmon, shrimp, or chickpeas instead of chicken for a twist.


Veggie boost: Add roasted peppers, zucchini, or cherry tomatoes for more color and nutrition.


Grain options: Try farro, couscous, or cauliflower rice if you want something different from rice or quinoa.


Spice it up: Add a pinch of chili flakes or cayenne to the chicken seasoning for heat.


Herby touch: Mix in fresh dill, mint, or basil with the yogurt sauce for a different Mediterranean profile.

Q&A

Q: Can I make this recipe ahead of time?

A: Yes. Cook the chicken, broccoli, and grains in advance, then store them in the fridge for up to 4 days. Add the garlic sauce just before serving to keep it fresh.


Q: Can I bake the chicken instead of grilling?

A: Definitely. Bake seasoned chicken breasts at 400°F (200°C) for about 20–25 minutes, or until fully cooked.


Q: Is there a dairy-free option for the sauce?

A: You can use a dairy-free yogurt alternative, such as coconut or almond-based yogurt, to make the sauce lactose-free.

Q: How can I make it low-carb?

A: Swap the rice or quinoa with cauliflower rice or a big salad base for a lighter, low-carb option.


Q: Can I use frozen broccoli?

A: Yes, just thaw and pat dry before roasting or grilling to avoid excess moisture.


Nutrition

(per serving, based on 2 servings)

Calories: ~420


Protein: 38 g


Carbohydrates: 28 g


Fat: 16 g


Fiber: 5 g


Sugar: 4 g


Sodium: 480 mg


(Values vary depending on portion sizes and grain choice.)


Conclusion

These Mediterranean Grilled Chicken & Broccoli Bowls are balanced, satisfying, and packed with flavor. The smoky grilled chicken and broccoli pair perfectly with the cool, garlicky yogurt sauce, while the grains make it a complete meal. It’s a versatile recipe that works for meal prep, family dinners, or a healthy lunch. With a few simple swaps, you can adapt it to suit your taste, making it a dish you’ll come back to again and again.

Everyday Garden Vegetable Soup

Description

This light yet satisfying vegetable soup is packed with colorful vegetables simmered in a flavorful broth. It’s easy to digest, naturally low in fat, and perfect for daily meals. The gentle flavors make it a favorite for the whole family, while the vegetables provide steady energy and nourishment.

Ingredients

  • 1 tbsp olive oil

  • 1 medium onion, finely chopped

  • 2 cloves garlic, minced

  • 2 carrots, diced

  • 2 celery stalks, sliced

  • 1 medium potato, diced

  • 1½ cups broccoli florets, chopped

  • 1 small zucchini (optional), diced

  • 6 cups vegetable broth (low sodium)

  • ½ tsp turmeric (optional, for color & flavor)

  • ½ tsp black pepper

  • Salt to taste

  • 2 tbsp fresh parsley or dill, chopped

  • 1 bay leaf (optional)

 Instructions

  1. Heat olive oil in a large pot over medium heat.

  2. Add onion and sauté for 3–4 minutes until soft.

  3. Stir in garlic and cook for 30 seconds.

  4. Add carrots, celery, and potato. Cook for 5 minutes, stirring.

  5. Pour in vegetable broth and add bay leaf, turmeric, salt, and pepper.

  6. Bring to a gentle boil, then reduce to a simmer.

  7. Cook for 15 minutes, then add broccoli (and zucchini if using).

  8. Simmer another 8–10 minutes until vegetables are tender.

  9. Remove bay leaf, stir in fresh herbs, and adjust seasoning.

  10. Serve warm.

 Servings

  • Serves: 4–6

  • Serving size: ~1½ cups

Helpful Notes

  • Keep vegetables slightly chunky for better texture

  • Use fresh herbs at the end for brighter flavor

  • Low-sodium broth lets you control salt levels

 Tips & Variations

  • More filling: Add cooked lentils or white beans

  • Extra flavor: A squeeze of lemon before serving

  • For kids: Blend half the soup for a smoother texture

  • Meal prep: Stores well in the fridge for 3–4 days

 Approximate Nutritional Info (per serving)

  • Calories: ~120

  • Protein: 4 g

  • Carbohydrates: 20 g

  • Fiber: 5 g

  • Fat: 3 g

  • Sodium: varies by broth used

(Values are estimates and will vary by ingredients.)

 General Benefits (Non-Medical)

  • Rich in vegetables that support daily nutrition

  • Light and comforting, easy to enjoy regularly

  • Helps with hydration due to broth content

  • Naturally balanced for everyday meals

 Q & A

Q: Can I eat this soup every day?
A: Yes, it’s made with everyday vegetables and simple ingredients, making it suitable for regular meals as part of a balanced diet.

Q: Can I freeze it?
A: Yes. Let it cool completely and freeze for up to 2 months.

Q: Can I add pasta or rice?
A: Absolutely—add small pasta or cooked rice near the end of cooking.

Q: Is this soup spicy?
A: No, it’s mild. You can add chili flakes if you like heat.

3-Ingredient Roasted Potatoes

3-Ingredient Roasted Potatoes

Ingredients

  • Potatoes: 900 g (2 lb) waxy or all-purpose potatoes, such as Yukon Gold or red potatoes.

  • Fat: 80 ml (1/3 cup) extra virgin olive oil or melted good-quality butter.

  • Salt: 1 1/2 tablespoons Diamond Crystal kosher salt or 1 tablespoon fine sea salt.

  • Note: Freshly cracked black pepper is an optional addition.


Instructions

1. Prep the Oven and Pan Preheat your oven to 200°C (400°F) or 180°C for fan-assisted ovens. Place a large rimmed baking sheet or roasting pan inside the oven while it heats; a hot pan is essential to ensure an immediate sear and prevent sticking.

2. Prepare the Potatoes Wash the potatoes and cut them into even chunks (about 4–5 cm or 1.5–2 inches), leaving the skins on. Place the chunks in a large bowl and toss thoroughly with the oil and salt until every piece is coated.

3. Arrange for Roasting Carefully remove the hot baking sheet from the oven. Arrange the potatoes in a single layer, preferably cut-side down, leaving space between each piece to ensure they roast rather than steam.

4. Roast and Flip Roast the potatoes for 25 minutes. Use a spatula to flip each piece, then return them to the oven for another 20–25 minutes until they are deep golden brown and easily pierced with a fork.

5. Serve Transfer the potatoes to a serving plate and serve while hot or warm.


Storage and Reheating

  • Refrigerate: Store in an airtight container for up to 4 days.

  • Reheat: For the best texture, spread them on a baking sheet and heat in a 200°C (400°F) oven for 6–8 minutes to restore their crunch. Avoid the microwave, as it will make them soggy.

  • Freeze: You can freeze these in a single layer; reheat them directly from frozen in a hot oven until crisp.

Loaded Zucchini Bake

Loaded Zucchini Bake

Ingredients

  • Zucchini: 3 to 4 medium-sized, sliced.

  • Tomatoes: 2 units, sliced.

  • White Onion: $1/2$ unit, sliced.

  • Bacon: Most of one package (reserve 3 pieces for other use).

  • Cheese: * 1 unit of sharp cheddar, shredded.

    • Grated parmesan cheese.

  • Fats & Oils:

    • Olive oil (for coating).

    • $1/4$ cup ghee or coconut oil.

  • Seasonings:

    • Salt and pepper.

    • Garlic powder.

    • Fresh oregano leaves.


Directions

  1. Prep: Preheat your oven to 350°F. Slice your zucchini, tomatoes, and onion.

  2. Cook Bacon: Fry the bacon in a skillet over low heat until thoroughly cooked, then crumble it.

  3. First Layer: Arrange the sliced zucchini equally in a 9×13-inch baking dish, ensuring the bottom is completely covered.

  4. Season: Apply a light coat of olive oil to the zucchini. Season with salt, pepper, and garlic powder.

  5. Add Fat: Place 4–5 small portions of ghee or coconut oil onto the surface of the zucchini.

  6. Vegetable Layers: Add a layer of $\frac{1}{4}$ of the sliced onion, followed by a layer of one sliced tomato.

  7. Protein & Cheese: Incorporate a layer of the crumbled bacon over the vegetables. Follow this with a uniform layer of shredded sharp cheddar cheese.

  8. Repeat & Finish: Repeat the layers once more. Finish with a final layer of grated parmesan cheese over the cheddar and garnish with fresh oregano leaves.

  9. Bake: Cover the dish with aluminum foil and bake for 15 to 20 minutes. Remove the foil and bake for an additional 15 minutes, or until the vegetables are tender and the cheese is golden brown.


Nutrition Facts (Per Serving)

Serving size: 1/8 of the dish

Nutrient Amount
Calories 462 kcal
Total Carbs 9 g
Net Carbs 7 g
Fat 39 g
Protein 18 g
Fiber 2g

Creamy Mediterranean Egg Salad

Egg Salad Plate

Creamy Mediterranean Egg Salad

Ingredients

6 hard-boiled eggs (4 chopped, 2 sliced for serving)

¼ cup plain Greek yogurt

1–2 tbsp olive oil

1 tsp Dijon mustard (optional but nice)

1 tbsp fresh lemon juice

1 small garlic clove, grated

2 tbsp finely chopped red onion

1 tbsp chopped fresh parsley

1 tbsp chopped fresh dill (optional but very Mediterranean)

Salt & black pepper to taste

Pinch of paprika or sumac (optional)

Instructions

Make the dressing

In a bowl mix Greek yogurt, olive oil, lemon juice, garlic, mustard, salt, and pepper.

Combine

Fold in chopped eggs, red onion, parsley, and dill.

Adjust salt and lemon to taste.

Plate Mediterranean-style

Spoon into a bowl and drizzle with olive oil.

Sprinkle with black pepper and paprika or sumac.

Asian Cabbage and Pork Skillet

Asian Cabbage and Pork Skillet


Why You’ll Love This Recipe

It’s ready faster than ordering takeout (hello, 30 minutes!).

Tastes just like the inside of your favorite crispy egg roll.

One-pan cleanup means less scrubbing for Mom—a major win!

High protein and veggie count make this a satisfying, guilt-free meal.

Super budget-friendly and stretches easily when feeding a crowd.

Ingredients You’ll Need

The hearty base protein that provides richness and essential cooking fat.

The pre-shredded cabbage and carrot blend that gives the signature egg roll crunch and bulk.

A pungent fresh root that gives the dish its authentic, sharp Asian flavor profile.

The powerful bulb that acts as the backbone of the savory flavor blend.

A crucial salty condiment that ties all the Asian flavors together.

A concentrated, nutty finishing oil that elevates the aroma and taste right before serving.

The thin green stalks that provide a mild onion flavor and a pop of color for garnish.

How It’s Made

This meal is a true skillet wonder, and it’s about as straightforward as dinner gets. You start by browning the main meat component until it’s cooked through, making sure to keep the savory juices right where they are. Next, you introduce the shredded vegetables and key flavorings, mixing and cooking them quickly. The magic happens as everything simmers together just long enough for the vegetables to soften and soak up all that incredible aroma and taste before you finish it with a simple drizzle.


Tips, Variations & Storage

Crucial Tip: Do not drain the fat after cooking the sausage! That rendered fat is essential for quickly sautéing and softening the cabbage mixture while adding tons of flavor.

Protein Substitution: If you prefer, swap the pork sausage for ground chicken, turkey, or even ground beef. If you use a lean meat like chicken, you may need to add a tablespoon of cooking oil to the pan.

Extra Add-ins: Toss in some sliced mushrooms, bell peppers, or even bamboo shoots right before the cabbage mixture goes in for added texture and nutrients.

Dietary Swap: For a soy-free and gluten-free version, use coconut aminos instead of the traditional soy sauce.

Storage: Leftovers keep beautifully in an airtight container in the fridge for up to three days. It makes a fantastic meal prep lunch!

Freezer Notes: While the meat base would freeze fine, I don’t recommend freezing this dish. Cooked cabbage becomes quite watery and mushy when thawed. This recipe is best enjoyed fresh or from the fridge.

FAQ

Q: I don’t have a coleslaw mix. Can I chop my own cabbage? A: Absolutely! Coleslaw mix is just a huge time-saver. If you’re chopping your own cabbage and carrots, just make sure to shred them very finely so they cook down quickly alongside the meat.


Q: Can I use ground turkey instead of pork sausage? A: Yes, ground turkey or chicken works great if you want to lower the fat content. Just remember to add a tiny bit of neutral cooking oil to the pan first since these meats don’t render as much fat as pork does.


Q: What is the best way to serve this dish? A: It’s wonderful served completely on its own! If you want to bulk it up, serve it over steamed white rice, cauliflower rice, or even a bed of Asian noodles like lo mein.


Q: Why do I need to keep the meat fat in the pan? A: The fat that cooks out of the sausage is crucial. It acts as the cooking oil for the cabbage mix, softening the vegetables while infusing them with savory flavor, preventing the final dish from tasting dry.


Recipes

Meat: One pound 1 lb. of raw, unseasoned ground pork sausage.

Vegetables: One standard package 1 Bag of pre-shredded cabbage and carrot blend.

Aromatics: Four measured teaspoons 4 tsp. of pureed fresh garlic cloves.

Aromatics: One tablespoon 1 Tbsp. of fresh ginger root, finely crushed.

Salty Finish: One tablespoon 1 Tbsp. of savory fermented soybean sauce.

Finishing Oil: One tablespoon 1 Tbsp. of toasted nut-flavored oil.

Garnish: A quarter cup ¼ C. of thinly sliced scallions, cut into small rounds.

Instructions

In a large frying pan or skillet over moderate-high heat, cook the ground meat until it is uniformly browned throughout. It is critical to retain the rendered fat within the pan and do not discard it.

Incorporate the cabbage-based vegetable mixture (coleslaw mix) into the hot skillet, then immediately lower the stove setting to medium.

Blend in the crushed ginger, the minced garlic, and the salty fermented sauce (soy sauce) with the meat and cabbage.

Allow the entire mixture to cook gently and steam until the shredded cabbage has reached a soft and tender texture.

Finish the dish by lightly pouring the toasted oil (sesame oil) over the contents, then sprinkle the sliced scallions (green onions) on top immediately prior to serving.

The best chocolate cake in the world

The best chocolate cake in the world


The Best Chocolate Cake in the World


There’s something incredibly comforting about a rich chocolate cake. The allure of its soft, moist texture combined with that deep, chocolatey flavor is enough to make anyone’s day a little brighter. This cake is a crowd-pleaser and perfect for any occasion, whether it’s a birthday, an afternoon treat, or just because you deserve a slice of something sweet. Trust me, once you take a bite, you might just declare it the best chocolate cake in the world!


Recipe Overview

Prep Time: 10 minutes

Cook Time: 50 minutes

Total Time: 1 hour

Servings: 8

Estimated Calories: 320 per slice

Ingredients

1 cup milk (240 ml)

1 cup sugar (200 g)

1 cup vegetable oil (240 ml)

4 tablespoons unsweetened cocoa powder (30 g)

2 large eggs

½ teaspoon vanilla extract

A pinch of salt

2 ripe bananas, mashed

1 cup all-purpose flour (125 g)

1 teaspoon baking powder (5 g)

Butter or oil for greasing

Instructions

In a mixing bowl, beat together the milk, sugar, oil, and cocoa powder for about 3-4 minutes, until the mixture is smooth and slightly thickened. Reserve 1 cup of this chocolate sauce.

To the remaining mixture in the bowl, add the eggs, vanilla extract, salt, and the mashed bananas. Continue to beat until everything is well combined.

Sift the flour and baking powder over the batter. Mix gently just until combined, being careful not to overmix.

Grease an 18 to 20 cm heavy pot with butter or oil. Pour the batter into the pot and cover it with a tight-fitting lid.

Place the pot over a flame diffuser on low heat and cook for 50 minutes. Avoid opening the lid during this time to ensure the cake cooks properly.

Check for doneness by inserting a toothpick in the center; it should come out clean.

Remove from heat and let it cool completely in the pot. Once cool, unmold the cake and drizzle the reserved chocolate sauce on top before serving.

Why This Recipe Works

This recipe stands out because it combines simple ingredients with an easy cooking method. The use of ripe bananas adds natural sweetness and moisture, making this cake not only delicious but also incredibly soft and tender. Plus, cooking it in a pot ensures a lovely, even bake without the need for an oven.


Serving Ideas

This chocolate cake is fantastic on its own, but you can dress it up with fresh fruit, a scoop of vanilla ice cream, or a dollop of whipped cream. It’s perfect for birthday parties, family gatherings, or a cozy dessert at home. You might even consider serving it with some coffee or a glass of cold milk!

Helpful Tips

Use very ripe bananas for the best flavor and moisture.

Make sure to mix the batter gently to avoid a tough cake.

If you don’t have a heavy pot, any oven-safe pot with a tight lid will work well.

Store any leftovers in an airtight container at room temperature for up to three days.

You can also freeze the cake before adding the chocolate sauce and enjoy it later!

FAQ

Q: Can I make this cake without bananas?

A: Yes! You can substitute the bananas with unsweetened applesauce for similar moisture.


Q: How do I know when the cake is done?

A: Insert a toothpick in the center; if it comes out clean, it’s ready!


Q: Can I bake this cake in the oven instead of on the stove?

A: Absolutely! Preheat your oven to 350°F (175°C) and bake in a greased cake pan for 25-30 minutes.


Q: What should I do with leftover chocolate sauce?

A: You can drizzle it over ice cream, pancakes, or use it in other desserts.


Conclusion

Now that you have the recipe, I encourage you to give this chocolate cake a try. It’s a wonderful way to enjoy a homemade treat that’s sure to impress anyone who takes a bite. Happy baking!


Ingredients

Wet Ingredients

1 cup milk (240 ml)

1 cup sugar (200 g)

1 cup vegetable oil (240 ml)

2 large eggs

½ teaspoon vanilla extract

2 ripe bananas, mashed Use very ripe bananas for the best flavor and moisture.

Dry Ingredients

4 tablespoons unsweetened cocoa powder (30 g)

1 cup all-purpose flour (125 g)

1 teaspoon baking powder (5 g)

A pinch of salt

For Greasing

Butter or oil For greasing the pot.

Method

Preparation

In a mixing bowl, beat together the milk, sugar, oil, and cocoa powder for about 3-4 minutes, until the mixture is smooth and slightly thickened. Reserve 1 cup of this chocolate sauce.

To the remaining mixture in the bowl, add the eggs, vanilla extract, salt, and the mashed bananas. Continue to beat until everything is well combined.

Sift the flour and baking powder over the batter. Mix gently just until combined, being careful not to overmix.

Cooking

Grease an 18 to 20 cm heavy pot with butter or oil. Pour the batter into the pot and cover it with a tight-fitting lid.

Place the pot over a flame diffuser on low heat and cook for 50 minutes. Avoid opening the lid during this time to ensure the cake cooks properly.

Check for doneness by inserting a toothpick in the center; it should come out clean.

Remove from heat and let it cool completely in the pot. Once cool, unmold the cake and drizzle the reserved chocolate sauce on top before serving.

Notes

This cake can be dressed up with fresh fruit, vanilla ice cream, or whipped cream. Store any leftovers in an airtight container at room temperature for up to three days. You can also freeze the cake before adding the chocolate sauce and enjoy it later.

Cheesy Baked Parmesan Meatloaf

Cheesy Baked Parmesan Meatloaf


Why You’ll Love This Recipe

Ultimate Comfort: It’s warm, savory, and fills the kitchen with the most inviting aroma.

Kid-Approved: The cheesy topping and familiar flavors make it a guaranteed winner with the little ones.

Budget-Friendly: We use a mix of proteins, which helps keep the cost low while maximizing flavor.

Hands-Off Cook Time: After 15 minutes of prep, the oven does all the heavy lifting!

Amazing Leftovers: It reheats beautifully, making it perfect for lunch the next day (if you have any left, that is!).

How It’s Made

The process for this cozy dinner is delightfully straightforward! First, you toss all of your foundational ingredients and aromatics into one large bowl and mix them well to ensure everything is evenly distributed. Once shaped into a clean loaf, the mixture gets brushed with a layer of red sauce and baked in the oven. Finally, we pull it out briefly to add the crowning layer of mozzarella before letting it finish baking until it’s perfectly browned and ready to rest.

Tips, Variations & Storage

Tip for Moisture: Always use cold hands when mixing the meatloaf. This keeps the fat from melting too early, ensuring a more tender final product.

Dietary Swap: For a leaner option, feel free to substitute all the beef and turkey with ground chicken or ground turkey breast instead.

Easy Substitution: If you don’t have breadcrumbs, you can use crushed-up crackers or even a small amount of quick-cooking oatmeal as a binder.

Add-in Idea: For a little zing, stir in a teaspoon of red pepper flakes when you mix the meat.

Freezer Notes: This is a freezer superstar! You can form the raw loaf, wrap it tightly, and freeze it for up to three months. Thaw overnight in the fridge before topping with sauce and baking.

Storage: Store any baked and cooled leftovers in an airtight container in the refrigerator for up to 4 days.

FAQ

Q: Do I really need to use both beef and turkey? A: You don’t have to, but mixing the two proteins is what gives this meatloaf its incredible flavor and keeps it from being too heavy. It’s highly recommended!


Q: Can I use fresh minced garlic instead of the jarred kind? A: Absolutely! Two teaspoons of the jarred minced garlic is roughly equivalent to two average cloves of fresh garlic, finely chopped.


Q: What is the best way to get that perfect brown crust on the cheese? A: After the last 10 minutes of baking, you can place the meatloaf under the broiler on high for 1 to 2 minutes, but watch it like a hawk—cheese burns quickly!


Q: Why does my meatloaf mixture feel too wet? A: If the mix feels too soft, simply add another tablespoon or two of breadcrumbs until it holds its shape when you form it into a loaf.


Q: How do I know when the meatloaf is fully cooked? A: The best way to check is using a meat thermometer; it should register an internal temperature of 165°F (74°C) in the thickest part.


Recipes

For the Loaf:

1 pound lean ground beef

1 pound ground turkey

1 cup diced yellow onion

2 large eggs lightly beaten

2 teaspoons finely minced garlic

1 ½ teaspoons Italian herb blend

¼ cup plain breadcrumbs

½ cup freshly grated Parmesan cheese for mixing

Freshly ground black pepper and kosher salt as needed

For the Topping:

½ cup prepared marinara sauce

½ cup shredded mozzarella cheese

Instructions

Preparation: Set your oven temperature to 350°F (175°C) in advance.

Combine Ingredients: In a spacious mixing basin, thoroughly combine the ground beef, ground turkey, diced onion, minced garlic, breadcrumbs, beaten eggs, Italian seasoning, and the half cup of Parmesan cheese. Season generously with kosher salt and black pepper.

Mix the Loaf: Use your hands to mix the components until they are uniform and fully incorporated. Take care to avoid over-mixing the blend.

Shape and Bake (Phase 1): Gently form the meat mixture into a cohesive loaf and place it inside a standard loaf pan. Spoon the marinara sauce evenly over the top surface. Place the pan in the preheated oven and bake for 40 minutes.

Finish Baking (Phase 2): Carefully remove the loaf from the oven. Sprinkle the shredded mozzarella across the top. Return the meatloaf to the oven and continue baking for the remaining 10 minutes, or until the cheese is melted and bubbly.

Broil and Rest: If you desire a golden-brown, crispy cheese crust, place the meatloaf under a high broiler for 1–2 minutes, watching carefully to prevent burning. Remove the loaf from the oven and allow it to rest in the pan for a minimum of 10 minutes before slicing and serving.

Homemade Oat and Chia Bread

Homemade Oat and Chia Bread

This hearty loaf is perfect for those who love a rustic, seed-heavy bread. It is incredibly satisfying, with a crunchy crust and a soft, nutrient-dense interior.

Ingredients

  • 3 cups Bread flour (or all-purpose flour)

  • 1 cup Rolled oats (plus extra for topping)

  • 3 tbsp Chia seeds

  • 1 packet (2 ¼ tsp) Active dry yeast

  • 1 ½ tsp Sea salt

  • 1 tbsp Honey or maple syrup

  • 1 ¼ cups Warm water (about 110°F)

  • 2 tbsp Olive oil


Detailed Instructions

  1. Activate the Yeast: In a small bowl, combine the warm water, honey, and yeast. Let it sit for 5–10 minutes until it becomes foamy on top.

  2. Mix Dry Ingredients: In a large mixing bowl, whisk together the flour, oats, chia seeds, and salt.

  3. Form the Dough: Pour the yeast mixture and olive oil into the dry ingredients. Stir until a shaggy dough forms.

  4. Knead: Turn the dough onto a floured surface and knead for about 8–10 minutes until smooth and elastic. (Alternatively, use a stand mixer with a dough hook for 5–7 minutes).

  5. First Rise: Place the dough in a lightly greased bowl, cover with a damp cloth, and let it rise in a warm, draft-free spot for 1 to 1.5 hours, or until it has doubled in size.

  6. Shape: Gently punch down the dough and shape it into a round boule or a traditional loaf. Brush the top lightly with water and sprinkle with extra oats and chia seeds.

  7. Second Rise: Place the shaped dough on a baking sheet or in a loaf pan. Cover and let rise again for 30–45 minutes.

  8. Bake: Preheat your oven to 375°F (190°C). Bake for 30–35 minutes, or until the crust is golden brown and the loaf sounds hollow when tapped on the bottom.

  9. Cool: Transfer to a wire rack and let the bread cool completely before slicing to ensure the interior sets properly.

Flu Fighting Tea

Flu Fighting Tea

This soothing blend uses natural ingredients like ginger, turmeric, and lemon to create a comforting, warm beverage.

Ingredients

  • 3 cups Water

  • Juice of 1/2 Lemon

  • 1 Cinnamon stick

  • 1/4 inch Fresh ginger

  • 1/4 tsp Cloves

  • 1 tsp Turmeric

  • 1 pinch Cayenne pepper

  • 1 tbsp Honey (added after simmering)


Instructions

  1. Combine Ingredients: Place the water, lemon juice, cinnamon stick, fresh ginger, cloves, turmeric, and cayenne into a medium-sized pot.

  2. Boil: Bring the entire mixture to a rolling boil over medium-high heat.

  3. Simmer: Once the tea reaches a boil, reduce the heat to low and let it simmer for approximately 10 minutes to allow the flavors and nutrients to infuse.

  4. Strain: Carefully pour the tea through a fine-mesh strainer into a mug to remove the cinnamon stick, ginger pieces, and cloves.

  5. Sweeten: Stir in 1 tablespoon of honey until fully dissolved.

  6. Serve: Drink the tea while it is still warm for the best experience.

Protein-Packed Chickpea Flour Chocolate Cake

Protein-Packed Chickpea Flour Chocolate Cake

This recipe makes a rich, moist, and delightfully protein-packed chocolate cake that’s surprisingly gluten-free and avoids refined sugars. It’s so wholesome you can enjoy a slice for breakfast!

Detailed Recipe:

  • Prep time: 15 minutes

  • Bake time: 35-45 minutes

  • Yields: One 9×5 loaf pan (about 12 slices)

Ingredients:

  • Dry:

    • 1 1/2 cups chickpea flour (sifted)

    • 1/2 cup unsweetened cocoa powder (sifted)

    • 3/4 cup coconut sugar (or your favorite granulated alternative like monk fruit, maple flakes, or sugar)

    • 1 1/2 tsp baking powder

    • 1/2 tsp baking soda

    • 1/4 tsp sea salt

  • Wet:

    • 1/2 cup unsweetened applesauce (adds moisture and acts as a binder)

    • 1/2 cup water (or plant milk, like oat or almond milk)

    • 1/3 cup melted coconut oil (or any neutral oil)

    • 1 tsp vanilla extract

    • Optional: 1/2 cup vegan chocolate chips (gently fold in)

Instructions:

  1. Prepare: Preheat your oven to 350°F (175°C). Grease a standard 9×5-inch loaf pan with a little oil or line it with parchment paper for easy removal.

  2. Sift and Mix Dry: In a large mixing bowl, sift together the chickpea flour and cocoa powder to remove any lumps. Add the coconut sugar, baking powder, baking soda, and salt. Whisk until well combined.

  3. Combine Wet: In a separate, smaller bowl, whisk together the applesauce, water (or milk), melted coconut oil, and vanilla extract until smooth.

  4. Create Batter: Pour the wet ingredients into the dry ingredients and stir with a spatula or whisk until just combined. The batter will be thick and rich. Avoid overmixing. Gently fold in the optional chocolate chips if using.

  5. Pour and Smooth: Transfer the batter to your prepared loaf pan. Smooth the top with a spatula.

  6. Bake: Place the pan in the preheated oven and bake for 35 to 45 minutes. The cake is done when a toothpick or cake tester inserted into the center comes out clean (or with just a few moist crumbs).

  7. Cool: Allow the cake to cool in the pan for about 10 minutes. Then, carefully turn it out onto a wire rack to cool completely before slicing. This helps set the structure.

  8. Enjoy: Slice and enjoy! It’s delicious on its own, with a dusting of cocoa powder, or a dollop of coconut whipped cream.

Vegan Peanut Butter Mousse

Vegan Peanut Butter Mousse

This mousse is incredibly creamy, using a base of coconut cream or silken tofu for a light, airy finish.

Ingredients

  • 1 cup Creamy peanut butter (natural is best)

  • 1 can (13.5 oz) Full-fat coconut milk, chilled overnight (use only the solid cream from the top)

  • 1/2 cup Maple syrup or agave nectar

  • 1 tsp Vanilla extract

  • Pinch of sea salt

  • For the Ganache Topping: 1/2 cup vegan chocolate chips melted with 2 tbsp coconut milk.

Instructions

  1. Prepare the Base: Scoop the hardened coconut cream from the top of the chilled can into a large chilled bowl. Whisk with a hand mixer until fluffy.

  2. Blend: Fold in the creamy peanut butter, sweetener, vanilla, and salt. Whisk again until the mixture is completely smooth and light.

  3. Set: Divide the mousse into individual serving bowls. Let them chill in the refrigerator for at least 2 hours to firm up.

  4. Top: Once set, pour a thin layer of the chocolate ganache over each bowl.

  5. Serve: Add a few crushed peanuts on top for a delightful crunch before serving.