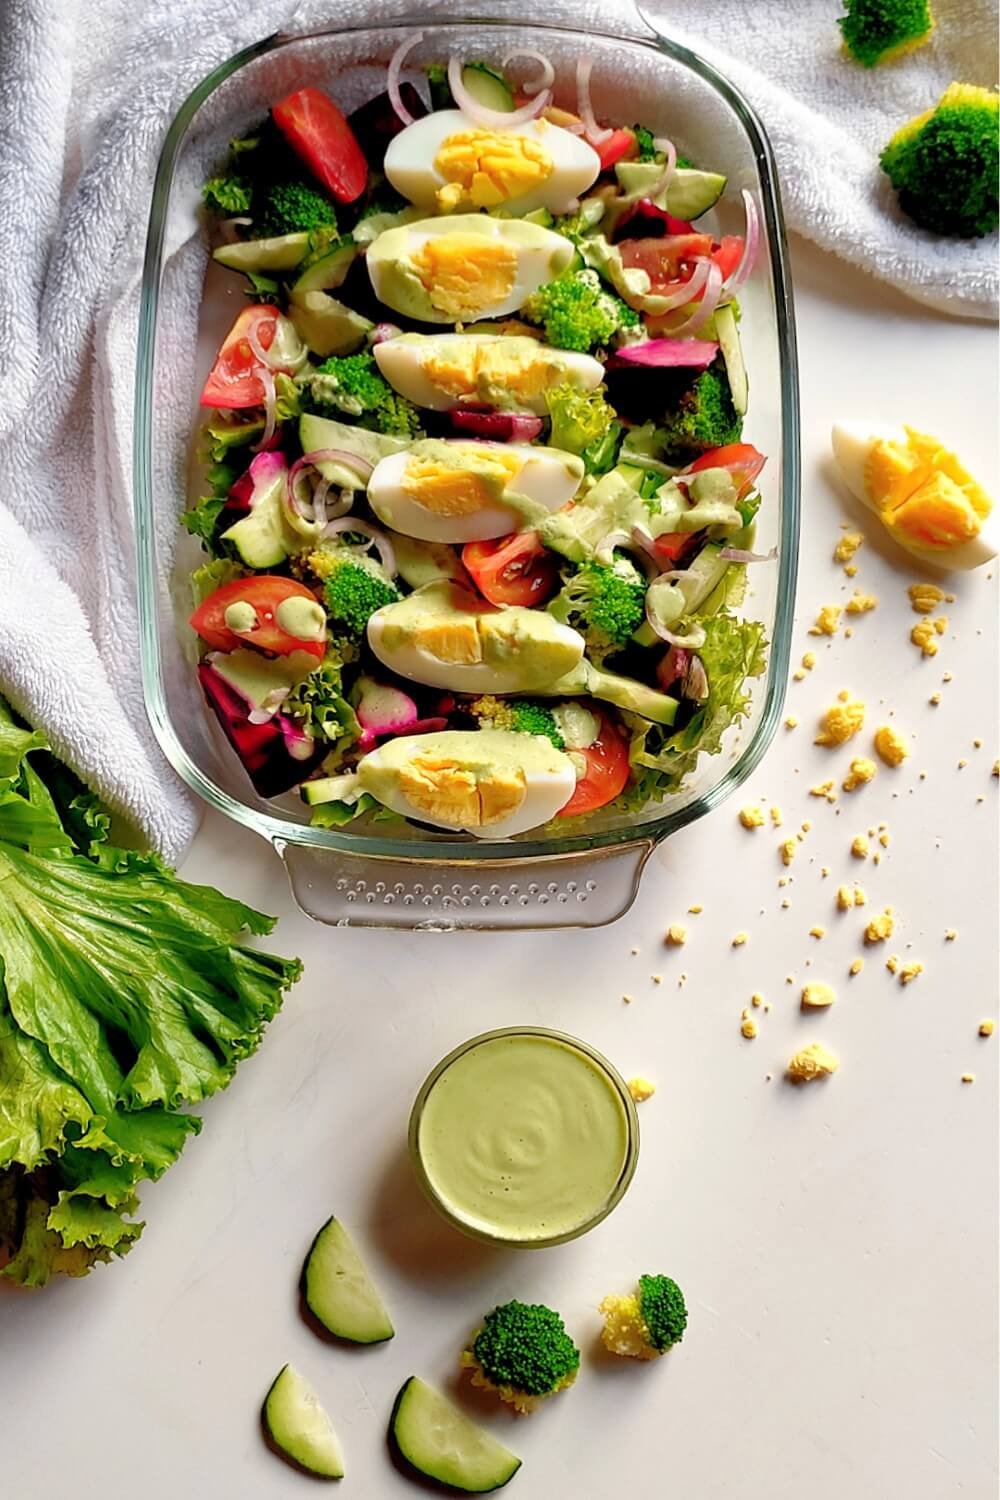
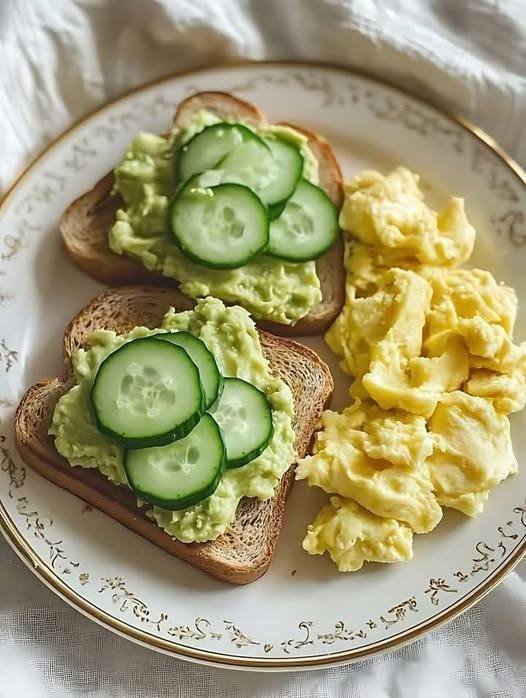
Homemade Creamy Ice Cream Recipe – No Machine Required, Makes 2 Liters

Hello everyone! Welcome to our food blog, your favorite place to find delicious recipes. Here you will find desserts, snacks, breakfast, appetizers, fresh salads. Let’s get started!

Meal Prep: Creamy Ice Cream Recipe

Learn how to prepare easy desserts with step-by-step recipes inspired by the best online cooking schools. Whether you’re an aspiring chef or just love gourmet cooking at home, these professional recipe ideas are perfect for busy days and high-quality meals.

Recipe ingredients:

  • 1 packet of powdered drink mix (strawberry or any flavor you like) (25 g / 0.88 oz)
  • 1 can of sweetened condensed milk (395 g / 13.9 oz)
  • 3 tablespoons of powdered milk (approx. 30 g / 1 oz)
  • 1 liter of milk (1000 ml / 33.8 fl oz / 4 ¼ cups)
  • 4 tablespoons of sugar (approx. 50 g / 1.76 oz)

Instructions:

In a blender, combine the powdered milk, condensed milk, milk, sugar, and powdered drink mix. Blend for about 5 minutes until smooth and well mixed.

Pour the mixture into a bowl and place it in the freezer for 1 hour and 30 minutes.

Remove from the freezer and transfer the semi-frozen mixture into a stand mixer or bowl. Beat it on high speed for 3 minutes to make it extra creamy.

Pour the whipped mixture into a container with a lid and freeze for at least 7 hours until firm.

Serving Tip:

You can top it with fruits, syrup, chocolate chips, or granola for added texture and flavor.

Creamy Pie with a Special 4-Milk Cream: Wonderful Recipe-I Always Make It for Dessert

Hi, everyone! Welcome back to our cooking blog, where we share delicious recipes every week. Today, we’re preparing a Creamy Pie. So, grab your pen and paper to jot down the ingredients and let’s dive into this easy, step-by-step recipe that’s perfect for breakfast, appetizers or even to accompany fresh salads!

How to Make Creamy Pie with a Special 4-Milk Cream

The Creamy Pie is an irresistible dessert with a smooth texture and rich flavor—perfect for ending a meal in style. You don’t need cooking classes or costly meal delivery services to prepare something delicious at home. With a bit of planning and our detailed meal prep guide, you can create amazing dishes with confidence and ease.

Recipe Ingredients:

For the Four-Milk Cream:

  • 1 2/3 cups milk (13.5 fl oz / 400ml)
  • 1 carton of table cream or heavy cream (7 oz / 200g)
  • 1 can sweetened condensed milk (14 oz / 395g)
  • 1 small bottle of coconut milk (6.8 fl oz / 200ml)
  • 4 tablespoons powdered milk (about 1 oz / 30g)
  • 3 tablespoons cornstarch (about 1 oz / 25g)

For the Biscuit Crumble:

  • 2 tablespoons melted butter (about 1 oz / 30g)
  • 4.6 oz milk biscuits or cookies (130g)

For Assembly:

  • Whipped cream, beaten to stiff peaks, to taste
  • 3.5 oz chopped white chocolate (100g)

Instructions:

Four Milk Cream:
First, in a saucepan, add the cornstarch, powdered milk, and sweetened condensed milk. Stir well until everything is fully dissolved.
Next, add the coconut milk, heavy cream, and regular milk. Mix again until smooth. Then, place the mixture over low heat, stirring constantly until it starts to boil and thickens.
After that, let it cook for another 2 minutes to ensure it’s well done. Finally, remove from heat and allow it to cool to room temperature before using.

Cookie Crumb Mixture:
To start, place the cookies in a food processor and blend until you get a fine crumb texture.
Then, add the melted butter and blend a little more until you have a moist crumb mixture.

Assembly:
In a glass baking dish, spread half of the cream evenly. After that, make a layer with the cookie crumbs and then a layer of chopped white chocolate.
Next, add the remaining cream on top, spreading it gently. Lastly, top it with whipped cream beaten to stiff peaks and sprinkle a bit more of the cookie crumbs on top to decorate.
To finish, refrigerate for at least 3 hours. Serve this creamy and beautiful Belgian-style dessert well chilled!

Fluffy Cottage Cheese Pancakes (Soft & Protein-Packed)

Description:
These pancakes are soft, fluffy, and naturally rich in protein thanks to cottage cheese and eggs. They’re slightly golden on the outside and tender inside—perfect for breakfast or a snack.


Ingredients (Makes ~6 pancakes)

  • 1 cup cottage cheese
  • 2 large eggs
  • ½ cup all-purpose flour or oats (for a healthier version, use rolled oats)
  • ½ teaspoon baking powder
  • ¼ teaspoon salt
  • ¼ teaspoon cinnamon (optional)
  • 1–2 tablespoons sugar or honey (optional, for sweetness)
  • 1 teaspoon vanilla extract (optional)
  • Butter or coconut oil, for cooking

Instructions

  1. Prepare the Batter:
    • In a large bowl, mix together cottage cheese and eggs until smooth.
    • Add flour or oatsbaking powdersalt, cinnamon, and sugar/honey if using. Stir until combined. The batter should be thick but scoopable.
    • Optional: Add vanilla extract for extra flavor.
  2. Heat the Pan:
    • Heat a non-stick skillet or frying pan over medium-low heat.
    • Add a small amount of butter or coconut oil to grease the pan.
  3. Cook the Pancakes:
    • Scoop 3–4 tablespoons of batter per pancake into the skillet.
    • Spread slightly to form a round shape.
    • Cook for 3–4 minutes until the bottom is golden brown.
    • Flip carefully and cook another 3–4 minutes until cooked through.
    • Reduce heat if they brown too quickly before the inside cooks.
  4. Serve:
    • Serve warm with honey, maple syrup, fresh fruit, or yogurt.
    • Store leftovers in an airtight container in the fridge for up to 3 days.

💡 Tips:

  • For extra fluffiness, blend the cottage cheese slightly before mixing with the other ingredients.
  • You can also fold in mashed banana for natural sweetness and extra moisture.
  • These pancakes can be reheated in a skillet or microwave.

Pineapple Coconut Dream Cake

Pineapple Coconut Dream Cake

Ingredients

For the Cake

  • 2 cups all-purpose flour
  • 1 ½ teaspoons baking powder
  • ½ teaspoon baking soda
  • ½ teaspoon salt
  • ¾ cup granulated sugar
  • ½ cup unsalted butter softened
  • 2 large eggs room temperature
  • 1 cup crushed pineapple well drained
  • ¾ cup coconut milk
  • 1 teaspoon vanilla extract
  • ½ cup shredded coconut unsweetened or sweetened

For the Coconut Cream Topping

  • 1 cup heavy whipping cream cold
  • ½ cup cream cheese softened
  •  cup powdered sugar
  • ½ teaspoon vanilla extract
  • ½ cup toasted shredded coconut for garnish

Instructions

Prepare the Cake

  • Preheat your oven to 350°F (180°C). Grease and lightly flour a 9-inch round or square cake pan.
  • In a medium bowl, whisk together the flour, baking powder, baking soda, and salt.
  • In a separate large bowl, beat the butter and sugar until light and fluffy. Add the eggs one at a time, mixing well after each.
  • Stir in the vanilla extract, coconut milk, and crushed pineapple. Gradually add the dry ingredients and mix until just combined. Fold in the shredded coconut.
  • Pour the batter into the prepared pan and smooth the top.

Bake

  • Bake for 35–40 minutes, or until a toothpick inserted in the center comes out clean.
  • Remove from the oven and let the cake cool completely.

Make the Topping

  • In a bowl, beat the cream cheese until smooth. Add powdered sugar and vanilla, mixing until creamy.
  • In another bowl, whip the cold heavy cream until soft peaks form. Gently fold the whipped cream into the cream cheese mixture.

Assemble

  • Spread the coconut cream topping evenly over the cooled cake. Sprinkle with toasted coconut for extra flavor and texture.

Chill & Serve

  • Refrigerate for at least 30 minutes before slicing. Serve chilled or slightly cool for the best taste.

AVOCADO AND SPINACH EGG SALAD

🥑 AVOCADO AND SPINACH EGG SALAD

A creamy, protein-packed, and refreshing salad perfect for a healthy lunch or light dinner!

  • 4 large eggs (hard-boiled and chopped)

  • 1 ripe avocado (mashed or diced)

  • 2 cups baby spinach (chopped)

  • 2 tbsp Greek yogurt (or mayonnaise for a richer flavor)

  • 1 tsp Dijon mustard

  • 1 tbsp lemon juice

  • 1 tbsp olive oil

  • Salt and black pepper to taste

  • Optional: chopped green onions, fresh dill, or red chili flakes for garnish

 Instructions:

  1. Boil the eggs:
    Place eggs in a pot, cover with water, and bring to a boil. Once boiling, simmer for 9–10 minutes, then cool and peel.

  2. Prepare the base:
    In a mixing bowl, mash the avocado with lemon juice, olive oil, and mustard.

  3. Add the rest:
    Stir in chopped eggs and spinach. Add Greek yogurt, salt, and pepper.

  4. Mix well:
    Gently combine all ingredients until creamy and evenly coated.

  5. Serve:
    Enjoy on whole-grain toast, in a sandwich, or as a side salad with grilled chicken or fish.

 Serving Ideas:

  • Spread on toast and top with cherry tomatoes.

  • Roll into a wrap with lettuce leaves.

  • Serve over quinoa or couscous for a heartier meal.

2-Ingredient Peanut Butter Fudge — Creamy, No-Bake, and Melt-in-Your-Mouth Delicious

This 2-Ingredient Peanut Butter Fudge is a total game-changer if you want a rich, creamy dessert without the hassle of candy thermometers or boiling sugar. Using store-bought vanilla frosting gives you a pre-mixed “sugar and fat” base that, when combined with peanut butter, transforms into a perfectly smooth, melt-in-your-mouth fudge. Minimal effort, maximum reward!

Sugar cookies

2-Ingredient Peanut Butter Fudge

Ingredients

Core Ingredients Amount
Smooth peanut butter 2 cups
Vanilla frosting (16 oz tub) 1 container

Equipment

  • 8×8-inch baking dish
  • Parchment paper

How to Make It

Discover more
Peanut
Butter
sugar
peanut butter
Peanut Butter
fudge
Fudge
peanut
cookie
butter

Step 1: Prep the Pan
Line your 8×8-inch dish with parchment paper, leaving a little overhang. This makes it easy to lift the fudge out once set.

Step 2: Mix the Magic
In a large bowl, combine the peanut butter and vanilla frosting. Stir for about 30 seconds until smooth and fully blended. The mixture will be thick, like soft cookie dough.

Step 3: Press and Smooth
Transfer the mixture to your prepared pan. Press firmly into the corners and smooth the top with a spoon or spatula.

Step 4: Chill
Refrigerate for 1½–2 hours until firm. For a faster set, freeze for 45–60 minutes.

Step 5: Slice and Serve
Use the parchment overhang to lift the fudge out of the pan. Cut into bite-sized squares with a sharp knife and enjoy!

Anti-Inflammatory Pickled Cucumber, Onion & Bell Pepper Salad

Anti-Inflammatory Pickled Cucumber, Onion & Bell Pepper Salad 

Ingredients

1 large cucumber, thinly sliced

1 small red onion, thinly sliced

1 bell pepper (red, yellow, or orange), thinly sliced

½ cup apple cider vinegar

1 tablespoon olive oil

1 teaspoon honey or maple syrup (optional)

½ teaspoon salt

¼ teaspoon black pepper

½ teaspoon turmeric (anti-inflammatory boost)

Optional: fresh dill or parsley, thin garlic slices, or chili flakes


👩‍🍳 Instructions

Prepare the vegetables:

Thinly slice the cucumber, onion, and bell pepper. Place them in a large bowl or glass jar.

Make the pickling dressing:

In a small bowl, whisk together apple cider vinegar, olive oil, honey (if using), salt, pepper, and turmeric.

Combine:

Pour the dressing over the vegetables. Toss or shake gently to coat evenly.

Rest & pickle:

Let sit for 10–15 minutes at room temperature for quick pickling. For deeper flavor, refrigerate for 30–60 minutes.

Serve:

Enjoy chilled or at room temperature as a salad, topping, or side.


🍽 Servings

Serves: 4

Serving Size: About 1 cup


Homemade 4-ingredient recipe ready in just 3 steps..


Homemade 4-ingredient recipe ready in just 3 steps.. I will sent it to the person who sent it Hi

 Ingredients

2 cups cooked, shredded chicken

2 medium zucchini, sliced thin

1 cup shredded mozzarella (or Italian blend)

1 cup Alfredo sauce (or heavy cream + garlic salt if homemade)

Instructions

Step 1 – Mix

In a bowl, combine shredded chicken, zucchini slices, and Alfredo sauce. Stir until evenly coated.

Step 2 – Assemble

Transfer the mixture into a greased baking dish. Spread evenly and top with shredded cheese.

Step 3 – Bake

Bake at 375°F (190°C) for 25–30 minutes, or until bubbly and golden on top.

Broil 2–3 minutes for extra browning if desired.Ingredients

2 cups cooked, shredded chicken

2 medium zucchini, sliced thin

1 cup shredded mozzarella (or Italian blend)

1 cup Alfredo sauce (or heavy cream + garlic salt if homemade)

Instructions

Step 1 – Mix

In a bowl, combine shredded chicken, zucchini slices, and Alfredo sauce. Stir until evenly coated.

Step 2 – Assemble

Transfer the mixture into a greased baking dish. Spread evenly and top with shredded cheese.

Step 3 – Bake

Bake at 375°F (190°C) for 25–30 minutes, or until bubbly and golden on top.

Broil 2–3 minutes for extra browning if desired.

Honey Lemon Turmeric Gummies

Honey Lemon Turmeric Gummies

These bright golden gummies are a soothing, immunity-supporting treat made with simple ingredients. Packed with turmeric, lemon, and honey, they offer gentle digestive support, natural anti-inflammatory benefits, and a comforting citrus sweetness. Perfect for kids and adults, they’re easy to make and store beautifully in the fridge.

Ingredients (Makes 30–40 Gummies)

  • 1 cup water
  • 1 cup fresh orange juice or lemon water (optional for more citrus flavor)
  • 2–3 tbsp fresh lemon juice
  • 2 tbsp honey (add 1 extra tbsp if you prefer sweeter gummies)
  • 1 tbsp ground turmeric
  • ½ tsp ground ginger (optional but boosts warmth & digestion)
  • ⅛ tsp black pepper (helps your body absorb turmeric)
  • 3 tbsp gelatin (grass-fed recommended)
  • ½ tsp vanilla extract (optional, for a smooth flavor)

Instructions

1. Warm the Base

In a small saucepan, combine:

  • Water
  • Lemon juice
  • Optional orange juice
  • Turmeric
  • Ginger
  • Black pepper

Heat on low only, stirring gently. Warm the mixture for 2–3 minutes—avoid boiling because high heat reduces the natural nutrients in lemon and turmeric.

2. Add Honey

Remove the pot from heat and wait 1 minute so the mixture is warm but not hot.
Whisk in the honey until fully dissolved. Adding honey at a cooler temperature keeps its natural enzymes and antioxidants intact.

3. Bloom the Gelatin

Slowly sprinkle the gelatin over the warm liquid while whisking continuously.
Let it rest for 1 minute to “bloom,” then whisk again until smooth and fully melted. This step is key to getting firm, springy gummies without graininess.

See also  Apple Oat Pancakes Recipe

4. Pour Into Molds

Carefully pour the mixture into silicone molds (bears, hearts, or simple squares) or into a shallow glass dish.

5. Chill

Refrigerate for 2 hours or until fully set.

6. Unmold

Pop gummies out of the molds, or if using a dish, slice into small cubes.

Storage

Store gummies in an airtight container in the refrigerator for up to 10 days.
They can also be frozen and thaw instantly in seconds.

Benefits (Natural & Safe)

  • Turmeric + pepper → increased absorption & anti-inflammatory properties
  • Lemon → vitamin C & digestive support
  • Honey → soothing, antibacterial sweetness
  • Gelatin → gut-friendly, helps hair/skin/nails

Cheesy Baked Potato Casserole

Cheesy Baked Potato Casserole

Creamy • Comforting • Oven-Baked

Servings: 6–8
Prep Time: 15 minutes
Bake Time: 25–30 minutes

Ingredients

Potatoes

  • 2 lbs (about 1 kg) Yukon Gold or Russet potatoes

  • Peeled and sliced into rounds or cut into cubes

Cream Sauce

  • 1½ cups heavy cream

  • 2 garlic cloves, finely minced

  • 1 teaspoon salt

  • ½ teaspoon black pepper

Cheese

  • 2 cups shredded cheddar or mozzarella cheese

Topping

  • ½ cup cooked and crumbled bacon

  • ¼ cup freshly chopped dill or chives


Instructions

1. Boil the Potatoes

  1. Place the sliced or cubed potatoes into a large pot.

  2. Cover with salted water.

  3. Bring to a boil and cook for 8–10 minutes, just until slightly tender.

  4. Drain well and set aside.


2. Prepare the Baking Dish

  1. Preheat oven to 375°F (190°C).

  2. Lightly grease a baking dish.


3. Layer the Casserole

  1. Arrange half of the potatoes evenly in the baking dish.

  2. Sprinkle with half of the cheese and half of the bacon.

  3. Add the remaining potatoes on top.


4. Add the Cream Sauce

  1. In a bowl, whisk together the cream, garlic, salt, and black pepper.

  2. Pour evenly over the layered potatoes.


5. Bake

  1. Sprinkle the remaining cheese over the top.

  2. Bake uncovered for 25–30 minutes, until the sauce is bubbling and the top is golden.


6. Garnish and Serve

  • Sprinkle with fresh dill or chives before serving.

  • Serve warm as a side dish or main course.

Homemade Flaky Green Onion & Spinach Flatbread

Homemade Flaky Green Onion & Spinach Flatbread

This recipe creates a beautiful, multi-layered bread similar to a scallion pancake or paratha.

Ingredients

  • Dough:

    • 550g (4 1/5 cups) Flour

    • 300ml (1 1/2 cups) Warm water

    • 1 Egg

    • 1 tsp (7g) Salt

  • Filling:

    • 40g Green onions, chopped

    • 50g Fresh spinach, chopped

    • 1/2 tsp Salt

    • 1/2 tsp Red pepper flakes

    • Oil or melted butter (for brushing between layers)

Instructions

  1. Make the Dough: In a large bowl, whisk the egg into the warm water and salt. Gradually add the flour and knead until a smooth, soft dough forms. Cover and let it rest for 20 minutes to relax the gluten.

  2. Prepare Filling: Mix the chopped onions, spinach, salt, and red pepper in a small bowl.

  3. Shape & Layer: Divide the dough into equal portions. Roll one piece out into a very thin rectangle. Brush the surface lightly with oil or butter and sprinkle a generous amount of the green filling over it.

  4. Create Flakiness: Roll the dough up tightly into a long rope, then coil that rope into a spiral (like a snail shell). Flatten the spiral gently with your hand or a rolling pin. This creates the “swirled” layers seen in the photo.

  5. Cook: Heat a lightly oiled skillet over medium heat. Fry each flatbread for 3–4 minutes per side until golden brown and crispy on the outside.


Lemon, Ginger & Turmeric Immune Tonic

A refreshing and simple infusion to support your daily hydration.

Ingredients

  • 3 slices Fresh lemon

  • 2–3 slices Raw ginger

  • 1 pinch Ground turmeric or fresh root

  • 1 dash Black pepper (optional, helps with turmeric absorption)

  • Warm water

Instructions

  1. Place the lemon, ginger, and turmeric into a mug.

  2. Pour warm water over the ingredients.

  3. Let steep for 5 minutes and sip slowly.


Simple Clove Water

Ingredients

  • 3–5 Whole cloves

  • 1 cup Water

Instructions

  1. Cold Method: Place cloves in water and let sit overnight in the fridge.

  2. Hot Method: Steep cloves in hot water for 10 minutes, then remove the cloves before drinking.

Grandma’s Secret Soft Poppy Seed Bread

Grandma’s Secret Soft Poppy Seed Bread

Adding a small amount of vinegar to yeast dough acts as a natural dough conditioner, making the bread incredibly soft, helping it rise higher, and extending its freshness.

Ingredients:

  • Flour: 3 ½ cups (approx. 500g) All-purpose or Bread flour

  • Milk: 1 cup (250ml) warm milk

  • Yeast: 2 ¼ tsp (1 packet) active dry yeast

  • Sugar: 2 tbsp

  • Salt: 1 tsp

  • Vinegar: 1 tbsp white distilled vinegar (The “Secret Ingredient”)

  • Butter: 4 tbsp (60g) unsalted, softened

  • Egg: 1 large egg (at room temperature)

  • Poppy Seeds: 2 tbsp

Instructions:

  1. Activate Yeast: In a large bowl, combine warm milk, sugar, and yeast. Let it sit for 5–10 minutes until foamy.

  2. Mix: Add the egg, softened butter, and the vinegar. Stir in the poppy seeds.

  3. Knead: Gradually add the flour and salt. Knead by hand or with a mixer for 8–10 minutes until the dough is smooth and elastic.

  4. First Rise: Place dough in a greased bowl, cover with a damp cloth, and let rise in a warm spot for 1 hour (or until doubled).

  5. Shape: Punch down the dough. Divide into 4 equal balls and place them in a greased baking pan (as seen in your image).

  6. Second Rise: Cover and let rise for another 30–45 minutes.

  7. Bake: Preheat oven to 350°F (175°C). Brush the top with a little milk or egg wash. Bake for 25–30 minutes until the top is golden brown.

  8. Cool: Let the bread cool in the pan for 10 minutes before transferring to a wire rack.


Lemon, Ginger & Turmeric Water

This warming drink is designed for hydration and comfort.

Ingredients:

  • Lemon: 3 fresh slices

  • Ginger: 2–3 slices of raw root

  • Turmeric: A pinch of ground turmeric or a small piece of fresh root

  • Black Pepper: A dash (helps with turmeric absorption)

  • Water: 1 cup of warm water

Instructions:

  1. Place the lemon, ginger, and turmeric into a mug.

  2. Add a dash of black pepper if desired.

  3. Pour warm water over the ingredients and let it infuse for 5 minutes.

  4. Sip slowly.


Simple Clove Infusion

A traditional, aromatic drink made with whole cloves.

Ingredients:

  • Whole Cloves: 3–5 pieces

  • Water: 1 cup

Instructions:

  1. Hot Method: Add cloves to boiling water, remove from heat, and steep for 10 minutes.

  2. Overnight Method: Place cloves in room temperature water and let soak overnight for a milder flavor.

  3. Strain the cloves out before drinking.

Lemon, Ginger & Turmeric Warm Infusion

Lemon, Ginger & Turmeric Warm Infusion

Prep Time: 5 minutes | Infusion Time: 5 minutes
Serves: 1 cup

A comforting warm drink made with simple kitchen ingredients. Lightly citrusy, gently spiced, and easy to prepare.


Ingredients

  • 3 thin slices fresh lemon

  • 2–3 thin slices fresh ginger

  • A small pinch ground turmeric

    • or a small piece of freshly grated turmeric root

  • Optional: a light dash of black pepper (for balanced flavor)

  • 1 cup warm water (not boiling)


Step-by-Step Instructions

1. Prepare the Ingredients

  • Wash the lemon and ginger thoroughly.

  • Slice the lemon thinly, keeping the peel on.

  • Peel the ginger and cut it into thin slices.

  • If using fresh turmeric root, peel and grate a small amount.


2. Combine

  • Place the lemon slices, ginger slices, turmeric, and black pepper (if using) into a heat-safe mug or glass.


3. Infuse

  • Pour warm (not boiling) water over the ingredients.

  • Very hot water is avoided to maintain the fresh taste of the lemon.


4. Steep

  • Let the mixture sit for about 5 minutes so the flavors gently blend.


5. Enjoy

  • Stir lightly and sip slowly while warm.

  • You may strain the ingredients or leave them in the cup for a stronger flavor.


Flavor Notes

  • Lemon adds brightness and freshness

  • Ginger gives gentle warmth

  • Turmeric provides a rich golden color and earthy taste

  • Black pepper balances the overall flavor


Clove Water (Simple Infusion Option)

A lightly spiced drink with a warm aroma.

Ingredients

  • 3–5 whole cloves

  • 1 cup water

Method 1: Cold Infusion

  1. Place the cloves in a glass of water.

  2. Cover and let sit overnight at room temperature.

  3. Strain before drinking if desired.

Method 2: Warm Infusion

  1. Add cloves to hot (not boiling) water.

  2. Let steep for 10 minutes.

  3. Strain and enjoy warm.


Serving Tips

  • Best enjoyed freshly prepared

  • Adjust ingredient amounts to suit your taste

  • Can be enjoyed plain or lightly sweetened if desired

4-Ingredient Homemade Crusty Bread

4-Ingredient Homemade Crusty Bread

Simple • Beginner-Friendly • Oven-Baked

Servings: 1 round loaf
Prep Time: 10 minutes
Rest Time: 1–2 hours
Bake Time: 40–45 minutes

This is a classic rustic bread with a crisp golden crust and soft, airy inside—made using just four basic ingredients.


Ingredients

  • 1½ cups warm water (370 ml)
    (Warm, not hot — about body temperature)

  • 2 teaspoons active dry yeast

  • 4 cups all-purpose flour (about 500 g)

  • 1 teaspoon salt


Step-by-Step Instructions

1. Activate the Yeast

  1. Pour the warm water into a large mixing bowl.

  2. Sprinkle the yeast over the water.

  3. Stir gently and let it sit for 5–10 minutes until slightly foamy.

This shows the yeast is ready.


2. Add Flour and Salt

  1. Add the flour and salt to the yeast mixture.

  2. Mix with a spoon or spatula until a soft, sticky dough forms.

No kneading is required.


3. First Rest (Rising Time)

  1. Cover the bowl with a clean kitchen towel or plastic wrap.

  2. Let the dough rest in a warm place for 1–2 hours, until doubled in size and bubbly.


4. Prepare for Baking

  1. Preheat your oven to 450°F (230°C).

  2. Place a heavy oven-safe pot with a lid (Dutch oven or deep casserole) inside the oven to heat for 30 minutes.


5. Shape the Dough

  1. Lightly flour your hands and work surface.

  2. Gently turn out the dough and shape it into a round loaf.

  3. Do not press out the air—handle gently.


6. Bake the Bread

  1. Carefully remove the hot pot from the oven.

  2. Place the dough inside the pot (you may line with parchment paper).

  3. Cover with the lid and bake for 30 minutes.

  4. Remove the lid and bake for an additional 10–15 minutes, until golden brown.


7. Cool Before Slicing

  1. Remove the bread from the pot.

  2. Let it cool on a wire rack for at least 20 minutes before cutting.


Helpful Tips

  • Crispy crust: Baking covered first traps steam, giving the bread its crisp exterior.

  • Soft inside: Do not cut while hot; cooling helps set the crumb.

  • Flavor options: You may add herbs, garlic powder, or seeds if desired.


Storage

  • Store at room temperature, wrapped in a clean cloth, for up to 2 days.

  • For longer storage, slice and freeze.

Lemon, Ginger & Turmeric Warm Tonic

Lemon, Ginger & Turmeric Warm Tonic

Servings: 1 cup
Prep Time: 5 minutes
Steep Time: 3–5 minutes

A warm, comforting drink made with lemon, ginger, and turmeric. This simple tonic is refreshing, gently spiced, and perfect for relaxing moments.


Ingredients

  • 3 thin slices fresh lemon

  • 2–3 thin slices fresh ginger

  • A small pinch ground turmeric

    • or about ½ teaspoon freshly grated turmeric root

  • A small dash black pepper (optional, enhances flavor balance)

  • 1 cup warm water (not boiling)

  • Optional sweetener:

    • 1 teaspoon honey or any preferred natural sweetener


Preparation Instructions

1. Prepare the Ingredients

  • Wash the lemon and ginger thoroughly.

  • Slice the lemon thinly, keeping the peel on.

  • Peel the ginger and slice it into thin pieces.

  • If using fresh turmeric root, peel and grate a small amount.


2. Combine in a Mug

  • Place the lemon slices, ginger slices, turmeric, and black pepper (if using) into a heat-safe mug.


3. Add Warm Water

  • Pour warm (not boiling) water over the ingredients.

  • Very hot water is avoided to maintain the fresh flavor of the lemon.


4. Steep

  • Let the mixture sit for 3–5 minutes.

  • This allows the flavors to blend gently into the water.


5. Sweeten and Enjoy

  • Add honey or another sweetener if desired.

  • Stir lightly and sip slowly while warm.


Flavor Notes

  • Lemon adds brightness and freshness.

  • Ginger provides gentle warmth and spice.

  • Turmeric contributes a deep golden color and earthy flavor.

  • Black pepper balances the turmeric and enhances overall taste.


Serving Tips

  • Enjoy this drink in the morning or evening as a calming warm beverage.

  • You can strain the solids before drinking or leave them in for a stronger flavor.

  • Adjust ingredient amounts to suit your taste preference.

The Ultimate Toasted Tuna Melt

The Ultimate Toasted Tuna Melt

Ingredients

For the Tuna Salad:


1 can (5 oz) tuna, drained (chunk light or albacore)


2-3 tbsp mayonnaise (adjust for creaminess)


1 tsp Dijon mustard (optional, for tang)


1 tbsp finely diced celery (for crunch)


1/2 tsp lemon juice


Salt and black pepper to taste


For the Sandwich:


2-4 slices of sourdough or brioche bread (as seen in the photo)


2 slices of cheese (cheddar, provolone, or Swiss work best)


Shredded iceberg lettuce


Unsalted butter, softened (for toasting)


Crinkle-cut dill pickles (for the side)


Instructions

Mix the Salad: In a small bowl, flake the tuna with a fork. Mix in the mayonnaise, mustard, celery, lemon juice, salt, and pepper until well combined.


Prep the Bread: Generously butter one side of each slice of bread. This ensures that even, golden-brown crust seen in the image.


Build the Melt: * Place two slices of bread, butter-side down, in a cold skillet.


Top each slice with a piece of cheese and a generous scoop of the tuna mixture.


Place the remaining bread slices on top, butter-side up.


Toast to Perfection: Turn the heat to medium-low. Cook for 3-4 minutes per side.


Tip: Press down lightly with a spatula to ensure the bread makes full contact with the pan. You want it deep golden brown and the cheese melted.


The Fresh Crunch: Remove the sandwiches from the heat. Carefully open them and tuck in a handful of fresh shredded lettuce. This keeps the lettuce from wilting too much while adding a cool crunch.


Serve: Cut the sandwiches in half and serve immediately with a pile of chilled crinkle-cut pickles.


Loaded Broccoli Cauliflower Salad (Low Carb)

Loaded Broccoli Cauliflower Salad (Low Carb)!!!

Ingredients

Salad


3 cups fresh broccoli florets (bite-sized)


3 cups fresh cauliflower florets (bite-sized)


1 cup shredded sharp cheddar cheese (or cubed for extra texture)


6 slices bacon, cooked crispy and crumbled


¼ cup red onion, finely diced


2 tablespoons chives or green onions (optional)


Creamy Dressing


¾ cup mayonnaise (or avocado oil mayo)


¼ cup sour cream


1 tablespoon apple cider vinegar (or lemon juice)


1 teaspoon Dijon mustard


½ teaspoon garlic powder


Salt & black pepper, to taste


👩‍🍳 Instructions


Prep the Veggies

Wash and dry broccoli and cauliflower thoroughly. Cut into small, bite-sized florets.


Cook the Bacon

Cook bacon until crispy. Drain, cool, and crumble.


Make the Dressing

In a bowl, whisk together mayonnaise, sour cream, vinegar, Dijon mustard, garlic powder, salt, and pepper until smooth.


Assemble the Salad

In a large bowl, combine broccoli, cauliflower, cheddar cheese, bacon, red onion, and chives.


Toss & Chill

Pour dressing over the salad and toss until well coated. Refrigerate for at least 30 minutes before serving for best flavor.

Creamy Mango Cardamom Ice Cream

Creamy Mango Cardamom Ice Cream


Ingredients

  • 2 cups Heavy whipping cream (chilled)

  • 1 can (14 oz) Sweetened condensed milk

  • 1 ½ cups Mango purée (fresh Alphonso mangoes work best for that bright yellow color)

  • 1 tsp Ground cardamom (this provides those tiny dark specks seen in the photo)

  • 1 tsp Vanilla extract

  • A pinch of Saffron threads (optional, for extra color and aroma)


Instructions

  1. Prep the Flavor Base: In a large bowl, whisk together the sweetened condensed milk, mango purée, ground cardamom, and vanilla extract until smooth. If using saffron, crush the threads into the mix.

  2. Whip the Cream: In a separate chilled bowl, beat the heavy whipping cream on medium-high speed until stiff peaks form. (Be careful not to over-beat into butter).

  3. Fold Together: Gently fold about a third of the whipped cream into the mango mixture to lighten it. Then, add the rest of the whipped cream and fold very gently with a spatula until no white streaks remain.

    • Note: Don’t stir vigorously, or you’ll lose the air that makes it fluffy!

  4. Freeze: Pour the mixture into a loaf pan or a freezer-safe container. Smooth the top with a spoon. Cover tightly with plastic wrap (press the wrap directly onto the surface to prevent ice crystals).

  5. Set: Freeze for at least 6 to 8 hours, or overnight.

  6. Serve: Scoop into a waffle cone just like in your picture!


Pro Tips for the Perfect Scoop

  • The Speckles: If you want those green bits to be more prominent, you can fold in finely crushed raw pistachios.

  • The Cone: For that specific look, use a fresh waffle cone bowl or a wide-rimmed waffle cone.

  • Temper: Let the container sit on the counter for 3–5 minutes before scooping; it makes the texture much silkier.

🍍 Tropical Mango Pineapple Smoothie

🍍 Tropical Mango Pineapple Smoothie

Yields: 2 Servings | Prep time: 5 minutes

Ingredients

  • Frozen Mango: 1 ½ cups (frozen gives it that thick, soft-serve texture)

  • Frozen Pineapple: 1 cup

  • Banana: 1 ripe banana (fresh or frozen) for extra creaminess

  • Coconut Milk: 1 cup (use canned for richness or carton for a lighter version)

  • Orange Juice: ½ cup (adds a nice citrus zing)

  • Optional Garnish: Shredded coconut (as seen in your photo) or a squeeze of lime.

Instructions

  1. Layer the Liquid: Add the coconut milk and orange juice to your blender first. This helps the blades move more easily.

  2. Add Fruit: Add the mango chunks, pineapple, and banana.

  3. Blend: Start on a low speed and gradually increase to high. Blend for about 45–60 seconds until the mixture is completely smooth and velvety.

  4. Adjust Consistency: * If it’s too thick, add a splash more coconut milk.

    • If it’s too thin, add a few more pieces of frozen fruit or a handful of ice.

  5. Serve: Pour into tall glasses, sprinkle with shredded coconut, and add a reusable straw just like in your picture!


💡 Pro-Tips for the Best Results

  • The “Cream” Factor: For a “protein style” smoothie, you can add ¼ cup of Greek yogurt or a scoop of vanilla protein powder.

  • Natural Sweetness: If your fruit isn’t very ripe, you can add a teaspoon of honey or maple syrup, though the mango and pineapple usually provide plenty of natural sugar.

  • The Texture: Using frozen fruit instead of ice cubes ensures the flavor stays concentrated and doesn’t get “watered down.”

Creamy Mango Strawberry Banana Smoothie

This creamy mango strawberry banana smoothie is a refreshing, naturally sweet drink that brings together bright fruit flavors and a smooth, satisfying texture. It is perfect for breakfast, a midday refreshment, or a light evening treat. The combination of mango, strawberries, and banana creates a beautiful balance of tropical sweetness and gentle freshness, making it enjoyable for all ages. This recipe is simple to prepare, requires only a few ingredients, and can be easily adjusted to suit your personal taste.

Ingredients

  • 1 cup ripe mango, peeled and cut into cubes

  • 1 cup fresh strawberries, washed and hulled

  • 1 medium ripe banana, sliced

  • ¾ to 1 cup cold milk (dairy or plant-based, such as almond or oat milk)

  • ½ cup plain yogurt for extra creaminess (optional)

  • 1 to 2 teaspoons honey or maple syrup (optional, depending on sweetness preference)

  • 4 to 6 ice cubes for a chilled texture

  • A few fresh strawberry slices or mango pieces for garnish (optional)

Preparation Steps

  1. Prepare the fruit
    Start by washing the strawberries thoroughly and removing the green tops. Peel the mango and cut it into even-sized cubes. Slice the banana into small pieces so it blends smoothly. Using ripe fruit helps create natural sweetness and a soft texture.

  2. Layer the ingredients
    Add the milk to the blender first. This helps the blades move easily. Next, add the mango cubes, strawberries, and banana slices. If you are using yogurt, add it at this stage for a creamy finish.

  3. Blend to smooth perfection
    Add the ice cubes and blend on medium speed for about 30 seconds. Increase to high speed and blend until the mixture becomes smooth and evenly combined. If the smoothie looks too thick, add a little more milk and blend again.

  4. Taste and adjust
    Taste the smoothie and decide if it needs extra sweetness. If desired, add honey or maple syrup and blend briefly to mix it in. Adjust the thickness by adding more milk or ice according to your preference.

  5. Serve and enjoy
    Pour the smoothie into a tall glass. Garnish with fresh strawberry slices or small mango cubes for a bright and inviting presentation. Serve immediately for the best flavor and texture.

Helpful Tips

  • Frozen fruit can be used instead of ice for a thicker smoothie.

  • For added nutrition, you can include chia seeds or oats.

  • To make it dairy-free, use plant-based milk and yogurt alternatives.

This mango strawberry banana smoothie is a delightful blend of flavor, color, and natural goodness. It is easy to make, refreshing to drink, and perfect for everyday enjoyment.

Quick Cinnamon Swirl Bread – Soft, Sweet, and So Addictive

Servings: 10 slices
Total Time: 45 minutes
Calories per Serving: ~180 kcal
Macros: 10g Protein / 4g Net Carbs / 13g Fat / 2g Fiber

Introduction

Few things smell as comforting as fresh cinnamon bread baking in the oven — and this Keto Cinnamon Bread brings that same nostalgic aroma to your low-carb kitchen. Each slice is buttery, moist, and gently sweet, with warm swirls of cinnamon running through a soft almond-flour crumb.

If you follow KetoLow CarbSlimmingWeight Watchers, or even a Mediterranean-inspired high-protein plan, this loaf fits beautifully. It’s gluten-free, sugar-free, and made from wholesome, nutrient-dense ingredients that support your wellness goals without sacrificing flavor.

This is your new go-to for cozy mornings, clean snacks, or healthy desserts that satisfy your cravings and your macros.

Look at the Recipe

  • Texture: Soft, moist, and buttery with a tender crumb.
  • Flavor: Warm cinnamon and vanilla notes, like a sweet bakery loaf.
  • Diet Benefit: Low-carb, high-protein, sugar-free, and Slimming & WW compatible.

Ingredients Needed

Dry Ingredients

  • 2 cups almond flour
  • 2 tbsp coconut flour
  • 1 tbsp baking powder
  • 1 tsp ground cinnamon
  • Pinch of salt

Wet Ingredients

  • large eggs
  • ½ cup unsweetened almond milk
  • ⅓ cup melted butter (or coconut oil for dairy-free)
  • ¼ cup granulated erythritol or monk fruit sweetener
  • 1 tsp vanilla extract

Cinnamon Swirl

  • 2 tbsp melted butter
  • 1 tbsp cinnamon
  • 1½ tbsp brown erythritol

How to Make Our Keto Cinnamon Bread

  1. Preheat oven to 350°F (175°C). Line a loaf pan with parchment paper.
  2. Mix dry ingredients: In a bowl, combine almond flour, coconut flour, baking powder, cinnamon, and salt.
  3. Mix wet ingredients: In another bowl, whisk eggs, almond milk, melted butter, sweetener, and vanilla.
  4. Combine: Add wet to dry ingredients and stir until thick batter forms.
  5. Layer: Pour half the batter into the pan. Add half the cinnamon swirl mixture. Repeat layers.
  6. Swirl: Use a knife to create gentle marbling.
  7. Bake: 35–40 minutes, or until a toothpick comes out clean.
  8. Cool: Let cool fully before slicing to keep structure and moisture intact.

Storage & Serving Suggestions

  • Store: Airtight container, up to 5 days at room temp or 7 in the fridge.
  • Freeze: Slice, wrap, and freeze for up to 3 months. Toast or microwave before serving.
  • Reheat: 10–15 seconds in the microwave or 3–4 minutes in a toaster oven.
  • Serve With: Cream cheese frosting, sugar-free glaze, almond butter, or Greek yogurt.

Macros & Plan Compatibility

Plan Notes
Keto & Low-Carb ~4g net carbs per slice; sugar-free and grain-free; fits Keto macros perfectly.
Slimming About 3–4 Syns per slice; mostly Free/Slimming-friendly when portioned.
High-Protein ~10g protein per slice; ideal for post-workout or as a balanced snack.
Weight Watchers ~2–3 SmartPoints per slice; use light butter or reduced-fat spread for fewer points.
Mediterranean Naturally nutrient-dense; made with clean fats and almond flour for heart health.

Tips & FAQs

Can I make this dairy-free?
Yes — swap butter for coconut oil and use a dairy-free milk like almond or cashew milk.

Can I skip coconut flour?
No, it helps balance the texture. Only almond flour will make the bread too dense.

How can I reduce the sweetness?
Use 2 tablespoons of erythritol instead of ¼ cup for a milder taste.

Can I meal prep it?
Yes! Slice, freeze, and thaw individual portions for breakfast or a quick snack.

Is it Slimming or WW friendly?
Yes — each slice is around 3–4 Syns or 2–3 SmartPoints depending on sweetener and butter.

Slimming World Hash Brown Crust Quiche

Crispy golden potato crust, fluffy egg filling, and fresh veggies — all for 0–1 syn per serving!

A lighter twist on the classic quiche, this recipe replaces pastry with a crunchy hash brown base. Perfect for breakfast, brunch, or even a light dinner, it’s delicious hot or cold and fits beautifully into your Slimming World plan.


Servings and Timing

  • Prep Time: 20 minutes
  • Cook Time: 45 minutes
  • Total Time: 1 hour 5 minutes
  • Yield: 4–6 servings
  • Dietary Badges: Slimming World Friendly | Low Syn | Gluten-Free | Vegetarian

Ingredients

Hash Brown Crust

  • 500g potatoes, peeled and grated
  • 1 medium egg
  • Salt and black pepper, to taste
  • Low-calorie cooking spray

Filling

  • 5 large eggs
  • 100g cooked lean ham or chopped turkey bacon (optional)
  • 1 small red bell pepper, diced
  • 3 spring onions, sliced
  • 80g reduced-fat grated cheese (e.g. 50% less-fat cheddar or mozzarella)
  • 2 tablespoons fat-free natural yogurt or quark
  • Chopped fresh chives or parsley (optional)
  • Salt and pepper, to taste

Instructions

  1. Prepare the crust:
    Preheat oven to 200°C (400°F). Grate potatoes and squeeze out excess moisture using a clean tea towel. Mix grated potato with 1 beaten egg, a pinch of salt, and pepper.
  2. Form the base:
    Spray a non-stick pie dish or ovenproof frying pan with low-calorie cooking spray. Press the potato mixture evenly across the base and up the sides to form a crust. Spray the top lightly with cooking spray.
  3. Prebake the crust:
    Bake for 20–25 minutes until golden and starting to crisp. Remove from oven and reduce temperature to 180°C (350°F).
  4. Prepare the filling:
    In a mixing bowl, whisk together eggs, yogurt (or quark), seasoning, and most of the cheese (reserve a little for topping). Stir in chopped peppers, onions, ham (if using), and herbs.
  5. Assemble and bake:
    Pour the filling into the baked crust. Sprinkle remaining cheese on top. Return to oven for 25–30 minutes until set and golden on top.
  6. Serve:
    Cool slightly before slicing. Serve warm or cold with salad or roasted vegetables.

Tip: For a crispier crust, bake an extra 5 minutes before adding the filling.


Ingredient Details & Substitutions

  • Potatoes: Waxy varieties like Maris Piper or Yukon Gold work best for grating and crisping.
  • Cheese: Use your Healthy Extra A choice to keep it 0 syns.
  • Meat: Ham, turkey bacon, or leftover chicken can be added; skip for vegetarian.
  • Dairy-Free Option: Substitute quark/yogurt with unsweetened soy yogurt and use dairy-free cheese.
  • Extra Veggies: Mushrooms, courgettes, or spinach can be added — just sauté briefly first to remove moisture.

Recipe Variations & Serving Suggestions

Flavor Variations:

  • Mediterranean: Add chopped sun-dried tomatoes, olives, and feta (adjust syns).
  • Breakfast Style: Add cooked onions, mushrooms, and low-syn sausages.
  • Vegetarian Delight: Replace ham with extra peppers, spinach, and a sprinkle of smoked paprika.

Serving Ideas:

  • Serve with a green salad or roasted cherry tomatoes for a balanced meal.
  • Great for meal prep — cut into portions for easy grab-and-go lunches.

Storage & Make-Ahead Tips

  • Refrigeration: Store in an airtight container in the fridge for up to 3 days.
  • Reheating: Warm slices in the oven at 180°C for 10 minutes or microwave briefly.
  • Freezing: Freeze portions individually, wrapped tightly. Thaw overnight in the fridge before reheating.
  • Make-Ahead: Bake the crust the day before and refrigerate; fill and bake fresh the next day.

Nutrition (per serving, with lean ham and reduced-fat cheese)

Calories: 180 | Protein: 19g | Carbs: 14g | Fat: 5g | Syns: 0–1 (depending on cheese brand)

Dietary Info: High Protein | Low Fat | Gluten-Free | Slimming World Friendly


FAQs

Q: Can I make this crustless?
A: Yes, simply skip the potato base and bake the filling in a greased dish — reduces prep time and syns stay the same.

Q: My crust went soggy — what happened?
A: Make sure to squeeze out all excess water from the potatoes before baking. You can also prebake a bit longer for a firmer base.

Q: Can I use sweet potatoes instead?
A: Absolutely! It gives a sweeter flavor and slightly softer crust — still great texture.


Story Behind the Recipe

This recipe was inspired by my love for traditional quiche but a dislike for heavy pastry. The hash brown crust came from a weekend experiment — a way to keep that crisp, comforting texture without the extra syns. The first time I served it, it disappeared before it even cooled. Since then, it’s been a family favorite — and a staple in my Slimming World meal rotation.


Call-to-Action

Try this Slimming World Hash Brown Quiche next time you want a hearty, healthy bake. Share your version in the comments or tag your photos — I love seeing your creations and flavor twists!

Lemon Poppy Seed Bread

Lemon Poppy Seed Bread

Servings: 8–10 slices | Prep Time: 15 minutes | Cook Time: 50–60 minutes


Ingredients

For the Bread

  • 2 cups all-purpose flour

  • 2 tablespoons poppy seeds

  • 1 teaspoon baking soda

  • ½ teaspoon baking powder

  • ½ teaspoon salt

  • 1 cup granulated sugar

  • ½ cup (1 stick) unsalted butter, softened

  • 2 large eggs

  • ⅓ cup fresh lemon juice (about 2 large lemons)

  • 1 tablespoon lemon zest

  • ¾ cup Greek yogurt or sour cream (for moisture)

  • 1 teaspoon vanilla extract

For the Lemon Glaze

  • 1 cup powdered sugar

  • 2 tablespoons fresh lemon juice


Instructions

1. Prepare the Oven and Pan

  1. Preheat your oven to 350°F (175°C).

  2. Grease a standard 9×5 inch loaf pan thoroughly, or line it with parchment paper for easy removal.


2. Combine the Dry Ingredients

  1. In a medium bowl, whisk together:

    • 2 cups flour

    • 2 tablespoons poppy seeds

    • 1 teaspoon baking soda

    • ½ teaspoon baking powder

    • ½ teaspoon salt

  2. Set aside.


3. Cream Butter and Sugar

  1. In a large mixing bowl, beat the softened butter and granulated sugar together until light, creamy, and fluffy (about 2–3 minutes).


4. Add Wet Ingredients

  1. Add the eggs one at a time, beating well after each.

  2. Stir in:

    • ⅓ cup fresh lemon juice

    • 1 tablespoon lemon zest

    • 1 teaspoon vanilla extract

    • ¾ cup Greek yogurt or sour cream

  3. Mix until smooth and fully combined.

Tip: For extra lemon flavor, rub the lemon zest into the sugar before creaming it with butter—this releases the natural oils.


5. Combine Wet and Dry Ingredients

  1. Gradually fold the dry ingredient mixture into the wet ingredients using a spatula.

  2. Mix just until combined—avoid over-mixing to keep the bread light and tender.

  3. The batter should be thick with a slightly textured consistency.


6. Bake the Bread

  1. Pour the batter into the prepared loaf pan and smooth the top with a spatula.

  2. Bake in the preheated oven for 50–60 minutes, or until:

    • The top is golden brown

    • A toothpick inserted in the center comes out clean


7. Cool and Glaze

  1. Allow the bread to cool in the pan for 10 minutes, then transfer it to a wire rack to cool completely.

  2. Prepare the glaze: whisk together 1 cup powdered sugar and 2 tablespoons lemon juice until smooth.

  3. Drizzle the glaze generously over the cooled loaf.


Baker’s Tips

  • Even Baking: If your oven tends to brown unevenly, tent the bread with foil halfway through baking.

  • Storage: Keep the bread in an airtight container at room temperature for up to 3 days, or refrigerate for up to a week to maintain moisture.

  • Serving Suggestion: Enjoy as a breakfast treat, snack, or dessert. Pairs wonderfully with tea or coffee.

Crispy Air Fryer Roast Potatoes

Crispy Air Fryer Roast Potatoes

Servings: 4 | Prep Time: 10 minutes | Cook Time: 25 minutes


Ingredients

  • 1.5 lbs (≈700g) potatoes – Use a starchy variety like Russet or Yukon Gold for fluffy interiors.

  • 2–3 tbsp vegetable oil or olive oil – Helps achieve a golden, crispy exterior.

  • 1 tsp salt – Enhances flavor and helps draw out moisture for crispiness.

  • ½ tsp garlic powder – Adds a gentle, savory flavor.

  • ½ tsp dried rosemary or thyme – Aromatic herbs that complement roasted potatoes.

  • ¼ tsp black pepper – Adds a mild, warming spice.


Instructions

1. Prepare the Potatoes

  1. Peel the potatoes.

  2. Cut them into uniform 1–2 inch chunks. Uniform size ensures even cooking.

2. Parboil the Potatoes (Optional but Recommended)

  1. Place the potato chunks in a pot of salted water.

  2. Bring the water to a gentle boil.

  3. Cook for 5–8 minutes, until the edges start to soften but the centers are still firm.

  4. Drain the water thoroughly. Let the potatoes sit for 1–2 minutes to allow excess moisture to evaporate.

Tip: This step ensures the inside stays fluffy while the outside crisps beautifully.

3. Roughen the Edges

  1. Return the drained potatoes to the pot.

  2. Cover with the lid and gently shake the pot for 10–15 seconds.

  3. This creates small rough edges on the potatoes, which will become extra-crispy when cooked.

4. Season the Potatoes

  1. Transfer the potatoes to a large mixing bowl.

  2. Add the oil, salt, garlic powder, herbs, and black pepper.

  3. Toss gently but thoroughly to coat every piece evenly.

5. Preheat the Air Fryer

  1. Set the air fryer to 400°F (200°C).

  2. Allow it to preheat for 3–5 minutes.

6. Air Fry the Potatoes

  1. Place the seasoned potatoes in the air fryer basket in a single layer. Avoid overcrowding for maximum crispiness.

  2. Air fry for 20–25 minutes.

  3. Shake the basket every 10 minutes to ensure even browning.

7. Check for Doneness

  • The potatoes should be deep golden brown.

  • Tap a piece lightly; it should sound “hollow” when done.

8. Serve

  • Serve immediately while hot for the best texture.

  • These potatoes pair well with roasted meats, salads, or as a snack with a dipping sauce.


Pro Tips for Perfect Crispiness

  1. Ensure dryness: After parboiling, remove as much surface moisture as possible before tossing with oil.

  2. Cook in batches: Avoid overcrowding the air fryer basket. Air circulation is key to crisp edges.

  3. Adjust seasoning: Feel free to add paprika or onion powder for extra flavor.

Crispy Stuffed Potato Omelette

Crispy Stuffed Potato Omelette

Ingredients
5 medium potatoes, peeled and grated
2 large eggs
30 g (2 tablespoons) all-purpose flour
3 slices cooked ham
3 slices cheese (mozzarella, Swiss, or provolone)
Salt and black pepper, to taste
2 tablespoons olive oil or butter, for cooking
Optional: freshly chopped chives or parsley, for garnish

Instructions

Prepare the Potatoes
Grate the peeled potatoes using the coarse side of a box grater. Place the grated potatoes in a bowl of cold water and gently swirl them to release excess starch. Drain well. Transfer the potatoes to a clean kitchen towel or cheesecloth and squeeze firmly to remove as much moisture as possible. Well-dried potatoes help create a crisp outer texture.

Make the Potato Mixture
In a large bowl, whisk the eggs with salt, black pepper, and the flour until smooth. Add the grated, dried potatoes and mix thoroughly so every strand is evenly coated.

Cook the First Layer
Heat 1 tablespoon of olive oil or butter in a wide non-stick skillet over medium to medium-low heat. Add half of the potato mixture to the pan. Press it down gently with a spatula to form an even, round layer.

Add the Filling
When the bottom layer begins to set and hold together, arrange the ham slices over the center. Place the cheese slices on top of the ham, leaving a small border around the edges.

Seal the Omelette
Carefully spread the remaining potato mixture over the filling. Use the spatula to smooth the surface and gently seal the edges so the filling stays enclosed.

Turn and Finish Cooking
Cook slowly for about 8–10 minutes until the underside develops a rich golden color and feels firm. Place a large plate over the skillet, turn the omelette out onto the plate, then slide it back into the skillet. Add the remaining tablespoon of oil or butter if needed. Cook the second side for another 8–10 minutes until evenly golden and the cheese inside is fully melted.

Serve
Transfer the omelette to a cutting board and let it rest for about 2 minutes. Slice into wedges and serve warm. Garnish with fresh chives or parsley if desired.

Helpful Tips

Heat Control
Keep the heat moderate and steady. Gentle cooking allows the potatoes to become tender inside while developing a crisp exterior.

Variations
You can replace the ham with cooked mushrooms, sautéed onions, or fresh spinach for a meat-free option. Adding herbs such as thyme or oregano to the potato mixture also adds extra flavor.