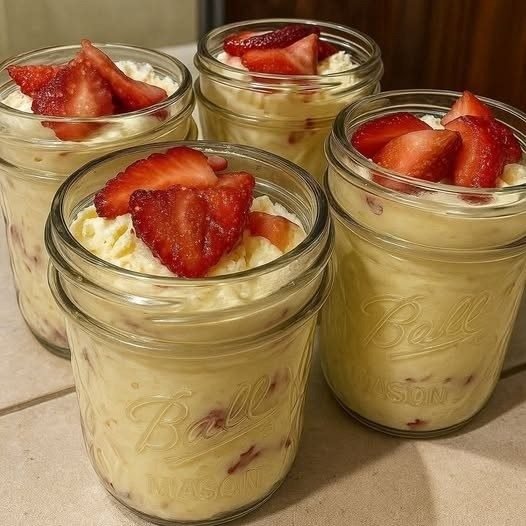
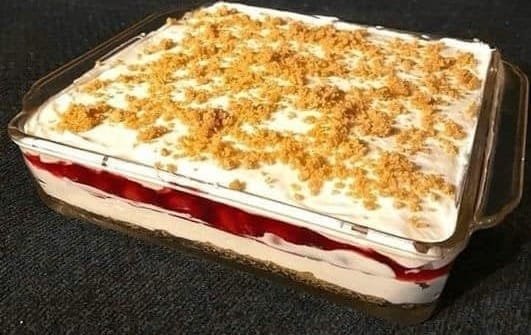
Biscoff Creamy Pudding Parfaits

Biscoff Creamy Pudding Parfaits

Smooth • No-Bake • Ready in Minutes

These Biscoff Creamy Pudding Parfaits are an easy, no-bake dessert that comes together quickly while still looking elegant and indulgent. Layers of finely crushed Biscoff cookies, smooth vanilla pudding blended with Biscoff spread, and fluffy whipped cream create a perfectly balanced dessert that’s sweet, creamy, and comforting.

Ideal for family gatherings, celebrations, or anytime you want a quick dessert that feels special.


🧾 Yield & Time

  • Servings: 4–6 parfaits

  • Preparation Time: About 10 minutes

  • Chilling Time (Optional): 30 minutes


🧺 Ingredients

Cookie Layers

  • Biscoff Cookies (Speculoos) – 1 pack (about 200 g)

  • Butter – 2 tablespoons, melted (optional, for a richer cookie base)

Creamy Pudding Layer

  • Instant Vanilla Pudding Mix – 1 standard box

  • Cold Milk – As directed on pudding package (usually 2 cups)

  • Biscoff Spread – 2 tablespoons, gently warmed until smooth

Topping

  • Whipped Cream – 1 cup (store-bought or homemade)

  • Extra Biscoff Cookies or Crumbs – for garnish


🥣 Step-by-Step Instructions

1️⃣ Prepare the Cookie Crumbs

Place about 15 Biscoff cookies into a zip-top bag or food processor. Crush until you have fine, even crumbs.

If you prefer a more structured base:

  • Transfer crumbs to a bowl

  • Stir in the melted butter until evenly combined

Set aside.


2️⃣ Make the Creamy Pudding Filling

In a medium mixing bowl, add the instant vanilla pudding mix and cold milk. Whisk for about 2 minutes, until the mixture thickens and becomes smooth.

Add the gently warmed Biscoff spread and whisk again until fully blended. The pudding should be creamy, evenly colored, and glossy.

Tip: Warming the spread slightly helps it blend smoothly without lumps.


3️⃣ Assemble the Parfaits

Use clear glasses or dessert cups so the layers are visible.

Layering order:

  • Bottom Layer:
    Add about 2 tablespoons of cookie crumbs to each glass. Gently press down with a spoon.

  • Middle Layer:
    Spoon or pipe the pudding mixture over the crumbs until the glass is about halfway full.

  • Second Cookie Layer:
    Sprinkle a thin layer of cookie crumbs on top of the pudding.

  • Top Layer:
    Finish with a generous spoonful or piped swirl of whipped cream.


4️⃣ Garnish and Finish

Sprinkle extra cookie crumbs over the whipped cream.
For a polished look, place one whole cookie gently into the cream at a slight angle.


5️⃣ Serve or Chill

  • These parfaits can be enjoyed immediately

  • For a softer, more blended texture, refrigerate for 30 minutes before serving

Chilling allows the cookie layers to gently soften, creating a dessert that feels smooth and cake-like.


⭐ Helpful Tips for Best Results

  • Use cold milk for the pudding so it thickens properly

  • Fine cookie crumbs give a smoother texture

  • Mini dessert cups are perfect for portion control

  • Keep covered if chilling longer than 30 minutes


🔄 Easy Variations

🍰 Cheesecake-Style

Fold 4 oz (115 g) softened cream cheese into the pudding for a richer, slightly tangy flavor.

🍌 Fruit Addition

Add a thin layer of sliced bananas between the pudding and whipped cream for a naturally sweet contrast.

🍫 Chocolate Touch

Drizzle melted chocolate over the whipped cream or mix chocolate chips into the pudding.

No-Churn Coffee Chocolate Chip Ice Cream

No-Churn Coffee Chocolate Chip Ice Cream

Creamy • Smooth • No Machine Needed

This No-Churn Coffee Chocolate Chip Ice Cream is rich, silky, and incredibly easy to make at home—no special equipment required. The combination of lightly sweetened cream, smooth coffee flavor, and chocolate chips creates a dessert that feels indulgent yet simple. Because it uses condensed milk instead of eggs, the texture stays soft and scoopable straight from the freezer.

Perfect for summer days, family treats, or anytime you crave a café-style frozen dessert at home.


🧾 Ingredients

Base Ingredients

  • Whipping Cream – 450 ml (about 2 cups), very cold

  • Sweetened Condensed Milk – 200 g (about ¾ cup), chilled

  • Instant Coffee – 2 tablespoons + 2 teaspoons
    (Adjust to taste for lighter or stronger coffee flavor)

  • Warm Water or Warm Milk – 1 to 2 tablespoons (for dissolving coffee)

Mix-Ins

  • Chocolate Chips – ½ cup

  • Extra Chocolate Chips – for topping (optional)

Optional Enhancers

  • A small pinch of salt (balances sweetness)

  • Cocoa Powder – 1 tablespoon (for mocha flavor)


🥣 Step-by-Step Instructions

1️⃣ Prepare the Coffee Mixture

In a small bowl, add the instant coffee and warm water or milk. Stir well until the coffee is fully dissolved and the mixture looks smooth, with no granules remaining.

Set aside and allow it to cool completely to room temperature.
(Adding warm coffee directly to cream can affect texture, so cooling is important.)


2️⃣ Whip the Cream

Pour the cold whipping cream into a large mixing bowl.
Using a hand mixer or stand mixer, whip on medium-high speed until the cream becomes thick and holds its shape.

How to tell it’s ready:
When you lift the beaters, the cream should stand upright and keep its form without falling over.

Tip: Stop mixing as soon as this stage is reached to maintain a light, smooth texture.


3️⃣ Combine the Base

Gently add the chilled condensed milk to the whipped cream.
Next, pour in the cooled coffee mixture.

Using a spatula, fold gently by scooping from the bottom and turning the mixture over itself. Continue until the color is even and the mixture looks smooth and airy.


4️⃣ Add Chocolate Chips

Sprinkle in the chocolate chips and gently fold again just until evenly distributed.

At this stage, you may also add:

  • A pinch of salt

  • Cocoa powder (sifted) for a mocha-style flavor


5️⃣ Transfer and Freeze

Spoon the mixture into a freezer-safe container.
Smooth the top with the back of a spoon and sprinkle extra chocolate chips if desired.

Cover tightly with a lid or wrap to keep the surface fresh and smooth.


6️⃣ Freeze Until Set

Place the container in the freezer for at least 6 hours, or preferably overnight.

Thanks to the condensed milk, the ice cream will remain soft and easy to scoop once frozen.


🍦 Serving Tips

  • Let the ice cream sit at room temperature for 2–3 minutes before scooping for best texture

  • Serve in bowls, cones, or alongside brownies or cookies

  • Sprinkle with cocoa powder or drizzle with chocolate syrup if desired


⭐ Pro Tips for Best Results

  • Cold Tools Matter: Chill your bowl and beaters for 10–15 minutes before whipping for maximum volume

  • Flavor Control: Adjust coffee quantity to suit your taste

  • Texture Boost: Mini chocolate chips distribute more evenly

  • Storage: Keep covered tightly to maintain smoothness

Mary Berry–Style Boiled Fruit Cake

Mary Berry–Style Boiled Fruit Cake

A classic, moist fruit loaf made with a simple boiling method

Why You’ll Love This Cake

This traditional boiled fruit cake is loved for its deep flavor, soft texture, and easy preparation. The gentle simmering step plumps the dried fruit and blends the flavors beautifully, resulting in a cake that improves with time.

  • Naturally moist from simmered fruit

  • Simple method — no mixer needed

  • Perfect for make-ahead baking

  • Great for tea time, gifting, or celebrations

  • Customizable with fruit, citrus, or nuts


Ingredients

For the Cake

  • 225 g (1 cup) unsalted butter

  • 225 g (1 cup) soft brown sugar

  • 225 g (1½ cups) mixed dried fruit
    (raisins, currants, sultanas, or chopped dates)

  • Zest and juice of 1 orange

  • 1 teaspoon ground cinnamon

  • 1 teaspoon mixed spice

  • 2 large eggs, lightly beaten

  • 225 g (1¾ cups) self-raising flour

Optional flavor boost (non-alcoholic):

  • 1 teaspoon orange extract or vanilla extract


Equipment Needed

  • Medium saucepan

  • Mixing spoon

  • 900 g (2 lb) loaf tin

  • Baking parchment


Step-by-Step Instructions

Step 1: Prepare the Oven and Tin

  • Preheat your oven to 160°C (325°F) or 140°C fan

  • Grease and line a 900 g loaf tin with parchment paper


Step 2: Boil the Fruit Mixture

  • Place the butter in a medium saucepan over low heat

  • Add the brown sugar, dried fruit, orange zest, orange juice, cinnamon, and mixed spice

  • Stir gently until the butter melts

  • Bring to a gentle simmer and cook for 5 minutes, stirring occasionally

  • Remove from heat and allow to cool for 10–15 minutes

This step softens the fruit and evenly distributes sweetness throughout the cake.


Step 3: Make the Batter

  • Once the mixture is warm (not hot), stir in the beaten eggs

  • Add the optional extract, if using

  • Sift in the self-raising flour

  • Fold gently until smooth and fully combined


Step 4: Bake

  • Spoon the batter into the prepared loaf tin

  • Smooth the top evenly

  • Bake for 1½ to 1¾ hours, or until a skewer inserted in the center comes out clean

  • If the top browns too quickly, loosely cover with foil during the final baking time


Step 5: Cool and Rest

  • Cool in the tin for 10 minutes

  • Transfer to a wire rack and cool completely

  • Wrap the cake in parchment and store in an airtight container

  • Resting the cake for 1–2 days improves flavor and texture


Tips for Best Results

  • Use fresh spices for the best aroma

  • Chop larger dried fruits for even distribution

  • Do not rush cooling — the structure sets as it cools

  • This cake slices best the next day


Variations

  • Nut version: Add ½ cup chopped walnuts or almonds

  • Fruit swap: Use dried apricots, cranberries, or figs

  • Citrus twist: Add lemon zest along with orange

  • Festive style: Add a small amount of candied peel


Storage

  • Room temperature (airtight): up to 7 days

  • Refrigerator: up to 2 weeks

  • Freezer: up to 3 months (wrap well)


Serving Suggestions

  • Enjoy with tea or coffee

  • Serve lightly warmed with butter

  • Pair with fresh fruit or mild cheese

  • Slice thinly for afternoon snacks

Sponge Chocolate Cake

Sponge Chocolate Cake

A soft, light chocolate cake with a tender crumb

Introduction

This Sponge Chocolate Cake is wonderfully soft, moist, and full of chocolate flavor. It’s made with simple ingredients and comes together easily, making it perfect for everyday baking or special occasions. Enjoy it plain with a dusting of powdered sugar or dress it up with a smooth chocolate glaze or sprinkles.


⏱️ Time & Yield

  • Prep Time: 15 minutes

  • Bake Time: 30–35 minutes

  • Cooling Time: 20 minutes

  • Total Time: About 1 hour

  • Pan Size: 7-inch or 8-inch round cake tin

  • Servings: 8 slices


🧾 Ingredients

  • 2 large eggs, room temperature

  • 130 g sugar

  • 70 g vegetable oil

  • 170 g all-purpose flour

  • 40 g unsweetened cocoa powder

  • 3 g baking soda

  • 120 ml milk or water

Optional for topping: powdered sugar, chocolate glaze, or chocolate sprinkles


👩‍🍳 Step-by-Step Instructions

1. Prepare the Pan and Oven

Preheat your oven to 180°C (350°F).
Grease a 7-inch or 8-inch round cake pan and line the bottom with parchment paper. Set aside.


2. Whisk Eggs and Sugar

In a large mixing bowl, add the eggs and sugar.
Whisk using a hand mixer or whisk for several minutes until the mixture becomes pale, thick, and noticeably increased in volume. This step helps give the cake its light texture.


3. Add the Liquid Ingredients

Slowly pour in the vegetable oil while whisking gently.

Add the milk or water and mix until smooth and evenly combined.


4. Prepare the Dry Ingredients

In a separate bowl, sift together:

  • Flour

  • Cocoa powder

  • Baking soda

Sifting helps remove lumps and ensures a smooth batter.


5. Combine Wet and Dry Mixtures

Add the dry ingredients to the wet mixture in two parts.
Use a spatula to gently fold everything together just until combined. Avoid over-mixing to keep the cake soft and airy.


6. Bake

Pour the batter into the prepared cake pan and smooth the top.

Bake for 30–35 minutes, or until a toothpick inserted into the center comes out clean.


7. Cool and Finish

Let the cake cool in the pan for 10 minutes, then turn it out onto a wire rack to cool completely.

Once cooled, decorate as desired with a chocolate glaze, powdered sugar, or sprinkles.


🍽️ Serving Suggestions

  • Serve plain with powdered sugar

  • Top with chocolate ganache or glaze

  • Pair with tea, coffee, or milk

  • Add fresh berries on the side


💡 Helpful Tips

  • Whisking the eggs and sugar well helps create a lighter texture

  • Use natural cocoa powder for a richer chocolate flavor

  • Let the cake cool completely before adding glaze

  • This cake can be sliced and layered with cream or frosting


🧊 Storage

  • Store covered at room temperature for up to 2 days

  • Refrigerate for up to 4 days

  • Wrap slices tightly and freeze for up to 2 months

Sherry’s Blueberry Cream Cheese Crumb Cake

Sherry’s Blueberry Cream Cheese Crumb Cake

A soft vanilla cake layered with creamy filling, juicy berries, and a buttery crumb topping

Introduction

This Blueberry Cream Cheese Crumb Cake is a comforting, bakery-style dessert that’s perfect for sharing. A tender vanilla cake forms the base, topped with a smooth cream cheese layer, bursts of blueberries, and a golden cinnamon crumb topping. It’s ideal for brunch tables, afternoon coffee breaks, or as a make-ahead dessert for gatherings.


⏱️ Time & Yield

  • Preparation Time: 25 minutes

  • Baking Time: 35–50 minutes (depending on pan size)

  • Cooling Time: 1 hour

  • Total Time: About 2 hours

  • Servings: 12–15 slices


🧾 Ingredients

Cake Batter

(Fits a 9×13-inch pan or an 8-inch square dish)

  • ½ cup unsalted butter, softened

  • 1 cup granulated sugar

  • 2 large eggs

  • 1 teaspoon vanilla extract

  • 2 cups all-purpose flour

  • 2 teaspoons baking powder

  • ½ teaspoon salt

  • ½ cup milk

  • 1½ cups fresh or frozen blueberries


Cream Cheese Layer

  • 8 oz cream cheese, softened

  • ¼ cup granulated sugar

  • 1 egg

  • ½ teaspoon vanilla extract


Crumb Topping

  • ½ cup all-purpose flour

  • ¼ cup brown sugar

  • ¼ cup cold butter, cubed

  • ½ teaspoon ground cinnamon


👩‍🍳 Step-by-Step Instructions

1. Prepare the Pan and Oven

Preheat your oven to 350°F (175°C).
Grease and lightly flour a 9×13-inch baking pan or an 8-inch square dish. Set aside.


2. Make the Cake Batter

In a large mixing bowl, beat the softened butter and granulated sugar together until light and fluffy.

Add the eggs one at a time, mixing well after each addition. Stir in the vanilla extract.

In a separate bowl, whisk together the flour, baking powder, and salt.

Add the dry ingredients to the butter mixture in two additions, alternating with the milk. Mix gently just until combined.

Carefully fold in the blueberries, taking care not to crush them.

Spread the batter evenly into the prepared pan.


3. Prepare the Cream Cheese Layer

In a medium bowl, beat the cream cheese until smooth.

Add the sugar, egg, and vanilla extract. Mix until creamy and well blended.

Spoon the cream cheese mixture over the cake batter. Use a knife to gently swirl if desired, or leave it layered.


4. Make the Crumb Topping

In a small bowl, combine the flour, brown sugar, and cinnamon.

Add the cold butter cubes and work them into the mixture using your fingers or a pastry cutter until small clumps form.

Sprinkle the crumb topping evenly over the cream cheese layer.


5. Bake

Bake uncovered:

  • 45–50 minutes for a 9×13-inch pan

  • 35–40 minutes for an 8-inch square pan

The top should be lightly golden and set.

Remove from the oven and allow the cake to cool completely before slicing. This helps the layers set neatly.


🍽️ Serving Suggestions

  • Serve at room temperature or slightly chilled

  • Pair with tea or coffee

  • Dust lightly with powdered sugar before serving if desired


💡 Helpful Tips & Variations

  • Nutty crunch: Add chopped walnuts or pecans to the crumb topping

  • Citrus touch: Stir 1 teaspoon lemon zest into the batter for added brightness

  • Berry swap: Use raspberries or blackberries in place of blueberries

  • Gentle mixing: Stir just until combined for a soft, tender cake


🧊 Storage

  • Store covered in the refrigerator for up to 3 days

  • Individual slices may be wrapped and frozen for up to 3 months

  • Thaw overnight in the refrigerator before serving

New Dessert in Minutes!

New Dessert in Minutes!

A quick, no-bake chocolate biscuit roll with peanuts

Introduction

Craving a homemade dessert but short on time? This quick chocolate biscuit roll comes together with simple pantry ingredients and requires no baking. It’s rich, chocolatey, slightly crunchy from peanuts, and perfect for serving with tea or coffee. An ideal make-ahead treat for gatherings or everyday indulgence.


⏱️ Time & Yield

  • Prep Time: 20 minutes

  • Chill Time: 2–4 hours (or overnight)

  • Total Time: About 2 hours 20 minutes

  • Servings: 10–12 slices


🧾 Ingredients

  • 500 g (17 oz) plain biscuits, broken into pieces

  • 120 g (1 cup) sugar

  • 60 g (½ cup) cocoa powder

  • 10 g vanilla sugar (or 1 teaspoon vanilla extract)

  • 250 ml (1 cup) milk, room temperature

  • 150 g (⅔ cup) butter

  • 220 g peanuts, finely chopped

    • 120 g for the mixture

    • 100 g for coating

  • A little butter or oil, for greasing


👩‍🍳 Step-by-Step Instructions

1. Prepare the Biscuits and Peanuts

Place the biscuits in a large mixing bowl and break them into medium-sized pieces using your hands. Thin or tea-style biscuits work best.

Grind the peanuts in a blender or food processor until finely chopped, with no large chunks remaining.


2. Combine the Dry Ingredients

Add 120 g of the ground peanuts to the bowl with the broken biscuits. Mix well to evenly distribute the peanuts. Set aside the remaining peanuts for decoration.


3. Make the Chocolate Mixture

In a small saucepan, combine the sugar, cocoa powder, and vanilla sugar.
Slowly pour in the milk while stirring continuously to avoid lumps.

Place the saucepan over low heat and cook, stirring constantly, until the mixture comes to a gentle boil and thickens slightly.


4. Add the Butter

Remove the saucepan from heat and add the butter. Stir until completely melted and smooth.
Allow the mixture to cool for about 10 minutes so it is warm but not hot.


5. Combine Everything

Pour the chocolate mixture over the biscuit and peanut mixture.
Mix thoroughly until all the biscuits are coated and the mixture becomes thick and cohesive.


6. Shape and Chill

Lay a large sheet of baking paper on the counter and lightly grease it with butter or oil.

Transfer the mixture onto the paper and shape it into a log. Roll it up tightly using the paper to help form a compact roll.

Place the roll in the refrigerator for at least 2–4 hours, or overnight, until firm.


🎨 Decorating the Dessert

Once fully set, unwrap the roll and lightly brush the surface with melted butter.
Sprinkle with the remaining crushed peanuts or other toppings such as coconut flakes or crushed biscuits.


🍽️ Serving Suggestions

  • Slice into rounds and arrange on a serving platter

  • Serve with tea, coffee, or milk

  • Ideal for parties, holidays, or quick desserts


💡 Helpful Tips

  • Let the chocolate mixture cool slightly before mixing to prevent soggy biscuits

  • Roll tightly for clean, neat slices

  • Chill well before cutting for best shape

  • Customize with nuts, dried fruit, or chocolate drizzle


🧊 Storage

Store wrapped in baking paper or an airtight container in the refrigerator for up to 4–5 days. Slice as needed.

Sugar-Free Banana & Chocolate Chip Breakfast Parfaits

Sugar-Free Banana & Chocolate Chip Breakfast Parfaits

A simple, no-added-sugar layered breakfast or snack

Introduction

These Banana & Chocolate Chip Breakfast Parfaits are an easy, make-ahead option made with creamy yogurt, ripe bananas, and chocolate chips. They’re naturally sweet, quick to assemble, and ideal for busy mornings. Layered in jars, they also look beautiful and are great for both adults and kids.


⏱️ Time & Yield

  • Prep Time: 15 minutes

  • Chill Time: Optional

  • Total Time: 15 minutes

  • Servings: 4 parfaits


🧾 Ingredients

  • 1 kg (about 4 cups) plain Greek yogurt, unsweetened

  • 4 large ripe bananas

  • 1 cup oats or low-sugar granola
    (rolled oats or crushed whole-grain biscuits work well)

  • ½ cup sugar-free chocolate chips
    (or dark chocolate chips, finely chopped)

  • 1 teaspoon vanilla extract (optional)

  • Ground cinnamon, a small pinch for each jar


👩‍🍳 Step-by-Step Instructions

1. Prepare the Base

Place four clean jars or containers on your counter.
Divide the oats, granola, or crushed biscuits evenly among them, spreading the base evenly at the bottom of each container.


2. Flavor the Yogurt

In a large mixing bowl, add the Greek yogurt.
Stir in the vanilla extract and a light pinch of cinnamon until smooth.

Optional natural sweetness:
Mash one very ripe banana until smooth and stir it directly into the yogurt for extra flavor without adding sugar.


3. Add the Yogurt Layer

Spoon the yogurt mixture evenly over the oat base in each jar, filling the containers about ¾ full. Smooth the tops gently with the back of a spoon.


4. Prepare the Bananas

Slice the remaining bananas into thin rounds.
Arrange a generous layer of banana slices over the yogurt in each jar.


5. Finish with Chocolate

Sprinkle the chocolate chips evenly over the banana layer, pressing them lightly so they stay in place.


6. Chill and Store

Seal the jars with lids and place them in the refrigerator.
They can be enjoyed right away or chilled for later.

For best appearance and texture, enjoy within 2–3 days, as bananas may darken slightly over time.


🍽️ Serving Ideas

  • Enjoy straight from the jar for breakfast or a snack

  • Add a drizzle of nut butter before serving

  • Serve chilled or slightly softened at room temperature


💡 Helpful Tips

  • Use very ripe bananas for the best natural sweetness

  • Layer just before serving if you prefer firmer banana slices

  • Swap oats for crushed biscuits for a dessert-style version

  • Mini chocolate chips distribute more evenly


🧊 Storage

Keep sealed in the refrigerator and consume within 2–3 days. Stir gently before eating if desired.


👧 Kid-Friendly Option

If the yogurt flavor is too plain for children, stir a small spoonful of peanut butter or almond butter into the yogurt before layering. It adds richness and a familiar taste kids enjoy.

Tropical Delight: Fruity Tapioca Jelly Drink

🌴 Tropical Delight: Fruity Tapioca Jelly Drink

A colorful, creamy chilled drink with fruit, jelly cubes, and soft tapioca pearls

Introduction

Tropical Delight is a vibrant and refreshing dessert-style drink made with creamy milk, tender tapioca pearls, fruity jelly cubes, and mixed fruit. It’s visually beautiful, lightly sweet, and wonderfully textured—perfect for warm days, gatherings, or as a fun treat for the whole family.


🧾 Ingredients

For the Jelly

  • 4 cups water

  • ¼ cup white sugar

  • 25 grams white unflavored jelly powder

  • Red food coloring

  • Yellow food coloring

  • Green food coloring

For the Drink Base

  • 835 grams fruit cocktail, well-drained
    (or an equal amount of chopped fresh fruits such as mango, pineapple, papaya, grapes, or strawberries)

  • 250 ml all-purpose cream or heavy cream

  • 300 ml condensed milk

  • 2 cups evaporated milk or fresh milk

  • 1 cup cooked small tapioca pearls


⏱️ Time Breakdown

  • Preparation Time: 20 minutes

  • Cooking Time: 15 minutes

  • Chilling Time: 1 hour

  • Total Time: 1 hour 35 minutes


👩‍🍳 Step-by-Step Instructions

1. Prepare the Jelly

In a medium pot, bring 4 cups of water to a full boil.
Add the ¼ cup white sugar and 25 grams jelly powder, stirring continuously until fully dissolved and clear.

Remove from heat and carefully divide the hot jelly mixture evenly into three separate heat-safe bowls.

Add:

  • Red food coloring to the first bowl

  • Yellow food coloring to the second bowl

  • Green food coloring to the third bowl

Stir each bowl until the color is evenly mixed.

Pour each colored mixture into separate shallow containers.
Allow them to cool at room temperature, then refrigerate until completely set.

Once firm, cut the jelly into small, even cubes. Set aside.


2. Prepare the Creamy Milk Base

In a large mixing bowl, combine:

  • All-purpose cream (or heavy cream)

  • Condensed milk

  • Evaporated milk (or fresh milk)

Whisk gently until smooth and well blended.


3. Assemble the Drink

Add the drained fruit cocktail (or fresh fruit mixture) into the milk base. Stir gently.

Fold in:

  • Cooked tapioca pearls

  • Colored jelly cubes

Mix carefully to avoid breaking the jelly pieces.


4. Chill and Serve

Transfer the mixture into serving glasses or a large pitcher.

Refrigerate for at least 1 hour to allow the flavors and textures to come together.

Serve well chilled.


🍹 Serving Suggestions

  • Serve as a cold dessert drink or sweet snack

  • Garnish with fresh fruit pieces or mint leaves for presentation

  • Best enjoyed cold with a spoon or wide straw


💡 Helpful Tips

  • Ensure the jelly is fully set before cutting for clean cubes

  • Drain canned fruits well to prevent excess liquid

  • Adjust sweetness by adding more or less condensed milk

  • Stir gently to keep the jelly cubes intact


🥛 Dietary Notes

  • Contains dairy

  • Can be prepared gluten-free by using certified gluten-free ingredients


🧊 Storage

Store leftovers in a covered container in the refrigerator and enjoy within 2 days. Stir gently before serving again.

Easy No-Bake Biscoff Cheesecake

Easy No-Bake Biscoff Cheesecake

Creamy • Smooth • No Oven Required

Preparation Time

  • Prep time: 30 minutes

  • Chilling time: Minimum 6 hours (overnight recommended)

  • Yield: 10–12 slices


Ingredients

Biscuit Base

  • 300 g (10.6 oz) Lotus Biscoff biscuits

  • 125 g (4.4 oz) unsalted butter, melted

Cheesecake Filling

  • 500 g (about 2 cups) full-fat cream cheese, room temperature

  • 100 g (3.5 oz) icing sugar

  • 250 g (8.8 oz) Biscoff spread (smooth or crunchy)

  • 1 teaspoon vanilla extract

  • 300 ml (1¼ cups) cold double cream (heavy whipping cream)

Topping

  • 150 ml (⅔ cup) double cream

  • 2 tablespoons icing sugar

  • 125 g (4.2 oz) Biscoff spread, gently melted

  • Extra Biscoff biscuits for decoration (optional)


Detailed Instructions

1. Prepare the Biscuit Base

  1. Place the Biscoff biscuits in a food processor and blend until fine crumbs form.
    Alternatively, place biscuits in a sealed bag and crush using a rolling pin.

  2. Transfer the crumbs to a bowl and pour in the melted butter.

  3. Mix thoroughly until the texture resembles damp sand.

  4. Press the mixture firmly into the base of a 20 cm (8-inch) springform pan, packing it down evenly.

  5. Place the pan in the refrigerator to chill while preparing the filling.


2. Make the Cheesecake Filling

  1. In a large mixing bowl, beat the cream cheese until smooth and lump-free.

  2. Add the icing sugar, Biscoff spread, and vanilla extract.

  3. Beat again until fully combined and creamy.

  4. In a separate bowl, whip the cold double cream until stiff peaks form.

  5. Gently fold the whipped cream into the Biscoff mixture using a spatula.
    Fold slowly to keep the filling light and airy.

  6. Pour the filling over the chilled biscuit base and smooth the top evenly.

  7. Cover and refrigerate for at least 6 hours, preferably overnight, until fully set.


3. Prepare the Topping

  1. Gently warm the Biscoff spread until pourable (microwave in short intervals).

  2. Pour the melted spread over the chilled cheesecake, allowing it to naturally spread.

  3. Whip the remaining double cream with icing sugar until stiff.

  4. Pipe or spoon the whipped cream around the edges of the cheesecake.

  5. Decorate with whole or crushed Biscoff biscuits if desired.


4. Serve

  1. Run a knife around the edge of the pan before releasing the springform.

  2. Slice using a sharp knife, wiping the blade clean between cuts.

  3. Serve chilled.


Helpful Tips

  • Use full-fat cream cheese for the best texture and structure.

  • Ensure all dairy ingredients are cold when whipping for proper consistency.

  • For clean slices, chill the cheesecake overnight.

  • Store leftovers covered in the refrigerator for up to 3 days.

No-Sugar Healthy Oatmeal Cookies

No-Sugar Healthy Oatmeal Cookies

Naturally Sweet • Wholesome • Easy to Make

These no-sugar oatmeal cookies are gently sweetened with fruit and stevia, making them a great option for everyday snacking. They are soft, lightly chewy, and full of natural texture from oats, nuts, and dried fruit. No refined sugar, no butter, and no flour are needed.

Prep Time

10 minutes

Bake Time

15–20 minutes

Yield

8–10 cookies


Ingredients

  • 1 cup (90 g) rolled oats

  • 50 g oat flakes (for added texture)

  • 1 medium apple, peeled, cored, and finely diced

  • 1 ripe banana

  • 80 g nuts (almonds, walnuts, or pecans), roughly chopped

  • 50 g dried cranberries

  • 1 tablespoon stevia (adjust to taste)

  • 1 tablespoon sesame seeds

  • 1 teaspoon vanillin or vanilla powder (optional)


Instructions

1. Prepare the Oven

Preheat your oven to 350°F (180°C).
Line a baking sheet with parchment paper or lightly grease it.

2. Mash the Banana

Place the banana in a large mixing bowl and mash thoroughly with a fork until smooth and creamy. This will act as the main binder for the cookies.

3. Combine the Base

Add the diced apple, rolled oats, oat flakes, and vanillin (if using) to the mashed banana.
Stir well until everything is evenly coated and the mixture begins to hold together.

4. Add Texture and Flavor

Fold in the chopped nuts, dried cranberries, stevia, and sesame seeds.
Mix gently until fully combined. The mixture should be thick and slightly sticky. If it feels too dry, add 1–2 teaspoons of water.

5. Shape the Cookies

Scoop about 2 tablespoons of the mixture for each cookie.
Roll gently into a ball, then flatten slightly into a thick disc.
Place cookies on the prepared baking sheet, leaving a little space between each one.

6. Bake

Bake for 15–20 minutes, or until the edges turn lightly golden and the cookies feel set when touched.

7. Cool

Remove from the oven and let the cookies cool on the baking sheet for 5 minutes, then transfer to a plate or cooling rack.
They will firm up more as they cool.


Helpful Tips

  • For softer cookies, bake closer to 15 minutes.

  • For firmer, slightly crisp edges, bake closer to 20 minutes.

  • You can replace cranberries with raisins or chopped dates if preferred.

  • Store cookies in an airtight container at room temperature for up to 2 days, or refrigerate for up to 5 days.

Carrot Cake with Cream Cheese Frosting

Carrot Cake with Cream Cheese Frosting

Prep Time: 25 minutes
Bake Time: 25–35 minutes
Cooling & Assembly: 60 minutes
Yield: 1 two-layer 8-inch cake or one 9×13-inch cake

This carrot cake has a moist crumb, balanced spice flavor, and a smooth cream cheese frosting. It is suitable for gatherings, celebrations, or everyday desserts.


Ingredients

For the Carrot Cake

  • 2 cups (250 g) all-purpose flour

  • 1½ cups (300 g) granulated sugar or brown sugar

  • 1 teaspoon baking powder

  • 1 teaspoon baking soda

  • ½ teaspoon salt

  • 1 tablespoon ground cinnamon

  • ½ teaspoon ground nutmeg

  • ½ teaspoon ground ginger

  • ¼ teaspoon ground cloves (optional)

  • 3 large eggs, room temperature

  • ¾ cup (180 ml) vegetable oil

  • ½ cup (120 ml) buttermilk or milk

  • 1 teaspoon vanilla extract

  • 2½ cups (260 g) finely grated carrots

  • ½ cup chopped walnuts or pecans (optional)

  • ½ cup raisins, sultanas, or dried cranberries (optional)

  • Zest of 1 orange (optional)


For the Cream Cheese Frosting

  • 200 g cream cheese, softened

  • ½ cup (113 g) unsalted butter, softened

  • 2½ cups (300 g) powdered sugar

  • 1 teaspoon vanilla extract

  • ½ teaspoon orange zest (optional)


Detailed Instructions

1. Prepare the Oven and Pans

Preheat the oven to 350°F (175°C).

Grease and line:

  • Two 8-inch round cake pans, or

  • One 9×13-inch baking pan

Set aside.


2. Mix Dry Ingredients

In a large bowl, whisk together:

  • Flour

  • Sugar

  • Baking powder

  • Baking soda

  • Salt

  • Cinnamon

  • Nutmeg

  • Ginger

  • Cloves

Whisk until evenly combined and free of lumps.


3. Mix Wet Ingredients

In a separate bowl, whisk together:

  • Eggs

  • Vegetable oil

  • Buttermilk

  • Vanilla extract

Mix until smooth and fully combined.


4. Combine Batter

Pour the wet ingredients into the dry ingredients.

Using a spatula, gently fold until just combined.

Add:

  • Grated carrots

  • Nuts (if using)

  • Dried fruit (if using)

  • Orange zest

Fold gently. Do not overmix, as this can affect texture.


5. Bake

Divide the batter evenly between prepared pans.

Bake for 25–35 minutes, or until:

  • The center springs back lightly when touched

  • A toothpick inserted in the center comes out clean

Remove from the oven and allow cakes to cool in pans for 10 minutes. Transfer to a wire rack and cool completely before frosting.


Cream Cheese Frosting

6. Prepare the Frosting

In a large bowl, beat the softened cream cheese and butter until smooth and creamy.

Gradually add powdered sugar, mixing on low speed until incorporated.

Add vanilla extract and orange zest (if using).

Increase speed and beat until light and smooth.


7. Assemble the Cake

If using layered pans:

  • Place one cake layer on a serving plate

  • Spread frosting evenly on top

  • Place the second layer on top

Frost the top and sides evenly.

For a sheet cake:

  • Spread frosting evenly over the cooled cake


Optional Garnishes

  • Chopped nuts

  • Dried fruit

  • Thin carrot curls

  • Light dusting of powdered sugar


Storage

  • Store refrigerated in an airtight container for 3–4 days

  • Bring to room temperature before serving

  • Cake layers can be frozen (unfrosted) for up to 2 months

Italian Lemon Yogurt Cake (Sugar-Free)

Italian Lemon Yogurt Cake (Sugar-Free)

Moist, fragrant, and naturally sweetened

Prep Time: 15 minutes
Bake Time: 45–50 minutes
Total Time: 1 hour
Yield: 1 loaf (8–10 slices)

This Italian-style lemon yogurt cake is light, moist, and full of bright citrus flavor. It’s sweetened with stevia instead of refined sugar, making it a better option for those reducing sugar intake while still enjoying a classic homemade cake.


Ingredients

Dry Ingredients

  • 1½ cups all-purpose flour

  • 2 teaspoons baking powder

  • ½ teaspoon kosher salt

Wet Ingredients

  • 1 cup plain coconut yogurt (or whole milk yogurt)

  • Stevia powder, to taste
    (use the amount equivalent to ¾–1 cup sugar, depending on brand strength)

  • 3 large eggs

  • 2 teaspoons finely grated lemon zest (from about 2 lemons)

  • ⅓ cup freshly squeezed lemon juice

  • ½ teaspoon pure vanilla extract

  • ½ cup olive oil

Lemon Soaking Syrup (Sugar-Free)

  • ¼ cup lemon juice

  • Stevia powder, equivalent to ¼ cup sugar

Sugar-Free Lemon Glaze (Optional)

  • Juice of 1 lemon

  • Powdered stevia sweetener, to taste
    (or sugar-free confectioner’s sweetener blend)


Step-by-Step Instructions

1. Prepare the Pan

Preheat oven to 350°F (180°C).
Grease an 8½ × 4¼ × 2½-inch loaf pan and line the bottom with parchment paper, or lightly coat with baking spray.


2. Mix Dry Ingredients

In a large bowl, sift together:

  • Flour

  • Baking powder

  • Salt

Set aside.


3. Mix Wet Ingredients

In a separate bowl, whisk together:

  • Yogurt

  • Stevia powder

  • Eggs

  • Lemon zest

  • Lemon juice

  • Vanilla extract

Whisk until smooth and well combined.


4. Combine Batter

Gradually whisk the dry ingredients into the wet mixture until just combined.
Do not overmix.


5. Add Oil

Gently fold in the olive oil using a spatula until fully incorporated.
The batter should be smooth and slightly thick.


6. Bake

Pour the batter into the prepared loaf pan and smooth the top.

Bake for 45–50 minutes, or until a toothpick inserted into the center comes out clean.


7. Prepare the Lemon Syrup

While the cake bakes, combine:

  • ¼ cup lemon juice

  • Stevia powder

Heat gently in a small saucepan just until dissolved. Do not boil. Set aside.


8. Soak the Cake

Allow the cake to cool in the pan for 10 minutes.
While still warm, slowly pour the lemon syrup over the cake so it absorbs evenly.

Let the cake cool completely.


9. Prepare the Sugar-Free Glaze (Optional)

Mix powdered stevia with lemon juice until a pourable glaze forms.
Drizzle over the cooled cake.

Allow glaze to set for about 1 hour before slicing.


Tips for Best Results

  • Use fine powdered stevia for smooth texture.

  • Olive oil gives authentic Italian flavor; use light olive oil if preferred.

  • For extra moisture, wrap the cooled cake and rest overnight before serving.

  • Skip the glaze for a lighter, breakfast-style cake.


Storage

  • Store covered at room temperature for 2 days

  • Refrigerate for up to 5 days

  • Freeze slices for up to 2 months

Easy Pineapple Bake

Easy Pineapple Bake

This versatile dish works beautifully as either a unique side dish for ham or a warm, spoonable dessert.

  • Prep time: 10 minutes

  • Cook time: 45–50 minutes

  • Total time: 1 hour

  • Servings: 8


Ingredients

  • 1 can (20 oz / 565 g) crushed pineapple, undrained

  • 1 cup granulated sugar

  • ½ cup all-purpose flour

  • 2 large eggs, beaten

  • ½ cup (1 stick) unsalted butter, melted

  • 1 tsp vanilla extract

  • Pinch of salt

  • 1 cup shredded sharp cheddar cheese (optional for a savory contrast)

  • Optional topping: ½ cup shredded coconut or chopped nuts


Instructions

  1. Preheat and Prep: Set your oven to 350°F (175°C). Lightly grease a baking dish to ensure the bake doesn’t stick.

  2. Mix the Base: In a large bowl, combine the crushed pineapple (with its juice), sugar, and flour. Stir until the mixture is smooth.

  3. Combine Wet Ingredients: Stir in the beaten eggs, melted butter, vanilla extract, and a pinch of salt. The batter should be thick but easy to pour.

  4. Add Cheese (Optional): If you enjoy the traditional savory-sweet version, gently fold in the shredded cheddar cheese until evenly distributed.

  5. Bake: Pour the mixture into your prepared dish and smooth the top. Add any desired toppings, such as coconut or nuts. Bake for 45–50 minutes until the center is set and the top is lightly golden.

  6. Rest and Serve: Allow the dish to cool for about 10 minutes before serving. This resting period helps the bake firm up and allows the flavors to deepen.


Tips for Success

  • Pineapple Texture: Use canned crushed pineapple in juice rather than syrup to avoid making the dish overly sweet.

  • Storage: Leftovers can be stored in an airtight container in the refrigerator for up to 4 days.

  • Serving Suggestions: This dish pairs exceptionally well with holiday mains like baked ham or roast turkey. If serving as a dessert, try it with a dollop of whipped cream or vanilla ice cream.

More Apples Than Dough” Pie

More Apples Than Dough” Pie

  • Prep time: 15 minutes

  • Cook time: 40–50 minutes

  • Total time: ~1 hour

  • Servings: 4–6


Ingredients

  • 4–5 medium apples, peeled and thinly sliced

  • 2 eggs

  • ½ cup sugar (100 g)

  • 1 tsp vanilla sugar

  • ⅓ cup milk (100 ml)

  • 1 ½ tbsp melted butter (20 g)

  • Zest of 1 lemon

  • Juice of ½ lemon (to drizzle over apples)

  • ⅔ cup wheat flour (80 g)

  • 1 tsp baking powder

  • A pinch of salt

  • Powdered sugar (for dusting)


Instructions

  1. Prepare Apples: Peel, core, and slice the apples very thinly (using a mandoline is recommended for uniform slices). Drizzle them with the juice of ½ a lemon to prevent browning and add flavor.

  2. Mix Wet Ingredients: In a mixing bowl, beat the 2 eggs with a pinch of salt. Add the sugar and vanilla sugar, beating until the mixture is frothy and light in color.

  3. Combine Remaining Liquids: Stir in the milk, melted butter, and lemon zest.

  4. Add Dry Ingredients: Gradually whisk in the flour and baking powder until the batter is smooth. Note that the batter will be quite thin and watery.

  5. Coat Apples: Gently fold the apple slices into the batter, ensuring every slice is thoroughly coated.

  6. Assemble: Grease an 8-inch (20 cm) baking pan and line it with parchment paper. Pour the apple-batter mixture into the pan, smoothing the top so the slices lie flat.

  7. Bake: Bake in a preheated oven at 350°F (180°C) for 40–50 minutes. The cake is done when the top is golden brown and a toothpick inserted into the center comes out clean.

  8. Cool and Serve: Allow the cake to cool completely in the pan to set its creamy, custard-like texture. Dust with powdered sugar before serving.


Recipe Tips

  • Consistency: The batter is meant to be thin; it serves primarily to bind the apple layers together into a custard.

  • Apple Choice: Use firm baking apples like Granny Smith, Honeycrisp, or Fuji to ensure the slices hold their shape.

  • Storage: This pie is excellent served cold and can be stored in an airtight container in the fridge for up to 4–5 days.

Homemade 3-Ingredient Strawberry Ice Cream

Homemade 3-Ingredient Strawberry Ice Cream

No gelatin, no ice cream machine—just creamy, fruity goodness

Prep Time: 10 minutes
Freeze Time: 4–6 hours
Yield: About 4–6 servings

This recipe is simple, naturally creamy, and customizable. You can swap strawberries for other fruits, chocolate chips, or even cookie pieces.


Ingredients

  • 500 ml (2 cups) whipping cream
    Use full-fat cream for best results; it creates a rich, creamy texture.

  • 150 g (2/3 cup) sweetened condensed milk
    Provides sweetness and helps the ice cream hold its shape without gelatin.

  • 100 g (3/4 cup) fresh strawberries, diced
    Adds natural fruit flavor. You can substitute raspberries, blueberries, or mango if desired.


Step-by-Step Instructions

1. Whip the Cream

Pour the cold whipping cream into a large mixing bowl.
Using an electric mixer, whip on medium-high speed until stiff peaks form.

  • Stiff peaks mean the cream holds its shape when the beaters are lifted.

  • Do not overwhip, or the cream may turn into butter.


2. Fold in the Condensed Milk

Gently add the sweetened condensed milk to the whipped cream.
Use a spatula to fold it in carefully, preserving the air in the whipped cream.
The mixture should become smooth and slightly glossy.


3. Add the Fruit

Fold in the diced strawberries (or your chosen fruit) until evenly distributed.
Be gentle to keep the whipped cream light and airy.


4. Transfer and Freeze

Pour the mixture into a freezer-safe container.
Smooth the top with a spatula and cover the container with a lid or plastic wrap.

Freeze for at least 4 hours, or until firm.
For best flavor, you can refrigerate the mixture for 1–2 hours before freezing to let the flavors meld, but this step is optional.


5. Serve

Scoop the ice cream into bowls and enjoy immediately.
Optional toppings: fresh berries, chocolate shavings, or a drizzle of fruit syrup.


Tips & Variations

  • Fruit Variations: Mango, banana, or mixed berries all work well.

  • Chocolate Strawberry: Fold in 50 g of finely chopped chocolate with the fruit.

  • Nutty Option: Add 2–3 tablespoons chopped nuts for texture.

  • Storage: Keep covered in the freezer for up to 7 days. For softer scooping, let ice cream sit at room temperature for 5 minutes before serving.

Lemon Crinkle Cookies

Lemon Crinkle Cookies

Soft, bright cookies with a delicate citrus flavor and a classic cracked sugar finish

Prep Time: 15 minutes
Chill Time: 30–60 minutes
Bake Time: 10–12 minutes
Yield: About 20–24 cookies

These Lemon Crinkle Cookies are tender on the inside with lightly crisp edges. Fresh lemon zest and juice give them a refreshing citrus taste, while the powdered sugar coating creates the signature crinkled appearance as they bake.


Ingredients

Cookie Dough

  • 1½ cups (180 g) all-purpose flour
    Provides structure for the cookies.

  • 1 teaspoon baking soda
    Helps the cookies spread slightly and crack on top.

  • ½ teaspoon baking powder
    Adds lightness to the texture.

  • ¼ teaspoon salt
    Balances the sweetness and enhances flavor.

  • 1 cup (227 g) unsalted butter, softened
    Creates a rich, tender cookie.

  • 1 cup (200 g) granulated sugar
    Sweetens and helps create a soft crumb.

  • 1 large egg
    Binds the dough and adds moisture.

  • 1 tablespoon fresh lemon zest
    Provides bright lemon aroma.

  • 2 tablespoons fresh lemon juice
    Adds natural citrus flavor.


For Coating

  • ½ cup powdered sugar
    Creates the classic crinkle finish.

  • Optional: 2–3 tablespoons granulated sugar
    Helps form a slight crust before rolling in powdered sugar.


Step-by-Step Instructions

1. Prepare the Dough

In a large bowl, beat the softened butter and granulated sugar together until pale, light, and fluffy. This usually takes 2–3 minutes with an electric mixer.

Add the egg and mix until fully incorporated.
Stir in the lemon zest and lemon juice until evenly combined.


2. Mix the Dry Ingredients

In a separate bowl, whisk together the flour, baking soda, baking powder, and salt.

Gradually add the dry ingredients to the wet mixture. Mix just until a soft, smooth dough forms. Avoid overmixing.


3. Chill the Dough

Cover the bowl and refrigerate the dough for 30–60 minutes.
This step firms the dough, improves texture, and helps prevent excessive spreading.


4. Shape and Coat

Preheat the oven to 175°C (350°F).
Line baking sheets with parchment paper.

Scoop the dough into tablespoon-sized portions and roll into balls.

For best results:

  1. Roll each dough ball lightly in granulated sugar (optional).

  2. Roll generously in powdered sugar, completely coating the surface.

Place the coated dough balls on the baking sheet, spacing them about 2 inches apart.


5. Bake

Bake for 10–12 minutes, until:

  • The edges are set

  • The tops are cracked and puffed

  • The centers remain soft

Do not overbake; the cookies will continue to set as they cool.


6. Cool

Let the cookies rest on the baking sheet for 5 minutes, then transfer them to a wire rack to cool completely.


Tips for Perfect Crinkle Cookies

  • Extra Cracks: Roll the dough in powdered sugar twice for a thicker white coating.

  • Strong Lemon Flavor: Add a drop of lemon extract if desired.

  • Soft Centers: Remove cookies when the centers still look slightly underbaked.

  • Storage: Store in an airtight container at room temperature for up to 4 days.

Vanilla Peach Cake with Cream and White Chocolate

Vanilla Peach Cake with Cream and White Chocolate

A light vanilla sponge layered with fruit, fluffy cream, and delicate white chocolate

Prep Time: 30 minutes
Total Time: About 1 hour + chilling time
Servings: 12–15 slices

This Vanilla Peach Cake is a refreshing, elegant dessert made with a soft sponge base, juicy peaches, smooth vanilla cream, and a snowy topping of white chocolate. It’s light, creamy, and perfect for celebrations, summer gatherings, or make-ahead desserts.


Ingredients

For the Sponge Cake

  • 3 large eggs
    Create structure and lightness.

  • 100 g granulated sugar
    Sweetens the cake and helps trap air for a fluffy texture.

  • 100 g all-purpose flour
    Forms the base of the sponge.

  • 1 teaspoon baking powder
    Provides gentle lift.

  • 1 teaspoon vanilla extract
    Adds classic vanilla flavor.


For the Cream Layer & Topping

  • 480 g canned peaches or apricots, drained
    Adds fruit sweetness and moisture.

  • Reserved fruit juice (from the can)
    Used to lightly moisten the sponge.

  • 300 ml (1¼ cups) cold milk

  • 250 ml (1 cup) cold whipping cream (36% fat)
    Creates a rich yet airy cream layer.

  • 2 packets instant vanilla cream or pudding mix
    Provides structure and vanilla flavor.

  • 100 g white chocolate, well chilled
    Used for garnish.


Step-by-Step Instructions

1. Prepare the Sponge Base

Preheat the oven to 180°C (350°F).
Line a 9×13-inch (23×33 cm) rectangular springform pan with parchment paper.

In a large bowl, beat the eggs and sugar using an electric mixer for 5–8 minutes, until the mixture becomes pale, thick, and nearly triples in volume.

Sift the flour and baking powder together.
Gently fold them into the egg mixture using a spatula, working slowly to keep the batter airy. Add the vanilla extract.

Pour the batter evenly into the prepared pan and smooth the surface.

Bake for 20–25 minutes, or until lightly golden and springy to the touch.
Allow the sponge to cool completely in the pan.


2. Prepare the Fruit

Drain the peaches well and reserve the juice.

Once the sponge has cooled, lightly prick the surface with a fork.
Drizzle 3–4 tablespoons of the reserved fruit juice evenly over the sponge to keep it moist.

Cut the peaches into small, bite-sized pieces and set aside.


3. Make the Vanilla Cream

In a large chilled bowl, combine:

  • Cold milk

  • Cold whipping cream

  • Instant vanilla cream mix

Beat on low speed for 30 seconds, then increase to high speed and beat for about 3 minutes, until thick, smooth, and holding stiff peaks.

Gently fold in the diced peaches until evenly distributed.


4. Assemble the Cake

Spread the peach and vanilla cream mixture evenly over the cooled sponge base.
Smooth the top using an offset spatula or the back of a spoon.

Using a fine grater, grate the chilled white chocolate generously over the entire surface of the cake.


5. Chill and Serve

Refrigerate the cake for at least 2–4 hours, or preferably overnight.
This allows the cream to set fully and makes slicing neat and clean.

Slice and serve chilled.


Helpful Tips & Variations

  • Cold Ingredients Matter: Keep milk, cream, and mixing bowl cold for best cream consistency.

  • Fruit Options: Apricots, mango, or mixed fruit can be used instead of peaches.

  • Extra Flavor: Add lemon zest to the cream for a brighter taste.

  • Storage: Store covered in the refrigerator for up to 3 days.

Italian Peach Crumble Cake

Italian Peach Crumble Cake

A soft, airy sponge topped with sweet peaches and a buttery crumb

Prep Time: 15 minutes
Bake Time: 35–40 minutes
Yield: One 9-inch (23 cm) round cake

This Italian-style Peach Crumble Cake is loved for its light, tender crumb and simple preparation. The delicate vanilla sponge gently supports juicy peaches, while the golden crumble topping adds texture and richness. It’s perfect for afternoon tea, dessert, or a casual gathering.


Ingredients

For the Cake Batter

  • 2 large eggs
    Provide structure and richness.

  • 100 g granulated sugar
    Sweetens the cake and helps create a light texture.

  • 8 g vanilla sugar (or 1 teaspoon vanilla extract)
    Adds gentle aroma and flavor.

  • 100 ml sunflower oil
    Keeps the cake moist and soft.

  • 100 ml milk
    Adds tenderness to the crumb.

  • 200 g all-purpose flour
    Forms the base of the sponge.

  • 12 g baking powder
    Helps the cake rise evenly.

  • 150 g peaches in syrup, drained and sliced
    Adds sweetness and juiciness. Fresh ripe peaches may also be used.


For the Crumble Topping

  • 50 g butter, softened
    Creates a rich, crumbly texture.

  • 50 g granulated sugar
    Sweetens and helps the topping turn golden.

  • 3 tablespoons all-purpose flour
    Binds the crumble together.


Step-by-Step Instructions

1. Prepare the Cake Batter

In a large mixing bowl, add the eggs, granulated sugar, and vanilla sugar.
Whisk until the mixture becomes pale, slightly thick, and airy.

Slowly pour in the sunflower oil and milk. Whisk again until fully combined.

Sift the flour and baking powder directly into the bowl.
Using a spatula or whisk, gently fold until the batter is smooth and free of lumps. Avoid overmixing.

Pour the batter into a greased and parchment-lined 9-inch round cake pan, spreading it evenly.


2. Arrange the Peaches

Place the sliced peaches gently on top of the batter in a circular or fan-shaped pattern.
Lightly press them into the surface so they sit neatly without sinking too deeply.


3. Make the Crumble Topping

In a small bowl, combine the softened butter, sugar, and flour.

Using your fingertips or a fork, rub the mixture together until it resembles small crumbs.

Sprinkle the crumble evenly over the peaches, covering the surface generously.


4. Bake the Cake

Preheat your oven to 180°C (350°F).

Bake the cake for 35–40 minutes, or until:

  • The top is golden and lightly crisp

  • A toothpick inserted into the center comes out clean

If the top browns too quickly, loosely cover with foil during the last few minutes.


Cooling & Serving

Allow the cake to cool in the pan for 10–15 minutes, then transfer to a wire rack.

Before serving, you may lightly dust the top with powdered sugar for a classic bakery-style finish.


Helpful Tips & Variations

  • Fresh Peaches: Use ripe, peeled peaches when in season.

  • Extra Flavor: Add a pinch of cinnamon or lemon zest to the crumble.

  • Storage: Keep covered at room temperature for 1 day or refrigerate for up to 3 days.

  • Serving Ideas: Enjoy plain, with whipped cream, or alongside vanilla yogurt.


Healthy Apple & Oat Breakfast Bake

Healthy Apple & Oat Breakfast Bake

A naturally sweet, nourishing breakfast perfect for meal prep

Prep Time: 15 minutes
Bake Time: 35–40 minutes
Yield: 6–8 servings

This Healthy Apple & Oat Breakfast Bake is a comforting, nutrient-rich dish made with whole ingredients and no refined sugar. Sweetness comes naturally from apples, banana, raisins, and cranberries, while oats and nuts provide lasting energy and fiber. It’s ideal for busy mornings, light breakfasts, or a satisfying snack.


Ingredients & Their Purpose

  • 1 cup (100 g) rolled oats
    Forms the base of the bake and provides fiber for sustained energy.

  • 3 medium apples, grated
    Adds moisture, natural sweetness, and a soft texture. Keep the peel on for added fiber.

  • 1 ripe banana, mashed
    Acts as a natural binder and sweetener.

  • 1/2 cup (120 ml) water
    Helps soften the oats and create a tender texture.

  • 2 large eggs
    Adds protein and helps the bake set properly.

  • 3.5 oz (100 g) dried cranberries
    Adds gentle tartness and natural sweetness.

  • 3.5 oz (100 g) raisins
    Enhances sweetness and moisture.

  • 1/2 cup (50 g) chopped nuts
    Walnuts, almonds, or pecans add crunch, healthy fats, and flavor.

  • 1 teaspoon baking powder
    Gives the bake a light lift.

  • 1 teaspoon ground cinnamon (optional)
    Adds warmth and aroma.


Step-by-Step Instructions

1. Prepare the Dried Fruit

Place the raisins and dried cranberries in a bowl. Cover them with hot water and let soak for 5 minutes.
Drain thoroughly and set aside. This step softens the fruit and prevents dryness in the bake.


2. Soak the Oats

In a large mixing bowl, combine the rolled oats and water.
Let sit for 5–10 minutes so the oats absorb the liquid and soften slightly.


3. Prepare the Fruit Base

  • Mash the banana until smooth.

  • Grate the apples using a coarse grater.

Add both the mashed banana and grated apples to the soaked oats. Stir well to combine.


4. Add the Eggs

In a separate bowl, lightly whisk the eggs.
Pour them into the oat mixture and stir until evenly incorporated.


5. Build Flavor & Texture

  • Sprinkle in the baking powder and cinnamon.

  • Fold in the soaked cranberries, raisins, and chopped nuts.

Mix gently to distribute everything evenly without overworking the batter.


6. Bake

  • Preheat oven to 180°C (350°F).

  • Lightly grease or line a 9×9-inch baking dish.

  • Pour the mixture into the dish and smooth the top.

Bake for 35–40 minutes, until:

  • The top is lightly golden

  • The center feels firm when gently pressed


Cooling & Serving

Let the bake cool in the pan for 10–15 minutes before slicing.
This allows it to set and makes cleaner slices.

Serve:

  • Warm on its own

  • With plain yogurt or a drizzle of nut butter

  • With fresh fruit on the side


Helpful Tips & Variations

  • Softer Texture: Blend oats briefly before soaking for a smoother result.

  • Dairy-Free: This recipe is naturally dairy-free.

  • Egg-Free Option: Replace eggs with 2 tablespoons ground flaxseed mixed with 5 tablespoons water (let rest 5 minutes).

  • Storage: Store slices in an airtight container in the refrigerator for up to 4 days.

  • Reheating: Warm in the microwave for about 30 seconds.

Chocolate-Coated Peanut and Cookie Balls (No-Bake)

Chocolate-Coated Peanut and Cookie Balls (No-Bake)

Yields: About 30 balls
Prep Time: 20–25 minutes
Chill Time: 30–60 minutes

A no-bake treat that combines crushed cookies, peanuts, and chocolate. Crispy, nutty, and easy to make, these bite-sized balls are perfect for snacks, parties, or homemade gifts.


📋 Ingredients

For the Filling:

  • 500 g (17.6 oz) cookies, crushed

  • 120 g (4.2 oz) peanuts, crushed

  • 120 g (½ cup) sugar

  • 60 g (½ cup) cocoa powder

  • 250 ml (1 cup) milk

  • 150 g (⅔ cup) butter

  • A pinch of vanillin or a few drops of vanilla extract

For the Chocolate Glaze:

  • 80 g (2.8 oz) dark chocolate

  • 80 g (2.8 oz) milk chocolate

  • 20 ml (1½ tbsp) vegetable oil

  • 50 g (1.8 oz) peanuts, chopped


👩‍🍳 Step-by-Step Instructions

Step 1: Prepare the Filling

  1. Crush Cookies and Peanuts: Crush the cookies into small pieces using a food processor or a rolling pin in a sealed bag. Roughly chop the peanuts and mix them with the crushed cookies in a large bowl.

  2. Make Chocolate Mixture: In a medium saucepan over medium heat, combine the milk, sugar, cocoa powder, and vanilla. Stir continuously until the sugar dissolves completely.

  3. Add Butter: Add the butter to the saucepan and stir until fully melted and smooth.

  4. Combine: Pour the warm chocolate mixture over the crushed cookies and peanuts. Stir thoroughly until everything is evenly coated. The mixture should be thick and sticky enough to form balls.


Step 2: Shape the Balls

  1. Scoop small portions of the mixture and roll them into balls about the size of a walnut.

  2. Place the balls on a tray lined with parchment paper or a silicone mat.

  3. Chill in the refrigerator or freezer for about 30 minutes to firm up.


Step 3: Prepare the Chocolate Glaze

  1. Combine the dark chocolate, milk chocolate, and vegetable oil in a heatproof bowl.

  2. Melt using a double boiler or microwave in 20–30 second intervals, stirring until smooth.

  3. Stir in the chopped peanuts for extra texture.


Step 4: Coat the Balls

  1. Remove the chilled balls from the fridge.

  2. Using a fork or skewer, dip each ball into the chocolate glaze, ensuring it is fully coated.

  3. Place the coated balls back on the tray and chill for 20–30 minutes until the glaze hardens.


Step 5: Serve and Store

  • Serve immediately, or arrange in a box for gifting.

  • Store in an airtight container in the refrigerator for up to 1 week.

  • For longer storage, freeze in an airtight container for up to 1 month.


💡 Tips for Success

  • Nut Variations: Substitute peanuts with almonds, hazelnuts, or walnuts for a different flavor.

  • Texture: Keep cookie pieces slightly larger for a chunkier consistency.

  • Glaze Tip: If you want a shinier coating, add a tiny extra teaspoon of oil to the melted chocolate.


These no-bake chocolate peanut cookie balls are crunchy, chocolaty, and easy to make, with no oven required. Perfect for snacks, dessert tables, or homemade gifts!

Decadent Chocolate Cake with Wine Glaze

🍫 Decadent Chocolate Cake with Wine Glaze

Servings: 8–10
Prep Time: 15 minutes
Bake Time: 1 hour
Total Time: 1 hour 15 minutes

A moist, flavorful chocolate cake with a subtle hint of cinnamon, topped with a smooth wine glaze. Perfect for any occasion or a special treat.


📋 Ingredients

For the Cake:

  • 1 box yellow cake mix

  • ¼ cup brown sugar

  • ¼ cup white sugar

  • 1 packet instant vanilla pudding mix

  • 2 teaspoons cinnamon

  • 4 large eggs

  • ¾ cup water

  • ¾ cup vegetable oil

  • ½ cup white wine

For the Wine Glaze:

  • 1 stick (½ cup) unsalted butter

  • 1 cup white sugar

  • ¼ cup white wine


👩‍🍳 Step-by-Step Instructions

Step 1: Preheat the Oven

  1. Preheat the oven to 350°F (175°C).

  2. Grease a bundt pan or cake mold generously with butter or cooking spray.


Step 2: Prepare the Cake Batter

  1. In a large mixing bowl, combine the cake mix, brown sugar, white sugar, vanilla pudding mix, and cinnamon. Mix well.

  2. Add eggs, water, oil, and white wine.

  3. Mix by hand or with an electric mixer until smooth and fully combined.


Step 3: Bake the Cake

  1. Pour the batter evenly into the prepared bundt pan.

  2. Bake in the preheated oven for 1 hour, or until a toothpick inserted into the center comes out clean or with a few moist crumbs.

  3. Remove from the oven and allow the cake to cool in the pan for 5–10 minutes.


Step 4: Prepare the Wine Glaze

  1. While the cake is baking, melt the butter in a small saucepan over medium heat.

  2. Stir in the white sugar and white wine.

  3. Cook, stirring constantly, until the sugar dissolves and the mixture is smooth. Remove from heat.

  4. Optional: Simmer for a few extra minutes for a thicker glaze.


Step 5: Glaze the Cake

  1. Carefully invert the slightly cooled cake onto a serving plate or wire rack.

  2. Pour the warm glaze slowly over the cake, letting it soak and drip down the sides.


Step 6: Serve

  • Allow the cake to cool completely before slicing, or serve slightly warm.

  • Optional: Serve with whipped cream or vanilla ice cream.


💡 Tips & Notes

  • Oil Measurement: Ensure the oil is ¾ cup, not ¾ teaspoon, for proper texture.

  • Wine Choice: Any white wine is fine—dry (Chardonnay) or sweet (Riesling) both work.

  • Storage: Keep leftovers in an airtight container at room temperature for up to 3 days or in the refrigerator for up to 1 week.


🔄 Variations

  • Add ¼ teaspoon espresso powder to intensify chocolate flavor.

  • Substitute the glaze with a simple chocolate ganache for a richer finish.

  • Sprinkle chopped nuts or chocolate chips on top before serving.

Easy Cherry Vanilla Oven Cake

🍒 Easy Cherry Vanilla Oven Cake

Serves: 8
Preparation Time: 10 minutes
Baking Time: 30–35 minutes

This cherry vanilla cake is soft, lightly sweet, and simple to prepare. A tender sponge base combined with juicy cherries makes it suitable for everyday baking, family gatherings, or serving with tea.


📋 Ingredients

  • 1½ cups (190 g) all-purpose flour

  • 1 cup (200 g) granulated sugar

  • 3 large eggs

  • ½ cup (115 g) unsalted butter, melted and cooled

  • ½ cup (120 ml) milk

  • 1½ teaspoons baking powder

  • 1 teaspoon vanilla extract

  • A small pinch of salt

  • 1 cup fresh or canned cherries, pitted and well drained


👩‍🍳 Step-by-Step Instructions

Step 1: Prepare the Oven and Pan

  1. Preheat the oven to 350°F (175°C).

  2. Grease a round cake pan or line it with parchment paper.


Step 2: Mix the Wet Ingredients

  1. In a large bowl, whisk the eggs and sugar together.

  2. Continue whisking until the mixture becomes light in color.

  3. Add the melted butter, milk, and vanilla extract.

  4. Whisk until smooth and well combined.


Step 3: Add the Dry Ingredients

  1. Sift the flour, baking powder, and salt into the bowl.

  2. Gently fold the dry ingredients into the wet mixture using a spatula.

  3. Mix only until smooth; avoid overmixing.


Step 4: Add Cherries and Bake

  1. Pour the batter evenly into the prepared pan.

  2. Scatter the cherries over the top.

  3. Place the pan in the oven and bake for 30–35 minutes.

  4. The cake is ready when a toothpick inserted in the center comes out clean.


Step 5: Cool and Serve

  1. Allow the cake to cool in the pan for 10 minutes.

  2. Transfer to a wire rack or serving plate.

  3. Serve as is or lightly dust with powdered sugar if desired.


🧊 Storage Tips

  • Store in an airtight container at room temperature for up to 2 days

  • Refrigerate for up to 5 days if needed


💡 Helpful Notes

  • Drain canned cherries well to prevent excess moisture

  • Gently press cherries into the batter for even distribution

  • Let the cake cool fully before slicing for clean pieces


🔄 Variations

  • Replace cherries with blueberries, raspberries, or sliced peaches

  • Add lemon or orange zest for extra flavor

  • Serve with plain yogurt or whipped cream if desired

Homemade Blueberry Chia Seed Jam

Homemade Blueberry Chia Seed Jam

Yields: About 1 cup
Preparation Time: 5 minutes
Cooking Time: 10 minutes

This homemade blueberry chia seed jam is simple to prepare and made with just a few basic ingredients. It thickens naturally using chia seeds and works well as a spread, topping, or filling.


📋 Ingredients

  • 2 cups fresh or frozen blueberries

  • 2 tablespoons chia seeds

  • 1 tablespoon fresh lemon juice

  • 1–2 tablespoons honey or maple syrup (optional, to taste)

  • ½ teaspoon vanilla extract (optional)


👩‍🍳 Step-by-Step Instructions

Step 1: Cook the Blueberries

  1. Place the blueberries in a small saucepan.

  2. Set the pan over medium heat.

  3. Cook for 5–10 minutes, stirring occasionally.

  4. The berries will soften and release their juices as they heat.


Step 2: Mash the Fruit

  1. Once the berries are soft and gently bubbling, remove the pan from heat.

  2. Use a fork or potato masher to mash the berries.

  3. Mash lightly for a chunky texture or more thoroughly for a smoother result.


Step 3: Add Remaining Ingredients

  1. Stir in the chia seeds.

  2. Add the lemon juice.

  3. Mix in honey or maple syrup if using.

  4. Add vanilla extract if desired.

  5. Stir well to combine.


Step 4: Allow the Jam to Thicken

  1. Let the mixture sit uncovered for 10–15 minutes.

  2. Stir once or twice during this time.

  3. The chia seeds will absorb liquid and thicken the mixture.


Step 5: Cool and Store

  1. Transfer the jam to a clean glass jar or container.

  2. Allow it to cool completely.

  3. Seal and refrigerate.


🧊 Storage Tips

  • Store in the refrigerator for up to 7 days

  • Freeze in a sealed, freezer-safe container for up to 3 months

  • Thaw in the refrigerator before use


💡 Helpful Notes

  • Adjust sweetness based on the natural flavor of the berries

  • Stir well before serving if the jam thickens unevenly

  • Chop larger fruits if using this method with other berries


🍽️ Serving Ideas

  • Spread on toast or crackers

  • Spoon over yogurt or oatmeal

  • Use as a filling for baked goods

  • Serve with pancakes or waffles

Butter Biscuits & Soft Melting Cookies

Butter Biscuits & Soft Melting Cookies

Yields: Approximately 40–50 biscuits
Preparation Time: 20 minutes
Baking Time: 10–12 minutes

These butter-based biscuits are light, tender, and gently crisp at the edges. The same dough can be shaped in different ways to create both simple butter biscuits and soft, swirl-style cookies. They are perfect for sharing, gifting, or enjoying with tea.


📋 Ingredients

  • 500 g butter, softened at room temperature

  • 1 cup fine or granulated sugar

  • 3 large eggs

  • 3 tablespoons neutral oil

  • 1 teaspoon vanilla flavoring

  • 5 cups all-purpose flour, sifted

  • 4 teaspoons baking powder

  • ¼ teaspoon bicarbonate of soda

Optional Decorations

  • Glacé cherries, finely chopped

  • Fruit jam (such as apricot or strawberry)

  • Melted chocolate for drizzling


👩‍🍳 Step-by-Step Instructions

Step 1: Prepare the Butter Mixture

  1. Place the softened butter and sugar in a large mixing bowl.

  2. Beat together until light in color and creamy in texture.

  3. Add the oil and vanilla flavoring.

  4. Beat in the eggs one at a time, mixing well after each addition.


Step 2: Add Dry Ingredients

  1. In a separate bowl, sift together the flour, baking powder, and bicarbonate of soda.

  2. Gradually add the dry mixture to the butter mixture.

  3. Mix gently until a soft, smooth dough forms.

  4. Stop mixing once combined to keep the biscuits tender.


Step 3: Shape the Biscuits

  1. Preheat the oven to 180°C (350°F).

  2. Lightly grease or line baking trays with parchment paper.

For Swirl-Style Cookies

  • Transfer the dough to a piping bag fitted with a large star nozzle.

  • Pipe small swirls onto the tray.

  • Add a small amount of jam or a piece of cherry in the center if desired.

For Simple Butter Biscuits

  • Roll small portions of dough into balls and flatten gently with a fork,
    or

  • Roll the dough out and cut into shapes using a cutter.


Step 4: Bake

  1. Place trays in the preheated oven.

  2. Bake for 10–12 minutes, until the edges are lightly colored.

  3. The biscuits should remain pale for a soft texture.


Step 5: Cool and Finish

  1. Remove biscuits from the oven.

  2. Allow them to cool completely on a wire rack.

  3. Once cooled, drizzle with melted chocolate if desired.


🧊 Storage Tips

  • Store in an airtight container at room temperature for up to 2 weeks

  • Flavors develop further after resting for a day


💡 Helpful Notes

  • Butter should be soft, not melted, before mixing

  • Avoid overmixing to maintain a light texture

  • Use similar-sized portions for even baking

Homemade Whole Wheat Digestive Biscuits

🍪 Homemade Whole Wheat Digestive Biscuits

Yields: Approximately 15–20 biscuits
Preparation Time: 20 minutes
Chilling Time: 30 minutes
Baking Time: 15–18 minutes

These homemade digestive-style biscuits are crisp, lightly sweet, and made with simple pantry ingredients. They are ideal for enjoying with tea, coffee, or as a light snack.


📋 Ingredients

Dry Ingredients

  • 1½ cups (240 g) whole wheat flour

  • ½ cup (75 g) powdered sugar

  • 1 teaspoon baking powder

  • ¼ teaspoon salt (use only if butter is unsalted)

Fat

  • ½ cup (130 g) cold butter, cut into small cubes

Liquid

  • 5 tablespoons cold milk


👩‍🍳 Step-by-Step Instructions

Step 1: Combine Dry Ingredients

  1. In a large mixing bowl, sift together the whole wheat flour, powdered sugar, and baking powder.

  2. Add salt if using unsalted butter.

  3. Whisk until evenly mixed.


Step 2: Add the Butter

  1. Add the cold butter cubes to the flour mixture.

  2. Using your fingertips or a pastry cutter, rub the butter into the flour.

  3. Continue until the mixture resembles fine crumbs.
    Keeping the butter cold helps create a crisp texture.


Step 3: Form the Dough

  1. Add the cold milk one tablespoon at a time.

  2. Mix gently until the dough just comes together.

  3. Avoid kneading; the dough should be firm, not soft.

  4. If the mixture feels too dry, add 1 teaspoon of milk.


Step 4: Chill the Dough

  1. Shape the dough into a flat disc.

  2. Wrap it and refrigerate for 30 minutes.
    Chilling helps with rolling and improves texture.


Step 5: Roll and Shape

  1. Preheat the oven to 180°C (350°F).

  2. Place the chilled dough between two sheets of parchment paper.

  3. Roll to about 5 mm thickness.

  4. Cut into rounds using a cookie cutter.

  5. If desired, lightly press or mark the surface with a fork or toothpick.


Step 6: Bake

  1. Arrange the biscuits on a parchment-lined baking tray.

  2. Leave a little space between each biscuit.

  3. Bake for 15–18 minutes, or until the edges turn lightly golden.


Step 7: Cool Completely

  1. Remove the tray from the oven.

  2. Transfer biscuits to a wire rack.

  3. Allow them to cool fully; they will become crisp as they rest.


🍽️ Serving Suggestions

  • Enjoy with tea, coffee, or warm milk

  • Serve with fruit spreads or nut butter

  • Use as a base for layered desserts


🧊 Storage Tips

  • Store in an airtight container at room temperature for up to 1 week

  • Keep away from moisture to maintain crispness


💡 Helpful Notes

  • For less sweetness, reduce powdered sugar slightly

  • Butter can be replaced with chilled plant-based fat if needed

  • Thinner biscuits will bake faster and become crisper