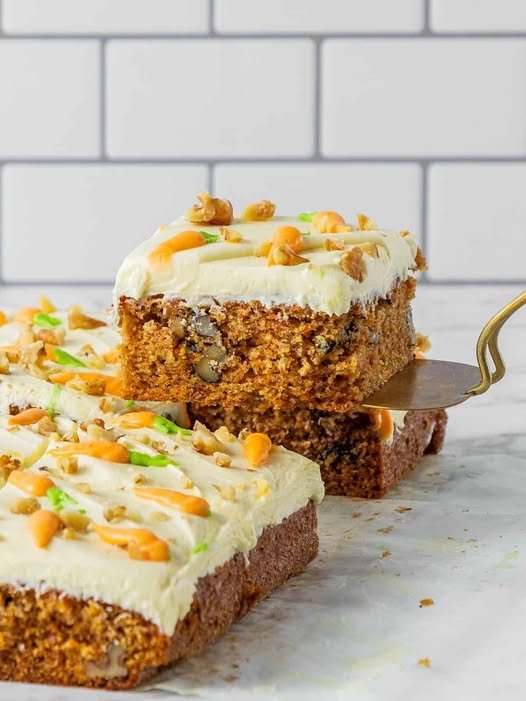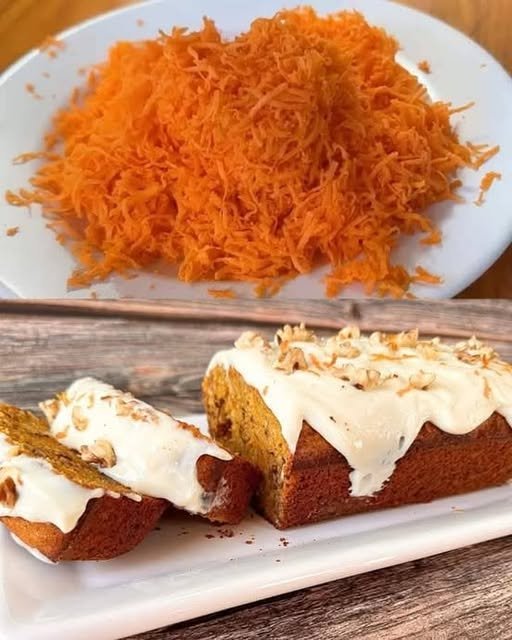
Quick and Delicious Carrot and Walnut Cake
Soft, lightly spiced cake with natural sweetness and a smooth topping
This carrot and walnut cake is moist, fragrant, and easy to prepare. Finely grated carrots keep the crumb soft, while walnuts add a pleasant texture. The gentle citrus aroma from orange zest brightens the flavor, making this cake perfect for tea time, family gatherings, or everyday baking.
Ingredients
For the Cake Batter
-
Large eggs – 3
Provide structure and help the cake rise evenly. -
Granulated sugar – 150 g (¾ cup)
Adds sweetness and keeps the cake tender. -
Vegetable oil – 80 ml (⅓ cup)
Ensures a soft texture that stays moist even after cooling. -
All-purpose flour – 180 g (1½ cups)
Gives the cake its shape while remaining light. -
Carrots – 200 g (about 2 medium), finely grated
Add natural moisture and mild sweetness. -
Walnuts – 100 g (½ cup), chopped
Bring gentle crunch and nutty flavor. -
Orange zest – from 1 orange
Adds freshness and aroma without extra liquid. -
Baking powder – 2 teaspoons
Helps the cake rise smoothly. -
Cake spice mix – ½ teaspoon
A blend of cinnamon, cloves, nutmeg, ginger, cardamom, vanilla, and anise. -
Salt – a small pinch
Balances flavors and enhances sweetness.
For the Creamy Topping (Optional but Recommended)
-
Cream cheese – 115 g (4 oz), softened
Creates a smooth and lightly tangy topping. -
Butter – 30 g (2 tablespoons), softened
Adds richness and structure. -
Powdered sugar – 120 g (1 cup)
Sweetens and smooths the frosting. -
Vanilla extract – ½ teaspoon
Rounds out the flavor.
Equipment Needed
-
Loaf pan
-
Mixing bowls
-
Whisk or hand mixer
-
Spatula
-
Wire cooling rack
Step-by-Step Instructions
1. Prepare the Oven and Pan
-
Preheat the oven to 350°F (175°C).
-
Lightly grease a loaf pan with oil or butter.
-
Line the base with parchment paper for easy release.
2. Whisk Eggs and Sugar
-
In a large bowl, add the eggs and sugar.
-
Whisk or beat for 2–3 minutes until the mixture becomes pale, airy, and slightly thickened.
3. Add Oil and Orange Zest
-
Slowly pour in the vegetable oil while whisking gently.
-
Stir in the orange zest until evenly distributed.
4. Combine Dry Ingredients
-
Sift together the flour, baking powder, salt, and spice mix.
-
Add to the wet mixture and fold gently using a spatula.
-
Mix only until the flour disappears to keep the cake soft.
5. Fold in Carrots and Walnuts
-
Add the grated carrots and chopped walnuts.
-
Fold gently until evenly mixed.
-
The batter will be thick but smooth.
6. Bake the Cake
-
Pour the batter into the prepared pan and level the top.
-
Bake for 40–50 minutes, until the cake is set and lightly golden.
-
A toothpick inserted in the center should come out clean.
7. Cool the Cake
-
Let the cake rest in the pan for 10 minutes.
-
Carefully remove and transfer to a wire rack.
-
Allow to cool completely before adding any topping.
Prepare the Creamy Topping
8. Make the Frosting
-
In a bowl, combine the cream cheese and butter.
-
Whisk until smooth and creamy.
-
Add powdered sugar and vanilla extract.
-
Mix until soft, smooth, and spreadable.
9. Finish and Serve
-
Spread the topping evenly over the cooled cake.
-
Garnish with extra chopped walnuts or orange zest if desired.
-
Slice and serve.
Storage Tips
-
Keep covered at room temperature for 1 day
-
Refrigerate for up to 4 days
-
Bring to room temperature before serving for best texture
-