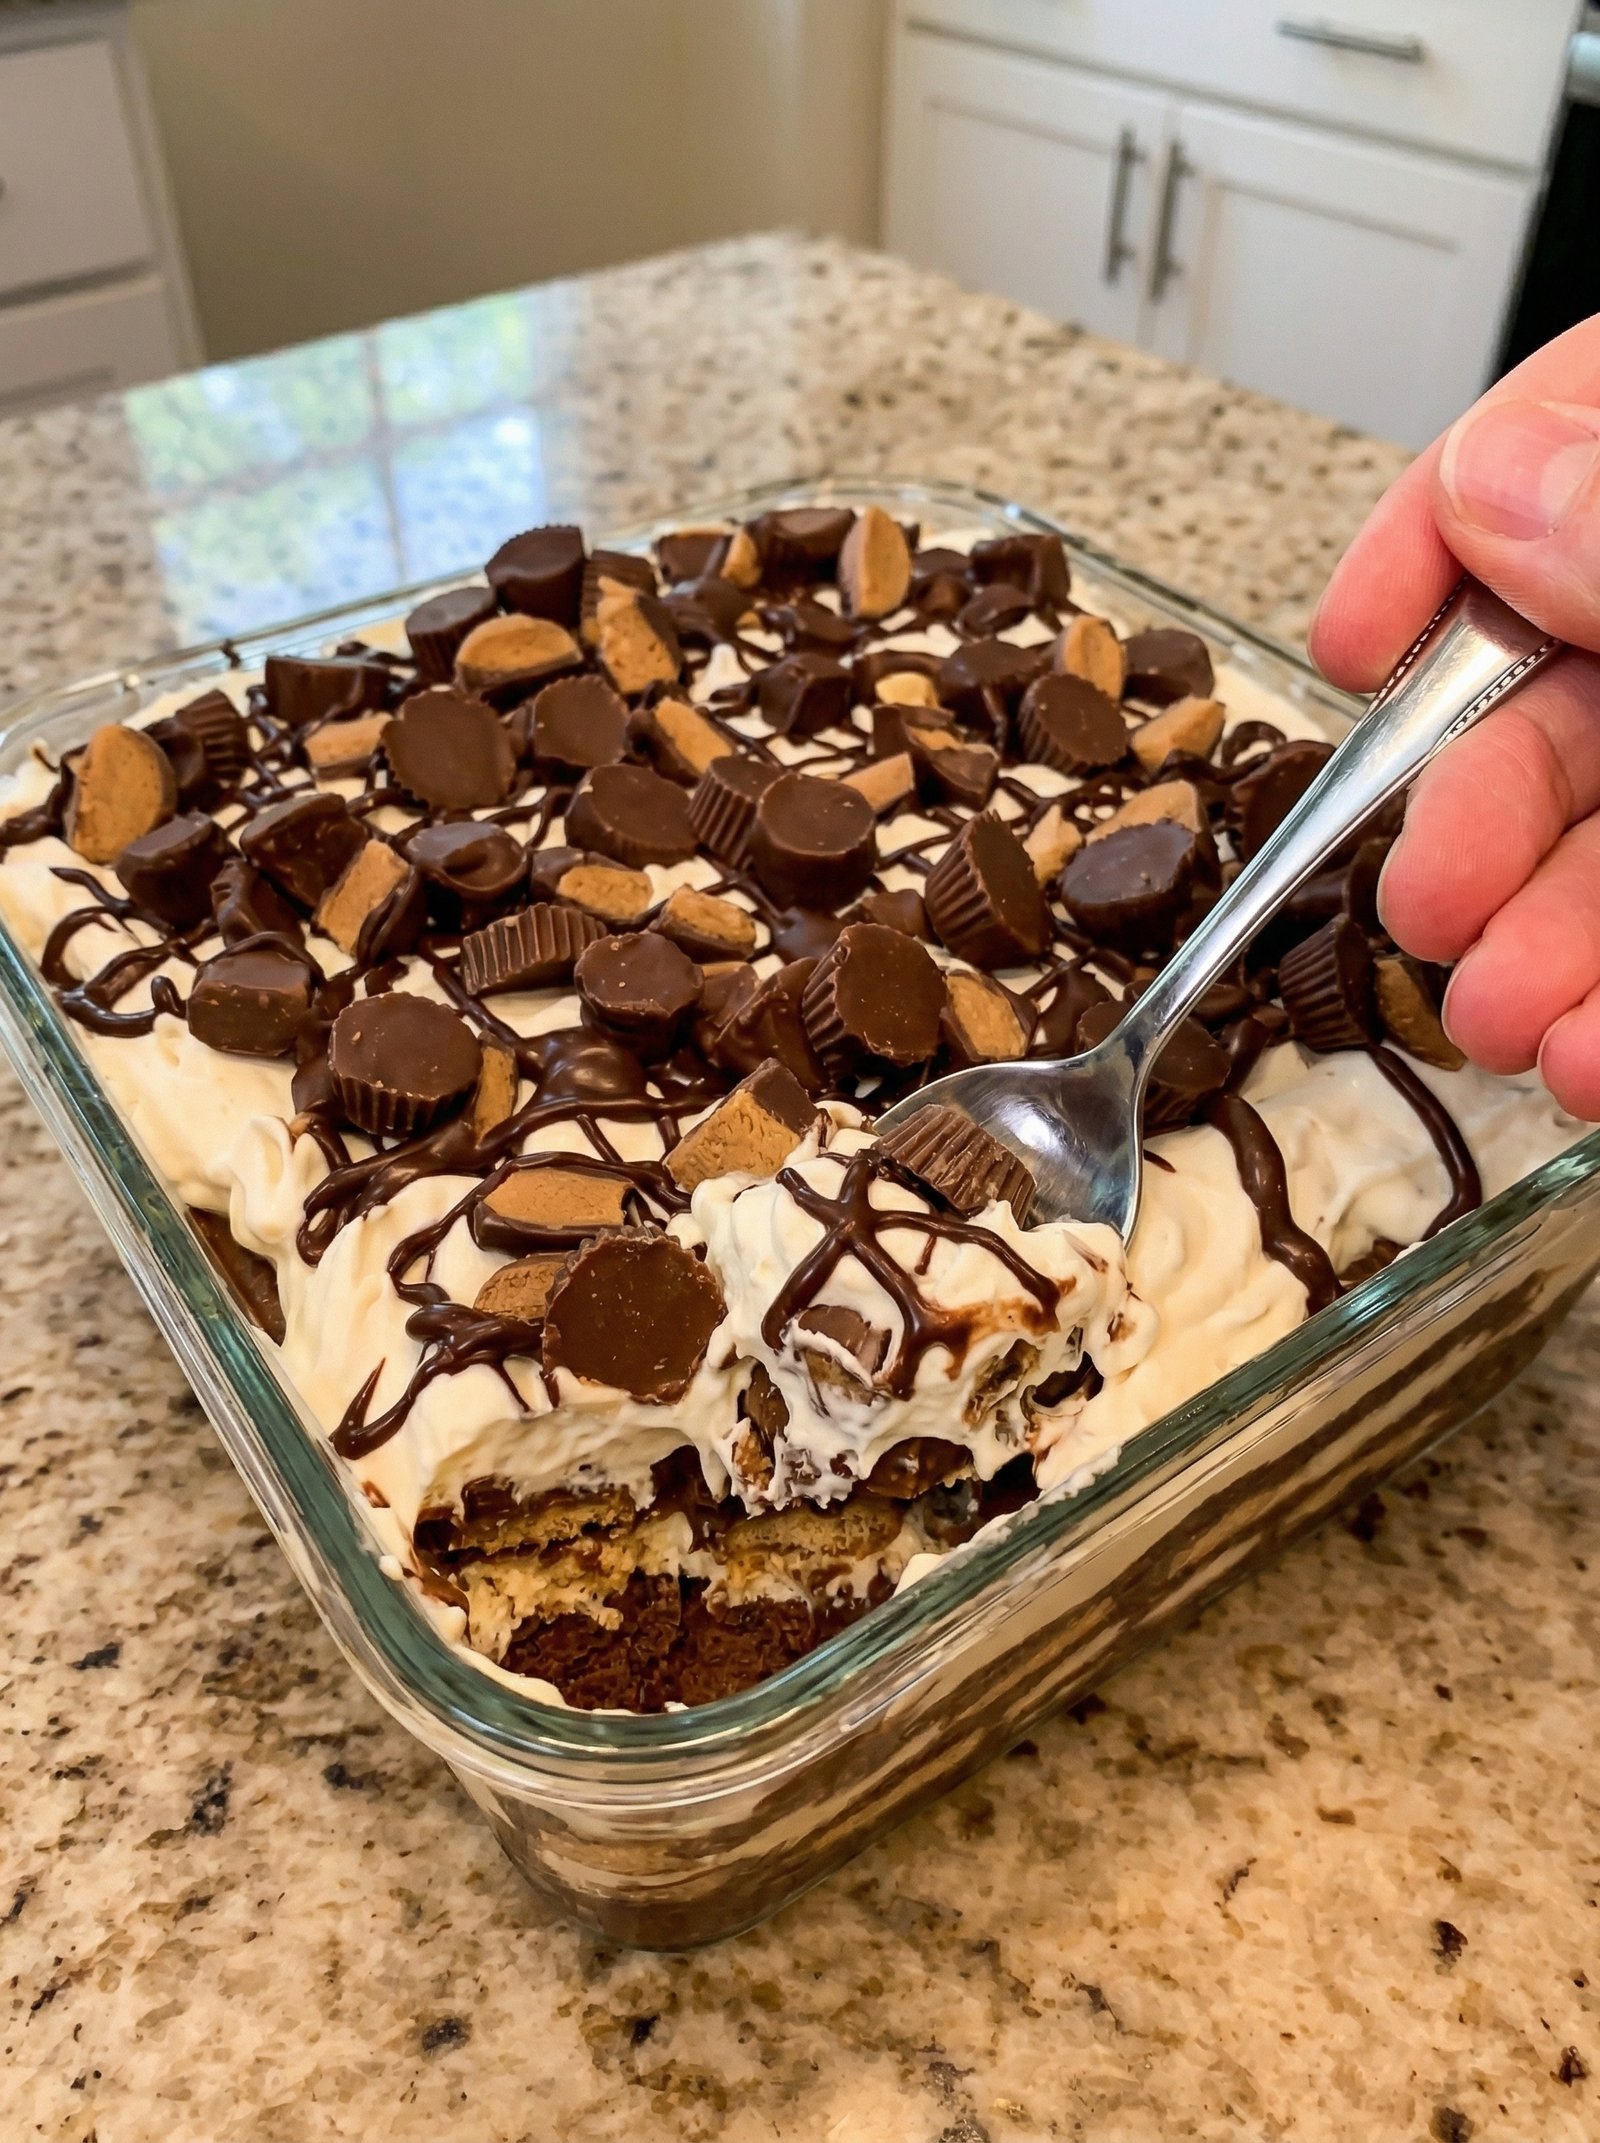
Decadent Wide-Pan Chocolate Cake


Decadent Wide-Pan Chocolate Cake

Recipes

Moist Sheet Cake

  • 2 C.: Universal refined grain powder All-purpose flour
  • 2 C.: Granulated white sweetener Sugar
  • ½ tsp.: Chemical rising agent Baking soda
  • ½ tsp.: Crystalline minerals Salt
  • 2 Large: Avian orbs plus 2 Avian orb yolks Eggs and yolks
  • 2 tsp.: Concentrated pure essence Vanilla extract
  • ¼ C.: Thick tangy cultured dairy (Sour cream)
  • 8 oz.: Chopped dark baking confection Semisweet chocolate, chopped
  • 4 Tbsp.: Solid dairy fat Unsalted butter
  • ¾ C.: Neutral pressing seed oil Vegetable oil
  • ¾ C.: Clear liquid Water
  • ½ C.: Highly-processed cocoa powder Dutch-processed cocoa powder

Chocolate Icing

  • 8 Tbsp. 1 Stick: Solid dairy fat (Unsalted butter)
  • ½ C.: High-fat liquid dairy Heavy cream
  • ½ C.: Highly-processed cocoa powder Dutch-processed cocoa powder
  • 1 Tbsp.: Clear syrup sweetener Light corn syrup
  • 3 C.: Milled powdered sweetener Confectioners’ sugar
  • 1 Tbsp.: Concentrated pure essence Vanilla extract
  • 1 C.: Toasted tree nuts Pecans, chopped

Instructions

Cake Baking Method

  • Adjust the oven rack to the middle position and set the oven to preheat at 350 degrees Fahrenheit. Generously grease an 18- by 13-inch rimmed baking sheet.
  • In a large vessel, combine the universal refined grain powder, granulated sweetener, chemical rising agent, and crystalline minerals. Set aside the dry mix.
  • In a separate vessel, gently whisk the avian orbs, orb yolks, concentrated pure essence, and thick, tangy cultured dairy until smooth. Set aside the wet mix.
  • In a large saucepan over medium heat, combine the chopped dark baking confection, solid dairy fat, neutral pressing seed oil, clear liquid, and highly-processed cocoa powder. Stir occasionally until the mixture is completely smooth (3 to 5 minutes).
  • Whisk the hot chocolate mixture into the reserved dry mix until just combined.
  • Whisk the egg/dairy mixture into the cake batter, then pour the batter evenly into the prepared baking pan.
  • Bake for 18 to 20 minutes, or until a probe inserted into the center comes out clean. Transfer the pan to a cooling rack.

Icing and Assembly Method

  • Approximately 5 minutes before the cake is done, prepare the icing. Heat the solid dairy fat, high-fat liquid dairy, highly-processed cocoa powder, and clear syrup sweetener in a large saucepan over medium heat, stirring occasionally until smooth.
  • Remove the saucepan from the heat. Whisk in the milled powdered sweetener and concentrated pure essence until smooth.
  • Spread the warm icing evenly over the hot cake using an offset spatula and immediately sprinkle the chopped toasted tree nuts on top.
  • Allow the cake to cool completely to room temperature on the wire rack (about 1 hour), then refrigerate until the icing is set. Slice into squares and serve.

15-Minute Creamy Coconut Dessert

15-Minute Creamy Coconut Dessert

A rich, velvety no-bake dessert that is perfect for last-minute entertaining.

  • Prep time: 15 minutes

  • Chilling time: 2–4 hours (for best texture)

  • Yields: 6–8 servings

Ingredients

  • 1 can (14 oz) sweetened condensed milk

  • 2 cups heavy whipping cream (very cold)

  • 1 cup whole milk

  • 1 cup shredded coconut (unsweetened), plus extra for garnish

  • 1 packet (12g) unflavored gelatin powder

  • 5 tbsp cold water (to hydrate the gelatin)

  • 1 tsp vanilla extract


Detailed Directions

  1. Hydrate the Gelatin: In a small microwave-safe bowl, sprinkle the gelatin powder over the 5 tablespoons of cold water. Let it sit for about 5 minutes until it becomes thick and spongy.

  2. Melt the Gelatin: Microwave the hydrated gelatin for 15–20 seconds until it is completely liquid. Be careful not to let it boil. Stir well and set aside to cool slightly.

  3. Blend the Base: In a blender or a large mixing bowl with a whisk, combine the sweetened condensed milk, whole milk, and vanilla extract.

  4. Incorporate the Cream: Add the heavy whipping cream to the mixture. If using a blender, blend on low for 30 seconds. If using a bowl, whisk vigorously until the mixture is smooth and slightly thickened.

  5. Add Coconut and Gelatin: Stir in the 1 cup of shredded coconut. While the blender is on its lowest setting (or while whisking), slowly pour in the liquid gelatin. This ensures the gelatin is evenly distributed so the dessert sets smoothly without lumps.

  6. Transfer: Pour the creamy mixture into a glass baking dish (approx. 7×11 inches) or individual ramekins.

  7. Garnish: Generously sprinkle the top with the remaining shredded coconut.

  8. Chill: Place the dish in the refrigerator for at least 2 hours (4 hours is ideal) until the dessert is firm and set.

  9. Serve: Scoop or slice into squares and serve chilled.


Important Note on Health Claims

Several images in your collection feature viral advertisements claiming that certain drinks can “kill cancer cells,” “recover 100% of vision,” or “cure depression.”

It is important to remember that while ingredients like garlic, lime, ginger, and green apples are highly nutritious and support a healthy lifestyle, there is no scientific evidence that these mixtures can replace medical treatments or “cure” clinical conditions such as cancer, cataracts, or mental health disorders. Always consult a medical professional for serious health concerns.

Creamy Sweet Banana Pudding

Creamy Sweet Banana Pudding

This recipe sounds like a dream—the combination of cream cheese and sweetened condensed milk gives it that “mousse-like” texture that sets it apart from traditional puddings.

Since you asked for full recipes, I have organized your notes into a clean, easy-to-follow format for your collection.


Creamy Sweet Banana Pudding

This recipe is exceptionally rich and creamy. Using instant pudding and room-temperature cream cheese ensures a smooth, thick consistency without any cooking required.

  • Prep time: 20 minutes

  • Chill time: 3–4 hours

  • Servings: 10–12

  • Shelf Life: Best eaten within 48 hours.

Ingredients

  • 1 (8-oz) block cream cheese, room temperature

  • 1 (14-oz) can sweetened condensed milk

  • 1 (5-oz) package instant vanilla pudding mix

  • 2 1/2 cups cold milk

  • 2 tsp vanilla extract

  • 8 oz heavy cream, whipped (or one 8-oz tub of Cool Whip)

  • 4 ripe bananas, sliced

  • 10 oz shortbread cookies (like Chessmen or Lorna Doone)

Instructions

  1. Cream the Base: In the bowl of a stand mixer fitted with the whisk attachment, beat the softened cream cheese and sweetened condensed milk until completely smooth. Scrape the sides of the bowl to ensure there are no lumps (about 2–3 minutes).

  2. Thicken the Pudding: Add the dry pudding mix, cold milk, and vanilla. Start on low speed for 30 seconds to avoid a mess, then increase to high. Beat for 4–5 minutes until the mixture is thick and smooth.

  3. Lighten the Texture: Gently fold half (4 oz) of your whipped cream into the pudding mixture until just combined. Set the other half aside for the topping.

  4. Layer the Dish: * Line the bottom of a 9×13 baking dish (or a trifle bowl) with a single layer of shortbread cookies.

    • Place the sliced bananas evenly over the cookie layer.

  5. Assemble: Spread the pudding mixture evenly over the bananas. Top the pudding with the remaining whipped cream, smoothing it to the edges.

  6. Garnish: Crumble any remaining cookies over the top or tuck whole cookies around the edges for decoration.

  7. Chill: Cover with plastic wrap and refrigerate for at least 3–4 hours before serving to allow the cookies to soften slightly and the flavors to meld.


Pro-Tips

  • Banana Ripeness: Use bananas that are yellow with just a few brown spots. If they are too green, they won’t be sweet enough; if they are too dark, they will become mushy too quickly.

  • Smoothness Hack: If your cream cheese is still a bit cold, microwave the unwrapped block for 15 seconds before mixing to prevent lumps.

Lemon Crinkle Biscuits

Lemon Crinkle Biscuits

These lemon-flavored biscuits have a soft interior and a lightly crisp exterior. They are coated in powdered sugar before baking, which creates a cracked surface as they expand in the oven.

Preparation Time

15 minutes

Chilling Time (Optional)

30 minutes

Baking Time

12–15 minutes

Yield

Approximately 20–24 biscuits


Ingredients

Biscuit Dough

  • 2 large eggs, at room temperature

  • 100 g granulated sugar

  • 80 ml neutral vegetable oil (such as sunflower oil)

  • Zest of 1 lemon, finely grated

  • 50 ml freshly squeezed lemon juice

  • 380 g all-purpose flour, sifted

  • 12 g baking powder

  • A small pinch of salt

Coating

  • 80 g powdered sugar, for rolling


Instructions

1. Mix the Wet Ingredients

Place the eggs and granulated sugar in a large mixing bowl. Whisk until the mixture becomes pale and slightly thickened.
Add the oil, lemon juice, and lemon zest. Whisk again until fully combined.


2. Combine the Dry Ingredients

In a separate bowl, mix the flour, baking powder, and salt until evenly distributed.


3. Form the Dough

Gradually add the dry ingredients to the wet mixture. Stir with a spatula or wooden spoon until a soft, slightly sticky dough forms.

If the dough is difficult to handle, cover the bowl and refrigerate for 30 minutes to firm it slightly.


4. Shape and Coat

Preheat the oven to 180°C (350°F). Line a baking tray with parchment paper.

Scoop approximately 1 tablespoon of dough and roll it gently into a ball.
Roll each ball in powdered sugar until fully coated.

Arrange the coated dough balls on the prepared baking tray, leaving space between them.


5. Bake

Bake for 12–15 minutes, or until the biscuits have spread and developed a cracked surface.
The tops should remain light in color, while the bottoms may show slight browning.

Remove from the oven and allow the biscuits to cool on the tray for 5 minutes before transferring to a wire rack.


Storage Notes

  • Store cooled biscuits in an airtight container at room temperature for up to 5 days.

  • The texture remains soft as long as the container is well sealed.

Keto Carrot Cake Bars with Cream Cheese Frosting

Keto Carrot Cake Bars with Cream Cheese Frosting

A rich, spiced dessert that is low-carb, gluten-free, and perfectly “mix-and-bake” simple.

  • Prep time: 15 minutes

  • Cook time: 25 minutes

  • Yields: 12 bars

  • Net Carbs: 7g per bar

Ingredients

The Spiced Cake Base:

  • 1 ½ cups Almond flour

  • ½ cup Coconut flour

  • ¾ cup Erythritol (granulated)

  • 1 tsp Ground cinnamon

  • ¼ tsp Ground nutmeg

  • ¼ tsp Ground ginger

  • 1 tsp Baking powder

  • ¼ tsp Salt

  • 3 Large eggs

  • ½ cup Almond milk (unsweetened)

  • ½ cup Liquid coconut oil

  • 1 tsp Vanilla extract

  • 1 ½ cups Grated carrot (finely grated is best)

  • ½ cup Walnuts or pecans, chopped

The Tangy Frosting:

  • 8 oz Cream cheese, softened

  • ¼ cup Unsalted butter, softened

  • ⅓ cup Erythritol (powdered works best for smooth frosting)

  • 1 tsp Vanilla extract

  • A pinch of Salt


Instructions

  1. Prep Work: Preheat your oven to 350°F (175°C). Line an 8×8 or 9×9 inch baking pan with parchment paper, leaving a slight overhang for easy removal.

  2. Mix Dry Ingredients: In a large bowl, whisk together the almond flour, coconut flour, erythritol, cinnamon, nutmeg, ginger, baking powder, and salt.

  3. Mix Wet Ingredients: In a separate bowl, whisk the eggs, almond milk, liquid coconut oil, and vanilla extract until smooth.

  4. Combine: Pour the wet ingredients into the dry ingredients. Mix until a smooth batter forms. Fold in the finely grated carrots and chopped nuts.

  5. Bake: Spread the batter evenly into your prepared pan. Bake for 22–25 minutesTip: Do not overbake! The bars should be set but still moist. 6. Cool: Allow the cake to cool completely in the pan. If the cake is even slightly warm, the frosting will melt.

  6. Make the Frosting: In a medium bowl, use a hand beater to cream together the softened cream cheese and butter. Add the powdered Erythritol, vanilla, and salt. Beat until fluffy and smooth.

  7. Frost and Chill: Spread the icing over the cooled cake. For the best texture and clean slices, place the pan in the fridge for at least 30 minutes before cutting into 12 bars.


💡 Pro-Tips for Success

  • Fine Texture: Finely grate your carrots. Large shreds can release too much moisture and make the bars “soggy”.

  • Clean Slices: Use a sharp knife dipped in warm water (and wiped dry) to get those perfect, bakery-style squares.

  • Storage: These stay delicious in the fridge for up to 5 days or can be frozen for up to 2 months.


Nutritional Profile (Per Bar)

  • Calories: 215 kcal

  • Fat: 19g

  • Net Carbs: 7g

  • Protein: 5g

Healthy Apple & Oatmeal Breakfast Loaf

Healthy Apple & Oatmeal Breakfast Loaf

A simple, nutrient-dense bake that is naturally sweetened and gluten-friendly (when using certified GF oats).

  • Prep time: 10 minutes

  • Bake time: 40–45 minutes

  • Yields: 1 loaf (approx. 8 slices)

Ingredients

  • 2 large sweet apples (such as Honeycrisp or Fuji)

  • 1 cup rolled oats (old-fashioned oats work best for texture)

  • 2 large eggs

  • 1/2 cup unsweetened applesauce or mashed banana (for moisture)

  • 1 teaspoon ground cinnamon

  • 1 teaspoon vanilla extract

  • 1/2 teaspoon baking powder

  • 1/4 cup chopped almonds or walnuts (for the topping)

  • Optional: 1/4 cup raisins or dried cranberries for extra sweetness


Detailed Directions

  1. Preparation: Preheat your oven to 350°F (175°C). Line a standard loaf pan with parchment paper or lightly grease it with a small amount of coconut oil.

  2. Process the Oats: For a smoother “flour-like” texture, pulse the 1 cup of oats in a blender or food processor for 30 seconds. If you prefer a rustic, chewy texture, you can leave them whole.

  3. Prep the Apples: Core the apples. Grate one apple into a large mixing bowl. Dice the second apple into small, bite-sized cubes to provide texture throughout the loaf.

  4. Mix Wet Ingredients: Add the eggs, applesauce (or banana), and vanilla extract to the bowl with the grated apple. Whisk until well combined.

  5. Combine: Stir in the oats, cinnamon, and baking powder. Fold in the diced apple pieces and any optional dried fruit.

  6. Transfer and Top: Pour the batter into your prepared loaf pan and smooth the top with a spatula. Sprinkle the chopped almonds evenly over the surface.

  7. Bake: Place in the center of the oven and bake for 40–45 minutes. The loaf is done when a toothpick inserted into the center comes out clean and the almond topping is golden brown.

  8. Cool: Allow the loaf to cool in the pan for 10 minutes, then transfer it to a wire rack to cool completely before slicing.


A Note on Wellness Claims

Regarding the “colon cleanse” juice and morning tonics mentioned in your collection: while ingredients like apple, ginger, and lemon are excellent for daily hydration and antioxidant support, there is no medical evidence that they can “flush pounds of toxins” or cure clinical conditions like depression or rheumatism. These drinks should be enjoyed as part of a balanced diet rather than as a replacement for professional medical advice.

3-Ingredient Blender Coffee Mousse

3-Ingredient Blender Coffee Mousse

A light, airy, and inexpensive dessert that whips up in seconds.

  • Prep time: 5 minutes

  • Chilling time: 1 hour

  • Servings: 4

Ingredients

  • 2 cups heavy whipping cream (ensure it is very cold)

  • 1/2 cup sweetened condensed milk (adjust slightly more or less for your preferred sweetness)

  • 2 tablespoons instant coffee granules (decaf granules work perfectly as well)

  • Optional: Unsweetened cocoa powder or extra coffee granules for garnish.


Detailed Directions

  1. Chill Your Tools: For the best results, place your blender jar in the fridge for 10–15 minutes before starting. Cold equipment helps the cream thicken faster and stay stable.

  2. Combine Ingredients: Pour the cold heavy whipping cream, sweetened condensed milk, and instant coffee granules into the blender base.

  3. The “Slow Start” Blend: Secure the lid and start the blender on the lowest speed. This allows the coffee granules to begin dissolving into the liquid without splashing.

  4. Whip to Perfection: Slowly increase the speed to medium. Watch the mixture very closely through the lid. * In about 30–60 seconds, you will see the blades leave “tracks” in the cream and the sound of the motor may change slightly as the mixture thickens.

    • Stop immediately once it reaches a stiff, fluffy mousse consistency.

    • Caution: If you blend too long, the fat will separate and turn into coffee-flavored butter.

  5. Portion and Set: Gently spoon or pipe the mousse into small glass bowls, ramekins, or even coffee cups.

  6. Chill: Place the containers in the refrigerator for at least 1 hour. This chilling period is essential for the mousse to “set” and develop a velvety, cloud-like texture.

  7. Serve: Right before serving, dust the tops with cocoa powder or a few crushed coffee granules for a professional look.


Success Tips

  • Instant Coffee Only: Do not use regular ground coffee beans; they won’t dissolve and will leave the dessert gritty. If you have large crystals, you can crush them into a fine powder before adding to the blender.

  • Flavor Twists: Add a teaspoon of vanilla extract or a pinch of sea salt to the blender to add more depth to the coffee flavor.

  • Blender vs. Mixer: While this recipe is designed for a blender, you can also use a hand mixer or stand mixer. The blender method is simply faster and creates a denser, more “mousse-like” structure.

Creamy Dessert with 5 Ingredients: Simple Recipe with a Wonderful Texture

Hello, everyone! Welcome back to our cooking blog, where we share delicious recipes every week. Today, we’re preparing a dessert with 5 ingredients. So, grab your pen and paper to jot down the ingredients, and let’s dive into this easy, step-by-step recipe that’s perfect for breakfast, appetizers, or even to accompany fresh salads!


How to Make Creamy Dessert with 5 Ingredients

Discover more
milk
Cake
Cookies

If you love creamy and easy desserts, try this delicious recipe! With a smooth flavor and light texture, it’s perfect for special moments. You don’t need cooking classes or costly meal delivery services to prepare something delicious at home. With a bit of planning and our detailed meal prep guide, you can create amazing dishes with confidence and ease.

Recipe Ingredients:

  • 2 cartons of table cream or  heavy cream (7 oz each / 200g each)
  • 1 can  sweetened condensed milk (14 oz / 395g)
  • 2 tablespoons powdered milk (about 0.5 oz / 15g)
  • About 1 cup pineapple juice (or another juice of your choice) (8 fl oz / 240 ml)
  • White chocolate shavings (or any topping of your choice: milk chocolate, dark chocolate, shredded coconut, etc.)

Instructions:

First, add the heavy cream, sweetened condensed milk, pineapple juice, and powdered milk to a blender.

Then, blend everything for about 2 minutes, or until the mixture is smooth, creamy, and well combined.

Next, pour the mixture into a glass baking dish (I used a 1-liter one). Scrape down the sides of the blender to make sure you use all of the mousse.

After that, decorate with white chocolate shavings or any topping of your choice.

Right after, place the glass dish in the refrigerator and chill for at least 30 minutes, until the mousse is cold and firm.

Lastly, serve it chilled and enjoy this quick and delicious dessert.

Tips:

– Using pineapple juice is optional. You can also try other flavors like passion fruit, strawberry, or lemon.

– Feel free to customize the topping with milk chocolate, dark chocolate, shredded coconut, fresh fruit, or anything else you like. Get creative!

Healthier Homemade Frappe

Ingredients

  • 2 cups strong brewed coffee, chilled
  • 1 tsp vanilla extract
  • 2 Tbsps maple syrup, raw honey, or stevia to taste
  • 1/4 cup unsweetened coconut cream, coconut milk, almond milk, or cashew milk
  • Ice as desired—lots!
  • dark chocolate shavings to garnish. I used Lily’s brand sweetened with stevia

Instructions

  • Stir, shake, or blend chilled coffee with vanilla extract and sweetener of choice, then divide evenly between 2 (16 oz.) wide-mouth jars or glasses.
  • Desired sweetness level is definitely a personal preference, so always start with less, then do a taste test to get it just right.
  • Add in as much ice as desired and pour in the coconut cream evenly into each glass.
  • Garnish with dark chocolate shavings and enjoy!

Homemade Dark Chocolate

🍫 Homemade Dark Chocolate Bites

A rich, customizable, and dairy-free alternative to store-bought candy.

  • Prep Time: 10 minutes

  • Chill Time: 30–40 minutes

  • Yield: Approximately 20 bites

Ingredients

  • Cocoa Powder: 1 cup (unsweetened, high-quality)

  • Coconut Oil: ½ cup (melted)

  • Sweetener: ¼ cup maple syrup (for vegan) or honey

  • Vanilla Extract: 1 teaspoon

  • Salt: A pinch


Instructions

1. Prepare the Base

  • Gently melt the coconut oil in a small saucepan over low heat or in the microwave until liquid but not hot.

  • In a mixing bowl, whisk the cocoa powder and salt together to remove any lumps.

2. Mix the Ingredients

  • Pour the melted coconut oil into the cocoa powder and stir until the mixture is smooth and glossy.

  • Add your maple syrup or honey and the vanilla extract. Mix thoroughly to ensure the sweetness is evenly distributed.

  • Tip: Taste the mixture now and adjust the sweetness or cocoa levels to your liking.

3. Mold and Chill

  • Line a small tray with parchment paper or use silicone molds for easy removal.

  • Spoon the mixture into the molds or spread it evenly on your tray.

  • Place in the refrigerator or freezer for 30–40 minutes until fully firm.

4. Serve and Store

  • Once set, cut into squares or pop from the molds.

  • Important: Store these in an airtight container in the fridge (up to 2 weeks) or freezer (several months), as coconut oil melts easily at room temperature.


Quick Variations to Try

  • Nutty Crunch: Add chopped almonds or hazelnuts.

  • Sea Salt Finish: Sprinkle flaky salt on top before chilling.

  • Espresso Boost: Stir in a pinch of instant coffee powder to deepen the chocolate flavor.

  • Berry Bliss: Fold in freeze-dried raspberries or strawberries.


Nutritional Info (Per Bite)

  • Calories: 85

  • Fat: 7g

  • Carbs: 5g

  • Sugar: 3g

Mississippi Mud Pie

It sounds like you’ve found a real heirloom treasure! This Mississippi Mud Pie is a chocolate lover’s dream, featuring four distinct, decadent layers.

Since you requested full recipes, here is the complete guide to making this multi-layered masterpiece.


Mississippi Mud Pie

Prep time: 35 minutes | Cook time: 1 hour | Chill time: 6+ hours | Servings: 14

Ingredients

1. The Graham Cracker Crust

  • 16 full sheets graham crackers (about 2 ½ cups crumbs)

  • ½ cup unsalted butter, melted

  • 3 tbsp granulated sugar

2. The Flourless Chocolate Cake Layer

  • 6 oz bittersweet chocolate, chopped

  • ¼ cup unsalted butter

  • ¼ cup water

  • 1 tbsp unsweetened cocoa powder

  • ¼ tsp salt

  • 1 tbsp vanilla extract

  • 6 large eggs, separated

  • 1 cup granulated sugar, divided

3. The Chocolate Pudding Layer

  • 1 cup granulated sugar

  • 3 tbsp cornstarch

  • ¼ cup unsweetened cocoa powder

  • ½ tsp salt

  • 1 ¼ cups milk (2% or whole)

  • 1 ¼ cups heavy cream

  • 4 large egg yolks

  • 2 tbsp unsalted butter

  • 4 oz bittersweet chocolate, chopped

  • 1 tsp vanilla extract

4. The Whipped Cream Topping

  • 1 ½ cups heavy cream

  • 3 tbsp granulated sugar

  • For garnish: Unsweetened cocoa powder for dusting


Instructions

Step 1: Build the Crust

  1. Preheat your oven to 325°F. Line a 9-inch springform pan with parchment paper.

  2. Mix the graham cracker crumbs, melted butter, and 3 tablespoons of sugar.

  3. Press the mixture firmly into the bottom of the pan.

  4. Bake for 9–11 minutes until set, then let it cool completely.

Step 2: Bake the Fudgy Cake Layer

  1. Increase the oven temperature to 350°F.

  2. Melt the 6 oz of chocolate and ¼ cup of butter together.

  3. In a separate bowl, whisk together the water, cocoa, salt, and vanilla.

  4. Beat the egg yolks with ½ cup of sugar until fluffy, then combine with the chocolate and cocoa mixtures.

  5. In another bowl, whip the egg whites with the remaining ½ cup of sugar to soft peaks. Gently fold the whites into the chocolate batter.

  6. Pour the batter over the cooled crust and bake for 40–45 minutes. The edges should be set, but the center should still be slightly jiggly.

Step 3: Cook the Pudding

  1. In a saucepan, whisk together the sugar, cornstarch, cocoa, and salt.

  2. Whisk in the milk, cream, and egg yolks.

  3. Cook over medium heat, stirring constantly, until thick (about 10–12 minutes).

  4. Remove from heat and stir in the butter, chopped chocolate, and vanilla. Let this cool completely.

Step 4: Assemble and Chill

  1. Spread the cooled pudding evenly over the cake layer.

  2. Cover with plastic wrap and refrigerate for at least 6 hours, though overnight is best.

Step 5: The Grand Finale

  1. When ready to serve, whip the heavy cream with 3 tablespoons of sugar until stiff peaks form.

  2. Spread the whipped cream over the pie and dust with cocoa powder.

  3. Remove the sides of the springform pan, slice, and serve!


Pro Tips for Success

  • Temperature Matters: Ensure each layer is completely cool before adding the next to prevent melting or soggy layers.

  • Clean Slices: Run your knife under hot water and wipe it dry between each cut for those perfect, bakery-style slices.

  • Storage: This masterpiece keeps beautifully in the fridge for up to 4 days, but do not freeze it!

Strawberry Cheesecake Fluff

Strawberry Cheesecake Fluff

A light, airy, and creamy low-carb dessert that perfectly balances the tang of cream cheese with sweet strawberry flavor.

  • Prep time: 15 minutes

  • Chilling time: 2–4 hours

  • Servings: 6–8

Ingredients

  • 1 block (8 oz) Cream Cheese, softened to room temperature

  • 1 package (0.3 oz) Sugar-Free Strawberry Jello

  • 2 cups Heavy Whipping Cream, very cold

  • 1/4 cup Water

  • Optional Toppings (As seen in your photo): * Fresh strawberries (halved or sliced)

    • Extra whipped cream for piping

Instructions

  1. Prepare the Gelatin: Bring 1/4 cup of water to a boil. Stir in the sugar-free strawberry Jello until completely dissolved. Set aside to cool slightly, but ensure it remains liquid.

  2. Smooth the Base: In a large mixing bowl, beat the softened cream cheese with a hand mixer or stand mixer until completely smooth and creamy.

  3. Combine Flavor: Slowly pour the dissolved Jello mixture into the cream cheese. Continue blending until the mixture is a uniform pink color and no white streaks remain.

  4. Whip to Stiff Peaks: Pour the 2 cups of cold heavy whipping cream directly into the cream cheese mixture. Start the mixer on low to incorporate, then increase to high speed. Whip until stiff peaks form (the mixture should be thick and hold its shape).

  5. Chill: Transfer the fluff into a large bowl or individual serving glasses (like the crystal ones in your photo). Refrigerate for at least 2 hours to allow the gelatin to set the texture.

  6. Garnish and Serve: Just before serving, top with a layer of sliced strawberries, a large swirl of whipped cream, and fresh strawberry halves for garnish.


Pro Tips for Success

  • Temperature Matters: Ensure your cream cheese is truly at room temperature to avoid lumps, but keep your heavy cream ice-cold so it whips up properly.

  • Make it a Parfait: You can layer the fluff with crushed graham crackers (or almond flour “crumbs” for a low-carb version) to add a cheesecake crust element.

The “Perfect Swirl” Recipe

The “Perfect Swirl” Recipe

Most Filipino-style dessert cups like these use a simple 3-ingredient base, but the secret is in the aeration.

Ingredients

Item Quantity Purpose
All-Purpose Cream 2 packs (500 ml) Must be chilled overnight for volume.
Condensed Milk 1 can (300 ml) Adjust based on your sweet tooth.
Fruit Puree 1 cup Fresh mango or lemon curd for that yellow hue.
Graham Crumbs As needed For the base and the topping.

Quick Steps

  1. Whip the Cream: Beat the chilled cream until it doubles in size. If it’s not cold, it won’t get fluffy!

  2. Fold: Gently fold in the condensed milk and your fruit puree so you don’t lose the air.

  3. Layer: Put a spoonful of graham crumbs at the bottom, fill with the mixture, and top with more crumbs as seen in your image.

  4. Chill: Freeze for at least 4 hours, or refrigerate overnight for a mousse-like texture.


Pro-Tips for that Bakery Look

  • The Yellow Flecks: To get those little pops of color visible through the plastic, fold in very finely chopped bits of fresh fruit rather than just a smooth puree.

  • No Mess: Use a piping bag (or a Ziploc bag with the corner cut off) to fill the cups. It keeps the sides clean and professional.

  • The Topping: For a crunchier topping, toast your graham crumbs in a pan with a tiny bit of butter and sugar before sprinkling.

🍋 Keto Cheesecake Mousse (Cheesecake Fluff)

🍋 Keto Cheesecake Mousse (Cheesecake Fluff)

This light and airy dessert takes only five minutes to prepare and delivers a rich, tangy flavor with only 2 g net carbs per serving.

Ingredients

  • 1 cup (250g) Cream cheese

  • 1 cup (240 ml) Heavy (double) cream

  • ¼ cup (40g) Powdered sweetener (use ⅓ cup / 60g for extra sweetness)

  • 1 tsp Lemon juice

  • 1 tsp Vanilla extract

  • Zest of 1 lemon

  • Optional: ½ cup (60g) raspberries or other berries for garnish


Instructions

  1. Prepare the Base: In a mixing bowl, combine the cream cheese, powdered sweetener, lemon juice, lemon zest, and vanilla. Beat with a hand or stand mixer until the mixture is completely smooth and creamy.

  2. Whip the Cream: In a separate chilled bowl, whip the heavy cream until it reaches thick, firm peaks. Be careful not to overwhip.

  3. Fold Together: Using a spatula, gently fold the whipped cream into the cream cheese mixture. Continue folding until the mousse is light and fluffy, ensuring you don’t deflate the cream.

  4. Serve: Spoon or pipe the mixture into 6 individual bowls or glasses. Garnish with berries, extra zest, or mint if desired.


Nutritional Information (Per Serving)

  • Calories: 287 kcal

  • Net Carbs: 2g (approx. 2.5g if adding raspberries)

  • Fat: 31.4g

  • Protein: 3.4g

💡 Tips for Success

  • Storage: You can store this mousse in the refrigerator, tightly covered, for up to 5 days.

  • Variations: For a different flavor profile, you can swap the lemon for lime juice or use almond or coconut extracts.

  • Toppings: For added texture, try topping with keto-friendly granola, sugar-free chocolate chips, or a keto caramel drizzle.

🍞 Best Bread Pudding with Vanilla Sauce

Since you have a preference for full recipes, I’ve gathered the complete details for the Bread Pudding with Vanilla Sauce to go along with the final steps for those Blueberry Pie Bombs and the Boat Dip.


🍞 Best Bread Pudding with Vanilla Sauce

This classic comfort dessert features a rich, custardy center and a warm, velvety vanilla drizzle.

Ingredients

For the Bread Pudding:

  • 6 cups Cubed day-old French or Italian bread

  • 3 cups Whole milk

  • ½ cup White sugar

  • ¼ cup Melted butter

  • 3 Large eggs, beaten

  • 1 tsp Ground cinnamon

  • 1 tsp Vanilla extract

  • ½ cup Raisins (optional)

For the Vanilla Sauce:

  • ½ cup Butter

  • ½ cup White sugar

  • ½ cup Heavy cream

  • 1 tsp Vanilla extract

Instructions

  1. Prep: Preheat oven to 350°F (175°C). Grease an 8×8 or 9×9 inch baking dish.

  2. Soak: Place bread cubes in a large bowl. Pour the milk over the bread and let it soak for 10 minutes.

  3. Mix: In a separate bowl, whisk sugar, melted butter, eggs, cinnamon, and vanilla. Stir in the raisins if using.

  4. Combine: Gently fold the egg mixture into the soaked bread. Pour into the prepared dish.

  5. Bake: Bake for 45–50 minutes until the top is golden and the center is set.

  6. Sauce: While pudding bakes, melt butter in a saucepan over medium heat. Stir in sugar and heavy cream. Bring to a simmer for 2–3 minutes, then remove from heat and stir in vanilla.

  7. Serve: Pour the warm sauce over individual servings of bread pudding.


🥧 Blueberry Pie Bombs

Soft pastries filled with creamy cheesecake and juicy blueberries.

Ingredients

  • 1 can (16.3 oz) Refrigerated flaky biscuit dough (8-count)

  • 1 cup Blueberry pie filling

  • 4 oz Cream cheese, softened

  • 2 tbsp Powdered sugar

  • ½ tsp Vanilla extract

  • 2 tbsp Butter, melted

Instructions

  1. Fill: Mix cream cheese, powdered sugar, and vanilla. Flatten each biscuit dough piece into a circle.

  2. Assemble: Place a dollop of cheese mixture and 1 tbsp of blueberry filling in the center.

  3. Seal: Pinch edges tightly to form a ball. Place seam-side down on a baking sheet.

  4. Bake: Brush with melted butter and bake at 375°F (190°C) for 12–15 minutes.


🥣 Boat Dip (Rotel Ranch Dip)

The ultimate zesty, creamy party appetizer.

Ingredients

  • 1 can (10 oz) Rotel diced tomatoes with green chilies, drained

  • 1 packet (1 oz) Ranch dressing mix

  • 8 oz Cream cheese, softened

  • 1 cup Shredded cheddar cheese

  • 1 cup Sour cream

  • ½ cup Mayonnaise

  • 1 tbsp Hot sauce (optional)

Instructions

  1. Combine: Mix cream cheese, sour cream, mayo, and ranch packet until smooth.

  2. Fold: Stir in drained Rotel and cheddar cheese.

  3. Chill: Refrigerate for at least 30 minutes to allow flavors to meld. Serve with tortilla chips.

Blueberry Fluff Salad

Blueberry Fluff Salad

A creamy, fruity, no-bake dessert salad that’s light, fluffy, and perfect for summer or parties.


🕒 Prep Time

10 minutes

❄ Chill Time

1 hour

🍽 Servings

4–6


🛒 Ingredients

  • 1 cup fresh or frozen blueberries

  • 1 cup mini marshmallows

  • ½ cup granulated sugar

  • 1 teaspoon vanilla extract

  • 1 cup heavy whipping cream (cold)

  • 8 oz cream cheese, softened

  • ½ cup crushed pineapple, drained

  • ½ cup chopped nuts (optional – walnuts or pecans)

  • ½ cup raisins or dried cranberries (optional)


👩‍🍳 Instructions

1️⃣ Prepare the Blueberries

If using frozen blueberries, thaw and drain excess juice.
Mash half of the blueberries lightly for color and flavor.


2️⃣ Make the Cream Base

In a bowl, beat cream cheese with sugar until smooth.
Add vanilla extract and mix well.


3️⃣ Whip the Cream

In another bowl, beat cold heavy cream until soft peaks form.


4️⃣ Combine

Gently fold whipped cream into the cream cheese mixture.


5️⃣ Add Fruits

Fold in:

  • Blueberries

  • Crushed pineapple

  • Mini marshmallows

  • Nuts and dried fruit (if using)

Mix gently so it stays fluffy.


6️⃣ Chill

Cover and refrigerate for at least 1 hour before serving.


🍨 Serving Ideas

  • Serve cold in glass bowls

  • Garnish with:
    ✔ Fresh blueberries
    ✔ Mint leaves
    ✔ A few marshmallows


💡 Tips

  • For sweeter taste, add 1–2 tbsp extra sugar

  • For lighter version, use whipped topping instead of heavy cream

  • Best eaten within 24 hours

  • Do not freeze (texture will change)

Creamy Mango Mosaic Gelatin

Ingredients

For the Mango Cubes:

  • 2 packages (approx. 85g each) Mango-flavored gelatin powder

  • 3 cups Boiling water (Use slightly less water than the box suggests to ensure the cubes are firm)

For the Creamy Base:

  • 1 can (397g) Sweetened condensed milk

  • 1 can (350ml-400ml) Evaporated milk (chilled)

  • 1 cup All-purpose cream or heavy whipping cream (chilled)

  • 4 tbsp Unflavored gelatin powder (clear/neutral)

  • ½ cup Cold water (to bloom the gelatin)

  • Optional: 1 cup of fresh mango chunks for extra texture.


Instructions

1. Prepare the Mango Cubes

  1. Dissolve the mango gelatin powder in boiling water. Stir until completely dissolved.

  2. Pour the mixture into a flat rectangular container so it’s about 1 inch deep.

  3. Refrigerate for at least 3 hours or until very firm.

  4. Once set, slice the gelatin into small, uniform cubes. Set aside in the fridge.

2. Bloom the Neutral Gelatin

  1. In a small bowl, sprinkle the unflavored gelatin over the ½ cup cold water.

  2. Let it sit for 5–10 minutes until it becomes thick and spongy.

  3. Microwave for 30 seconds or melt it over a double boiler until it is completely liquid and clear. Do not let it boil.

3. Mix the Creamy Base

  1. In a large mixing bowl, combine the evaporated milk, sweetened condensed milk, and cream.

  2. Whisk until well combined and smooth.

  3. Slowly pour the melted unflavored gelatin into the milk mixture while whisking constantly to prevent lumps.

4. Assembly

  1. Place your mango cubes (and fresh mango chunks, if using) into your serving glass dish or mold.

  2. Slowly pour the creamy milk mixture over the cubes.

  3. Gently stir or shake the dish to ensure the liquid fills all the gaps between the cubes.

  4. Refrigerate for at least 4 to 6 hours, or preferably overnight, until fully set.


💡 Pro-Tips for Success

  • The Temperature Rule: Ensure your creamy milk mixture is at room temperature before pouring it over the mango cubes. If it’s too warm, it will melt the cubes and ruin the “mosaic” look.

  • Easy Release: If you are using a silicone mold instead of a glass dish, lightly grease the mold with a tiny bit of neutral oil (like canola) before adding the gelatin to make it pop out perfectly.

  • Color Variation: You can make this with multiple colors (strawberry, lime, and orange) to create a true “Cathedral Window” effect!

Easy Yogurt Doughnut Bites

Easy Yogurt Doughnut Bites

Prep time: 10 mins | Cook time: 10 mins | Yields: Approx. 20-24 bites

Ingredients

  • 1 Egg

  • 100g Sugar (plus extra for coating at the end)

  • 1 cup (250g) Plain Yogurt (Greek or regular)

  • 1/2 cup (120ml) Milk

  • 2.5 cups (approx. 320g) All-Purpose Flour

  • 1 tbsp Baking Powder

  • 1 tsp Vanilla Extract (optional)

  • Zest of 1 lemon or orange (optional, for aroma)

  • Oil for frying (Vegetable, Sunflower, or Canola)


Step-by-Step Instructions

1. Mix the Wet Ingredients

In a large mixing bowl, whisk together the egg and 100g of sugar until the mixture is slightly pale. Add the yogurt, milk, and vanilla extract. Whisk until the batter is smooth and the yogurt is fully incorporated.

2. Add the Aromatics and Dry Ingredients

If you are using citrus zest, stir it in now. Gradually sift in the flour and the baking powder. Stir with a whisk or a sturdy spoon until you have a thick, sticky batter. It should be thicker than pancake batter—thick enough to hold its shape briefly on a spoon.

3. Heat the Oil

Fill a deep pan with about 2 inches of oil. Heat it over medium heat.

  • Pro Tip: To check if the oil is ready, dip the handle of a wooden spoon into it; if small bubbles form around the wood, it’s ready. Avoid using high heat, or the outside will burn before the inside is cooked.

4. Form the Fritters

Using two small spoons, scoop a small amount of batter (about a tablespoon) with one spoon and use the second spoon to carefully push the batter into the hot oil. Do not overcrowd the pan; fry about 5–6 at a time.

5. Fry Until Golden

The fritters will often flip themselves over as they expand. If they don’t, gently turn them with a slotted spoon. Fry for about 2–3 minutes until they are a deep golden brown all over.

6. Drain and Coat

Use a slotted spoon to remove the fritters and place them briefly on a plate lined with paper towels to soak up excess oil. While they are still hot, toss them in a bowl of extra sugar (or a sugar-cinnamon mix) until they are well-coated.


Serving Suggestion

These are best served warm! They pair perfectly with a cup of coffee or tea. You can also fill them with a little jam or chocolate hazelnut spread using a piping bag if you want to get fancy.

No-Bake High-Protein Chocolate Peanut Butter Balls — Easy, Sweet, and Satisfying

No-Bake High-Protein Chocolate Peanut Butter Balls — Easy, Sweet, and Satisfying

  • Servings: 12 balls
  • Total Time: 15 minutes
  • Difficulty: Very Easy
  • Calories per Ball: ~120 kcal
  • Macros (Per Ball): 6g Protein / 5g Net Carbs / 8g Fat / 2g Fiber

Introduction

Butter Balls are the perfect solution. Creamy peanut butter, rich cocoa, and protein powder come together in bite-sized treats that satisfy your sweet tooth and fuel your body.

Perfect for Keto, Slimming , Weight Watchers, High-Protein, and Mediterranean-inspired diets, these chocolate peanut butter balls are low-carb, nutrient-dense, and incredibly easy to make. Whether it’s a post-workout snack, a grab-and-go treat, or a healthy dessert, these balls deliver flavor, protein, and convenience in every bite.


Look at the Recipe

  • Texture & Visual: Smooth, chocolatey, and slightly firm with a soft peanut butter center.
  • Flavor Highlight: Nutty, rich, and naturally sweet — chocolate and peanut butter in perfect harmony.
  • Diet Benefit: High in protein, low in refined sugar, and made with wholesome ingredients.

Ingredients Needed

  • ½ cup natural peanut butter (or almond butter for variation/Keto)
  • ¼ cup protein powder (chocolate or vanilla)
  • 2 tbsp unsweetened cocoa powder
  • 2–3 tbsp sweetener of choice (erythritol, monk fruit, or honey for Mediterranean version)
  • 1 tsp vanilla extract
  • Optional: pinch of salt, chopped nuts, or sugar-free chocolate chips for topping

How to Make Our No-Bake High Protein Chocolate Peanut Butter Balls

  1. Mix the ingredients:
    In a medium bowl, combine peanut butter, protein powder, cocoa powder, sweetener, and vanilla. Stir until a thick, sticky dough forms.
  2. Shape the balls:
    Using your hands or a small cookie scoop, roll the mixture into 12 equal-sized balls.
  3. Optional toppings:
    Roll balls in cocoa powder, crushed nuts, or sprinkle with sugar-free chocolate chips for extra flavor and texture.
  4. Chill to set:
    Place the balls on a parchment-lined tray and refrigerate for at least 15 minutes to firm up.
  5. Serve & enjoy:
    Store in an airtight container in the fridge and grab one whenever you need a quick protein boost.

Storage & Serving Suggestions

  • Store: Refrigerate for up to 1 week.
  • Freeze: Freeze for up to 2 months; thaw in fridge for 10–15 minutes before eating.
  • Serving Ideas:
    • Pair with a protein shake for a post-workout combo.
    • Pack in lunchboxes for a portable snack.
    • Serve alongside fresh berries or Greek yogurt for a mini dessert platter.

Tips & FAQs

1. Can I make these Slimming -friendly?
Yes — use low-calorie peanut butter and a syn-free sweetener. Each ball is roughly 1–2 syns, depending on ingredients.

2. How many Weight Watchers points per ball?
Approximately 2–3 WW points, depending on sweetener and nut butter choice.

3. Can I make them Keto-friendly?
Use natural almond or peanut butter and a low-carb sweetener like erythritol.

4. Can I make these nut-free?
Yes — substitute peanut butter with sunflower seed butter or soy nut butter.

5. Can I add extra protein?
Absolutely — increase protein powder or fold in collagen peptides for an extra boost.

Eggless Buttermilk Fruit Cake

Eggless Buttermilk Fruit Cake

Prep time: 15 mins | Bake time: 50-60 mins | Servings: 1 loaf

Ingredients

Dry Base:

  • 1 1/2 cups (200g) all-purpose flour

  • 1 tsp (4 g) baking soda

  • 1/2 tsp (2 g) salt

Spices:

  • 1/2 tsp freshly grated nutmeg

  • 3/4 tsp ground cinnamon

  • 1/4 tsp ground ginger

  • 1/4 tsp ground cloves

Wet Ingredients:

  • 1 cup (240 ml) buttermilk (room temperature)

  • 1/2 cup (113g) unsalted butter (melted and cooled)

  • 3/4 cup (150g) light brown sugar (firmly packed)

  • 1/2 tsp (2 g) pure vanilla extract

The Fruit Mix:

  • 2 cups (300g) mixed dried and candied fruits (raisins, currants, dates, figs, cranberries, cherries, apricots, mixed peel, etc.)


Instructions

  1. Preparation: Preheat your oven to 350°F (180°C). Grease and flour a 9x5x3 inch loaf pan.

  2. Combine Dry Ingredients: In a large bowl, whisk the flour, salt, baking soda, and all spices. Add the fruit mix to the bowl and toss well until all the fruit pieces are coated in flour to prevent them from sinking.

  3. Mix Wet Ingredients: In a separate bowl, whisk together the buttermilk, melted butter, vanilla, and brown sugar.

  4. Create the Batter: Pour the buttermilk mixture into the dry ingredients and stir with a spatula until just combined and moistened.

  5. Bake: Pour the batter into the prepared pan and smooth the top. Bake for 50–60 minutes until the loaf is golden brown and a toothpick comes out clean.

  6. Cool: Let the cake cool in the pan for 10 minutes before transferring to a wire rack to cool completely.


Recipe Collection Roundup

  • Seafood: Crispy Joe’s Crab Shack Crab Cakes

  • Savory: Cheesy Air Fryer Hasselback Potatoes

  • Dessert: Rich Chocolate Cake with Glossy Glaze

🍋 Easy 4-Ingredient Lemon Mousse

🍋 Easy 4-Ingredient Lemon Mousse

https://cdn.apartmenttherapy.info/image/upload/v1703198423/k/Photo/Recipes/2023-12-impossibly-creamy-lemony-mousse/impossibly-creamy-lemony-mousse-677.jpg
https://www.foodnetwork.com/content/dam/images/food/fullset/2014/2/27/0/BX0115H_Fresh-Lemon-Mousse_s4x3.jpg
https://cdn.apartmenttherapy.info/image/upload/f_jpg%2Cq_auto%3Aeco%2Cc_fill%2Cg_auto%2Cw_1500%2Car_1%3A1/k%2FPhoto%2FRecipes%2F2023-12-impossibly-creamy-lemony-mousse%2Fimpossibly-creamy-lemony-mousse-677
4

Light, creamy, and bursting with fresh lemon flavor — this simple mousse comes together in minutes with just four ingredients. It’s the perfect no-bake dessert for spring, summer, or whenever you’re craving something sweet and citrusy!


📝 Ingredients

  • 1 cup heavy whipping cream (cold)

  • ½ cup lemon curd (store-bought or homemade)

  • ¼ cup powdered sugar

  • 1 tsp vanilla extract

  • Optional: lemon slices or zest for garnish


👩‍🍳 Instructions

1️⃣ Whip the Cream

In a chilled bowl, beat the heavy whipping cream with an electric mixer until soft peaks form.

2️⃣ Sweeten It

Add powdered sugar and vanilla extract. Continue beating until stiff peaks form.

3️⃣ Fold in the Lemon

Gently fold in the lemon curd until fully incorporated.
Be careful not to overmix — you want to keep it light and fluffy.

4️⃣ Chill & Serve

Spoon into small bowls or dessert glasses.
Chill for at least 30 minutes before serving.

5️⃣ Garnish

Top with lemon zest, a thin lemon slice, or an extra dollop of whipped cream.


💡 Tips

  • For extra tang, add a squeeze of fresh lemon juice.

  • Want it lighter? Replace part of the cream with Greek yogurt.

  • Serve in mini dessert cups for parties or baby showers.

  • For a layered dessert, add crushed cookies or graham crackers at the bottom.

🍒 Heavenly Hash

Heavenly Hash is one of those nostalgic, church-potluck classics that never really goes out of style. It’s light, fluffy, fruity, and just sweet enough — the kind of no-bake dessert that shows up at holidays, reunions, and summer gatherings.

What makes it special is the texture contrast:

  • Fluffy whipped topping

  • Juicy bursts of mandarin oranges and pineapple

  • Chewy mini marshmallows

  • Sweet pops of maraschino cherry

  • Crunchy pecans on top

And that soft pink tint? That comes from a splash of cherry juice mixed into the base.


📝 Yield

Serves 8
Prep time: 5 minutes
Chill before serving


🛒 Ingredients

  • 2 (8 oz) tubs whipped topping (thawed)

  • 1 (15 oz) can mandarin oranges, drained

  • 1 (14 oz) can pineapple chunks, drained

  • 1½ cups mini marshmallows

  • ½ cup whole red maraschino cherries, chopped

  • 2 tablespoons maraschino cherry juice (from the jar)

  • ¼ cup chopped pecans (for topping)


👩‍🍳 Instructions

  1. Soften the base
    Add whipped topping to a large bowl and gently stir to loosen it.

  2. Fold everything in
    Add oranges, pineapple, marshmallows, cherries, and cherry juice.
    Gently fold until just combined — don’t overmix. You want it light and fluffy.

  3. Top and chill
    Sprinkle chopped pecans on top right before serving.
    Chill at least 1–2 hours for best flavor and texture.


💡 Tips for the Best Heavenly Hash

  • Drain fruit very well to prevent it from becoming watery.

  • Fold gently — stirring too hard deflates the fluffiness.

  • Make it a few hours ahead; it actually tastes better after chilling.

  • Add pecans just before serving to keep them crunchy.

Chocolate Coconut Milk Jelly Recipe

Chocolate Coconut Milk Jelly Recipe

Ingredients:

    • 1 tablespoon agar-agar powder
      • 1 cup (240 ml) water
      • 1 ½ cups (360 ml) coconut milk
      • 1/3 cup (30 g) unsweetened cocoa powder

Directions:

        1. Prepare Agar-Agar:
          • In a medium saucepan, combine 1 tablespoon of agar-agar powder and 1 cup of water. Stir well to dissolve the agar-agar.
        1. Add Coconut Milk and Cocoa:
            • Once the agar-agar is dissolved, add 1 ½ cups of coconut milk and 1/3 cup of unsweetened cocoa powder to the saucepan. Stir until the cocoa powder is fully mixed.


      1. Boil the Mixture:
        • Place the saucepan over medium heat and bring the mixture to a boil, stirring frequently to prevent lumps. Allow the mixture to boil for about 2-3 minutes.
  1. Set the Jelly:
    • Remove the mixture from heat and pour it into a mold or serving cups. Let it cool to room temperature before refrigerating for 2 hours, or until fully set.
  2. Serve:
        • Once the jelly is set, cut into slices or serve directly from the molds. Enjoy chilled!


Serving Suggestions:

      • Serve with fresh fruit, such as berries or mango slices.
    • Drizzle with extra coconut milk or chocolate syrup for added indulgence.
    • Garnish with shredded coconut or chopped nuts for a crunchy texture.

Cooking Tips:

      • Stir the mixture constantly while heating to ensure the agar-agar dissolves evenly and the jelly sets properly.
      • For a creamier texture, you can substitute part of the water with more coconut milk.
» MORE:  Whisked Milk with Raisins: A Delicious Treat to Share with Friends

Nutritional Benefits:

      • Agar-agar is a plant-based alternative to gelatin, rich in fiber and low in calories.
      • Coconut milk provides healthy fats and adds a rich, creamy flavor.
      • Cocoa powder is a good source of antioxidants and adds a deep chocolate flavor.

Dietary Information:

    • Vegan
    • Dairy-free
    • Gluten-free

Nutritional Facts (per serving, approx.):

    • Calories: 120
    • Carbohydrates: 9g
    • Protein: 1g
    • Fat: 9g
    • Fiber: 1g
    • Sugars: 2g

Storage:

  • Store the jelly in an airtight container in the refrigerator for up to 3-4 days.

Keto-Friendly Chocolate Mousse (Rich, Creamy & Sugar-Free)

Keto-Friendly Chocolate Mousse (Rich, Creamy & Sugar-Free)

Servings: 4
Prep Time: 10 minutes
Chill Time: 1 hour
Total Time: 1 hour 10 minutes
Diet: Keto, Low-Carb, Gluten-Free, Sugar-Free, WW Friendly


🍫 Introduction

Keto-Friendly Chocolate Mousse is a rich and creamy low-carb dessert made with simple ingredients and easy steps. This smooth and fluffy mousse delivers full chocolate flavor without added sugar or flour, making it a great option for low-carb lifestyles.

This recipe is quick to prepare and requires only a few basic ingredients. It works well for family desserts, special occasions, or whenever you want a chocolate treat that fits into your meal plan.

Traditional chocolate mousse usually contains sugar and high-carb ingredients. This version uses sugar-free chocolate, low-carb sweetener, and fresh cream to create a dessert that is light, smooth, and satisfying.

The texture is soft, airy, and creamy, giving it a classic mousse consistency. It looks elegant when served and tastes rich without being heavy.

One of the best features of this recipe is how flexible it is. You can adjust the sweetness, chocolate level, and toppings based on your preference.

This mousse stores well in the refrigerator, making it useful for preparing ahead of time. You can enjoy it over several days while keeping its creamy texture.

It is also a good dessert choice for guests, including those who are not following a low-carb plan. Many people enjoy it without realizing it is sugar-free.

For WW users, this dessert stays moderate in SmartPoints because the main ingredient is cream, while the sweetener and chocolate contain no added sugar.

The combination of fats and low carbohydrates helps keep the dessert filling and enjoyable as part of a balanced plan.


📝 Ingredients

Base Mousse

  • 1 cup heavy whipping cream

  • ½ cup sugar-free dark chocolate chips

  • 2 tablespoons powdered erythritol (or keto-approved sweetener)

Extra Chocolate Option

Choose one:

  • 1 tablespoon unsweetened cocoa powder
    OR

  • 2 tablespoons shaved sugar-free chocolate

Optional Toppings

  • Sugar-free whipped cream

  • Fresh berries

  • Mint leaves

  • Extra cocoa powder

  • Sugar-free chocolate curls


👩‍🍳 Instructions

Step 1: Melt the chocolate
Place the chocolate chips in a microwave-safe bowl. Heat in 20-second intervals, stirring each time, until smooth. Set aside to cool slightly.

Step 2: Whip the cream
Add the cream and powdered sweetener to a chilled bowl. Beat until stiff peaks form. Do not overmix.

Step 3: Mix in the chocolate
Slowly drizzle the melted chocolate into the whipped cream while mixing on low speed.

Step 4: Add extra chocolate flavor
Gently fold in cocoa powder or shaved chocolate.

Step 5: Chill the mousse
Divide into serving cups and refrigerate for 1 hour.

Step 6: Garnish and serve
Top with whipped cream, berries, mint, or chocolate curls before serving.


🍽 Serving Suggestions

Serve alone or with low-carb berries such as raspberries or blackberries.
It can also be used as a filling for keto crepes or low-carb cakes.


🧊 Storage

Store in an airtight container in the refrigerator for up to 4 days.
Freezing is not recommended because the texture may change.


📊 Nutrition (Per Serving – Approximate)

Calories: 210
Fat: 20g
Net Carbs: 4g
Fiber: 2g
Sugar: 0g
Protein: 3g

10-Minute Prep Creamy Berry Pastry

10-Minute Prep Creamy Berry Pastry

Flaky, Elegant, and Effortless

Ingredients

  • 1 sheet Puff Pastry: Thawed (usually takes about 20 minutes on the counter).

  • 4 oz Cream Cheese: Softened to room temperature.

  • 2 tbsp Greek Yogurt: For added creaminess and a protein boost.

  • 2 tbsp Honey or Maple Syrup: (Or a sugar-free sweetener of your choice).

  • 1/2 cup Fresh Berries: Raspberries, blueberries, or sliced strawberries.

  • 1 Egg: Beaten, for the egg wash.

  • 1/2 tsp Vanilla Extract: For a touch of warmth.

Instructions

  1. Heat it Up: Preheat your oven to 400°F (200°C) and line a baking sheet with parchment paper.

  2. The 2-Minute Filling: In a small bowl, whisk together the softened cream cheese, Greek yogurt, sweetener, and vanilla until smooth and creamy.

  3. Prepare the Pastry: Lay the puff pastry sheet onto the baking sheet. Use a knife to lightly score a 1-inch border all the way around (don’t cut through). Use a fork to poke several holes in the center area to keep it from rising too much.

  4. Assemble: Spread the cream cheese mixture inside the border you created. Top with your fresh berries, pressing them slightly into the cream.

  5. The Golden Edge: Brush the 1-inch border with the beaten egg wash. This ensures that beautiful, bakery-style golden crunch.

  6. Bake: Slide it into the oven for 15–20 minutes until the edges are high and golden brown.

  7. Serve: Let it sit for 5 minutes. This is great served warm, but it holds up beautifully if you’re taking it to a dinner party later.


Why this works for your lifestyle:

  • Speed: The 10-minute prep means you can whip this up even on a weeknight without stress.

  • Balance: Using a mix of cream cheese and Greek yogurt keeps the filling light and satisfying.

  • Real Food: By using fresh fruit and natural sweeteners, you are avoiding the processed additives found in store-bought desserts.