🥒 Anti-Inflammatory Zucchini Bagels

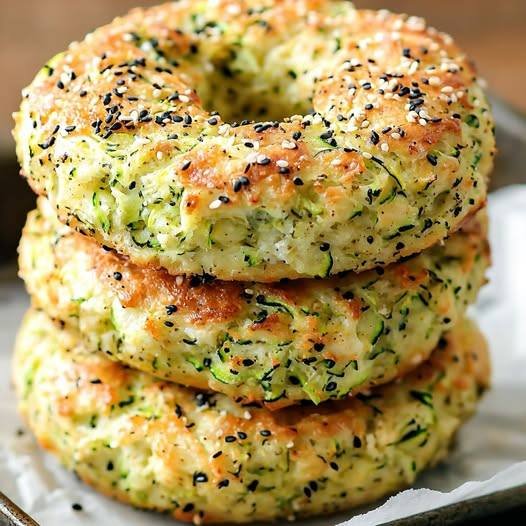
Low-Carb • Gluten-Free • Nourishing

Soft inside, lightly crisp outside, and packed with anti-inflammatory goodness. Perfect for breakfast, sandwiches, or toasted with cream cheese.

✨ Why they’re anti-inflammatory

  • Zucchini → antioxidants + hydration
  • Almond flour → low-carb, vitamin E
  • Eggs → protein + healthy fats
  • Turmeric & garlic → inflammation fighters
  • Optional seeds → omega-3s

🛒 Ingredients (Makes 6 Bagels)

  • 1½ cups grated zucchini, moisture squeezed out VERY well
  • 1½ cups almond flour
  • 1 cup shredded mozzarella (or dairy-free mozzarella)
  • 2 oz cream cheese, softened (or dairy-free alternative)
  • 2 large eggs
  • 1 tsp baking powder
  • ½ tsp salt
  • ½ tsp garlic powder
  • Âź tsp turmeric
  • 1 tbsp olive oil

Optional Toppings

  • Sesame seeds
  • Everything bagel seasoning
  • Pumpkin or chia seeds

👩‍🍳 Instructions

  1. Prep zucchini
    Grate zucchini and squeeze out as much liquid as humanly possible (this is key).
  2. Melt cheese
    Microwave mozzarella + cream cheese for 30–40 seconds until soft and mixable.
  3. Mix dough
    Stir in eggs, olive oil, zucchini, almond flour, baking powder, salt, garlic powder, and turmeric. Mix until a thick dough forms.
  4. Shape bagels
    Divide into 6 portions. Roll into balls, poke a hole in the center, and shape into bagels.
  5. Top & bake
    Place on a parchment-lined tray. Add toppings if using.
    Bake at 375°F (190°C) for 18–22 minutes, until golden.
  6. Cool slightly
    Let rest 5 minutes before slicing—texture improves as they set.

🔥 Serving Ideas

  • Toasted + cream cheese or avocado
  • Breakfast sandwich with egg & spinach
  • Savory snack with hummus or labneh

Mediterranean Low-Carb Tortillas

Mediterranean Low-Carb Tortillas (Flexible, Strong & Grain-Free)

These Mediterranean-style low-carb tortillas are soft, bendable, and shockingly sturdy—without flour, starches, or sugar. Made with just eggs and cheese (plus one secret ingredient), they’re perfect for wraps, gyros, quesadillas, or breakfast roll-ups while staying low-carb and protein-rich.

Unlike eggy flatbreads that crack or tear, these tortillas cool into a flexible, almost wheat-like texture. The key is gentle heat, full blending, and allowing them to rest after cooking. Simple ingredients. Smart technique. Big payoff.

Ingredients (Makes 4 Tortillas)

  • 2 large eggs
  • ½ cup shredded mozzarella (low-moisture works best)
  • 1 tablespoon cream cheese (the secret to flexibility)

Optional (still carnivore, improves strength):

  • ½ tablespoon beef gelatin

Equipment

  • Blender or food processor
  • Non-stick skillet (8–10 inch)
  • Silicone spatula

Instructions

1️⃣ Blend Until Silky

Add eggs, shredded mozzarella, cream cheese, and gelatin (if using) to a blender or food processor.
Blend until completely smooth—no cheese bits, no streaks. This step is crucial for even cooking and flexibility.

2️⃣ Heat the Pan Gently

Place a non-stick skillet over medium-low heat.
Lightly grease with butter or beef tallow.
The pan should be warm, not hot—too much heat causes rubbery tortillas.

3️⃣ Cook Thin & Even

Pour Ÿ of the batter into the center of the pan.
Immediately swirl to form a thin, even circle.

Cook for 60–90 seconds, until:

  • The edges lift easily
  • The surface looks set with no wet spots

4️⃣ Flip Carefully

Flip gently using a silicone spatula.
Cook the second side for 30–40 seconds, then remove to a plate or cooling rack.

👉 Do not overcook — they continue to firm up as they cool.

Cooling = Flexibility

Let tortillas cool for 2–3 minutes before using.
This resting phase is where the magic happens—they become bendable, strong, and tear-resistant.

Texture Troubleshooting

  • Too eggy? Use 1 whole egg + 1 egg white
  • Breaking? Add a little more cream cheese or gelatin
  • Rubbery? Heat was too high

Storage

  • Fridge: 3–4 days (store with parchment between)
  • Freezer: Up to 1 month

Simple, clean, and endlessly versatile—these tortillas prove low-carb doesn’t mean low-satisfaction. 💪🌯

Blueberry Cottage Cheese Pancake Bites

 Blueberry Cottage Cheese Pancake Bites

Ingredients (Makes 10–12 Bites)

1 cup cottage cheese
2 large eggs
½ ripe banana, mashed
½ cup oat flour
(or almond flour for lower-carb option)
1 tbsp honey or maple syrup (optional)
1 tsp vanilla extract
1 tsp baking powder
Pinch of salt
½ cup fresh or frozen blueberries

Instructions

1. Make the Batter
Add cottage cheese, eggs, mashed banana, honey (if using), and vanilla to a blender or food processor.
Blend until smooth.
Pour mixture into a bowl and fold in oat flour, baking powder, and salt.
Gently stir in blueberries.
2. Air Fryer Method (Recommended)
Preheat air fryer to 350°F (175°C).
Lightly grease silicone molds or the air fryer basket.
Spoon batter into molds, filling each about ž full.
Air fry for 8–10 minutes, until set and lightly golden.
Cool slightly before removing.
3. Oven Method
Preheat oven to 375°F (190°C).
Grease a mini muffin tin or line with silicone cups.
Fill each cup about ž full.
Bake for 14–16 minutes, until puffed and a toothpick comes out clean.
Let cool for 5 minutes before serving.

Supreme Pizza Bowls

The Recipe: Supreme Pizza Bowls

  • Prep time: 10 minutes

  • Cook time: 10-12 minutes

  • Servings: 2 bowls

Ingredients

  • The Base: 1 cup fresh baby spinach or sautĂŠed mushrooms (to add volume).

  • The Sauce: 1/2 cup sugar-free marinara or pizza sauce.

  • The Cheese: 1.5 cups shredded mozzarella cheese.

  • The Proteins: 1/4 cup pepperoni slices, 1/4 cup cooked Italian sausage crumbles.

  • The Veggies: 2 tbsp diced green bell peppers, 1 tbsp sliced black olives, 1 tbsp diced red onion.

  • The Finish: 1/2 tsp dried oregano, a pinch of red pepper flakes, and 1 tbsp grated Parmesan.

Instructions

  1. Prep the Oven: Preheat your oven (or air fryer) to 200°C (400°F).

  2. Layer the Foundation: In two oven-safe ramekins or small bowls, place a layer of spinach at the bottom. This wilts down and mimics a “crust” layer.

  3. Add the Sauce & Meat: Spoon half the pizza sauce over the spinach. Add your sausage crumbles and a few pepperoni slices.

  4. The Cheese Blanket: Top each bowl generously with mozzarella cheese.

  5. Add Toppings: Arrange the remaining pepperoni, peppers, onions, and olives on top of the cheese.

  6. Bake: Place bowls on a baking sheet. Bake for 10–12 minutes, or until the cheese is melted and starting to brown/bubble.

  7. Garnish: Sprinkle with oregano, red pepper flakes, and Parmesan. Let sit for 2 minutes before eating (it’s molten hot!).

Tips for Success

  • Drain Your Toppings: If using “wet” ingredients like canned mushrooms or pineapple (if that’s your thing), pat them dry first to avoid a soggy bowl.

  • The “Crispy Edge” Trick: Sprinkle a little Parmesan around the inside rim of the bowl before baking; it creates a salty, crispy crust effect.

  • Air Fryer Version: You can air fry these at 190°C for about 6–8 minutes.

Nutritional Info (Per Serving)

Metric Amount
Calories 380 kcal
Net Carbs 6g
Protein 24g
Fat 28g
Fiber 2g

Benefits of Pizza Bowls

  • Keto-Friendly: Keeps you in ketosis by eliminating the flour-based crust.

  • High Protein: Helps with satiety, making you feel full longer than a bread-heavy meal.

  • Low Prep: No kneading, rising, or rolling dough. It’s the ultimate “lazy” gourmet meal.

Common Questions (Q&A)

Q: Can I meal prep these?

A: Yes! Assemble them in microwave-safe containers (but don’t bake yet). When ready to eat, microwave for 2 minutes or pop them in the oven.

Q: What is the best sauce to use?

A: Look for brands like Rao’s or check labels for “no added sugar.” Many standard pizza sauces are surprisingly high in corn syrup.

Q: Can I make this vegan?

A: Absolutely. Swap the meats for plant-based crumbles and use a cashew-based mozzarella or nutritional yeast.

Zero-Carb Savory Egg & Cream Cheese Spread

Zero-Carb Savory Egg & Cream Cheese Spread 

A creamy, fluffy, protein-packed spread that’s naturally very low in carbs, flour-free, and perfect for keto or low-carb lifestyles. Great as a dip, sandwich filling (lettuce wraps), or side dish.

⚠️ Note: “Zero carb” is a common phrase, but eggs and dairy contain trace carbs. This recipe is very low carb (≈1g net carb per serving), not absolute zero.

Ingredients (6 servings)

  • 6 large eggs, hard-boiled

  • 4 oz (115g) full-fat cream cheese, softened

  • 2 tbsp mayonnaise (sugar-free)

  • 1 tsp Dijon mustard (optional)

  • 2 tbsp finely chopped green onions

  • 1 tbsp fresh chopped parsley or chives

  • Salt & black pepper to taste

  • Optional add-ins: pinch paprika, garlic powder, or shredded cheddar

 Instructions

  1. Boil Eggs
    Place eggs in cold water, bring to boil, then simmer 9–10 minutes. Cool in ice water and peel.

  2. Mash Base
    In a bowl, mash eggs with a fork to desired texture (chunky or smooth).

  3. Mix Creamy Ingredients
    Add softened cream cheese, mayonnaise, mustard, salt, and pepper. Mix until fluffy.

  4. Add Herbs
    Fold in green onions and herbs.

  5. Chill (Optional but Recommended)
    Refrigerate 30–60 minutes for best flavor and texture.

  6. Serve
    Eat alone, in lettuce wraps, stuffed in celery, or as a side with grilled meat.

Description

This spread is:

  • High protein

  • High healthy fats

  • Low carb

  • Gluten-free

  • Flour-free

  • Quick (15 minutes prep)

It’s rich, creamy, slightly tangy, and very satisfying.

 Tips for Best Results

  • Use room temperature cream cheese for smoother texture.

  • For extra fluffiness, use a hand mixer.

  • Add crispy bacon bits for more flavor.

  • For dairy-free: replace cream cheese with mashed avocado (will slightly increase carbs).

  • Store in airtight container up to 3 days in refrigerator.

 Servings

  • Makes: 6 servings

  • Serving size: About ½ cup

 Nutritional Information (Per Serving – Approximate)

  • Calories: 210

  • Protein: 10g

  • Fat: 19g

  • Net Carbs: 1g

  • Fiber: 0g

  • Sugar: <1g

(Values vary depending on brands used.)

 Benefits

✔ Supports low-carb & keto diets
✔ Helps reduce cravings
✔ High satiety (keeps you full longer)
✔ Quick meal prep option
✔ No flour or starch

 Q & A

Q: Is this really zero carb?
A: Not technically. Eggs and dairy contain tiny amounts of carbs, but it’s extremely low carb.

Q: Can I eat this while cutting weight?
A: Yes, if it fits your calorie goals. It’s low carb but still calorie-dense due to fat.

Q: Can I freeze it?
A: Not recommended — texture changes after thawing.

Q: How can I make it spicier?
A: Add hot sauce, jalapeĂąos, cayenne, or pepper flakes.

Q: Can I meal prep this?
A: Yes, keeps well refrigerated for 3 days.

Asparagus-Stuffed Chicken Breast – A Homemade Delight

Asparagus-Stuffed Chicken Breast – A Homemade Delight

When hunger strikes, fast food may seem like the quickest solution. But nothing compares to the satisfaction of preparing a wholesome meal at home—especially when it’s something as flavorful and elegant as Asparagus-Stuffed Chicken Breast. Homemade cooking gives you full control over ingredients, flavors, and portion sizes, while also allowing you to enjoy the creative side of cooking.

Choosing homemade meals over fast food isn’t just about nutrition; it’s a lifestyle upgrade. Home-cooked meals typically contain fewer calories, less sodium, and better quality ingredients. With dishes like Asparagus-Stuffed Chicken Breast, you get lean protein from chicken, fiber and vitamins from asparagus, and rich flavor from herbs and cheese—all in one satisfying meal.

Cooking at home also creates opportunities to connect with loved ones. A cooking night with friends or family can turn an ordinary meal into a shared experience. Plus, this dish works beautifully for meal prep. Make a few portions in advance and enjoy stress-free dinners during busy weekdays.

Preparing meals from scratch encourages mindfulness about what you eat and how it affects your body. The next time you’re choosing between takeout and cooking, remember that a homemade dish like this offers nourishment, comfort, and pride in every bite.


Ingredients for Asparagus-Stuffed Chicken Breast

  • Chicken Breasts: 2 large, boneless, skinless

  • Asparagus: 1 cup, trimmed and chopped

  • Turkey Bacon: 4 slices, cooked and chopped

  • Cream Cheese: 4 ounces, softened

  • Garlic: 2 cloves, minced

  • Parmesan Cheese: Âź cup, grated

  • Spices: Salt, black pepper, and dried herbs (thyme or oregano)

  • Olive Oil: For searing (optional)


Step-by-Step Preparation

1. Preheat the Oven

Preheat your oven to 375°F (190°C). This ensures even cooking and keeps the chicken juicy while the filling becomes tender.


2. Prepare the Chicken

  • Place each chicken breast between two sheets of plastic wrap or parchment paper.

  • Gently pound with a meat mallet or rolling pin until about ½ inch thick.

  • Season lightly with salt and pepper.


3. Make the Filling

  • Trim asparagus into 2–3 inch pieces.

  • In a bowl, mix together:

    • Cream cheese

    • Garlic

    • Parmesan cheese

    • Turkey bacon

    • Salt, pepper, and herbs


4. Stuff the Chicken

  • Lay asparagus on one side of each chicken breast.

  • Spoon cream cheese mixture over the asparagus.

  • Fold or roll the chicken over the filling.

  • Secure with toothpicks or kitchen twine.


5. Sear the Chicken (Optional but Recommended)

  • Heat olive oil in a skillet over medium-high heat.

  • Sear chicken seam-side down for 2–3 minutes per side until golden brown.


6. Bake

  • Transfer chicken to a baking dish or oven-safe skillet.

  • Bake for 25–30 minutes, or until internal temperature reaches 165°F (75°C).


7. Rest and Serve

  • Let the chicken rest for 5–10 minutes before slicing.

  • Slice to reveal the asparagus filling and serve hot.


Serving Ideas

Serve with:

  • Roasted vegetables

  • Mashed potatoes

  • Rice or quinoa

  • Fresh salad

🥩 Slow Cooker Cubed Beef Stew (Rich & Tender)

🥩 Slow Cooker Cubed Beef Stew (Rich & Tender)

Ingredients

  • 2½–3 lbs beef stew meat (chuck, cubed)

  • 1 large onion, diced

  • 3 cloves garlic, minced

  • 3 carrots, sliced

  • 2–3 potatoes, cubed

  • 2 cups beef broth

  • Âź cup soy sauce

  • 2 tbsp Worcestershire sauce

  • 1 tbsp tomato paste

  • 1 tsp dried thyme

  • 1 tsp paprika

  • ½ tsp black pepper

  • ½ tsp salt (adjust at end)

  • 2 tbsp olive oil

  • 1 tbsp cornstarch + 2 tbsp water (optional)


Instructions

1️⃣ Base layer
Add diced onion to the bottom of the slow cooker.
Place cubed beef on top.

(Optional but powerful upgrade: brown the beef in olive oil first for deeper flavor.)

2️⃣ Sauce mix
Whisk together:

  • Beef broth

  • Soy sauce

  • Worcestershire

  • Tomato paste

  • Garlic

  • Thyme

  • Paprika

  • Black pepper

Pour evenly over beef.

3️⃣ Add vegetables
Top with carrots and potatoes.

4️⃣ Cook

  • LOW: 8 hours

  • HIGH: 4–5 hours
    Cook until beef is fork-tender.

5️⃣ Thicken (optional)
Mix cornstarch + water.
Stir into stew during last 30 minutes on HIGH.


🔥 Flavor Boost Options

  • 1 bay leaf while cooking

  • Splash of balsamic vinegar or apple cider vinegar at the end

  • Fresh parsley before serving

  • Pinch of red pepper flakes for gentle heat

  • ½ tsp sugar or honey if broth tastes too salty


🍞 Serve With

  • Crusty bread

  • Mashed potatoes

  • Buttered rice

  • Warm dinner rolls

Chocolate and Milk Powder Pudding (No-Bake, Creamy Dessert)

Hello, everyone! Welcome back to our cooking blog, where we share delicious recipes every week. Today, we’re preparing a creamy dessert. So, grab your pen and paper to jot down the ingredients, and let’s dive into this easy, step-by-step recipe that’s perfect for breakfast, appetizers, or even to accompany fresh salads!

Chocolate-making kit

How to Make Chocolate and Milk Powder Pudding

This easy no-bake chocolate and milk powder pudding is a rich, creamy dessert with a smooth texture and irresistible flavor. You don’t need cooking classes or costly meal delivery services to prepare something delicious at home. With a bit of planning and our detailed meal prep guide, you can create amazing dishes with confidence and ease.

Recipe Ingredients:

Chocolate Pudding Layer

  • 200 ml whole milk (6.8 fl oz)
  • 1 can sweetened condensed milk – 395 g (13.9 oz)
  • 1 carton heavy cream – 200 g (7.0 oz)
  • 1 cup cocoa powder (50% cacao)—approx. 120 g (4.2 oz)
  • 1 packet unflavored gelatin – 12 g (0.42 oz)
  • 5 tablespoons water – 75 ml (2.5 fl oz)

Milk Powder Pudding Layer

  • 200 ml whole milk (6.8 fl oz)
  • 1 can sweetened condensed milk – 395 g (13.9 oz)
  • 1 carton heavy cream – 200 g (7.0 oz)
  • 1 cup milk powder – approx. 100 g (3.5 oz)
  • 1 packet unflavored gelatin – 12 g (0.42 oz)
  • 5 tablespoons water – 75 ml (2.5 fl oz)

Instructions:

Step 1: Prepare the Chocolate Layer

Discover more
sweetened condensed milk
Pudding
cocoa powder

In a small bowl, hydrate the unflavored gelatin with 5 tablespoons (75 ml / 2.5 fl oz) of water and let it sit for 5 minutes. Microwave for 15 seconds until fully dissolved and set aside.

Dessert decorating supplies

In a blender, combine the milk, sweetened condensed milk, heavy cream, cocoa powder, and dissolved gelatin, then blend for 2 minutes until completely smooth and creamy.

Lightly grease a Bundt pan or glass mold with oil, pour the mixture into the mold, and refrigerate for 30 minutes, or until slightly firm.

Step 2: Prepare the Milk Powder Layer

Hydrate the gelatin again with 5 tablespoons (75 ml / 2.5 fl oz) of water and microwave for 15 seconds until dissolved.

Kitchen gadget reviews

In a blender, combine the milk, sweetened condensed milk, heavy cream, milk powder, and dissolved gelatin, then blend for 2 minutes until smooth and creamy.

Carefully pour this mixture over the chocolate layer and refrigerate for at least 3 hours, or until fully set.

Serving

Once fully chilled, gently unmold and serve. The result is a beautiful layered pudding with a rich chocolate base and a creamy milk powder top.

Pro Tips

  • For clean layers, make sure the first layer is slightly firm before adding the second.
  • Use high-quality cocoa powder for deeper chocolate flavor and premium dessert results.
  • Garnish with chocolate syrup, chocolate shavings, or fresh strawberries for a professional presentation.

Olive Oil With Lemon in the Morning

Olive Oil With Lemon in the Morning

A simple traditional wellness drink made with extra virgin olive oil and fresh lemon juice, often taken on an empty stomach to support digestion and overall health.

Recipe Name

Morning Olive Oil & Lemon Elixir

Description

This natural tonic combines healthy fats from extra virgin olive oil with vitamin C and antioxidants from fresh lemon juice. Many people use it first thing in the morning to gently stimulate digestion, support liver function, and promote heart health.

 Ingredients (1 Serving)

  • 1 tablespoon extra virgin olive oil (cold-pressed, high quality)

  • 1 tablespoon fresh lemon juice (about ½ lemon)

  • Optional: Âź cup warm water (to dilute if preferred)

 How to Make It

  1. Squeeze fresh lemon juice into a small glass.

  2. Add the olive oil.

  3. Stir or whisk well until lightly blended.

  4. Drink immediately on an empty stomach.

  5. Wait 15–30 minutes before eating breakfast.

Optional method: Mix both into warm (not hot) water for a milder taste.

Tips for Best Results

  • Use high-quality extra virgin olive oil (first cold press).

  • Always use freshly squeezed lemon juice (not bottled).

  • Start with smaller amounts (1 teaspoon each) if you’re new to it.

  • Consistency matters — try it for 2–3 weeks before judging results.

  • If you have acid reflux or gallbladder issues, consult a healthcare provider first.

 Servings

1 serving

You can increase to 2 tablespoons of each if tolerated, but 1 tablespoon each is standard.

 Nutritional Information (Approximate per serving)

Nutrient Amount
Calories ~120 kcal
Fat 14 g (mostly monounsaturated)
Saturated Fat 2 g
Carbohydrates 1 g
Vitamin C ~10–15% DV
Sugar <1 g

Note: Values vary depending on lemon size.

 Potential Benefits

1️⃣ Supports Digestion

Olive oil may help lubricate the digestive tract, while lemon juice can stimulate digestive enzymes.

2️⃣ Heart Health

Rich in monounsaturated fats, olive oil may help support healthy cholesterol levels.

3️⃣ Antioxidant Boost

Lemon provides vitamin C; olive oil contains polyphenols.

4️⃣ Mild Detox Support

May support natural liver function (your body detoxes naturally through liver and kidneys).

5️⃣ May Help With Constipation

Olive oil can have a mild natural laxative effect.

6️⃣ Skin Glow Support

Healthy fats + antioxidants may support skin hydration.

Frequently Asked Questions

Q1: Can I take it every day?

Yes, many people take it daily. If you experience stomach upset, reduce the amount.

Q2: Is it good for weight loss?

It’s not a magic weight-loss drink. However, healthy fats may improve satiety and reduce overeating.

Q3: Can I use bottled lemon juice?

Fresh is best for maximum vitamin C and enzymes.

Q4: When is the best time to drink it?

First thing in the morning on an empty stomach.

Q5: Who should avoid this?

  • People with gallstones

  • Severe acid reflux sufferers

  • Those on certain blood thinners
    Always consult a professional if unsure.

High-Protein Cloud Cake

High-Protein Cloud Cake

Ingredients

  • Eggs: 4 large, separated (yolks and whites)

  • Greek Yogurt: 1 ½ cups (plain, unsweetened)

  • Optional for flavor: 1 teaspoon vanilla extract or a pinch of stevia (if you prefer a sweeter taste)

  • Optional for topping: A dusting of powdered stevia or fresh berries


Detailed Instructions

  1. Preparation: Preheat your oven to 170°C (340°F). Line the bottom and sides of a 6-inch round cake pan with parchment paper. This is a delicate cake, so the paper helps it release without breaking.

  2. Mix the Base: In a medium bowl, whisk the 4 egg yolks with the 1 ½ cups of Greek yogurt until the mixture is completely smooth. If you are using vanilla or a sweetener, stir it in now.

  3. Whip the Egg Whites: In a separate, very clean glass or metal bowl, beat the 4 egg whites using an electric mixer until they form stiff peaks. You should be able to lift the beaters and have the foam stand straight up without drooping.

  4. Fold Gently: Gently fold about one-third of the whipped egg whites into the yogurt mixture to lighten it. Then, very carefully fold in the remaining egg whites. Do not overmix, or you will lose the “cloud” airiness.

  5. Bake: Pour the batter into your prepared pan. Place the cake pan inside a larger baking dish and fill the larger dish with about an inch of hot water (a water bath). Bake for 35–40 minutes.

  6. Cool and Set: Turn off the oven and leave the door slightly ajar, letting the cake cool inside for 10 minutes (this prevents it from collapsing too quickly). Remove from the oven and let it cool completely before refrigerating for at least 2 hours.

  7. Serve: Dust with a little powdered sweetener or top with fresh fruit before serving cold.


Why This Recipe Works

  • Protein-Packed: By using Greek yogurt and eggs, this dessert provides a high amount of protein with very little fat or carbohydrates.

  • Texture: The whipped egg whites act as the leavening agent, giving the cake its signature “cloud” lift.

Bay Leaf Herbal Tea (Supportive Wellness Drink)

Bay Leaf Herbal Tea (Supportive Wellness Drink)

(Not a cure. May support overall health when combined with medical treatment and healthy lifestyle.)

 Ingredients

  • 2–3 dried bay leaves

  • 2 cups water

  • Optional: slice of lemon or small piece of cinnamon

Instructions

  1. Bring water to a boil.

  2. Add bay leaves.

  3. Reduce heat and simmer for 10–15 minutes.

  4. Remove from heat and let steep another 5 minutes.

  5. Strain and drink warm.

 Description

Bay leaf tea is a mild herbal infusion traditionally used to support digestion and general wellness.

 Notes & Tips

  • Do not consume more than 1–2 cups per day.

  • Avoid during pregnancy.

  • If you have diabetes or take blood pressure medication, monitor levels closely.

  • Never replace prescribed medication with herbal tea.

Servings

Makes 2 cups (1 day supply)

🥗 Nutritional Info (Approximate per cup)

  • Calories: ~2

  • Carbohydrates: <1g

  • Fat: 0g

  • Fiber: trace

  • Contains small amounts of plant antioxidants

 Potential Benefits (Evidence-Based Perspective)

Bay leaves may:

  • Contain antioxidants

  • Support digestion

  • Have mild anti-inflammatory properties

  • Slightly support blood sugar regulation (limited small studies)

But they do NOT cure:

  • Diabetes

  • High blood pressure

  • High cholesterol

  • Poor circulation

These conditions require medical diagnosis and management.

Q & A

Q: Can one leaf cure diabetes?

No. Diabetes is a metabolic disease that requires long-term medical management.

Q: Can bay leaf replace blood pressure medication?

No. Stopping medication without doctor approval can be dangerous.

Q: Is it safe to try?

In small amounts as tea, generally yes for most adults — but always check with your doctor if you have medical conditions or take medication.

Easy Blender Cream Cheese Cake

Easy Blender Cream Cheese Cake

Ingredients

  • Cream cheese: 500g (about 2 blocks), softened

  • Eggs: 3 large

  • Milk: 1 cup

  • Condensed milk: 1 can (approx. 395g)

  • Cornstarch: 2 tablespoons

  • Vanilla extract: 1 teaspoon

  • Butter: For greasing the pan


Detailed Instructions

  1. Preheat and Prepare: * Preheat your oven to 180°C (350°F).

    • Grease a round cake pan or springform pan with butter to prevent sticking.

  2. Blend the Base: * Place the eggs, milk, condensed milk, and vanilla extract into a blender.

    • Add the softened cream cheese and the cornstarch.

    • Blend on medium speed for about 2 minutes, or until the mixture is completely smooth and free of lumps.

  3. Bake: * Pour the smooth batter into your prepared cake pan.

    • Bake for 40–50 minutes. The cake should be set around the edges but still have a slight “jiggle” in the center.

  4. Cool and Set: * Remove from the oven and let it cool to room temperature.

    • For the best texture and flavor, refrigerate for at least 4 hours (or overnight) before serving.


Serving Suggestion

You can top this cake with a simple fruit jam, fresh berries, or a dusting of powdered stevia for an extra touch of sweetness.

Guava Leaf Tea (Traditional Herbal Infusion)

Guava Leaf Tea (Traditional Herbal Infusion)

Ingredients (2 Servings)

  • 8–10 fresh guava leaves (or 1 tbsp dried guava leaves)

  • 2 cups water

  • Honey or lemon (optional, to taste)

Instructions

1️⃣ Prepare the Leaves

  • Wash fresh leaves thoroughly.

  • If large, tear into smaller pieces to release more flavor.

2️⃣ Boil

  • Bring 2 cups of water to a boil.

  • Add guava leaves.

  • Reduce heat and simmer for 10–15 minutes.

3️⃣ Steep

  • Turn off heat and let steep for another 5 minutes.

4️⃣ Strain & Serve

  • Strain into a cup.

  • Add honey or lemon if desired.

  • Serve warm.

 Description Notes

  • Flavor: Mild, grassy, slightly bitter.

  • Color: Light amber to medium brown.

  • Texture: Smooth herbal infusion.

  • Best consumed fresh.

  • Can also be chilled and served as iced tea.

Tips

  • Use young, bright green leaves for milder flavor.

  • Avoid yellowing or damaged leaves.

  • Do not overboil (can become too bitter).

  • Store dried leaves in an airtight container.

  • Drink 1–2 cups per day.

 Servings

  • Makes: 2 cups

  • Serves: 2 people

 Approximate Nutritional Info (Per Cup)

Guava leaf tea is very low in calories.

  • Calories: 2–5

  • Carbohydrates: <1g

  • Fat: 0g

  • Protein: 0g

  • Sugar: 0g (without honey)

Contains small amounts of:

  • Antioxidants (polyphenols)

  • Vitamin C (trace)

  • Plant compounds (quercetin, flavonoids)

 Potential Benefits

Traditionally associated with:

  • ✔️ Digestive support

  • ✔️ May help with occasional diarrhea

  • ✔️ Supports blood sugar balance

  • ✔️ Rich in antioxidants

  • ✔️ May support immune health

  • ✔️ May help reduce inflammation

Note: Not a medical treatment. Consult a healthcare provider if pregnant, nursing, on medication, or managing medical conditions.

 Q & A

Q: Can I use dried leaves?

Yes. Use about 1 tablespoon dried leaves per 2 cups water.

Q: How often can I drink it?

Typically 1–2 cups daily is common in traditional use.

Q: Can I drink it cold?

Yes. Refrigerate after brewing and serve over ice.

Q: Does it taste bitter?

Slightly. Add honey or lemon to balance.

Q: Can I mix it with other herbs?

Yes. Ginger or mint pairs well.

Crispy Cheese Toast Sandwich

Crispy Cheese Toast Sandwich


 Description

These cheesy toast sandwiches are incredibly easy and unbelievably delicious. Crispy and golden on the outside with perfectly melted cheese inside, they’re so good that you’ll want to make them again and again. Perfect for breakfast, snacks, or quick dinners — and made with only 3 ingredients!


 Ingredients (3 Only)

  • 8 slices of bread

  • 1½ cups cheddar cheese or mozzarella (grated)

  • 2–3 tablespoons butter

 Instructions

  1. Spread butter on one side of each bread slice

  2. Place grated cheese between two slices (buttered side facing out)

  3. Close the sandwich

  4. Cook on a pan, grill, or air fryer over medium heat

  5. Toast until both sides are golden brown and the cheese is fully melted


 Cooking Options

  • Pan: 2–3 minutes per side

  • Air Fryer: 180°C (350°F) for 6–8 minutes

  • Oven: 190°C (375°F) for 10 minutes

 Servings

Makes 4 sandwiches

 Nutritional Information (Per Sandwich – Approx.)

Nutrient Amount
Calories 280
Protein 9 g
Carbohydrates 26 g
Fat 16 g
Calcium High
Sugar 3 g

Benefits

✔ Quick and budget-friendly
✔ Loved by kids and adults
✔ Rich in calcium and protein
✔ No special equipment needed
✔ Ultimate comfort food

 Notes & Tips

  • Mozzarella gives the best cheese stretch

  • Use garlic butter for extra flavor

  • Cook on low to medium heat so the cheese melts properly

  • Add a little butter on the outside for extra crispiness

 Q & A

Q: Can I use brown bread?
Yes, it works perfectly and is a bit healthier.

Q: Can I add extra ingredients?
Yes, but the classic version tastes amazing with just 3 ingredients.

Q: Are these good for kids’ lunch boxes?
Yes, best when packed fresh.

Q: How often can I make them?
They’re best enjoyed in moderation — 2–3 times a week.

Clove Steam Inhalation

Clove Steam Inhalation (Traditional Home Remedy)

Clove steam inhalation is a simple, aromatic home remedy traditionally used to help clear nasal congestion, soothe the throat, and support easier breathing. The warm steam hydrates nasal passages while cloves release a strong, spicy vapor rich in natural compounds.

Description

This remedy combines hot water and whole cloves to create a soothing steam. The active compound in cloves, eugenol, is known for its warming aroma and natural antimicrobial properties. When inhaled safely, it may help:

  • Relieve sinus congestion

  • Ease cold and flu discomfort

  • Calm cough irritation

  • Support clearer breathing

  • Provide a relaxing, spa-like experience

 Ingredients (1 Serving)

  • 4 cups (1 liter) water

  • 1–2 tablespoons whole cloves

  • Optional: 1 cinnamon stick or a slice of fresh ginger


👩‍🍳 Instructions

1️⃣ Bring water to a gentle boil.
2️⃣ Add cloves (and optional ingredients).
3️⃣ Simmer 5 minutes, then remove from heat.
4️⃣ Carefully pour into a heat-safe bowl.
5️⃣ Sit comfortably, lean over the bowl.
6️⃣ Drape a towel over your head to trap steam.
7️⃣ Inhale gently for 5–10 minutes (keep eyes closed).

⚠️ Keep face 8–12 inches from the water to avoid burns.

 Tips for Best Results

  • Do not use boiling water directly from heat — let it cool slightly.

  • Keep eyes closed to prevent irritation.

  • Use once daily during congestion.

  • Stay hydrated afterward.

  • Not recommended for young children without medical advice.

 Servings

  • Makes 1 steam session

  • Can be repeated daily as needed

 Nutritional Information

Since this is inhaled (not consumed), it contains no calories, fat, sugar, or carbs.

 Potential Benefits

  • 🌬 Helps loosen mucus

  • 🤧 May ease stuffy nose

  • 🦠 Clove contains natural antimicrobial compounds

  • 😌 Promotes relaxation

  • 🌡 Warm steam supports sinus drainage

Note: This is a supportive home remedy — not a substitute for medical treatment.

Q & A

Q: Can I drink the clove water afterward?
A: It can be strained and sipped like tea, but the flavor will be very strong and spicy.

Q: How often can I use it?
A: Once daily during cold or sinus discomfort.

Q: Can I add essential oils?
A: Only if labeled safe for steam inhalation, and use 1–2 drops max.

Q: Is it safe during pregnancy?
A: Occasional steam inhalation is generally mild, but consult your healthcare provider first.

Q: Does it cure colds?
A: No. It may help relieve symptoms but does not cure infections.

Ginger Lemon Water

Ginger Lemon Water

A refreshing, metabolism-supporting drink that helps reduce bloating, curb cravings, and support overall fat loss when paired with healthy habits. This simple ginger water is hydrating, soothing, and easy to prep for the whole week.

 Description

Ginger water is a natural wellness drink made by infusing fresh ginger (and optional lemon) into water. It’s known for supporting digestion, reducing inflammation, easing bloating, and gently boosting metabolism — which can help with fat loss over time, especially in stubborn areas like the abdomen, arms, back, neck, and thighs when combined with balanced nutrition and movement.


 Ingredients

  • 1–2 inches fresh ginger root, peeled and sliced

  • 1 liter (4 cups) water

  • ½ fresh lemon, sliced or juiced (optional, but recommended)


 Instructions

  1. Prepare ginger
    Peel and thinly slice fresh ginger.

  2. Boil water
    Bring water to a boil, add ginger, and simmer for 10–15 minutes.

  3. Cool & strain
    Remove from heat, let cool slightly, then strain.

  4. Add lemon (optional)
    Stir in lemon juice or add lemon slices.

  5. Store
    Pour into bottles and refrigerate for up to 3 days.

Serve warm or cold.

 Notes & Tips

  • 🌿 Stronger flavor? Simmer longer or add more ginger

  • 🧊 Great cold for summer, warm for digestion

  • 🍯 Add a small drizzle of honey if needed (optional)

  • ❄️ Shake before drinking if infused overnight

 Servings

  • 4 servings (1 cup each)

 Nutritional Info (Per Serving – Approx.)

  • Calories: 5–10

  • Carbs: 1–2g

  • Fat: 0g

  • Protein: 0g

  • Sugar: 0g

  • WW Points: 0

 Benefits

  • Supports digestion and gut health

  • Helps reduce bloating and water retention

  • Anti-inflammatory properties

  • May support metabolism and appetite control

  • Naturally detoxifying and hydrating

  • Caffeine-free and sugar-free

 Q & A

Q: Does ginger water burn belly fat?
Ginger water doesn’t burn fat on its own, but it supports fat loss by improving digestion, reducing bloating, and helping control appetite when paired with a healthy lifestyle.

Q: When should I drink it?
Best times are morning on an empty stomach or between meals.

Q: How much can I drink daily?
1–3 cups per day is ideal.

Q: Can I drink it every day?
Yes, most people can safely enjoy it daily.

Q: Who should avoid it?
If you’re pregnant, on blood thinners, or have gallbladder issues, check with a healthcare professional first.

Sugar-Free Oatmeal and Apple Energy Dessert

Sugar-Free Oatmeal and Apple Energy Dessert

Ingredients

  • Rolled Oats: 1 cup

  • Warm Milk: ⅔ cup (150 ml)

  • Apples: 2, grated or finely diced

  • Butter: 2 tablespoons, melted

  • Eggs: 2 large

  • Vanilla Extract: ½ teaspoon

  • Walnuts or Almonds: ½ cup, chopped (optional for added texture)


Detailed Instructions

  1. Hydrate the Oats: In a large mixing bowl, combine the 1 cup of rolled oats with the ⅔ cup of warm milk. Stir well and allow the mixture to sit for 10 minutes so the oats can soften and absorb the liquid.

  2. Prepare the Fruit and Nuts: While the oats are soaking, peel and either grate or finely dice the 2 apples. If using walnuts or almonds, chop them into small pieces to ensure even distribution.

  3. Create the Batter: Add the 2 eggs, 2 tablespoons of melted butter, and ½ teaspoon of vanilla extract to the soaked oats. Mix thoroughly until the eggs are fully incorporated. Fold in the prepared apples and nuts.

  4. Fill the Molds: Lightly grease a silicone mold or muffin tin. Using a spoon, fill each cavity nearly to the top with the batter, as these bites do not rise significantly.

  5. Bake: Preheat your oven to 180°C (350°F). Bake for 25–30 minutes until the tops are golden brown and the centers are firm.

  6. Cool and Serve: Let the dessert cool in the mold for at least 5 minutes before removing. This helps the structure set, making them easy to grab as a portable energy snack.


Why This Works

  • Natural Sweetness: Grated apples provide moisture and sweetness without the need for refined sugar.

  • Satiety: The combination of fiber from the oats and protein from the eggs helps keep you feeling full and energized.

Lemon Garlic Butter Chicken & Creamy Parmesan Pasta

Lemon Garlic Butter Chicken & Creamy Parmesan Pasta

Ingredients

For the Chicken:

  • Chicken: 2 boneless, skinless chicken breasts

  • Olive oil: 1 tablespoon

  • Unsalted butter: 2 tablespoons

  • Garlic: 3 cloves, minced

  • Lemon juice: 1 tablespoon

  • Seasoning: Salt, black pepper, and paprika to taste

For the Pasta:

  • Pasta: 250g spaghetti or linguine

  • Heavy cream: 1 cup

  • Parmesan cheese: ½ cup, freshly grated

  • Garlic: 2 cloves, minced

  • Lemon zest: 1 teaspoon

  • Fresh parsley: 2 tablespoons, chopped


Detailed Instructions

1. Prepare the Chicken

  • Slice and Season: Cut the chicken breasts into bite-sized pieces. Season generously with salt, pepper, and a dash of paprika.

  • Sear: Heat 1 tablespoon of olive oil and 1 tablespoon of butter in a large skillet over medium-high heat. Add the chicken and cook until golden brown and cooked through (about 6–8 minutes).

  • Finish with Flavor: Reduce the heat to low. Add the remaining 1 tablespoon of butter, minced garlic, and 1 tablespoon of lemon juice to the pan. Toss the chicken to coat it in the garlic butter sauce, then remove the chicken from the pan and set it aside.

2. Cook the Pasta

  • Boil: Cook your pasta in a large pot of salted boiling water according to the package instructions until al dente.

  • Reserve Water: Before draining, save about ½ cup of the starchy pasta water.

3. Create the Creamy Parmesan Sauce

  • SautĂŠ Garlic: In the same skillet used for the chicken (don’t wash it—those brown bits add flavor!), add a little more butter if needed and sautĂŠ the minced garlic for 30 seconds.

  • Simmer Cream: Pour in the heavy cream and bring to a gentle simmer.

  • Melt Cheese: Whisk in the ½ cup of Parmesan cheese until the sauce is smooth. If it’s too thick, add a splash of the reserved pasta water.

  • Add Zest: Stir in the lemon zest for that bright, zesty finish.

4. Combine and Serve

  • Toss: Add the cooked pasta to the skillet and toss thoroughly to coat every strand in the creamy sauce.

  • Plate: Serve the pasta topped with the lemon garlic chicken. Garnish with fresh parsley and extra Parmesan if desired.


Cooking Tip

To keep this meal balanced, try serving it with a side of steamed broccoli or a fresh green salad.

Homemade Bread in a Bag

Homemade Bread in a Bag

Ingredients

  • All-purpose flour: 3 cups (divided)

  • Sugar: 3 teaspoons

  • Rapid-rise yeast: 1 packet

  • Warm water: 1 cup (essential for activating yeast)

  • Olive oil: 3 tablespoons

  • Salt: $1\frac{1}{4}$ teaspoons


Detailed Instructions

  1. Combine Initial Ingredients:

    Open a large (gallon-sized) heavy-duty freezer bag. Pour in 1 cup of flour, the sugar, the packet of yeast, and 1 cup of warm water. Seal the bag tightly, pushing out the excess air.

  2. The “Shake” Phase:

    Squeeze and shake the bag with your hands until the ingredients are well blended. Let the mixture rest for about 10 minutes; you should see bubbles forming as the yeast activates.

  3. Add Remaining Ingredients:

    Open the bag and add the olive oil, salt, and the remaining 2 cups of flour. Reseal the bag and continue to knead and squish it from the outside until a dough ball forms and pulls away from the sides of the bag.

  4. Knead the Dough:

    Lightly flour a clean surface. Remove the dough from the bag and knead it by hand for about 5–8 minutes until it is smooth and elastic.

  5. First Rise:

    Place the dough in a lightly greased bowl, cover it with a damp cloth, and let it rise in a warm spot for about 30–45 minutes, or until it has doubled in size.

  6. Shape and Second Rise:

    Gently punch the dough down to release air. Divide it into smaller portions if using mini loaf pans (as seen in the image) or keep it as one large loaf. Place the dough into greased baking pans. Cover again and let rise for another 20 minutes.

  7. Bake:

    Preheat your oven to 190°C (375°F). Bake for 25–30 minutes or until the crust is a deep golden brown and the bread sounds hollow when tapped on the bottom.

  8. Cool:

    Remove from the pans and let the bread cool on a wire rack before slicing to ensure the center stays fluffy.

Zesty Lemon Apple Cake

Zesty Lemon Apple Cake

Ingredients

  • Apples: 4-5 medium, peeled and thinly sliced

  • Eggs: 2 large

  • Wheat flour: ⅔ cup (80g)

  • Milk: ⅓ cup (100ml)

  • Unsweetened applesauce: 1 ½ tablespoons

  • Lemon: Zest of 1 lemon and juice of ½ lemon

  • Baking powder: 1 teaspoon

  • Stevia: 1 teaspoon (adjust based on your brand’s sweetness level)

  • Salt: A pinch


Detailed Instructions

  1. Prepare the Apples: Peel and thinly slice your apples. Immediately toss them with the juice of ½ lemon in a bowl. This prevents browning and adds a bright base flavor.

  2. Mix the Wet Base: In a separate large bowl, whisk the 2 eggs with a pinch of salt and the 1 teaspoon of stevia until the mixture is slightly frothy. Stir in the 100ml of milk, 1 ½ tablespoons of applesauce, and the lemon zest.

  3. Incorporate Dry Ingredients: Sift the 80g of wheat flour and 1 teaspoon of baking powder into the wet mixture. Whisk gently until the batter is smooth and there are no large lumps.

  4. Combine: Fold the sliced apples into the batter. Ensure every slice is well-coated; this is what creates the “layered” look in the finished cake.

  5. Prepare for Baking: Preheat your oven to 180°C (350°F). Grease a round cake pan or line it with parchment paper. Pour the apple and batter mixture into the pan, smoothing out the top.

  6. Bake: Bake for 30–35 minutes. The cake should be golden on top and firm to the touch. Because of the high fruit content, it will remain moist and custard-like inside.

  7. Final Touch: Let the cake cool completely before slicing. This allows the fruit layers to set. If you like, you can lightly dust the top with a tiny bit of powdered stevia or cinnamon before serving.

Oatmeal and Apple Snack Bites

Oatmeal and Apple Snack Bites

Ingredients

  • Rolled oats: 1 cup

  • Warm milk: ⅔ cup (150 ml)

  • Apples: 2, grated or finely chopped

  • Butter or margarine: 2 tablespoons

  • Eggs: 2

  • Vanilla extract: ½ teaspoon

  • Walnuts or almonds: ½ cup, chopped

  • Vegetable oil: For greasing the pan


Detailed Instructions

  1. Soak the Oats: In a large mixing bowl, combine the 1 cup of rolled oats with the 150 ml of warm milk. Stir and let the mixture sit for about 10 minutes. This softens the oats, ensuring a better texture for the final snack.

  2. Prepare the Apples and Nuts: While the oats soak, peel and then either grate or finely chop your 2 apples. Chop your ½ cup of walnuts or almonds into small, crunchy pieces.

  3. Combine Ingredients: To the soaked oats, add the 2 eggs, 2 tablespoons of butter (melted), and ½ teaspoon of vanilla extract. Stir well. Fold in the prepared apples and the chopped nuts until the mixture is uniform.

  4. Prepare the Pan: Lightly grease a muffin tin or a silicone rectangular mold with a small amount of vegetable oil.

  5. Bake: Preheat your oven to 180°C (350°F). Spoon the mixture into the prepared molds, filling them nearly to the top. Bake for 25 to 30 minutes, or until the bites are firm to the touch and a light golden brown on top.

  6. Cool: Allow the snacks to cool in the pan for 5–10 minutes before removing them. This helps them set so they don’t break apart.


Tips for Success

  • Texture: If you prefer a smoother snack, you can use “quick oats” instead of rolled oats.

  • Flavor Boost: Feel free to add a pinch of cinnamon or nutmeg to the batter to complement the apples.

Oatmeal and Apple Bites

Oatmeal and Apple Bites

These bites are a great way to enjoy a fiber-rich snack using simple, whole ingredients.


Ingredients

  • Oatmeal: 1 cup (90g)

  • Warm milk: 150 ml (about ⅔ cup)

  • Apples: 2 large, peeled and diced

  • Butter: 20g (1 ½ tablespoons), melted

  • Vanillin: 1/2 teaspoon (or vanilla extract)

  • Eggs: 2 large


Instructions

  1. Soak the Oats: In a medium mixing bowl, combine the oatmeal and the warm milk. Let it sit for about 10 minutes until the oats have absorbed the liquid and softened.

  2. Prepare the Apples: While the oats soak, peel and dice your apples into small, uniform pieces.

  3. Mix the Base: Whisk the eggs in a separate bowl, then add them to the oat mixture along with the melted butter and vanillin. Stir until well combined.

  4. Fold in Apples: Gently fold the diced apples into the oat mixture so they are evenly distributed.

  5. Fill the Mold: Spoon the mixture into a silicone baking mold (rectangular or muffin-shaped). Fill each cavity nearly to the top as these will not rise significantly.

  6. Bake: Preheat your oven to 180°C (350°F). Bake for approximately 25–30 minutes, or until the tops are golden brown and the center is set.

  7. Cool and Serve: Allow the bites to cool in the mold for a few minutes before removing them to ensure they hold their shape.

Mediterranean Ground Beef Wrap with Whipped Hot Honey Feta

Mediterranean Ground Beef Wrap with Whipped Hot Honey Feta

Ingredients

For the Ground Beef

  • 1 lb (450g) ground beef
  • 1 small onion, finely diced
  • 2 garlic cloves, minced
  • 1 tsp ground cumin
  • 1 tsp smoked paprika
  • ½ tsp dried oregano
  • Âź tsp crushed red pepper flakes (optional)
  • ½ tsp salt
  • Âź tsp black pepper
  • 1 tbsp olive oil

For the Whipped Hot Honey Feta

  • ½ cup crumbled feta cheese
  • Âź cup Greek yogurt
  • 2 tbsp honey
  • ½ tsp chili flakes (adjust to taste)
  • 1 tsp lemon juice

For the Wraps

  • 4 large flatbreads or tortillas
  • 1 cup shredded romaine lettuce
  • ½ cup cherry tomatoes, halved
  • Âź cup roasted red peppers, sliced
  • 2 tbsp fresh parsley, chopped
  • Optional: cucumber slices or red onion

Directions

1. Cook Ground Beef:

Heat olive oil in a skillet over medium heat.

Sauté onion and garlic 2–3 minutes until fragrant.

Add ground beef, cumin, smoked paprika, oregano, red pepper flakes, salt, and black pepper.

Cook 6–8 minutes until browned and fully cooked. Drain excess fat if needed.

2. Prepare Whipped Hot Honey Feta:

In a small bowl, whisk together feta, Greek yogurt, honey, chili flakes, and lemon juice until smooth and creamy.

3. Assemble Wraps:

Warm flatbreads slightly.

Spread a generous layer of whipped hot honey feta down the center of each flatbread.

Top with cooked ground beef, shredded lettuce, cherry tomatoes, roasted red peppers, and parsley.

Add optional cucumber slices or red onion.

4. Serve:

Roll each flatbread tightly into a wrap. Slice in half if desired and serve immediately.

Nutritional Information (Approximate Per Serving – Serves 4)

Calories: 430 kcal

Protein: 28g

Carbohydrates: 34g

Fat: 22g

Saturated Fat: 8g

Fiber: 5g

Sugar: 10g

Sodium: 780mg

Balsamic Glazed Chicken & Orzo with Whipped Feta & Grilled Zucchini

Balsamic Glazed Chicken & Orzo with Whipped Feta & Grilled Zucchini

Ingredients

For the Chicken & Balsamic Glaze

  • 1 lb (450g) boneless, skinless chicken breasts or thighs
  • 2 tbsp olive oil
  • 2 tbsp balsamic vinegar
  • 1 tbsp honey
  • 1 garlic clove, minced
  • ½ tsp dried thyme
  • ½ tsp salt
  • Âź tsp black pepper

For the Orzo & Vegetables

  • 1 cup dry orzo pasta
  • 1 medium zucchini, sliced lengthwise into strips
  • 1 tbsp olive oil
  • ½ tsp salt
  • Âź tsp black pepper

For the Whipped Feta

  • ½ cup crumbled feta cheese
  • Âź cup Greek yogurt
  • 1 tsp olive oil
  • ½ tsp garlic powder
  • Black pepper to taste

Optional Garnish

  • Fresh parsley or basil
  • Lemon wedges

Directions

1. Marinate & Cook Chicken:

In a small bowl, mix olive oil, balsamic vinegar, honey, garlic, thyme, salt, and pepper.

Coat chicken evenly with glaze and let marinate 15–20 minutes.

Heat a skillet over medium heat and cook chicken 5–7 minutes per side until golden and cooked through. Remove and rest 5 minutes, then slice.

2. Cook Orzo:

Boil orzo according to package instructions until al dente. Drain and set aside.

3. Grill Zucchini:

Toss zucchini slices with olive oil, salt, and pepper.

Grill or sear in a skillet 2–3 minutes per side until tender and slightly charred.

4. Prepare Whipped Feta:

In a small bowl, mash together feta, Greek yogurt, olive oil, garlic powder, and black pepper until smooth and creamy.

5. Assemble Bowls:

Divide orzo among bowls.

Top with sliced balsamic chicken and grilled zucchini.

Spoon whipped feta over the top.

Garnish with fresh parsley or basil and serve with lemon wedges if desired.

Nutritional Information (Approximate Per Serving – Serves 4)

Calories: 440 kcal

Protein: 34g

Carbohydrates: 35g

Fat: 18g

Saturated Fat: 6g

Fiber: 4g

Sugar: 8g

Sodium: 760mg

Creamy Tuscan “Marry Me” Butter Beans

Creamy Tuscan “Marry Me” Butter Beans

Ingredients

For the Beans

  • 2 cups cooked butter beans (canned, drained and rinsed)
  • 1 tbsp olive oil
  • 3 garlic cloves, minced
  • 1 small shallot, finely diced
  • 1 tsp dried oregano
  • ½ tsp crushed red pepper flakes (optional)
  • ½ tsp salt
  • Âź tsp black pepper

For the Creamy Sauce

  • ½ cup heavy cream or coconut cream for lighter version
  • Âź cup grated Parmesan cheese
  • ½ cup sun-dried tomatoes, chopped
  • 1 cup fresh baby spinach
  • 1 tsp lemon zest
  • 1 tbsp fresh parsley, chopped

Optional Garnish

  • Fresh basil leaves
  • Drizzle of olive oil

Directions

1. SautĂŠ Aromatics:

Heat olive oil in a large skillet over medium heat.

Add shallot and garlic; sauté 2–3 minutes until fragrant and softened.

Stir in oregano, red pepper flakes, salt, and black pepper.

2. Add Butter Beans:

Add butter beans to the skillet and stir to coat in the aromatics. Cook 2–3 minutes.

3. Make the Creamy Sauce:

Pour in heavy cream and stir.

Add Parmesan cheese and sun-dried tomatoes. Simmer gently 3–5 minutes until sauce thickens slightly.

Stir in baby spinach and lemon zest until spinach wilts.

4. Serve:

Transfer to bowls and garnish with chopped parsley, fresh basil, and a drizzle of olive oil. Serve warm with crusty bread or over rice/quinoa.

Nutritional Information (Approximate Per Serving – Serves 4)

Calories: 340 kcal

Protein: 15g

Carbohydrates: 28g

Fat: 18g

Saturated Fat: 7g

Fiber: 8g

Sugar: 4g

Sodium: 720mg