Italian Lemon Cake
Easy Traditional Italian Lemon Cake Recipe
If you’re looking for a delightful dessert that brightens up any occasion, then this Easy Traditional Italian Lemon Cake recipe is just what you need. With its zesty lemon flavor and a moist, tender crumb, this cake is a real showstopper. It’s perfect for afternoon tea, birthday celebrations, or simply to satisfy your sweet tooth. The luscious lemon cream filling gives this cake a refreshing twist that will leave you coming back for more. Let’s dive into making this delightful dessert!
Recipe Summary
Prep Time: 20 minutes
Cook Time: 40 minutes
Total Time: 1 hour
Servings: 8
Estimated Calories: 250 per slice
Ingredients
2 eggs
Pinch of salt
100 g sugar
1 tsp vanilla extract
120 ml sunflower oil
120 ml milk
200 g flour
15 g baking powder
1 egg (for lemon cream)
1 tbsp (10 g) cornstarch
2 tbsp (25 g) sugar (for lemon cream)
300 ml milk (for lemon cream)
Zest of 1 lemon
Juice of 1 lemon
Butter for greasing
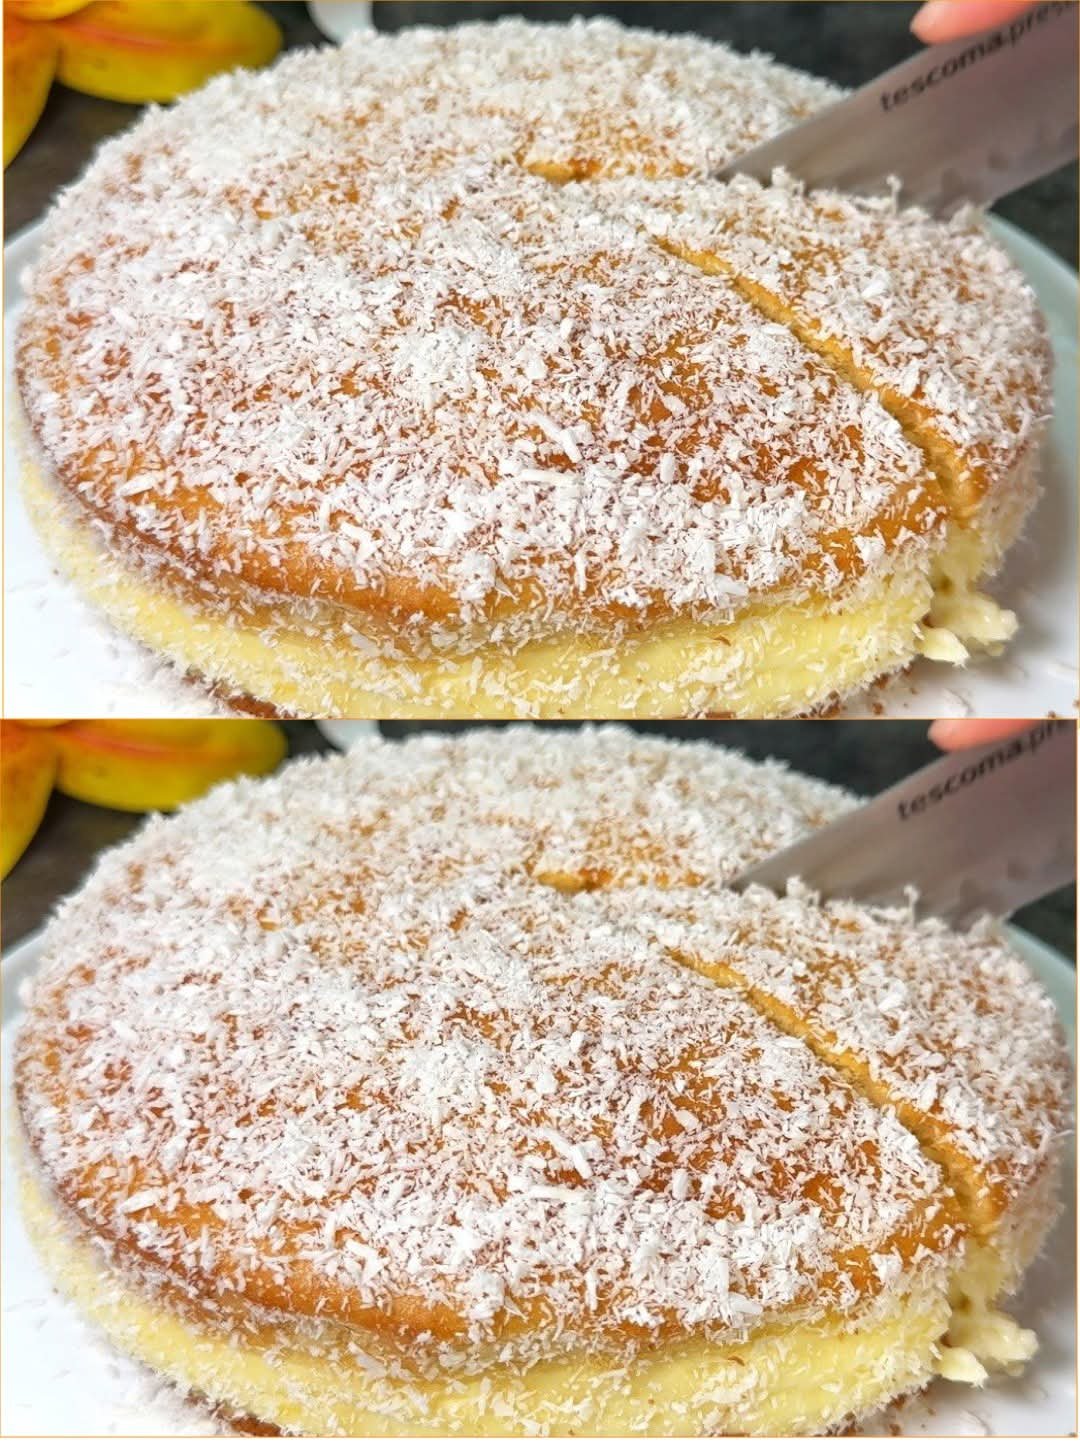
Coconut flakes for coating
Instructions
Preheat your oven to 190°C (375°F) and grease a 20 cm (8 inch) round baking pan with butter.
In a mixing bowl, whisk together 2 eggs, a pinch of salt, and 100 g of sugar until the mixture is light and fluffy.
Add 1 tsp of vanilla extract, 120 ml of sunflower oil, and 120 ml of milk to the egg mixture. Mix until smooth.
Sift in 200 g of flour and 15 g of baking powder. Gently fold until everything is fully combined and lump-free.
Pour half of the batter into the prepared pan and bake for 15 minutes.
While the cake is baking, prepare the lemon cream. In a saucepan, whisk together 1 egg, 1 tbsp of cornstarch, and 2 tbsp of sugar until smooth.
Gradually add 300 ml of milk, along with the zest and juice of 1 lemon, to the mixture. Cook over medium heat, stirring constantly until it thickens and comes to a boil.
Remove the cake from the oven and spread the hot lemon cream evenly over the partially baked layer.
Carefully pour the remaining batter on top and spread gently to cover.
Reduce the oven temperature to 180°C (350°F) and bake for an additional 25 minutes, or until golden and fully set.
Allow the cake to cool completely. Brush the surface lightly with melted butter and generously coat with coconut flakes before slicing.
Why This Recipe is Popular
People love searching for this Easy Traditional Italian Lemon Cake recipe because it brings nostalgia and comfort with its bright citrus flavor. It’s an easy cake to whip up for special occasions or just to enjoy at home. Plus, who can resist a cake that is both delicious and visually appealing?
Serving Suggestions
This Italian Lemon Cake is best enjoyed chilled, making it a great dessert for warm days. It pairs wonderfully with a cup of tea, coffee, or even a scoop of vanilla ice cream for an indulgent treat.
Tips and Variations
Storage: Keep uneaten cake covered in an airtight container in the fridge for up to three days.
Texture: Ensure not to overmix the batter for a lighter cake.
Flavor Boost: Add a tablespoon of limoncello to the lemon cream for an extra kick.
Substitution: You can substitute coconut flakes with crushed almonds for a different flavor and texture.
Gluten-Free Option: Swap out regular flour for a gluten-free flour blend.
FAQ Section
1. Can I make this cake ahead of time?
Yes, you can bake the cake a day in advance and store it in the fridge. Just add the coconut flakes before serving.
2. What if I don’t like coconut?
You can omit the coconut flakes or replace them with crushed nuts or a dusting of powdered sugar.
3. How do I know when the cake is done?
The cake should be golden brown and a toothpick inserted into the center should come out clean.
4. Can I freeze this cake?
Yes, you can freeze the cake before adding the coconut flakes. Wrap it well and store it for up to three months.
So, grab your ingredients and try out this Easy Traditional Italian Lemon Cake recipe. It’s an experience that will refresh your taste buds and brighten your day! Happy baking!
Ingredients
For the cake
2 pieces eggs
1 pinch salt
100 g sugar
1 tsp vanilla extract
120 ml sunflower oil
120 ml milk
200 g flour
15 g baking powder
1 piece egg (for lemon cream)
1 tbsp cornstarch
2 tbsp sugar (for lemon cream)
300 ml milk (for lemon cream)
1 piece zest of lemon
1 piece juice of lemon
Butter for greasing
Coconut flakes for coating
Method
Preparation
Preheat your oven to 190°C (375°F) and grease a 20 cm (8 inch) round baking pan with butter.
In a mixing bowl, whisk together 2 eggs, a pinch of salt, and 100 g of sugar until the mixture is light and fluffy.
Add 1 tsp of vanilla extract, 120 ml of sunflower oil, and 120 ml of milk to the egg mixture. Mix until smooth.
Sift in 200 g of flour and 15 g of baking powder. Gently fold until everything is fully combined and lump-free.
Pour half of the batter into the prepared pan and bake for 15 minutes.
Lemon Cream Preparation
While the cake is baking, prepare the lemon cream. In a saucepan, whisk together 1 egg, 1 tbsp of cornstarch, and 2 tbsp of sugar until smooth.
Gradually add 300 ml of milk, along with the zest and juice of 1 lemon, to the mixture. Cook over medium heat, stirring constantly until it thickens and comes to a boil.
Remove the cake from the oven and spread the hot lemon cream evenly over the partially baked layer.
Carefully pour the remaining batter on top and spread gently to cover.
Baking
Reduce the oven temperature to 180°C (350°F) and bake for an additional 25 minutes, or until golden and fully set.
Allow the cake to cool completely.
Brush the surface lightly with melted butter and generously coat with coconut flakes before slicing.
Notes
Keep uneaten cake covered in an airtight container in the fridge for up to three days. Ensure not to overmix the batter for a lighter cake. You can add a tablespoon of limoncello to the lemon cream for an extra kick. Substitute coconut flakes with crushed almonds for a different flavor and texture. Swap out regular flour for a gluten-free flour blend for a gluten-free option.