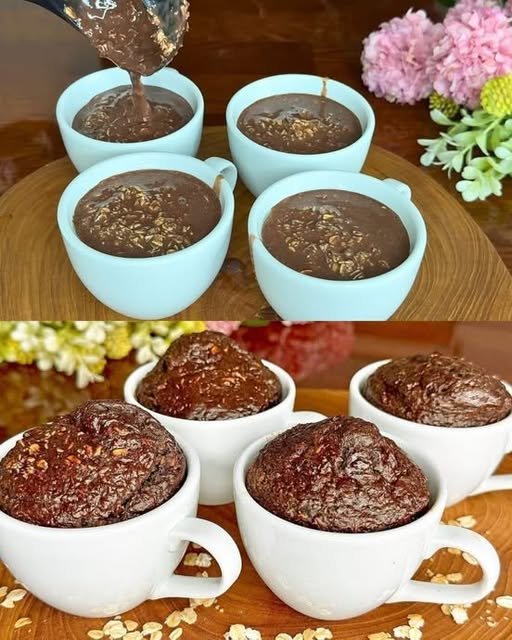
Healthy Chocolate Lava Baked Oats
Naturally Sweet • Wholesome • Comforting
Serves: 2 generous portions (easily doubled)
This recipe turns simple pantry staples into a warm, chocolatey breakfast or dessert with a naturally soft center. It’s filling, balanced, and made with everyday ingredients.
Ingredients
Oat Base
-
1 cup rolled oats (old-fashioned oats for best texture)
-
1 medium ripe banana (naturally sweet and creamy)
-
½ cup milk of choice (almond, oat, soy, or dairy)
-
2 tablespoons unsweetened cocoa powder
-
1–2 tablespoons natural liquid sweetener (maple syrup or honey, to taste)
-
1 teaspoon baking powder
-
½ teaspoon pure vanilla extract
-
A small pinch of sea salt (balances the chocolate flavor)
Soft Chocolate Center (Optional but Recommended)
-
2 small pieces dark chocolate (70% cocoa or higher)
or -
1 tablespoon dark chocolate chips
Step-by-Step Instructions
1. Prepare the Oven
-
Heat your oven to 180°C (350°F)
-
Lightly coat two oven-safe ramekins or ceramic mugs with a little oil or butter to prevent sticking
-
Place them on a baking tray for easy handling
2. Blend the Batter
Add the following to a blender:
-
Rolled oats
-
Banana
-
Milk
-
Cocoa powder
-
Natural sweetener
-
Baking powder
-
Vanilla extract
-
Sea salt
Blend for 30–45 seconds until the mixture is:
-
Completely smooth
-
Thick but pourable
-
Similar to cake or pancake batter
If the batter seems too thick, add 1–2 tablespoons of milk.
3. Fill the Cups
-
Pour the batter into the prepared mugs
-
Fill each about ¾ full to allow gentle rising
4. Add the Chocolate Center
-
Gently press one piece of dark chocolate into the center of each mug
-
Make sure it is fully covered with batter so it stays soft inside
5. Bake
-
Place the tray in the oven
-
Bake for 18–25 minutes, depending on your preferred texture:
-
18–20 minutes: softer, richer texture
-
22–25 minutes: more set and cake-like
-
6. Rest & Enjoy
-
Remove from the oven
-
Let sit for 5 minutes to settle
-
Enjoy warm, straight from the mug or turned out onto a plate
Optional Toppings (Wholesome Add-Ons)
-
Fresh berries or sliced banana
-
A spoon of yogurt or coconut yogurt
-
Chopped nuts or seeds
-
Light drizzle of nut butter
Helpful Notes
Air Fryer Method
-
Cook at 160°C (320°F) for 12–15 minutes
-
Check at 12 minutes and adjust as needed
No Blender Option
-
Use 1 cup oat flour instead of whole oats
-
Mash the banana very smoothly with a fork
-
Whisk all ingredients until well combined
Diet-Friendly
-
Naturally sweetened
-
Made with whole grains
-
Easily adaptable for dairy-free or gluten-free needs (use certified oats)


 Keto & low-carb friendly