Prep time: 15 mins | Cook time: 10 mins | Serves: 2
Ingredients
For the Chicken Salad:
2 cups Cooked chicken breast (shredded or finely chopped)
1/2 cup Mayonnaise
1 tsp Dijon mustard
1/4 cup Celery (finely diced for crunch)
1 tbsp Fresh chives or green onions (sliced thin)
Salt and black pepper to taste
For the Sandwich Build:
4 slices Sourdough or Ciabatta bread
4-6 strips Crispy cooked bacon
1 Large tomato (sliced)
1 cup Shredded iceberg or romaine lettuce
2 tbsp Butter (softened, for the bread)
Instructions
Mix the Filling: In a medium bowl, combine the shredded chicken, mayonnaise, mustard, celery, and chives. Season with salt and pepper. Stir until the chicken is well-coated and creamy.
Prep the Bread: Lightly butter the outside of each slice of bread. This ensures a golden, crispy crust.
Layer the Flavors: * Place two slices of bread butter-side down.
Add a layer of crispy bacon.
Top with a generous scoop of the chicken salad mixture.
Add tomato slices and shredded lettuce.
Close the sandwich with the remaining bread (butter-side up).
The Toasting: Heat a panini press or a heavy skillet over medium heat.
If using a press: Grill for 3–5 minutes until the bread is golden brown with clear grill marks.
If using a skillet: Place the sandwich in the pan and weight it down with a second heavy pan. Flip after 3 minutes and repeat on the other side.
Serve: Slice diagonally and enjoy while the bread is still warm and crunchy.
Pro-Tip: If you want a little extra zing, add a squeeze of fresh lemon juice or a dash of hot sauce to the chicken mixture before assembling!
This recipe serves one large glass or two smaller ones. It’s naturally sweet, velvety, and packed with vitamins.
Ingredients
2 cups Frozen Peach Slices: (Frozen gives it that thick, soft-serve texture seen in your photo).
1 cup Milk of choice: (Whole milk, almond milk, or oat milk all work great).
1/2 cup Greek Yogurt: Vanilla or plain for extra creaminess and protein.
1 tbsp Honey or Maple Syrup: Optional, depending on how sweet your peaches are.
1/4 tsp Vanilla Extract: To give it that “peaches and cream” flavor profile.
Optional: A pinch of cinnamon or a scoop of protein powder.
Instructions
Layer the Blender: Pour your liquid (milk) in first, followed by the yogurt, vanilla, and sweetener. Adding liquids first helps the blender blades move freely.
Add the Fruit: Add the frozen peach slices on top.
Blend: Start on a low speed and gradually increase to high. Blend until the mixture is completely smooth and those beautiful swirls form.
Check Consistency: If it’s too thick, add a splash more milk. If you want it thicker, add a few more frozen peaches or a couple of ice cubes.
Garnish: Pour into a tall glass and top with two fresh thin peach slices, just like in your picture!
Quick Tips for the Best Results
The Peach “Hack”: If you only have fresh peaches, peel and slice them, then freeze them on a tray for 2 hours before blending. This prevents the smoothie from becoming watery.
Nutrient Boost: Toss in a tablespoon of chia seeds or flax seeds; they won’t change the flavor but will add healthy fats and fiber.
This recipe makes one large or two small servings. It is naturally sweet, creamy, and packed with antioxidants.
Ingredients
1 cup Frozen Raspberries: Gives that beautiful pink color and a tart kick.
1/2 cup Mango Cubes: Provides a tropical sweetness and silky texture.
1 medium Banana: Best if sliced and frozen for a thicker, “milkshake” consistency.
1 cup Liquid Base: You can use almond milk, coconut water, or oat milk.
1/2 cup Greek Yogurt (Optional): Add this if you want extra protein and a creamier finish.
Fresh Mint: For garnish (as seen in your photo).
Instructions
Layer the Ingredients: Add your liquid base to the blender first. This helps the blades move freely and prevents the frozen fruit from getting stuck.
Add the Fruit: Add the frozen raspberries, mango cubes, and banana.
Blend: Start on a low speed and gradually increase to high. Blend for about 45–60 seconds until completely smooth.
Check Consistency: If it’s too thick, add a splash more liquid. If you prefer it thicker (like a smoothie bowl), add a few more ice cubes or frozen fruit pieces.
Serve: Pour into a chilled glass. Top with a sprig of fresh mint and use a glass straw to match your picture!
Quick Tips for the Best Result
Use Frozen Fruit: Using frozen fruit instead of ice ensures the flavor stays concentrated and the texture remains frosty.
Sweetness: If your berries are a bit tart, you can add a teaspoon of honey or maple syrup.
Storage: This is best enjoyed immediately, but you can store it in an airtight jar in the fridge for up to 24 hours (just give it a good shake before drinking).
Prep time: 10 mins | Bake time: 40–45 mins | Servings: 8
Ingredients
2 cups fresh blueberries (frozen works too, do not thaw)
3 large eggs
½ cup all-purpose flour
½ cup granulated sugar
1 ¼ cups whole milk (or half-and-half for extra richness)
2 tablespoons butter, melted (plus extra for greasing)
1 tablespoon vanilla extract
1 teaspoon lemon zest (optional, for brightness)
Pinch of salt
Powdered sugar for dusting
Instructions
Prepare the Oven and Pan: Preheat your oven to 350°F (175°C). Generously butter a 9-inch square baking dish or a deep pie plate.
Layer the Berries: Wash and dry your blueberries thoroughly. Spread them in an even layer across the bottom of the prepared dish.
Mix the Batter: In a large bowl, whisk the eggs and sugar together until slightly pale. Slowly whisk in the melted butter, vanilla, lemon zest, and salt.
Combine with Dry Ingredients: Add the flour to the wet mixture and whisk until smooth. Gradually pour in the milk, whisking constantly to ensure there are no lumps. The batter will be very thin, similar to a crepe or pancake batter.
Bake: Carefully pour the batter over the blueberries. Place the dish in the center of the oven and bake for 40 to 45 minutes.
Test for Doneness: The cake is done when the edges are golden brown and the center has puffed up and is “just set” (it should have a slight, firm jiggle but not be liquid).
Cool and Serve: Let the cake rest for at least 15 minutes. It will sink slightly as it cools—this is normal! Dust with powdered sugar and serve warm or at room temperature.
Tips for Success
No Sinking Berries: If you find your berries always sink to the bottom, you can toss them in a tablespoon of flour before placing them in the pan.
Add a Topping: This cake is delicious with a dollop of whipped cream or a small scoop of vanilla bean ice cream.
Storage: Store any leftovers in the refrigerator for up to 3 days. It tastes wonderful when chilled the next morning!
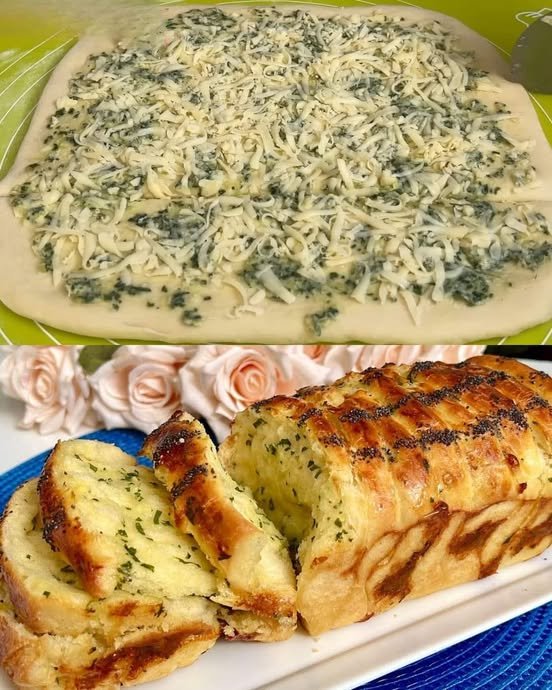
Soft, flavorful bread with a garlic-parsley butter filling and melted mozzarella center
Yield
1 loaf or 8–10 rolls
Oven Temperature
180°C (350°F)
Ingredients
Dough
70 ml warm water
70 ml warm milk
1 teaspoon dry yeast
1 teaspoon sugar
250 g all-purpose flour
½ teaspoon salt
20 ml vegetable oil or melted butter
Filling
100 g mozzarella cheese, shredded
2 tablespoons unsalted butter, softened
2 cloves garlic, minced
1 tablespoon fresh parsley, finely chopped
Topping
1 egg, beaten (for egg wash)
1 teaspoon poppy seeds
Instructions
1. Prepare the Dough
In a medium mixing bowl, combine the warm water, warm milk, sugar, and dry yeast.
Stir gently and allow to stand for 5–10 minutes, until the mixture becomes frothy.
Add the flour, salt, and oil to the yeast mixture. Mix until a soft, cohesive dough forms.
Transfer the dough to a lightly floured surface and knead for about 5 minutes, until smooth and elastic.
Place the dough in a lightly oiled bowl, cover with a clean damp cloth, and allow it to rise in a warm, draft-free area for approximately 1 hour, or until doubled in size.
2. Prepare the Filling
In a small bowl, combine the softened butter, minced garlic, and chopped parsley.
Mix until a smooth, spreadable paste forms.
3. Shape and Fill
Punch down the risen dough to release air.
Roll the dough into a large rectangle on a lightly floured surface.
Spread the garlic-parsley butter evenly over the dough.
Sprinkle the shredded mozzarella cheese evenly on top of the butter layer.
Roll the dough tightly from one edge into a log.
Optional shaping:
Cut the log into thick slices for individual rolls, or
Slice the log lengthwise, twist the two strands together, and form a braided loaf.
4. Final Rise and Bake
Place the shaped loaf or rolls in a greased loaf pan or baking tray.
Cover and allow to rise for 20 minutes in a warm place.
Preheat the oven to 180°C (350°F).
Brush the top of the dough with the beaten egg and sprinkle poppy seeds evenly.
Bake for 25–30 minutes, until the bread is golden brown and the mozzarella inside is fully melted.
5. Cooling and Serving
Remove the bread from the oven and allow it to cool for at least 10 minutes before slicing.
Serve warm. This bread pairs well with soups, salads, or as a savory snack on its own.
Storage
Store at room temperature in an airtight container for up to 2 days
Refrigerate for longer storage; reheat in a preheated oven to restore freshness
Light, airy, vegetable-filled bread bites with a crisp golden exterior
Yield
Approximately 20–24 small bites, depending on size
Equipment
Deep frying pan or skillet
Slotted spoon
Mixing bowls
Parchment paper or paper towels for draining
Ingredients
Dough
1 large egg
200 ml warm milk
200 ml warm water
10 g dry yeast
20 g granulated sugar
8 g salt
540 g all-purpose flour
Vegetable and Cheese Mix-ins
1 medium potato, peeled and finely diced
1 red bell pepper, finely diced
2 green bell peppers, finely diced
1 medium onion, finely chopped
A handful of fresh parsley, finely chopped
80 g Tulum cheese (or a crumbly cheese such as feta), crumbled
For Frying
400 ml vegetable oil
Instructions
1. Prepare the Yeast Base
In a large mixing bowl, combine the warm milk, warm water, sugar, and dry yeast.
Whisk gently to dissolve and let the mixture stand for 5 minutes, until slightly frothy.
2. Mix the Dough
Add the egg and salt to the yeast mixture and mix until fully combined.
Gradually incorporate the flour, stirring with a spatula until a soft, sticky dough forms.
Do not add extra flour beyond the recipe unless absolutely necessary; the dough should remain soft and hydrated to ensure a light, airy texture.
3. Add Vegetables and Cheese
Fold the finely diced potato, red pepper, green peppers, onion, and parsley into the dough.
Gently mix in the crumbled cheese until evenly distributed.
Ensure all ingredients are well combined, but avoid overmixing, which could deflate the dough.
4. Allow the Dough to Rise
Cover the bowl with plastic wrap or a clean, damp cloth.
Let the dough rise in a warm, draft-free environment for 45–60 minutes, until it has roughly doubled in volume and shows a light, web-like structure when gently pulled.
5. Shape and Fry the Bites
Heat the vegetable oil in a deep frying pan over medium heat. The oil should reach approximately 170–180°C (340–355°F).
Shape the dough into small portions using two lightly oiled spoons or a piping bag with a large tip.
Carefully drop the dough portions into the hot oil, frying in small batches to prevent overcrowding.
Fry, turning occasionally, until each bite is evenly golden brown and crispy on all sides, approximately 3–5 minutes per batch.
Remove the bites with a slotted spoon and place them on a plate lined with paper towels to drain excess oil.
6. Serve
Serve warm as a snack or side dish.
Suggested accompaniments: yogurt-garlic dip, spicy tomato chutney, or a simple herb sauce.
Storage
Best consumed on the day of frying for maximum crispness.
Store any leftovers in an airtight container in the refrigerator for up to 1 day; reheat in a preheated oven to restore crispness.
Fruit jam (apricot, strawberry, or preferred variety)
Shredded coconut, for topping
Instructions
1. Prepare the Batter
In a large mixing bowl, combine the eggs, granulated sugar, and vanilla sugar.
Whisk for 2–3 minutes, until the mixture becomes pale and slightly thickened.
Add the lemon juice, vegetable oil, and milk. Mix until fully combined.
Sift the flour and baking powder together.
Gradually fold the dry ingredients into the wet mixture using a spatula, mixing just until smooth and free of lumps.
2. Assemble the Cake
Preheat the oven to 180°C (350°F).
Lightly grease a round baking pan and line the base with parchment paper if desired.
Pour half of the batter into the prepared pan and spread evenly.
Spoon the jam over the batter in small portions, keeping a slight margin from the edges of the pan.
Carefully pour the remaining batter over the jam layer and smooth the surface gently.
3. Bake
Place the pan in the preheated oven.
Bake for 25–30 minutes, until the cake is evenly golden and a skewer inserted into the cake portion comes out clean.
Remove from the oven and allow the cake to rest in the pan for 10 minutes.
4. Finish the Cake
While the cake is still warm, spread a thin, even layer of jam over the surface.
Sprinkle shredded coconut evenly across the top.
Allow the cake to cool further before slicing.
Storage
Store at room temperature in a covered container for up to 2 days
Refrigerate for longer storage if preferred
Serving Notes
This cake can be served warm or at room temperature. The lemon flavor provides balance to the sweetness of the jam, while the coconut topping adds texture.
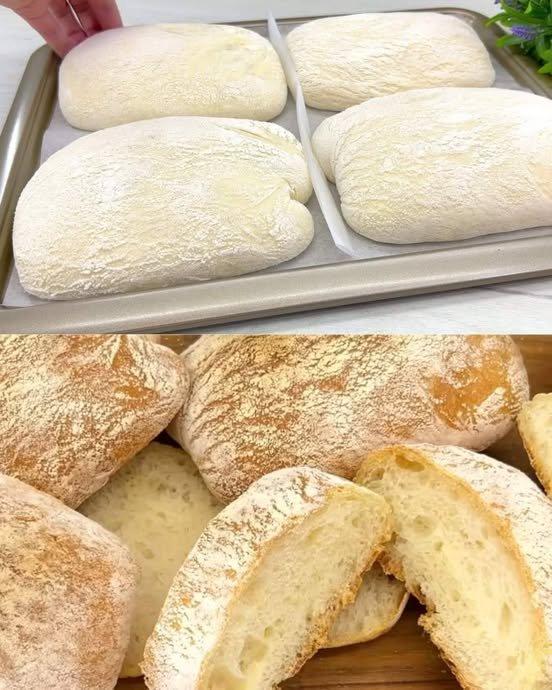
A rustic Italian-style bread with an open crumb and crisp, lightly floured crust
Yield
2 large loaves or 4–6 small loaves
Total Time
Approximately 60–70 minutes (excluding cooling)
Oven Temperature
220°C (430°F)
Ingredients
Yeast Starter
100 ml water, lukewarm
1 teaspoon granulated sugar
8 g dry yeast
3 tablespoons wheat flour (all-purpose or bread flour)
Main Dough
500 g wheat flour, sifted
1½ teaspoons salt
350 ml water, lukewarm
30 ml vegetable oil
Instructions
1. Prepare the Yeast Starter
In a small bowl, combine the lukewarm water, sugar, and dry yeast.
Add the flour and whisk until a smooth mixture forms.
Cover the bowl and allow it to stand at room temperature for 10–15 minutes, until the mixture becomes foamy and visibly active.
2. Mix the Dough
Place the sifted flour and salt into a large mixing bowl and stir to distribute evenly.
Create a well in the center of the flour.
Pour in the prepared yeast starter, the remaining lukewarm water, and the vegetable oil.
Mix using a sturdy spoon or spatula until all ingredients are combined and a very soft, sticky dough forms.
The dough should be fluid and elastic rather than firm; this high moisture content is essential for an open internal structure.
Cover the bowl and allow the dough to rise in a warm, draft-free environment for 30–40 minutes, until it has doubled in volume and shows visible air bubbles on the surface.
3. Shape the Bread
Generously flour a clean work surface.
Carefully transfer the risen dough onto the floured surface, handling it gently to preserve the air inside.
Lightly dust the top of the dough with additional flour.
Using a dough scraper or lightly floured hands, divide the dough into 2 large portions or 4–6 smaller rectangular portions.
Place the shaped pieces onto a baking tray lined with parchment paper, leaving space between each loaf to allow for expansion.
4. Bake
Preheat the oven to 220°C (430°F).
Place the baking tray on the center rack of the oven.
Bake for 20–25 minutes, until the bread is evenly golden and the crust is firm.
Remove from the oven and transfer the loaves to a wire rack.
Allow the bread to cool for at least 15 minutes before slicing to allow the crumb to stabilize.
Storage
Best consumed on the day of baking
Can be stored at room temperature for up to 24 hours
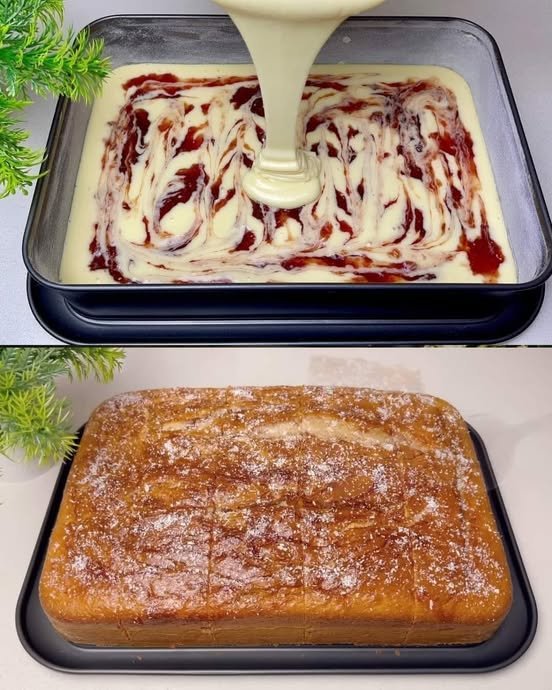
A soft, moist cake with a delicate strawberry swirl and coconut topping
Yield
1 rectangular cake (20 × 30 cm) Serves 10–12
Oven Temperature
180°C (350°F)
Ingredients
3 medium eggs, at room temperature
150 g granulated sugar
8 g vanilla sugar (or 1 teaspoon vanilla extract)
150 g vanilla yogurt
120 ml sunflower oil
290 g all-purpose flour (or type 00)
15 g baking powder
1 small pinch of salt
Approximately 120 g (½ cup) strawberry jam
Grated coconut, for topping
Instructions
1. Prepare the Batter
Place the eggs, granulated sugar, vanilla sugar, and salt in a large mixing bowl.
Whisk using a hand mixer or balloon whisk for 3–5 minutes, until the mixture becomes pale, slightly thickened, and airy.
Add the sunflower oil and vanilla yogurt. Mix gently until fully blended.
Sift the flour and baking powder into the bowl.
Fold the dry ingredients into the batter using a spatula or whisk, mixing just until smooth and free of lumps. Avoid overmixing.
2. Prepare the Baking Pan
Lightly grease a rectangular baking pan measuring approximately 20 × 30 cm.
Dust the pan lightly with flour and remove any excess.
3. Create the Strawberry Swirl
Pour approximately two-thirds of the batter into the prepared pan and spread it evenly.
Spoon the strawberry jam over the surface in small portions.
Using a knife or skewer, gently draw through the batter to distribute the jam and create a marbled pattern.
Carefully pour the remaining batter over the top and spread gently to cover the jam layer.
4. Bake the Cake
Place the pan in the preheated oven.
Bake at 180°C (350°F) for 30–35 minutes, until the cake is fully baked and a skewer inserted into the center comes out clean.
Remove from the oven and allow the cake to rest in the pan for 10 minutes.
Transfer to a wire rack to cool further.
5. Finish and Serve
While the cake is still slightly warm, lightly brush the surface with a small amount of warmed strawberry jam or honey, if desired.
Sprinkle grated coconut evenly over the top.
Allow the cake to cool completely before slicing.
Storage
Store in an airtight container at room temperature for up to 3 days
Refrigerate for longer storage if preferred
Serving Notes
This cake is well suited for serving at room temperature alongside tea or coffee. The yogurt contributes to a soft texture that remains moist over time.
A layered dessert made with crisp puff pastry, smooth vanilla custard, and apricot fruit filling
Yield
1 cake (20–22 cm / 8–9 inches) Serves 8–10
Oven Temperature
200°C (400°F)
Ingredients
Puff Pastry Layers
250 g ready-to-use puff pastry, thawed if frozen
Water, for light brushing
2 teaspoons granulated sugar
Apricot Layer
300 g apricot jam or apricot fruit spread
1 tablespoon water (optional, for adjusting consistency)
Vanilla Custard Cream
400 ml whole milk
80 g granulated sugar
30 g cornstarch
2 large egg yolks
10 g vanilla sugar (or 1 teaspoon vanilla extract)
50 g unsalted butter, softened
Finishing
Powdered sugar, for dusting
50 g almond flakes or finely crushed baked pastry crumbs
Instructions
1. Prepare and Bake the Pastry
Preheat the oven to 200°C (400°F).
Roll out the puff pastry if needed and divide it into two equal circles (20–22 cm).
Place both circles on a parchment-lined baking tray.
Lightly brush the surface of each pastry with water and sprinkle evenly with sugar.
Using a sharp knife, gently mark the top pastry circle into 8–10 equal wedges without cutting fully through. This will help maintain clean portions after assembly.
Bake for 15–20 minutes, until the pastry is fully puffed and evenly golden.
Remove from the oven and allow both layers to cool completely before assembly.
2. Prepare the Custard Cream
In a saucepan, combine the egg yolks, sugar, vanilla sugar, and cornstarch.
Add a small portion of the milk and whisk until smooth and free of lumps.
Gradually pour in the remaining milk while whisking continuously.
Place the saucepan over medium heat and cook, stirring constantly, until the mixture thickens into a smooth, stable custard.
Remove from heat and stir in the butter until fully incorporated.
Transfer the custard to a bowl and cover the surface directly with parchment paper or a food-safe cover to prevent drying.
Allow the custard to cool to room temperature before assembling the cake.
3. Assemble the Cake
Place a pastry ring or the rim of a springform pan on a serving plate.
Position the unscored pastry layer at the base.
If the apricot jam is very thick, warm it slightly with the water and stir until smooth.
Spread the apricot layer evenly over the pastry base.
Spoon the cooled custard cream over the apricot layer and smooth the surface.
Arrange the pre-marked pastry wedges on top, aligning them to form a complete circle.
4. Chill and Finish
Refrigerate the assembled cake for at least 4 hours, preferably overnight, to allow the custard to fully set.
Carefully remove the pastry ring.
Gently press almond flakes or pastry crumbs onto the sides of the cake.
Dust the top evenly with powdered sugar.
For decoration, place a small amount of apricot jam at the center if desired.
A layered pastry dessert with flaky dough, bright apricot fruit, and smooth vanilla custard
Yield
1 cake (20–22 cm / 8–9 inch) Serves 8–10
Oven Temperature
180°C (350°F), conventional oven
Ingredients
Quick Puff-Style Yeasted Pastry
250 g all-purpose flour
150 g cold unsalted butter, cut into small cubes or coarsely grated
100 ml milk, lukewarm (not hot)
25 g granulated sugar
4 g instant yeast
1 large egg (room temperature)
10 g vanilla sugar (or 1 teaspoon vanilla extract)
20 ml melted butter (cooled)
Apricot Layer
300 g apricot jam or thick apricot compote
Optional: 1–2 teaspoons fresh lemon juice (for balance)
Vanilla Custard Cream
400 ml whole milk
2 large egg yolks
80 g granulated sugar
30 g cornstarch
50 g unsalted butter, softened
Decoration
50 g sliced almonds
Powdered sugar, for dusting
Instructions
1. Prepare the Dough
In a small bowl, combine the lukewarm milk, sugar, and instant yeast. Stir gently and let stand for 5 minutes until slightly foamy.
Add the egg, vanilla sugar, and melted butter to the yeast mixture. Whisk until smooth.
In a large mixing bowl, add the flour and cold butter. Using your fingertips or a pastry cutter, gently combine until the mixture resembles coarse crumbs.
Important: The butter pieces should remain visible. This creates flakiness.
Pour the liquid ingredients into the flour mixture. Mix just until a soft dough forms.
Do not knead excessively.
Shape the dough into a flat disc, cover with a clean cloth, and allow it to rest in a warm, draft-free place for 30 minutes, until slightly puffed.
2. Shape and Bake the Pastry Layers
Divide the rested dough into two equal portions.
Roll each portion into a circle approximately 20–22 cm (8–9 inches) in diameter.
Place both circles on parchment-lined baking trays.
Lightly score the top pastry circle into wedges using a sharp knife (do not cut all the way through). This will help with slicing after assembly.
Bake both layers at 180°C (350°F) for 15–20 minutes, until lightly golden and fully baked.
Remove from the oven and allow to cool completely.
3. Prepare the Custard Cream
In a bowl, whisk the egg yolks, sugar, and cornstarch with 3–4 tablespoons of the milk until smooth and lump-free.
Heat the remaining milk in a saucepan over medium heat until hot but not boiling.
Slowly pour the hot milk into the egg mixture while whisking continuously.
Return the mixture to the saucepan. Cook over medium heat, stirring constantly, until thick and smooth.
Remove from heat and immediately stir in the butter until fully incorporated.
Transfer the custard to a bowl, cover the surface directly with parchment or food-safe wrap to prevent a skin from forming, and allow to cool completely.
4. Assemble the Cake
Place the first pastry layer on a serving plate. Position a cake ring or springform ring around it.
Spread the apricot jam evenly over the pastry base.
Spoon the cooled custard over the apricot layer and smooth the surface.
Carefully place the second pastry layer (scored side up) on top.
Refrigerate for at least 4 hours, preferably overnight, to allow the custard to fully set.
5. Final Decoration
Remove the cake ring carefully.
Gently press almond slices onto the sides of the cake.
Dust the top generously with powdered sugar.
Optional: add a small spoon of apricot jam in the center for a polished finish.
This vibrant Mediterranean olive oil dip combines savory herbs, zesty lemon, and a hint of spice. It’s the perfect match for warm, crusty bread—ideal as an appetizer, snack, or even a party favorite!
📝 Ingredients
¾ cup extra virgin olive oil
2 tablespoons balsamic vinegar
1 teaspoon dried oregano
½ teaspoon dried thyme
½ teaspoon crushed red pepper flakes (optional, for a kick)
1 clove garlic, finely minced or grated
Zest of ½ lemon
Salt and freshly ground black pepper, to taste
Fresh herbs (like chopped parsley or basil), for garnish (optional)
👩🍳 Instructions
In a small bowl or shallow dish, pour the olive oil and balsamic vinegar.
Add the dried oregano, thyme, red pepper flakes, and garlic.
Stir in the lemon zest and season with salt and pepper to taste.
Let the dip sit for 5–10 minutes to allow the flavors to blend.
Garnish with fresh herbs if using.
Serve with warm, crusty bread like ciabatta, sourdough, or baguette.
🥖 Tip: Lightly toast your bread for an extra crunch!
❓ Q&A
Q1: Can I make this dip ahead of time? A1: Yes! You can prepare it a few hours in advance. The flavors deepen over time. Just give it a good stir before serving.
Q2: What bread goes best with this dip? A2: Rustic breads like sourdough, ciabatta, or French baguette work best. They hold up well and soak up the oil beautifully.
Chicken: 1 lb (500g) chicken breast or tenderloins, sliced into strips.
The “Binder”: 2–3 egg yolks (as shown in your photo).
Seasonings: 1 tsp salt, ½ tsp black pepper, 1 tsp garlic powder, and 1 tsp paprika.
Breading: 1 cup Panko breadcrumbs (for extra crunch) or regular breadcrumbs.
Cooking: Vegetable oil for frying.
Step-by-Step Instructions
Marinate the Chicken: Place your chicken strips in a large glass bowl. Add the egg yolks and your seasonings (salt, pepper, garlic powder, and paprika). Mix thoroughly until every piece of chicken is well-coated. Let it sit for 10–15 minutes to allow the flavors to sink in.
Bread the Chicken: Place your breadcrumbs in a shallow dish. Take one strip of chicken at a time and press it firmly into the breadcrumbs, ensuring it is covered on all sides. Shake off any excess.
Heat the Oil: Fill a large skillet with about an inch of vegetable oil. Heat it over medium-high heat. To check if it’s ready, drop a breadcrumb in; if it sizzles immediately, you’re ready to fry.
Fry until Golden: Carefully place the chicken strips in the hot oil. Do not overcrowd the pan. Fry for about 3–4 minutes per side until they reach a deep golden-brown color and the chicken is cooked through.
Drain and Serve: Remove the chicken and place them on a plate lined with paper towels to soak up any extra oil.
Pro Tips for Success
Extra Flavor: Add a tablespoon of Dijon mustard or a splash of hot sauce to the egg yolks before mixing.
Air Fryer Version: If you prefer not to deep fry, spray the breaded tenders with a little oil and air fry at 400°F (200°C) for about 10–12 minutes, flipping halfway through.
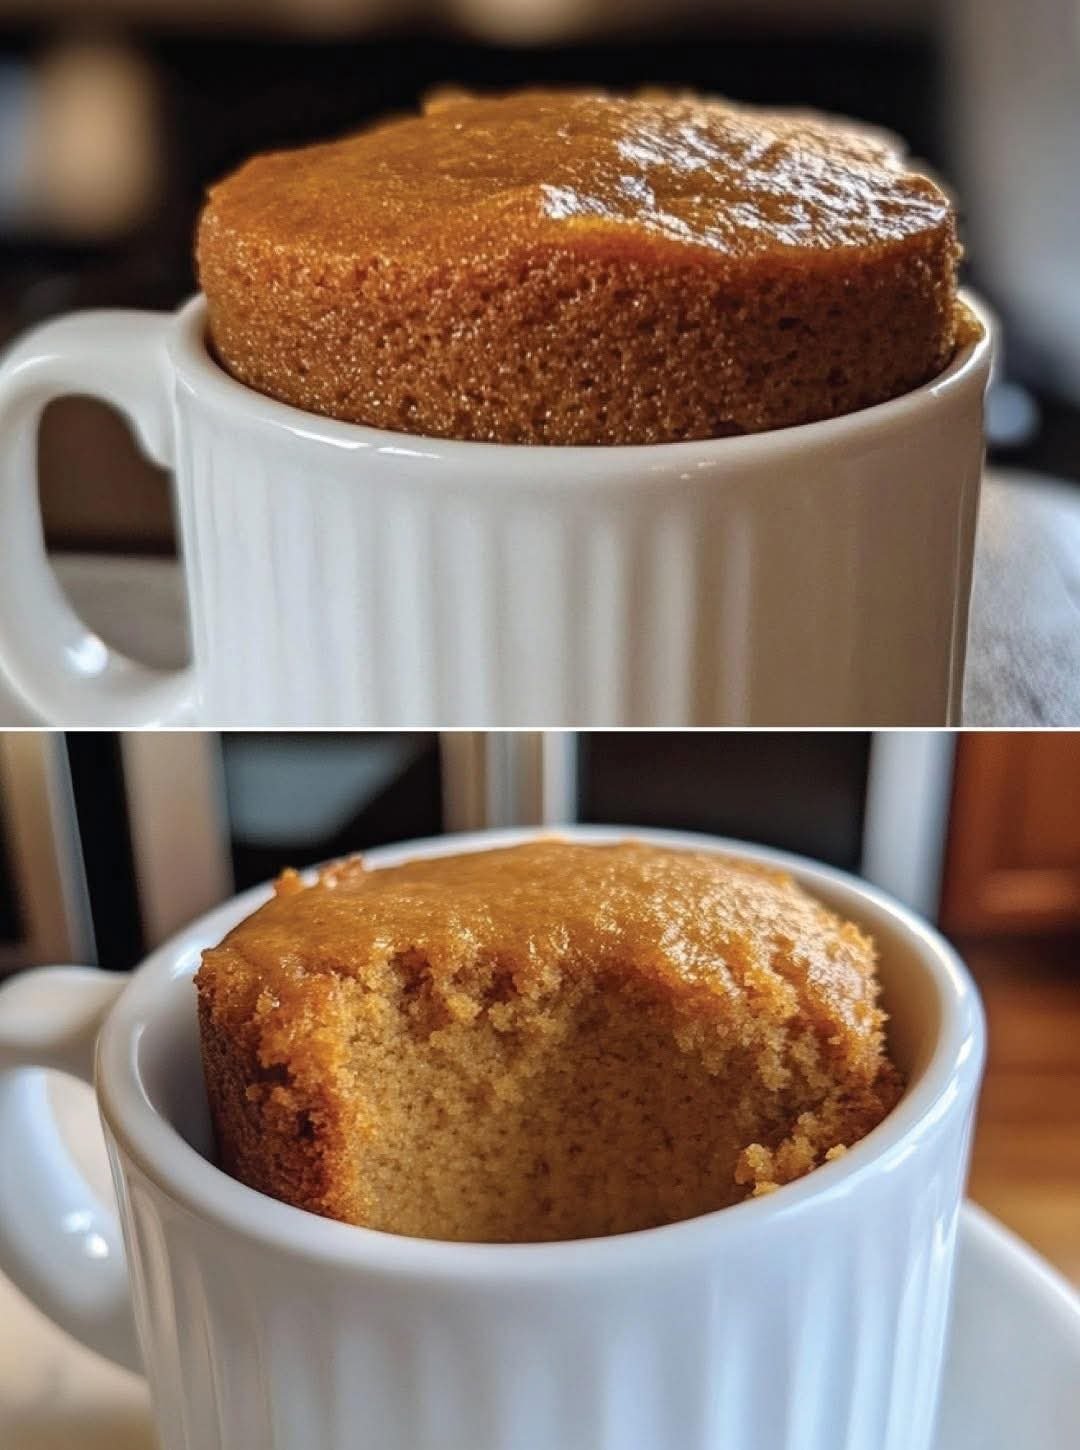
When that fall craving for pumpkin spice hits, you don’t have to head to the bakery and spend a day’s worth of points on a single muffin. This 2-Minute Pumpkin Spice Mug Cake is thePumpkin Spice Mug Cake is the perfect solution for Weight Watchers members who need a quick, sweet fix that won’t derail their progress. It is warm, comforting, and perfectly portioned to keep you on track.
This recipe is a staple for clean eating because it uses wholesome pumpkin purée and oat flour to provide a boost of fiber and Vitamin A. By utilizing a mix of a whole egg and liquid egg whites, we keep the texture rich and cake-like while significantly lowering the points and fat content. It’s a macro-friendly dessert that feels like a warm hug in a mug.
Whether you need a quick breakfast on a chilly morning or a late-night snack that fits your points, this mug cake delivers. It is a healthy recipe that requires no oven, no messy pans, and just a few minutes of your time.
Look at the Recipe
Moist & Tender Crumb: Thanks to the pumpkin purée, this cake stays incredibly soft without any added oil or butter.
Warm Harvest Spices: The aromatic blend of cinnamon and pumpkin spice provides that classic “autumn in a cup” flavor.
WW-Friendly Volume: A generous serving size that satisfies your hunger for very few points.
Ingredients Needed
90g Pumpkin Purée (1/3 cup): Use 100% pure pumpkin, not pumpkin pie filling.
1 Whole Egg: For structure and richness.
2 tbsp Liquid Egg Whites: Adds volume and protein without extra fat.
4 tbsp Oat Flour: (Or your favorite WW-friendly flour blend).
1 tbsp Erythritol: (Or 1 packet of Stevia) for calorie-free sweetness.
1/4 tsp Baking Powder: To give our mug cake the perfect rise.
1/4 tsp Vanilla Extract: To enhance the sweetness.
Pinch of Pumpkin Spice: Or cinnamon for that cozy flavor profile.
How to Make Our Pumpkin Mug Cake
Prep the Batter: Place a small mixing bowl on your counter. Add the pumpkin purée, whole egg, egg whites, flour, sweetener, vanilla, and baking powder.
Whisk Until Smooth:Mix well using a fork or whisk until the batter is completely smooth and no flour clumps remain.
Prepare the Mugs: Lightly spray two microwave-safe mugs with non-stick cooking spray if you plan on popping the cakes out to serve.
Divide and Portion:Pour the batter evenly between the two mugs.
Microwave Magic:Cook on high for 90–100 seconds. The tops should look set but still slightly springy to the touch.
Rest and Serve:Let the cakes rest for 1 minute before eating. This allows the steam to distribute, ensuring a moist texture.
Storage & Serving Suggestions
Storing: These are best enjoyed fresh, but you can store a cooked mug cake in the fridge for 24 hours. Just cover the top with plastic wrap.
Reheating: If eating cold from the fridge, microwave for 10–15 seconds to restore that “fresh-baked” warmth.
Serving Pairings: Top with a dollop of non-fat Greek yogurt or a swirl of sugar-free whipped topping. For a decadent twist, drizzle with 1 tsp of sugar-free maple syrup.
Tips & FAQs
How many WW points is this pumpkin mug cake?
Depending on your specific flour and sweetener, this recipe usually ranges between 2–4 WW points per mug. Using oat flour is often the most point-friendly option!
Can I add chocolate chips?
Yes! Adding 1 tsp of sugar-free mini chocolate chips is a great way to add a “treat” feel for a very small point increase.Why is my mug cake rubbery?
Overcooking is the main culprit. Start with 90 seconds; every microwave power varies. If it’s still wet, add 10-second increments.
Can I bake this in the oven?If you prefer the oven, bake at $350°F$ ($175°C$) in oven-safe ramekins for 12–15 minutes, or until a toothpick comes out clean.
These handheld pockets feature seasoned ground beef and melty cheese tucked inside soft biscuit dough, finished with a savory garlic-Parmesan butter.
Prep time: 15 minutes
Cook time: 25 minutes
Servings: 6-8 (Makes 8 large bombs)
Ingredients
For the Filling:
1 lb (450g) ground beef (lean 85-90% recommended)
1 tbsp olive oil
1 small onion, finely diced
2 cloves garlic, minced
1 tsp Worcestershire sauce
1 tsp salt
½ tsp black pepper
1 cup shredded cheddar cheese (or mozzarella/Colby Jack mix)
For the Dough & Topping:
1 can (16 oz) refrigerated biscuit dough (8 count, like Pillsbury Grands)
¼ cup unsalted butter, melted
2 tbsp grated Parmesan cheese
1 tsp garlic powder
1 tsp dried parsley (optional garnish)
Instructions
1. Prepare the Beef Filling
Heat the olive oil in a skillet over medium heat.
Add the diced onion and sauté until softened (about 3 minutes). Stir in the minced garlic and cook for another 30 seconds until fragrant.
Add the ground beef, salt, pepper, and Worcestershire sauce. Cook until the beef is fully browned, breaking it up with a spatula as it cooks.
Drain any excess grease from the pan.
Remove from heat and stir in the shredded cheese until it begins to melt and bind the beef together. Let the mixture cool slightly so it doesn’t tear the dough.
2. Assemble the Bombs
Preheat your oven to 375°F (190°C) and line a large baking sheet with parchment paper.
Take each biscuit and flatten it with your hands or a rolling pin into a circle roughly 4–5 inches wide.
Place about 2 tablespoons of the beef and cheese mixture into the center of each dough circle.
Gather the edges of the dough over the filling and pinch tightly to seal. Roll it gently in your hands to form a smooth ball.
Place the balls seam-side down on the prepared baking sheet.
3. Add the Topping & Bake
In a small bowl, whisk together the melted butter, grated Parmesan, garlic powder, and parsley.
Brush the mixture generously over the top of each dough ball.
Bake for 15–18 minutes, or until the bombs are puffed and a deep golden brown.
(Optional) Brush with any remaining garlic butter immediately after taking them out of the oven for extra shine and flavor.
4. Serve
Serve warm while the cheese is still melty. These pair perfectly with ranch dressing, ketchup, or even a spicy marinara for dipping.
Pro-Tips for Success
Avoid the Leak: To prevent the “bombs” from bursting, ensure the beef mixture isn’t too hot when you assemble them, and make sure your pinch-seal is very firm.
Variety: Try adding a small slice of pickled jalapeño or a bit of crispy bacon inside the bomb for an extra flavor kick.
Storage: These keep well in the fridge for up to 3 days. Reheat them in an air fryer or oven to keep the biscuit exterior from getting soggy.
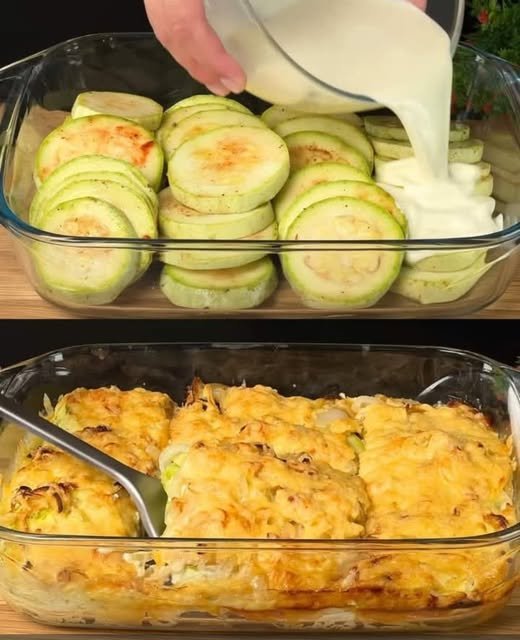
A creamy, golden-brown vegetable bake featuring tender zucchini and a savory yogurt-egg glaze.
Prep time: 15 minutes
Cook time: 30–35 minutes
Servings: 4 side portions
Ingredients
2 zucchini, sliced into rounds
2 onions, thinly sliced into rounds
2 cloves garlic, finely chopped
2 eggs
150 g yogurt (plain or Greek)
150 g cheese, grated (such as Mozzarella or Cheddar)
Seasonings: Salt, black pepper, paprika, and vegetable seasoning to taste
Oil for greasing and cooking
Instructions
1. Prepare the Vegetables
Preheat your oven to 390°F (200°C). Lightly grease a glass baking dish with oil. Season the zucchini rounds with salt, black pepper, paprika, and vegetable seasoning.
2. Layer the Dish
Arrange the seasoned zucchini rounds and sliced onions in rows in the baking dish, overlapping them slightly to fill the pan. Sprinkle the chopped garlic evenly over the top.
3. Mix the Creamy Glaze
In a small bowl, whisk together the 2 eggs and 150 g of yogurt until smooth. Season this mixture with a pinch of salt and pepper if desired.
4. Top and Bake
Pour the yogurt and egg mixture evenly over the rows of vegetables, ensuring they are well-coated. Sprinkle the 150 g of grated cheese generously over the entire surface.
5. Bake to Perfection
Place the dish in the oven and bake for 30–35 minutes, or until the zucchini is tender and the cheese topping is bubbly and deep golden brown.
6. Serve
Let the dish rest for 5 minutes before serving to allow the creamy sauce to set.
Recipe Variations
Extra Protein: You can tuck slices of cooked ham or turkey between the zucchini layers.
Herb Freshness: Top with fresh chopped parsley or dill after baking for a burst of color and flavor.
Crispy, garlic-buttered edges with a soft, cheesy center—made easily in the air fryer.
Prep time: 10 minutes
Cook time: 45 minutes
Total time: 55 minutes
Servings: 2 side portions
Ingredients
2 large russet potatoes (scrubbed and cleaned)
4 tbsp unsalted butter, melted
1 tbsp garlic paste (or finely minced garlic)
3 to 5 slices Colby Jack cheese (cut into small squares/fourths)
Kosher salt and black pepper, to taste
Optional Toppings:
Sour cream
Fresh chives, chopped
Bacon bits
Instructions
1. Prep the Potatoes
To ensure the potato sits still, cut a thin horizontal slice off the bottom of each potato to create a flat base. Do not discard these slices! Place the potato flat-side down between two chopsticks. Use a sharp knife to cut 1/4-inch slices across the potato. The chopsticks will act as a guard, preventing you from cutting all the way through the bottom.
2. The Air Fryer Setup
Place the small potato slices you cut from the bottoms into the air fryer basket. Place the large sliced potatoes directly on top of them. This creates a slight curve that helps the “Hasselback” slices fan out and open up during cooking.
3. First Garlic Butter Wash
In a small bowl, whisk together the melted butter, garlic paste, salt, and pepper. Gently pry the potato slices apart and brush about half of the garlic butter over the tops, ensuring some of it drips down into the crevices. Sprinkle with a little extra salt and pepper.
4. The Initial Roast
Set your air fryer to 370°F (188°C). Cook the potatoes for 20 minutes.
5. Second Baste
Open the air fryer and brush the remaining garlic butter over the potatoes. Continue cooking at 370°F for another 20–25 minutes. The potatoes should be tender on the inside and the edges should be golden-brown and crisp.
6. Add the Cheese
Take your cheese squares (Colby Jack melts beautifully here) and tuck them into the slices. You can put cheese in every slice for a “mega-melt” or every other slice depending on your preference. Return to the air fryer for 1–2 minutes until the cheese is bubbling and melted.
7. Garnish and Serve
Carefully remove the potatoes from the basket. Top with a dollop of sour cream and a sprinkle of fresh chives.
Success Tips
The Chopstick Trick: If you don’t have chopsticks, two wooden spoons with flat handles work just as well to stop your knife.
Potato Choice: Russets are best for this recipe because their high starch content leads to a fluffier interior and crispier skin compared to waxy potatoes.
Don’t Overcrowd: Ensure there is space between the two potatoes in the basket so the air can circulate and crisp up the sides.
Servings: 8 Total Time: 15 minutes Difficulty: Easy Calories per Serving: ~105 Macros (Per Slice): Protein 3g • Carbs 8g • Fat 7g • Fiber 1g
Intoduction
This garlic bread delivers everything we crave—crispy golden edges, a soft buttery center, and the kind of aroma that makes the whole kitchen feel warm and inviting. It’s quick, comforting, and wonderfully light compared to traditional versions.
Perfect for anyone wanting a simple, wholesome, and guilt-free recipe, this version uses clean, pantry-friendly ingredients while still delivering big garlic flavor. Whether you’re pairing it with dinner, serving it as a snack, or adding it to a weekend spread, this garlic bread fits beautifully into a lighter, more intentional approach to comfort food.
If you love easy weeknight meals, nutrient-conscious swaps, and bold, satisfying flavor, this garlic bread is your new go-to.
Look at the Recipe
Crispy edges with a soft, buttery center
Rich garlic flavor with herby, savory notes
Lightened-up ingredients for a guilt-free, cleaner comfort food experience
Ingredients Needed
Garlic Butter Spread
• 4 tbsp softened butter or light butter
• 1 tbsp olive oil
• 4–5 garlic cloves, minced
• 1 tbsp chopped parsley
• ½ tsp garlic powder
• ½ tsp dried oregano
• Salt and pepper to taste
• 2 tbsp parmesan (optional)
Bread
• 1 baguette, ciabatta, sourdough, or low-carb bread of choice
How to Make Our Garlic Bread
Preheat your oven to 400°F (200°C).
Mix together the butter, olive oil, minced garlic, parsley, garlic powder, oregano, salt, and pepper until smooth.
Slice your bread and spread the garlic mixture generously over the surface.
Sprinkle parmesan on top if you want deeper savory flavor.
Bake for 10–12 minutes until the edges turn golden and crisp.
Slice and serve warm for the best texture and flavor.
Macros & Plan Compatibility
Plan
Notes
Keto & Low-Carb
3–4g net carbs per slice using low-carb bread. Grain-free options work well.
Slimming
About 2 syns per slice using light butter and a lighter bread option.
High-Protein
6–8g protein per slice if using high-protein bread and adding parmesan.
Weight Watchers
About 2–3 SmartPoints per slice (Blue plan) using reduced-fat butter.
Mediterranean
Works well using whole-grain bread and olive oil for heart-healthy fats.
Storage & Serving Suggestions
Store:
Keep leftovers in an airtight container for up to 2 days. Reheat:
Warm in the oven at 350°F for 5–7 minutes to regain crispness. Freeze:
Freeze pre-buttered slices and bake straight from frozen. Serve With:
Soups, salads, pasta alternatives, grilled chicken, low-carb casseroles.
FAQs
1. Can I make this garlic bread without butter?
Yes. You can replace butter with olive oil to keep it lighter. Olive oil gives a crispier crust, while butter creates a richer texture.
2. How do I keep garlic bread from getting soggy?
Bake in a hotter oven, avoid excess butter/oil, and use a wire rack to allow air to circulate underneath.
3. Can I prepare garlic bread ahead of time?
Yes. Assemble the bread and refrigerate up to 24 hours before baking.
4. Does garlic bread freeze well?
Absolutely. Freeze prepared slices and bake directly from frozen at 400°F for 12–14 minutes.
5. What bread works best?
Baguette for crispness, ciabatta for chew, sourdough for depth, or keto/high-protein bread for diet-friendly versions.
6. How can I boost the flavor even more?
Use roasted garlic, stir parmesan into the spread, or add fresh herbs after baking.