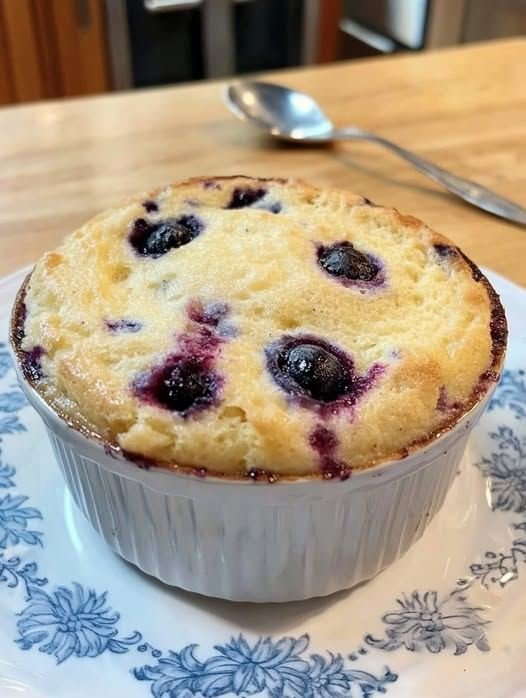
☕ Coffee Banana Smoothie Recipe


☕ Coffee Banana Smoothie Recipe

This recipe makes one large serving. For the best texture, use a frozen banana to get that thick, creamy consistency shown in your image.


Ingredients

1 Frozen Banana: Peeled and sliced before freezing.


1/2 cup Cold Brew or Chilled Coffee: Strong coffee works best.


1/2 cup Milk of choice: (Dairy, Almond, or Oat milk all work great).


1/4 cup Greek Yogurt: Adds creaminess and a boost of protein.


1 tsp Honey or Maple Syrup: Optional, depending on how ripe your banana is.


1/4 tsp Ground Cinnamon: For that warm flavor profile seen in the photo.


A handful of ice: If you want it extra frosty.


Instructions

Combine: Place the frozen banana, chilled coffee, milk, yogurt, and cinnamon into a high-speed blender.


Blend: Start on a low setting and increase to high until the mixture is completely smooth and frothy.


Taste Test: Give it a quick sip. If you want it sweeter, add your honey or maple syrup and pulse again.


Garnish: Pour into a tall glass. Top with fresh banana slices and a light dusting of cinnamon, just like the picture!


💡 Pro-Tips for the Best Results

The Coffee: If you don’t have cold brew, you can use 1 teaspoon of instant coffee powder dissolved in a little bit of warm water instead.


Add-ins: Feel free to toss in a tablespoon of almond butter or a scoop of chocolate protein powder if you want to turn this into a full meal replacement.

Refreshing Green Glow Smoothie

Refreshing Green Glow Smoothie

Ingredients

1 cup Lettuce: Romaine or Butter lettuce works best for a mild, sweet flavor.


1/2 Medium Cucumber: Sliced (peel it if you want a smoother texture, keep it for extra fiber).


1 Ripe Banana: Frozen slices will make the smoothie extra creamy and cold.


1 cup Milk of choice: You can use dairy, almond, oat, or soy milk.


Optional: A squeeze of lime or a teaspoon of honey if you prefer it a bit zestier or sweeter.


Instructions

Prep the Greens: Wash the lettuce and cucumber thoroughly.


Layer the Blender: Add the liquid (milk) first. This helps the blades spin freely and prevents sticking.


Add Solids: Add the lettuce and cucumber slices, followed by the banana on top.


Blend: Start on a low speed and gradually increase to high. Blend for about 45–60 seconds until the green flecks disappear and the mixture is perfectly smooth.


Serve: Pour into a glass and enjoy immediately while fresh.


Quick Tips for Success

Texture: If the smoothie is too thick, add a splash more milk. If it’s too thin, add 2-3 ice cubes.


The “Curumber” Note: The image has a slight typo (“Curumber”), but it definitely means Cucumber, which provides the high water content that makes this drink so hydrating!

Homemade Mixed Berry & Banana Smoothie

Homemade Mixed Berry & Banana Smoothie

This recipe yields a creamy, naturally sweet drink packed with antioxidants.


Ingredients

Ingredient Amount

Blackberries 1/2 cup

Raspberries 1/2 cup

Banana 1 medium (sliced)

Strawberries 1/2 cup (halved)

Liquid Base 1 cup (Milk, Almond milk, or Coconut water)

Optional Creaminess 1/4 cup Greek yogurt

Instructions

Prep the Fruit: Rinse your berries thoroughly. If you want a thicker, colder smoothie (like the one in the glass), use frozen berries or a frozen banana.


Layer the Blender: To help your blender run smoothly, add the liquid first, followed by the soft fruit (banana), and then the heavier berries on top.


Blend: Start on a low speed and gradually increase to high. Blend for about 45–60 seconds until the texture is completely velvety and no berry seeds are visible.


Adjust: If it’s too thick, add a splash more liquid. If you prefer it sweeter, a teaspoon of honey or a single pitted date works wonders.


A Pro Tip for Texture

The smoothie in your photo has a very “frothy” and consistent pink hue. To achieve this, try using unsweetened oat milk—it has a natural creaminess that binds the acidity of the berries perfectly without needing added sugars.

Strawberry Banana Smoothie

Strawberry Banana Smoothie


This smoothie is the sort that greets your morning like a gentle sunrise in a glass—creamy, cool, and rosy. The strawberry seeds drift inside like tiny constellations, and the bananas play the role of quiet sweetness architects.

Ingredients (1 tall glass or 2 small)

1 ripe banana (fresh or frozen)


1 cup fresh strawberries, hulled


½ cup yogurt (plain or strawberry)


½ cup milk (dairy or non-dairy)


1–2 tsp honey or sugar (optional, depending on sweetness)


3–4 ice cubes (skip if using frozen fruit)


½ tsp chia seeds (optional, for a subtle nutty whisper)


Instructions

Prepare the fruit: Slice the banana into easy-to-blend rounds. Trim the strawberries; if they’re particularly fragrant, let them sit a moment—they sometimes smell like they’re rehearsing for summer.


Load the blender: Add banana, strawberries, yogurt, milk, and honey. Ice cubes can join the chorus now.


Blend: Run at high speed until the mixture becomes smooth and cloud-soft. If it turns too thick, add a splash more milk; if too thin, toss another strawberry in for good measure.


Pour & finish: Empty into a chilled glass. A few sliced berries on top give a small celebration feel. Sip immediately, before the fruit decides to settle.


Q&A (Detailed, Approx. 350 Words Total)

Q: Can I make this without yogurt?

A: Yes—swap yogurt for an extra ¼ cup milk plus 2 tablespoons oats. The oats thicken the drink while keeping its strawberry-banana charm intact.

Q: How do I make the smoothie colder and thicker?

A: Freeze your banana slices beforehand. They turn the drink into something close to edible velvet. You can also freeze half your strawberries if you prefer a frostier texture.


Q: Is this suitable for a post-workout drink?

A: Absolutely. Bananas offer quick carbs, strawberries bring antioxidants, and yogurt (if you keep it in) adds protein. For extra recovery power, add one tablespoon peanut butter or a scoop of protein powder.


Q: What if my strawberries aren’t sweet enough?

A: A tease of honey—just a ribbon—can balance the flavor. Alternatively, a bit of orange juice brightens everything like a tiny spotlight.


Q: Can I store the smoothie?

A: Smoothies don’t age gracefully. If you must, refrigerate for up to 6 hours in an airtight bottle and shake before drinking. The color may deepen slightly, like fruit remembering where it came from.


If you’d like variations (chocolate, oat-based, dairy-free, or protein-rich), I can conjure those too.

Banana Pineapple Mango Yogurt Almond Milk Smoothie

Banana Pineapple Mango Yogurt Almond Milk Smoothie

Q: What ingredients do I need (1–2 servings)?


1 ripe banana, sliced


½ cup fresh or frozen mango cubes


½ cup fresh or frozen pineapple chunks


½ cup plain yogurt (Greek or regular)


¾ to 1 cup unsweetened almond milk


Optional: 1–2 teaspoons honey or dates (if extra sweetness is needed)


Optional: a few ice cubes (for a thicker, chilled smoothie)


Q: How do I prepare this smoothie step by step?

First, peel and slice the banana. Cut the mango and pineapple into small cubes if using fresh fruit. Add the banana, mango, and pineapple to a blender. Next, add the yogurt and pour in the almond milk. If you prefer a colder or thicker texture, add ice cubes. Blend on high speed for 30–60 seconds until smooth and creamy. Taste and adjust sweetness if needed, then blend again briefly. Pour into a glass and serve immediately.

Q: What does this smoothie taste like?

This smoothie has a naturally sweet, tropical flavor. The banana adds creaminess, mango provides rich sweetness, pineapple gives a light tang, and yogurt balances everything with a mild, creamy texture. Almond milk keeps it light and dairy-free-friendly.

Q: Is this smoothie healthy?

Yes, it’s very nutritious. Bananas provide potassium and energy, mango and pineapple are rich in vitamin C and antioxidants, yogurt adds protein and probiotics, and almond milk is low in calories and lactose-free. It’s ideal for breakfast, a post-workout drink, or a healthy snack.


Q: Can I customize this recipe?

Absolutely. You can add chia seeds or flaxseeds for extra fiber, protein powder for muscle recovery, or spinach for added greens without changing the taste much. Coconut milk can replace almond milk for a richer flavor.


Q: How should it be served?

Serve chilled in a tall glass. You can garnish with fruit pieces or seeds if desired. Enjoy fresh for best taste and nutrition.

Spinach & Cheese Omelette

Spinach & Cheese Omelette

Ingredients

2 tablespoons extra virgin olive oil – Provides healthy fats and prevents sticking

3 cloves garlic, minced – Adds aromatic depth and flavor

½ onion, finely diced – Creates a sweet, savory base

2 cups fresh spinach – Choose baby spinach for tenderness

3 large eggs – Room temperature eggs work best for even cooking

1 slice Havarti cheese – Can substitute with Swiss, Gruyère, or your favorite melting 🧀

1 tomato, sliced (for serving) – Fresh garnish that adds color and freshness

Pinch sea salt – Enhances all flavors

Pinch black pepper – Adds subtle heat and complexity

How to Make Spinach & Cheese Omelette:

Step-by-Step Instructions:

Step 1: Prepare Your Ingredients Start by having all ingredients prepped and ready to go, as omelette cooking moves quickly. Crack the eggs into a bowl and whisk them thoroughly with a pinch of salt and pepper until well combined and slightly frothy. Mince the garlic, dice the onion finely, and wash the spinach thoroughly. Having everything prepared ensures smooth cooking for your Ultimate Spinach & Cheese Omelette.

Step 2: Heat the Pan Heat 1 tablespoon of extra virgin olive oil in a non-stick or well-seasoned 8-10 inch pan over medium heat. The pan should be hot enough that a drop of water sizzles but doesn’t smoke. This temperature control is crucial for achieving the perfect texture.

Step 3: Sauté the Aromatics Add the diced onion to the heated pan and cook for 2-3 minutes until it becomes translucent and fragrant. Add the minced garlic and cook for another 30 seconds, stirring constantly to prevent burning. The aromatics should smell amazing and create the flavor foundation for your Ultimate Spinach & Cheese Omelette.

Step 4: Wilt the Spinach Add the fresh spinach to the pan and cook for 1-2 minutes, stirring gently until the leaves are wilted but still vibrant green. The spinach will reduce significantly in volume. Season lightly with salt and pepper, then transfer the mixture to a plate and set aside.


Step 5: Clean and Reheat the Pan Wipe the pan clean with a paper towel and add the remaining tablespoon of olive oil. Heat over medium-low heat – this lower temperature is key to preventing the eggs from cooking too quickly and becoming rubbery.

Step 6: Add the Eggs Pour the whisked eggs into the pan, tilting it to ensure even distribution. Let the eggs set for about 30 seconds without stirring, then use a spatula to gently push the cooked edges toward the center while tilting the pan to let uncooked egg flow underneath.


Step 7: Add the Filling When the eggs are almost set but still slightly wet on top, add the spinach mixture to one half of the omelette. Tear the Havarti cheese into pieces and distribute over the spinach. The residual heat will melt the cheese perfectly.


Step 8: Fold and Serve Using a spatula, carefully fold the omelette in half over the filling. Slide onto a plate and garnish with fresh tomato slices. Serve immediately while the Ultimate Spinach & Cheese Omelette is hot and the cheese is melted.


Blueberry Cottage Cheese Breakfast Bake

Blueberry Cottage Cheese Breakfast Bake

Ingredients

2 cups cottage cheese

2 cups fresh blueberries

3 large eggs

1/2 cup almond flour or gluten-free flour

1/4 cup honey or maple syrup

1 teaspoon vanilla extract

1 teaspoon baking powder

1/2 teaspoon cinnamon

Pinch of salt

Instructions

Preheat the oven to 350°F (175°C) and grease a baking dish.

In a large bowl, combine the cottage cheese, eggs, honey, and vanilla extract. Mix well until smooth.

In another bowl, whisk together the almond flour, baking powder, cinnamon, and salt.

Gradually add the dry ingredients to the wet mixture and stir until just combined.

Gently fold in the blueberries, being careful not to break them.

Pour the batter into the greased baking dish and spread it evenly.

Bake for 30-35 minutes, or until the top is golden and a toothpick inserted in the center comes out clean.

Allow to cool slightly before slicing and serving. Enjoy warm or at room temperature.

Notes

You can substitute almond flour with any gluten-free flour of your choice.

For a sweeter taste, you can add more honey or maple syrup.

Feel free to add other berries or nuts for extra flavor and texture.


Garlic Parmesan Cheeseburger Bombs

Ingredients

1 lb ground beef

1 tube refrigerated biscuit dough (8 count)

1/2 cup shredded Parmesan cheese

1 tsp garlic powder

1 tsp onion powder

1/2 tsp salt

1/2 tsp black pepper

4 oz mozzarella cheese, cut into 8 cubes

2 tbsp melted butter

1 tbsp chopped parsley (optional)

Instructions

Preheat your oven to 375°F (190°C).

In a skillet, cook the ground beef over medium heat until browned. Drain excess fat.

Add garlic powder, onion powder, salt, and black pepper to the beef. Stir well.

Flatten each biscuit into a 4-inch circle.

Place a spoonful of the beef mixture and a mozzarella cube in the center of each biscuit.

Seal the edges by pinching them together to form a ball.

Place the bombs seam-side down on a baking sheet.

Bake for 12-15 minutes until golden brown.

Brush with melted butter and sprinkle with Parmesan cheese and parsley.

Serve warm.
Notes
Use fresh garlic for extra flavor.
Substitute mozzarella with cheddar if preferred.
Store leftovers in an airtight container for up to 2 days.

Cheesy Garlic Chicken Wraps Recipe

Ingredients

2 large chicken breasts (diced)

1 tbsp olive oil

2 tsp garlic powder

1 tsp onion powder

1 tsp paprika

Salt and pepper (to taste)

1 cup shredded cheddar cheese

½ cup shredded mozzarella cheese

4 large flour tortillas

½ cup creamy garlic sauce (store-bought or homemade)

Fresh parsley (optional for garnish)

How to Make Cheesy Garlic Chicken Wraps:

Step-by-Step Instructions:

Step 1: Prepare the Chicken Start by dicing your chicken breasts into bite-sized pieces, approximately ¾-inch cubes. This ensures even cooking and makes the wraps easier to eat. Pat the chicken dry with paper towels and season generously with garlic powder, onion powder, paprika, salt, and pepper.

Step 2: Cook the Chicken Heat olive oil in a large skillet over medium-high heat. Once the oil is shimmering, add the seasoned chicken pieces in a single layer. Cook for 6-8 minutes, stirring occasionally, until the chicken is golden brown on all sides and cooked through (internal temperature should reach 165°F).

Step 3: Warm the Tortillas While the chicken is cooking, warm your flour tortillas. You can do this by wrapping them in a damp paper towel and microwaving for 30 seconds, or by heating them individually in a dry skillet for 30 seconds per side.

Step 4: Assemble the Wraps Place each warm tortilla on a clean surface. Spread 2 tablespoons of creamy garlic sauce down the center of each tortilla, leaving about 2 inches from the edges. Divide the cooked chicken evenly among the tortillas, then top with the cheddar and mozzarella cheese blend.

Step 5: Wrap and Serve Fold the bottom edge of each tortilla up over the filling, then fold in the sides and roll tightly from bottom to top. Cut each wrap in half diagonally and serve immediately while the cheese is still melted and the chicken is warm.

Sweet Heat Blackberry Jalapeño Stuffed Chicken

Sweet Heat Blackberry Jalapeño Stuffed Chicken

Ingredients

For the Chicken

  • 2 large boneless skinless chicken breasts
  • Salt & black pepper to taste
  • 1 tsp smoked paprika
  • 1 tbsp olive oil

For the Filling

  • ½ cup fresh or frozen blackberries
  • 1 small jalapeño, seeds removed and finely chopped
  • 2 oz cream cheese or goat cheese
  • 1 tbsp honey
  • 1 tsp fresh thyme leaves

Optional Garnish

Fresh thyme or parsley

Extra blackberrie

Directions

Preheat oven to 375°F (190°C).

Carefully slice a pocket into each chicken breast without cutting all the way through. Season with salt, pepper, and smoked paprika.

In a small bowl, mix blackberries, jalapeño, cream cheese, honey, and thyme until well combined.

Stuff each chicken breast with the blackberry-jalapeño mixture and secure with toothpicks if needed.

Heat olive oil in an oven-safe skillet over medium-high heat. Sear chicken 3–4 minutes per side until golden.

Transfer skillet to the oven and bake 15–20 minutes until chicken is fully cooked (internal temperature 165°F / 74°C).

Remove toothpicks, drizzle with any pan juices, and garnish with fresh thyme and extra blackberries. Serve warm.

Nutritional Info (Approx. per serving – serves 2)

Calories: 370 kcal

Protein: 36 g

Carbohydrates: 12 g

Fat: 20 g

Fiber: 3 g

Sugar: 8 g

Crispy Flatbread with Brie, Cranberries & Walnuts with Maple Chili Drizzle

Crispy Flatbread with Brie, Cranberries & Walnuts with Maple Chili Drizzle

Ingredients

  • 2 flatbreads or naan
  • 4 oz (115g) brie cheese, sliced
  • 1/4 cup dried cranberries
  • 2 tbsp walnuts, roughly chopped
  • 1 tbsp olive oil
  • Salt and pepper, to taste

Maple Chili Drizzle:

  • 2 tbsp maple syrup
  • 1/2 tsp chili flakes (adjust to taste)
  • 1/2 tsp apple cider vinegar or lemon juice

Directions

Preheat oven to 400°F (200°C). Lightly brush flatbreads with olive oil.

Arrange brie slices evenly over each flatbread. Top with cranberries and walnuts. Season lightly with salt and pepper.

Bake for 8–10 minutes, until brie is melted and flatbread edges are crisp.

In a small bowl, mix maple syrup, chili flakes, and vinegar or lemon juice. Drizzle over baked flatbreads.

Slice and serve immediately while warm and melt

Nutritional Info (per flatbread)

Calories: ~350 kcal

Protein: 10g

Carbs: 30g

Fat: 22g

Golden Cauliflower Skillet with Melted Brie, Garlic Butter Drizzle & Herb Crunch

Golden Cauliflower Skillet with Melted Brie, Garlic Butter Drizzle & Herb Crunch

Ingredients

  • 1 large head cauliflower, cut into florets
  • 2 tbsp olive oil
  • 1/2 tsp smoked paprika
  • 1/2 tsp garlic powder
  • Salt and black pepper, to taste
  • 6 oz (170g) brie cheese, sliced (rind on)

Garlic Butter Drizzle:

  • 3 tbsp unsalted butter
  • 2 cloves garlic, finely minced

Herb Crunch:

  • 1/3 cup panko breadcrumbs
  • 2 tbsp olive oil
  • 2 tbsp fresh parsley, finely chopped
  • 1 tbsp fresh thyme or rosemary, chopped

Directions

Heat olive oil in a large skillet over medium-high heat. Add cauliflower florets, smoked paprika, garlic powder, salt, and pepper.

Cook for 10–12 minutes, stirring occasionally, until cauliflower is golden brown and tender with crispy edges.

Reduce heat to medium-low. Arrange brie slices over the cauliflower, cover the skillet, and let melt for 2–3 minutes until soft and creamy.

Meanwhile, melt butter in a small pan over low heat. Add garlic and cook gently for 30–60 seconds until fragrant. Remove from heat.

In another small pan, heat olive oil and toast panko breadcrumbs until golden and crisp. Stir in chopped herbs and remove from heat.

Drizzle garlic butter over the melted brie cauliflower and finish with the herb crunch. Serve immediately while warm and gooey.

Nutritional Info (per serving)

Calories: ~390 kcal

Protein: 14g

Carbs: 22g

Fat: 28g

Greek Chicken Gyro Wraps with Spicy Cucumber Yogurt

Greek Chicken Gyro Wraps with Spicy Cucumber Yogurt

Ingredients

  • 2 chicken breasts, thinly sliced
  • 2 tbsp olive oil
  • Zest and juice of 1 lemon
  • 2 cloves garlic, minced
  • 1 tsp dried oregano
  • 1/2 tsp smoked paprika
  • Salt and pepper, to taste
  • 4 pita breads or flatbreads
  • 1 cup shredded lettuce
  • 1/2 cup cherry tomatoes, halved
  • 1/4 cup red onion, thinly sliced

Spicy Cucumber Yogurt Sauce:

  • 1 cup plain Greek yogurt
  • 1/2 cup cucumber, finely grated and squeezed dry
  • 1 tsp chili flakes or 1/2 tsp chili paste (adjust to taste)
  • 1 tbsp lemon juice
  • 1 tbsp olive oil
  • Salt, to taste

Directions

In a bowl, mix olive oil, lemon zest, lemon juice, garlic, oregano, paprika, salt, and pepper. Add chicken and marinate for at least 20 minutes.

Heat a skillet or grill pan over medium-high heat. Cook chicken for 5–7 minutes until fully cooked and lightly charred.

Prepare the spicy cucumber yogurt sauce by combining Greek yogurt, grated cucumber, chili flakes or paste, lemon juice, olive oil, and salt. Mix until smooth.

Warm pita breads until soft and pliable.

Assemble wraps by layering lettuce, tomatoes, red onion, and cooked chicken. Drizzle generously with the spicy cucumber yogurt sauce, wrap, and serve immediately.

Nutritional Info (per wrap)

Calories: ~400 kcal

Protein: 32g

Carbs: 34g

Fat: 16g

🫐 Frozen Blueberry Yogurt Clusters


🫐 Frozen Blueberry Yogurt Clusters

Ingredients

Fresh Blueberries: 1 to 2 cups (washed and dried thoroughly).


Greek Yogurt: 1 cup (plain or vanilla).


Sweetener: 1-2 tablespoons of honey or maple syrup (or the powdered sweetener shown in your image).


Vanilla Extract: 1 teaspoon.


Optional: A pinch of salt to enhance the flavor.


Instructions

Prep the Mix: In a medium bowl, whisk together the Greek yogurt, sweetener, and vanilla extract until smooth.


Coat the Berries: Fold the fresh blueberries into the yogurt mixture. Gently stir until every berry is generously coated.


Scoop & Cluster: Line a baking sheet or large plate with parchment paper. Use a spoon to scoop small “clusters” (about 5-8 berries each) onto the paper.


Freeze: Place the tray in the freezer for at least 2 to 3 hours, or until the clusters are completely firm and frozen.


Serve: Once frozen, peel them off the parchment paper. Eat them immediately or store them in a freezer-safe bag for a quick snack later.


💡 Pro-Tips for Success

Dry the Berries: Make sure your blueberries are completely dry after washing. If they are wet, the yogurt won’t stick well and you’ll get icy crystals.


Yogurt Choice: Using Full-Fat Greek Yogurt results in a creamier texture that is less likely to turn into a “hard ice” block.


Chocolate Version: For an extra treat, you can melt some dark chocolate with a teaspoon of coconut oil and drizzle it over the frozen clusters before a final 10-minute chill.

Loaded Cheesy Pocket Tacos

Loaded Cheesy Pocket Tacos

Prep time: 15 mins | Cook time: 25 mins | Total time: 40 mins

Ingredients

The Filling

  • 1 lb ground beef

  • 1 small onion: Finely chopped.

  • 1 tsp garlic powder

  • 1 tsp paprika

  • 1 tsp cumin

  • 1 tsp chili powder

  • Salt and black pepper: To taste.

  • 1/2 cup pizza sauce or taco sauce

The Cheese Blend

  • 1 cup shredded mozzarella or cheddar

  • 1/2 cup shredded Monterey Jack

The Dough & Finish

  • 1 package refrigerated crescent or pizza dough

  • 1 egg: Beaten (for egg wash).

  • Optional toppings: Sour cream, salsa, chopped parsley, or cilantro.


Instructions

1. Sauté and Season the Beef

In a skillet over medium heat, cook the ground beef and chopped onion until the beef is browned and the onions are soft. Drain the excess fat—this is crucial to ensure the dough doesn’t get soggy. Stir in the garlic powder, paprika, cumin, chili powder, salt, and pepper. Cook for 2 more minutes to let the spices “bloom,” then remove from heat to cool slightly.

2. Prepare the Oven and Dough

Preheat your oven to 375°F (190°C). Line a baking sheet with parchment paper. Unroll your dough and cut it into equal squares or rectangles. If using crescent dough, you can pinch the perforated diagonal seams together to create solid rectangles.

3. Assemble the Pockets

Place a spoonful of the beef mixture in the center of each dough piece. Drizzle a little sauce over the meat, then top with a generous pinch of the blended cheeses.

AI Tip: Leave a small border around the edges so you can get a clean seal!

4. Seal and Glaze

Fold the dough over the filling. Use your fingers or the tines of a fork to pinch the edges firmly. Place them seam-side down on your baking sheet. Brush the tops with the beaten egg wash; this is what gives them that professional, bakery-style golden sheen.

5. Bake to Perfection

Bake for 20–25 minutes. You’re looking for the dough to be puffed up and a deep golden brown. Let them rest for 5 minutes after they come out of the oven—the cheese inside will be very hot!


Serving Suggestions

  • The “Dip” Flight: Serve these with three small bowls: one with cool sour cream, one with spicy salsa, and one with guacamole.

  • Add a Crunch: If you want some texture, sprinkle a little cornmeal on the bottom of the baking sheet before placing the pockets down.

Cheesy Garlic Potato & Onion Bake

Cheesy Garlic Potato & Onion Bake

Prep time: 15 mins | Cook time: 45 mins | Servings: 4

Ingredients

  • 2 cups potatoes: Peeled and diced into small, uniform cubes.

  • 1 cup onion: Chopped finely.

  • 1 cup shredded cheese: Use a good melting cheese like Cheddar or Mozzarella.

  • 2 cloves garlic: Minced finely.

  • 1/4 cup olive oil

  • 1 tsp salt

  • 1/2 tsp black pepper

Flavor Boosters (Optional):

  • Herbs: Freshly chopped rosemary, thyme, or parsley.

  • Spice: A pinch of cayenne or smoked paprika.

  • Cheese Twist: A sprinkle of Parmesan for a nutty crust.


Instructions

1. Preparation

Preheat your oven to 375°F (190°C). While the oven warms, prep your vegetables. Ensure the potatoes are diced into even cubes so they cook at the same rate. Thoroughly wash and scrub them before peeling.

2. Sauté the Base

In a large skillet, heat the olive oil over medium heat. Add the diced potatoes and cook, stirring occasionally, until they are slightly browned and starting to soften.

3. Add Aromatics

Stir in the chopped onions and minced garlic. Season with salt and black pepper. Continue to cook until the onions are translucent and the potatoes are tender.

Note: Be careful not to burn the garlic or over-brown the onions; you want them soft and fragrant.

4. The Cheesy Finish

Transfer the mixture to a baking dish (a rustic ceramic dish looks great for serving). Evenly sprinkle the shredded cheese over the top. If you are using Parmesan or smoked paprika, add them now.

5. Bake

Place the dish in the oven and bake until the cheese is completely melted, bubbly, and slightly golden (usually about 10–15 minutes depending on your oven).


Tips for Success

  • The Best Sauté: Keep an eye on your onions. You want them translucent, not caramelized to a crisp, to maintain that sweet, savory balance.

  • Storage: If you have leftovers, they keep beautifully in an airtight container in the fridge for 3–4 days.

  • Reheating: To maintain the texture of the potatoes, reheat in the oven with a tiny drizzle of olive oil to crisp the edges back up.

Creamy Amish Baked Custard

This Amish Baked Custard is a classic, simple dessert prized for its silky, melt-in-your-mouth texture and gentle sweetness. Unlike many modern custards that use heavy cream, this traditional version relies on sweetened condensed milk and a careful tempering method to create a light, airy consistency. Finished with a sprinkle of nutmeg, it’s comforting served warm from the oven or chilled for a cool treat.


Amish Baked Custard

Ingredients

Ingredient Amount
Sweetened condensed milk 1 can (14 oz)
Hot water 4 cups
Eggs 6
Vanilla extract 2 teaspoons
Salt ¼ teaspoon
Nutmeg For garnish

How to Make Amish Baked Custard

Step 1: Prep the Base
Preheat oven to 325°F. In a large bowl, combine the sweetened condensed milk and hot water, stirring until smooth.

Step 2: Beat the Eggs
In a separate bowl, beat the eggs until light and fluffy. This helps give the custard its signature lift.

Step 3: Temper the Eggs
Slowly add a small amount of the hot milk mixture to the eggs while whisking constantly to prevent scrambling. Once warmed, stir the eggs back into the main milk mixture. Add vanilla and salt.

Step 4: Set Up a Water Bath
Pour the mixture into individual ramekins or a 2-quart baking dish. Place the dishes in a larger, high-sided pan. Carefully add about ½ inch of hot water to the outer pan to ensure gentle, even cooking.

Step 5: Bake

  • Ramekins: Bake for 1 hour.
  • Large Dish: Bake for 1 hour 40 minutes.
    Custard is done when a knife inserted in the center comes out clean.

Step 6: Cool and Garnish
Let the custard cool for at least 1 hour to set. Sprinkle with nutmeg before serving. Serve warm, or refrigerate for a chilled version.

Creamy Cabbage Lasagna

Creamy Cabbage Lasagna

Prep time: 20 mins | Cook time: 35 mins | Total time: 55 mins

Ingredients

The Base & Filling

  • 1 medium head of cabbage: Cut into large leaves, tough stems removed.

  • 2 cups ricotta cheese

  • 1 1/2 cups mozzarella cheese: shredded.

  • 1/2 cup Parmesan cheese: Grated.

  • 1 medium onion: chopped.

  • 2 cloves garlic: Mince d.

  • 2 tbsp olive oil

  • Salt and pepper: To taste.

  • Fresh basil or oregano: For garnish.

The Béchamel Sauce

  • 3 tbsp butter

  • 3 tbsp all-purpose flour (Gluten-free flour works too).

  • 2 1/2 cups milk

  • 1/4 tsp nutmeg

  • Salt and pepper: To taste.


Instructions

1. Prepare the Cabbage “Noodles.”

Bring a large pot of salted water to a boil. Add the cabbage leaves and blanch them for 2-3 minutes until tender but still firm. Drain the leaves and pat them dry with paper towels. Removing excess moisture is key to preventing a watery lasagna!

2. Create the Béchamel

In a saucepan, melt the butter over medium heat. Whisk in the flour to form a smooth paste (roux). Gradually pour in the milk, whisking constantly to keep it smooth. Simmer for 5-7 minutes until thickened. Stir in the nutmeg, salt, and pepper, then set aside.

3. Mix the Ricotta Filling

Heat olive oil in a skillet and sauté the onion and garlic until softened (about 3-4 minutes). In a medium bowl, combine the ricotta, the sautéed onion/garlic, 1 cup of the mozzarella, and the Parmesan. Season well with salt and pepper.

4. Assemble the Layers

Preheat your oven to 375°F (190°C). Grease a baking dish and follow this order:

  • Bottom: A thin layer of béchamel sauce.

  • Layer 1: Cabbage leaves, followed by half of the ricotta mixture.

  • Layer 2: Cabbage leaves and the rest of the ricotta mixture.

  • Top: A final layer of cabbage, the remaining béchamel, and the final 1/2 cup of mozzarella.

5. Bake and Serve

Cover the dish with foil and bake for 25 minutes. Remove the foil and bake for another 10 minutes until the cheese is golden and bubbling. Let it rest for 5-10 minutes before slicing to let the layers set. Garnish with fresh herbs.


Pro Tip: If your cabbage leaves are very thick, you can use a rolling pin to gently flatten the blanched ribs before layering; this helps the lasagna lay flatter and cut more cleanly.

Keto Chicken Stir-Fry with Low-Carb Noodles

Introduction: This Keto Chicken Stir-Fry with Low-Carb Noodles is a delicious, low-carb twist on the classic stir-fry. Packed with tender chicken, crisp vegetables, and keto-friendly noodles, it’s a satisfying and flavorful meal that’s ready in under 30 minutes. With a savory garlic and ginger sauce, this dish is perfect for busy weeknights when you want something healthy, filling, and packed with flavor.


Ingredients:

  • 1 lb boneless, skinless chicken breast or thigh, sliced into thin strips
  • 2 tablespoons avocado oil or olive oil, divided
  • 1 medium bell pepper, thinly sliced
  • 1 medium zucchini, spiralized or sliced into thin strips
  • 1 cup broccoli florets
  • 1 cup mushrooms, sliced
  • 1 cup shredded cabbage (optional for extra crunch)
  • 2 cloves garlic, minced
  • 1 tablespoon fresh ginger, minced
  • 1 pack low-carb noodles (such as shirataki noodles or zucchini noodles, rinsed and drained)
  • 2 tablespoons soy sauce or tamari (for gluten-free)
  • 1 tablespoon rice vinegar
  • 1 teaspoon sesame oil
  • Salt and black pepper, to taste
  • Sesame seeds and sliced green onions, for garnish

Instructions:

Step 1: Prepare the Chicken

  1. Heat Oil in a Large Skillet:
    • In a large skillet or wok, heat 1 tablespoon of avocado oil over medium-high heat.
  2. Cook the Chicken:
    • Add the sliced chicken, season with a little salt and pepper, and stir-fry for 5-7 minutes, or until fully cooked and golden brown. Remove from the skillet and set aside.

Step 2: Stir-Fry the Vegetables

  1. Add Remaining Oil to the Skillet:
    • Add the remaining 1 tablespoon of oil to the skillet.
  2. Sauté Garlic and Ginger:
    • Add the minced garlic and ginger, stirring for 1-2 minutes until fragrant.
  3. Add Vegetables:
    • Add the bell pepper, broccoli, mushrooms, zucchini, and cabbage (if using). Stir-fry for 4-5 minutes, or until the vegetables are tender but still crisp.

Step 3: Add the Noodles and Sauce

  1. Prepare Low-Carb Noodles:
    • If using shirataki noodles, rinse them thoroughly and pat them dry. If using spiralized zucchini, lightly pat dry with a paper towel to remove excess moisture.
  2. Combine Noodles with Veggies:
    • Add the low-carb noodles to the skillet with the vegetables, stirring to combine.
  3. Add Sauce Ingredients:
    • Pour in the soy sauce (or tamari), rice vinegar, and sesame oil. Stir well, coating everything in the sauce.
  4. Return Chicken to Skillet:
    • Add the cooked chicken back to the skillet and toss to combine with the noodles and veggies. Stir-fry for an additional 2-3 minutes to heat everything through.

Step 4: Serve and Garnish

  1. Transfer to Serving Plates:
    • Divide the stir-fry into bowls or plates.
  2. Garnish and Enjoy:
    • Garnish with sesame seeds and sliced green onions. Serve hot, and enjoy your keto-friendly stir-fry!

Tips and Variations:

  1. Switch Up the Protein: Substitute chicken with shrimp, beef, or tofu for different flavors.
  2. Add Spice: Add a pinch of red pepper flakes or a drizzle of sriracha if you like a little heat.
  3. Storage: Store leftovers in an airtight container in the refrigerator for up to 3 days. Reheat in a skillet over low heat.

Nutritional Information (Per Serving, Approx. 4 Servings):

  • Calories: 250
  • Carbohydrates: 6 g
  • Fiber: 2 g
  • Net Carbs: 4 g
  • Protein: 25g
  • Fat: 15g

WW SmartPoints (Per Serving):

Each serving has approximately 6 SmartPoints on the Weight Watchers program, depending on specific ingredients used.


This Keto Chicken Stir-Fry with Low-Carb Noodles is a quick, satisfying, and flavorful meal that’s low in carbs but high in nutrients and protein. With tender chicken, fresh vegetables, and keto-friendly noodles, it’s a complete meal that’s perfect for any night of the week. Enjoy!

Baked Cauliflower Tastes Better Than Meat! Crispy Roasted Cauliflower

Baked Cauliflower Tastes Better Than Meat! Crispy Roasted Cauliflower

Table of Contents

Cauliflower has transcended its reputation as a bland, overlooked vegetable and emerged as a culinary superstar, especially when roasted to perfection. My Crispy Roasted Cauliflower recipe is a testament to the versatility and deliciousness of this humble vegetable. Infused with Italian herbs and Parmesan, this dish promises a crispy, flavorful experience that rivals any meat dish. Whether you are a dedicated vegetarian or simply looking to add more vegetables to your diet, this recipe will win you over with its crispy texture and rich, savory taste.

History

Cauliflower, a member of the Brassica family, has been cultivated for centuries. Originally from the Mediterranean region, it has been a staple in many traditional cuisines. Over time, it has gained popularity worldwide due to its adaptability and nutritional benefits. Roasting cauliflower enhances its natural sweetness and creates a delightful crispiness that makes it a favorite in modern kitchens. This recipe pays homage to the classic roasted cauliflower while elevating it with contemporary flavors and techniques.

Ingredients

1 head of cauliflower

3 slices of lemon

A handful of dill

1 1/4 cups panko breadcrumbs

1 clove of minced garlic

3/4 cup all-purpose flour

3 eggs

5 tbsp olive oil

1 tsp Italian herbs

A handful of chopped parsley

1 cup grated Parmesan cheese

Salt, to taste

Ground black pepper, to taste

Sauce:
  • 3/4 cup sour cream
  • 1/2 cup yogurt
  • Freshly chopped parsley
  • Salt and ground black pepper
  • Lemon juice
Directions
Prepare the Cauliflower

Start by cutting the cauliflower into florets. Bring a pot of salted water to a boil and add the lemon slices, a handful of dill, and the cauliflower florets. Boil for five minutes, then drain and set aside. This step helps to infuse the cauliflower with subtle flavors and tenderize it slightly before roasting.

See also  3 STEPS TO MAKE CAKE
Prepare the Coating Mixture

In a large mixing bowl, combine the panko breadcrumbs, minced garlic, olive oil, Italian herbs, salt, ground black pepper, chopped parsley, and grated Parmesan cheese. Mix until well combined. This breadcrumb mixture will give the cauliflower its irresistible crispy coating.

Coat the Cauliflower

Set up a dredging station with a plate of all-purpose flour, a bowl of whisked eggs, and the bowl of breadcrumb mixture. Dredge each cauliflower floret first in the flour, then dip it in the whisked eggs, and finally coat it in the breadcrumb mixture. Ensure each piece is evenly coated for maximum crispiness.

Bake the Cauliflower

Place the coated cauliflower florets on a parchment-lined baking tray. Preheat your oven to 350°F (175°C) and bake for 20 minutes, or until the cauliflower is golden brown and crispy. The aroma of the herbs and Parmesan will fill your kitchen, making it hard to wait for the finished product.

Prepare the Sauce

While the cauliflower is baking, prepare the sauce. In a small bowl, combine the sour cream, yogurt, freshly squeezed lemon juice, chopped parsley, salt, and ground black pepper. Mix well. This creamy, tangy sauce complements the crispy cauliflower perfectly, adding a refreshing contrast to each bite.

Serve and Enjoy

Once the cauliflower is done baking, remove it from the oven and let it cool slightly. Serve the crispy roasted cauliflower with the prepared sauce. Garnish with extra parsley if desired. Enjoy this delicious, meat-free dish that is sure to impress both vegetarians and meat-lovers alike.

Nutrition Information

Per Serving:

Calories: 220

See also  Mediterranean Lemon Chicken with Artichokes & Olives

Protein: 10g

Carbohydrates: 25g

Dietary Fiber: 3g

Sugars: 3g

Fat: 10g

Saturated Fat: 3g

Cholesterol: 75mg

Sodium: 320mg

Vitamin A: 8% DV

Vitamin C: 70% DV

Calcium: 20% DV

Iron: 10% DV

Conclusion

This Crispy Roasted Cauliflower recipe is a delightful alternative to traditional meat dishes. The combination of herbs, Parmesan, and a crispy breadcrumb coating makes it a standout dish that will leave you craving more. Perfect for a weeknight dinner or as a side dish for a special occasion, this recipe is sure to become a favorite in your household.

Creamy Garlic Butter Chicken & Linguine in Alfredo Sauce 🍝🧄

Full recipe >>>Creamy Garlic Butter Chicken & Linguine in Alfredo Sauce 🍝🧄

Ingredients

For the Chicken

2 boneless, skinless chicken breasts (sliced)

Salt & black pepper – to taste

1 tsp paprika

1 tsp Italian seasoning

2 tbsp butter

1 tbsp olive oil

For the Pasta

250 g linguine (or fettuccine)

Water + salt (for boiling)

For the Alfredo Sauce

3 tbsp butter

4–5 garlic cloves (minced)

1 cup heavy cream

1 cup milk

¾ cup grated Parmesan cheese

½ tsp black pepper

Salt – to taste

½ tsp chili flakes (optional)

1 tsp Italian seasoning

Garnish (optional)

Fresh parsley

Extra Parmesan cheese

Instructions

1. Cook the Pasta

Boil linguine in salted water according to package instructions.

Drain and set aside (reserve ¼ cup pasta water).

2. Cook the Chicken

Season chicken with salt, pepper, paprika, and Italian seasoning.

Heat butter + olive oil in a pan over medium heat.

Cook chicken 4–5 minutes per side until golden and fully cooked.

Remove chicken from pan and set aside.

3. Make the Garlic Alfredo Sauce

In the same pan, add butter.

Add minced garlic and sauté for 30 seconds (don’t burn).

Pour in cream and milk, stir well.

Add salt, black pepper, chili flakes, and Italian seasoning.

Simmer on low heat for 3–4 minutes.

Add Parmesan cheese slowly, stirring until smooth and creamy.

4. Combine Everything

Add cooked pasta to the sauce.

Slice chicken and add it back to the pan.

Toss everything together.

(Add a little pasta water if sauce is too thick.)

5. Serve

Garnish with parsley and extra Parmesan.

Serve hot and creamy

🍋 Lemon Ginger Water

Full recipe>>> 🍋 Lemon Ginger Water

Ingredients:

1 fresh lemon

1-inch piece fresh ginger

1–2 cups water (hot or warm)

Optional: a few mint leaves

Method:

Wash and thinly slice the ginger (no need to peel if clean).

Boil the water.

Add ginger slices and simmer for 5–10 minutes.

Turn off heat and let it cool slightly.

Squeeze in ½ to 1 lemon (don’t add lemon to boiling water).

Strain if you like, or drink as is.

How to drink:

Best first thing in the morning on an empty stomach

Can also drink warm or cold during the day

Benefits:

Boosts digestion

Helps with bloating

Supports immunity

Refreshing and detox-friendly

Soft Homemade Oatmeal Muffins Recipe

Soft Homemade Oatmeal Muffins Recipe

These oatmeal muffins are warm, comforting, and perfect for breakfast, tea time, or a light snack. They have a golden top, a gentle oat texture, and a naturally satisfying taste. Made with simple pantry ingredients, these muffins are easy to prepare and fill your kitchen with a lovely aroma while baking. They are enjoyable on their own or with a little butter, honey, or fruit spread.


Ingredients (Makes 10–12 muffins)

1½ cups rolled oats


1 cup milk (warm, not hot)


1½ cups all-purpose flour


¾ cup sugar (white or light brown)


2 teaspoons baking powder


½ teaspoon baking soda


½ teaspoon salt


1 teaspoon ground cinnamon (optional but nice)


2 large eggs (room temperature)


½ cup cooking oil or melted butter


1 teaspoon vanilla essence


Preparation Steps

Soak the oats:

Place the rolled oats in a bowl and pour the warm milk over them. Stir gently and let them rest for about 15–20 minutes. This step softens the oats and helps create moist muffins.


Prepare the oven and pan:

Preheat your oven to 180°C (350°F). Line a muffin tray with paper liners or lightly grease each cup.


Mix dry ingredients:

In a large bowl, combine the flour, sugar, baking powder, baking soda, salt, and cinnamon. Stir well so everything is evenly mixed.


Mix wet ingredients:

In another bowl, whisk the eggs, oil (or melted butter), and vanilla essence until smooth. Add the soaked oats along with any remaining milk and mix gently.


Combine everything:

Pour the wet mixture into the bowl of dry ingredients. Fold gently using a spatula or spoon. Mix just until combined. Do not overmix, as this keeps the muffins soft.


Fill the muffin cups:

Spoon the batter evenly into the prepared muffin cups, filling each about ¾ full.


Bake:

Place the tray in the preheated oven and bake for 18–22 minutes, or until the tops are golden and a toothpick inserted in the center comes out clean.


Cool and enjoy:

Remove the muffins from the oven and let them cool in the tray for 5 minutes, then transfer to a wire rack.


Serving Tips

These oatmeal muffins taste wonderful warm or at room temperature. You can enjoy them plain or pair them with fresh fruit, yogurt, or a warm drink. They also store well in an airtight container for a few days.


If you’d like, I can also share variations such as banana oat muffins, apple oat muffins, or a honey-sweetened version.

Simple Wonton Soup Recipe

It looks like there might be a slight error in your question. Did you mean “wonton soup”? If so, I’d be happy to provide you with a simple and delicious recipe for wonton soup. Wonton soup is a popular Chinese dish consisting of wontons (dumplings) served in a flavorful broth.

Simple Wonton Soup Recipe:

Table of Contents

Ingredients:

For Wontons:

  • 1/2 pound ground pork
  • 1/2 cup finely chopped shrimp
  • 2 green onions, finely chopped
  • 1 tablespoon soy sauce
  • 1 tablespoon oyster sauce
  • 1 teaspoon sesame oil
  • 1 teaspoon grated ginger
  • Wonton wrappers

For Soup:

  • 4 cups chicken broth
  • 2 cups water
  • 2 cups bok choy, chopped
  • 1 cup sliced mushrooms
  • 1-2 teaspoons soy sauce (adjust to taste)
  • 1 teaspoon sesame oil
  • Salt and pepper to taste

Instructions:

  1. Prepare the Wonton Filling: In a bowl, mix together ground pork, chopped shrimp, green onions, soy sauce, oyster sauce, sesame oil, and grated ginger.
  2. Assemble the wontons: Place a small amount of the filling in the center of each wonton wrapper. Moisten the edges with water, fold in half to form a triangle, and press the edges to seal.
  3. Prepare the Broth: In a pot, bring chicken broth and water to a simmer. Add soy sauce, sesame oil, salt, and pepper to taste.
  4. Cook the Wontons: Gently drop the wontons into the simmering broth and cook until they float to the surface, which should take about 3-5 minutes.
  5. Add Vegetables: Add bok choy and sliced mushrooms to the broth and cook for an additional 3-5 minutes or until the vegetables are tender.
  6. Serve: Ladle the soup into bowls, making sure to include a mix of wontons, vegetables, and broth.
  7. Garnish (Optional): Garnish with additional chopped green onions and a drizzle of sesame oil if desired.

Easy Mini Cinnamon Sugar Muffins

🧁 Easy Mini Cinnamon Sugar Muffins (WW Friendly)

Soft, bite-sized, and lightened up with applesauce.

Yields: About 24 mini muffins
WW Points: ~3 points per mini muffin

📝 Ingredients

  • 1½ cups all-purpose flour

  • ½ cup sugar or sugar substitute

  • 1 tbsp baking powder

  • ½ tsp salt

  • 1 tsp cinnamon

  • ½ cup unsweetened applesauce

  • ½ cup milk (skim or almond)

  • 1 large egg

  • 1 tsp vanilla extract

Topping

  • 2 tbsp sugar or sugar substitute

  • 1 tsp cinnamon


🥣 Instructions

1️⃣ Prep:
Preheat oven to 350°F (175°C). Spray a mini muffin pan with nonstick spray.

2️⃣ Dry Mix:
In a bowl, combine flour, sugar, baking powder, salt, and cinnamon.

3️⃣ Wet Mix:
In another bowl, whisk together applesauce, milk, egg, and vanilla.

4️⃣ Combine:
Stir wet ingredients into dry ingredients just until combined. Do not overmix.

5️⃣ Fill:
Fill mini muffin cups about ⅔ full.

6️⃣ Top:
Mix topping ingredients and sprinkle evenly over batter.

7️⃣ Bake:
Bake for 12–15 minutes, until a toothpick inserted comes out clean.

8️⃣ Cool & Serve:
Let cool slightly and enjoy warm or room temperature.