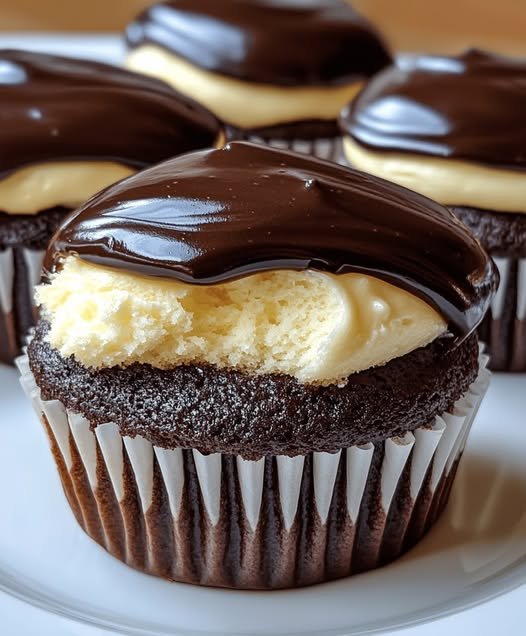
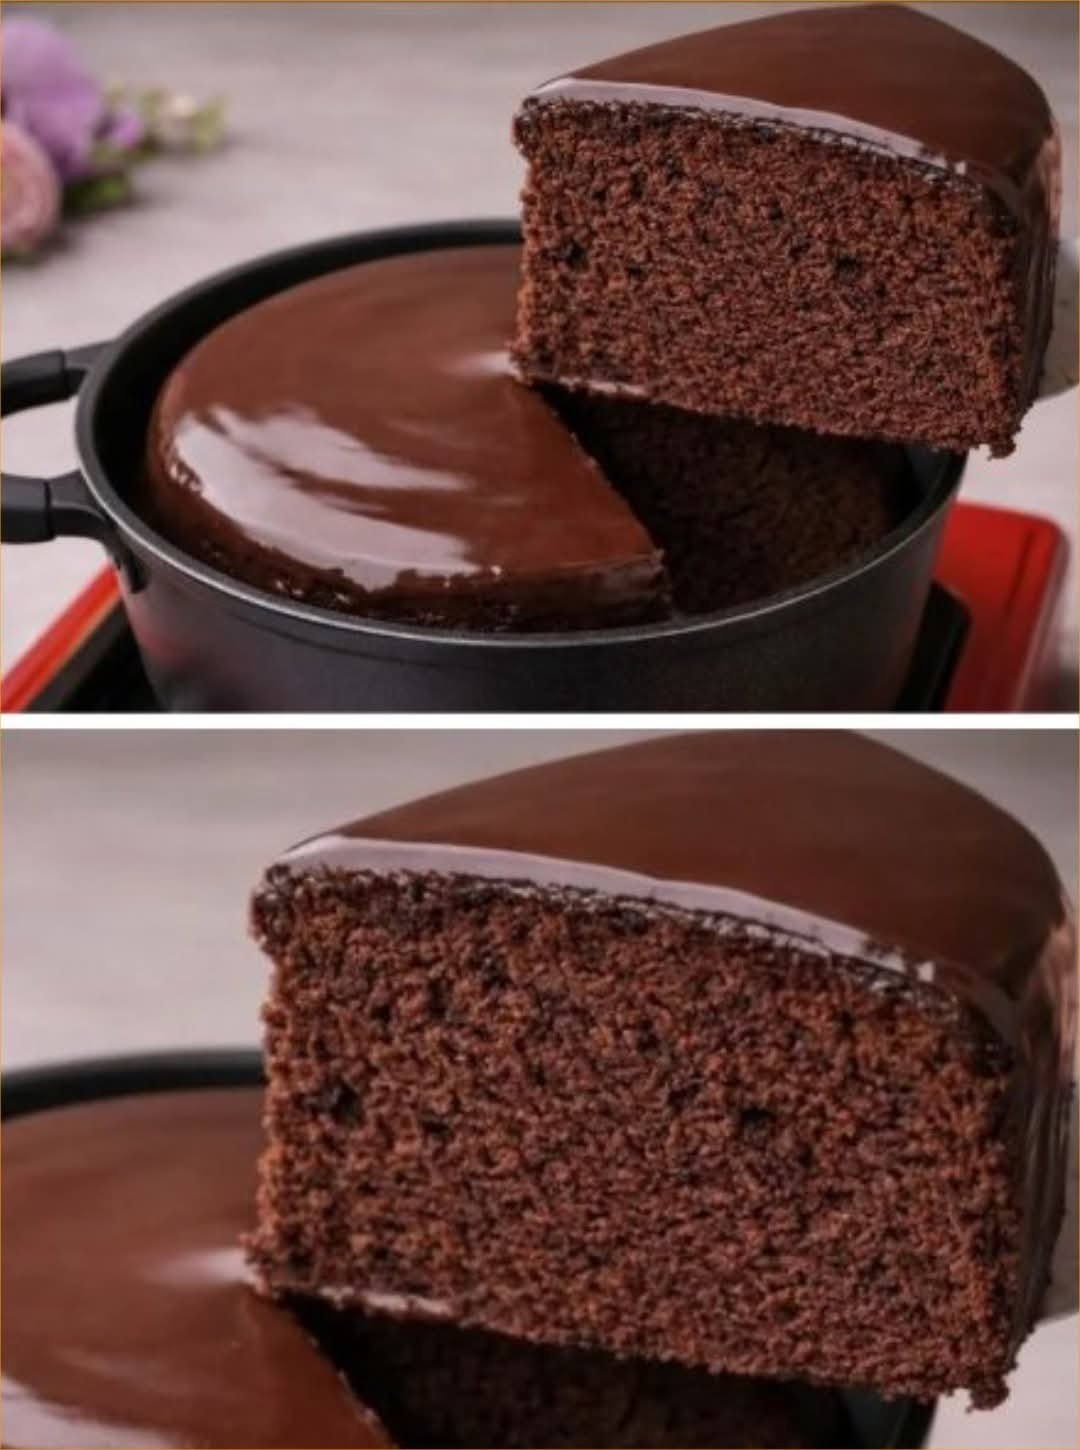
Avocado and Egg Flatbreads

Avocado and Egg Flatbreads


Ingredients

For the flatbreads
  • 1 each avocado Scoop the flesh into a bowl.
  • 1 each egg Cracked into the bowl.
  • 50 g mozzarella cheese, grated About 1/2 cup.
  • 1 small carrot, grated
  • to taste salt
  • to taste black pepper
  • 1/4 hot pepper or chili flakes (optional) For a bit of heat.
For garnishing
  • to taste fresh parsley or dill, finely chopped Add for flavor.
  • to taste sesame seeds Sprinkled over the flatbreads.
  • as needed tbsp olive oil For greasing and adding flavor.

Method

Preparation
  1. Preheat your oven to 180°C (350°F) and line a baking tray with parchment paper.
  2. Scoop the flesh of the avocado into a bowl and mash it until smooth.
  3. Crack the egg into the bowl and mix it well with the mashed avocado until fully combined.
  4. Stir in the grated carrot, grated mozzarella, chopped parsley or dill, salt, black pepper, and hot pepper or chili flakes if using. Mix until everything is evenly incorporated.
  5. Lightly grease your hands or a spoon with olive oil. Divide the mixture into portions and shape each into flatbread-like rounds on the prepared tray.
  6. Sprinkle sesame seeds generously over each round.
Baking
  1. Bake for 20–25 minutes, or until the flatbreads are set, lightly golden, and feel firm to the touch.
  2. Remove from the oven and let them cool slightly before serving.

Notes

These flatbreads are versatile enough for any meal and can be served with optional toppings like sliced tomatoes, hot sauce, or Greek yogurt. Store in an airtight container in the fridge for up to three days or freeze them for later.

Homemade Natural Energy and Immunity Booster

Homemade Natural Energy and Immunity Booster


Ingredients

  • 50g (1.75 oz) walnuts
  • 50g (1.75 oz) almonds
  • 50g (1.75 oz) prunes
  • 50g (1.75 oz) dried apricots
  • 50g (1.75 oz) raisins
  • 1 whole organic lemon
  • 50-70ml (3-5 tablespoons) raw honey
  • Baking soda (for cleaning lemon)

Instructions

Preparing the Nuts

  1. Soak walnuts and almonds in clean water for 4-6 hours
  2. Drain thoroughly and pat dry with paper towels
  3. This soaking process activates the nuts and makes them more digestible

Preparing the Dried Fruits

  1. Rinse prunes and dried apricots under running water
  2. Pat dry thoroughly with paper towels
  3. Rinse raisins and pat dry

Preparing the Lemon

  1. Clean the lemon by sprinkling with baking soda
  2. Scrub gently and rinse thoroughly
  3. Cut the whole lemon into pieces, including the peel
  4. Remove any visible seeds

Making the Mixture

  1. Place all dried fruits and nuts in a food processor or blender
  2. Add the cut lemon pieces
  3. Process until finely chopped and well combined
  4. Transfer to a clean bowl
  5. Stir in honey until thoroughly incorporated
  6. Store in an airtight glass jar in the refrigerator

Usage

  • Take 1 teaspoon daily, preferably in the morning
  • Can be consumed with a glass of water
  • Best taken on an empty stomach

Storage

  • Keep refrigerated in an airtight glass container
  • Will last up to 3 months when properly stored
  • Do not use metal containers for storage

Nutrition Information

Per teaspoon (approximately 5g):

  • Calories: 20
  • Protein: 0.5g
  • Healthy Fats: 1g
  • Carbohydrates: 2.5g
  • Fiber: 0.5g

Health Benefits

This natural supplement is rich in:

  • Vitamin C from fresh lemon
  • Vitamin E and healthy fats from nuts
  • Iron and fiber from dried fruits
  • Antioxidants from all ingredients
  • Natural enzymes and minerals
  • Beneficial plant compounds

Important Notes

  • Always use organic ingredients when possible
  • Consult with healthcare provider before starting any new supplement
  • Not recommended as a meal replacement
  • Adjust honey amount based on personal preference
  • Those with nut allergies should avoid this mixture
  • Diabetics should consult their doctor due to natural sugar content

This time-tested remedy combines the nutritional benefits of nuts, dried fruits, and honey to create a natural energy booster that supports daily health and vitality when taken regularly as part of a balanced diet.

Creamy Mango Banana Smoothie

Creamy Mango Banana Smoothie

Prep time: 5 minutes | Servings: 1


Ingredients

1 cup Frozen Mango Cubes: Using frozen mango is key to getting that thick, whipped texture shown in the image.


1 Frozen Banana: Sliced before freezing for easier blending.


1/2 cup Greek Yogurt: This provides the creamy white layer and adds protein.


1/4 to 1/2 cup Milk of choice: (Dairy, almond, or oat milk all work well). Start with less to keep it thick.


Optional: A squeeze of honey or a splash of vanilla extract for extra sweetness.


Instructions

Prep the Fruit: If your fruit isn’t already frozen, peel and slice the banana and cube the mango, then freeze for at least 4 hours.


Layer the Blender: Add the liquid (milk) first, followed by the yogurt, then the frozen mango and banana. Adding liquid first helps the blades move more easily.


Blend: Start on a low speed and gradually increase to high. If you have a tamper for your blender, use it to push the frozen fruit down.


Tip: If it’s too thick to move, add milk one tablespoon at a time until it blends smoothly.


Assemble (Optional): To match the photo, you can place a few fresh banana slices and mango chunks against the inside of your glass before pouring the smoothie in.


Serve: Pour the mixture into a glass. It should be thick enough to hold a “swirl” on top!


Pro-Tips for Success

For a “Smoothie Bowl” Texture: Use only a splash of milk. The less liquid you use, the more it will resemble the thick, whipped consistency in the picture.


Naturally Sweet: Make sure your bananas are spotty and ripe before you freeze them; this ensures the smoothie is sweet without needing added sugar.

Creamy Banana Nut Milkshake Delight

Creamy Banana Nut Milkshake Delight

This Creamy Banana Nut Milkshake Delight is a classic, joyful treat that brings together smooth bananas, rich ice cream, crunchy nuts, and festive toppings. It is perfect for warm afternoons, special gatherings, or anytime you want something comforting and refreshing. The texture is thick and creamy, while the flavors are naturally sweet and balanced. This recipe is simple to prepare at home and looks beautiful when served in tall glasses like the ones shown in the image.


Ingredients (Serves 2 large shakes)

2 ripe bananas, peeled and sliced


2½ cups vanilla ice cream, well chilled


1½ cups cold milk (full cream or low-fat, as preferred)


2 tablespoons chopped nuts (walnuts or pecans work very well)


1 tablespoon honey or sugar (optional, depending on sweetness preference)


½ teaspoon vanilla essence


Toppings

Whipped cream


Extra chopped nuts


Colorful sugar sprinkles


2 maraschino cherries


Banana slices for garnish


Step-by-Step Instructions

Prepare the bananas

Slice the bananas and place them in the freezer for 20–30 minutes. Slightly chilled bananas help create a thicker, creamier shake.


Blend the base

Add the chilled banana slices, vanilla ice cream, cold milk, honey or sugar (if using), and vanilla essence to a blender. Blend on medium speed until the mixture becomes smooth and creamy with no lumps.


Add texture

Add the chopped nuts to the blender and pulse briefly. This keeps small crunchy bits in the shake, giving it a pleasant texture without overpowering the creaminess.


Serve immediately

Pour the milkshake evenly into two tall serving glasses. The shake should be thick enough to hold toppings beautifully.


Decorate generously

Top each glass with a swirl of whipped cream. Sprinkle extra chopped nuts and colorful sugar sprinkles over the top. Place a banana slice on the side of each glass and finish with a cherry on top for a classic look.


Serving Tips

Serve immediately with long spoons or wide straws.


For extra richness, replace half the milk with chilled cream.


For a lighter version, use frozen yogurt instead of ice cream.


This Creamy Banana Nut Milkshake Delight is comforting, visually appealing, and full of flavor. It is easy to make, loved by all ages, and perfect for turning an ordinary moment into something special.

Blueberry Fluff Salad

Blueberry Fluff Salad

A creamy, fruity, no-bake dessert salad that’s light, fluffy, and perfect for summer or parties.


🕒 Prep Time

10 minutes

❄ Chill Time

1 hour

🍽 Servings

4–6


🛒 Ingredients

  • 1 cup fresh or frozen blueberries

  • 1 cup mini marshmallows

  • ½ cup granulated sugar

  • 1 teaspoon vanilla extract

  • 1 cup heavy whipping cream (cold)

  • 8 oz cream cheese, softened

  • ½ cup crushed pineapple, drained

  • ½ cup chopped nuts (optional – walnuts or pecans)

  • ½ cup raisins or dried cranberries (optional)


👩‍🍳 Instructions

1️⃣ Prepare the Blueberries

If using frozen blueberries, thaw and drain excess juice.
Mash half of the blueberries lightly for color and flavor.


2️⃣ Make the Cream Base

In a bowl, beat cream cheese with sugar until smooth.
Add vanilla extract and mix well.


3️⃣ Whip the Cream

In another bowl, beat cold heavy cream until soft peaks form.


4️⃣ Combine

Gently fold whipped cream into the cream cheese mixture.


5️⃣ Add Fruits

Fold in:

  • Blueberries

  • Crushed pineapple

  • Mini marshmallows

  • Nuts and dried fruit (if using)

Mix gently so it stays fluffy.


6️⃣ Chill

Cover and refrigerate for at least 1 hour before serving.


🍨 Serving Ideas

  • Serve cold in glass bowls

  • Garnish with:
    ✔ Fresh blueberries
    ✔ Mint leaves
    ✔ A few marshmallows


💡 Tips

  • For sweeter taste, add 1–2 tbsp extra sugar

  • For lighter version, use whipped topping instead of heavy cream

  • Best eaten within 24 hours

  • Do not freeze (texture will change)

Heavenly Orange Raisin Scones

Heavenly Orange Raisin Scones


Ingredients

Dry Ingredients
  • 8 cups all-purpose flour
  • 10 tsp baking powder
  • 1 cup sugar 200 g
  • Orange zest to taste
Wet Ingredients
  • 500 g margarine Can substitute with butter
  • 1.5 cups raisins 225 g
  • 2 cups Amasi Can substitute with yogurt or buttermilk
  • 0.5 cup fresh orange juice Freshly squeezed is best
  • 2 tsp vanilla essence optional
  • 3 units eggs 1 egg for egg wash

Method

Preparation
  1. Preheat your oven to 400°F (200°C).
  2. In a large bowl, combine the flour, baking powder, and sugar.
  3. Cut in the margarine until the mixture is crumbly.
  4. Stir in the orange zest and raisins until evenly distributed.
Mixing
  1. In another bowl, mix Amasi, orange juice, and vanilla essence if using.
  2. Pour the wet mixture into the dry ingredients and combine gently.
Shaping and Baking
  1. Knead the dough lightly on a floured surface, roll it out, and cut into your desired shapes.
  2. Brush the tops with the beaten egg for a golden finish.
  3. Place the scones on a baking tray and bake for 15-20 minutes, or until lightly golden.

Notes

Store leftover scones in an airtight container at room temperature for up to 2 days. For longer storage, freeze them in a zip-top bag. Experiment with different dried fruits or nuts, and feel free to add spices like cinnamon or nutmeg for variation.

KETO SAUSAGE ROLLS.

🥐 Keto Sausage Rolls

Crispy, savory, and only 2g Net Carbs per roll.

Ingredients

The Keto Dough

  • 1 ½ cups Almond flour

  • ½ cup Coconut flour

  • 1 cup Shredded mozzarella cheese

  • 2 tbsp Cream cheese

  • 2 Large eggs (1 for dough, 1 for egg wash)

  • 1 tbsp Psyllium husk powder (optional, for elasticity)

  • Baking Powder: ½ tsp

  • Seasoning: ¼ tsp salt, ¼ tsp black pepper

  • Optional: 1 tbsp melted butter

The Sausage Filling

  • 1 lb Ground pork sausage (or turkey/chicken)

  • ½ Medium onion, finely diced

  • 1 Garlic clove, minced

  • 1 tbsp Fresh parsley, chopped

  • Seasoning: 1 tsp dried sage, 1 tsp ground mustard, salt & pepper to taste

  • 1 tbsp Olive oil (for sautéing)


Instructions

1. Prepare the Filling

  1. Sauté: Heat olive oil in a skillet. Sauté onion and garlic for 3-4 minutes until translucent.

  2. Brown: Add the ground sausage. Break it apart with a spatula and cook until browned (5-7 mins).

  3. Season: Stir in sage, mustard powder, salt, and pepper. Remove from heat and let cool slightly.

2. Make the Dough

  1. Melt Cheese: Combine mozzarella and cream cheese in a microwave-safe bowl. Heat in 30-second bursts until fully melted and smooth.

  2. Mix Dry: In a separate bowl, whisk together almond flour, coconut flour, baking powder, salt, pepper, and psyllium husk.

  3. Combine: Add 1 egg (and butter if using) to the melted cheese. Gradually incorporate the dry ingredients. Knead by hand until a pliable dough forms. Tip: If too sticky, add 1 tbsp of almond flour at a time.

3. Assemble & Bake

  1. Roll: Place dough between two sheets of parchment paper. Roll into a rectangle about 1/4-inch thick.

  2. Cut: Cut into long strips (about 3 inches wide).

  3. Fill: Place 2-3 tbsp of the cooked sausage mixture down the center of each strip.

  4. Seal: Fold the dough over the meat and pinch the edges (use a fork for a decorative seal).

  5. Egg Wash: Brush the tops with the remaining beaten egg for a golden finish.

  6. Bake: Place on a parchment-lined tray at 375°F (190°C) for 20-25 minutes until golden brown.

Anti-Inflammatory Liquid Gold

Anti-Inflammatory Liquid Gold (Green Juice)
Yields: ~2 large bottles (8–10 servings)
Prep Time: 10 minutes
Blend Time: 5 minutes
📝 Ingredients
2 large cucumbers
1 bunch celery (about 6–8 stalks)
1 large bunch fresh parsley
1 large bunch fresh cilantro
2 cups fresh spinach or kale
1–2 inch piece fresh ginger, peeled
1 lemon, peeled (or juice only)
1 green apple (optional, for mild sweetness)
1 tsp turmeric powder or 1-inch fresh turmeric root
Pinch of black pepper (boosts turmeric absorption)
2–3 cups cold filtered water (adjust for thickness)
👩‍🍳 Instructions
Wash & prep:
Thoroughly wash all produce. Roughly chop cucumbers, celery, greens, and apple.
Blend:
Add everything to a high-speed blender. Blend until completely smooth (1–2 minutes).
Strain (optional):
For a juice-like texture, strain through a nut milk bag or fine mesh sieve.
For maximum fiber, drink as-is.
Store:
Pour into airtight glass bottles or jars. Refrigerate up to 3–4 days.

Creamy Mango Mosaic Gelatin

Ingredients

For the Mango Cubes:

  • 2 packages (approx. 85g each) Mango-flavored gelatin powder

  • 3 cups Boiling water (Use slightly less water than the box suggests to ensure the cubes are firm)

For the Creamy Base:

  • 1 can (397g) Sweetened condensed milk

  • 1 can (350ml-400ml) Evaporated milk (chilled)

  • 1 cup All-purpose cream or heavy whipping cream (chilled)

  • 4 tbsp Unflavored gelatin powder (clear/neutral)

  • ½ cup Cold water (to bloom the gelatin)

  • Optional: 1 cup of fresh mango chunks for extra texture.


Instructions

1. Prepare the Mango Cubes

  1. Dissolve the mango gelatin powder in boiling water. Stir until completely dissolved.

  2. Pour the mixture into a flat rectangular container so it’s about 1 inch deep.

  3. Refrigerate for at least 3 hours or until very firm.

  4. Once set, slice the gelatin into small, uniform cubes. Set aside in the fridge.

2. Bloom the Neutral Gelatin

  1. In a small bowl, sprinkle the unflavored gelatin over the ½ cup cold water.

  2. Let it sit for 5–10 minutes until it becomes thick and spongy.

  3. Microwave for 30 seconds or melt it over a double boiler until it is completely liquid and clear. Do not let it boil.

3. Mix the Creamy Base

  1. In a large mixing bowl, combine the evaporated milk, sweetened condensed milk, and cream.

  2. Whisk until well combined and smooth.

  3. Slowly pour the melted unflavored gelatin into the milk mixture while whisking constantly to prevent lumps.

4. Assembly

  1. Place your mango cubes (and fresh mango chunks, if using) into your serving glass dish or mold.

  2. Slowly pour the creamy milk mixture over the cubes.

  3. Gently stir or shake the dish to ensure the liquid fills all the gaps between the cubes.

  4. Refrigerate for at least 4 to 6 hours, or preferably overnight, until fully set.


💡 Pro-Tips for Success

  • The Temperature Rule: Ensure your creamy milk mixture is at room temperature before pouring it over the mango cubes. If it’s too warm, it will melt the cubes and ruin the “mosaic” look.

  • Easy Release: If you are using a silicone mold instead of a glass dish, lightly grease the mold with a tiny bit of neutral oil (like canola) before adding the gelatin to make it pop out perfectly.

  • Color Variation: You can make this with multiple colors (strawberry, lime, and orange) to create a true “Cathedral Window” effect!

Keto White Chocolate Macadamia Nut Cookies

Keto White Chocolate Macadamia Nut Cookies

Prep time: 15 mins | Bake time: 9 mins | Yields: Approx. 24 cookies

Ingredients

  • 1/2 cup Unsalted butter, softened

  • 3/4 cup Brown Sugar Swerve (packed)

  • 1/2 cup Granular Swerve

  • 2 Large eggs (room temperature preferred)

  • 1 tsp Vanilla extract

  • 2 1/2 cups Super-fine almond flour

  • 1 tsp Baking soda

  • 1/2 tsp Salt

  • 1 cup Macadamia nuts, roughly chopped

  • 1 cup Lily’s White Chocolate Chips


Instructions

  1. Prep the Oven: Preheat your oven to 350°F (175°C). Line two large baking sheets with parchment paper or silicone baking mats.

  2. Cream the Fats & Sugars: In a large bowl, cream together the softened butter, Brown Swerve, and Granular Swerve until light and fluffy (about 2 minutes with a hand mixer).

  3. Incorporate Liquids: Beat in the eggs one at a time, followed by the vanilla extract. Scrape down the sides of the bowl to ensure everything is combined.

  4. Mix Dry Ingredients: In a separate medium bowl, whisk together the almond flour, baking soda, and salt to remove any large clumps.

  5. Combine: Gradually add the dry flour mixture to the wet sugar mixture. Mix on low speed or by hand until a thick dough forms.

  6. The Mix-ins: Gently fold in the chopped macadamia nuts and the white chocolate chips.

  7. Scoop: Drop rounded teaspoon-sized scoops (or use a small cookie scoop) onto the prepared baking sheets, spacing them about 2 inches apart.

  8. Bake: Bake for 9 to 9:30 minutes. Watch for a darker golden brown color on the edges. Note: They will look very soft, but they will firm up as they cool.

  9. Cool: Slide the entire parchment sheet onto a cooling rack. Do not move the cookies until they are completely cooled, as almond flour cookies are fragile while warm.


A Quick Tip

Since almond flour doesn’t spread quite as much as wheat flour, if you prefer a flatter cookie, you can gently press the tops of the dough balls down with a spoon before putting them in the oven.

Classic Strawberry Banana Smoothie

Classic Strawberry Banana Smoothie

This recipe makes one large or two small servings. It’s naturally sweet, creamy, and takes about 5 minutes to whip up.


Ingredients

Item Amount Note

Frozen Strawberries 1 ½ cups Provides the chill and the pink color

Banana 1 medium Use a ripe one for better sweetness

Milk of choice 1 cup Dairy, almond, or oat all work well

Greek Yogurt ¼ cup For extra creaminess and protein

Honey or Maple Syrup 1 tsp Optional, depending on your sweetness preference

Instructions

Prep the Fruit: If your banana isn’t frozen, peel it and break it into chunks. Using at least one frozen fruit (the strawberries) ensures the smoothie is thick and cold without needing ice, which can water down the flavor.


Combine: Place the milk and yogurt into the blender first (liquid at the bottom helps the blades move easier), then add the strawberries and banana.


Blend: Start on a low speed and gradually increase to high. Blend for about 45–60 seconds until the mixture is completely smooth and no fruit chunks remain.


Adjust: If it’s too thick, add a splash more milk. If it’s too thin, add a few more frozen strawberries.


Serve: Pour into a tall glass. To match your photo, garnish with a fresh strawberry on the rim!


Pro-Tips for the Best Texture

The “Spotty” Banana: Use bananas with a few brown spots; they have a higher sugar content and blend smoother than green ones.


Creamy Boost: Add a tablespoon of almond butter or a sprinkle of chia seeds if you want to make it more filling.

Strawberry Apple Cider Punch

🍓 Recipe: Strawberry Apple Cider Punch

  • Prep time: 15 minutes

  • Yields: 8–10 servings

  • Category: Beverage (Non-alcoholic)

Ingredients

Category Ingredient Quantity
The Base Fresh Apple Cider (unfiltered is best) 6 cups
The Fruit Fresh Strawberries (hulled and sliced) 2 cups
The Fizz Sparkling Water or Ginger Ale 3 cups
The Zing Fresh Lemon Juice 1/4 cup
The Aromatics Cinnamon Sticks 3–4 sticks
Garnish Fresh Mint Leaves & Sliced Apples Handful

Instructions

  1. Muddle the Berries: In a large pitcher or punch bowl, add 1 cup of the sliced strawberries and the lemon juice. Use a muddler (or wooden spoon) to gently mash them until the juices are released.

  2. Combine: Pour in the apple cider and stir well to incorporate the strawberry base.

  3. Infuse: Add the remaining sliced strawberries, apple slices, and cinnamon sticks. Let the mixture sit in the fridge for at least 30 minutes to allow the flavors to marry.

  4. Add the Fizz:  Just before serving, pour in the chilled sparkling water or ginger ale. Stir gently to keep the bubbles intact.

  5. Serve: Pour into ice-filled glasses and garnish with a sprig of fresh mint.

💡 Tips & Notes

  • Temperature Matters: Always chill your cider and sparkling water for at least 4 hours before mixing. This prevents the ice from melting too quickly and watering down the flavor.

  • The Cider Choice: Use “Apple Cider” (the cloudy, brown stuff) rather than “Apple Juice.” Cider has a complex, tart profile that balances the strawberries much better.

  • Sweetness Control: If your cider is very tart, you can stir in 2 tablespoons of honey or maple syrup during Step 2.

🥗 Nutritional Info (Per Serving)

Estimate based on 1 serving (approx. 8 oz) using sparkling water.

  • Calories: 110 kcal

  • Total Fat: 0g

  • Carbohydrates: 28g

  • Sugars: 22g (natural fruit sugars)

  • Vitamin C: 35% DV

  • Potassium: 210mg

✨ The Benefits

  • Antioxidant Boost: Both strawberries and apples are packed with polyphenols and vitamin C, which support immune health.

  • Hydration with Flavor: It’s a great way to stay hydrated for those who find plain water boring, without the artificial dyes found in store-bought sodas.

  • Digestive Aid: If using a high-quality, unfiltered cider, you’re getting a small dose of pectin, which is great for gut health.

❓ Common Questions

Q: Can I make this alcoholic?

A: Absolutely. It pairs beautifully with bourbon for a “harvest” feel or with Prosecco if you want a lighter, spritzer-style drink.

Q: Can I make this a day in advance?

A: You can prep the cider and fruit mixture 24 hours early. However, do not add the sparkling water or ginger ale until the very last second, or it will go flat.

Q: Can I use frozen strawberries?

A: Yes!  Frozen berries actually act like flavored ice cubes and keep the punch cold longer without diluting it.

Easy Dessert Without Gelatin With Just 3 Simple Ingredients

Hi everyone, today we’re going to learn how to make Easy Dessert using simple ingredients. So grab your pen and paper to jot down the ingredients, then follow the complete preparation method.

How to Make Easy Dessert

Dessert recipe without gelatin and condensed milk. See below the list of all ingredients and required quantities. And then, a very complete preparation method with details of the recipe.

Recipe Ingredients:

10 tablespoons powdered milk

1 packet (25 grams/0.88 oz) passion fruit flavored powdered drink mix

¾ cup (200 ml/6.8 fl oz) ice-cold water

Instructions:

First, in a blender, add the ice-cold water and passion fruit powdered drink mix. Blend until smooth and well combined.


Then, without turning off the blender, gradually add the powdered milk. Continue blending until you achieve a creamy, thick consistency.

Once the dessert is smooth and creamy, turn off the blender and pour the mixture into individual cups or a glass dish.


Finally, refrigerate for about 2 hours, then serve chilled.

🐟 Crispy Pan Fried Fish (Ready in 5 Minutes)

🐟 Crispy Pan Fried Fish (Ready in 5 Minutes)

Quick, budget-friendly, and perfectly crispy on the outside with flaky, juicy fish inside. This method works great for both fresh and frozen fillets.


⭐ Why You’ll Love It

  • Ready in under 10 minutes

  • Uses simple pantry ingredients

  • No deep frying needed

  • Golden, crispy crust every time

  • Delicious with just lemon or any sauce you like


🛒 Ingredients (Serves 2)

  • 2 thin fish fillets (5–6 oz each) – tilapia, cod, or haddock

  • Salt & black pepper (to taste)

  • ¼ cup all-purpose flour (or rice flour)

  • 1 tsp paprika (optional)

  • 2–3 tbsp vegetable, canola, or peanut oil

  • Lemon wedges (for serving)

  • Chopped parsley or dill (optional garnish)


🍳 Instructions

  1. Dry the fish:
    Pat fillets completely dry using paper towels.

  2. Season:
    Sprinkle both sides with salt, pepper, and paprika if using.

  3. Coat with flour:
    Dredge fish in flour, pressing lightly. Shake off excess.

  4. Heat the pan:
    Heat a heavy skillet on medium-high until hot. Add oil to lightly coat the bottom.

  5. Cook:
    Place fish in pan without overcrowding.
    Cook 2–3 minutes without moving until golden and crispy.

  6. Flip:
    Gently turn and cook another 2 minutes until fully cooked and flaky.

  7. Serve:
    Remove from pan and serve hot with lemon wedges and herbs.


✅ Pro Tips

  • Always heat pan before adding oil

  • Do not move fish too soon — it will release naturally

  • Thicker fillets need 1–2 extra minutes per side

  • Fish is done when it flakes easily with a fork


🥣 Sauce Ideas (Optional)

  • Lemon butter sauce

  • Garlic mayo

  • Creamy dill sauce

  • Tartar sauce

  • White wine butter sauce


🕒 Make-Ahead Tip

You can coat the fish in flour and store in the fridge up to 24 hours before frying.


This crispy pan-fried fish pairs perfectly with:
✔ Rice
✔ Salad
✔ Roasted vegetables
✔ Mashed potatoes

Quick Pickled Cucumbers.

Quick Pickled Cucumbers.
Ingredients:
2 large cucumbers (thinly sliced)
1 small red onion (thinly sliced)
1/2 cup white vinegar
1/4 cup water
2 tablespoons sugar (adjust to taste)
1/2 teaspoon salt
1/4 teaspoon black pepper
1/2 teaspoon mustard seeds (optional)
1 tablespoon chopped fresh dill (or 1/2 tsp dried dill)
Optional: pinch of red pepper flakes for heat
Instructions:
Prep the Veggies:
Wash and thinly slice cucumbers (use a mandoline if you have one).
Slice the red onion into thin rings.
Make the Pickling Brine:
In a small bowl, whisk together vinegar, water, sugar, salt, and pepper until sugar dissolves.
Add mustard seeds, dill, and red pepper flakes if using.
Combine:
In a large bowl or jar, layer the cucumbers and onions.
Pour the brine over the top until everything is submerged.
Chill & Marinate:
Cover and refrigerate for at least 1–2 hours (better overnight) to let flavors meld.
Serve:
Toss before serving and enjoy chilled as a refreshing side dish.
Tips:
Use Persian or English cucumbers for fewer seeds and crisper texture.
Lasts up to 5 days in the fridge.
Great with grilled meats, sandwiches, or as a topping for rice bowls.

This Broccoli Cheddar Soup

 Servings: 4–6 | Prep time: 10 mins | Cook time: 20 mins
Ingredients
1/4 cup Unsalted butter
1/2 Yellow onion, finely diced
1/4 cup All-purpose flour
2 cups Whole milk (or half-and-half for extra richness)
2 cups Chicken or vegetable broth
3 cups Fresh broccoli florets, chopped small
1 cup Carrots, julienned or shredded
8 oz Sharp cheddar cheese, freshly grated (about 2 cups)
1/2 tsp Garlic powder
1/4 tsp Smoked paprika (optional, for depth)
Salt and pepper to taste
Instructions
Sauté: In a large pot or Dutch oven, melt the butter over medium heat. Add the onion and sauté until translucent (about 3–4 minutes).
Make the Roux: Sprinkle the flour over the onions. Whisk constantly for 1–2 minutes to cook out the raw flour taste—don’t let it brown!
Liquids: Slowly pour in the broth and milk while whisking vigorously to prevent lumps.
Simmer: Add the broccoli, carrots, garlic powder, and paprika. Bring to a gentle simmer. Reduce heat to low, cover, and cook for 12–15 minutes until the broccoli is fork-tender.
The Cheese: Remove the pot from the heat. Stir in the grated cheddar cheese one handful at a time until fully melted and smooth.
Season: Taste and add salt/pepper as needed. Serve immediately.
💡 Notes & Pro-Tips
Grate Your Own Cheese: Pre-shredded cheese is coated in potato starch to prevent clumping, which can make your soup grainy. Grating a block of sharp cheddar yields a much silkier texture.
Texture Control: If you prefer a smoother soup, use an immersion blender to pulse it a few times before adding the cheese.
Don’t Boil the Cheese: Always take the pot off the heat before adding the cheese. Boiling cheese can cause it to “break” or separate, leaving you with an oily mess.
🥗 Nutritional Info (Per Serving)
Calories: 380 kcal
Protein: 16g
Fat: 28g
Carbs: 18g
Fiber: 3g

Chicken & Gravy:

Prep time: 20 minutes
Cook time: 40 minutes
Servings: 2
Calories per serving: ~720 kcal
Ingredients 🛒
For the Chicken & Gravy:
2 bone-in, skin-on chicken thighs 🍗
1 tbsp olive oil 🫒
Salt & pepper to taste 🧂
1 tsp dried thyme
1 tsp garlic powder
1 tbsp butter 🧈
1 tbsp flour
¾ cup chicken stock
2 tbsp heavy cream (optional)
1 tbsp chopped parsley 🌿
For the Mashed Potatoes:
400g potatoes, peeled and cubed 🥔
2 tbsp butter
2–3 tbsp milk or cream
Salt to taste
For the Roasted Carrots:
200g baby carrots 🥕
1 tbsp olive oil
½ tsp honey or brown sugar
Salt & pepper
Chopped parsley for garnish
Instructions 👩‍🍳
Preheat oven to 400°F (200°C).
Roast the carrots: Toss carrots with olive oil, honey, salt, and pepper. Spread on a baking sheet and roast for 25–30 minutes, turning once, until tender and caramelized.
Cook the chicken: Season chicken thighs with salt, pepper, thyme, and garlic powder. Heat olive oil in a skillet over medium-high heat. Sear chicken skin-side down for 5–6 minutes until golden. Flip and sear the other side for 4–5 minutes. Transfer to oven and roast for 20 minutes or until internal temperature hits 165°F (74°C).
Boil potatoes: Meanwhile, boil potatoes in salted water for 15–18 minutes or until fork-tender. Drain, mash with butter and milk/cream. Season to taste.
Make the gravy: In the same skillet used for chicken, melt butter over medium heat. Stir in flour and cook for 1 minute. Gradually whisk in chicken stock and cook for 3–4 minutes until thickened. Stir in cream if using, and add chopped parsley.
Assemble & serve: Plate mashed potatoes, top with chicken thigh and spoon over gravy. Add roasted carrots on the side. Finish with a sprinkle of parsley.
Notes & Variations 📝
Use boneless chicken thighs if preferred—reduce oven time by 5–7 minutes.
Swap carrots for roasted parsnips or green beans.
Gravy can be made dairy-free by omitting cream and using olive oil.

Lemon Blueberry Scones

Lemon Blueberry Scones

Prep time: 20 mins | Bake time: 18–22 mins | Yields: 8 scones

Ingredients

For the Scones For the Lemon Glaze
2 cups All-purpose flour 1 cup Powdered sugar
1/2 cup Granulated sugar 2 tbsp Fresh lemon juice
2 1/2 tsp Baking powder 1 tsp Lemon zest
1/2 tsp Salt 1 tbsp Heavy cream (optional, for thickness)
1 tbsp Lemon zest (about 2 lemons)
1/2 cup Unsalted butter (cold and grated)
1/2 cup Heavy cream (cold)
1 Large egg
1 tsp Vanilla extract
1 cup Fresh blueberries

Instructions

1. Prep the Dry Mix

In a large bowl, whisk together the flour, sugar, baking powder, salt, and lemon zest. The zest is best rubbed into the sugar with your fingertips to release the citrus oils.

2. Incorporate the Butter

Take your cold, grated butter and add it to the flour mixture. Use a pastry cutter or two forks to mix until the mixture resembles coarse crumbs.

Pro Tip: Keep the butter as cold as possible. If it starts to soften, pop the bowl in the freezer for 5 minutes.

3. Mix the Wet Ingredients

In a separate small bowl, whisk together the heavy cream, egg, and vanilla extract.

4. Combine

Pour the wet ingredients into the dry ingredients. Gently fold with a spatula until just combined. Fold in the blueberries carefully so they don’t burst and turn the dough purple.

5. Shape and Chill

Turn the dough onto a lightly floured surface. Work it into an 8-inch disc (about 1 inch thick). Cut the disc into 8 wedges (like a pizza).

  • Crucial Step: Place the wedges on a baking sheet and refrigerate for at least 15–30 minutes. This prevents them from spreading too much in the oven.

6. Bake

Preheat your oven to 400°F (200°C). Brush the tops of the scones with a little extra heavy cream and a sprinkle of sugar if desired. Bake for 18–22 minutes or until the tops are golden brown.

7. Glaze

While the scones cool, whisk the powdered sugar, lemon juice, and zest together. Once the scones are slightly warm (not hot!), drizzle the glaze generously over the top.


Success Tips

  • Don’t Overmix: Overworking the dough makes the scones tough. Mix until the flour just disappears.

  • Frozen Blueberries: If using frozen berries, do not thaw them first; add them straight from the freezer.

  • Cold is Key: Using cold cream and cold butter creates those flaky layers.

Chicken Bacon Ranch Lasagna Soup

Chicken Bacon Ranch Lasagna Soup
Ingredients
2 cups Cooked Chicken
3 cups Cheddar Cheese shredded
7 Lasagna Sheets broken
1 cup Carrots diced
1 cups Yellow Onion diced
1 cups Celery diced
3 cups Whole Milk
3 cups Chicken Broth
5 tablespoon Butter
1 teaspoon Olive Oil
¼ cups All Purpose Flour
1 cup Bacon Bits
2 tablespoons Ranch Seasoning
1 teaspoon Chicken Bouillon Powder
Instructions
Heat a large pot over medium heat and add the butter and olive oil. Once the butter has melted, stir in the diced onions, carrots, and celery. Cook the vegetables for 7–8 minutes, stirring occasionally, until they start to become tender.
Sprinkle the flour over the softened vegetables and stir to coat everything evenly. Reduce the heat to low and continue cooking for 2–3 minutes, stirring frequently to prevent sticking.
Pour in the whole milk and chicken broth, then add the ranch seasoning, chicken bouillon powder, cooked chicken, and bacon crumbles. Stir well to combine and bring the mixture to a gentle simmer, stirring occasionally as it heats.
Once the soup reaches a simmer, add the broken lasagna sheets. Let the soup cook for about 15 minutes, or until the lasagna sheets are cooked to al dente. When the noodles are done, turn off the heat.
Let the soup cool for 2–3 minutes to prevent the cheese from breaking. Stir in the shredded cheese in small handfuls, mixing after each addition until the cheese is fully melted and incorporated. Serve and enjoy

Italian Wraps

Italian Wraps


Ingredients

Main Ingredients
  • 5 pieces tortillas
  • 330 g minced meat or 11 oz
  • 2 tbsp tomato paste
  • 30 ml tomato sauce (for the meat) or 1/8 cup
  • 60 ml tomato sauce (for spreading) or 1/2 cup
  • 60 g cream cheese or 1/4 cup
  • 1 tsp dried oregano
  • 1 tsp garlic powder
  • 1 tsp salt
  • 200 g mozzarella cheese, shredded or 1 cup

Method

Cooking
  1. Heat a pan over medium heat. Add the minced meat and cook until it’s browned, breaking it up well while it cooks.
  2. Stir in the tomato paste, 30 ml of tomato sauce, cream cheese, oregano, garlic powder, and salt. Let this simmer gently while stirring, until the mixture is thick, creamy, and well combined.
  3. Spread a thin layer of tomato sauce over each tortilla.
  4. Evenly distribute the meat mixture on top of the tortillas, then sprinkle with shredded mozzarella.
  5. Roll the tortillas tightly and place them seam side down in the air fryer basket.
  6. Brush or spoon remaining tomato sauce over the rolls and sprinkle with more mozzarella.
  7. Air-fry at 190°C (375°F) for 10–15 minutes until the wraps are golden, bubbly, and slightly crisp on the outside.
  8. Let them rest for 2 minutes before serving hot.

Notes

These wraps are perfect for a family dinner, casual lunch, or snack. They pair well with a side salad or crispy veggies. Feel free to add extra toppings like fresh basil or chili flakes for added flavor.

FRESH CUCUMBER LEMONADE

FRESH CUCUMBER LEMONADE

Ingredients:
2 large cucumbers, peeled and chopped
1 cup fresh lemon juice (about 4-5 lemons)
1/2 cup honey or sugar (adjust to taste)
4 cups cold water
Ice cubes
Lemon slices and cucumber rounds for garnish
Procedure:
1. In a blender, puree the cucumbers until smooth.
2. Strain the cucumber puree through a fine mesh sieve into a pitcher.
3. Add the fresh lemon juice and honey to the pitcher, stirring until well combined.
4. Pour in the cold water and mix well.
5. Serve over ice cubes and garnish with lemon slices and cucumber
It help in weight loss too….

Cream Cheese Pound Cake with Frosting

. Cream Cheese Pound Cake with Frosting

This recipe produces a dense, velvety crumb that is richer than a standard sponge cake.

Ingredients

  • For the Cake:

    • 1 ½ cups unsalted butter (softened)

    • 8 oz (225g) cream cheese (softened)

    • 3 cups granulated sugar

    • 6 large eggs (room temperature)

    • 3 cups all-purpose flour

    • 1 tsp salt

    • 2 tsp vanilla extract

  • For the Frosting:

    • 4 oz cream cheese (softened)

    • ¼ cup butter (softened)

    • 2 cups powdered sugar

    • 1 tsp vanilla extract

Step-by-Step Instructions

  1. Preheat and Prep: Preheat your oven to 160°C (325°F). Grease and flour a large loaf pan or bundt pan.

  2. Cream Butter and Cheese: In a large bowl, beat the softened butter and 8 oz of cream cheese together until smooth and creamy.

  3. Add Sugar: Gradually add the granulated sugar, beating on medium-high speed for about 5 minutes until the mixture is light and fluffy.

  4. Incorporate Eggs: Add the eggs one at a time, beating well after each addition. Stir in the vanilla extract.

  5. Add Dry Ingredients: Gently fold in the flour and salt. Mix just until combined; do not overmix, or the cake will be tough.

  6. Bake: Pour the batter into the pan. Bake for 1 hour to 1 hour 15 minutes, or until a toothpick comes out clean. Let it cool completely.

  7. Frost: Beat the frosting ingredients together until smooth. Use a piping bag with a star tip to create the decorative peaks shown in the video.


2. Golden Yogurt Fritters (Frittelle)

These are the light, airy doughnut bites from your photos.

Ingredients

  • 1 Egg

  • 100g Sugar

  • 1 cup (250g) Plain Yogurt

  • ½ cup (120ml) Milk

  • 2 ½ cups All-purpose flour

  • 1 tbsp Baking powder

  • Oil for frying

  • Extra sugar for coating

Step-by-Step Instructions

  1. Make the Batter: Whisk the egg and sugar in a bowl. Stir in the yogurt and milk.

  2. Combine: Sift in the flour and baking powder. Mix until you have a thick, sticky batter that holds its shape on a spoon.

  3. Heat Oil: Heat 2 inches of oil in a pan over medium heat.

  4. Fry: Using two spoons, scoop a small amount of batter and drop it into the oil. Fry for 2–3 minutes until golden brown all over.

  5. Coat: Remove with a slotted spoon and immediately toss in a bowl of sugar while still hot.

🧀 Baked Chicken & Rice Casserole

🧀 Baked Chicken & Rice Casserole

A creamy, cheesy comfort-food casserole that’s quick, filling, and perfect for busy nights.

⭐ Why You’ll Love It

✔ Comfort food classic
✔ Easy prep
✔ Kid-friendly
✔ Freezer-friendly
✔ Super cheesy


🛒 Ingredients

  • 1 box Rice-A-Roni (Chicken flavor)

  • 4 cups cooked shredded chicken

  • 1 can cream of onion soup (or cream of mushroom/chicken)

  • 1 cup sour cream

  • 2 cups shredded cheddar cheese

  • French fried onions (optional topping)


👩‍🍳 Instructions

  1. Preheat oven to 350°F (180°C).

  2. Cook Rice-A-Roni according to package directions.

  3. Stir in:

    • Cream of onion soup

    • Sour cream

  4. Add shredded chicken and mix well.

  5. Spread mixture into a greased 9×13 baking dish.

  6. Sprinkle cheddar cheese evenly on top.

  7. Bake for 40 minutes, until hot and bubbly.

  8. Let cool 5 minutes.

  9. Top with French fried onions (optional) and serve.


💡 Tips & Variations

  • Use turkey instead of chicken if needed.

  • Add peas, mushrooms, or onions for extra nutrition.

  • For extra creaminess: add ¼ cup milk or cream.

  • Use low-fat sour cream & low-sodium soup for a lighter version.


🧊 Storage

  • Fridge: 3–4 days in airtight container

  • Freezer: up to 3 months

  • Thaw overnight and reheat in oven or microwave

Guava Leaf Tea

Description

Guava leaf tea is a herbal drink rich in antioxidants and plant compounds. Research suggests it may help improve insulin sensitivity and reduce blood sugar spikes after meals.

 Ingredients

  • 8–10 fresh guava leaves (or 1 tablespoon dried leaves)

  • 2 cups water

  • Optional: ½ teaspoon cinnamon

  • Optional: ½ teaspoon lemon juice

Instructions

  1. Wash the leaves thoroughly.

  2. Bring water to a boil.

  3. Add guava leaves and simmer on low heat for 10–15 minutes.

  4. Strain the tea.

  5. Drink warm or slightly cooled.

 Serving Size

  • 1 cup, 1–2 times daily

  • Best time: After meals

 Approximate Nutritional Information (per cup)

  • Calories: 2–5 kcal

  • Carbohydrates: 0 g

  • Fat: 0 g

  • Contains: Antioxidants, flavonoids, trace vitamin C

 Potential Benefits

✔ May help manage blood sugar
✔ May improve cholesterol levels
✔ May support weight management
✔ May promote gut health

Important Notes

  • If you are taking insulin or diabetes medication, consult your doctor before use.

  • Do not exceed 2 cups per day.

  • Pregnant women and kidney patients should consult a healthcare professional first.

Tips

  • Fresh leaves may be more effective than dried ones.

  • Use regularly for 4–6 weeks, then monitor blood sugar levels.

  • Works best alongside a healthy diet and regular exercise.

 Q & A

Q: Does it cure diabetes?
No. It may help manage blood sugar but is not a cure.

Q: How long before seeing results?
Mild improvements may be noticed within 2–4 weeks.

Q: Can it be consumed daily?
Yes, in moderation (1–2 cups per day).

Q: Does it melt fat?
It does not directly burn fat but may support metabolism.

Healthy Oatmeal Fruit Cake

Recipe: The “Glow-Up” Oatmeal Fruit Cake

Prep time: 15 minutes


Bake time: 45–50 minutes


Servings: 8–10 slices


Ingredients

The Base:


3 cups Old-fashioned rolled oats (divided: 2 cups blended into flour, 1 cup left whole)


1 ½ tsp Baking powder


1 tsp Ground cinnamon


½ tsp Ground ginger


¼ tsp Sea salt


The Wet Ingredients:

2 Large eggs (or flax eggs for vegan)


1 ½ cups Unsweetened applesauce


1/3 cup Pure maple syrup or honey


1 tsp Vanilla extract


½ cup Milk of choice (almond, oat, or dairy)


The Fruit & Nut Mix:


1 ½ cups Mixed dried fruit (raisins, cranberries, chopped apricots, or dates)


½ cup Chopped walnuts or pecans


Instructions

Prep: Preheat your oven to 180°C (350°F). Grease a 9×5 inch loaf pan or line it with parchment paper.


Make Oat Flour: Place 2 cups of the oats in a blender and pulse until they reach a fine, flour-like consistency.


Mix Dry: In a large bowl, whisk the oat flour, the remaining 1 cup of whole oats, baking powder, cinnamon, ginger, and salt.


Mix Wet: In a separate bowl, whisk the eggs, applesauce, maple syrup, vanilla, and milk until smooth.


Combine: Pour the wet ingredients into the dry. Stir until just combined, then fold in your dried fruit and nuts.


Rest: Let the batter sit for 5 minutes. This allows the oats to hydrate, resulting in a better texture.


Bake: Pour into the pan and bake for 45–50 minutes, or until a toothpick comes out clean.


Cool: Let it cool in the pan for at least 20 minutes before slicing. This cake “sets” as it cools!


💡 Notes & Pro-Tips

The Texture: Expect a dense, moist, “baked oatmeal” texture rather than a fluffy sponge cake.


Fruit Hydration: If your dried fruit is very hard, soak it in warm water (or orange juice!) for 10 minutes before adding to the batter for extra juiciness.


Storage: Store in an airtight container in the fridge for up to 5 days, or freeze individual slices for a quick “grab-and-go” breakfast.


🥗 Nutritional Info & Benefits

Nutrient Per Serving (1 slice)

Calories 240 kcal

Fiber 5g

Protein 6g

Sugar 14g (Natural)

Why it’s good for you:

Sustained Energy: High in complex carbohydrates from oats, which have a low glycemic index.


Heart Healthy: Oats contain beta-glucan, a soluble fiber known to help lower cholesterol.


No Refined Sugar: Relies on the natural sweetness of applesauce and dried fruit.


❓ Q&A

Q: Can I make this gluten-free?


A: Absolutely. Just ensure your oats are certified gluten-free to avoid cross-contamination.


Q: It feels a bit wet in the middle, did I undercook it?


A: Because of the applesauce and oats, it is naturally very moist. However, if it feels “gummy,” let it cool completely; the structure firms up significantly at room temperature.


Q: Can I use fresh fruit instead of dried?


A: You can! Fresh blueberries or diced apples work well, but keep in mind they release more moisture, so you may need to bake it for an extra 5–10 minutes.