A classic cupcake is more than just a sweet treat; it’s a versatile dessert with a rich history and surprising ways to boost its nutritional value.
1. Basic Vanilla Cupcake Recipe
This standard recipe makes 12 soft, fluffy cupcakes, using common ingredients like flour, sugar, butter, eggs, milk, and vanilla. The process involves creaming the butter and sugar, mixing in the wet ingredients, folding in the dry, and baking at 350°F (175°C) for about 18–20 minutes.
2. Nutritional Facts (Per Cupcake)
A standard homemade vanilla cupcake (approx. 59g) typically contains:
Calories: ~180 to 250 kcal (with frosting, this can jump to 350+ kcal).
Total Fat: 7g – 11g.
Carbohydrates: 28g – 35g.
Sugars: 17g – 20g.
Protein: 2g – 3g.
3. Key Benefits & Healthy Swaps
While typically an indulgence, cupcakes offer specific benefits and opportunities for modification:
Portion Control: Their individual size makes it easier to manage calorie intake compared to a large cake.
Mood Booster: Carbohydrates help the brain produce serotonin, which can improve emotional well-being.
Energy Spike: They provide instant energy through carbohydrates, useful for quick refueling.
Nutrient Fortification: Swapping refined flour for whole wheat or ragi flour increases fiber, while adding nuts or fruit (like berries or carrots) boosts vitamins and minerals.
Would you like to explore chocolate-specific recipes or more low-calorie healthy alternatives?
Banana cream dessert: delicious, simple and irresistible homemade recipe
Hi, everyone, today we’re going to learn how to make Banana dessert using simple ingredients. So grab your pen and paper to jot down the ingredients, then follow the complete preparation method.
How to Make Banana cream dessert
Banana cream dessert blends the natural sweetness of bananas with a smooth, creamy texture, making it perfect for any occasion. See below the list of all ingredients and required quantities. And then, a very complete preparation method with details of the recipe.
Recipe Ingredients:
4 ripe bananas
1/2 cup of sweetened condensed milk
1 teaspoon of vanilla extract
1 cup of heavy cream
1 tablespoon of lemon juice
Sugar to taste
Mint leaves for garnish (optional)
Instructions:
First, peel the bananas and slice them into rounds.
Then, place the sliced bananas in a bowl and mix them with the lemon juice. This will prevent the bananas from darkening.
In another bowl, combine the heavy cream, sweetened condensed milk, and vanilla extract. Mix well and set aside.
Next, in a glass dish or individual cups, create a layer of banana slices at the bottom.
After that, spread a layer of the prepared cream over the bananas.
Repeat the layering process until all the ingredients are used, finishing with a cream layer.
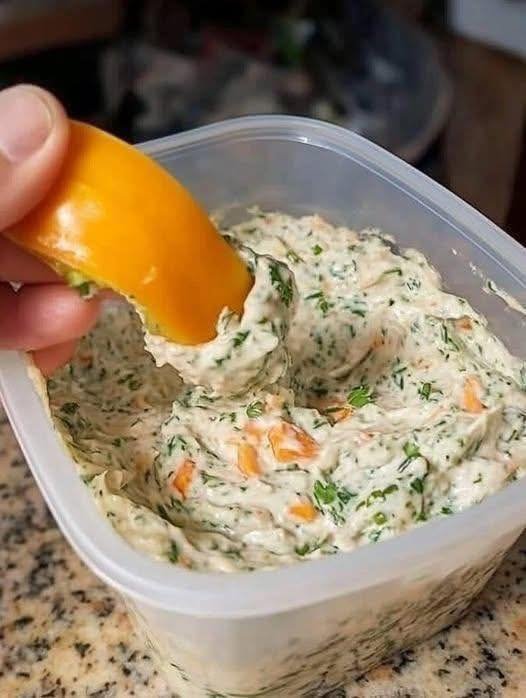
A creamy, fresh, and vibrant spread that pairs perfectly with toasted bread or crackers.
Ingredients
2 cups Carrots, finely grated
1 cup Cream cheese or thick Greek yogurt
2 cloves Garlic, minced
½ cup Fresh parsley or dill, finely chopped
2 tbsp Mayonnaise (optional, for extra creaminess)
To taste: Salt and black pepper
For serving: Toasted baguette slices or crackers
Step-by-Step Instructions
Prepare the Carrots: Use the finest side of your grater to grate the carrots. If the carrots are very juicy, give them a light squeeze with your hands to remove excess moisture so the spread stays thick.
Soften the Base: In a medium mixing bowl, stir the cream cheese (or Greek yogurt) until it is smooth and creamy.
Combine Flavors: Add the minced garlic, chopped herbs, and mayonnaise to the creamy base. Mix well until the herbs are evenly distributed.
Fold in Carrots: Add the grated carrots to the bowl. Use a spatula to fold them into the cream mixture until the spread turns a beautiful light orange hue.
Season: Add a pinch of salt and black pepper. Taste and adjust the seasoning as needed.
Chill and Serve: While you can serve this immediately, letting it sit in the refrigerator for 15 minutes allows the garlic and herb flavors to meld together. Spread a generous amount onto toasted bread and garnish with an extra sprig of parsley.
Why This Recipe is a Treasure
Speed: It truly takes only 10 minutes from start to finish.
Versatility: It works as a dip for vegetables, a sandwich spread, or a fancy appetizer for dinner parties.
Freshness: The raw carrots provide a lovely natural sweetness and crunch that balances the savory garlic.
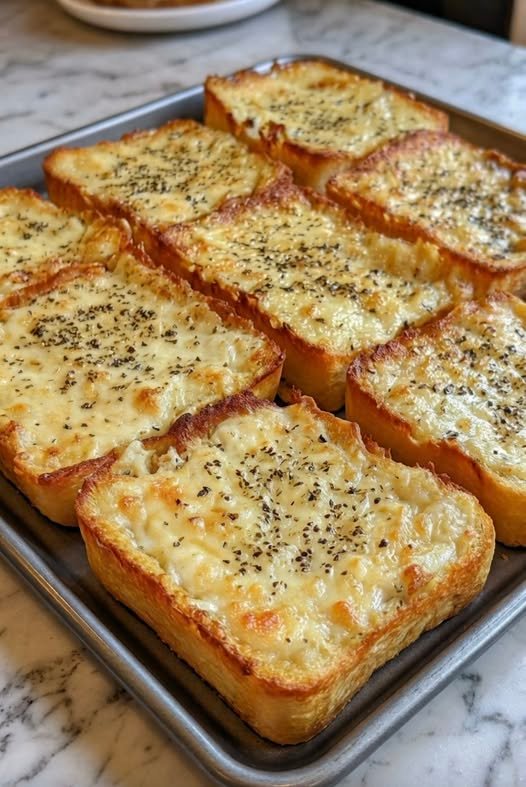
The ultimate savory, flourless snack for any time of day!
Ingredients
2 large Potatoes, grated
1 large Carrot, grated
2 Eggs
1 cup Shredded cheese (Cheddar or Mozzarella work best)
½ cup Green onions, finely chopped
To taste: Salt and black pepper
Cooking oil: For pan-frying
Step-by-Step Instructions
1. Prepare the Vegetables
Grate the potatoes and the carrot using the medium holes of a box grater.
2. Remove Excess Moisture
This is the most important step for a crispy result. Place the grated potatoes and carrots into a clean kitchen towel or cheesecloth. Twist the cloth and squeeze firmly to remove as much liquid as possible.
3. Mix the Ingredients
In a large mixing bowl, combine the dried vegetables, eggs, shredded cheese, and chopped green onions. Season with a pinch of salt and pepper to enhance the flavors. Stir well until the eggs and cheese have evenly coated the vegetables.
4. Shape the Fingers
Take about two tablespoons of the mixture at a time. Firmly press and roll the mixture between your palms to form small logs or “finger” shapes.
5. Pan-Fry to Perfection
Heat a thin layer of oil in a large skillet over medium heat. Carefully place the vegetable fingers in the pan, leaving space between them. Cook for approximately 4 minutes per side. Flip them gently once they are golden brown and crispy.
6. Drain and Serve
Remove the fingers from the pan and place them on a plate lined with paper towels to soak up any extra oil. Serve warm with your favorite dipping sauce, like Greek yogurt or a light garlic aioli.
Pro Tip: If you want an even firmer texture, you can let the vegetable mixture sit for 5 minutes after mixing to allow the fibers to bind with the egg before shaping.
This recipe creates a dense, satisfying muffin with a lovely toasted oat topping.
Ingredients
1 ½ cups All-purpose flour (or whole wheat flour for extra fiber)
1 cup Rolled oats (plus a little extra for sprinkling on top)
½ cup Brown sugar (packed)
1 tbsp Baking powder
1 tsp Cinnamon
½ tsp Salt
1 cup Milk (any variety)
1 Large egg
¼ cup Melted coconut oil or butter
1 tsp Vanilla extract
1 ½ cups Fresh apples (peeled and finely diced; Fuji or Honeycrisp work great)
Step-by-Step Instructions
Preheat and Prep: Preheat your oven to 400°F (200°C). Grease a 12-cup muffin tin or line it with paper liners.
Combine Dry Ingredients: In a large bowl, whisk together the flour, rolled oats, brown sugar, baking powder, cinnamon, and salt.
Mix Wet Ingredients: In a separate medium bowl, whisk the milk, egg, melted oil/butter, and vanilla extract until well combined.
Merge the Two: Pour the wet ingredients into the dry ingredients. Stir gently with a spatula just until combined. Tip: Do not over-mix; a few lumps are perfectly fine for a fluffy texture.
Fold in Apples: Gently fold the diced apples into the batter.
Fill the Tins: Spoon the batter into the prepared muffin tin, filling each cup about ¾ full.
Add the Topping: Sprinkle a few extra rolled oats over the top of each muffin for that beautiful bakery-style look shown in your photo.
Bake: Bake for 18–20 minutes, or until a toothpick inserted into the center comes out clean.
Cool: Let the muffins cool in the tin for 5 minutes before transferring them to a wire rack.
Why This Recipe Works
Texture: The oats soften during baking but provide a hearty chew.
Beginner Friendly: This is a “one-bowl” style method that doesn’t require a heavy stand mixer.
Customizable: You can swap the apples for blueberries or add a handful of chopped walnuts for extra crunch.
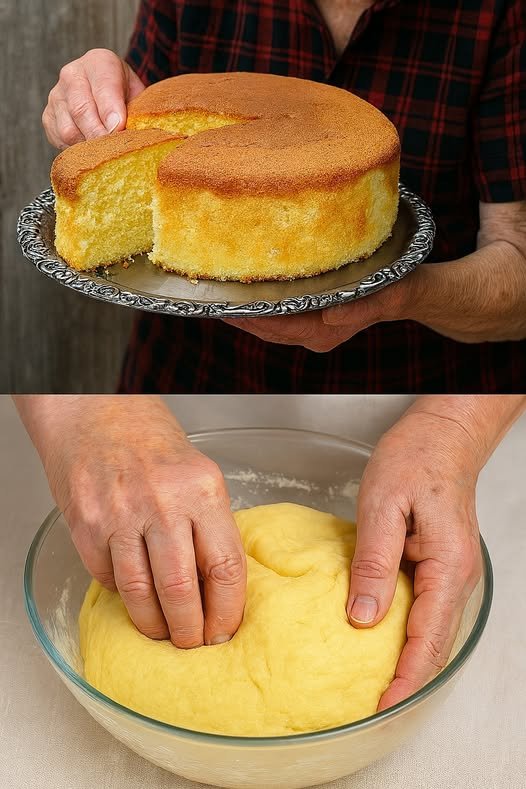
This recipe uses a simple kneading technique to develop the structure needed for that “cloud-like” interior seen in your photos.
Ingredients
1 cup Warm water (ensure it is between 105–115°F; too hot will kill the yeast)
1 package (2 ¼ tsp) Active dry yeast
1 tbsp Sugar (this feeds the yeast and helps with browning)
3 ½ cups All-purpose flour (plus a little extra for dusting)
1 tsp Salt
¼ cup Olive oil (this keeps the crumb soft and moist)
Step-by-Step Instructions
1. Activate the Yeast
In a large bowl, combine the warm water and sugar. Stir until the sugar dissolves. Sprinkle the active dry yeast over the top. Let it sit for about 5–10 minutes until it becomes foamy and smells like fresh bread.
2. Mix the Dough
Add the olive oil and salt to the yeast mixture. Gradually stir in the flour, one cup at a time. Continue mixing until a shaggy dough forms and begins to pull away from the sides of the bowl.
3. Knead for Structure
Turn the dough out onto a lightly floured surface. Knead the dough for 8–10 minutes by hand (or 5 minutes using a stand mixer with a dough hook).
The Goal: The dough should become smooth, elastic, and slightly tacky, but it should not stick to your hands. This process builds the strength needed for that high rise shown in your images.
4. The First Rise
Lightly grease a large bowl with a little olive oil. Place the dough inside and turn it once to coat it in oil. Cover the bowl with a clean kitchen towel or plastic wrap. Let it rise in a warm, draft-free spot for 1 to 1 ½ hours, or until it has doubled in size.
5. Shape the Loaf
Gently “punch down” the dough to release excess air (as seen in the top image of your file). Turn it onto a floured surface and shape it into a rectangle. Roll it up tightly into a log shape and pinch the seams shut. Place the dough into a greased 9×5-inch loaf pan.
6. The Second Rise
Cover the loaf pan and let the dough rise again for about 30–45 minutes. The dough should rise about an inch above the rim of the pan. Preheat your oven to 375°F (190°C) during this time.
7. Bake to Perfection
Bake for 30–35 minutes. The top should be a beautiful golden brown, and the loaf should sound hollow when you tap the bottom.
Optional: Brush the top with a little melted butter or olive oil immediately after taking it out of the oven for an extra soft crust.
8. Cool Completely
Allow the bread to cool in the pan for 10 minutes, then transfer it to a wire rack. Wait at least 30 minutes before slicing to ensure the internal structure is set and stays fluffy.
Tips for the Best Results
Temperature Matters: If your kitchen is cold, your dough will take longer to rise. You can place the bowl inside an “off” oven with the oven light turned on for a perfect proofing environment.
Don’t Over-Flour: Use only as much flour as needed during kneading. Too much flour will make the bread dense rather than fluffy.
This recipe is perfect for managing meals because it feels indulgent but is actually quite simple and focuses on whole ingredients.
Ingredients
1.5 lbs Chicken breasts (sliced into cutlets) or boneless thighs
2 tbsp Olive oil
3 tbsp Butter (divided)
6 cloves Garlic (minced)
1 cup Chicken broth (low sodium)
1 cup Heavy cream (or full-fat coconut milk for a dairy-free version)
½ cup Parmesan cheese (grated)
1 tsp Italian seasoning (or a mix of dried oregano and thyme)
Salt and black pepper to taste
Fresh parsley (chopped, for garnish)
Step-by-Step Instructions
Season the Chicken: Pat the chicken dry with paper towels. Season both sides generously with salt, pepper, and Italian seasoning.
Sear the Chicken: In a large skillet, heat the olive oil and 1 tablespoon of butter over medium-high heat. Add the chicken and cook for about 5–7 minutes per side until golden brown and cooked through. Remove the chicken from the pan and set it aside on a plate.
Sauté the Garlic: In the same skillet (don’t wash it! those brown bits are flavor), add the remaining 2 tablespoons of butter. Once melted, add the minced garlic and sauté for about 1 minute until fragrant.
Deglaze and Simmer: Pour in the chicken broth. Use a wooden spoon to scrape the bottom of the pan to release the flavorful bits. Let the broth simmer for 2-3 minutes until it reduces slightly.
Create the Cream Sauce: Turn the heat down to medium-low. Stir in the heavy cream and let it come to a gentle simmer (do not let it boil rapidly, or the cream might separate).
Add Cheese: Stir in the Parmesan cheese. Continue stirring until the cheese is melted and the sauce begins to thicken slightly.
Combine: Place the cooked chicken (and any juices from the plate) back into the skillet. Spoon the sauce over the chicken and let it simmer together for 2 minutes to ensure everything is hot.
Garnish and Serve: Top with fresh chopped parsley and extra black pepper if desired.
Meal Management Tips
To keep your meals interesting and balanced, try these variations:
Add Greens: Stir in two handfuls of fresh spinach at Step 6 until wilted.
Vegetable Base: Serve this over steamed zucchini noodles, cauliflower rice, or roasted asparagus to keep it blood-sugar friendly.
The “Acid” Trick: If the sauce feels too heavy, add a squeeze of fresh lemon juice at the very end to brighten the flavors.
This dessert has a unique, airy texture—somewhere between a marshmallow and a firm mousse.
Ingredients
1 ½ cups Water (or unsweetened almond milk for a creamier texture)
2 tbsp Unsweetened cocoa powder (high quality is best for flavor)
1 ½ tbsp Agar-agar powder (this is a plant-based gelatin substitute that sets firmly)
Optional:2-3 tbsp Stevia or Erythritol (adjust to your preferred sweetness)
Step-by-Step Instructions
Mix the Base: In a small saucepan, whisk together the water, cocoa powder, and your sugar-free sweetener while the water is still cold. Make sure there are no cocoa clumps.
Add the Thickener: Stir in the agar-agar powder. It is important to mix it in thoroughly before turning on the heat.
Simmer: Place the saucepan over medium heat. Bring the mixture to a gentle boil, stirring constantly. Once it starts to bubble, reduce the heat to low and let it simmer for 2 minutes. This “activates” the agar-agar so it sets properly.
The “Cloud” Step (Optional but Recommended): For the extra bubbly, airy texture seen in the photo, remove from heat and use a hand mixer or milk frother to whip the mixture for about 1-2 minutes until it becomes foamy.
Mold the Bites: Pour the mixture into small silicone molds (like a muffin tin or chocolate mold). If you don’t have molds, you can pour it into a flat glass container and cut it into squares later.
Set: Let it sit at room temperature for 15 minutes, then move it to the refrigerator. Agar-agar sets very quickly, usually within 30 to 60 minutes.
Serve: Gently pop them out of the molds. For an extra touch, you can lightly dust them with a tiny bit more cocoa powder.
Tips for Success
Agar-Agar vs. Gelatin: Do not swap agar-agar for regular gelatin 1:1. Agar-agar is much stronger and sets at room temperature, which gives these bites their specific “snap.”
Flavor Boost: Since the base is water, adding a drop of vanilla extract or a pinch of sea salt can really make the chocolate flavor pop without adding calories.
This bread relies on “psyllium husk” to bind the seeds together, making it incredibly high in fiber and low in net carbs.
Ingredients
1 cup Sunflower seeds
½ cup Flax seeds (whole)
½ cup Hazelnuts or almonds (roughly chopped)
1 ½ cups Rolled oats (ensure they are gluten-free if needed)
2 tbsp Chia seeds
4 tbsp Psyllium husk powder (this is the “glue”)
1 tsp Fine sea salt
1 tbsp Maple syrup or honey (optional, for a hint of balance)
3 tbsp Melted coconut oil or ghee
1 ½ cups Water
Step-by-Step Instructions
Combine Dry Ingredients: In a flexible silicone loaf pan (or a greased metal one), whisk together the sunflower seeds, flax seeds, chopped nuts, oats, chia seeds, psyllium husk, and salt. Mix very well.
Whisk Wet Ingredients: In a separate small bowl, whisk together the water, melted oil, and sweetener.
Mix Everything: Pour the liquid over the dry ingredients. Mix with a spoon until everything is soaked and the dough becomes very thick (the psyllium husk will absorb the water quickly).
Smooth the Top: Level the top of the dough with the back of a spoon.
The “Secret” Rest: Let the dough sit on the counter for at least 2 hours, or even overnight. This is vital so the seeds and husk bind together; otherwise, the bread will crumble.
Preheat and Bake: Preheat your oven to 175°C (350°F). Place the loaf pan on the middle rack and bake for 20 minutes.
The Flip: Remove the loaf from the oven, carefully take the bread out of the pan, and place it upside down directly on the oven rack. Bake for another 30 to 40 minutes. It is done when it sounds hollow when tapped.
The Wait: Let the bread cool completely before slicing. If you cut it while hot, it will be gummy inside.
5 Breads to Look For (or Bake)
If you prefer traditional textures, look for these varieties which have a lower Glycemic Index (GI):
100% Stone-Ground Whole Wheat: Less processed than “enriched” wheat.
Sprouted Grain Bread: (Like Ezekiel bread) Uses germinated grains which are easier to digest.
Traditional Sourdough: The fermentation process creates acids that slow down starch digestion.
Pumpernickel: Real pumpernickel is made from coarsely ground rye and is very dense and fibrous.
Almond Flour Bread: Uses nut flour instead of grain, resulting in very low carb counts.
Pro-Tip: To further reduce the blood sugar impact, always pair your bread with a healthy fat or protein, like avocado, peanut butter, or a boiled egg.
1. Prep filling: In a bowl mix mozzarella, pepperoni, bell pepper, Italian seasoning, and red‑pepper flakes.
2. Assemble: Lay a tortilla flat. Spread a thin layer of pizza sauce, then sprinkle the cheese‑pepperoni mix evenly. Top with another tortilla.
3. Cook: Heat a skillet over medium heat, add a little olive oil or butter. Place the assembled quesadilla and cook 2‑3 min per side, pressing gently, until golden brown and melty.
4. Slice & serve: Cut into wedges. Serve with extra pizza sauce or ranch for dipping/..
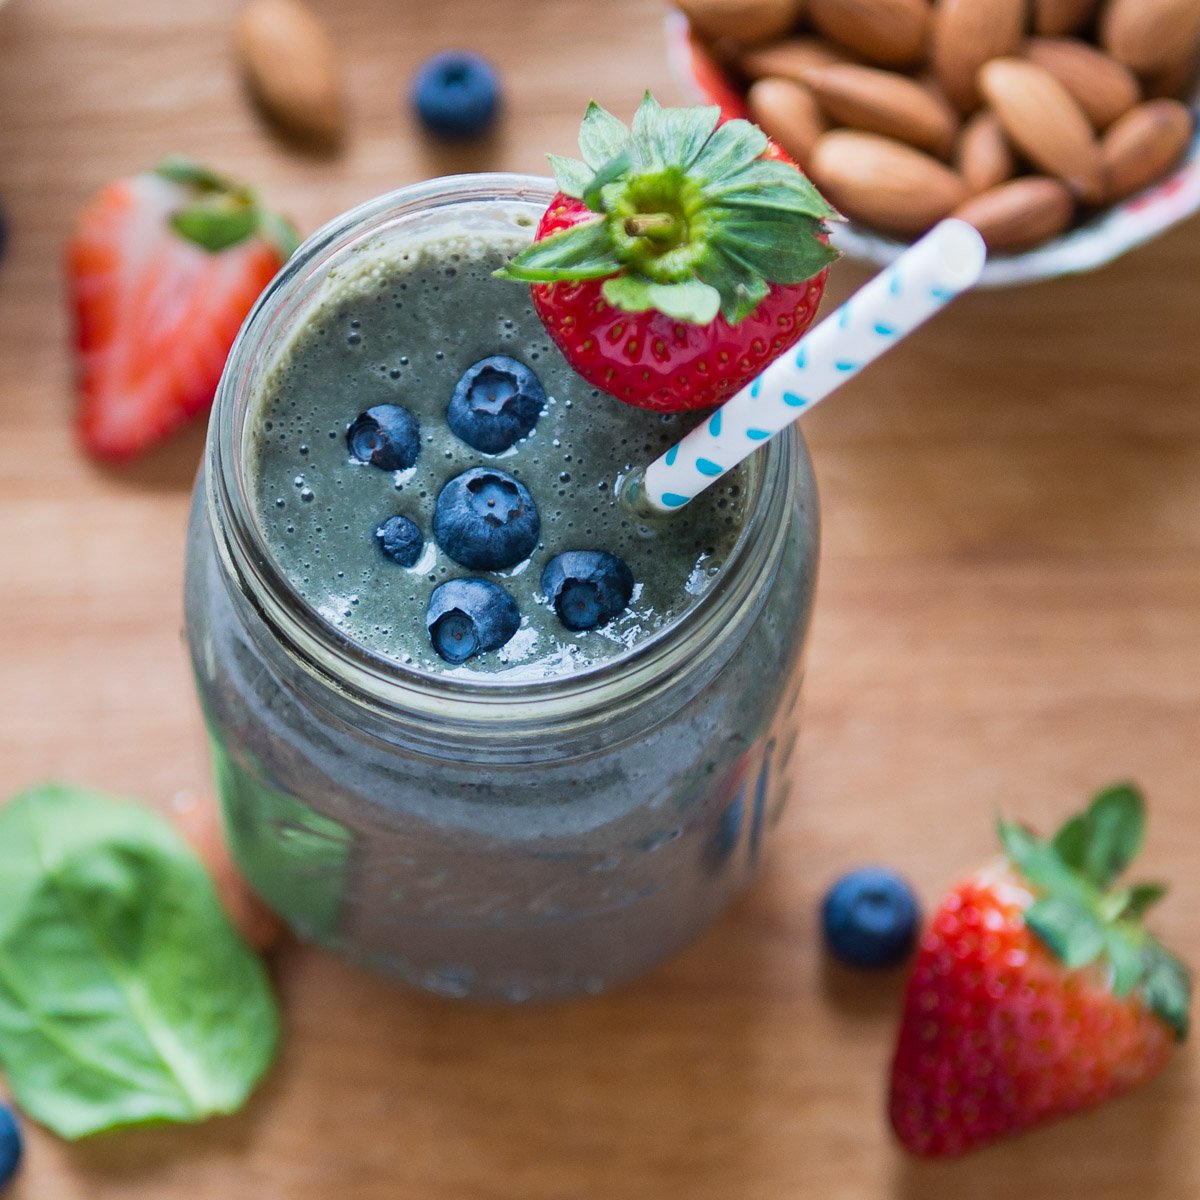
This recipe is packed with antioxidants, healthy fats, and fiber to keep you energized.
Ingredients
Liquid: 1 cup unsweetened almond milk (or any milk of your choice).
Fruit: 1/2 cup frozen blueberries and 1/2 cup fresh or frozen strawberries.
Greens: 1 handful of fresh baby spinach (adds color and nutrients without changing the taste).
Creaminess & Protein: 1 tablespoon almond butter or a small handful of raw almonds.
Sweetener (Optional): 1-2 pitted dates or 1/2 a frozen banana for extra thickness.
Toppings: Extra blueberries, a strawberry slice, and a sprinkle of sliced almonds.
Instructions
Layer the Ingredients: Add the almond milk to your blender first (this helps it blend smoother), followed by the spinach, almond butter, and finally the frozen berries.
Blend: Start on a low speed and gradually increase to high. Blend for 45–60 seconds until the spinach is completely pulverized and the texture is creamy.
Adjust Consistency: If it’s too thick, add a splash more almond milk. If it’s too thin, add a few ice cubes or more frozen fruit.
Serve: Pour into a glass or mason jar. Top with fresh berries and almonds as seen in your image for that perfect “insta-worthy” look!
Quick Tips for the Best Result
Freeze your fruit: Using frozen blueberries and strawberries gives the smoothie a thick, milkshake-like consistency without needing ice.
Boost it: Feel free to add a teaspoon of chia seeds or flax seeds for extra Omega-3s.
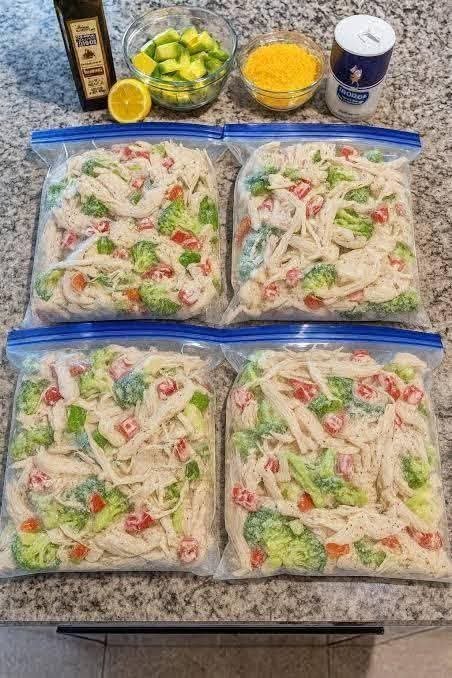
Finding the time to cook a balanced meal shouldn’t feel like a second job. This High-Protein Chicken Veggie Skillet is the perfect solution for busy athletes, parents, and health-conscious foodies who need a nutrient-dense dinner on the table in under 20 minutes. By focusing on lean chicken breast and a rainbow of antioxidant-rich vegetables, we’ve created a clean eating masterpiece that hits your macros without any unnecessary fillers or heavy sauces.
This recipe is a staple for high-protein followers because it prioritizes volume and satiety. We use high-heat searing to lock in the juices of the chicken while keeping the vegetables crisp-tender, ensuring every bite is bursting with natural flavor. It’s a “fridge-clear” recipe that works with whatever seasonal greens you have on hand, making it a versatile addition to your weekly rotation.
Whether you’re in a deep cutting phase or just looking for easy meal prep ideas, this skillet delivers. It’s low-carb, gluten-free, and designed to provide a steady stream of energy without the post-dinner slump. It’s professional-grade nutrition made simple.
Look at the Recipe
Sensory Appeal: Vibrant pops of color from fresh peppers and zucchini paired with golden-seared chicken bites.
Flavor Highlight: A savory blend of smoked paprika and garlic with a bright, zesty lemon finish.
Key High-Protein Benefit: Over 35 grams of lean protein per serving to support muscle recovery and metabolic health.
Ingredients Needed
The Protein:
1.5 lbs Boneless, skinless chicken breast, cut into 1-inch cubes
1 tbsp Avocado oil (high smoke point for searing)
1 tsp Smoked paprika
½ tsp Garlic powder
Salt and black pepper to taste
The Veggies:
2 Bell peppers (any color), sliced into strips
1 Medium zucchini, halved and sliced
1 cup Broccoli florets, bite-sized
1 Small red onion, sliced
2 cloves Garlic, minced
Finish: 1 tbsp Fresh lemon juice and chopped parsley
How to Make Our Chicken Veggie Skillet
Sear the Chicken: Heat the avocado oil in a large cast-iron or non-stick skillet over medium-high heat. Season the chicken cubes with paprika, garlic powder, salt, and pepper. Add to the pan in a single layer and sear for 5–6 minutes until golden brown and cooked through. Remove chicken and set aside.
Sauté the Aromatics: In the same pan, add the red onion and bell peppers. Sauté for 3 minutes until they start to soften and develop a slight char.
Flash-Cook the Greens: Add the zucchini and broccoli to the skillet. Stir in the minced garlic. Cook for 4–5 minutes, stirring frequently. You want the vegetables to be vibrant and tender but still have a satisfying “snap.”
Combine and Brighten: Return the cooked chicken to the skillet. Toss everything together for 1 minute to reheat. Turn off the heat and squeeze the fresh lemon juice over the top. This acidity is the secret to a restaurant-quality clean meal.
Serve: Garnish with fresh parsley and serve immediately.
Storage & Serving Suggestions
Storing: This is a meal-prep dream. Store in airtight containers in the fridge for up to 4 days.
Reheating: Quickly toss back into a hot skillet for 2 minutes or microwave for 60–90 seconds.
Freezing: You can freeze this skillet for up to 2 months, though the zucchini may be slightly softer upon thawing.
Serving Pairings: Enjoy as-is for a low-carb dinner, or serve over a bed of quinoa or cauliflower rice to soak up the juices.
Tips & FAQs
Can I use chicken thighs instead of breast? Yes! Chicken thighs will add more moisture and a richer flavor, though the fat and calorie content will be slightly higher. It remains a fantastic high-protein choice.
How do I prevent the vegetables from getting soggy? The key is high heat and not overcrowding the pan. Sauté the vegetables in batches if necessary so they sear rather than steam.
What other vegetables work well in this skillet? Snap peas, asparagus, and halved cherry tomatoes are excellent additions. This recipe is highly adaptable to whatever is fresh in your garden or local market.
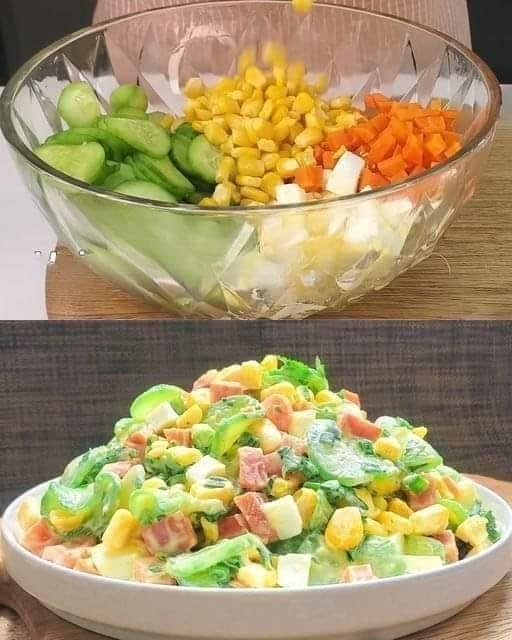
A refreshing, protein-rich, low-calorie salad perfect for a light dinner. It’s filling, simple, and supports weight management when paired with an overall balanced diet.
Gently squeeze out excess water to avoid a watery salad.
Prepare the Eggs & Veggies
Boil eggs (10 minutes), cool, peel, and chop.
Dice carrots finely (you can lightly steam for softer texture).
Cook corn if using fresh.
Make the Dressing
Mix yogurt + mustard.
Add black pepper or a squeeze of lemon if desired.
Combine
In a large bowl, mix cucumbers, eggs, carrots, corn, green onion, parsley.
Add dressing and toss gently.
Chill 15–30 minutes before serving for best flavor.
Servings
Makes: 2 light dinner portions or 3 side servings
Serving Size: ~1½ cups
Nutritional Information (Per Serving – Approximate)
(Based on 2 servings)
Calories: 220–250 kcal
Protein: 15–18 g
Carbohydrates: 18–22 g
Fat: 10–12 g
Fiber: 3–4 g
Low calorie, moderate protein, and satisfying volume.
Benefits
High in protein (eggs + yogurt) → keeps you full longer High water & fiber from cucumbers → supports digestion Lower calorie dinner option Balanced carbs from corn & carrots Probiotic benefits from yogurt
Note: No single food causes weight loss. Weight loss happens when your overall daily calorie intake is lower than what you burn.
Tips for Best Results
Use Greek yogurt for thicker, higher-protein dressing.
Remove cucumber water to prevent sogginess.
Add a squeeze of lemon for freshness.
For extra protein: add grilled chicken or tuna.
For lower carbs: reduce corn amount.
Weight Loss Notes
Eating this salad for dinner may help with weight loss if:
It replaces a higher-calorie meal.
You maintain a calorie deficit overall.
You balance meals throughout the day.
Eating it alone without considering total calories will not automatically cause weight loss.
Q & A
Q: Can I eat this every day? Yes, but rotate vegetables for nutrient variety.
Q: Can I skip eggs? Yes, replace with chickpeas, tofu, or extra yogurt for protein.
Q: How long does it last in the fridge? Up to 2 days in an airtight container.
Q: Is this keto? Not fully, because of corn and carrots. Reduce those for lower carbs.
Q: Can I meal prep this? Yes, but store dressing separately for best texture.
WW-Friendly Low-Carb Crock Pot Chicken Pot Pie – Creamy, comforting shredded chicken and vegetables slow-cooked to perfection, topped with light golden protein biscuits for a cozy meal that fits your goals.
Servings & Timing
Servings: 6
Prep Time: 15 minutes
Cook Time: 6–7 hours (Low) or 4 hours (High)
Total Time: Up to 7 hours
Estimated WW Points
Approximately 4–5 Points per serving (may vary by plan and specific brands used).
2 pounds boneless, skinless chicken breasts (trimmed of visible fat)
Creamy Light Sauce
1 cup plain nonfat Greek yogurt
½ cup reduced-fat cream cheese (softened)
1 cup low-sodium chicken broth
½ teaspoon dried thyme
½ teaspoon dried parsley
Vegetables
1 cup frozen peas
1 cup diced carrots
1 cup diced celery
½ cup diced onion
Seasonings
2 teaspoons garlic powder, divided
2 teaspoons onion powder, divided
1 teaspoon black pepper, divided
1 teaspoon salt (optional, to taste)
Biscuit Topping (Light Protein Drop Biscuits)
1 cup almond flour
½ cup plain nonfat Greek yogurt
1 egg
1 teaspoon baking powder
¼ teaspoon salt
Instructions
Prepare Slow Cooker: Lightly coat the crock pot with non-stick spray.
Season Chicken: Arrange chicken breasts in a single layer. Sprinkle with 1 teaspoon garlic powder, 1 teaspoon onion powder, and ½ teaspoon pepper.
Mix Sauce: In a bowl, whisk Greek yogurt, cream cheese, broth, thyme, and parsley until smooth. Spread evenly over chicken.
Add Vegetables: Layer peas, carrots, celery, and onion on top. Sprinkle with remaining seasonings.
Cook: Cover and cook on Low for 6–7 hours or High for 4 hours, until chicken is tender and shreds easily.
Shred & Combine: Use two forks to shred chicken directly in the crock pot. Stir well to create a thick, creamy filling.
Prepare Biscuits: Preheat oven to 375°F (190°C). Mix almond flour, baking powder, and salt. Stir in yogurt and egg until a soft dough forms. Drop spoonfuls onto a lined baking sheet. Bake 12–14 minutes until lightly golden.
Serve: Spoon filling into bowls and top with one biscuit per serving.
Additional Notes
Using chicken breast keeps the recipe lean and lowers Points.
For thicker sauce without added Points, stir in ½ teaspoon xanthan gum during the last 20 minutes.
Naturally lower in carbs than traditional pot pie and significantly lighter than versions made with canned condensed soup.
Introduction
Traditional chicken pot pie is comfort food at its finest—but it’s often heavy in both carbs and Points. This slow cooker version keeps the creamy texture and hearty flavor while lightening the sauce and swapping traditional pastry for a protein-forward, lower-carb biscuit. It’s cozy enough for Sunday dinner but smart enough for everyday tracking.
Step-by-Step Cooking Guide
Stage 1: Build the Base
Placing the chicken on the bottom ensures even cooking and full moisture absorption. Spreading the creamy mixture evenly helps prevent dry spots.
Tip: If the cream cheese isn’t fully softened, microwave it briefly so it blends smoothly.
Stage 2: Slow Cooking
Cooking low and slow develops deeper flavor while keeping chicken tender.
Visual cue: Chicken should shred effortlessly and appear opaque throughout.
If sauce looks thin before shredding, it will thicken once mixed together.
Stage 3: Shredding & Thickening
Shred directly in the pot and stir thoroughly. The yogurt and cream cheese create a naturally creamy consistency without flour or canned soup.
For extra thickness without added Points, leave the lid slightly ajar during the last 20 minutes.
Stage 4: Baking the Light Biscuits
These protein biscuits provide the nostalgic topping without a traditional flour crust.
Visual cue: Tops should be lightly golden and firm to the touch.
If slightly soft in the center, bake 1–2 minutes longer.
Ingredient Details & Substitution Tips
Chicken Breast
Zero Points on most WW plans, making it the ideal protein base.
Substitute: Trimmed chicken thighs for richer flavor (Points may increase).
Nonfat Greek Yogurt
Adds creaminess and boosts protein while keeping fat and Points low.
Substitute: Fat-free plain skyr for similar results.
Reduced-Fat Cream Cheese
Provides structure and richness without excessive fat.
Lower-Point Option: Replace half with additional Greek yogurt.
Almond Flour
Lower in carbs than all-purpose flour.
Alternative: Use whole wheat flour for lower cost (carbs increase and Points may adjust).
Vegetables
Classic pot pie vegetables add bulk and fiber.
Lower-Carb Option: Replace carrots with mushrooms or zucchini.
Recipe Variations & Serving Suggestions
Flavor Variations
Add ½ teaspoon poultry seasoning for classic pot pie flavor.
Stir in fresh chopped parsley before serving for brightness.
Add diced mushrooms for extra volume with minimal Points.
Dietary Variations
Dairy-Free: Use dairy-free yogurt and light dairy-free cream cheese (recalculate Points).
Extra Low-Carb: Skip carrots and peas, increase celery and mushrooms.
Serving Suggestions
Serve in individual ramekins for a traditional pot pie feel.
Pair with a crisp side salad dressed with lemon vinaigrette.
Add cracked black pepper on top just before serving for depth.
Storage & Make-Ahead Information
Storage
Refrigerate in airtight containers for up to 4 days.
Freezing
Freeze filling only (without biscuits) for up to 2 months.
Reheating
Reheat on stovetop over medium-low heat, stirring occasionally. Add a splash of broth if needed.
Make-Ahead Tip
Prepare filling one day ahead; bake biscuits fresh before serving for best texture.
Quality Note
Biscuits soften in the fridge. For best texture, reheat briefly in the oven.
Estimated WW Points: 4–5 per serving (varies by tracking method and brands used)
Dietary Highlights:
High-Protein | Lower-Carb than Traditional Pot Pie | WW-Friendly
Allergens: Contains dairy, eggs, tree nuts (almonds).
Frequently Asked Questions
Q: Can I skip the biscuit topping?
Yes. The filling alone lowers carbs and Points further.
Q: Why is my filling watery?
Vegetables release moisture during cooking. Let it cook uncovered for the last 20–30 minutes or stir in xanthan gum.
Q: Can I use frozen chicken?
For food safety, thaw chicken before adding to the slow cooker.
Q: Can I cook biscuits on top in the crock pot?
Low-fat biscuits will not bake properly in a moist slow cooker environment. Oven baking ensures structure.
Personal Notes
This version was created to keep the cozy feeling of chicken pot pie while fitting into a balanced lifestyle. After testing multiple lighter sauce combinations, Greek yogurt proved to deliver the best creamy texture without sacrificing protein or increasing Points unnecessarily.
Reader Engagement
If you try this WW-friendly version, share how you customized it. Leave a rating and comment with your Point calculation and favorite variations. Your feedback helps others confidently recreate this lighter comfort classic.
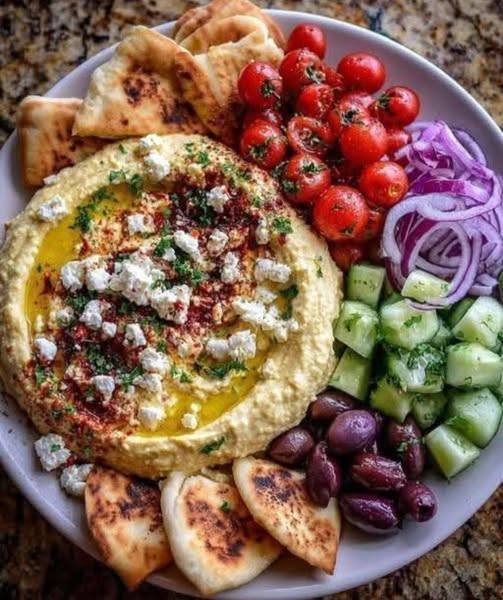
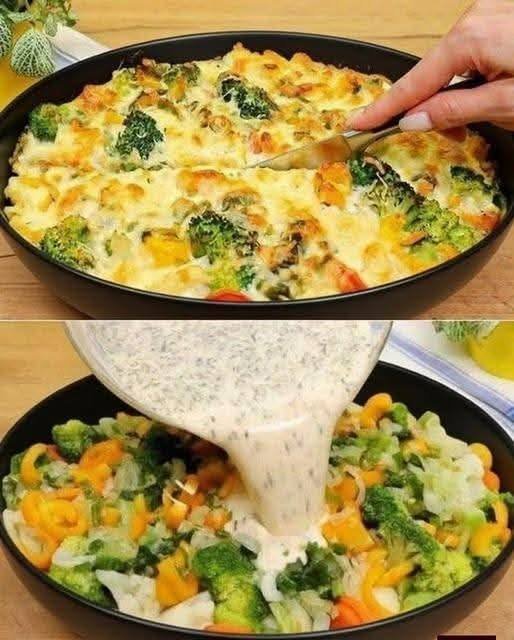
Say goodbye to greasy chips and hello to this Creamy Veggie & Herb Dip with Bell Pepper Scoops — a refreshing, protein-rich snack that perfectly balances creaminess, crunch, and clean ingredients.
Whether you’re following Keto, Slimming , Weight Watchers, or the Mediterranean diet, this dip checks all the boxes: low-carb, wholesome, packed with nutrients, and naturally satisfying.
It’s made with Greek yogurt, cottage cheese, and fresh herbs for a silky, protein-packed texture — and paired with crisp, colorful bell peppers that double as edible “scoops.” Quick to make, endlessly customizable, and so refreshing, it’s your new go-to for guilt-free snacking or party platters that everyone can enjoy.
Look at the Recipe
Texture & Visual: Silky smooth dip contrasted with crisp, vibrant bell pepper “cups.”
Flavor Highlight: Fresh herbs, tangy yogurt, and creamy cottage cheese.
Diet Benefit: Low in carbs, high in protein, and loaded with Mediterranean freshness.
Ingredients Needed
For the Creamy Dip
1 cup non-fat Greek yogurt
½ cup cottage cheese (or ricotta for Mediterranean twist)
1 tbsp extra-virgin olive oil
1 tbsp lemon juice
1 small garlic clove, minced
1 tbsp chopped fresh dill
1 tbsp chopped parsley
1 tsp chopped chives (optional)
Salt & black pepper, to taste
For the Bell Pepper Scoops
2 large bell peppers (mixed colors: red, yellow, or orange)
Slice into large, scoopable wedges or cups for dipping
How to Make Our Creamy Veggie & Herb Dip with Bell Pepper Scoops
Blend the base: In a food processor or blender, add Greek yogurt, cottage cheese, olive oil, lemon juice, and garlic. Blend until smooth and creamy.
Add herbs: Stir in fresh dill, parsley, and chives. Season with salt and black pepper to taste.
Prep the peppers: Slice bell peppers into thick “scoop” wedges or small cups.
Serve: Spoon the creamy dip into a bowl and surround it with bell pepper scoops for easy dipping.
Optional: Drizzle a touch of olive oil on top for extra Mediterranean flair and heart-healthy fats.
Storage & Serving Suggestions
Store: Keep the dip in an airtight container in the fridge for up to 4 days.
Serve Cold: The flavor actually improves after chilling for 1–2 hours.
Meal Prep Tip: Make a big batch and portion it into snack containers with sliced peppers for grab-and-go lunches.
Pairings:
Serve with cucumber rounds, celery sticks, or cherry tomatoes.
Spread it on whole-grain pita (for Mediterranean eaters) or keto seed crackers.
Tips & FAQs
1. Can I make this dip dairy-free?
Yes! Substitute the Greek yogurt and cottage cheese with coconut yogurt or blended silken tofu for a dairy-free version.
2. Is this Slimming -friendly?
Absolutely. Use fat-free Greek yogurt and cottage cheese, skip the olive oil, and it’s syn-free or nearly so.
3. How many Weight Watchers points per serving?
With fat-free dairy, this comes out to 1–2 WW points per serving (depending on plan and olive oil use).
4. What herbs work best?
Fresh dill, parsley, and chives add brightness, but you can mix in basil, cilantro, or mint for different flavor profiles.
5. Can I make this for meal prep?
Yes — it keeps beautifully in the fridge and is perfect for snack boxes, office lunches, or pre-workout fuel.
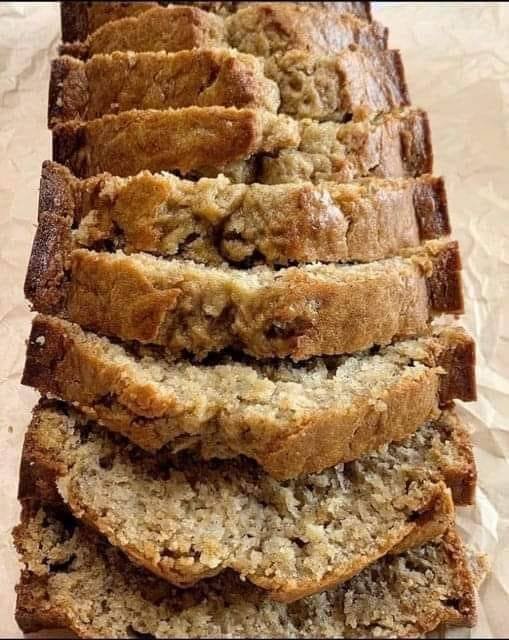
Servings: 8 Total Time: 50 minutes Difficulty: Easy Calories per Serving: 180 kcal Macros per Serving: Protein 12g / Carbs 7g / Fat 10g / Fiber 3g
Introduction
If you love the sweet, comforting taste of banana bread but want to stay on track with your keto, low-carb, or Weight Watchers goals, this Keto & Low-Carb Cottage Cheese Banana Bread is your perfect match. Packed with protein and natural flavor, it gives all the indulgence of classic banana bread without the carb overload.
The secret ingredient? Creamy cottage cheese! It keeps the bread moist, tender, and full of protein, making it ideal for breakfast, a snack, or a guilt-free dessert.
Enjoy the soft, slightly sweet, and protein-rich texture that fits seamlessly into your low-carb and high-protein lifestyle, while still satisfying your cravings.
Look at the Recipe
Sensory Appeal: Moist, tender crumb with a golden crust
Flavor Highlight: Sweet banana flavor balanced with a subtle tang from cottage cheese
Key Benefit: High-protein, low-carb, and Weight Watchers–friendly
Ingredients Needed
Wet Ingredients
1 cup mashed ripe banana (about 2 small bananas)
1 cup cottage cheese (full-fat or low-fat depending on preference)
3 large eggs
1 tsp vanilla extract
3 tbsp melted coconut oil or butter
Dry Ingredients
1 cup almond flour
½ cup coconut flour
1 tsp baking powder
½ tsp baking soda
½ tsp salt
1–2 tbsp low-carb sweetener (like erythritol or monk fruit, optional for extra sweetness)
Optional Add-ins
½ cup sugar-free chocolate chips
¼ cup chopped walnuts or pecans
How to Make Our Keto & Low-Carb Cottage Cheese Banana Bread
Preheat Oven & Prep Pan: Preheat oven to 350°F (175°C). Grease a 9×5-inch loaf pan or line with parchment paper.
Blend Wet Ingredients: In a blender or food processor, combine banana, cottage cheese, eggs, vanilla, and melted coconut oil. Blend until smooth and creamy.
Mix Dry Ingredients: In a large bowl, whisk almond flour, coconut flour, baking powder, baking soda, salt, and sweetener until well combined.
Combine Wet & Dry:Pour wet ingredients into dry ingredients and gently fold together until no lumps remain. If using add-ins, fold them in now.
Bake:Transfer batter to prepared loaf pan and bake for 40–50 minutes, or until a toothpick inserted in the center comes out clean.
Cool & Slice: Let the bread cool completely before slicing. This ensures a moist texture and easier serving.
Storage & Serving Suggestions
Storing: Keep in an airtight container at room temperature for up to 2 days, or in the fridge for up to 5 days.
Freezing: Slice and freeze individually for quick breakfasts or snacks.
Serving Pairings: Enjoy plain, with a smear of almond butter, or topped with fresh berries for extra flavor and fiber.
Tips & FAQs
Q: Can I use Greek yogurt instead of cottage cheese?
A: Yes! Use thick Greek yogurt for a similar texture and protein boost.
Q: How do I make it sweeter without adding sugar?
A: Use a low-carb sweetener like erythritol, monk fruit, or stevia.
Q: Can I make this nut-free?
A: Simply omit almond flour and use sunflower seed flour instead, adjusting the quantity slightly.
Q: Can I add chocolate chips or nuts?
A: Absolutely! Sugar-free chocolate chips or chopped walnuts enhance flavor and texture.
Q: Is this recipe Weight Watchers friendly?
A: Yes! Using almond and coconut flours keeps the carb count low while the protein content is high, keeping your points minimal.
When you crave the comfort of a cheesy, hearty skillet dinner but still want to stay aligned with your low-carb routine, this keto cheesy ground beef spaghetti skillet is exactly the kind of recipe that satisfies every craving. It’s warm, nostalgic, and full of that classic “pasta night” flavor—without the heavy carbs.
By using low-carb spaghetti alternatives and lean, protein-packed ground beef, this skillet fits beautifully into keto, high-protein, and Weight Watchers goals. Every bite delivers rich, melty cheese, savory beef, and tender noodles that taste just as comforting as traditional spaghetti.
If you want a quick weeknight dinner that’s simple, wholesome, and macro-friendly, this keto cheesy ground beef spaghetti skillet delivers on flavor, convenience, and weeknight ease.
Look at the Recipe
A golden, cheesy top over a saucy, beefy spaghetti base
Classic Italian-style flavor with rich tomato, garlic, and melted cheese
Keto-friendly, low-carb noodles paired with high-protein ground beef
Ingredients Needed
Base Ingredients
1 lb lean ground beef (90–93%)
2 cups low-carb spaghetti (hearts of palm pasta, shirataki noodles, or zucchini noodles)
1 cup sugar-free marinara sauce
½ cup diced onions
1 cup bell peppers, chopped
2 cloves garlic, minced
Seasoning Mix
1 tsp Italian seasoning
½ tsp smoked paprika
Salt & pepper, to taste
Cheese Layer
1 cup reduced-fat shredded mozzarella
¼ cup grated Parmesan
¼ cup low-fat cottage cheese (protein boost + creaminess)
Optional Add-ins
Fresh basil
Red pepper flakes
Mushrooms or spinach
How to Make Our Keto Cheesy Ground Beef Spaghetti Skillet
Brown the beef. Heat a large skillet and cook the ground beef until browned. Drain excess fat to keep the meal high-protein and Weight Watchers friendly.
Sauté the vegetables.Stir in onions, bell peppers, and garlic. Cook until soft and fragrant.
Add the sauce.Pour in the sugar-free marinara and season with Italian seasoning, paprika, salt, and pepper. Simmer for 3 minutes.
Mix in the low-carb spaghetti. Add shirataki, zucchini noodles, or hearts of palm spaghetti. Toss well to coat fully in the sauce.
Create the cheesy layer.Fold in cottage cheese for creaminess, then sprinkle mozzarella and Parmesan over the top.
Melt and finish. Cover the skillet for 2–3 minutes until the cheese melts into a bubbly, golden layer.
Serve hot. Garnish with basil if desired.
Storage & Serving Suggestions
Store: Refrigerate in an airtight container for up to 4 days.
Reheat: Warm on the stovetop or microwave until hot.
Freeze: Freeze in a sealed container for up to 2 months (best with hearts of palm pasta).
Serving Pairings: Serve with a keto side salad, steamed broccoli, or roasted zucchini.
Tips & FAQs
What’s the best low-carb noodle for this recipe?
Hearts of palm spaghetti gives the best pasta-like texture. Shirataki is ultra-low carb. Zoodles work too but release more moisture.
Can I use ground turkey instead of beef?
Yes—ground turkey or chicken makes this even lighter and more Weight Watchers friendly.
How do I keep the dish from getting watery?
Dry shirataki noodles well, or sauté zoodles briefly before adding them.
Can I make this dairy-free?
Use dairy-free mozzarella and omit cottage cheese.
How do I make it extra high-protein?
Add ½ cup cottage cheese, swap to extra-lean beef, or stir in cooked chicken chunks.
8-Measures Cake with 4 Ingredients: Easy, Light, and Very Flavorful Recipe
Hello, everyone! Welcome back to our cooking blog, where we share delicious recipes every week. Today, we’re preparing a 8-Measures Cake. So, grab your pen and paper to jot down the ingredients and let’s dive into this easy, step-by-step recipe that’s perfect for breakfast, appetizers or even to accompany fresh salads!
How to Make 8-Measures Cake with 4 Ingredients
Looking for a delicious cake with simple ingredients? This one is perfect — light texture and ideal for any moment. You don’t need cooking classes or costly meal delivery services to prepare something delicious at home. With a bit of planning and our detailed meal prep guide, you can create amazing dishes with confidence and ease.
Recipe Ingredients:
8 large eggs
5.6 oz of granulated sugar (¾ cup or 160 g)
6.7 oz of all-purpose flour (1½ cups or 190 g)
⅛ teaspoon of vanilla extract (or to taste)
1 fl oz of lemon juice (2 tablespoons or 30 ml, optional)
Instructions:
First, let’s prepare the egg whites:
Separate the egg whites from the yolks carefully.
Then, start beating the egg whites until foamy — you can add lemon juice at this point if desired.
Next, gradually add the sugar while continuing to beat.
After that, keep beating until you get a firm and glossy meringue.
After this, we’ll incorporate the yolks:
Add the yolks one at a time into the meringue.
Right after each addition, beat well to keep the batter light and airy.
Next, we’ll add the flour:
Sift the flour before using.
Then, gently fold it into the batter with upward movements, so you don’t lose the air in the mixture.
Now it’s time to bake the cake:
Grease only the bottom of a 22×10 cm (8.7×3.9 inch) glass baking dish with butter and line it with parchment paper.
Do not grease the sides — this helps the cake rise evenly.
Pour the batter into the dish and lightly smooth the top.
Bake in a preheated oven at 356 °F (180 °C) for about 35 to 40 minutes.
Finally, let’s finish the process:
Remove the cake from the oven and let it cool completely.
Then, carefully remove it from the dish.
You can top it with icing or simply serve it with coffee.
This recipe makes approximately two servings, similar to what you see in the photo.
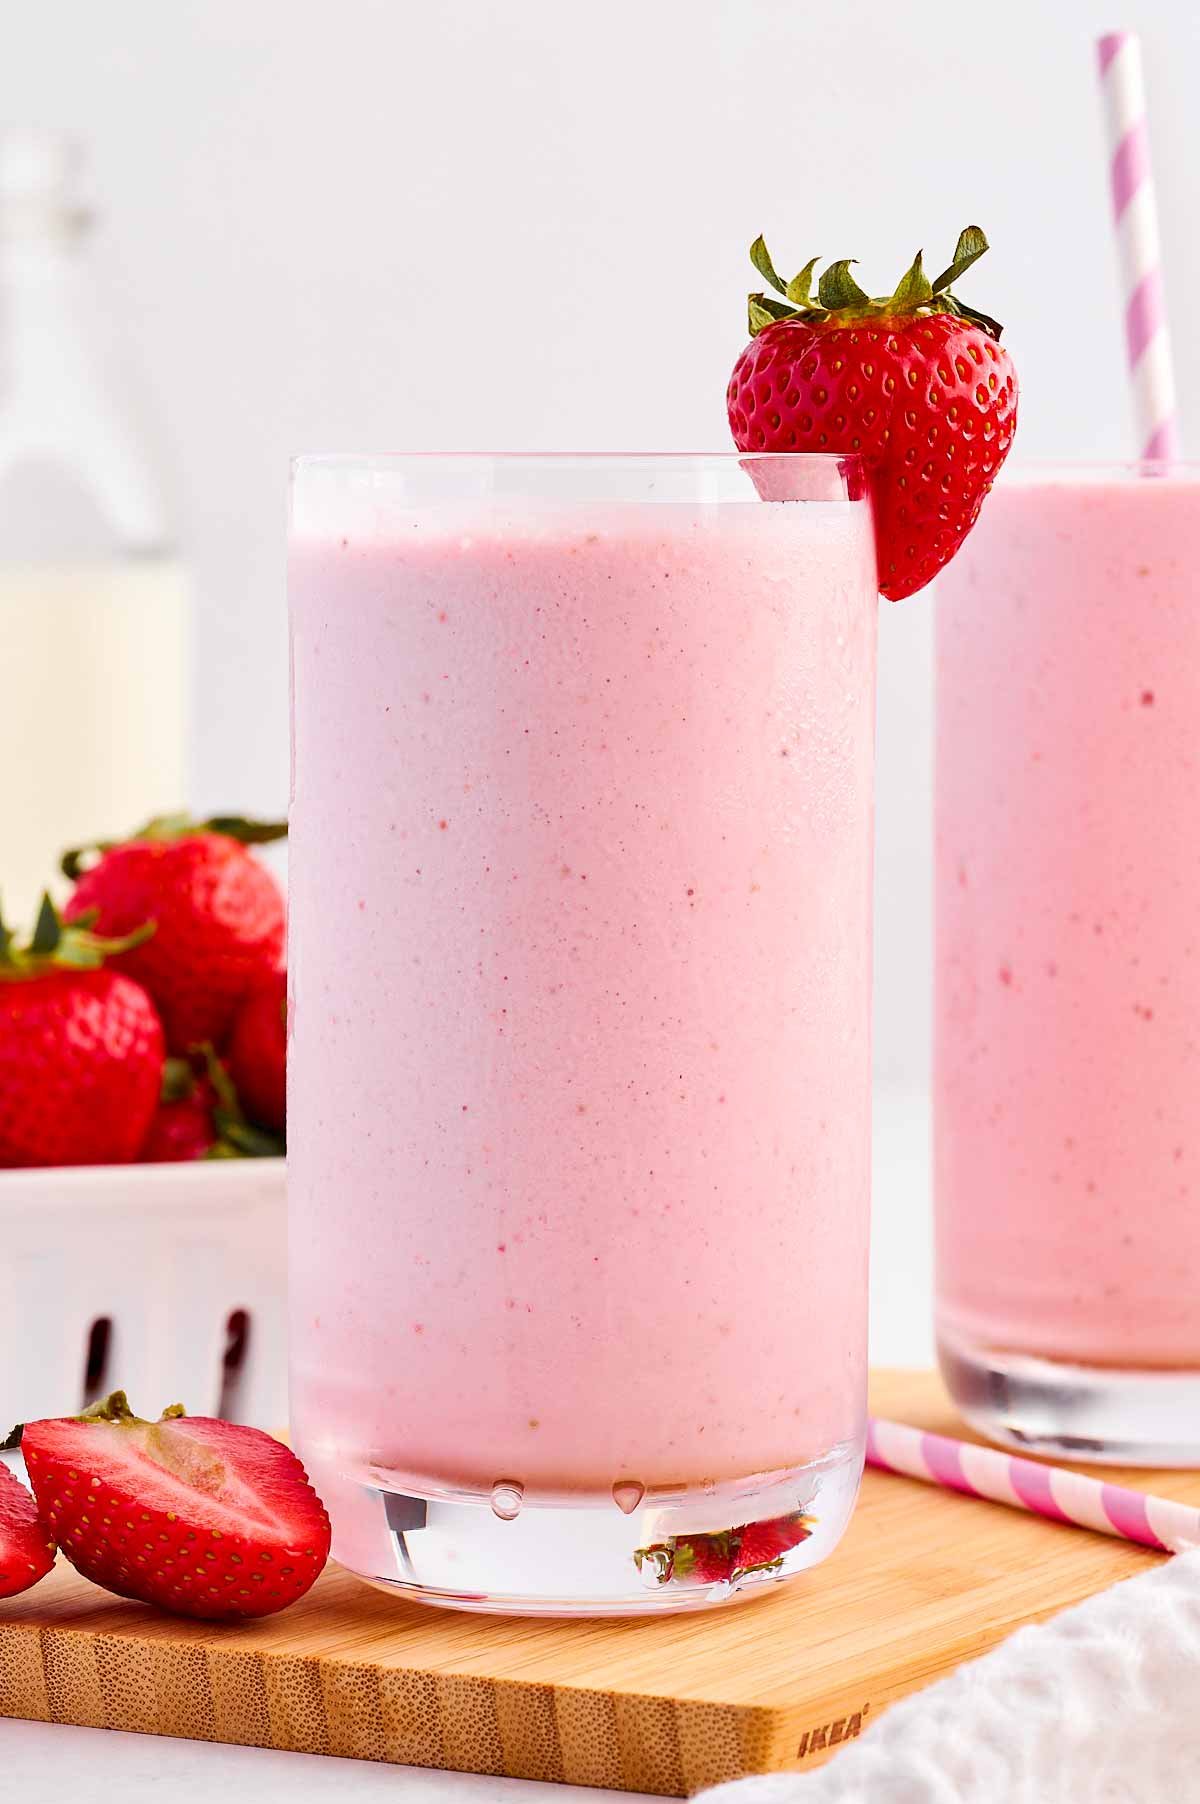
Ingredients
Frozen Strawberries: 2 cups (using frozen gives it that thick, frosty texture).
Milk of Choice: 1 ½ cups (Whole milk, almond, or oat milk all work great).
Greek Yogurt: ½ cup (Plain or vanilla for extra creaminess and protein).
Sweetener: 1–2 tablespoons of honey or maple syrup (adjust to your taste).
Vanilla Extract: ½ teaspoon (to enhance the berry flavor).
Instructions
Layer the Blender: Add the liquid (milk) and yogurt to the blender first. This helps the blades move more easily.
Add the Rest: Toss in the frozen strawberries, sweetener, and vanilla extract.
Blend: Start on a low speed and gradually increase to high. Blend for about 45–60 seconds until completely smooth with no visible fruit chunks.
Check Consistency: If it’s too thick, add a splash more milk. If you prefer it thicker, add a few more frozen berries or a handful of ice.
Serve: Pour into tall glasses.
Pro-Tips for the Aesthetic
The Garnish: Slit a fresh strawberry halfway up the middle and perch it on the rim of the glass, just like in your picture.
The Straw: Use a striped paper straw for that classic “milkshake” look.
Extra Pink: For an even more vibrant color, you can add a small slice of raw beet (don’t worry, you won’t taste it!) or a teaspoon of strawberry powder.


 Prep the Cucumbers
 Prepare the Eggs & Veggies
 Make the Dressing
 Combine
 High in protein (eggs + yogurt) → keeps you full longer
 Note: No single food causes weight loss. Weight loss happens when your overall daily calorie intake is lower than what you burn.
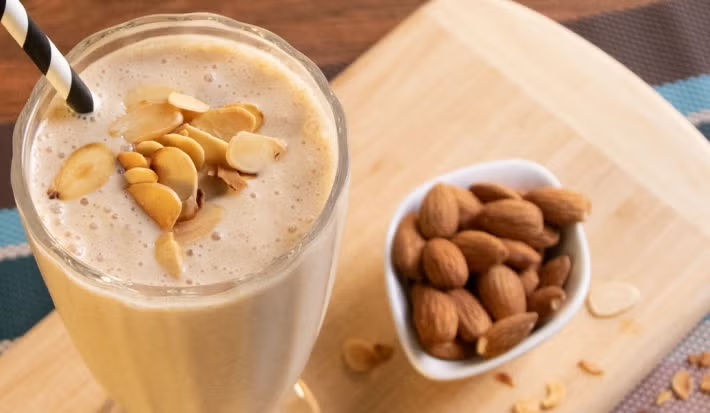


 Ingredients (4 servings)
 Instructions
 Rest & Serve
 Calories
 Weight-Loss Tips