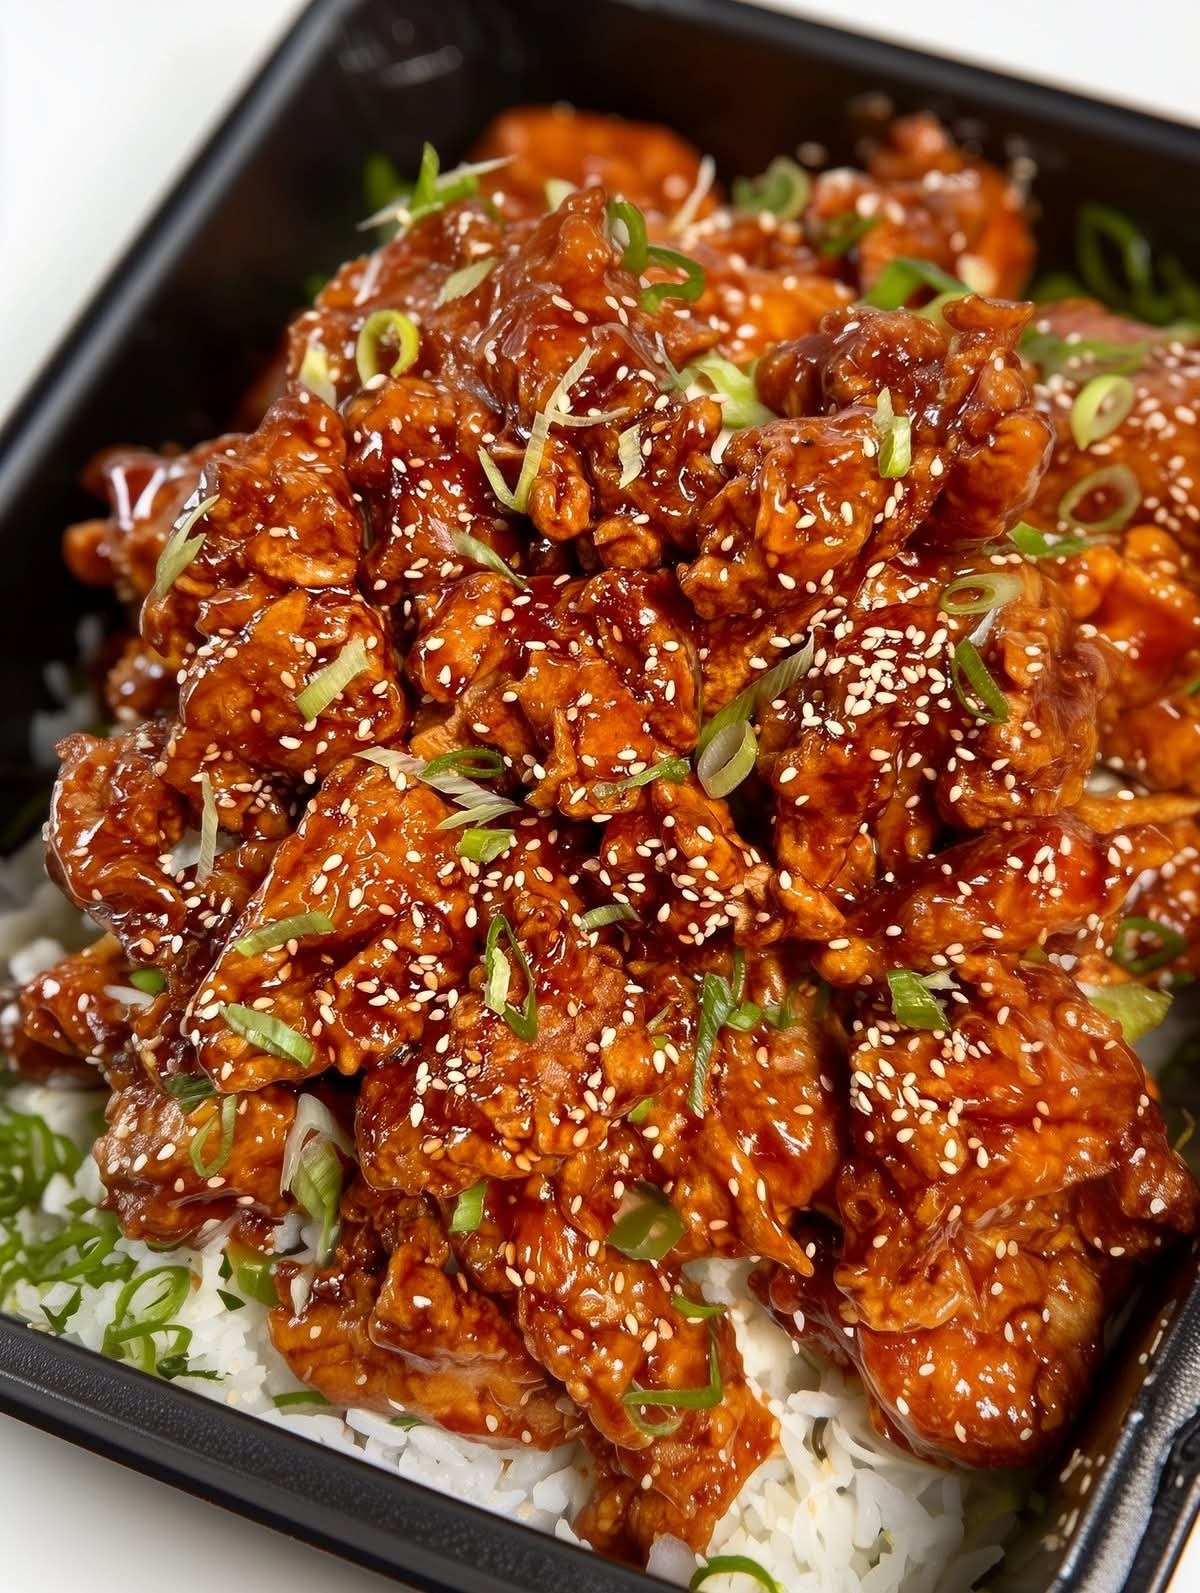
No-Knead Condensed Milk Rolls

No-Knead Condensed Milk Rolls

Super soft, fluffy, and requires only 2 minutes of active mixing.

Ingredients

  • 3 cups All-Purpose Flour: Provides the structure for the rolls.

  • 1/4 cup Granulated Monk Fruit or Stevia: Replaces the refined sugar for a lighter option.

  • 1/4 tsp Salt: To balance the sweetness and strengthen the dough.

  • 2 1/4 tsp (1 packet) Instant Yeast: Essential for the rise without kneading.

  • 1/2 cup Warm Water: To activate the yeast (ensure it is warm to the touch, not hot).

  • 1/2 cup Condensed Milk: For that signature milky flavor and soft crumb.

  • 1/4 cup Butter, melted: Adds richness and moisture.

  • 2 Eggs: Helps with the rise and creates a golden, brioche-like texture.


Detailed Instructions

1. Mix the Base

  • In a large bowl, whisk together the warm water, melted butter, condensed milk, and eggs until smooth.

  • Add the instant yeast and sugar substitute to the liquid mixture and stir.

2. Combine with Flour

  • Add the all-purpose flour and salt to the wet ingredients.

  • Use a sturdy spatula or wooden spoon to mix for about 2 minutes until a sticky, shaggy dough forms and no dry flour remains.

  • Note: Do not be tempted to add more flour; a sticky dough is the secret to a soft roll.

3. First Rise

  • Cover the bowl with a clean kitchen towel or plastic wrap.

  • Let the dough rest in a warm, draft-free spot for 1 to 1.5 hours, or until it has doubled in size.

4. Shape and Second Rise

  • Gently deflate the dough and turn it out onto a lightly floured surface.

  • Divide the dough into 12 equal portions and roll them into smooth balls.

  • Place the balls into a greased baking pan, cover, and let them rise again for 30–45 minutes until puffy.

5. Bake

  • Preheat your oven to 175°C (350°F).

  • Optional: Brush the tops with a little egg wash (1 egg beaten with a splash of water) for a shiny finish.

  • Bake for 20–25 minutes or until the tops are a beautiful golden brown.

Friendly Cinnamon Muffin Donuts

WW-Friendly Cinnamon Muffin Donuts

These muffins provide that classic “donut” texture using a simple, protein-rich base. By swapping the coating, you can enjoy that signature crunch without the heavy sugar hit.

Ingredients

The Batter Base:

  • 2 cups Self-Rising Flour: Provides the structure and lift.

  • 1 cup Sweetened Condensed Milk: This acts as your sweetener and fat source (look for a fat-free or low-fat version to lower the point count further).

  • 2 Large Eggs: To bind the batter and add a boost of protein.

The Mindful Coating:

  • ½ cup Granulated Stevia or Monk Fruit: A 1:1 sugar substitute to keep the “crunch” without the glycemic spike.

  • 1 teaspoon Ground Cinnamon: For that classic aromatic flavor.

  • 2–3 tablespoons Light Butter (Melted): Used sparingly to help the cinnamon mixture stick.


Detailed Instructions

1. Preparation

  • Preheat: Set your oven to 180°C (350°F). Ensure the rack is in the center position for even browning.

  • Prep the Pan: Lightly spray a standard 12-cup muffin tray with non-stick cooking spray or use silicone liners to ensure the muffins pop out easily.

2. Create the Batter

  • In a large mixing bowl, crack the two eggs and whisk them lightly.

  • Pour in the sweetened condensed milk and whisk until the eggs and milk are fully incorporated.

  • Slowly fold in the self-rising flour.

  • Pro Tip: Use a spatula to mix until just combined. If you overmix, the muffins will become tough rather than fluffy. Stop as soon as you see no more dry flour streaks.

3. Bake to Perfection

  • Spoon the batter into the prepared muffin cups, filling each about ¾ of the way full. This gives them room to rise into a “donut hole” dome.

  • Place in the oven and bake for 18–22 minutes.

  • The Test: Insert a toothpick into the center of a muffin; if it comes out clean or with just a few dry crumbs, they are ready. They should be a light golden brown.

4. The Finishing Touch

  • While the muffins are cooling for a minute, combine the cinnamon and sugar substitute in a small, shallow bowl.

  • Melt your light butter in a separate small bowl.

  • While the muffins are still warm, lightly brush the tops with a thin layer of butter.

  • Immediately roll the buttered top into the cinnamon-sweetener mix.

High-Protein Breakfast Wrap with Cottage Cheese & Avocado

High-Protein Breakfast Wrap

with Cottage Cheese & Avocado

Creamy, savory, and packed with protein to keep you full for hours.


📝 Ingredients (1 large wrap)

1 large high-protein or whole wheat tortilla


2 large eggs


½ cup cottage cheese (small curd)


½ avocado, sliced


¼ cup shredded cheddar or mozzarella (optional)


2 tbsp diced bell peppers or spinach (optional)


Salt & black pepper to taste


½ tsp garlic powder (optional)


1 tsp olive oil or butter (for cooking)


Hot sauce or salsa (optional)


👩‍🍳 Instructions

1️⃣ Scramble the Eggs

Heat oil or butter in a skillet over medium heat.

Whisk eggs with a pinch of salt, pepper, and garlic powder.

Pour into skillet and cook gently, stirring until soft and fluffy.


Add spinach or bell peppers during the last minute if using.


Remove from heat.


2️⃣ Warm the Tortilla

Warm tortilla in a dry skillet for 20–30 seconds per side or microwave for 10–15 seconds to make it flexible.


3️⃣ Assemble the Wrap

Spread cottage cheese across the center of the tortilla.


Top with:


Scrambled eggs


Avocado slices


Shredded cheese (if using)


Hot sauce or salsa


4️⃣ Fold

Fold in the sides, then roll tightly from bottom up.


Optional: Toast seam-side down in skillet for 1–2 minutes per side to crisp.


Elegant Baked Blueberry Cheesecake


Elegant Baked Blueberry Cheesecake

Ingredients

For the Crust:

  • 2 cups digestive biscuits or graham crackers (crushed)
  • ½ cup melted butter
  • 2 tbsp sugar (optional)

For the Cheesecake Filling:

  • 2 cups cream cheese (room temperature)
  • ¾ cup sugar
  • 2 large eggs (room temperature)
  • 1 cup heavy cream
  • 1 tsp vanilla essence
  • 1 tbsp cornflour (optional – helps prevent cracks)

For the Blueberry Topping:

  • 2 cups fresh or frozen blueberries
  • ¼ cup sugar
  • 1 tbsp lemon juice
  • 1 tbsp cornflour + 2 tbsp water (mix to make slurry)

👩‍🍳 Step-by-Step Method

Step 1: Prepare the Crust

  1. Crush biscuits into fine crumbs using a blender or rolling pin.
  2. Mix crumbs with melted butter (and sugar if using).
  3. Press mixture firmly into the bottom of a greased 8×8 inch baking dish or springform pan.
  4. Bake at 180°C (350°F) for 10 minutes.
  5. Remove and let it cool.

Step 2: Make the Cheesecake Filling

  1. In a large bowl, beat cream cheese until smooth and creamy.
  2. Add sugar and mix well.
  3. Add eggs one at a time, mixing gently (do not overbeat).
  4. Add heavy cream, vanilla essence, and cornflour.
  5. Mix until smooth and lump-free.

💡 Tip: Overmixing adds air and causes cracks.

Step 3: Bake the Cheesecake

  1. Pour the filling over the cooled crust.
  2. Tap the pan gently to remove air bubbles.
  3. Bake at 160°C (320°F) for 45–55 minutes.
    • Center should be slightly jiggly.
  4. Turn off oven and leave cheesecake inside for 1 hour (door slightly open).
  5. Cool completely at room temperature.
  6. Refrigerate for at least 4 hours or overnight.

Step 4: Prepare the Blueberry Topping

  1. In a saucepan, add blueberries, sugar, and lemon juice.
  2. Cook on medium heat until berries release juice.
  3. Add cornflour slurry and cook until thick and glossy.
  4. Let it cool completely.

Step 5: Assemble

  1. Spread cooled blueberry topping evenly over chilled cheesecake.
  2. Chill for another 30–60 minutes before slicing.
  3. Slice with a warm knife for clean cuts.

✨ Pro Tips for Perfect Cheesecake

✔ Use room temperature ingredients

✔ Don’t overmix

✔ Bake at low temperature

✔ Chill properly for best texture

Creamy Cucumber, Bacon, & Cheddar Salad


Creamy Cucumber, Bacon, & Cheddar Salad

This salad is best when eaten shortly after preparing, as the salt in the dressing will naturally draw moisture out of the cucumbers over time.


Ingredients

Cucumbers: 3–4 large English or Persian cucumbers, thinly sliced (these have thinner skins and fewer seeds, keeping the salad crisper).


Bacon: 6–8 slices of bacon, cooked until crispy and crumbled.


Cheese: 1–1.5 cups shredded sharp cheddar cheese.


Dressing:


1/2 cup sour cream (or a mix of sour cream and mayonnaise for extra richness).


1–2 tablespoons ranch dressing (optional, but adds great flavor).


1 teaspoon lemon juice or white wine vinegar (for a little tang).


1/2 teaspoon garlic powder.


Salt and black pepper to taste.


Optional: 1–2 tablespoons finely chopped green onions or red onion for bite.


Instructions

Prep the Bacon: Cook the bacon in a skillet until crispy. Drain on paper towels, let cool, and crumble into bite-sized pieces.


Prep the Cucumbers: Wash and slice the cucumbers into thin, uniform rounds. If you have time, place the slices on paper towels and sprinkle with a little salt. Let them sit for 15 minutes, then pat them dry with more paper towels; this helps keep the final salad from getting too watery.


Make the Dressing: In a medium bowl, whisk together the sour cream (or sour cream/mayo blend), ranch dressing, lemon juice/vinegar, garlic powder, and a pinch of black pepper. Taste and add salt if needed (remember that the bacon and cheese are already salty!).


Assemble: In a large mixing bowl, combine the sliced cucumbers, crumbled bacon, and shredded cheddar cheese.


Toss: Add the dressing to the bowl and toss gently until everything is evenly coated.


Chill & Serve: For the best flavor, refrigerate for 15–20 minutes before serving. This allows the dressing to thicken slightly and the flavors to meld.


Pro-Tips for Success

Keep it Crunchy: The secret to this salad is drying your cucumber slices thoroughly before adding the dressing.


Freshness: If you are prepping this for a party, keep the bacon and cheese separate and add them—along with the dressing—right before serving. This ensures the bacon stays crunchy.

Spinach & Cheese Puff Pastry Pie

Crispy, golden layers of puff pastry filled with creamy spinach and cheese – your new go-to savory snack or light meal.


Servings: 9 squares | Prep Time: 15 mins | Bake Time: 30–35 mins | Total Time: 50 mins

Dietary Badges: ✅ Vegetarian ✅ Freezer-Friendly


🧾 Ingredients Checklist:

Puff pastry sheets (2, thawed)

Cooked spinach (squeezed dry)

Ricotta or cottage cheese

Feta cheese (crumbled)

Shredded mozzarella (optional)

Egg (for filling and brushing)

Onion (finely diced, optional)

Olive oil or butter

Salt & pepper

Sesame seeds (for topping)

📋 Instructions:

Preheat oven to 375°F (190°C).

Line a baking tray with parchment paper.

Make the filling:

In a pan, sauté onions in olive oil (if using). Add spinach to remove excess moisture. In a bowl, combine spinach, ricotta, feta, one egg, salt, pepper, and mozzarella.

Assemble base layer:

Place one puff pastry sheet on the baking tray. Spread the spinach filling evenly, leaving 1/2 inch around the edges.

Add top layer:

Place second puff pastry sheet on top. Seal edges with a fork. Score into 9 squares with a knife (don’t cut all the way through).

Brush and top:

Brush with beaten egg. Sprinkle sesame seeds on top.

Bake for 30–35 mins:

Bake until golden and puffed. Let rest 5 minutes before cutting through.

📝 Notes:

Best served warm but delicious at room temp.

Use frozen spinach, fully thawed and squeezed dry, for ease.

This dish is similar to Greek spanakopita but with a pastry twist.

✨ Introduction:

This Spinach and Cheese Puff Pastry Pie is the definition of cozy-meets-elegant. Think spanakopita vibes with the buttery crunch of puff pastry – ideal for brunch, lunchboxes, or a satisfying meatless dinner.


I made this the first time to impress guests and now it’s on constant rotation. It’s that good.


🍳 Step-by-Step Cooking Guide

🧅 Sauté the Spinach

Start by cooking out moisture from spinach and lightly sautéing onions for extra depth.


Tip: Frozen spinach works great – just squeeze it dry in a clean kitchen towel.


🧀 Mix the Filling

In a mixing bowl, combine ricotta, feta, spinach, and egg. Season well.


Optional: Add shredded mozzarella for extra gooey texture.


🥟 Assemble the Pie

Lay out one puff pastry sheet. Add filling evenly. Cover with second sheet. Seal edges with a fork.


🔪 Score Before Baking

Lightly score the top into 9 squares – this makes slicing easier post-bake and gives that signature puff pie look.


🥚 Brush and Top

Egg wash = golden finish. Sesame seeds = texture and visual appeal.


🔥 Bake Until Puff and Gold

Bake at 375°F (190°C) until deeply golden and puffed up.

🧾 Ingredient Details & Substitutions

🥬 Ingredient Highlights:

Spinach: Fresh or frozen. Must be dry.

Cheese Mix: Ricotta adds creaminess, feta gives salt and tang, mozzarella adds melt.

Puff Pastry: Store-bought is perfect. Thaw completely before use.

🔁 Substitutes:

No feta? Use goat cheese or just increase ricotta and salt slightly.

Vegan? Use dairy-free cheeses and egg replacer; brush with plant milk.

Gluten-Free? Use GF puff pastry (available in select stores).

🛠 Equipment Tips

Baking Tray & Parchment: Prevents sticking and ensures even browning.

Fork: To seal edges tight.

Sharp Knife: Scoring helps steam escape and makes cutting cleaner post-bake.

🍽 Recipe Variations & Serving Suggestions

🧄 Flavor Boosts:

Add minced garlic to the spinach.

Mix in a pinch of nutmeg for warmth.

Top with a drizzle of honey for sweet-savory contrast.

🍄 Other Add-Ins:

Mushrooms (sautéed first)

Caramelized onions

Chopped sun-dried tomatoes

🍽 Serve With:

Greek salad or tomato cucumber salad

Yogurt or tzatziki dip

A glass of crisp white wine or sparkling water with lemon

❄️ Storage & Make-Ahead Tips

🧊 Storage:

Keeps in fridge up to 4 days in airtight container.

Reheat in oven at 350°F (175°C) for 10 mins to revive crispiness.

❄️ Freezing:

Freeze slices individually. Reheat directly from frozen in oven for 20 mins.

🕒 Make-Ahead:

Assemble the pie and refrigerate covered for up to 24 hours before baking.

🍴 Nutrition Facts (Estimated per square)

Calories: 220 | Carbs: 18g | Protein: 7g | Fat: 14g

Allergens: Dairy, Gluten, Egg


Diet Highlights:

✅ High in calcium from cheese

✅ Vegetarian

✅ Contains iron from spinach


❓ FAQs

Q: Can I use phyllo instead of puff pastry?

A: Yes! Use 6–8 layers, brushing each with olive oil or butter.


Q: Can I make this crustless?

A: Not with the same results – puff pastry is essential to this version’s texture.


Q: How do I keep the pastry from getting soggy?

A: Squeeze all water out of the spinach and don’t overfill the pie.


💬 Story Behind the Recipe

This recipe reminds me of Sunday brunches at my aunt’s house – her spanakopita was legendary. I wanted to recreate that same flavor with a shortcut: puff pastry. After a few iterations, this version became a staple. It’s nostalgic, comforting, and always a hit with guests – even spinach skeptics.


💛 Reader Interaction

Have you tried this with a twist? Maybe added mushrooms or a spicy version? Let me know in the comments – I love hearing how you make it your own!

📢 Call-to-Action

Bake this savory spinach pie for your next gathering – or just treat yourself to a flaky, cheesy square of comfort.

Tag your photos with #ZestSpinachPie and show me how yours turned out!

🍫🥜 No-Bake Peanut Butter Oat Energy Balls

Healthy • No Oven • 10-Minute Snack


Perfect for meal prep, lunchboxes, or a sweet bite without the guilt.


🛒 Ingredients (Makes ~12 balls)

1 cup rolled oats

½ cup peanut butter (creamy works best)

⅓ cup chocolate chips

2 tbsp cocoa powder

1–2 tbsp honey or maple syrup (to taste)

1 tsp vanilla extract (optional)

Pinch of salt

(Optional add-ins: chia seeds, flaxseed, protein powder)


👩‍🍳 Instructions

Mix everything

Add all ingredients to a bowl.

Stir until sticky

Mix until a thick, scoopable dough forms. If too dry, add 1 tbsp peanut butter or honey.

Roll

Scoop about 1 tablespoon and roll into balls.

Chill

Refrigerate for 20–30 minutes to firm up.

✨ Texture & Taste

Chewy oats

Rich peanut butter

Melty chocolate chips

Just sweet enough

🧊 Storage

Fridge: up to 7 days

Freezer: up to 2 months

🔥 Variations

Protein boost: add 1 scoop vanilla or chocolate protein powder

Vegan: use maple syrup + dairy-free chips

Nut-free: swap peanut butter for sunflower seed butter

Fresh Greek Chicken & Veggie Salad

Fresh Greek Chicken & Veggie Salad

This recipe balances lean protein with crunchy, vibrant vegetables and the tang of feta cheese.

Prep time: 15 minutes | Servings: 1 bowl


Ingredients

  • Chicken: 1 cup cooked shredded chicken breast (seasoned with salt, pepper, and a pinch of oregano).

  • Vegetables:

    • 1/2 English cucumber, sliced into rounds.

    • 1/2 cup cherry tomatoes, halved.

    • 1/4 small red onion, thinly sliced.

  • Cheese: 2 tablespoons crumbled feta cheese.

  • Garnish: 1 fresh lemon wedge (for squeezing over the top).

  • Dressing (Optional but recommended): 1 tablespoon extra virgin olive oil, a splash of fresh lemon juice, a pinch of dried oregano, sea salt, and cracked black pepper.


Instructions

  1. Prepare the Base: Place your shredded chicken into a medium-sized bowl.

  2. Add Veggies: Arrange the cucumber rounds, halved cherry tomatoes, and red onion slices on top of the chicken.

  3. Add the Finishers: Sprinkle the crumbled feta cheese generously over the top.

  4. Season: If you haven’t already, lightly drizzle the olive oil and fresh lemon juice over the salad. Add a sprinkle of cracked black pepper and a dash of oregano to taste.

  5. Serve: Place your lemon wedge on the side or right on top, just like in your photo, so you can squeeze it over right before eating.


Tips for Success

  • Make it Ahead: This stores well in the fridge, but keep the dressing and lemon juice separate until you are ready to eat to keep the cucumbers crisp.

  • Protein: If you’re short on time, a rotisserie chicken works perfectly for this.

Creamy Lettuce, Cucumber, and Olive Salad with Grated Cheese

Creamy Lettuce, Cucumber, and Olive Salad with Grated Cheese

This refreshing and creamy salad is a simple yet satisfying dish that brings together crisp lettuce, cool cucumbers, tender olives, and a generous sprinkle of finely grated cheese. It is perfect as a light meal, a side dish for lunch, or an elegant starter for dinner. The creamy dressing gently coats each ingredient, creating a smooth and flavorful bite every time.

Ingredients

  • 4 cups chopped fresh lettuce (romaine or iceberg work well)

  • 1 large cucumber, thinly sliced

  • 1 cup pitted green olives, sliced into rounds

  • 1/2 cup finely grated cheese (such as parmesan or a mild hard cheese)

  • 1/3 cup plain yogurt or mayonnaise

  • 2 tablespoons olive oil

  • 1 tablespoon fresh lemon juice

  • 1 small clove garlic, very finely minced (optional)

  • 1/2 teaspoon salt, or to taste

  • 1/4 teaspoon black pepper

  • 1 teaspoon dried herbs (such as oregano or parsley)

Instructions

Begin by washing the lettuce thoroughly under cool running water. Shake off excess moisture and pat dry with a clean towel to keep the salad crisp. Chop the lettuce into bite-sized pieces and place them in a large mixing bowl.

Next, slice the cucumber into thin rounds. If the cucumber has large seeds, you may remove them for a smoother texture, though this step is optional. Add the sliced cucumber to the bowl with the lettuce. Then, slice the pitted green olives into neat rings and mix them in gently so they distribute evenly.

In a separate small bowl, prepare the creamy dressing. Combine the yogurt or mayonnaise with olive oil and fresh lemon juice. Stir until smooth and well blended. Add the minced garlic if using, along with salt, black pepper, and dried herbs. Mix again until the dressing is creamy and aromatic.

Pour the dressing over the salad mixture. Toss gently using a large spoon so that all the vegetables are lightly coated without crushing them. Taste and adjust seasoning if needed.

Transfer the salad to a serving plate and finish by sprinkling the finely grated cheese generously over the top. Serve immediately for the freshest flavor and best texture. This salad pairs wonderfully with warm bread, grilled vegetables, or simple rice dishes, making it a versatile and delightful addition to any meal.

Mango Strawberry Chia Pudding

Mango Strawberry Chia Pudding

This recipe is naturally sweet, packed with fiber, and perfect for a healthy breakfast or a light dessert.


Ingredients

The Base:


2 ripe mangoes (peeled and pitted)


1/2 cup coconut milk (or almond milk for a lighter version)


3 tbsp chia seeds


1 tsp honey or maple syrup (optional, depending on mango sweetness)


The Mix-ins:


1/2 cup fresh strawberries, finely diced


The Toppings:


Fresh mango chunks


1 whole strawberry


A sprig of mint (optional for garnish)


Instructions

Puree the Mango: Place the flesh of the mangoes and the milk into a blender. Blend until completely smooth and creamy.


Combine: Pour the mango puree into a bowl or a large jar. Stir in the chia seeds and your sweetener of choice.


The “Speckled” Look: Fold in the finely diced strawberries. These give the drink those beautiful red pops of color seen in your photo.


Set: Cover and refrigerate for at least 2 hours, or ideally overnight. This allows the chia seeds to expand and thicken the mixture into a pudding consistency.


Assemble: Once set, give it a gentle stir. Pour into a glass and top with fresh mango cubes and a whole strawberry on the rim just like the picture!


Quick Tips for Success

Texture: If it’s too thick after sitting, stir in a splash more milk. If it’s too thin, add another teaspoon of chia seeds and wait 30 minutes.


Mango Quality: Use “Champagne” (Ataulfo) mangoes if available; they are less fibrous and much creamier for blending.

Carrot & Beetroot Vitality Juice

Carrot & Beetroot Vitality Juice

This blend is naturally sweet, earthy, and packed with Vitamin A and iron.


Ingredients

  • Carrots: 3–4 medium-sized (washed and peeled).

  • Beetroot: 1 small or half of a large one (peeled and sliced).

  • Apple (Optional): 1 green or red apple (adds sweetness and balances the earthy beet flavor).

  • Ginger: A small 1-inch knob (peeled, for a spicy kick and digestion).

  • Lemon Juice: 1 tablespoon (to keep the color bright and add Vitamin C).

  • Water: ½ cup (only if using a blender).


Preparation Steps

Method 1: Using a Juicer

  1. Prep: Wash all vegetables thoroughly. Peel the carrots and beetroot to remove any bitter skin.

  2. Process: Feed the carrots, beetroot, apple, and ginger through your juicer one by one.

  3. Finish: Stir in the fresh lemon juice.

  4. Serve: Pour into a glass and enjoy immediately for the best nutrient absorption.

Method 2: Using a Blender

  1. Chop: Cut the carrots, beetroot, and apple into small cubes.

  2. Blend: Place the cubes into the blender with the ginger and ½ cup of water. Blend on high until completely smooth.

  3. Strain: Pour the mixture through a fine-mesh nut milk bag or a cheesecloth into a pitcher. Squeeze well to extract all the juice.

  4. Serve: Stir in the lemon juice and serve chilled.


Quick Tips for the Best Juice

  • Balance the Earthiness: Beetroot has a very strong “earthy” flavor. If you are new to beet juice, start with a smaller amount and increase it as you get used to the taste.

  • Cold is Best: Chill your vegetables in the fridge before juicing for a crisp, refreshing drink without needing ice.

  • Don’t Waste the Pulp: If you use a juicer, you can save the leftover carrot and beet pulp to mix into muffin batters or compost for your garden.

Zesty Pear & Mango Smoothie

Zesty Pear & Mango Smoothie

Prep time: 5 minutes Servings: 1


Ingredients

  • 1 ripe Pear: Cored and sliced (keep the skin on for extra fiber!).

  • 1 cup Mango: Fresh or frozen chunks.

  • 1/2 Lime: Juiced (plus a little zest for the top).

  • 1/2 cup Greek Yogurt: For that creamy texture seen in the photo.

  • 1/4 cup Liquid: Use coconut water, almond milk, or plain water to help it blend.

  • Optional: A drizzle of honey or agave if your fruit isn’t quite sweet enough.


Instructions

  1. Prep the Fruit: Wash the pear thoroughly. Remove the core and stems. If you’re using a fresh mango, peel it and cut the flesh into cubes.

  2. Load the Blender: Add the pear, mango, yogurt, and lime juice into your blender.

  3. Add Liquid: Start with a small amount of your chosen liquid. You can always add more if you prefer a thinner consistency.

  4. Blend: Pulse until smooth and creamy. If you used fresh (not frozen) fruit, add a handful of ice cubes and blend again to get that chilled, frothy finish.

  5. Garnish: Pour into a tall glass. Top with a pinch of lime zest and a thin lime wheel on the rim, just like in the picture.


Tips for the Perfect Blend

  • Ripeness Matters: Pears are best when they give slightly to pressure near the stem. A ripe pear provides the best natural sweetness.

  • Texture: If the smoothie feels too “gritty” (sometimes pears have a naturally sandy texture), blending for an extra 30 seconds usually smooths it right out.

Edible Chocolate Chip Cookie Dough

 Chocolate Chip Cookie Dough

Ingredients

  • 1 ¼ cups All-purpose flour (Must be heat-treated, see note below)

  • ½ cup Unsalted butter, softened

  • ½ cup Packed light brown sugar

  • ¼ cup Granulated white sugar

  • 2 tbsp Milk or cream (any kind)

  • ½ tsp Vanilla extract

  • ¼ tsp Salt

  • ½ cup Semi-sweet chocolate chips


Instructions

  1. Heat-Treat the Flour: This is the most important step for safety. Spread the flour on a baking sheet and bake it at 175°C for about 5 minutes, or microwave it in a bowl on high for 1 minute (stirring halfway through). Let it cool completely before using.

  2. Cream Butter and Sugars: In a medium bowl, beat the softened butter, brown sugar, and white sugar together until the mixture is smooth and fluffy.

  3. Mix in Liquids: Add the milk and vanilla extract, mixing until well combined.

  4. Combine: Stir in the heat-treated flour and salt until a dough forms. If it seems too dry, add another teaspoon of milk.

  5. Fold: Fold in the chocolate chips.

  6. Serve: You can eat it immediately with a spoon, or use an ice cream scoop to portion it into perfect, treat-ready balls just like in your photo.


Quick Tips

  • Storage: Keep this in an airtight container in the refrigerator for up to 5 days, or you can freeze it for up to 3 months.

  • Variations: Feel free to swap the chocolate chips for white chocolate chunks, sprinkles, or even crushed nuts if you like a little extra crunch.

Diabetic-Friendly Vanilla Cream Rolls (5-Minute No-Bake)

Diabetic-Friendly Vanilla Cream Rolls (5-Minute No-Bake)

 Description

These light, creamy vanilla rolls are made with a low-carb, sugar-free filling and thin, crisp roll shells. The texture is silky and melts in your mouth, while keeping carbohydrates lower than traditional pastry cream rolls. Perfect for a quick dessert, tea snack, or make-ahead treat.

⚠️ “Diabetic-friendly” means lower in sugar and carbs — always monitor blood glucose and consult your healthcare provider for personal guidance.

 Ingredients (Makes 8 Rolls)

For the Cream Filling

  • 1 cup heavy whipping cream (cold)

  • 4 oz (115 g) cream cheese, softened

  • 2–3 tablespoons powdered erythritol or monk fruit sweetener (adjust to taste)

  • 1 teaspoon pure vanilla extract

  • Pinch of salt

For the Roll Shells (Quick Option)

  • 8 low-carb wafer rolls OR

  • 8 thin low-carb crepes (store-bought or homemade)

Optional dusting: powdered erythritol

 Instructions (5–10 Minutes)

  1. Whip Cream
    Beat heavy cream until soft peaks form.

  2. Mix Base
    In another bowl, beat cream cheese, sweetener, vanilla, and salt until smooth.

  3. Combine
    Gently fold whipped cream into cream cheese mixture until light and fluffy.

  4. Fill Rolls
    Transfer filling into a piping bag (or zip bag with tip cut).
    Pipe into wafer rolls or spread onto crepes and roll tightly.

  5. Chill (Optional but Recommended)
    Refrigerate 20–30 minutes for best texture.

  6. Serve
    Dust lightly with powdered sweetener if desired.

Servings

  • 8 rolls

  • 1 roll per serving

Nutritional Info (Approx. Per Roll)

(Using erythritol and low-carb shells)

  • Calories: 120–150

  • Net Carbs: 2–4g

  • Fat: 12g

  • Protein: 2–3g

  • Sugar: <1g

  • Fiber: 1–2g

(Numbers vary depending on shells used.)

 Benefits

✔ Lower sugar than traditional cream rolls
✔ Low net carbs (keto-friendly option)
✔ High satiety from healthy fats
✔ No refined sugar
✔ Quick preparation
✔ Portion-controlled dessert

 Notes & Tips

  • Chill bowl and beaters for faster whipping.

  • Don’t overbeat cream — it can turn grainy.

  • Add lemon zest for brightness.

  • For firmer filling, add 1 tablespoon chia seeds or ½ teaspoon gelatin (bloomed).

  • Store refrigerated up to 3 days.

Variations

  • 🍓 Add sugar-free strawberry puree swirl

  • 🍫 Mix in 1 tbsp unsweetened cocoa powder

  • 🥥 Add 1 tbsp coconut cream for tropical flavor

  • ☕ Add ½ tsp instant espresso for mocha twist

 Q & A

Q: Is this safe for diabetics?
It contains no added sugar and uses low-glycemic sweeteners, but portion control is important.

Q: Can I use stevia?
Yes, but use a baking blend to avoid bitterness.

Q: Can I make it dairy-free?
Use coconut cream and dairy-free cream cheese.

Q: Can I freeze them?
Yes, freeze up to 1 month. Thaw in fridge.

Q: Why is my filling runny?
Cream wasn’t whipped enough or ingredients were too warm.

Cottage Cheese Chaffles

Cottage Cheese Chaffles

A quick, savory or sweet low-carb breakfast.


Ingredients

  • 1/2 cup Cottage Cheese: Small curd works best for a smoother texture.

  • 1 Large Egg: Acts as the binder for the batter.

  • 1/2 cup Shredded Mozzarella Cheese: Provides the “chaffle” structure and a crispy exterior.

  • 2 tbsp Almond Flour: (Optional) Adds a bit of heartiness to the texture.

  • Seasoning:

    • For Savory: A pinch of garlic powder and dried chives.

    • For Sweet: A drop of vanilla extract and a pinch of cinnamon.


Instructions

  1. Preheat the Iron: Plug in your mini waffle maker (or standard waffle iron) and let it heat up until the indicator light goes off. Lightly spray with a non-stick cooking oil if needed.

  2. Mix the Batter: In a medium bowl, whisk the egg thoroughly. Fold in the cottage cheese, shredded mozzarella, and your choice of seasoning. If you prefer a smoother waffle, you can pulse these ingredients in a blender for 5 seconds.

  3. Cook: Pour about half of the mixture (roughly 1/4 to 1/3 cup) onto the center of the waffle iron. Close the lid and cook for 3–5 minutes.

    • Tip: Resist the urge to open the lid early! Wait until the steam stops rising to ensure the cheese has crisped up enough to release from the iron.

  4. Cool and Crisp: Remove the chaffle carefully and let it sit on a wire rack or plate for 1–2 minutes. It will become crispier as it cools slightly.

  5. Serve: Enjoy plain, or top with avocado and a fried egg (savory) or fresh berries and a dollop of Greek yogurt (sweet).


Why This Recipe is a Keeper

  • Low Carb: By replacing flour with cheese and egg, you significantly reduce the glycemic impact of your breakfast.

  • High Protein: Between the cottage cheese and the egg, this meal provides sustained energy to keep you full until lunch.

  • Versatile: You can make a large batch and toast them later in the week for an even faster morning routine.

Broccoli & Cauliflower Healing Soup

Broccoli & Cauliflower Healing Soup

A gentle, creamy, and nourishing soup made with fresh broccoli and cauliflower. It’s light on the stomach, packed with fiber, antioxidants, and vitamins — perfect for digestion and overall wellness.

 Description

This soup is smooth, naturally creamy (without heavy cream), and easy to digest. Both broccoli and cauliflower belong to the cruciferous vegetable family, known for supporting gut health, reducing inflammation, and boosting immunity.

It’s ideal for:

  • Sensitive stomach days

  • Detox-style meals

  • Light dinners

  • Immune support

Ingredients (4 Servings)

  • 2 cups broccoli florets

  • 2 cups cauliflower florets

  • 1 small onion, chopped

  • 2 cloves garlic, minced

  • 1 tablespoon olive oil

  • 3 cups vegetable broth (or water)

  • ½ teaspoon turmeric (optional, for extra anti-inflammatory benefits)

  • Salt & black pepper to taste

  • ½ cup milk or coconut milk (optional for creaminess)

  • Fresh parsley (optional garnish)

 Instructions

  1. Heat olive oil in a pot over medium heat.

  2. Add chopped onion and garlic. Sauté until soft (2–3 minutes).

  3. Add broccoli and cauliflower florets. Stir for 1–2 minutes.

  4. Pour in vegetable broth. Bring to a boil.

  5. Reduce heat and simmer for 15–20 minutes until vegetables are tender.

  6. Blend using a hand blender (or regular blender) until smooth.

  7. Add milk/coconut milk if desired.

  8. Season with salt, pepper, and turmeric.

  9. Simmer for another 2 minutes. Serve warm.

 Servings

  • Makes: 4 servings

  • Serving size: ~1 bowl (1.5 cups)

 Nutritional Information (Per Serving – Approximate)

  • Calories: 120–150 kcal

  • Protein: 5g

  • Fiber: 4–5g

  • Carbohydrates: 15g

  • Fat: 6g

  • Vitamin C: 80% Daily Value

  • Vitamin K: 90% Daily Value

Anti-Inflammatory Liquid Gold (Green Juice)

Anti-Inflammatory Liquid Gold (Green Juice)

 Anti-Inflammatory Liquid Gold (Green Juice)
Yields: ~2 large bottles (8–10 servings)
Prep Time: 10 minutes
Blend Time: 5 minutes
📝 Ingredients
2 large cucumbers
1 bunch celery (about 6–8 stalks)
1 large bunch fresh parsley
1 large bunch fresh cilantro
2 cups fresh spinach or kale
1–2 inch piece fresh ginger, peeled
1 lemon, peeled (or juice only)
1 green apple (optional, for mild sweetness)
1 tsp turmeric powder or 1-inch fresh turmeric root
Pinch of black pepper (boosts turmeric absorption)
2–3 cups cold filtered water (adjust for thickness)
👩‍🍳 Instructions
Wash & prep:
Thoroughly wash all produce. Roughly chop cucumbers, celery, greens, and apple.
Blend:
Add everything to a high-speed blender. Blend until completely smooth (1–2 minutes).
Strain (optional):
For a juice-like texture, strain through a nut milk bag or fine mesh sieve.
For maximum fiber, drink as-is.
Store:
Pour into airtight glass bottles or jars. Refrigerate up to 3–4 days.

Banana Oatmeal Weight-Loss Smoothie

Banana Oatmeal Weight-Loss Smoothie

Description

A creamy, fiber-rich oatmeal smoothie made with oats, banana, and protein-boosting ingredients to keep you full for hours. Perfect for breakfast or a meal replacement when trying to manage calories.

 Ingredients (1 Serving)

  • ½ cup rolled oats

  • 1 medium banana

  • 1 cup unsweetened almond milk (or skim milk)

  • ½ cup Greek yogurt (plain, non-fat)

  • 1 tablespoon chia seeds

  • ½ teaspoon cinnamon

  • 1 teaspoon honey (optional)

  • ½ cup ice cubes

 Instructions

  1. Soften oats (optional but recommended):
    Soak oats in almond milk for 5–10 minutes for smoother texture.

  2. Add all ingredients to a blender.

  3. Blend until smooth and creamy.

  4. Pour into a glass and enjoy immediately.


💡 Tips for Best Results

  • ✔ Use rolled oats, not instant flavored oats.

  • ✔ Add protein powder if using as a meal replacement.

  • ✔ For lower calories, skip honey.

  • ✔ Prep overnight oats in the fridge for quicker mornings.

  • ✔ Pair with light exercise for better results.

 Servings

  • Makes: 1 serving

  • Can be doubled for 2 servings

Nutritional Information (Approx. Per Serving)

Nutrient Amount
Calories 350–400 kcal
Protein 18–22g
Carbohydrates 55g
Fiber 9–11g
Fat 8–10g
Sugar 18g (natural + optional honey)

(Values vary depending on ingredients used.)

 Health Benefits

1️⃣ Keeps You Full Longer

Oats and chia seeds are high in fiber, helping reduce hunger cravings.

2️⃣ Supports Digestion

Soluble fiber improves gut health.

3️⃣ Helps Control Blood Sugar

Oats have a low glycemic index compared to refined carbs.

4️⃣ Boosts Metabolism

Protein from Greek yogurt supports muscle and fat burning.

5️⃣ Heart Healthy

Oats may help reduce LDL (bad cholesterol).

 Q & A

Q1: Can I lose 10 pounds in one week with this?

Realistically, no. Safe weight loss is 1–2 pounds per week. Rapid loss is mostly water weight.

Q2: Can I drink this twice a day?

Yes, but ensure you’re getting enough protein, vegetables, and healthy fats throughout the day.

Q3: Can I use water instead of milk?

Yes, but it will be less creamy and slightly lower in protein.

Q4: Is this good for diabetics?

It can be, but skip honey and monitor portion size. Always consult a healthcare provider.

Q5: Can I make it vegan?

Yes. Use plant-based yogurt and milk.

Chia & Cumin Seed Tonic

Chia & Cumin Seed Tonic

A refreshing, fiber-packed drink to start your morning.

Ingredients

  • 1 tbsp Chia Seeds: Rich in fiber and Omega-3 fatty acids.

  • 1 tsp Cumin Seeds (Jeera): Known for supporting digestion.

  • 1 ½ cups Water: Filtered or spring water is best.

  • 1 tsp Honey or Maple Syrup: (Optional) For a touch of natural sweetness.

  • ½ Lemon: Freshly squeezed juice.

  • A pinch of Cinnamon: (Optional) For extra flavor.


Preparation Instructions

  1. Prepare the Cumin Water: * Place the cumin seeds in a small pot with the water.

    • Bring to a gentle boil, then reduce heat and simmer for about 5 minutes until the water turns a light golden hue.

    • Strain the seeds out and let the liquid cool to room temperature.

  2. Soak the Chia Seeds: * Add the chia seeds to the cooled cumin water.

    • Stir well and let them soak for at least 20–30 minutes (or overnight in the fridge) until they expand and become gelatinous.

  3. Final Mix: * Add the fresh lemon juice and your choice of natural sweetener if using.

    • Stir or shake vigorously to ensure the chia seeds are evenly distributed.

  4. How to Consume: * Drink this first thing in the morning on an empty stomach or about 30 minutes before a meal to help with satiety.


Helpful Tips for Success

  • Stay Hydrated: Because chia seeds absorb a lot of water, make sure you drink plenty of plain water throughout the rest of the day.

  • Consistency over “Quick Fixes”: This drink works best when paired with the healthy cucumber salad we discussed and regular movement.

  • Safety Note: If you have any digestive issues or are on medication, it’s always a good idea to check with a healthcare professional before adding new supplements to your daily routine.

Creamy Cucumber & Corn Salad

Creamy Cucumber & Corn Salad

A light yet satisfying dinner or side dish.


Ingredients

The Base:

  • 2 Large Cucumbers: Sliced into thin half-moons.

  • 1-2 Carrots: Peeled and finely diced.

  • 3 Hard-boiled Eggs: Peeled and chopped into bite-sized pieces.

  • 80g Sweet Corn: (Canned or steamed), drained well.

  • Fresh Herbs: A handful of chopped green onions and fresh parsley.

The Dressing:

  • 3-4 tbsp Thick Greek Yogurt: (Plain and unsweetened).

  • 1 tbsp Dijon or Whole Grain Mustard.

  • 1/3 tsp Salt: (Adjust to taste).

  • Optional: A squeeze of lemon juice or a pinch of black pepper for extra zest.


Instructions

  1. Prep the Cucumbers: Place your sliced cucumbers in a bowl and sprinkle with the 1/3 teaspoon of salt. Let them sit for about 5–10 minutes. This draws out excess water so your salad doesn’t get soggy. After sitting, gently pat them dry with a paper towel.

  2. Combine the Vegetables: In a large mixing bowl, add the prepared cucumbers, diced carrots, sweet corn, and chopped green onions.

  3. Add Protein: Gently fold in the chopped hard-boiled eggs.

  4. Whisk the Dressing: In a small separate bowl, whisk together the Greek yogurt and mustard until smooth.

  5. Mix and Garnish: Pour the dressing over the salad and toss gently until everything is evenly coated. Top with freshly chopped parsley.

  6. Serve: This salad is best served chilled. You can eat it immediately or let it sit in the fridge for 20 minutes to let the flavors meld.


Why it works

By using Greek yogurt instead of mayonnaise, you’re significantly increasing the protein content while keeping the texture creamy. The cucumbers provide hydration, while the eggs and corn offer enough substance to keep you feeling full through the evening.

Wholesome Banana Oat Muffins


Wholesome Banana Oat Muffins

Prep time: 10 minutes


Cook time: 20–25 minutes


Yield: 12 muffins


Ingredients

3 ripe bananas, mashed (the riper, the better!)


2 large eggs


2 cups rolled oats (use certified gluten-free if needed)


1 tsp baking powder


1 tsp cinnamon


1 tsp vanilla extract


Optional: A handful of sugar-free chocolate chips or fresh blueberries for extra flavor.


Instructions

Preheat: Set your oven to 350°F (175°C) and line a muffin tin with silicone liners or lightly grease the wells.


Mix: In a large bowl, mash the bananas well with a fork. Add the eggs, vanilla, and cinnamon, and mix until well combined.


Combine: Stir in the oats and baking powder until everything is incorporated. If you are adding berries or chocolate chips, gently fold them in now.


Fill: Divide the mixture evenly into your prepared muffin tin.


Bake: Bake for 20–25 minutes, or until the tops are set and a toothpick inserted into the center comes out clean.


Cool: Let them cool in the pan for a few minutes before transferring them to a wire rack.

Hamburger Potato Casserole

Hamburger Potato Casserole

🕒 The Basics

Prep time: 20 minutes


Cook time: 60 minutes


Servings: 6 people


Difficulty: Easy


🛒 Ingredients

The Base

Ground Beef: 1.5 lbs (80/20 or 90/10 lean)


Potatoes: 5–6 medium Russet or Yukon Gold potatoes (peeled and sliced into 1/8-inch rounds)


Onion: 1 medium yellow onion, diced


Garlic: 3 cloves, minced


The Sauce

Cream of Mushroom Soup: 1 can (10.5 oz)


Milk: 3/4 cup (whole or 2%)


Sour Cream: 1/2 cup (adds tang and creaminess)


Cheddar Cheese: 2 cups, shredded (divided)


Seasonings: 1 tsp salt, 1/2 tsp black pepper, 1 tsp paprika, 1/2 tsp dried thyme


👩‍🍳 Instructions

Prep the Oven: Preheat your oven to 375°F (190°C). Grease a 9×13 inch baking dish.


Brown the Beef: In a large skillet, cook the ground beef and diced onions over medium-high heat until the meat is no longer pink. Drain the excess grease. Stir in the minced garlic and cook for 1 minute until fragrant. Season with half of the salt and pepper.


Mix the Sauce: In a medium bowl, whisk together the cream of mushroom soup, milk, sour cream, paprika, thyme, and the remaining salt and pepper.


Layer it Up: * Place half of the sliced potatoes in the bottom of the baking dish.


Spread the beef mixture evenly over the potatoes.


Pour half of the sauce over the beef.


Add the remaining potatoes in a final layer.


Pour the rest of the sauce over the top.


Bake: Cover the dish tightly with aluminum foil. Bake for 45 minutes.


Cheese it Up: Remove the foil. Sprinkle the 2 cups of shredded cheddar cheese over the top. Bake uncovered for another 15 minutes, or until the potatoes are fork-tender and the cheese is bubbly and golden.

Rest: Let the casserole sit for 5–10 minutes before serving. This allows the sauce to thicken.


💡 Pro Tips & Notes

Slice Thin: Use a mandoline slicer for the potatoes if you have one. Consistent thickness ensures every potato is cooked through at the same time.


The Potato Choice: Russets soak up the sauce beautifully, while Yukon Golds hold their shape better and offer a buttery flavor.


Vegetable Boost: Feel free to add a layer of frozen peas, corn, or canned green beans between the beef and potatoes for a complete one-dish meal.


🥗 Nutritional Info (Per Serving)

Calories Total Fat Carbs Protein Sodium

485 kcal 28g 32g 26g 840mg

✅ Benefits

Meal Prep Friendly: This tastes even better the next day as the flavors meld.


Kid-Approved: It features familiar, mild flavors that even picky eaters enjoy.


Budget-Friendly: Uses pantry staples and affordable cuts of meat.


❓ Common Questions (Q&A)

Q: Can I use ground turkey instead?


A: Absolutely! It’s a great way to lean out the recipe. Just add a teaspoon of Worcestershire sauce to the turkey to boost the “beefy” umami flavor.


Q: Why are my potatoes still hard?


A: This usually happens if the slices are too thick or the dish wasn’t covered tightly enough. The steam trapped by the foil is what cooks the potatoes.


Q: Can I freeze this?


A: Yes. You can freeze it after baking. Thaw it in the fridge overnight and reheat in the oven at 350°F until warmed through. Note that potatoes can sometimes change texture slightly after freezing.

BREAKFAST TOASTS – 9 EASY RECIPES

🥑🍓 BREAKFAST TOASTS – 9 EASY RECIPES

1️⃣ Avocado & Egg Toast

Ingredients:

  • 1 slice bread (toasted)
  • ½ ripe avocado
  • 1 egg
  • Salt & black pepper

Method:

  1. Toast the bread until golden.
  2. Mash avocado with salt & pepper.
  3. Fry or poach the egg.
  4. Spread avocado on toast and place egg on top.
  5. Sprinkle pepper and serve.

2️⃣ Berry & Cream Cheese Toast

Ingredients:

  • 1 slice toasted bread
  • 2 tbsp cream cheese
  • Sliced strawberries
  • Blueberries

Method:

  1. Toast bread.
  2. Spread cream cheese evenly.
  3. Add berries on top.
  4. Drizzle honey (optional).

3️⃣ Peanut Butter & Banana Toast

Ingredients:

  • 1 slice toasted bread
  • 1–2 tbsp peanut butter
  • 1 banana (sliced)

Method:

  1. Toast bread.
  2. Spread peanut butter.
  3. Arrange banana slices on top.
  4. Sprinkle chia seeds (optional).

4️⃣ Mushroom & Spinach Toast

Ingredients:

  • 1 slice bread
  • ½ cup sliced mushrooms
  • ½ cup spinach
  • 1 tbsp butter or oil
  • Salt & pepper

Method:

  1. Sauté mushrooms in butter until soft.
  2. Add spinach and cook until wilted.
  3. Season with salt & pepper.
  4. Place mixture on toasted bread.

5️⃣ Ricotta & Tomato Toast

Ingredients:

  • 1 slice toasted bread
  • 2 tbsp ricotta cheese
  • Fresh tomato slices
  • Salt, pepper, oregano

Method:

  1. Spread ricotta on toast.
  2. Add tomato slices.
  3. Sprinkle seasoning and serve.

6️⃣ Smoked Salmon & Cucumber Toast

Ingredients:

  • 1 slice toasted bread
  • 2 tbsp cream cheese
  • Smoked salmon slices
  • Cucumber slices

Method:

  1. Spread cream cheese on toast.
  2. Add salmon.
  3. Top with cucumber slices.
  4. Add lemon juice if desired.

7️⃣ Hummus & Roasted Red Pepper Toast

Ingredients:

  • 1 slice toasted bread
  • 2 tbsp hummus
  • Roasted red pepper strips

Method:

  1. Spread hummus on toast.
  2. Add roasted red peppers.
  3. Sprinkle chili flakes (optional).

8️⃣ Bacon & Egg Toast

Ingredients:

  • 1 slice toasted bread
  • 2 strips bacon
  • 1 fried egg

Method:

  1. Cook bacon until crispy.
  2. Fry egg to your liking.
  3. Place bacon on toast.
  4. Top with egg and serve.

9️⃣ Almond Butter & Apple Toast

Ingredients:

  • 1 slice toasted bread
  • 1–2 tbsp almond butter
  • Thin apple slices
  • Cinnamon (optional)

Method:

  1. Spread almond butter on toast.
  2. Arrange apple slices.
  3. Sprinkle cinnamon for extra flavor.

Easy Potato Patties

Easy Potato Patties

If you’re craving a deliciously crispy snack, look no further than this easy homemade potato patties recipe! These golden, crunchy treats are made with tender mashed potatoes, sautéed veggies, and smoky cheese, creating a delightful blend of flavors and textures. People adore these potato patties because they are simple to make, serve as a versatile side dish, or stand alone as a hearty snack. You’ll find them to be a delightful addition to any meal or a great afternoon nibble!


Recipe Summary

Prep Time: 15 minutes

Cook Time: 15 minutes

Total Time: 30 minutes

Servings: 4

Estimated Calories: 220 per serving

Ingredients

1 kg (2 lb) potatoes, peeled

1 shallot or small onion, finely chopped

1 carrot, grated

Fresh parsley, chopped to taste

Smoked cheese (scamorza), cut into small cubes

2 eggs

125 ml (1/2 cup) plain yogurt

4–5 tbsp (30–40 g) wheat flour

Salt and black pepper to taste

Vegetable oil for frying

Instructions

Boil the peeled potatoes in salted water until fork-tender. Drain and let them cool slightly.

In a pan, heat a little oil over medium heat. Sauté the finely chopped shallot and grated carrot for 5–7 minutes until softened and lightly golden.

Mash the cooled potatoes until smooth in a large bowl.

Add the sautéed vegetables, chopped parsley, salt, and pepper to the mashed potatoes. Mix well.

Stir in the smoked cheese cubes, eggs, and yogurt until combined.

Gradually add flour until a thick, moldable mixture forms.

Heat vegetable oil in a frying pan over medium heat.

Shape the mixture into thick patties and fry them on both sides until deep golden brown and cooked through.

Drain the patties on paper towels and serve warm.

Why This Recipe is Popular

Easy homemade potato patties are a beloved dish for many reasons. They’re not only a great way to use up leftover potatoes but also evoke feelings of nostalgia and comfort. Their simplicity and versatility make them a great choice for busy weeknights or casual gatherings, and they cater to both kids and adults alike.


Serving Suggestions

These crispy potato patties make a fantastic side dish with a variety of main courses or a delightful snack on their own. Pair them with a fresh salad or some dipping sauce like garlic aioli for an extra flavor boost. They also work well at barbecues, parties, or family dinners!


Tips and Variations

Storage: Store any leftover potato patties in an airtight container in the refrigerator for up to 3 days. Reheat them in a skillet for best results.

Texture: For extra crispiness, make sure the oil is hot enough before adding the patties. This helps achieve a perfect golden crust.

Flavor Ideas: Feel free to mix in other herbs or spices such as dill or paprika to enhance the flavor.

Cheese Swap: Try using different types of cheese, like cheddar or feta, for a unique twist.

Vegetable Add-ins: You can add in finely diced bell peppers or spinach for added nutrition and flavor.

FAQs

1. Can I freeze these potato patties?

Yes, you can freeze the uncooked patties. Just layer them between parchment paper and store in an airtight container for up to 2 months.


2. What can I serve with potato patties?

They pair perfectly with simple salads, yogurt dips, or your favorite sauces.


3. How long do the patties take to fry?

Each side typically takes about 3–4 minutes in hot oil until golden brown.


4. Can I make these potato patties gluten-free?

Absolutely! Substitute the regular flour with a gluten-free all-purpose flour to suit your dietary needs.


Give this easy homemade potato patties recipe a try! They’re bound to become a new family favorite that you’ll want to make again and again. Happy cooking!

Crispy Spiced Roasted Chickpeas

Crispy Spiced Roasted Chickpeas

A crunchy, fiber-rich snack that can help support steady blood sugar

Description

These crispy roasted chickpeas are seasoned with olive oil, cumin, and smoked paprika, then baked until golden and crunchy. They’re a simple, affordable, plant-based snack that’s high in fiber and protein—both of which help slow digestion and reduce blood sugar spikes when eaten as part of a balanced diet.

Using a muffin tin (as shown in the image) helps keep the chickpeas evenly spread, so they roast instead of steaming.

 Ingredients

  • 1 can (15 oz / 425 g) chickpeas, drained and rinsed

  • 2 tablespoons olive oil

  • 1 teaspoon ground cumin

  • ½ teaspoon smoked paprika

  • Salt and black pepper, to taste

Optional add-ins: garlic powder, chili flakes, turmeric, or lemon zest

Instructions

  1. Preheat oven to 400°F (200°C).

  2. Drain and rinse chickpeas well. Pat completely dry with a clean towel (very important for crispiness).

  3. Place chickpeas in a bowl and toss with olive oil, cumin, smoked paprika, salt, and pepper.

  4. Spoon chickpeas into a muffin tin, dividing them evenly between cups (or spread on a baking sheet).

  5. Roast for 25–30 minutes, shaking halfway through, until golden and crispy.

  6. Let cool for 5 minutes—they crisp up more as they cool.

  7. Taste and adjust seasoning if needed.

 Tips for Best Results

  • Dry chickpeas thoroughly to avoid sogginess

  • Don’t overcrowd—airflow = crunch

  • For extra crispiness, roast an additional 5 minutes at 425°F (220°C)

  • Store loosely covered; airtight containers soften them

 Servings

  • 4 servings

  • Serving size: ~½ cup roasted chickpeas

Nutritional Information (per serving – approx.)

  • Calories: ~180

  • Protein: 6–7 g

  • Fiber: 6 g

  • Healthy fats: 7 g

  • Net carbs: ~14 g

(Values may vary based on oil and portion size)

 Health Benefits

  • High fiber helps slow glucose absorption

  • Plant protein supports satiety and muscle health

  • Low glycemic load compared to refined snacks

  • Heart-healthy fats from olive oil

  • Naturally gluten-free and vegan

⚠️ Note: This recipe does not “instantly lower blood sugar,” but it can help prevent sharp spikes when eaten instead of sugary or refined snacks.

Recipe Q&A

Q: Can people with diabetes eat this?
A: Yes, in moderate portions. Chickpeas are a low-GI food and generally blood-sugar friendly.

Q: Can I make this in an air fryer?
A: Yes! Cook at 375°F (190°C) for 12–15 minutes, shaking halfway.

Q: Why use a muffin tin?
A: It keeps chickpeas separated so they roast evenly and get crisp on all sides.

Q: How long do they keep?
A: Best same day. They’ll keep 2–3 days at room temperature but lose crunch.

Q: Can I use dried chickpeas?
A: Yes—soak and fully cook them first, then proceed with the recipe.