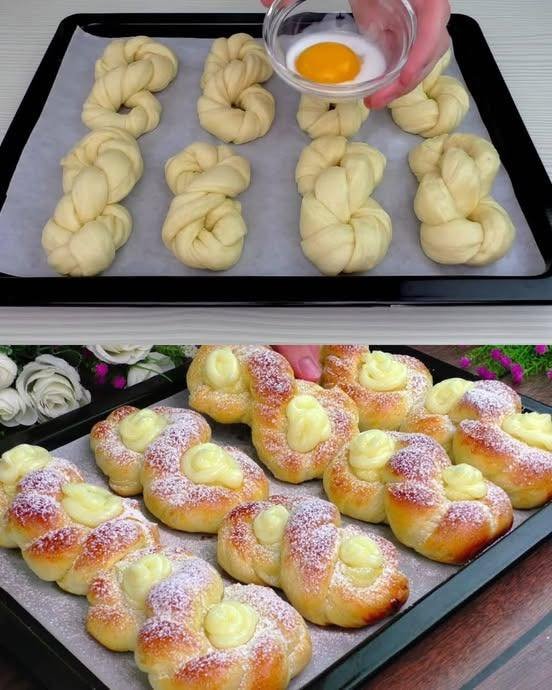
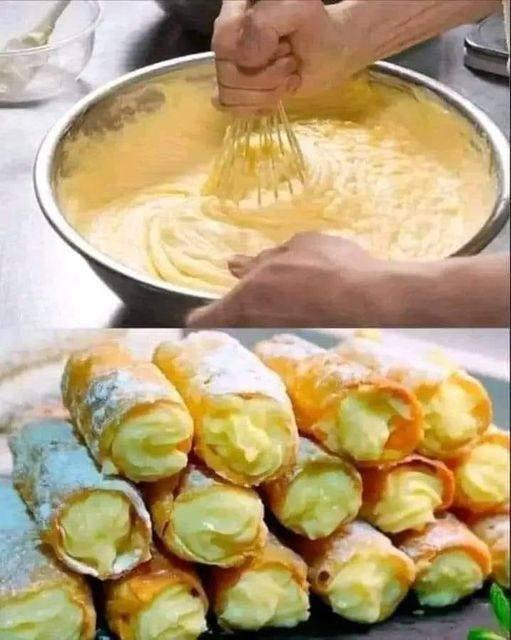
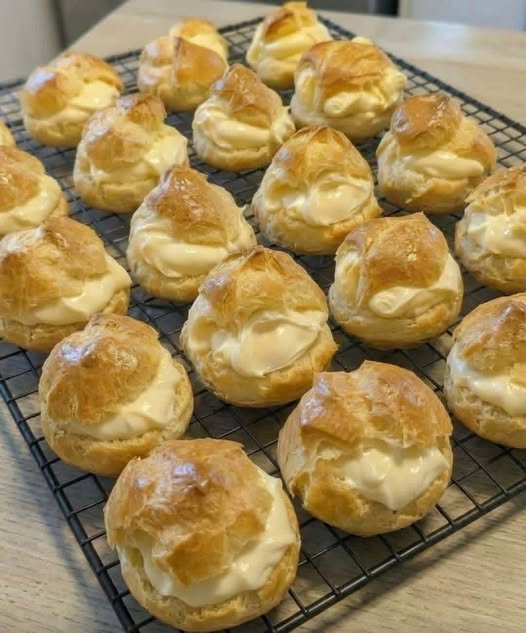
No flour, no sugar! Coconut cake in 5 minutes!

Full recipe>>> Time & Yield

Prep time: 5 minutes

Cook time: 20–25 minutes

Total time: ~30 minutes

Servings: 6 slices

📝 Ingredients

2 cups unsweetened shredded coconut

3 large eggs

½ cup plain yogurt (or Greek yogurt)

1 ripe banana, mashed (natural sweetness)

1 tsp baking powder

1 tsp vanilla extract (optional)

Pinch of salt

1–2 tbsp coconut oil (for greasing)

👩‍🍳 Instructions

Preheat oven to 180°C / 350°F. Grease a small baking dish with coconut oil.

In a bowl, whisk the eggs until slightly frothy.

Add mashed banana, yogurt, vanilla, and salt. Mix well.

Stir in shredded coconut and baking powder until fully combined.

Pour batter into the prepared dish and smooth the top.

Bake for 20–25 minutes, until golden and set in the center.

Let cool for 5 minutes before slicing. Serve warm or chilled.

💡 Notes & Tips

Use fine shredded coconut for a smoother texture.

If you like it sweeter, add 1–2 tbsp honey or maple syrup (still refined-sugar-free).

For extra flavor, add lemon zest or cinnamon.

This cake firms up more as it cools—don’t overbake.

Can also be cooked in an air fryer (160°C / 320°F for 15–18 min).

🥗 Nutritional Information (per serving – approx.)

Calories: 180 kcal

Protein: 6 g

Healthy fats: 13 g

Carbohydrates: 9 g

Fiber: 4 g

Sugar: 4 g (naturally occurring)

Values may vary based on ingredients used.

Sticky Beef with Caramelized Onions

INGREDIENTS:

1 lb Flat Iron steak , thinly sliced against the grain

1/4 cup Coconut Oil

3 Green onions , cut into 1-inch long diagonal slices

Low Carb Mongolian Beef Marinade:

1/4 cup Coconut Aminos

1 teaspoon Fresh root ginger, peeled and ginger , Do not use powdered ginger!

2 cloves Garlic , chopped

INSTRUCTIONS:

1.Scroll up to watch the short recipe video first!

2.Cut the Flat Iron Steak into very thin slices against the grain.

3.Add the sliced beef to a small ziplock bag and add the coconut aminos, peeled and grated root ginger (do not use powdered ginger), and garlic. Let marinate for 1 hour in the fridge.

4.When you are ready to cook, drain the meat from the marinade but reserve the liquid for later.

5.Add the coconut oil to a large wok or cast iron skillet and heat it until it’s almost smoking, the oil must be hot so you can get the nice crispy edges on the beef.

6.Add the beef to the very hot oil (you may need to do it in two batches, don’t crowd the pan) and keep stir frying over a high heat, taking care not to burn it for just 1-3 minutes.

When the last batch of meat is in, add the green onions and cook for the last 30 seconds to 1 minute.

7.If you want more ‘sauce’ to serve with the meat quickly cook the remaining marinade for just a minute or two in your wok after the last batch of beef has been cooked, and serve with the beef.

8.Serve immediately!

I eat vegetable casserole

Full recipe>>> Servings


4 large servings

(You can eat it twice a day comfortably)


🧺 Ingredients


1 medium zucchini, sliced


1 medium eggplant, cubed


1 red bell pepper, chopped


1 green bell pepper, chopped


1 medium onion, sliced


2 medium tomatoes, chopped


2 cups cauliflower florets


1 cup mushrooms, sliced


2 cloves garlic, minced


1 tsp olive oil (optional but recommended)


½ tsp salt (or to taste)


½ tsp black pepper


1 tsp dried oregano or Italian seasoning


½ tsp paprika or chili flakes (optional)


½ cup low-sodium vegetable broth


👩‍🍳 Instructions


Preheat oven to 375°F (190°C).


Lightly grease a casserole dish with olive oil or cooking spray.


Add all vegetables to the dish and mix well.


Add garlic, salt, pepper, oregano, paprika, and vegetable broth.


Toss everything gently to coat.


Cover with foil and bake for 35 minutes.


Remove foil and bake uncovered for 15–20 more minutes until vegetables are soft and slightly roasted.


Let rest for 5 minutes before serving.


🔥 Nutritional Information (per serving – approx.)


Calories: 120–140 kcal


Protein: 4–5 g


Carbohydrates: 18–20 g


Fiber: 6–8 g


Fat: 3 g


Sugar: 6–7 g


Sodium: Depends on broth/salt used


(Naturally cholesterol-free)

Jalapeño Cheddar Cornbread Muffins

Jalapeño Cheddar Cornbread Muffins

Servings: 10–12 muffins
Prep Time: 15 minutes
Cook Time: 18–20 minutes
Total Time: 35 minutes

A buttery, cheesy, slightly spicy muffin perfect for chili nights, BBQs, or a savory snack.


🧾 Ingredients

  • 1 cup (120 g) all-purpose flour

  • ⅓ cup (40 g) finely ground cornmeal

  • 2 tsp baking powder

  • ½ tsp baking soda

  • 3 tbsp (35 g) sugar

  • ½ tsp salt

  • ¼ cup (60 g) butter, melted and cooled

  • 1 large egg

  • ¾ cup (180 ml) cream or milk (or dairy alternative)

  • 1 cup (100 g) cheddar cheese, shredded

  • ¾ cup (120 g) corn kernels, fresh or canned (drained)

  • 2 green onions, chopped

  • 2 jalapeños – 1 chopped (seeds optional for heat), 1 sliced for garnish


👩‍🍳 Instructions


1️⃣ Preheat the Oven

  • Preheat oven to 350°F (175°C).

  • Spray a 10–12 cup muffin tin with nonstick cooking spray or line with paper liners.


2️⃣ Mix the Dry Ingredients

  • In a large bowl, whisk together:

    • All-purpose flour

    • Cornmeal

    • Baking powder

    • Baking soda

    • Sugar

    • Salt


3️⃣ Combine the Wet Ingredients

  • In a separate bowl, whisk together:

    • Melted butter

    • Egg

    • Cream (or milk alternative)

  • Pour the wet mixture into the dry ingredients.

  • Stir until just combined—do not overmix.


4️⃣ Fold in the Flavor

  • Gently fold in:

    • Corn kernels

    • Chopped green onions

    • Chopped jalapeño

    • Shredded cheddar cheese


5️⃣ Fill the Muffin Cups

  • Scoop the batter evenly into the prepared muffin cups.

  • Top each muffin with a slice of fresh jalapeño for a bakery-style finish.


6️⃣ Bake

  • Bake for 18–20 minutes, or until a toothpick inserted into the center comes out clean.

  • Let cool slightly before serving.


7️⃣ Serve & Enjoy

  • Serve warm as a side with chili, BBQ, or enjoy on their own.

  • Optional: Spread with butter or a drizzle of honey for a sweet-savory touch.


💡 Tips for Success

  • Use sharp cheddar for stronger flavor.

  • Drain canned corn well to prevent soggy muffins.

  • Keep some lumps in the batter—overmixing can make muffins dense.

  • For extra heat, leave the seeds in the jalapeños.


🔁 Variations

  • Smoky Twist: Add cooked bacon pieces.

  • Sweet & Spicy: Stir in 1 tbsp honey.

  • Gluten-Free: Swap flour for a 1:1 gluten-free blend.

Cheesy Bacon Cheeseburger Queso Dip

Cheesy Bacon Cheeseburger Queso Dip

Servings: 6–8
Prep Time: 10 minutes
Cook Time: 15–20 minutes
Total Time: 30 minutes

A creamy, cheesy, savory dip with all the flavors of a cheeseburger—perfect for game nights, parties, or a cozy snack at home.


🧾 Ingredients

  • 1 pound (450 g) ground beef (lean or regular)

  • 8 oz (225 g) cooked bacon, finely chopped

  • 1 cup (100 g) sharp cheddar cheese, freshly shredded

  • 1 cup (100 g) mozzarella cheese, shredded

  • ½ cup (115 g) cream cheese, softened

  • ½ cup (120 ml) sour cream

  • ½ cup (120 ml) whole milk (adjust for desired consistency)

  • 1 tablespoon taco seasoning (store-bought or homemade)

  • ½ teaspoon garlic powder

  • ½ teaspoon onion powder

  • Salt and freshly ground black pepper, to taste

  • Fresh parsley, chopped (for garnish)

  • Tortilla chips, pretzels, or sliced baguette (for serving)

Optional Additions:

  • Diced jalapeños for spice

  • Sautéed onions, bell peppers, or mushrooms for extra veggies


👩‍🍳 Instructions


1️⃣ Cook the Beef

  1. Heat a skillet over medium heat.

  2. Add ground beef and cook until fully browned, about 6–8 minutes.

  3. Drain excess grease.


2️⃣ Season the Beef

  1. Add taco seasoning, garlic powder, and onion powder.

  2. Stir well to evenly coat the beef with spices.

  3. Set aside.


3️⃣ Make the Cheese Base

  1. In a large saucepan over low heat, melt the cream cheese.

  2. Stir in sour cream and milk until smooth and creamy.


4️⃣ Add the Cheeses

  1. Gradually sprinkle in cheddar and mozzarella.

  2. Stir constantly until fully melted and smooth.


5️⃣ Combine & Finish

  1. Fold the seasoned beef and crumbled bacon into the cheese mixture.

  2. Taste and adjust seasoning with salt and black pepper if needed.


6️⃣ Garnish & Serve

  1. Top with extra bacon and chopped parsley.

  2. Serve warm with tortilla chips, pretzel bites, sliced baguette, or as a topping for baked potatoes, fries, or nachos.


💡 Tips for Best Results

  • Use freshly shredded cheese for smoother melting.

  • Thin the dip with a splash of milk if it becomes too thick.

  • Keep warm in a mini slow cooker or fondue pot for parties.

  • Reheat gently on the stovetop or microwave in short bursts.


🔁 Variations

  • Spicy Kick: Add diced jalapeños or a few dashes of hot sauce.

  • Veggie Boost: Mix in sautéed onions, bell peppers, or mushrooms.

  • Low-Carb Option: Serve with celery sticks, bell pepper strips, or low-carb chips.

  • Double Batch: Ideal for larger gatherings.


❄️ Storage

  • Refrigerator: Store in an airtight container for up to 4 days.

  • Reheating: Warm gently on stovetop or microwave; add milk to loosen if needed.

  • Freezing: Not recommended (cheese texture may separate).


This dip brings all the flavors of a cheeseburger into a creamy, cheesy, savory treat. Perfect for entertaining or snacking!

Clove Tea – Natural Wellness Drink

Clove Tea – Natural Wellness Drink

Yield: 1 cup
Prep Time: 2 minutes
Cook Time: 7 minutes
Total Time: About 10 minutes

A warm, aromatic tea that soothes, refreshes, and supports digestion. Optional ingredients like honey, cinnamon, or ginger can enhance flavor and benefits.


🧾 Ingredients

  • 1 cup (250 ml) water

  • 4–5 whole cloves

  • 1 teaspoon honey (optional, for sweetness)

  • 1 small piece of cinnamon stick or 1 slice of fresh ginger (optional)


👩‍🍳 Instructions


1️⃣ Boil the Water

  • Pour 1 cup of water into a small saucepan or pot.

  • Bring to a gentle boil over medium heat.


2️⃣ Add Spices

  • Add whole cloves.

  • If using, also add cinnamon stick or ginger slice.


3️⃣ Simmer

  • Lower heat and let simmer for 5–7 minutes.

  • This releases essential oils and aroma from the cloves.


4️⃣ Strain the Tea

  • Remove from heat.

  • Strain tea into a cup using a fine sieve or strainer.


5️⃣ Sweeten (Optional)

  • Add honey if desired.

  • Stir gently and enjoy warm.


💡 Tips & Variations

  • Drink 1 cup daily, especially in the morning.

  • Add a squeeze of lemon juice for extra vitamin C.

  • Chew 1–2 cloves after meals to naturally freshen breath.

  • Adjust steeping time for a stronger or milder flavor.

  • Mix with green tea for a flavorful twist.


⚖️ Nutritional Note

  • Low in calories (honey adds ~20 kcal per teaspoon)

  • Naturally caffeine-free

  • Contains antioxidants and essential oils from cloves


This simple clove tea recipe is perfect for daily wellness or as a comforting drink during cold or flu season.

Pineapple Coconut Dream Cake

Pineapple Coconut Dream Cake

Yield: 10–12 slices
Prep Time: 25 minutes
Bake Time: 30–35 minutes
Assembly Time: 15 minutes
Total Time: About 1½ hours
Course: Dessert

This cake is soft, moist, and packed with tropical flavor from pineapple and coconut. It has fluffy layers, creamy coconut filling, and a smooth coconut frosting with toasted coconut on the outside.


🧾 Ingredients

For the Pineapple Cake:

  • 2½ cups all-purpose flour

  • 2 cups granulated sugar

  • 1 teaspoon baking soda

  • 1 teaspoon salt

  • 2 large eggs

  • 1 can (20 oz / 565 g) crushed pineapple with juice

  • ½ cup coconut milk (full-fat recommended)

  • ½ cup vegetable oil

  • 1 teaspoon vanilla extract


For the Coconut Cream Filling:

  • 1 cup heavy cream (cold)

  • 1 cup powdered sugar

  • 1 cup sweetened shredded coconut

  • 4 oz (115 g) cream cheese, softened


For the Coconut Frosting:

  • 1 cup unsalted butter, softened

  • 4 cups powdered sugar

  • 2 tablespoons coconut milk

  • 1 teaspoon vanilla extract

  • 1½ cups toasted coconut flakes (for coating)


👩‍🍳 Instructions


1️⃣ Bake the Cake Layers

  1. Preheat oven to 175°C (350°F).

  2. Grease and flour two 9-inch round pans.

  3. In a bowl, whisk together:

    • Flour

    • Sugar

    • Baking soda

    • Salt

  4. In another bowl, mix:

    • Eggs

    • Crushed pineapple (with juice)

    • Coconut milk

    • Oil

    • Vanilla

  5. Combine wet and dry ingredients. Mix until smooth.

  6. Divide batter evenly between pans.

  7. Bake for 30–35 minutes or until a toothpick comes out clean.

  8. Cool completely before assembling.


2️⃣ Make Coconut Cream Filling

  1. Beat heavy cream with powdered sugar until stiff peaks form.

  2. In a separate bowl, beat cream cheese until smooth.

  3. Stir shredded coconut into cream cheese.

  4. Gently fold whipped cream into coconut mixture.


3️⃣ Make Coconut Frosting

  1. Beat butter until creamy.

  2. Gradually add powdered sugar.

  3. Mix in coconut milk and vanilla.

  4. Stir in ½ cup toasted coconut (reserve rest for coating).


4️⃣ Assemble the Cake

  1. Place one cake layer on a plate.

  2. Spread coconut cream filling evenly on top.

  3. Place second cake layer on top.

  4. Frost entire cake with coconut frosting.

  5. Press remaining toasted coconut flakes onto sides and top.

Optional garnish:

  • Pineapple slices

  • Cherries

  • Extra coconut flakes


🍽 Serving

Serve chilled or at room temperature.


💡 Tips

✔ Use pineapple with juice (do not drain)
✔ Let cake cool fully before frosting
✔ Toast coconut lightly for best flavor
✔ Chill cake 30 minutes before slicing

Red Pepper Zucchini Muffins

Red Pepper Zucchini Muffins

Yield: 10–12 muffins
Prep Time: 15 minutes
Bake Time: 25 minutes
Total Time: About 40 minutes
Course: Breakfast / Snack / Light Meal

These savory muffins are soft, cheesy, and packed with vegetables. They’re perfect for breakfast, lunchboxes, or a quick snack.


🧾 Ingredients

  • 1 medium zucchini, grated

  • ¼ red bell pepper, finely chopped

  • 200 g (1 cup) grated cheese (cheddar, parmesan, feta, or goat cheese)

  • 2 large eggs

  • 1 teaspoon salt

  • 1 teaspoon black pepper

  • 125 g (1 cup) all-purpose flour

  • 1 teaspoon baking powder

Optional additions:

  • 1 tablespoon chopped fresh herbs (parsley, dill, or chives)

  • ¼ teaspoon smoked paprika or chili flakes

  • 1 tablespoon olive oil (for extra moisture)


👩‍🍳 Instructions


1️⃣ Prepare the Zucchini

  • Grate the zucchini.

  • Place it in a strainer or clean cloth and squeeze out excess liquid.
    (This prevents soggy muffins.)


2️⃣ Mix Wet Ingredients

In a bowl, whisk together:

  • Eggs

  • Salt

  • Black pepper


3️⃣ Add Vegetables and Cheese

Stir into the egg mixture:

  • Drained zucchini

  • Chopped red pepper

  • Grated cheese

Mix gently.


4️⃣ Add Dry Ingredients

  • Add flour and baking powder.

  • Fold gently until just combined.
    Do not overmix.


5️⃣ Fill Muffin Tin

  • Line muffin tray with paper liners or grease lightly.

  • Divide batter evenly among cups (about ¾ full).


6️⃣ Bake

  • Preheat oven to 180°C (350°F).

  • Bake for 25 minutes or until golden and a toothpick comes out clean.


7️⃣ Cool & Serve

  • Let cool for 5–10 minutes.

  • Serve warm or at room temperature.


💡 Tips

✔ Always squeeze zucchini dry
✔ Use freshly grated cheese
✔ Add herbs for extra flavor
✔ Don’t overmix batter
✔ Bake on middle oven rack


🔁 Variations

  • Carrot muffins: Replace zucchini with grated carrot

  • Protein boost: Add cooked chopped chicken or turkey

  • Spicy: Add chili flakes

  • Dairy-free: Use dairy-free cheese

  • Gluten-free: Use gluten-free flour blend


❄️ Storage

  • Room temperature: Up to 3 days

  • Refrigerator: Up to 5 days

  • Freezer: Up to 3 months


🧮 Nutrition (Approximate per muffin)

  • Calories: 140–160

  • Protein: 7–9 g

  • Carbohydrates: 12–14 g

  • Fat: 7–9 g

Creamy Iced Dessert (No-Bake Frozen Treat)

Creamy Iced Dessert (No-Bake Frozen Treat)

Yield: 6–8 servings
Prep Time: 15 minutes
Chill/Freeze Time: 3–4 hours
Total Time: About 4 hours
Course: Dessert

This creamy frozen dessert is made with a rich milk base, folded with whipped cream, and finished with chocolate pieces. It’s smooth, refreshing, and perfect for special occasions.


🧾 Ingredients

  • ¾ cup (200 ml) whipped cream (prepared)

  • ½ cup powdered milk

  • 1 can (395 g / 14 oz) sweetened condensed milk

  • 1 carton (240 ml / 8 oz) heavy cream

  • 1 cup chocolate flakes or chocolate chips

  • 1 chocolate bar, chopped (for topping)


👩‍🍳 Instructions


1️⃣ Prepare the Cream Base

  • In a saucepan, add:

    • Sweetened condensed milk

    • Heavy cream

    • Powdered milk

  • Stir until fully combined.


2️⃣ Thicken the Mixture

  • Place saucepan over medium heat.

  • Stir constantly to prevent sticking.

  • Cook until mixture thickens slightly and coats the back of a spoon.

  • Do not boil.


3️⃣ Cool Completely

  • Remove from heat.

  • Transfer to a bowl and let cool to room temperature.


4️⃣ Whip the Cream

  • Prepare whipped cream according to package instructions.

  • Whip until soft peaks form.


5️⃣ Combine

  • Gently fold whipped cream into the cooled milk mixture.

  • Use slow folding motions to keep the mixture airy.


6️⃣ Add Chocolate

  • Stir in chocolate flakes gently.


7️⃣ Assemble

  • Pour mixture into a glass dish.

  • Sprinkle chopped chocolate bar on top.


8️⃣ Chill

  • Refrigerate or freeze for at least 3 hours until firm and cold.


🍽 Serving

Serve well chilled or semi-frozen.


💡 Tips & Variations

✔ Add vanilla extract for extra flavor
✔ Use white chocolate or dark chocolate
✔ Add crushed cookies or nuts
✔ Use molds for individual portions
✔ Add fruit pieces for a fresh twist


❄️ Storage

  • Freezer: Up to 1 month

  • Refrigerator (soft texture): Up to 3 days


🧮 Nutrition (Approximate per serving)

  • Calories: 320–380

  • Fat: 18–22 g

  • Carbohydrates: 35–40 g

  • Protein: 6–7 g

Cooked Cabbage with Eggs

Cooked Cabbage with Eggs

Yield: 2–3 servings
Prep Time: 10 minutes
Cook Time: 10–15 minutes
Total Time: About 25 minutes
Course: Breakfast / Lunch / Dinner

This simple dish combines tender sautéed cabbage with softly scrambled eggs. It’s affordable, nutritious, and quick to prepare, making it perfect for any meal of the day.


🧾 Ingredients

  • 2 cups shredded cabbage (green or red)

  • 3 large eggs

  • 2 tablespoons olive oil

  • 2 cloves garlic, minced (optional)

  • Salt, to taste

  • Black pepper, to taste

Optional add-ins:

  • ½ small onion, sliced

  • ¼ teaspoon smoked paprika or cumin

  • ¼ cup shredded cheese

  • Chopped parsley or green onions


👩‍🍳 Instructions


1️⃣ Heat the Pan

  • Place a large skillet over medium heat.

  • Add olive oil and allow it to warm.


2️⃣ Cook the Garlic

  • Add minced garlic (and onion, if using).

  • Sauté for 30–60 seconds until fragrant, stirring constantly.


3️⃣ Cook the Cabbage

  • Add shredded cabbage to the pan.

  • Season with salt and pepper.

  • Cook for 5–7 minutes, stirring occasionally, until cabbage becomes soft with slightly golden edges.

✔ Do not overcook — cabbage should remain slightly crisp.


4️⃣ Add the Eggs

  • Push cabbage to one side of the pan.

  • Crack eggs into the empty side.

  • Gently scramble eggs until just set.


5️⃣ Combine

  • Mix eggs and cabbage together.

  • Taste and adjust seasoning if needed.


6️⃣ Serve

Serve hot as a main dish or side.


💡 Flavor Variations

  • Spicy: Add chili flakes or paprika

  • Vegetable boost: Add carrots or bell peppers

  • Creamy: Stir in cheese at the end

  • Herbed: Add dill or parsley

  • Protein boost: Add cooked sausage or tofu


🍽 Serving Ideas

  • Eat on its own

  • Serve with whole-grain bread

  • Use as sandwich or wrap filling

  • Serve with rice or potatoes


❄️ Storage

  • Refrigerate in airtight container for up to 3 days

  • Reheat in skillet for best texture


🧮 Nutrition (Approximate per serving)

  • Calories: 180–220

  • Protein: 10–12 g

  • Fat: 12–14 g

  • Carbohydrates: 8–10 g

  • Fiber: 3–4 g


🧠 Tips for Best Results

✔ Use fresh cabbage
✔ Cook over medium heat
✔ Avoid overcooking
✔ Season gradually
✔ Try different spices

Young and Healthy with this Daily Habit

Young and Healthy with this Daily Habit

Ever wonder how some people maintain their health and vitality well into their later years? There’s an old saying: “Simple habits make a strong body.” And it’s true! A 95-year-old Chinese doctor has revealed the secret to his youthful liver and healthy intestines – a simple, natural drink made with carrots and tomatoes.

Why Carrot & Tomato?

Carrots: These humble root vegetables are rich in beta-carotene, fiber, and antioxidants. They not only support liver detoxification but also improve digestion and protect cells from damage.

Tomatoes: Packed with lycopene, vitamin C, and potassium, tomatoes are known to reduce inflammation, improve heart and liver health, and keep the intestines happy.

Simple Recipe: Carrot & Tomato Vitality Drink

Ingredients:

  • 1 medium carrot (peeled and chopped)
  • 1 ripe tomato (chopped)
  • ½ cup water
  • Optional: A squeeze of fresh lemon juice for extra freshness

How to Make It:

    1. Blend: Add the carrot, tomato, and water into a blender. Blend until smooth.
    2. Strain (Optional): If you prefer a smoother drink, you can strain it.
  1. Enhance (Optional): Add a squeeze of lemon juice if desired.
  2. Drink Fresh: Enjoy once a day, preferably in the morning.

Why It Works

This light and natural drink is filled with essential nutrients that support liver function and gut health. The fiber aids in digestion, while the antioxidants assist the liver in flushing out toxins. Over time, it keeps the body feeling light, clean, and youthful, just like that wise 95-year-old doctor.

No need for fancy supplements or complicated routines. Sometimes, the simplest ingredients are the most powerful. So, why not try this daily habit and give your liver and intestines the care they deserve!

 Top Benefits of Carrot & Tomato Vitality Drink

    1. Boosts Immunity

        • Carrots are rich in beta-carotene (a precursor of vitamin A), which supports a healthy immune system.

      • Tomatoes contain vitamin C and lycopene, both of which enhance immune function.

    1. Improves Vision

      • Carrots are famous for their high vitamin A content, crucial for eye health and night vision.

    1. Promotes Skin Glow

      • Antioxidants like beta-carotene and lycopene help combat free radicals, leading to clearer, healthier skin.

    1. Aids Digestion

      • Both carrots and tomatoes have good fiber content, promoting a healthy gut and regular bowel movements.

    1. Detoxifies the Body

      • The drink supports liver function and helps flush out toxins naturally.

    1. Heart Health Support

      • Lycopene in tomatoes helps reduce LDL (bad) cholesterol and supports heart function.

 Tips for Making the Drink

    • Ingredients: 2 carrots, 2 ripe tomatoes, a pinch of black salt, lemon juice, and optional ginger or mint.

    • Blend: Peel and chop carrots, cut tomatoes, and blend until smooth. Strain if desired.

    • Serve: Chill slightly or serve over ice for a refreshing morning drink.

  • Enhance: Add a dash of turmeric or a bit of beetroot for extra nutrients and color.

 Why It’s Important

    • Great as a morning vitality booster or a midday pick-me-up.

    • Acts as a natural multivitamin drink without added sugar or preservatives.

  • Helps you hit your daily vegetable intake goals easily.

  • A healthy substitute for caffeinated or sugary beverages.

Basque Burnt Cheesecake

Basque Burnt Cheesecake

Yield: 6–8 servings
Pan Size: 6-inch (15 cm) round pan
Prep Time: 15 minutes
Bake Time: 30 minutes
Chill Time: 4 hours
Total Time: About 5 hours
Course: Dessert

Basque Burnt Cheesecake is famous for its dark, caramelized top and ultra-creamy center. It looks deeply browned on the outside but stays soft and custard-like inside. No crust is needed, and the recipe is very simple.


🧾 Ingredients

  • 340 g (12 oz) cream cheese, softened

  • 80 g (2.8 oz) white sugar

  • 3 large eggs, room temperature

  • 1 teaspoon vanilla extract

  • 1 g (about ¼ tsp) salt

  • 150 g (5.3 oz) whipping cream (heavy cream)

  • 10 g (0.4 oz) cornstarch or cake flour


👩‍🍳 Instructions


1️⃣ Prepare the Pan

  • Lightly grease a 6-inch round pan.

  • Line the bottom and sides with parchment paper, allowing paper to rise above the edges (this helps remove the cake easily).

  • Preheat oven to 210°C (415°F).


2️⃣ Soften the Cream Cheese

  • Place cream cheese in a bowl.

  • Mash with a spatula or mix on low speed until smooth and creamy.

  • Make sure there are no lumps.


3️⃣ Add Sugar

  • Add sugar to cream cheese.

  • Mix until fully combined and mixture looks lighter and smooth.


4️⃣ Add Eggs

  • Add eggs one at a time, mixing well after each addition.

  • The batter should look smooth and slightly fluffy after all eggs are added.


5️⃣ Add Flavor and Cream

  • Mix in vanilla extract and salt.

  • Add whipping cream and stir until fully blended.


6️⃣ Add Starch

  • Sift in cornstarch (or cake flour).

  • Mix gently until batter is completely smooth.


7️⃣ Pour and Remove Air

  • Pour batter into prepared pan.

  • Tap pan gently on the counter a few times to release air bubbles.


8️⃣ Bake

  • Place pan on the middle oven rack.

  • Bake at 210°C (415°F) for 30 minutes.

  • The top should be dark brown (almost burnt).

  • Center will still jiggle when shaken.


9️⃣ Cool and Chill

  • Let cheesecake cool at room temperature.

  • Refrigerate for at least 4 hours before slicing.

✔ Texture improves after chilling
✔ Flavor deepens after 1 day


🧠 Tips for Best Results

✔ All ingredients should be room temperature
✔ Do not overmix after adding eggs
✔ Do not bake longer than 30 minutes
✔ Dark top = correct result
✔ Use parchment paper, not foil


🔁 Variations

  • Stronger cheese flavor: Add 50 g more cream cheese

  • Softer texture: Add 20–30 ml more cream

  • Lemon version: Add 1 tsp lemon zest

  • Chocolate version: Add 80 g melted dark chocolate


❄️ Storage

  • Refrigerator: Up to 4 days

  • Freezer: Up to 1 month (wrap tightly)


🧮 Nutrition (Approximate per slice)

  • Calories: 280–320

  • Fat: 20–23 g

  • Carbohydrates: 18–22 g

  • Protein: 5–6 g

Creamy Lime & Chocolate Dessert (No-Bake Layered Dessert)

Creamy Lime & Chocolate Dessert (No-Bake Layered Dessert)

Yield: 6–8 servings
Prep Time: 15 minutes
Chill Time: 3 hours
Total Time: About 3 hours 15 minutes
Course: Dessert

This dessert is made with a smooth lime-flavored cream layer and a rich chocolate ganache. It’s easy to prepare, requires no baking, and has a perfect balance of creamy and chocolatey flavors.


🧾 Ingredients

For the Lime Cream Layer:

  • 1 can (395 g / 14 oz) sweetened condensed milk

  • ⅓ cup (100 ml) milk

  • 1 cup (200 ml) heavy cream

  • Juice of 2 fresh limes
    (or 1 packet lime-flavored powdered drink mix)

For the Chocolate Ganache:

  • 80 g (3 oz) semi-sweet chocolate, chopped

  • ½ cup (100 ml) heavy cream


👩‍🍳 Instructions


1️⃣ Prepare the Lime Cream

  • Add to a blender:

    • Heavy cream

    • Condensed milk

    • Milk

    • Lime juice

  • Blend for 3–4 minutes until thick and smooth.

  • The acid from the lime will naturally thicken the mixture.


2️⃣ Prepare the Chocolate Ganache

  • Place chopped chocolate and heavy cream in a saucepan.

  • Heat on low, stirring constantly until chocolate melts fully.

  • Continue stirring until mixture becomes smooth and glossy.

  • Remove from heat and let cool slightly (still pourable).


3️⃣ Assemble the Dessert

  • Use a glass dish (about 800 ml / 27 fl oz capacity).

  • Spread one layer of lime cream on the bottom.

  • Add a layer of chocolate ganache on top.

  • Repeat layers until dish is filled.

  • Finish with chocolate ganache on top.


4️⃣ Chill

  • Cover and refrigerate for at least 3 hours, or until firm and set.


🍽 Serving

Serve cold.
Optional garnish:

  • Lime zest

  • Chopped nuts

  • Whipped cream

  • Chocolate shavings


💡 Tips & Variations

✔ For tangier flavor: use fresh lime juice
✔ For sweeter flavor: use bottled juice or milk chocolate
✔ For firmer texture: chill overnight
✔ For extra richness: use dark chocolate
✔ Can be served in individual cups


❄️ Storage

  • Refrigerator: Up to 3 days

  • Do not freeze (texture may change)


🧮 Nutrition (Approximate per serving)

  • Calories: 300–350

  • Fat: 18–22 g

  • Carbohydrates: 30–35 g

  • Protein: 4–5 g

Almond Cream Cake (Yeast-Based Almond Cake)

Almond Cream Cake (Yeast-Based Almond Cake)

Yield: 12–16 slices
Prep Time: 30 minutes
Rising Time: 1 hour 20 minutes
Bake Time: 35–40 minutes
Total Time: About 3 hours
Course: Dessert

This soft, buttery yeast cake is topped with a sugar-butter crust, soaked with cream, and finished with almond flakes for a rich and tender texture. It’s similar to European bakery cream cakes and perfect for tea or special occasions.


🧾 Ingredients

For the Dough:

  • 200 ml (¾ cup + 1 tbsp) warm milk

  • 2 teaspoons active dry yeast

  • 2 tablespoons sugar

  • 2 large eggs (room temperature)

  • ½ teaspoon vanilla extract (or 2 g vanillin)

  • Pinch of salt

  • 120 g (½ cup) butter, melted and cooled

  • 470 g (about 4 cups) all-purpose flour

For the Topping:

  • 120 g (½ cup) sugar

  • 50 g (¼ cup) cold butter

  • Almond slices or almond flakes (as needed)

For the Cream Finish:

  • 125 ml (½ cup) heavy cream


👩‍🍳 Instructions


1️⃣ Activate the Yeast

  • Warm milk to about 43°C (110°F) — warm, not hot.

  • Add sugar and sprinkle yeast on top.

  • Stir gently and let sit 15–20 minutes until foamy.

✔ This step ensures a light, airy cake.


2️⃣ Prepare Wet Ingredients

In a large bowl, combine:

  • Activated yeast mixture

  • Eggs

  • Melted butter

  • Vanilla
    Whisk until smooth.


3️⃣ Make the Dough

  • Sift flour and add gradually to the wet mixture.

  • Add salt.

  • Knead for 10–15 minutes until soft and elastic.
    The dough should be smooth and slightly tacky, not sticky.


4️⃣ First Rise

  • Place dough in a greased bowl.

  • Cover and let rise in a warm place for 1 hour until doubled in size.


5️⃣ Prepare the Sugar-Butter Topping

  • Mix sugar with cold butter using fingers until crumbly.
    This creates a light crust during baking.


6️⃣ Shape and Second Rise

  • Grease a 9×13 inch (23×33 cm) pan.

  • Spread dough evenly into the pan.

  • Cover and let rise 20–30 minutes.

  • Preheat oven to 180°C (350°F).


7️⃣ Add Topping

  • Make small indentations with fingers across the dough.

  • Sprinkle sugar-butter mixture evenly on top.


8️⃣ Bake

  • Bake for 25–30 minutes until lightly golden.


9️⃣ Cream & Almond Finish

  • Remove cake from oven.

  • Pour heavy cream evenly over hot cake.

  • Sprinkle almond flakes on top.

  • Return to oven for 10 minutes.

✔ The cream soaks into the cake, making it moist and rich.


🔟 Cool and Serve

  • Cool completely in pan.

  • Cut into squares and serve at room temperature.


🧠 Helpful Tips

✔ Milk must be warm, not hot
✔ Use room-temperature eggs
✔ Bake on center rack
✔ Don’t skip second rise — it improves texture
✔ Let cake cool before slicing for best structure


🔁 Variations

  • Lemon version: Add 1 tsp lemon zest

  • Almond flavor: Add ½ tsp almond extract

  • Spiced: Add cinnamon or cardamom

  • Nut-free: Use coconut flakes instead of almonds

  • Dairy-free: Use plant milk, vegan butter, and coconut cream

  • Gluten-free: Use gluten-free baking flour blend


❄️ Storage

  • Room temperature (covered): 2–3 days

  • Refrigerator: Up to 5 days

  • Freezer: Up to 1 month (wrap tightly)


🧮 Nutrition (Approximate per slice)

  • Calories: 350–400

  • Fat: 18–22 g

  • Carbohydrates: 40–45 g

  • Protein: 6–7 g

Healthy Diet Cake with Oats and Apples – Ready in Just 5 Minutes Prep

Healthy Diet Cake with Oats and Apples – Ready in Just 5 Minutes Prep

Ingredients:

    • 1 cup oats
      • 2 apples, grated
      • 100 ml water
      • 1 banana, mashed
    • 2 eggs
    • 80g cranberries
    • 1 teaspoon baking powder
  • 1/4 teaspoon cinnamon
  • Butter for greasing the pan

Instructions:

    1. Preheat the Oven:
      • Preheat your oven to 180°C (360°F).
  1. Prepare the Batter:
      • In a large mixing bowl, combine the oats, grated apples, water, mashed banana, and eggs. Mix well until all ingredients are evenly incorporated.


      • Add the cranberries, baking powder, and cinnamon to the mixture. Stir until everything is well combined.
  2. Prepare the Pan:
        • Grease a baking dish with butter to prevent the cake from sticking.


    • Pour the batter into the prepared baking dish, spreading it out evenly.
  3. Bake the Cake:
        • Place the baking dish in the preheated oven and bake for 40 minutes, or until the cake is golden brown and a toothpick inserted into the center comes out clean.


  4. Cool and Serve:
        • Allow the cake to cool in the pan for a few minutes before transferring it to a wire rack to cool completely.
      • Slice and serve warm or at room temperature.


Cooking Tips:

      • For added texture, you can include chopped nuts or seeds in the batter.
    • Use ripe bananas for a sweeter cake without adding any sugar.
    • If you don’t have cranberries, you can substitute them with raisins, dried cherries, or chopped dates.

Nutritional Benefits:

      • Oats are rich in fiber, which aids in digestion and helps keep you feeling full longer.
      • Apples provide vitamins and antioxidants that are beneficial for overall health.
      • Bananas are a good source of potassium, which is essential for heart health.
  • Eggs add high-quality protein and essential nutrients to the cake.

Why You’ll Love This Recipe:

      • It’s a quick and easy recipe that fits perfectly into a busy lifestyle.
      • The natural sweetness from fruits means no added sugar is needed.
      • It’s a healthy, nutritious option that can be enjoyed any time of the day.
    • The cake is moist and flavorful, with a delightful mix of textures from the oats and cranberries.

Dietary Information:

    • This cake is free from added sugar and flour, making it suitable for those on a sugar-free or gluten-free diet (ensure oats are certified gluten-free if necessary).
  • It contains eggs, so it’s not suitable for a vegan diet, but you can substitute the eggs with a flaxseed or chia seed egg replacement.

Butterfinger Balls (No-Bake Candy Bites)

Butterfinger Balls (No-Bake Candy Bites)

Yield: 20 balls
Prep Time: 15 minutes
Chill Time: 30 minutes
Total Time: About 45 minutes
Course: Dessert
Cuisine: American

These no-bake Butterfinger Balls combine creamy peanut butter, crunchy graham cracker crumbs, and crushed Butterfinger candy, all coated in smooth chocolate. They’re easy to make, freezer-friendly, and perfect for parties or gifting.


🧾 Ingredients

For the filling:

  • 4 tablespoons (56 g) unsalted butter, softened

  • 1 cup (240 g) creamy peanut butter (use regular creamy peanut butter, not natural)

  • 1 teaspoon vanilla extract

  • 1 cup (120 g) powdered (confectioners’) sugar, sifted

  • ¾ cup (75 g) graham cracker crumbs (about 6 full crackers, crushed)

  • ½ cup (about 50 g) Butterfinger bars, crushed (2–3 regular bars)

For coating:

  • 8 ounces (225 g) chocolate chips, melting wafers, or chocolate bark

Optional toppings:

  • Extra crushed Butterfinger

  • Sprinkles

  • Pinch of coarse sea salt


👩‍🍳 Instructions

1️⃣ Mix the base

In a medium bowl, beat together:

  • Softened butter

  • Peanut butter

Mix until smooth and fully blended.


2️⃣ Add sugar and vanilla

  • Stir in vanilla extract.

  • Gradually add powdered sugar (in 2–3 parts), mixing well after each addition.
    You should get a soft, moldable dough that holds together.


3️⃣ Add crumbs and candy

  • Fold in graham cracker crumbs.

  • Gently mix in crushed Butterfinger pieces.
    (Reserve 1 tablespoon of candy for topping, if desired.)


4️⃣ Shape the balls

  • Scoop about 1 to 1½ tablespoons of mixture.

  • Roll into smooth balls using your palms.

  • Place on a parchment-lined tray.


5️⃣ Chill

Refrigerate or freeze for 30 minutes until firm.
(Cold balls are much easier to dip in chocolate.)


6️⃣ Melt the chocolate

Melt chocolate:

  • In the microwave: 20–30 second bursts, stirring each time
    OR

  • Over a double boiler until smooth


7️⃣ Dip the balls

  • Dip each chilled ball into melted chocolate using a fork.

  • Tap gently to remove excess chocolate.

  • Place back on parchment paper.

Optional: sprinkle crushed Butterfinger, sprinkles, or sea salt on top before chocolate sets.


8️⃣ Set the coating

Chill for 10–20 minutes until chocolate hardens.


🧠 Troubleshooting

Too sticky?
➜ Add 1–2 tablespoons powdered sugar or graham crumbs.

Too dry?
➜ Add 1 teaspoon peanut butter or softened butter.

Chocolate too thick?
➜ Stir in 1 teaspoon vegetable oil or coconut oil.

Candy lost crunch?
➜ Do not over-crush Butterfinger; leave some small chunks.


❄️ Storage

Refrigerator:
Store in airtight container for up to 7 days

Freezer:
Freeze up to 5–6 months
Thaw overnight in fridge before serving.


💡 Expert Tips

✔ Use cookie scoop for equal sizes
✔ Let balls sit 5 minutes before dipping to prevent cracking
✔ For extra crunch, press candy on top after dipping
✔ Add espresso powder to chocolate for mocha flavor
✔ For nut-free: use sunflower seed butter and nut-free candy


🧮 Nutrition (Approximate per ball)

  • Calories: ~140

  • Fat: 9–10 g

  • Carbohydrates: 12–14 g

  • Protein: 3–4 g


📌 Important Note

Use regular creamy peanut butter.
Natural peanut butter can make the mixture too oily and soft.

Creamy High-Protein Herb Dip Fresh, flavorful, and packed with lean protein in every scoop.

Servings: 6
Total Time: 10 minutes
Difficulty: Easy
Calories per Serving: ~95
Macros (per serving): 12g Protein / 3g Net Carbs / 4g Fat / 1g Fiber

Intro

This Creamy High-Protein Herb Dip is the kind of snack that feels indulgent but fits perfectly into a keto, low-carb, and Weight Watchers–friendly lifestyle. It’s thick, cool, and packed with fresh herbs—like a cross between ranch dip and whipped Greek yogurt—yet made with clean, macro-balanced ingredients.

If you’re trying to stay low carb while keeping your protein intake high, this dip is a game changer. It pairs beautifully with crisp veggies, high-protein crackers, or grilled meats, making it a go-to for meal prep, parties, or everyday snacking.

The best part? It takes just 10 minutes to make and stays unbelievably creamy for days.


Look at the Recipe

• Thick, smooth, ultra-creamy texture that holds up on any veggie or cracker
• Fresh herb flavor with garlic, lemon, and cooling yogurt notes
• High-protein, low-carb ingredients that boost fullness and support clean eating goals


Ingredients Needed

Base

  • 1 ½ cups plain nonfat Greek yogurt
  • ½ cup low-fat cottage cheese
  • 1 scoop unflavored or savory whey protein powder

Herbs & Seasoning

  • 2 tbsp fresh parsley, finely chopped
  • 1 tbsp fresh dill, finely chopped
  • 1 tbsp fresh chives, minced
  • 1 clove garlic, grated
  • 1 tsp lemon zest
  • 1 tbsp lemon juice
  • ½ tsp onion powder
  • ½ tsp salt (adjust to taste)
  • ¼ tsp black pepper

Optional Add-Ins

  • 1–2 tsp olive oil for richness (optional for keto; skip for very low WW points)
  • Red pepper flakes for a little heat
  • Extra herbs for garnish

How to Make Our Creamy High-Protein Herb Dip

  1. Blend the base. Add Greek yogurt, cottage cheese, and protein powder to a blender or food processor. Blend until silky smooth and thick.
  2. Fold in flavor. Transfer the blended mixture to a bowl. Stir in the parsley, dill, chives, garlic, lemon zest, and lemon juice until evenly combined.
  3. Season to taste. Add salt, pepper, and onion powder. Mix well and adjust lemon or herbs if needed.
  4. Chill before serving. Let the dip rest for at least 20 minutes in the fridge so the flavors can bloom and the texture can firm up.
  5. Serve and enjoy. Pair with cucumbers, bell peppers, celery, or keto crackers for a high-protein, low-carb snack that satisfies every craving.

Storage & Serving Suggestions

  • Refrigeration: Keeps well for 3–4 days in an airtight container.
  • Meal Prep: Portion into small containers for easy grab-and-go protein snacks.
  • Freezing: Not ideal—dairy separates after thawing.
  • Serving Pairings: Veggie sticks, grilled chicken skewers, salmon bites, keto almond crackers.

Tips & FAQs

Can I use only yogurt (no cottage cheese)?
Yes, but cottage cheese adds thickness and extra protein. If skipping it, use a bit more protein powder.

Can this be made dairy-free?
Use a dairy-free Greek-style yogurt and a plant-based protein powder. Texture will be slightly looser.

What herbs work best?
Parsley, dill, and chives are classic, but basil or cilantro work too.

How do I make it richer for keto?
Add 1–2 teaspoons of olive oil or a spoonful of cream cheese.

Is this Weight Watchers friendly?
Absolutely—use nonfat Greek yogurt and skip added oil for minimal points.

Homemade Lemon Water

Homemade Lemon Water

Ingredients

  • 2 Large Lemons: Choose firm, bright yellow lemons.

  • 4–6 Cups Water: Filtered or spring water works best.

  • Ice: Optional, for serving.

  • Optional Sweetener: A small amount of honey or stevia if you find it too tart.


Instructions

  1. Wash the Lemons: Since you are putting the slices directly into the water, scrub the skin thoroughly to remove any wax or residue.

  2. Slice: Cut one lemon into thin rounds.

  3. Juice: Squeeze the juice of the second lemon into your pitcher.

  4. Combine: Add the lemon slices to the pitcher and fill with water.

  5. Infuse: Let the pitcher sit in the refrigerator for at least 30 minutes before drinking. This allows the lemon oils and juice to blend with the water.


Healthy Tips for Use

  • Protect Your Teeth: The acid in lemons can soften tooth enamel. It is best to drink this through a straw or rinse your mouth with plain water afterward.

  • Temperature: Many people prefer drinking this warm in the morning to help wake up their digestive system, or ice-cold for refreshment.

  • Manage Expectations: While staying hydrated can reduce bloating and help you feel better, sustainable body changes come from a balanced diet and regular physical activity.

🥤 Banana & Apple Silk Smoothie

🥤 Banana & Apple Silk Smoothie

Prep time: 5 minutes | Servings: 1 large glass

Ingredients

Category Ingredient Quantity
Fruit Ripe Banana (frozen is best for thickness) 1 large
Fruit Red Apple (peeled and chopped) ½ large
Base Greek Yogurt or Skyr (Plain or Vanilla) ½ cup
Liquid Milk of choice (Oat, Almond, or Dairy) ½ to ¾ cup
Sweetener Honey or Maple Syrup (Optional) 1 tsp
Spice Ground Cinnamon A tiny pinch
Garnish Extra Banana 3-4 thin slices


Instructions

  1. Prepare the Fruit: * Peel and slice the banana. (Pro tip: use a frozen banana to get that thick, soft-serve consistency seen in the image).

    • Peel the apple and remove the core. Chopping it into small chunks helps it blend smoothly without leaving grainy bits of skin.

  2. Layer the Blender: * Add the liquid first, followed by the yogurt, then the fruit. This helps the blender blades catch the liquid and prevents “air pockets.”

  3. Blend: * Start on a low speed and gradually increase to high. Blend for about 45–60 seconds until perfectly silky.

    • If it’s too thick: Add a splash more milk.

    • If it’s too thin: Add a few ice cubes or more frozen banana.

  4. The “Visual” Touch: * To get the look in the photo, slice 3-4 very thin rounds of banana.

    • Press a few against the inside glass wall before pouring (the suction will hold them there).

    • Pour the smoothie in carefully, then float the remaining slices on top.


Quick Tips for the Best Result

  • The Apple: Since apples are fibrous, using a high-powered blender is key. If you don’t have one, you can use unsweetened applesauce (about 1/3 cup) instead of a fresh apple for an even smoother texture.

  • The Color: To keep the smoothie that bright, creamy beige color, add a tiny squeeze of lemon juice. This prevents the apple and banana from oxidizing (turning brown) if you don’t drink it immediately.

CAKE MIX ITALIAN CREAM CAKE

on the menu: easy CAKE MIX ITALIAN CREAM CAKE This recipe may be cheating a little because it involves a boxed cake mix but I promise after you bake this cake that will not matter. This is easily my favorite cake I have ever made (and I have baked some great ones like this Chocolate Fudge Cake with Peanut Butter Frosting and Chocolate Ganache). I have baked this Easy Italian Cream Cake so many times including several times to give away as gifts. Try this cake soon and let me know what you think.

Ingredients:

  • CAKE:
  • 1 (16.25-OUNCE) PACKAGE WHITE CAKE MIX
  • 3 LARGE EGGS
  • 1 1/4 CUPS BUTTERMILK
  • 1/4 CUP VEGETABLE OIL
  • 1 (3.5-OUNCE) CAN FLAKED COCONUT
  • 2/3 CUP CHOPPED PECANS, TOASTED
  • 3 TABLESPOON RUM (OPTIONAL)
  • CREAM CHEESE FROSTING:
  • 1 (8-OUNCE) PACKAGE CREAM CHEESE, SOFTENED
  • 1/2 CUP BUTTER OR MARGARINE, SOFTENED
  • 1 (16-OUNCE) PACKAGE POWDERED SUGAR
  • 2 TEASPOONS VANILLA EXTRACT
  • 1 CUP CHOPPED PECANS, TOASTED

HOW TO MAKE CAKE MIX ITALIAN CREAM CAKE:

  • BEAT THE FIRST 4 INGREDIENTS AT MEDIUM SPEED WITH AN ELECTRIC MIXER 2 MINUTES. STIR IN COCONUT AND PECANS.
  • POUR INTO 3 GREASED AND FLOURED 9-INCH ROUND CAKE PANS. BAKE AT 350°F FOR 15 TO 17 MINUTES OR UNTIL A WOODEN PICK INSERTED IN CENTER COMES OUT CLEAN.
  • COOL IN PANS ON WIRE RACKS 10 MINUTES. REMOVE FROM PANS, AND COOL COMPLETELY ON WIRE RACKS.
  • SPRINKLE EACH CAKE LAYER EVENLY WITH RUM, IF DESIRED; LET STAND 10 MINUTES.
  • SPREAD CREAM CHEESE FROSTING BETWEEN LAYERS AND ON TOP AND SIDES OF CAKE. CHILL 2 HOURS BEFORE SLICING.
  • BEAT CREAM CHEESE AND BUTTER AT MEDIUM SPEED WITH AN ELECTRIC MIXER UNTIL SMOOTH. GRADUALLY ADD POWDERED SUGAR, BEATING UNTIL LIGHT AND FLUFFY. STIR IN VANILLA AND PECANS. FROST CAKE WHEN COMPLETELY COOLED.

Mexican Street Corn Coleslaw

Prep time: 20 mins | Chill time: 2 hours | Serves: 6–8

​Ingredients

The Base

  • 8 cups Green cabbage, shredded

  • 2 cups Red cabbage, shredded

  • 2 cups Sweet corn, canned (drained) or fresh grilled
  • 1 large Jalapeño, finely diced (remove seeds for less heat)
  • ½ cup Green onions, thinly sliced

  • ¼ cup Fresh cilantro or parsley, chopped
  • ½ cup Cotija cheese (or Feta), crumbled

The Dressing

  • 1 cup Mayonnaise
  • 1 tbsp Fresh lime juice (approx. ½ a lime)
  • ½ tsp Chili powder
  • ½ tsp Ground black pepper
  • ¼ tsp Salt

​Instructions

​1. Prepare the Dressing

​In a small bowl, whisk together the mayonnaise, lime juice, chili powder, salt, and black pepper until smooth. Set this aside for a few minutes; allowing the dressing to sit helps the chili powder bloom and the flavors meld.

​2. Prep the Veggies

​Shred both the green and red cabbage into thin strips using a sharp knife or a food processor. Place them into a large mixing bowl. Add the diced jalapeño and sliced green onions.

​3. Combine

​Add the drained corn and the crumbled Cotija cheese to the cabbage mixture. If you are using fresh corn, grilling it beforehand adds a fantastic smoky “street food” authenticity to the dish.

​4. Dress and Toss

​Pour the dressing over the vegetables. Use tongs or large spoons to toss thoroughly, ensuring every shred of cabbage is lightly coated.

​5. Chill (Crucial Step)

​Cover the bowl and refrigerate for at least 2 hours. This allows the cabbage to soften slightly and the flavors to penetrate the vegetables. Give it one final toss just before serving to redistribute the dressing.

​Tips for Success

  • Cheese Subs: If you can’t find Cotija, Feta is the best substitute due to its saltiness and dry texture. Queso Fresco also works but is much milder.
  • Lighten it Up: You can swap half of the mayonnaise for Greek yogurt or Mexican Crema for a tangier, slightly lighter profile.
  • Smoke it: A pinch of smoked paprika or using chipotle powder instead of standard chili powder adds a lovely campfire depth.

Lemon Garlic Chickpea Cake*

Lemon Garlic Chickpea Cake*
*Ingredients* (makes ~6 cakes)
– 1 can (400 g) chickpeas, drained & rinsed
– 2 garlic cloves, minced
– Zest of 1 lemon + 1 tbsp lemon juice
– 2 tbsp fresh parsley, chopped (plus extra for garnish)
– 1 egg (or flax egg for vegan)
– 3 tbsp breadcrumbs (panko works well)
– 1/2 tsp salt & 1/4 tsp black pepper
– 2 tbsp olive oil (for frying)
– Lemon wedges & parsley for serving
*Method*
1. *Mash base*: In a bowl, mash chickpeas with a fork or potato masher, leaving some texture.
2. *Mix ingredients*: Add garlic, lemon zest, lemon juice, parsley, egg, breadcrumbs, salt & pepper. Combine into a thick batter.
3. *Form cakes*: Scoop ~1/4 cup mixture, shape into patties (about 6).
4. *Cook*: Heat olive oil in a skillet over medium‑high heat. Fry cakes 3–4 min per side until golden‑brown and crisp.
5. *Serve*: Place on parchment (like in the photo). Garnish with fresh parsley and serve with lemon 

Melt in Your Mouth Banana Bread

🍌 Melt-in-Your-Mouth Banana Bread

🛒 Ingredients

  • 1 ¾ cups all-purpose flour
  • 1 teaspoon baking soda
  • ½ teaspoon salt
  • 1 teaspoon ground cinnamon
  • ¼ teaspoon ground nutmeg
  • 1 cup (2 sticks) unsalted butter, softened
  • ¾ cup granulated sugar
  • 2 large eggs, beaten
  • 1 teaspoon vanilla extract
  • 3 ripe bananas, mashed
  • ½ cup chopped walnuts (optional)

👩‍🍳 Instructions

  1. Preheat oven: Preheat your oven to 350°F (175°C). Grease and flour a 9×5 inch loaf pan.
  2. Combine dry ingredients: In a medium bowl, whisk together the flour, baking soda, salt, cinnamon, and nutmeg.
  3. Cream wet ingredients: In a large bowl, cream together the butter and sugar until light and fluffy. Beat in the eggs one at a time, then stir in the vanilla extract.
  4. Combine wet and dry ingredients: Gradually add the dry ingredients to the wet ingredients, alternating with the mashed bananas. Mix until just combined, being careful not to overmix.
  5. Add nuts (optional): If using, gently fold in the chopped walnuts.
  6. Bake: Pour the batter into the prepared loaf pan. Bake for 50-60 minutes, or until a toothpick inserted into the center comes out clean.
  7. Cool: Let the bread cool in the pan for 10 minutes before transferring it to a wire rack to cool completely.

💡 Optional Glaze

For a sweet glaze, you can mix together powdered sugar, milk, and a touch of vanilla extract. Drizzle over the cooled loaf.

Banana Chia & Oat Power Blend

Banana Chia & Oat Power Blend

Ingredients

  • 1 ripe Banana: Sliced as shown in the first glass.

  • 1/4 cup Rolled Oats: Use old-fashioned oats for the best texture.

  • 2 tablespoons Chia Seeds: These provide the speckled appearance and thickening power seen in the final result.

  • 1 cup Milk of choice: (e.g., Almond, Oat, or Dairy). Use slightly less for a thicker pudding and more for a smoothie.

  • Optional Sweetener: 1 teaspoon of maple syrup or honey.

  • Optional Flavor: A dash of cinnamon or a drop of vanilla extract.

Preparation Instructions

  1. Layer or Mix:

    • For the “Aesthetic” Look: Layer the oats at the bottom, followed by the chia seeds, and top with the sliced bananas as seen in the image.

    • For Practicality: Add all dry ingredients (oats and chia seeds) into a glass or jar.

  2. Add Liquid: Pour your chosen milk over the ingredients. If you are making a smoothie, you can add all ingredients to a blender immediately.

  3. Hydrate: Stir well to ensure the chia seeds are fully submerged and not clumped together.

  4. The Wait (Crucial): * Overnight Oats: Cover and refrigerate for at least 4 hours, or ideally overnight. The chia seeds and oats will absorb the liquid, creating the thick, creamy consistency shown in the second glass.

    • Smoothie: If you prefer the blended version, let the mixture sit for 10 minutes before blending to soften the oats for a smoother texture.

  5. Final Touch: Before eating or drinking, give it a good stir. The banana will naturally sweeten the mixture as it sits.


Why This Combination Works

  • Chia Seeds: They can absorb up to 10–12 times their weight in liquid, turning the milk into a gel-like pudding.

  • Oats: Provide slow-release energy and fiber to keep you full.

  • Banana: Acts as a natural sweetener and provides potassium.

Strawberry Cheesecake Banana Pudding: A Creamy, Dreamy Layered Dessert

Ingredients (Serves 6)

For the Cheesecake Pudding Base:

  • 1 box (3.4 oz) instant vanilla pudding mix
  • 1 ½ cups cold milk
  • 1 (8 oz) block cream cheese, softened
  • 1 (14 oz) can sweetened condensed milk
  • 1 tsp vanilla extract
  • 1 ½ cups whipped topping (like Cool Whip or homemade whipped cream)

For the Layers:

  • 4 ripe bananas, sliced
  • 1 ½ cups sliced fresh strawberries
  • 1 box Nilla wafers (or any vanilla-flavored cookies)
  • Extra whipped topping, for garnish
  • Crushed Nilla wafers or strawberry slices, for decoration (optional)

Step-by-Step Instructions

1. Prepare the Cheesecake Pudding Base

  1. In a large bowl, whisk the vanilla pudding mix with cold milk until it begins to thicken (about 2 minutes).
  2. In a separate bowl, beat softened cream cheese until smooth and fluffy.
  3. Add sweetened condensed milk and vanilla extract to the cream cheese, mixing until fully incorporated.
  4. Fold the prepared pudding into the cream cheese mixture.
  5. Gently fold in the whipped topping to keep the texture light and creamy.
  6. Chill in the refrigerator while you prepare the fruit and cookies.

2. Slice the Fruit

  • Wash and hull the strawberries, then slice them thinly.
  • Peel and slice bananas into ¼-inch rounds.
  • For best results, do this just before assembling to prevent browning.

3. Layer the Dessert

  1. In a 9×9 dish or trifle bowl, add a base layer of Nilla wafers.
  2. Top with a layer of banana slices and strawberry slices.
  3. Spoon a generous layer of cheesecake pudding over the fruit.
  4. Repeat the layers: wafers, fruit, pudding — until all ingredients are used, finishing with a layer of pudding.
  5. Garnish with whipped topping, crushed wafers, and extra strawberry slices.

4. Chill & Serve

  • Cover and refrigerate for at least 4 hours, preferably overnight, to let the flavors meld and the pudding firm up.
  • Serve chilled, scooped into bowls or sliced like a cake if fully set.