Christmas Chaos Cake

Christmas Chaos Cake

Serves: 12 | Prep time: 45 mins | Bake time: 30-45 mins

Ingredients

For the Spiced Cake Base:

  • 2 cups All-purpose flour

  • 1 ½ tsp Baking powder & ½ tsp Baking soda

  • ½ tsp Salt

  • 1 tsp Cinnamon & ½ tsp Nutmeg

  • 1 cup Granulated sugar & ½ cup Light brown sugar (packed)

  • ¾ cup Unsalted butter (softened)

  • 3 large Eggs (room temperature)

  • 1 tsp Vanilla extract

  • ½ cup Sour cream & ½ cup Buttermilk

The “Chaos” Mix-ins:

  • ½ cup each: Chopped pecans, shredded coconut, mini chocolate chips, and chopped dried cranberries

  • ¼ cup Crushed candy canes (optional)

  • Optional: Red and green gel food coloring for a marbled look.

For the Cream Cheese Frosting:

  • 8 oz Cream cheese (softened)

  • ½ cup Unsalted butter (softened)

  • 3 cups Powdered sugar

  • 1 tsp Vanilla extract

  • 1–2 tbsp Heavy cream (for consistency)


Step-by-Step Instructions

1. Preparation

Preheat your oven to 350°F (175°C). Grease and flour a 9×13-inch pan for a sheet cake or two 9-inch round pans for a layered look.

2. Mix Dry and Wet Bases

  • Dry: Whisk together the flour, baking powder, soda, salt, cinnamon, and nutmeg.

  • Creaming: In a large bowl, beat the butter and both sugars until light and fluffy (about 2–3 minutes).

  • Wet: Beat in the eggs one at a time, then mix in the vanilla and sour cream until smooth.

3. Combine and Fold

Gradually add the dry ingredients and the buttermilk to the butter mixture, alternating between them. Mix just until combined—do not overmix. Fold in the pecans, coconut, chocolate chips, cranberries, and candy canes.

  • Pro Tip: If you want the marbled look mentioned in the story, divide the batter before adding mix-ins and tint portions with red and green gel coloring.
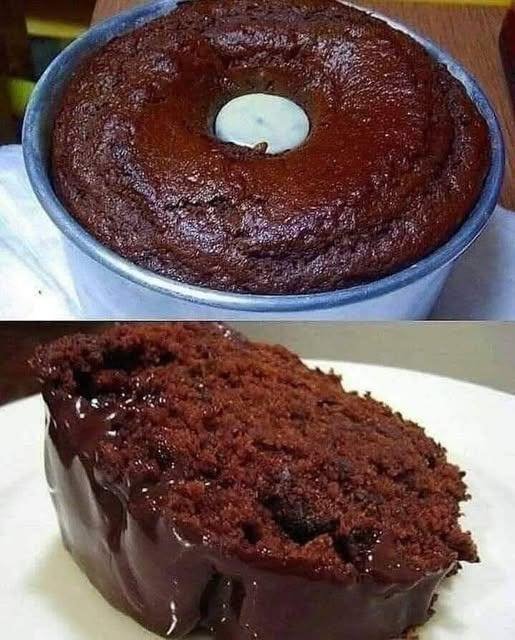
4. Bake and Cool

Pour the batter into your prepared pan. Bake for 40–45 minutes (for a 9×13 pan) or until a toothpick comes out clean. Let it cool in the pan for 15 minutes, then move to a wire rack to cool completely.

5. Frost and Decorate

Beat the cream cheese and butter until creamy, then gradually add powdered sugar, vanilla, and heavy cream until fluffy. Spread generously over the cooled cake. Top with extra sprinkles, chocolate drizzle, or more crushed candy canes to lean into the “chaos”.


Chef’s Storage & Serving Tips

  • Make-Ahead: You can bake the cake layers 1–2 days in advance; just wrap them tightly in plastic at room temperature until you are ready to frost.

  • Storage: Store leftovers covered at room temperature for 2 days or in the fridge for up to 5 days.

  • Pairing: This festive dessert pairs beautifully with hot cocoa, eggnog, or a peppermint latte.

Spinach Artichoke Crescent Roll Bake

🥬 Spinach Artichoke Crescent Roll Bake

Yields: 8–10 rolls
Prep Time: 20 minutes
Bake Time: 18–22 minutes

A warm, cheesy appetizer that combines creamy spinach and artichokes inside golden, buttery crescent rolls. Perfect for parties, snacks, or cozy meals.


📝 Ingredients

For the Filling:

  • 1 cup frozen chopped spinach, thawed and well-drained

  • 1 cup canned artichoke hearts, chopped and well-drained

  • 4 oz (115 g) cream cheese, softened

  • ¼ cup sour cream

  • ¼ cup mayonnaise

  • ½ cup shredded mozzarella cheese

  • ¼ cup grated Parmesan cheese

  • 1 clove garlic, minced

  • Salt & pepper, to taste

For the Rolls:

  • 1 can (8 oz / 225 g) refrigerated crescent roll dough (sheet or regular)

  • 1 egg, beaten (optional, for brushing tops)

  • Extra mozzarella or Parmesan for topping (optional)

  • Fresh parsley, chopped (for garnish, optional)


👩‍🍳 Step-by-Step Instructions

Step 1 — Preheat & Prepare the Dish

  1. Preheat oven to 375°F (190°C).

  2. Lightly grease a baking dish or oven-safe skillet with butter or cooking spray.


Step 2 — Make the Filling

  1. In a medium bowl, combine cream cheese, sour cream, and mayonnaise. Mix until smooth.

  2. Stir in mozzarella, Parmesan, and garlic.

  3. Add the spinach and artichokes, mixing until evenly combined.

  4. Season with salt and pepper to taste.

Optional: Add a pinch of red pepper flakes or Italian seasoning for extra flavor.


Step 3 — Prepare the Dough

  1. Unroll the crescent dough onto a clean surface. If using perforated crescent rolls, pinch the seams to form a solid rectangle.

  2. Spread the spinach artichoke filling evenly over the dough, leaving about ½ inch from the edges.

  3. Starting from one long edge, roll the dough into a log (like a jelly roll).

  4. Using a sharp knife or unflavored dental floss, slice the log into 1-inch rolls (about 8–10 pieces).


Step 4 — Assemble & Bake

  1. Place the rolls cut side up in the prepared baking dish.

  2. Optional: Brush tops with beaten egg for a golden finish.

  3. Optional: Sprinkle extra mozzarella or Parmesan on top.

  4. Bake for 18–22 minutes or until golden brown and puffed.


Step 5 — Garnish & Serve

  1. Remove from oven and let cool for 5 minutes.

  2. Garnish with fresh parsley if desired.

  3. Serve warm as an appetizer, snack, or side dish.


💡 Tips for Success

  • Drain Well: Squeeze out excess liquid from spinach and artichokes to avoid soggy rolls.

  • Cheese Variations: Try Monterey Jack, cheddar, or Gruyère for different flavors.

  • Make Ahead: Assemble rolls and refrigerate for up to 8 hours before baking. Add 2–3 minutes to baking time.

  • Freezing: Bake, cool, and freeze in an airtight container for up to 1 month. Reheat at 350°F until warmed through.


🍴 Serving Ideas

  • Pair with tomato soup for a cozy meal.

  • Serve alongside a fresh garden salad for lunch.

  • Offer with marinara or garlic dip for extra indulgence.


⏱ Summary Table

Step Time Key Notes
Preheat Oven 5 min Grease baking dish
Make Filling 10 min Drain spinach well
Prepare Dough 5 min Roll tightly for neat slices
Bake 18–22 min Golden brown top
Serve Best served warm

Chocolate-Coated Peanut and Cookie Balls (No-Bake)

Chocolate-Coated Peanut and Cookie Balls (No-Bake)

Yields: About 30 balls
Prep Time: 20–25 minutes
Chill Time: 30–60 minutes

A no-bake treat that combines crushed cookies, peanuts, and chocolate. Crispy, nutty, and easy to make, these bite-sized balls are perfect for snacks, parties, or homemade gifts.


📋 Ingredients

For the Filling:

  • 500 g (17.6 oz) cookies, crushed

  • 120 g (4.2 oz) peanuts, crushed

  • 120 g (½ cup) sugar

  • 60 g (½ cup) cocoa powder

  • 250 ml (1 cup) milk

  • 150 g (⅔ cup) butter

  • A pinch of vanillin or a few drops of vanilla extract

For the Chocolate Glaze:

  • 80 g (2.8 oz) dark chocolate

  • 80 g (2.8 oz) milk chocolate

  • 20 ml (1½ tbsp) vegetable oil

  • 50 g (1.8 oz) peanuts, chopped


👩‍🍳 Step-by-Step Instructions

Step 1: Prepare the Filling

  1. Crush Cookies and Peanuts: Crush the cookies into small pieces using a food processor or a rolling pin in a sealed bag. Roughly chop the peanuts and mix them with the crushed cookies in a large bowl.

  2. Make Chocolate Mixture: In a medium saucepan over medium heat, combine the milk, sugar, cocoa powder, and vanilla. Stir continuously until the sugar dissolves completely.

  3. Add Butter: Add the butter to the saucepan and stir until fully melted and smooth.

  4. Combine: Pour the warm chocolate mixture over the crushed cookies and peanuts. Stir thoroughly until everything is evenly coated. The mixture should be thick and sticky enough to form balls.


Step 2: Shape the Balls

  1. Scoop small portions of the mixture and roll them into balls about the size of a walnut.

  2. Place the balls on a tray lined with parchment paper or a silicone mat.

  3. Chill in the refrigerator or freezer for about 30 minutes to firm up.


Step 3: Prepare the Chocolate Glaze

  1. Combine the dark chocolate, milk chocolate, and vegetable oil in a heatproof bowl.

  2. Melt using a double boiler or microwave in 20–30 second intervals, stirring until smooth.

  3. Stir in the chopped peanuts for extra texture.


Step 4: Coat the Balls

  1. Remove the chilled balls from the fridge.

  2. Using a fork or skewer, dip each ball into the chocolate glaze, ensuring it is fully coated.

  3. Place the coated balls back on the tray and chill for 20–30 minutes until the glaze hardens.


Step 5: Serve and Store

  • Serve immediately, or arrange in a box for gifting.

  • Store in an airtight container in the refrigerator for up to 1 week.

  • For longer storage, freeze in an airtight container for up to 1 month.


💡 Tips for Success

  • Nut Variations: Substitute peanuts with almonds, hazelnuts, or walnuts for a different flavor.

  • Texture: Keep cookie pieces slightly larger for a chunkier consistency.

  • Glaze Tip: If you want a shinier coating, add a tiny extra teaspoon of oil to the melted chocolate.


These no-bake chocolate peanut cookie balls are crunchy, chocolaty, and easy to make, with no oven required. Perfect for snacks, dessert tables, or homemade gifts!

Decadent Chocolate Cake with Wine Glaze

🍫 Decadent Chocolate Cake with Wine Glaze

Servings: 8–10
Prep Time: 15 minutes
Bake Time: 1 hour
Total Time: 1 hour 15 minutes

A moist, flavorful chocolate cake with a subtle hint of cinnamon, topped with a smooth wine glaze. Perfect for any occasion or a special treat.


📋 Ingredients

For the Cake:

  • 1 box yellow cake mix

  • ¼ cup brown sugar

  • ¼ cup white sugar

  • 1 packet instant vanilla pudding mix

  • 2 teaspoons cinnamon

  • 4 large eggs

  • ¾ cup water

  • ¾ cup vegetable oil

  • ½ cup white wine

For the Wine Glaze:

  • 1 stick (½ cup) unsalted butter

  • 1 cup white sugar

  • ¼ cup white wine


👩‍🍳 Step-by-Step Instructions

Step 1: Preheat the Oven

  1. Preheat the oven to 350°F (175°C).

  2. Grease a bundt pan or cake mold generously with butter or cooking spray.


Step 2: Prepare the Cake Batter

  1. In a large mixing bowl, combine the cake mix, brown sugar, white sugar, vanilla pudding mix, and cinnamon. Mix well.

  2. Add eggs, water, oil, and white wine.

  3. Mix by hand or with an electric mixer until smooth and fully combined.


Step 3: Bake the Cake

  1. Pour the batter evenly into the prepared bundt pan.

  2. Bake in the preheated oven for 1 hour, or until a toothpick inserted into the center comes out clean or with a few moist crumbs.

  3. Remove from the oven and allow the cake to cool in the pan for 5–10 minutes.


Step 4: Prepare the Wine Glaze

  1. While the cake is baking, melt the butter in a small saucepan over medium heat.

  2. Stir in the white sugar and white wine.

  3. Cook, stirring constantly, until the sugar dissolves and the mixture is smooth. Remove from heat.

  4. Optional: Simmer for a few extra minutes for a thicker glaze.


Step 5: Glaze the Cake

  1. Carefully invert the slightly cooled cake onto a serving plate or wire rack.

  2. Pour the warm glaze slowly over the cake, letting it soak and drip down the sides.


Step 6: Serve

  • Allow the cake to cool completely before slicing, or serve slightly warm.

  • Optional: Serve with whipped cream or vanilla ice cream.


💡 Tips & Notes

  • Oil Measurement: Ensure the oil is ¾ cup, not ¾ teaspoon, for proper texture.

  • Wine Choice: Any white wine is fine—dry (Chardonnay) or sweet (Riesling) both work.

  • Storage: Keep leftovers in an airtight container at room temperature for up to 3 days or in the refrigerator for up to 1 week.


🔄 Variations

  • Add ¼ teaspoon espresso powder to intensify chocolate flavor.

  • Substitute the glaze with a simple chocolate ganache for a richer finish.

  • Sprinkle chopped nuts or chocolate chips on top before serving.

🍯 Honey Infusion with Ginger, Garlic & Onion

🍯 Honey Infusion with Ginger, Garlic & Onion

Yields: 1 small jar
Preparation Time: 10 minutes
Infusion Time: 12–24 hours

This honey-based infusion combines aromatic ingredients with natural sweetness to create a richly flavored syrup. It can be used in warm drinks, drizzled over foods, or enjoyed in small amounts as part of a balanced diet.


📋 Ingredients

  • 1 cup raw honey

  • 1 large red onion, finely diced

  • 3–4 garlic cloves, peeled and thinly sliced or lightly crushed

  • 1 tablespoon fresh ginger, finely grated or thinly sliced

  • 2 tablespoons fresh lemon juice


👩‍🍳 Step-by-Step Instructions

Step 1: Prepare the Ingredients

  1. Peel and finely dice the red onion.

  2. Peel the garlic cloves and slice them thinly or lightly crush them to release flavor.

  3. Peel the ginger and grate it finely or cut it into very thin strips.


Step 2: Layer the Jar

  1. Use a clean, dry glass jar.

  2. Add the onion, garlic, and ginger to the jar in layers.

  3. Pour the lemon juice evenly over the ingredients.


Step 3: Add the Honey

  1. Slowly pour the honey into the jar.

  2. Make sure all ingredients are fully submerged.

  3. Leave about 2–3 cm (1 inch) of space at the top, as the mixture may release liquid over time.


Step 4: Infuse

  1. Seal the jar tightly.

  2. Place it in the refrigerator or a cool, dark area.

  3. Allow the mixture to infuse for 12–24 hours.

  4. During this time, the honey will thin slightly and absorb the flavors.


Step 5: Use and Store

  1. Stir gently before each use.

  2. Use small amounts as desired:

    • Stir into warm (not hot) water or tea

    • Drizzle over roasted vegetables

    • Add to salad dressings or marinades

  3. Keep refrigerated and use within 2 weeks.


💡 Helpful Notes

  • The flavor is strong at first but becomes more balanced as it infuses

  • Honey helps soften the sharp taste of onion and garlic

  • Always use clean utensils when scooping to maintain freshness


🔄 Optional Flavor Additions

  • A cinnamon stick for warmth

  • A small pinch of ground spice for depth

  • Orange or lemon peel for citrus aroma


🧊 Storage Tips

  • Store in a sealed glass jar

  • Keep refrigerated after opening

  • Discard if you notice unusual odor or appearance

Easy Cherry Vanilla Oven Cake

🍒 Easy Cherry Vanilla Oven Cake

Serves: 8
Preparation Time: 10 minutes
Baking Time: 30–35 minutes

This cherry vanilla cake is soft, lightly sweet, and simple to prepare. A tender sponge base combined with juicy cherries makes it suitable for everyday baking, family gatherings, or serving with tea.


📋 Ingredients

  • 1½ cups (190 g) all-purpose flour

  • 1 cup (200 g) granulated sugar

  • 3 large eggs

  • ½ cup (115 g) unsalted butter, melted and cooled

  • ½ cup (120 ml) milk

  • 1½ teaspoons baking powder

  • 1 teaspoon vanilla extract

  • A small pinch of salt

  • 1 cup fresh or canned cherries, pitted and well drained


👩‍🍳 Step-by-Step Instructions

Step 1: Prepare the Oven and Pan

  1. Preheat the oven to 350°F (175°C).

  2. Grease a round cake pan or line it with parchment paper.


Step 2: Mix the Wet Ingredients

  1. In a large bowl, whisk the eggs and sugar together.

  2. Continue whisking until the mixture becomes light in color.

  3. Add the melted butter, milk, and vanilla extract.

  4. Whisk until smooth and well combined.


Step 3: Add the Dry Ingredients

  1. Sift the flour, baking powder, and salt into the bowl.

  2. Gently fold the dry ingredients into the wet mixture using a spatula.

  3. Mix only until smooth; avoid overmixing.


Step 4: Add Cherries and Bake

  1. Pour the batter evenly into the prepared pan.

  2. Scatter the cherries over the top.

  3. Place the pan in the oven and bake for 30–35 minutes.

  4. The cake is ready when a toothpick inserted in the center comes out clean.


Step 5: Cool and Serve

  1. Allow the cake to cool in the pan for 10 minutes.

  2. Transfer to a wire rack or serving plate.

  3. Serve as is or lightly dust with powdered sugar if desired.


🧊 Storage Tips

  • Store in an airtight container at room temperature for up to 2 days

  • Refrigerate for up to 5 days if needed


💡 Helpful Notes

  • Drain canned cherries well to prevent excess moisture

  • Gently press cherries into the batter for even distribution

  • Let the cake cool fully before slicing for clean pieces


🔄 Variations

  • Replace cherries with blueberries, raspberries, or sliced peaches

  • Add lemon or orange zest for extra flavor

  • Serve with plain yogurt or whipped cream if desired

Homemade Blueberry Chia Seed Jam

Homemade Blueberry Chia Seed Jam

Yields: About 1 cup
Preparation Time: 5 minutes
Cooking Time: 10 minutes

This homemade blueberry chia seed jam is simple to prepare and made with just a few basic ingredients. It thickens naturally using chia seeds and works well as a spread, topping, or filling.


📋 Ingredients

  • 2 cups fresh or frozen blueberries

  • 2 tablespoons chia seeds

  • 1 tablespoon fresh lemon juice

  • 1–2 tablespoons honey or maple syrup (optional, to taste)

  • ½ teaspoon vanilla extract (optional)


👩‍🍳 Step-by-Step Instructions

Step 1: Cook the Blueberries

  1. Place the blueberries in a small saucepan.

  2. Set the pan over medium heat.

  3. Cook for 5–10 minutes, stirring occasionally.

  4. The berries will soften and release their juices as they heat.


Step 2: Mash the Fruit

  1. Once the berries are soft and gently bubbling, remove the pan from heat.

  2. Use a fork or potato masher to mash the berries.

  3. Mash lightly for a chunky texture or more thoroughly for a smoother result.


Step 3: Add Remaining Ingredients

  1. Stir in the chia seeds.

  2. Add the lemon juice.

  3. Mix in honey or maple syrup if using.

  4. Add vanilla extract if desired.

  5. Stir well to combine.


Step 4: Allow the Jam to Thicken

  1. Let the mixture sit uncovered for 10–15 minutes.

  2. Stir once or twice during this time.

  3. The chia seeds will absorb liquid and thicken the mixture.


Step 5: Cool and Store

  1. Transfer the jam to a clean glass jar or container.

  2. Allow it to cool completely.

  3. Seal and refrigerate.


🧊 Storage Tips

  • Store in the refrigerator for up to 7 days

  • Freeze in a sealed, freezer-safe container for up to 3 months

  • Thaw in the refrigerator before use


💡 Helpful Notes

  • Adjust sweetness based on the natural flavor of the berries

  • Stir well before serving if the jam thickens unevenly

  • Chop larger fruits if using this method with other berries


🍽️ Serving Ideas

  • Spread on toast or crackers

  • Spoon over yogurt or oatmeal

  • Use as a filling for baked goods

  • Serve with pancakes or waffles

Baked Chicken Alfredo Calzones

Baked Chicken Alfredo Calzones


Ingredients

    • 1 pound (450 g) pizza dough (store-bought or homemade), divided into 4 portions
    • 1 cup cooked chicken breast, shredded or finely chopped
    • 1/2 cup Alfredo sauce (store-bought or homemade)
    • 1/4 cup Parmesan cheese, finely grated
    • 1 cup shredded mozzarella cheese, divided
    • 1 teaspoon garlic powder
    • 1 teaspoon Italian seasoning (or 1/2 teaspoon dried oregano + 1/2 teaspoon dried basil)
    • Salt and freshly ground black pepper, to taste
    • 1 large egg, beaten (for egg wash)
    • Optional: a pinch of red pepper flakes for heat
    • Optional: marinara sauce for dipping
  • Optional garnish: chopped fresh parsley or basil

Instructions

    1. Preheat the oven: Preheat the oven to 400°F (200°C). Line a baking sheet with parchment paper or lightly oil a rimmed baking tray.
    2. Prepare the filling: In a medium bowl combine the shredded chicken, Alfredo sauce, Parmesan cheese, half of the mozzarella (reserve the other half for stuffing/topping), garlic powder and Italian seasoning. Season with salt and pepper to taste. If the mixture seems very loose, reduce the Alfredo slightly or add a tablespoon of extra Parmesan to thicken. Taste and adjust seasoning.
  1. Roll out the dough: On a lightly floured surface, divide the dough into four equal pieces. Roll each piece into a circle or oval about 6–7 inches (15–18 cm) across. Keep the unused portions covered to prevent drying.
  2. Assemble the calzones: Spoon about 1/4 of the chicken Alfredo filling onto one half of each dough disc, leaving a 1/2–1 inch (1–2 cm) border around the edge. Sprinkle a little of the remaining mozzarella on top of the filling for extra melt.
  3. Seal the edges: Fold the dough over the filling to create a half-moon. Press the edges together firmly and crimp with a fork or use your fingers to create a tight seal. Make a small slit or two in the top of each calzone to vent steam during baking.
  4. Brush and bake: Place calzones on the prepared baking sheet. Brush the tops with beaten egg for a glossy, golden finish. Bake in the preheated oven for 18–22 minutes, or until the crust is deep golden and the filling is hot and bubbling. If tops brown too quickly, tent loosely with foil.
  5. Garnish and rest: Remove from the oven and let calzones rest 4–5 minutes before serving—this allows the filling to set slightly and prevents scalding. Optional: sprinkle with extra Parmesan and chopped parsley or basil. Serve with warm marinara sauce for dipping if desired.

Effortless Lemon Ice Cream Sugar-Free Delight with Just Three Ingredients

Effortless Lemon Ice Cream Sugar-Free Delight with Just Three Ingredients

Ice cream lovers, rejoice! Imagine creating a delicious, sugar-free lemon ice cream at home using just three ingredients in under five minutes. This simple recipe not only satisfies your sweet tooth but does so in a healthier way, without any added sugar. Here’s how to make this refreshing treat that’s so easy and tasty, you may never want to buy store-bought ice cream again!

1. Benefits of Homemade Lemon Ice Cream

Healthier: By making your own ice cream, you control the ingredients, ensuring there are no unwanted additives or sugars.

Refreshing: Lemon adds a natural zest that is both invigorating and delightful, perfect for cooling down on a warm day.

Simple Ingredients: With only three ingredients, this recipe is uncomplicated and quick, ideal for spontaneous dessert cravings.

2. Ingredients Needed

To whip up your own batch of lemon ice cream, you’ll need:

1 cup of heavy cream

2 tablespoons of fresh lemon juice

3 tablespoons of honey (or to taste, depending on your preference for sweetness)

3. How to Make Lemon Ice Cream

This recipe is not only straightforward but also quick, making it a perfect last-minute dessert option.

INSTRUCTIONS:

Mix Ingredients: In a medium-sized mixing bowl, combine the heavy cream, fresh lemon juice, and honey. Mix thoroughly until the honey is completely dissolved.

Whisk or Blend: Using a hand mixer or blender, whip the mixture until it becomes thick and creamy. This usually takes about 3 to 4 minutes.

Freeze: Pour the mixture into a freezer-safe container. If you prefer a soft-serve consistency, you can enjoy it immediately. For those who like their ice cream firmer, freeze it for about an hour, then stir it, and freeze again until it reaches the desired consistency.

4. Serving Suggestions

Scoop your lemon ice cream into bowls or cones. This ice cream pairs beautifully with fresh berries or a sprig of mint for an extra touch of elegance and freshness. It’s a wonderful dessert to follow a meal or as a cool treat on a sunny afternoon.

5. Storage Tips

Store any leftover ice cream in an airtight container in the freezer. Before serving again, let it sit out for a few minutes to soften slightly for easier scooping.

This three-ingredient, sugar-free lemon ice cream is a testament to the idea that simplicity often leads to the best results. Quick, easy, and delightfully refreshing, it’s a perfect treat for anyone looking to indulge their sweet tooth without overdoing it on sugar. Give this recipe a try, and it might just become your new favorite way to beat the heat and keep your dessert game light and zesty!

Banana Pineapple Ginger Smoothie

This Banana Pineapple Ginger Smoothie is a vibrant, tropical drink that combines natural sweetness with a gentle spicy kick from fresh ginger. It’s perfect for breakfast, a mid-day energy boost, or a light evening refreshment. The smoothie is rich in vitamins, aids digestion, and helps support immunity.

Ingredients

  • 1 ripe banana (peeled and sliced)

  • 1 cup fresh pineapple chunks (or frozen)

  • 1 teaspoon fresh ginger (grated or thinly sliced)

  • 1 cup chilled milk (dairy or plant-based like almond or coconut milk)

  • ½ cup fresh orange juice or cold water

  • 1 teaspoon honey or maple syrup (optional)

  • 4–5 ice cubes (optional, for extra chill)

Preparation Steps

  1. Prepare the Fruits:
    Peel the banana and slice it into small rounds. Cut fresh pineapple into bite-sized chunks, removing the hard core. If using frozen pineapple, no thawing is required.

  2. Prepare the Ginger:
    Peel the ginger using a spoon or knife. Grate it finely or slice it thin so it blends smoothly without fibrous bits.

  3. Blend the Ingredients:
    Add banana slices, pineapple chunks, ginger, milk, and orange juice (or water) into a blender. If you prefer a sweeter smoothie, add honey or maple syrup at this stage.

  4. Adjust Texture:
    Blend on high speed for 30–45 seconds until smooth and creamy. Add ice cubes and blend again if you want a colder, thicker texture.

  5. Taste and Serve:
    Taste the smoothie and adjust sweetness or liquid if needed. Pour into a chilled glass and serve immediately.

Health Benefits

  • Banana provides potassium and natural energy.

  • Pineapple is rich in vitamin C and bromelain, supporting digestion.

  • Ginger helps reduce inflammation and soothes the stomach.

  • Milk or plant milk adds creaminess and calcium.

Serving Tips

  • Garnish with a pineapple slice or a pinch of grated ginger.

  • For a protein boost, add a tablespoon of yogurt or soaked chia seeds.

  • Best enjoyed fresh to retain maximum nutrients.

This smoothie is naturally refreshing, lightly spicy, and full of tropical flavor—perfect for a healthy daily routine. 🥤🍍🍌

A Chef’s Key to Exceptional Egg Salad: Techniques for Achieving Creamy Perfection

Egg salad may seem simple, but any seasoned chef will tell you: the difference between an ordinary bowl and an unforgettable one comes down to technique. This humble dish relies on a balance of texture, seasoning, and method. When done right, egg salad becomes silky, rich, and luxurious — the kind you want to eat straight from the bowl.

Here’s how chefs elevate this classic comfort food into something exceptional.

1. Start With Perfectly Cooked Eggs

The foundation of a creamy egg salad is a tender, velvety egg — never rubbery whites, never chalky yolks.

Chef’s Technique:

  • Place eggs in a pot.
  • Cover with cold water by at least one inch.
  • Bring to a boil slowly over medium heat.
  • Once the water reaches a full boil, turn off the heat, cover, and let the eggs sit for 10–11 minutes.
  • Immediately transfer to an ice bath for 5 minutes.

This prevents that gray ring around the yolk and ensures they peel beautifully.

2. Grate, Don’t Chop

Most home cooks roughly chop their eggs. Chefs often use a different method:

Use the small side of a grater or press eggs through a mesh cooling rack.

This technique creates:

  • An ultra-fine texture
  • Even distribution of yolk richness
  • That signature restaurant-level creaminess

This is the trick that transforms good egg salad into silky egg salad.

3. Build a Balanced, Creamy Base

The classic mistake is adding too much mayonnaise in an attempt to make the salad creamy. True creaminess comes from combining:

  • Mayonnaise for richness
  • Mustard for acidity
  • A touch of sour cream or Greek yogurt for extra silkiness
  • A tiny splash of pickle brine or lemon juice for brightness

This creates a layered flavor profile and prevents the salad from tasting flat.

4. Season Like a Chef

Eggs crave seasoning. Without it, even the best technique falls flat.

Chefs add:

  • A generous pinch of Kosher salt
  • Fresh black pepper
  • Smoked paprika or regular paprika for depth
  • Fresh dill or chives for fresh, aromatic notes

Optional but chef-approved:

  • A small spoon of finely minced shallot
  • Celery for crisp texture
  • A little Dijon for tang

5. Let It Rest

Texture and flavor improve dramatically after 20–30 minutes in the refrigerator.

Resting time allows:

  • Flavors to meld
  • Excess moisture to absorb
  • The salad to thicken naturally

This is why restaurant egg salad always tastes “more put together.”

Restaurant-Quality Creamy Egg Salad Recipe

Ingredients (Serves 4)

For the eggs:

  • 8 large eggs

Creamy base:

  • 1/3 cup mayonnaise
  • 1 tbsp Dijon mustard
  • 1 tbsp sour cream or Greek yogurt
  • 1–2 tsp pickle brine or lemon juice

Mix-ins & seasoning:

  • 1/4 cup finely diced celery
  • 1 tbsp minced shallot (optional)
  • 1 tbsp chopped fresh dill or chives
  • 1/2 tsp salt
  • 1/4 tsp black pepper
  • Pinch of smoked or regular paprika

Instructions

1. Cook the Eggs

  1. Place eggs in a pot and cover with cold water.
  2. Heat over medium until the water comes to a full boil.
  3. Turn off heat, cover, and let sit for 10–11 minutes.
  4. Transfer eggs to an ice bath for 5 minutes.
  5. Peel once cool.

2. Prepare the Eggs

  • Grate the eggs using the small side of a box grater, OR press them through a metal rack for fluffy, even pieces.

3. Make the Creamy Dressing

In a large bowl, whisk together:

  • Mayonnaise
  • Dijon
  • Sour cream/Greek yogurt
  • Pickle brine or lemon juice
  • Salt, pepper, and paprika

4. Combine

  • Fold in the grated eggs, celery, and shallot.
  • Finish with fresh herbs.
  • Mix gently to keep the mixture airy.

5. Chill and Serve

  • Refrigerate for 20–30 minutes to enhance creaminess.
  • Serve on toasted bread, crackers, croissants, or in lettuce cups.

Final Thoughts

The secret to extraordinary egg salad isn’t a long list of ingredients — it’s professional technique. Perfectly cooked eggs, grated texture, balanced acidity, and a short resting time transform a simple, everyday recipe into something luxurious and memorable.

Master these steps, and you’ll never go back to ordinary egg salad again.

Banana Chia & Oat Power Blend

Banana Chia & Oat Power Blend

Ingredients

  • 1 ripe Banana: Sliced as shown in the first glass.

  • 1/4 cup Rolled Oats: Use old-fashioned oats for the best texture.

  • 2 tablespoons Chia Seeds: These provide the speckled appearance and thickening power seen in the final result.

  • 1 cup Milk of choice: (e.g., Almond, Oat, or Dairy). Use slightly less for a thicker pudding and more for a smoothie.

  • Optional Sweetener: 1 teaspoon of maple syrup or honey.

  • Optional Flavor: A dash of cinnamon or a drop of vanilla extract.

Preparation Instructions

  1. Layer or Mix:

    • For the “Aesthetic” Look: Layer the oats at the bottom, followed by the chia seeds, and top with the sliced bananas as seen in the image.

    • For Practicality: Add all dry ingredients (oats and chia seeds) into a glass or jar.

  2. Add Liquid: Pour your chosen milk over the ingredients. If you are making a smoothie, you can add all ingredients to a blender immediately.

  3. Hydrate: Stir well to ensure the chia seeds are fully submerged and not clumped together.

  4. The Wait (Crucial): * Overnight Oats: Cover and refrigerate for at least 4 hours, or ideally overnight. The chia seeds and oats will absorb the liquid, creating the thick, creamy consistency shown in the second glass.

    • Smoothie: If you prefer the blended version, let the mixture sit for 10 minutes before blending to soften the oats for a smoother texture.

  5. Final Touch: Before eating or drinking, give it a good stir. The banana will naturally sweeten the mixture as it sits.


Why This Combination Works

  • Chia Seeds: They can absorb up to 10–12 times their weight in liquid, turning the milk into a gel-like pudding.

  • Oats: Provide slow-release energy and fiber to keep you full.

  • Banana: Acts as a natural sweetener and provides potassium.

Healthy Cashew Smoothie

Healthy Cashew Smoothie

Ingredients

The following ingredients are required for this recipe:

  • Banana: 1 medium (frozen is best for a thicker texture).

  • Strawberries: 1/2 cup fresh or frozen.

  • Avocado: 1/4 to 1/2 of a ripe avocado (adds healthy fats and creaminess).

  • Cashews: 1/4 cup raw or roasted (unsalted).

  • Almond Milk: 1 cup (unsweetened).

  • Honey: 1–2 teaspoons, or to taste.

  • Ice: 1/2 cup to 1 cup depending on desired thickness.


Instructions

  1. Prep the Cashews: If you do not have a high-speed blender, soak the cashews in hot water for 15 minutes and drain them before using to ensure a perfectly smooth consistency.

  2. Combine: Add the almond milk to the blender first (liquid first helps the blades spin more easily), followed by the bananastrawberriesavocado, and cashews.

  3. Sweeten and Chill: Add the honey and the ice.

  4. Blend: Start on a low speed and gradually increase to high. Blend for 45–60 seconds until the cashews are completely pulverized and the mixture is silky.

  5. Adjust: If the smoothie is too thick, add a splash more almond milk. If you prefer it colder/thicker, add more ice.

Why this works

  • Avocado: Provides a velvety mouthfeel and heart-healthy monounsaturated fats.

  • Cashews: Act as a natural “cream” while adding plant-based protein.

  • Strawberries: Give the smoothie its signature pale pink color and a boost of Vitamin C

Zucchini Cornbread Casserole

If you’re a fan of cornbread but are looking for something with a little more kick and nutritional value, we’ve got just the dish! This cheesy Zucchini Cornbread casserole is bursting with flavor and packed with summer veggies. Zucchini is truly the star of the show here, with a hefty 3 1/2 cups loaded into this dish. Sweet corn and a zesty jalapeno play supporting roles for a final result that knocks it out of the park.

INGREDIENTS
  • 3 1/2 cups shredded zucchini, well drained
  • 1 white onion, diced
  • 16 ounces shredded cheddar cheese, divided
  • 1 cup frozen corn, thawed
  • 1 jalapeño, diced (remove seeds for less spice)
  • 2 eggs
  • 1 teaspoon garlic powder
  • 1 teaspoon cumin
  • 1 teaspoon salt
  • ½ black pepper
  • 1 (8.5 0z) box corn muffin mix
How to Make Zucchini Cornbread Casserole
  1. Preheat oven to 350 degrees F and lightly grease an 8×8 inch baking dish.
  2. In a large bowl, mix together the zucchini, onion, half the cheese, corn, jalapeño, eggs and spices.
  3. Slowly mix in the corn muffin mix until fully combined.
  4. Transfer mixture to the prepared baking dish and top with remaining cheese.
  5. Bake for 50-55 minutes or until cooked through the center and golden on top. Serve warm.

Bazlama (Traditional Turkish Yogurt Flatbread), Soft, pillowy flatbread cooked on the stovetop the traditional way.

Servings: 6 Flatbreads

Total Time: 45 minutes (plus rising time)

Difficulty: Medium

Calories per Serving: 165 kcal

Macros: Protein 7g / Carbs 32g / Fat 1g / Fiber 1.5g


The Ultimate Weight Watchers Bread Substitute

If you have been searching for a bread that feels indulgent but fits your points, this Turkish Yogurt Flatbread, or Bazlama, is a game-changer. Unlike traditional breads that rely on heavy oils or butter, Bazlama uses the magic of Greek yogurt to create a dough that is incredibly soft and flexible. It’s the perfect companion for a Mediterranean-style lunch or a clean-eating dinner.

In the Weight Watchers community, we often settle for thin, dry wraps. This recipe changes that. By using non-fat Greek yogurt in the dough, we increase the protein content while keeping the fat minimal. This results in a pillowy, airy texture that is perfect for dipping into shakshuka or using as a high-protein sandwich wrap.

This is a healthy recipe that doesn’t taste like “diet food.” It’s a rustic, authentic staple that brings a touch of international flavor to your kitchen without sacrificing your progress. It’s simple, wholesome, and surprisingly easy to master on your own stovetop.

Look at the Recipe

  • Pillowy Texture: These breads puff up on the skillet, creating a hollow “pocket” and a soft, chewy crumb.
  • Mild Tangy Flavor: The yogurt adds a subtle depth of flavor that complements both sweet and savory toppings.
  • WW-Friendly Benefit: Naturally low-fat and higher in protein than standard white bread or store-bought naan.

Ingredients Needed

  • 3 cups All-Purpose Flour: (Or a mix of white and whole wheat for extra fiber).
  • 1 cup Non-Fat Plain Greek Yogurt: Room temperature works best.
  • 1 tsp Active Dry Yeast: To get that signature Bazlama puff.
  • 1 tsp Salt: For essential flavor balancing.
  • 3/4 cup Warm Water: Ensure it is lukewarm ($105°F$ to $110°F$) to activate the yeast.
  • Optional: A sprinkle of dried parsley or garlic powder for extra flavor.

How to Make Our Bazlama

  1. Activate the Yeast: In a small bowl, combine the warm water and yeast. Let it sit for 5–10 minutes until it becomes frothy and bubbly.
  2. Mix the Dough: In a large mixing bowl, whisk the flour and salt. Create a well in the center and pour in the yeast mixture and the Greek yogurt.
  3. Knead to Perfection: Stir until a shaggy dough forms. Transfer to a floured surface and knead for about 5–8 minutes until the dough is smooth and slightly elastic. If using a stand mixer, use the dough hook on medium-low speed.
  4. The First Rise: Place the dough in a lightly greased bowl, cover with a damp cloth, and let rise in a warm spot for about 1 hour, or until doubled in size.
  5. Shape the Rounds: Punch the dough down and divide into 6 equal portions. Roll each piece into a ball, then use a rolling pin to flatten them into 1/2 inch thick circles.
  6. Stovetop Grilling: Heat a non-stick skillet over medium heat (no oil needed!). Place one dough circle in the pan. Cook for 2–3 minutes until bubbles form on top, then flip and cook for another 2 minutes. The bread should puff up like a balloon!

Storage & Serving Suggestions

Storing: Once cooled, store your Bazlama in a sealed zip-top bag at room temperature for up to 2 days.

Reheating: To bring back that “just-baked” softness, microwave for 15 seconds wrapped in a damp paper towel, or toast lightly in a dry pan.

Freezing: These freeze beautifully! Place parchment paper between each flatbread and freeze for up to 3 months.

Serving Pairings: For a low-point meal, serve with a side of hummus and fresh cucumbers. It also makes an incredible base for a “WW Pizza” using fat-free mozzarella and tomato sauce.


Tips & FAQs (SEO-Optimized)

How many WW points is one Bazlama?

Typically, one flatbread is 4–5 points on most plans, depending on the flour used. Using a 50/50 split of Whole Wheat flour can help increase the fiber and keep you full longer.

My bread isn’t puffing up, what happened?

The most common culprit is a pan that isn’t hot enough. Make sure the skillet is fully preheated before dropping the dough. Also, ensure your yeast is fresh and “bloomed” properly in step one.

Can I make this dough ahead of time?

Yes! You can let the dough rise in the refrigerator overnight. This actually develops a deeper flavor. Just let it come to room temperature for 30 minutes before rolling and cooking.

Is there a gluten-free version?

You can substitute a 1:1 gluten-free baking flour, but the texture will be less “stretchy” and more like a traditional pita.

Butter Biscuits & Soft Melting Cookies

Butter Biscuits & Soft Melting Cookies

Yields: Approximately 40–50 biscuits
Preparation Time: 20 minutes
Baking Time: 10–12 minutes

These butter-based biscuits are light, tender, and gently crisp at the edges. The same dough can be shaped in different ways to create both simple butter biscuits and soft, swirl-style cookies. They are perfect for sharing, gifting, or enjoying with tea.


📋 Ingredients

  • 500 g butter, softened at room temperature

  • 1 cup fine or granulated sugar

  • 3 large eggs

  • 3 tablespoons neutral oil

  • 1 teaspoon vanilla flavoring

  • 5 cups all-purpose flour, sifted

  • 4 teaspoons baking powder

  • ¼ teaspoon bicarbonate of soda

Optional Decorations

  • Glacé cherries, finely chopped

  • Fruit jam (such as apricot or strawberry)

  • Melted chocolate for drizzling


👩‍🍳 Step-by-Step Instructions

Step 1: Prepare the Butter Mixture

  1. Place the softened butter and sugar in a large mixing bowl.

  2. Beat together until light in color and creamy in texture.

  3. Add the oil and vanilla flavoring.

  4. Beat in the eggs one at a time, mixing well after each addition.


Step 2: Add Dry Ingredients

  1. In a separate bowl, sift together the flour, baking powder, and bicarbonate of soda.

  2. Gradually add the dry mixture to the butter mixture.

  3. Mix gently until a soft, smooth dough forms.

  4. Stop mixing once combined to keep the biscuits tender.


Step 3: Shape the Biscuits

  1. Preheat the oven to 180°C (350°F).

  2. Lightly grease or line baking trays with parchment paper.

For Swirl-Style Cookies

  • Transfer the dough to a piping bag fitted with a large star nozzle.

  • Pipe small swirls onto the tray.

  • Add a small amount of jam or a piece of cherry in the center if desired.

For Simple Butter Biscuits

  • Roll small portions of dough into balls and flatten gently with a fork,
    or

  • Roll the dough out and cut into shapes using a cutter.


Step 4: Bake

  1. Place trays in the preheated oven.

  2. Bake for 10–12 minutes, until the edges are lightly colored.

  3. The biscuits should remain pale for a soft texture.


Step 5: Cool and Finish

  1. Remove biscuits from the oven.

  2. Allow them to cool completely on a wire rack.

  3. Once cooled, drizzle with melted chocolate if desired.


🧊 Storage Tips

  • Store in an airtight container at room temperature for up to 2 weeks

  • Flavors develop further after resting for a day


💡 Helpful Notes

  • Butter should be soft, not melted, before mixing

  • Avoid overmixing to maintain a light texture

  • Use similar-sized portions for even baking

Homemade Whole Wheat Digestive Biscuits

🍪 Homemade Whole Wheat Digestive Biscuits

Yields: Approximately 15–20 biscuits
Preparation Time: 20 minutes
Chilling Time: 30 minutes
Baking Time: 15–18 minutes

These homemade digestive-style biscuits are crisp, lightly sweet, and made with simple pantry ingredients. They are ideal for enjoying with tea, coffee, or as a light snack.


📋 Ingredients

Dry Ingredients

  • 1½ cups (240 g) whole wheat flour

  • ½ cup (75 g) powdered sugar

  • 1 teaspoon baking powder

  • ¼ teaspoon salt (use only if butter is unsalted)

Fat

  • ½ cup (130 g) cold butter, cut into small cubes

Liquid

  • 5 tablespoons cold milk


👩‍🍳 Step-by-Step Instructions

Step 1: Combine Dry Ingredients

  1. In a large mixing bowl, sift together the whole wheat flour, powdered sugar, and baking powder.

  2. Add salt if using unsalted butter.

  3. Whisk until evenly mixed.


Step 2: Add the Butter

  1. Add the cold butter cubes to the flour mixture.

  2. Using your fingertips or a pastry cutter, rub the butter into the flour.

  3. Continue until the mixture resembles fine crumbs.
    Keeping the butter cold helps create a crisp texture.


Step 3: Form the Dough

  1. Add the cold milk one tablespoon at a time.

  2. Mix gently until the dough just comes together.

  3. Avoid kneading; the dough should be firm, not soft.

  4. If the mixture feels too dry, add 1 teaspoon of milk.


Step 4: Chill the Dough

  1. Shape the dough into a flat disc.

  2. Wrap it and refrigerate for 30 minutes.
    Chilling helps with rolling and improves texture.


Step 5: Roll and Shape

  1. Preheat the oven to 180°C (350°F).

  2. Place the chilled dough between two sheets of parchment paper.

  3. Roll to about 5 mm thickness.

  4. Cut into rounds using a cookie cutter.

  5. If desired, lightly press or mark the surface with a fork or toothpick.


Step 6: Bake

  1. Arrange the biscuits on a parchment-lined baking tray.

  2. Leave a little space between each biscuit.

  3. Bake for 15–18 minutes, or until the edges turn lightly golden.


Step 7: Cool Completely

  1. Remove the tray from the oven.

  2. Transfer biscuits to a wire rack.

  3. Allow them to cool fully; they will become crisp as they rest.


🍽️ Serving Suggestions

  • Enjoy with tea, coffee, or warm milk

  • Serve with fruit spreads or nut butter

  • Use as a base for layered desserts


🧊 Storage Tips

  • Store in an airtight container at room temperature for up to 1 week

  • Keep away from moisture to maintain crispness


💡 Helpful Notes

  • For less sweetness, reduce powdered sugar slightly

  • Butter can be replaced with chilled plant-based fat if needed

  • Thinner biscuits will bake faster and become crisper

Wholesome Carrot Cake (No Refined Flour, No Added Sugar)

🥕 Wholesome Carrot Cake (No Refined Flour, No Added Sugar)

Serves: 6 slices
Preparation Time: 15 minutes
Baking Time: 45–50 minutes

This carrot cake is soft, naturally sweet, and easy to prepare using simple ingredients. It relies on oats, fruits, and nuts for structure and flavor, making it suitable for breakfast, snacks, or a light dessert. No special equipment is needed—just a bowl, a spoon, and an oven.


📋 Ingredients

  • 2 cups (200 g) oat flakes

  • 1 teaspoon baking powder

  • 1 cup (240 ml) milk of choice

  • 1 medium carrot, finely grated

  • 1 medium apple, finely grated

  • 4 tablespoons raisins, rinsed and drained

  • ¼ cup (50 g) walnuts, chopped

  • 3 large eggs

  • 2 tablespoons olive oil

  • 4 tablespoons stevia or preferred sweetener

  • ½ teaspoon vanilla flavoring (optional)


👩‍🍳 Step-by-Step Instructions

Step 1: Prepare the Oats

Place the oat flakes in a mixing bowl. For a softer texture, you may blend them briefly to create a coarse flour.


Step 2: Add Dry Ingredients

Add the baking powder to the oats and mix well to distribute evenly.


Step 3: Prepare Fruits and Vegetables

Grate the carrot and apple using a fine grater. Add them directly to the oat mixture.


Step 4: Add Liquid Ingredients

Crack the eggs into the bowl. Pour in the milk and olive oil. Add the sweetener and vanilla flavoring if using.


Step 5: Mix the Batter

Stir everything together until well combined. The batter will be thick.
Let it rest for 5 minutes so the oats can absorb moisture.


Step 6: Add Raisins and Nuts

Gently fold in the raisins and chopped walnuts until evenly distributed.


Step 7: Prepare the Baking Tin

Line an 18 cm (7-inch) round cake tin with parchment paper or lightly grease it.


Step 8: Bake

  1. Preheat the oven to 180°C (360°F).

  2. Pour the batter into the prepared tin and smooth the top.

  3. Bake for 45–50 minutes, until the top is set and lightly golden.

  4. Insert a toothpick into the center; it should come out clean.


Step 9: Cool and Serve

Remove the cake from the oven and allow it to cool completely before slicing.


🍽️ Serving Ideas

  • Serve warm or chilled

  • Pair with plain yogurt or fresh fruit

  • Slice into smaller portions for snacks or packed meals


🧊 Storage Tips

  • Store in an airtight container in the refrigerator for up to 5 days

  • Individual slices can be frozen for up to 2 months

  • Warm briefly before serving if desired


💡 Helpful Notes

  • Walnuts can be replaced with seeds for a nut-free version

  • Raisins may be replaced with chopped dates

  • Apples with natural sweetness work best

The Best Air Fryer Grilled Cheese Sandwich

The Best Air Fryer Grilled Cheese Sandwich

Serves: 1–2 people
Preparation Time: 5 minutes
Cooking Time: 8–10 minutes

This Air Fryer Grilled Cheese Sandwich delivers a perfectly crisp outside with a warm, creamy cheese center—all made quickly and easily. Using an air fryer allows even browning with minimal effort, making this a reliable go-to meal any time of day.


📋 Ingredients

  • 2 slices bread (white, sourdough, whole wheat, or preferred type)

  • 2–3 slices cheese (cheddar, mozzarella, American, or a combination)

  • 1–2 tablespoons butter, softened
    or mayonnaise for a crisp finish

Optional Add-Ins

  • Thinly sliced tomatoes

  • Cooked bacon or ham

  • Avocado slices

  • Jalapeños or red pepper flakes (optional)


👩‍🍳 Step-by-Step Instructions

Step 1: Preheat the Air Fryer

  1. Preheat the air fryer to 375°F (190°C).

  2. Allow it to warm for 2–3 minutes to ensure even cooking.


Step 2: Prepare the Bread

  1. Spread a thin, even layer of butter or mayonnaise on one side of each slice of bread.

  2. This coated side will become the outer, crispy surface.


Step 3: Assemble the Sandwich

  1. Place one slice of bread on a plate, coated side down.

  2. Layer the cheese evenly over the bread.

  3. Add any optional ingredients if desired.

  4. Top with the second slice of bread, coated side facing up.


Step 4: Cook

  1. Place the sandwich carefully into the air fryer basket.

  2. Cook for 4–5 minutes, then gently flip the sandwich.

  3. Continue cooking for another 4–5 minutes, or until:

    • The bread is golden and crisp

    • The cheese is fully melted


Step 5: Serve

  1. Remove the sandwich from the air fryer.

  2. Let it rest for 1 minute.

  3. Slice in half and serve warm.


🌟 Why This Recipe Works

  • Even Crisping: Hot air circulates evenly for consistent browning.

  • Smooth Melting: The closed air fryer environment helps melt the cheese evenly.

  • Simple Technique: Butter or mayonnaise creates a beautifully crisp texture.


🔄 Variations to Try

  • Cheese Upgrade: Use gouda, brie, or a cheese blend

  • Vegetable Option: Add spinach, roasted peppers, or caramelized onions

  • Spicy Style: Try pepper jack cheese or mild chili flakes

  • Gluten-Free: Use gluten-free bread

  • Sweet Version: Use chocolate spread with banana slices for a dessert-style sandwich


💡 Helpful Tips

  • Do not overfill the sandwich to keep it easy to flip

  • Flip gently using a spatula or tongs

  • Best enjoyed fresh, but leftovers can be reheated in the air fryer for 1–2 minutes


🍽️ Serving Ideas

  • Pair with tomato soup for a comforting meal

  • Serve with a fresh salad or sliced fruit

  • Cut into smaller portions for sharing

No-Bake Banana Chocolate Walnut Cake

🍌🍫 No-Bake Banana Chocolate Walnut Cake

Serves: 6–8 people
Preparation Time: 15 minutes
Chilling Time: 2–4 hours

This No-Bake Banana Chocolate Walnut Cake is smooth, rich, and naturally satisfying. It comes together quickly without using an oven, making it perfect for warm days, quick desserts, or special family treats. The combination of banana, chocolate, and walnuts creates a balanced texture and flavor everyone enjoys.


📋 Ingredients

  • 2 large ripe bananas, mashed until smooth

  • 1 cup (300 g) condensed milk

  • 1 tablespoon cocoa powder

  • 7 oz (200 g) digestive biscuits or graham crackers, crushed into fine crumbs

  • ½ cup walnuts, roughly chopped

Optional Topping

  • 1 additional banana, thinly sliced for decoration

  • Extra chopped walnuts or a light dusting of cocoa powder (optional)


👩‍🍳 Step-by-Step Instructions

Step 1: Prepare the Chocolate Banana Mixture

  1. Place a medium saucepan over low heat.

  2. Add the condensed milk and cocoa powder.

  3. Stir continuously until the mixture becomes smooth and evenly blended.

  4. Add the mashed bananas.

  5. Continue stirring gently for 2–3 minutes until the mixture thickens slightly.

  6. Remove from heat and allow it to cool for a minute.


Step 2: Add Crunch and Texture

  1. Add the crushed biscuits to the warm mixture.

  2. Add the chopped walnuts.

  3. Fold everything together gently until all crumbs are evenly coated.

  4. The mixture should be thick and easy to shape.


Step 3: Shape the Cake

  1. Lightly grease an 8×8-inch baking dish or line it with parchment paper.

  2. Transfer the mixture into the dish.

  3. Press it down firmly using the back of a spoon or spatula.

  4. Smooth the surface evenly.


Step 4: Decorate

  1. Arrange banana slices neatly across the top.

  2. Sprinkle extra walnuts or cocoa powder if desired.

  3. Press lightly so the topping stays in place.


Step 5: Chill and Serve

  1. Place the dish in the refrigerator.

  2. Chill for at least 2 to 4 hours, or until firm.

  3. Once set, slice into squares or rectangles.

  4. Serve cold for best texture and flavor.


🌟 Helpful Tips

  • Fresh Appearance: If preparing ahead, lightly brush banana slices with a small amount of lemon juice to help maintain their color.

  • Extra Smooth Finish: A thin layer of melted chocolate can be spread on top before decorating for added richness.

  • Nut Options: Pecans or hazelnuts can be used instead of walnuts for a different texture.

Crispy Potato & Egg Nest Muffins

🥔🍳 Crispy Potato & Egg Nest Muffins

Yields: 12 muffins
Prep Time: 15 minutes
Bake Time: 25–30 minutes

These Crispy Potato & Egg Nest Muffins are a comforting and satisfying dish made with simple ingredients. Grated potatoes form a crisp outer layer, while the inside stays soft and flavorful. They are perfect for breakfast, brunch, or light meals and are easy to prepare ahead of time.


📋 Ingredients

  • 3 large potatoes, peeled and grated

  • 4–5 large eggs, well beaten

  • 1 cup shredded cheese (cheddar or mozzarella works well)

  • 12 cherry tomatoes (one per muffin)

  • 2 green onions, finely chopped

  • Salt, to taste

  • Black pepper, to taste

  • A small pinch of garlic powder or paprika (optional)

  • Vegetable oil or butter, for greasing the muffin tin


👩‍🍳 Step-by-Step Instructions

Step 1: Prepare the Potatoes

  1. Preheat your oven to 400°F (200°C).

  2. Place the grated potatoes into a bowl of cold water.

  3. Rinse well to remove excess starch.

  4. Drain and squeeze the potatoes firmly using a clean kitchen towel until they are as dry as possible.
    Dry potatoes help create a crisp texture during baking.


Step 2: Make the Potato Nests

  1. Transfer the dried potatoes to a mixing bowl.

  2. Add salt, black pepper, and half of the shredded cheese.

  3. Mix gently until evenly combined.

  4. Grease a 12-cup muffin tin thoroughly.

  5. Divide the potato mixture evenly among the cups.

  6. Press the mixture firmly into the bottom and up the sides of each cup to form a nest shape.


Step 3: Prepare the Egg Mixture

  1. In a separate bowl or jug, whisk the eggs until smooth.

  2. Add chopped green onions and any remaining seasoning.

  3. Stir gently to combine.


Step 4: Assemble and Bake

  1. Carefully pour the egg mixture into the center of each potato nest.

  2. Place one cherry tomato in the center of each muffin.

  3. Sprinkle the remaining shredded cheese evenly on top.

  4. Bake for 25–30 minutes, or until:

    • The potato edges are golden and crisp

    • The egg filling is fully set


Step 5: Cool and Serve

  1. Remove the muffin tin from the oven.

  2. Allow the muffins to rest for 5 minutes.

  3. Use a small knife to gently loosen the edges.

  4. Lift the muffins out carefully.

Serve warm for the best texture and flavor.


🌟 Why You’ll Love This Recipe

  • Crispy Outside, Soft Inside: The potato base becomes golden and crunchy while the egg stays tender.

  • Easy to Customize: Add extra vegetables like spinach, bell peppers, or mushrooms for variety.

  • Great for Planning Ahead: These muffins can be prepared in advance and reheated while keeping their texture.

Fat Bomb Fluff ( Low-Carb Dessert)

Fat Bomb Fluff ( Low-Carb Dessert)

Description

Fat Bomb Fluff is a rich, creamy, no-bake keto dessert that tastes like a cross between cheesecake fluff and cookie dough ice cream. It’s high in healthy fats, low in carbs, and incredibly satisfying—perfect for curbing sweet cravings while staying keto or low-carb. Serve it chilled, frozen, or straight from the bowl.

 Ingredients

  • 8 oz cream cheese, softened

  • ½ cup unsalted butter, softened

  • ½ cup powdered erythritol or monk fruit sweetener (to taste)

  • 1 tsp vanilla extract

  • 1 cup heavy whipping cream, cold

  • ¾–1 cup sugar-free chocolate chips

  • Optional add-ins:

    • Pinch of salt (enhances flavor)

    • 1–2 tbsp peanut butter or almond butter

    • 1–2 tbsp cocoa powder (for chocolate version)

 Instructions

  1. In a large bowl, beat cream cheese and butter until smooth and fluffy (2–3 minutes).

  2. Add sweetener, vanilla, and salt. Beat again until fully combined.

  3. In a separate bowl, whip the heavy cream until stiff peaks form.

  4. Gently fold the whipped cream into the cream cheese mixture in batches.

  5. Fold in chocolate chips and any optional add-ins.

  6. Serve immediately or chill for 30–60 minutes for a firmer texture.

 Servings

  • 6 servings

  • Serving size: ~¾ cup

Nutritional Information (Per Serving – Approx.)

  • Calories: 270–290

  • Fat: 26–28g

  • Protein: 3–4g

  • Net Carbs: 2–3g

  • Sugar: 0g

(Values may vary depending on brands used)

 Benefits

  • ✅ Keto & low-carb friendly

  • ✅ No baking required

  • ✅ High-fat for satiety

  • ✅ Helps curb sugar cravings

  • ✅ Customizable flavors

  • ✅ Can be frozen or eaten chilled

 Recipe Notes

  • Use powdered sweetener, not granulated, to avoid grainy texture.

  • Let cream cheese and butter fully soften before mixing.

  • Fold whipped cream gently to keep the fluff airy.

  • Chill longer if you prefer an ice-cream-like consistency.

 Tips & Variations

  • Frozen Treat: Freeze in individual portions for 1–2 hours.

  • Chocolate Lover: Add cocoa powder and extra chocolate chips.

  • Cookie Dough Style: Add vanilla + chopped keto cookies.

  • Dairy-Free: Use dairy-free cream cheese, butter, and coconut cream.

  • Extra Protein: Mix in unflavored or vanilla collagen powder.


Q & A

Q: Is Fat Bomb Fluff keto-friendly?
A: Yes! It’s low in net carbs and high in fats, perfect for keto diets.

Q: Can I freeze it?
A: Absolutely. Freeze for a firmer texture—let it sit 5–10 minutes before serving.

Q: How long does it last?
A: Up to 5 days in the fridge or 2 months in the freezer (airtight container).

Q: Can I make it less sweet?
A: Yes, reduce sweetener or add a pinch of salt to balance flavors.

Q: Can I use flavored cream cheese?
A: You can, but check carb counts carefully.

Creamy Orange Sunshine Smoothie

Creamy Orange Sunshine Smoothie

Prep time: 5 minutes | Servings: 2 smoothies

🛒 Ingredients

To achieve that bright color and thick, frothy consistency, you will need:

Ingredient Amount Notes
Oranges 2 large Peeled and deseeded (Navel or Valencia work best).
Frozen Banana 1 medium Essential for the thick, creamy texture shown.
Greek Yogurt $1/2$ cup Use Plain or Vanilla for added creaminess and protein.
Milk of Choice $1/2$ cup Almond milk, coconut milk, or dairy milk.
Vanilla Extract 1 tsp This provides the “creamsicle” flavor.
Honey or Maple Syrup 1 tbsp Optional, depending on the sweetness of your oranges.
Ice $1/2$ cup Optional, for a frostier finish.

🥣 Instructions

  1. Prepare the Fruit: Peel the oranges and remove as much of the white pith as possible to avoid bitterness. Ensure your banana is pre-frozen for the best results.

  2. Combine: Add the liquid ingredients (milkyogurtvanilla, and sweetener) to the blender first.

  3. Layer: Add the orange segments and frozen banana on top.

  4. Blend: Start on a low setting and gradually increase to high. Blend for 60 seconds until the mixture is perfectly smooth and no orange fibers remain.

  5. Garnish: Slice an extra orange into thin rounds. Cut a small slit in each slice and place them on the rim of the glasses as shown in the image.

💡 Tips for Success

  • The “Cream” Factor: For an even richer taste, replace the milk with a splash of heavy cream or full-fat coconut milk.

  • Boost the Color: If your oranges are pale, add a tiny pinch of turmeric. It won’t change the flavor but will make the orange color pop.

  • High Fiber: If you prefer a lighter texture, you can use $1/2$ cup of fresh orange juice instead of whole oranges, though you’ll lose the beneficial fiber.

No-Sugar, 3-Ingredient Low-Calorie Dessert

No-Sugar, 3-Ingredient Low-Calorie Dessert

Introduction

This dessert is perfect for those who want a guilt-free, naturally sweet treat without any added sugar. It’s made with just three wholesome ingredients and is packed with fiber and natural sweetness. You can enjoy it as a quick snack, post-workout treat, or a light dessert.

Prep Time: 5 minutes

Chill Time: 30 minutes (optional)

Total Time: 35 minutes

Servings: 2

Ingredients

2 ripe bananas (or 1 cup mashed ripe banana)

¼ cup unsweetened cocoa powder

2 tablespoons peanut butter (or almond butter for variation)

(Optional toppings: crushed nuts, unsweetened coconut flakes, or dark chocolate shavings (sugar-free))

Instructions

Mash the Bananas

In a bowl, mash the bananas until smooth. The riper the bananas, the sweeter the dessert.

Add Cocoa Powder and Peanut Butter

Mix in the unsweetened cocoa powder and peanut butter, stirring until well combined and creamy.

 Chill or Serve

You can enjoy it immediately or refrigerate for 30 minutes for a thicker, mousse-like texture.

 Optional Toppings

Garnish with chopped nuts, coconut flakes, or dark chocolate shavings if desired.

Tips for the Best Low-Calorie Dessert

Sweeter Taste:

Use extra ripe bananas for natural sweetness.

Nut-Free Option:

Swap peanut butter for Greek yogurt or sunflower seed butter.

Chilled Mousse:

Let it sit in the fridge for a thicker, mousse-like consistency.

Chocolate Intensity:

Adjust cocoa powder based on how rich you want it.

Make it a Popsicle:

Freeze the mixture in popsicle molds for a frozen treat!

Nutrition Facts (Per Serving, Approximate)

Calories: ~150 kcal

Carbohydrates: ~25g

Protein: ~4g

Fat: ~5g

Fiber: ~4g

Natural Sugars: ~12g

Chef’s Key to Exceptional Egg Salad: Techniques for Achieving Creamy Perfection

Egg salad may seem simple, but any seasoned chef will tell you: the difference between an ordinary bowl and an unforgettable one comes down to technique. This humble dish relies on a balance of texture, seasoning, and method. When done right, egg salad becomes silky, rich, and luxurious—the kind you want to eat straight from the bowl.

Here’s how chefs elevate this classic comfort food into something exceptional.

1. Start With Perfectly Cooked Eggs

The foundation of a creamy egg salad is a tender, velvety egg—never rubbery whites, never chalky yolks.

Chef’s Technique:

  • Place eggs in a pot.
  • Cover with cold water by at least one inch.
  • Bring to a boil slowly over medium heat.
  • Once the water reaches a full boil, turn off the heat, cover, and let the eggs sit for 10–11 minutes.
  • Immediately transfer to an ice bath for 5 minutes.

This prevents that gray ring around the yolk and ensures they peel beautifully.

2. Grate, Don’t Chop

Most home cooks roughly chop their eggs. Chefs often use a different method:

Use the small side of a grater or press eggs through a mesh cooling rack.

This technique creates:

  • An ultra-fine texture
  • Even distribution of yolk richness
  • That signature restaurant-level creaminess

This is the trick that transforms good egg salad into silky egg salad.

3. Build a Balanced, Creamy Base

The classic mistake is adding too much mayonnaise in an attempt to make the salad creamy. True creaminess comes from combining:

  • Mayonnaise for richness
  • Mustard for acidity
  • A touch of sour cream or Greek yogurt for extra silkiness
  • A tiny splash of pickle brine or lemon juice for brightness

This creates a layered flavor profile and prevents the salad from tasting flat.

4. Season Like a Chef

Eggs crave seasoning. Without it, even the best technique falls flat.

Chefs add:

  • A generous pinch of Kosher salt
  • Fresh black pepper
  • Smoked paprika or regular paprika for depth
  • Fresh dill or chives for fresh, aromatic notes

Optional but chef-approved:

  • A small spoon of finely minced shallot
  • Celery for crisp texture
  • A little Dijon for tang

5. Let It Rest

Texture and flavor improve dramatically after 20–30 minutes in the refrigerator.

Resting time allows:

  • Flavors to meld
  • Excess moisture to absorb
  • The salad thickens naturally

This is why restaurant egg salad always tastes “more put together.”

Restaurant-Quality Creamy Egg Salad Recipe

Ingredients (Serves 4)

For the eggs:

  • 8 large eggs

Creamy base:

  • 1/3 cup mayonnaise
  • 1 tbsp Dijon mustard
  • 1 tbsp sour cream or Greek yogurt
  • 1–2 tsp pickle brine or lemon juice

Mix-ins & seasoning:

  • 1/4 cup finely diced celery
  • 1 tbsp minced shallot (optional)
  • 1 tbsp chopped fresh dill or chives
  • 1/2 tsp salt
  • 1/4 tsp black pepper
  • Pinch of smoked or regular paprika

Instructions

1. Cook the Eggs

  1. Place eggs in a pot and cover with cold water.
  2. Heat over medium until the water comes to a full boil.
  3. Turn off heat, cover, and let sit for 10–11 minutes.
  4. Transfer eggs to an ice bath for 5 minutes.
  5. Peel once cool.

2. Prepare the Eggs

  • Grate the eggs using the small side of a box grater, OR press them through a metal rack for fluffy, even pieces.

3. Make the Creamy Dressing

In a large bowl, whisk together:

  • Mayonnaise
  • Dijon
  • Sour cream/Greek yogurt
  • Pickle brine or lemon juice
  • Salt, pepper, and paprika

4. Combine

  • Fold in the grated eggs, celery, and shallot.
  • Finish with fresh herbs.
  • Mix gently to keep the mixture airy.

5. Chill and Serve

  • Refrigerate for 20–30 minutes to enhance creaminess.
  • Serve on toasted bread, crackers, croissants, or in lettuce cups.

Final Thoughts

The secret to extraordinary egg salad isn’t a long list of ingredients—it’s professional technique. Perfectly cooked eggs, grated texture, balanced acidity, and a short resting time transform a simple, everyday recipe into something luxurious and memorable.

Master these steps, and you’ll never go back to ordinary egg salad again.