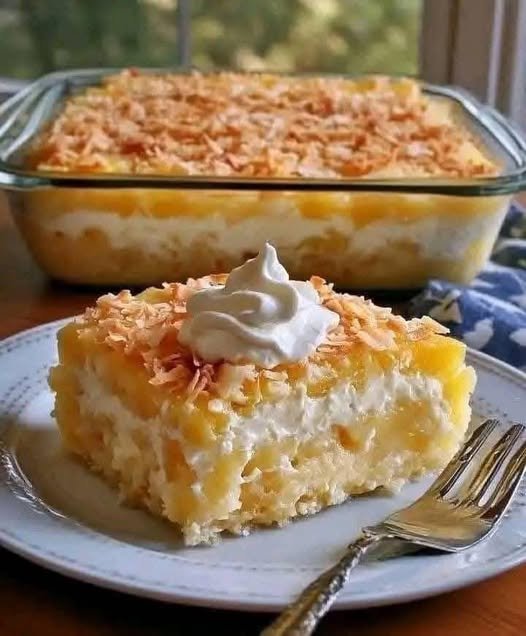
Pineapple Coconut Dream Cake
A Pineapple Coconut Dream Cake is a delightful dessert that blends tropical flavors into a moist, decadent treat.
Its vibrant combination of pineapple and coconut is a feast for both the eyes and the palate, making it perfect for special occasions, celebrations, or a weekend indulgence.
This cake transports you to a sun-soaked island with every bite, encapsulating the sweetness and richness of tropical paradise.
Baking this cake is more than just following a recipe; it’s an experience of crafting a dessert that brings joy to any gathering.
From its luscious layers to its creamy frosting, every element of the Pineapple Coconut Dream Cake tells a story of comfort and creativity.
The harmonious balance of sweet pineapple and nutty coconut creates a masterpiece that is both refreshing and indulgent.
This cake isn’t just about flavor; it’s also about creating memories. Whether you’re baking it for loved ones or savoring it as a solo treat
the Pineapple Coconut Dream Cake is bound to leave an impression. Its vibrant flavors, fluffy texture, and stunning presentation make it a dessert worth cherishing.
Ingredients
/2 ½ cups all-purpose flour
/1 ½ teaspoons baking powder
/½ teaspoon baking soda
/½ teaspoon salt
/1 cup unsalted butter, softened
/1 ¾ cups granulated sugar
/4 large eggs
/1 teaspoon vanilla extract
/1 cup canned crushed pineapple, drained
/½ cup coconut milk
/1 cup shredded sweetened coconut
For the frosting:
/1 cup unsalted butter, softened
/4 cups powdered sugar
/2 tablespoons coconut milk
/½ teaspoon vanilla extract
/½ cup crushed pineapple
½ cup shredded coconut (for garnish)
Instructions
Start by preheating your oven to 350°F (175°C). Grease and flour two 9-inch round cake pans or line them with parchment paper to ensure easy removal of the cake layers later.
In a medium-sized bowl, whisk together the flour, baking powder, baking soda, and salt. This ensures an even distribution of the leavening agents, leading to a well-risen cake.
Using a stand or hand mixer, cream the butter and sugar in a large mixing bowl until light and fluffy. This step incorporates air into the batter, which is crucial for achieving a soft cake texture.
Add the eggs one at a time, beating well after each addition. This helps the batter maintain its structure.
while ensuring the eggs are fully incorporated. Stir in the vanilla extract to enhance the overall flavor profile.
Gradually add the dry ingredients to the wet mixture, alternating with the coconut milk. Begin and end with.
the dry ingredients to maintain the batter’s consistency. Be careful not to overmix, as this can result in a dense cake.
Fold in the crushed pineapple and shredded coconut gently. This step adds the tropical flavors while maintaining the batter’s airy texture.
Divide the batter evenly between the prepared cake pans. Smooth the tops with a spatula for even baking.
Place the pans in the preheated oven and bake for 25-30 minutes or until a toothpick inserted into the center comes out clean.
Allow the cakes to cool in their pans for 10 minutes before transferring them to a wire rack to cool completely. Proper cooling prevents the frosting from melting when assembled.
Prepare the frosting by beating butter until creamy. Gradually add powdered sugar, alternating.
with coconut milk, until you achieve a smooth consistency. Mix in vanilla extract and crushed pineapple for extra flavor.
How to Make
Begin by assembling the cake layers. Place one cake layer on a serving plate or cake stand, and spread a generous amount of frosting over the top. Use an offset spatula to create an even layer of frosting.
Add the second cake layer on top of the first, ensuring it is level. Apply a crumb coat of frosting over the entire cake.
This thin layer seals in crumbs and provides a smooth base for the final coat of frosting.
Spread the remaining frosting over the cake, starting from the top and working your way down the sides.
Use a bench scraper or spatula to smooth out the frosting, creating a clean, polished look.
Sprinkle shredded coconut evenly over the top and sides of the cake for garnish. Press gently to help the coconut adhere to the frosting. This adds texture and enhances the tropical presentation.
Chill the cake in the refrigerator for about 30 minutes to set the frosting. This step makes slicing the cake easier and ensures the layers remain intact.
When ready to serve, slice the cake with a sharp knife, wiping the blade clean between cuts for neat slices. Serve the cake on dessert plates, and enjoy with a glass of cold milk or coffee.
Store any leftover cake in an airtight container in the refrigerator. It can be enjoyed for up to three days, maintaining its moistness and flavor.
For an extra touch, garnish individual slices with fresh pineapple wedges or a drizzle of caramel sauce. This elevates the dessert’s presentation and flavor.
Tips
Ensure all your ingredients are at room temperature before starting. This helps them blend seamlessly, resulting in a smoother batter and evenly baked cake.
Drain the crushed pineapple thoroughly before adding it to the batter. Excess moisture can affect the cake’s texture and prevent it from baking properly.
Use high-quality coconut milk for the best flavor. If possible, opt for full-fat coconut milk for a richer cake.
Toast the shredded coconut lightly before garnishing the cake. Toasting enhances the coconut’s natural nutty flavor and adds a slight crunch.
Don’t skip the crumb coat when frosting the cake. It may seem like an extra step, but it makes the final frosting layer much smoother and more professional-looking.
Refrigerate the cake layers for 15-20 minutes before assembling. Slightly chilled layers are easier to handle and less likely to crumble during assembly.
Experiment with flavors by adding a hint of rum extract or almond extract to the batter. These additions pair beautifully with pineapple and coconut.
If you’re short on time, consider baking the cake layers a day in advance. Wrap them tightly in plastic wrap and store them at room temperature until ready to frost.
Invest in a rotating cake stand for frosting. It makes the process more manageable and allows for a more even application of frosting.
Always use a serrated knife for slicing the cake. Its saw-like motion helps create cleaner cuts without crushing the delicate layers.
Conclusion
The Pineapple Coconut Dream Cake is more than just a dessert; it’s an embodiment of tropical bliss and culinary creativity.
Each bite carries the essence of summer, combining the sweetness of pineapple with the richness of coconut in a symphony of flavors.
This cake’s versatility makes it suitable for any occasion, from casual family dinners to grand celebrations.
Its visually stunning presentation and irresistible taste ensure it becomes the centerpiece of any dessert table.
Baking this cake is a rewarding process that allows you to experiment with textures and flavors.
The moist, flavorful layers paired with creamy frosting create a harmonious balance that is hard to resist.
Sharing a slice of this cake with loved ones brings moments of joy and connection. It’s a dessert that sparks conversation and leaves lasting memories.
Even as leftovers, the Pineapple Coconut Dream Cake remains a treat. Its flavors intensify after a day in the fridge, making it even more enjoyable


 Description
 No white flour
 Ingredients
 Instructions
 Servings
 Nutritional Information (Per Cookie – Approx.)
 Health Benefits
 Notes & Tips
 Q & A
Q & A