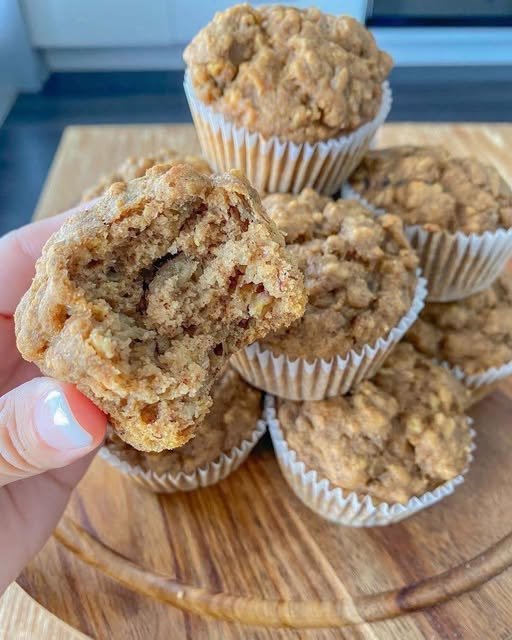
The Easiest No-Knead Soft Flatbread

The Easiest No-Knead Soft Flatbread

This recipe creates a flexible, fluffy bread that works perfectly for wraps, dipping into soups, or making quick personal pizzas.

πŸ›’ Ingredients

  • 2 cups Warm water (not boiling!) πŸ’§

  • 1 tbsp Sugar 🀍

  • 1 tbsp Dry yeast

  • 4 cups All-purpose flour 🌾

  • 1 tsp Salt πŸ§‚

  • 2 tbsp Vegetable oil (optional, for the dough surface) πŸ«’


πŸ‘©β€πŸ³ Step-by-Step Instructions

  1. Activate Yeast: In a large bowl, mix the warm water, sugar, and yeast. Let it sit for about 5–10 minutes until it becomes frothy. 🫧 ➑️

  2. Mix the Dough: Add the flour and salt to the bowl. Stir with a sturdy spoon until a sticky dough forms. There is no need to knead; just ensure all the flour is hydrated. ➑️

  3. First Rise: Cover the bowl with a damp cloth or plastic wrap. Let it rest in a warm spot for about 1 hour or until it has doubled in size. πŸ“ˆ ➑️

  4. Shape: Turn the dough onto a floured surface. Gently divide it into 10–12 equal pieces. Roll each piece into a smooth ball and then flatten into a disc using your fingers or a rolling pin. ➑️

  5. Second Rest: Place the discs on a baking tray lined with parchment paper. Cover and let them rest for another 15–20 minutes. ➑️

  6. Bake: Preheat your oven to 220Β°C (425Β°F). Bake for 10–15 minutes until they puff up and the tops are beautifully golden brown. πŸ₯§ ➑️

    • Alternative: You can also cook these on a hot, dry skillet over medium heat for 2 minutes per side!

  7. Keep Soft: As soon as they come out of the oven, stack them and wrap them in a clean kitchen towel. The steam will keep them soft and pliable. ➑️


❓ Common Questions (Q&A)

Q: Can I use whole wheat flour? A: Yes! You can replace up to half of the all-purpose flour with whole wheat. You may need an extra tablespoon of water as whole wheat absorbs more liquid. 🌾

Q: Why didn’t my bread puff up? A: Usually, this is because the oven wasn’t hot enough or the yeast was old. Make sure your oven is fully preheated before putting the tray in! πŸ”₯

Q: How do I store these? A: Once completely cool, store them in a zip-top bag at room temperature for 2 days or freeze them for up to 3 months. Reheat in a toaster or skillet for that “just baked” taste! 🧊

Q: Can I add toppings? A: Absolutely! Before baking, you can brush the tops with a little water and sprinkle on sesame seeds, dried herbs, or even a little sea salt. ✨


Happy baking! πŸ₯–πŸ§€

Roasted Beet, Avocado & Mandarin Salad 🍊πŸ₯‘

Roasted Beet, Avocado & Mandarin Salad 🍊πŸ₯‘

  • Prep time: 15 minutes ⏱️

  • Cook time: 45 minutes (for roasting beets) ⏲️

  • Servings: 2–4 πŸ‘₯

  • Difficulty: Easy ✨


Ingredients List πŸ›’

  • Fresh Beets: 3–4 medium β€” Scrubbed and trimmed. 🍎

  • Avocado: 1 large β€” Ripe but firm, sliced into wedges. πŸ₯‘

  • Mandarin Oranges: 2–3 β€” Peeled and segmented. 🍊

  • Fresh Cilantro or Parsley: 1/4 cup β€” Finely chopped. 🌿

  • Olive Oil: 2 tablespoons β€” Extra virgin for the dressing. πŸ«’

  • Lemon or Lime Juice: 1 tablespoon β€” Freshly squeezed. πŸ‹β€πŸŸ©

  • Honey or Agave: 1 teaspoon β€” To balance the citrus. 🍯

  • Salt & Black Pepper: To taste. πŸ§‚

  • Red Pepper Flakes: A tiny pinch β€” For a subtle hint of heat. 🌢️


Step-by-Step Instructions πŸ‘©β€πŸ³

  1. Roast the Beets ⏲️

    • Preheat your oven to 400Β°F (200Β°C). ➑️ Wrap each beet individually in foil and place them on a baking sheet. ➑️ Roast for 45–60 minutes until a knife slides easily into the center. ➑️ Let them cool, then peel off the skins (they should slip right off!) and cut into wedges or half-moons.

  2. Prepare the Fruit and Veg πŸ”ͺ

    • Avocado: Slice the avocado in half, remove the pit, and cut into elegant wedges. ➑️ Squeeze a little lemon juice over them immediately to prevent browning.

    • Mandarins: Carefully peel the mandarins and remove as much of the white pith as possible. ➑️ Keep the segments whole.

  3. Whisk the Vinaigrette πŸ₯£

    • In a small jar or bowl, combine the olive oil, lemon juice, honey, salt, black pepper, and a pinch of red pepper flakes. ➑️ Shake or whisk until the dressing is emulsified.

  4. Assemble with Care πŸͺœ

    • Place the roasted beet wedges in a large bowl first. ➑️ Add the avocado wedges and mandarin segments. ➑️ Be gentle so the beets don’t “stain” the avocado too much before serving.

  5. Drizzle and Garnish ✨

    • Pour the vinaigrette over the salad. ➑️ Toss very lightly with your hands or large spoons. ➑️ Scatter the freshly chopped cilantro or parsley over the top.

  6. Final Presentation 🍽️

    • Transfer to a clean white plate or serving bowl to make the vibrant colors pop. ➑️ Serve immediately while the beets are at room temperature or slightly chilled.


Q/A Section ❓

Q: Can I use canned or pre-cooked beets to save time? A: ➑️ Absolutely! If you’re in a hurry, vacuum-packed steamed beets found in the produce section work beautifully. Just slice them up and you’re ready to go.

Q: What is the best way to peel mandarins cleanly? A: ➑️ For the best look, try to remove the “strings” (pith) carefully. If you want a gourmet touch, you can “supreme” the citrus by cutting the segments out of the membranes with a sharp knife.

Q: How do I stop the beets from turning everything red? A: ➑️ The trick is to toss the beets in a little oil first to “seal” them, and then add the avocado and mandarins at the very last second right before serving.

Q: Can I add some crunch to this? A: ➑️ Yes! This salad tastes amazing with a sprinkle of toasted walnuts, pumpkin seeds (pepitas), or even some crumbled feta cheese if you like. πŸ₯œπŸ§€


Pro-Tips πŸ’‘

  • Glove Up: ➑️ When peeling and slicing roasted beets, wearing kitchen gloves will keep your hands from turning bright pink! 🧀

  • Ripeness Check: ➑️ For the avocado, look for one that gives slightly to gentle pressure. If it’s too soft, it will turn into a mash when you toss the salad.

  • Citrus Variety: ➑️ If mandarins aren’t in season, blood oranges or cara cara oranges provide a stunning color contrast. 🍊🍎

Creamy Garlic Chicken with Bacon

Creamy Garlic Chicken with Bacon

  • Prep time: 10 minutes

  • Cook time: 20 minutes

  • Servings: 4


Ingredients

The Chicken:

  • 1.5 lbs chicken breast (sliced into cutlets or strips)

  • 1 tsp garlic powder

  • Salt and black pepper to taste

  • 1 tbsp olive oil

The Sauce & Toppings:

  • 4–6 strips of bacon (chopped)

  • 1 small onion (finely diced)

  • 3 cloves garlic (minced)

  • 1 cup heavy cream

  • 1/4 cup chicken broth (or water)

  • 1/2 cup grated Parmesan cheese

  • 1/2 tsp dried oregano or Italian seasoning

  • Fresh parsley (chopped, for garnish)


Instructions

  1. Crisp the Bacon: In a large skillet over medium heat, fry the chopped bacon until crispy. Use a slotted spoon to remove the bacon and set it aside on a paper towel. Leave about 1 tablespoon of the bacon fat in the pan.

  2. Sear the Chicken: Season the chicken pieces with salt, pepper, and garlic powder. Add the olive oil to the skillet with the bacon fat. Increase heat to medium-high and sear the chicken for about 3–5 minutes per side until golden brown and cooked through. Remove chicken from the pan and set aside.

  3. SautΓ© Aromatics: Lower the heat to medium. Add the diced onion to the same skillet and cook until translucent (about 3 minutes). Add the minced garlic and cook for another 30 seconds until fragrant.

  4. Simmer the Sauce: Pour in the chicken broth and heavy cream. Stir in the Parmesan cheese and dried herbs. Let the sauce simmer gently for 3–5 minutes until it starts to thicken slightly.

  5. Combine: Place the cooked chicken back into the skillet, coating it thoroughly with the sauce. Sprinkle the crispy bacon and fresh parsley over the top.

  6. Serve: Enjoy immediately while the sauce is hot and creamy.


Tips for Success

  • For a lighter version: You can substitute the heavy cream with half-and-half or evaporated milk, though the sauce will be slightly thinner.

  • Extra Flavor: Add a handful of fresh spinach or sun-dried tomatoes to the sauce during step 4 for a “Tuscan” twist.

Oat and Seed Chocolate Medallions

Oat and Seed Chocolate Medallions

  • Prep time: 15 minutes

  • Bake time: 12–15 minutes

  • Yields: 10–12 cookies

Ingredients

The Base:

  • 1 Β½ cups rolled oats

  • Β½ cup almond butter (or any seed butter)

  • ΒΌ cup unsweetened applesauce

  • 1 tsp vanilla extract

  • Β½ tsp cinnamon

  • A pinch of salt

The Mix-ins:

  • ΒΌ cup pumpkin seeds (pepitas)

  • ΒΌ cup dried cranberries or raisins

  • ΒΌ cup slivered almonds

The Topping:

  • 1 cup sugar-free dark chocolate chips

  • 1 tsp coconut oil (for a smooth finish)

  • Extra seeds and nuts for garnish


Step-by-Step Instructions

  1. Preparation: Preheat your oven to 350Β°F (175Β°C). Line a large baking sheet with parchment paper or a silicone baking mat.

  2. Mix the Dough: In a large bowl, combine the almond butter, applesauce, vanilla, cinnamon, and salt. Stir until smooth. Fold in the rolled oats until they are fully hydrated by the wet ingredients.

  3. Fold in Textures: Gently stir in the pumpkin seeds, dried fruit, and slivered almonds. The mixture should be sticky and hold together when pressed.

  4. Shape the Cookies: Scoop about 2 tablespoons of dough for each cookie. Place them on the baking sheet and press them down into flat discs, about ΒΌ inch thick. These cookies do not spread during baking, so shape them exactly how you want them to look.

  5. Bake: Bake for 12–15 minutes or until the edges are slightly firm and golden. Let them cool completely on the baking sheet; they will firm up significantly as they cool.

  6. The Chocolate Layer: Melt the chocolate chips and coconut oil in the microwave in 30-second intervals, stirring until glossy. Spoon a generous amount of chocolate over the top of each cooled cookie, spreading it to the edges.

  7. Decorate and Set: While the chocolate is still wet, press a few extra nuts and seeds into the top for that “jeweled” look. Place the cookies in the refrigerator for 20 minutes to allow the chocolate to snap-harden.


Questions & Answers

Q: Can I make these without a nut butter? A: Yes! You can substitute the almond butter with sunflower seed butter or tahini for a nut-free version that still provides that rich, creamy bind.

Q: My cookies are a bit crumbly. How can I fix that? A: This usually means the oats were a bit dry. You can add an extra tablespoon of applesauce or a splash of water to the dough next time. Also, ensure you let them cool completely before moving them, as they “set” during the cooling process.

Q: How do I get the chocolate to look professional and shiny? A: Adding a tiny bit of coconut oil helps with the shine. For the best look, avoid overheating the chocolate; melt it slowly and stir often.

Q: How should I store these? A: Since these have a chocolate coating, they are best kept in an airtight container in the refrigerator. This keeps the base chewy and prevents the topping from softening.

Golden Vegetable & Cheese Fritters

Golden Vegetable & Cheese Fritters

Ingredients

  • The Liquid Base: 1 egg, 200 ml warm milk, 200 ml warm water.

  • The Yeast Mix: 10 g dry yeast, 20 g granulated sugar, 8 g salt.

  • The Flour: 540 g all-purpose flour (sifted).

  • The Garden Mix: 1 potato (finely diced), 1 red pepper (finely diced), 2 green peppers (finely diced), 1 onion (finely chopped), and a handful of fresh parsley (finely chopped).

  • The Cheese: 80 g Tulum cheese (or any crumbly, salty cheese like Feta).

  • For Frying: 400 ml vegetable oil.

Step-by-Step Instructions

  1. Activate the Yeast: In a large mixing bowl, combine the warm milk, warm water, sugar, and dry yeast. Whisk together and let it sit for about 5 minutes until it starts to foam.

  2. Form the Batter: Add the egg and salt to the yeast mixture. Gradually whisk in the flour until a thick, sticky dough forms.

  3. The Rise: Cover the bowl with plastic wrap or a clean towel and let it rest in a warm place for 45–60 minutes until it has doubled in size and looks bubbly and stretchy (as seen in the glass bowl in your photo).

  4. Add the Flavor: Once risen, deflate the dough slightly and stir in the diced potato, peppers, onion, parsley, and crumbled cheese. Mix well so the vegetables are evenly distributed.

  5. Heat the Oil: In a deep skillet or pot, heat the 400 ml of oil over medium heat.

  6. Fry until Golden: Use a spoon (or two) to drop small mounds of the dough into the hot oil. Fry in batches for 3–4 minutes per side. They will puff up beautifully.

  7. Drain: Once they reach a deep golden brown, remove them with a slotted spoon and place them on a paper towel to absorb any excess oil.


Recipe Q&A: Vegetable Fritters

Q: Do I need to cook the potato before adding it to the dough? A: No, but you must dice the potato very finely. Because the fritters are small and fried in hot oil, the tiny potato bits will steam and cook perfectly inside the dough while the outside crisps up.

Q: Can I use a different cheese if I can’t find Tulum? A: Yes! Feta cheese is a great substitute because it has a similar saltiness and crumbly texture. Sharp white cheddar or even crumbled goat cheese would also work well.

Q: Why is my dough too sticky to handle? A: This dough is meant to be very soft and stickyβ€”it shouldn’t be kneaded like bread. Using two oiled spoons to drop the batter into the pan is the easiest way to handle it without a mess.

Q: How do I know if my oil is the right temperature? A: Drop a tiny bit of batter into the oil; if it sizzles and rises to the surface immediately, the oil is ready. If it browns too quickly, turn the heat down slightly so the inside has time to cook through.

Creamy Fried Milk Cubes

Creamy Fried Milk Cubes

Ingredients

  • The Custard: 2 cups whole milk, 1/2 cup cornstarch, 1/2 cup sugar, 1 cinnamon stick, and a small piece of lemon peel.

  • The Coating: 2 large eggs (beaten), 1/2 cup all-purpose flour, 1/2 cup sugar mixed with 1 tablespoon ground cinnamon.

  • Oil for frying (neutral oil like sunflower or vegetable oil).

Step-by-Step Instructions

  1. Infuse the Milk: In a saucepan, combine 1.5 cups of the milk with the sugar, cinnamon stick, and lemon peel. Heat over medium until it starts to simmer, then remove from heat and let it sit for 10 minutes to infuse.

  2. Dissolve Cornstarch: In a small bowl, whisk the remaining 1/2 cup of cold milk with the cornstarch until completely smooth with no lumps.

  3. Thicken the Custard: Remove the cinnamon stick and lemon peel from the warm milk. Return the pan to low heat and slowly pour in the cornstarch mixture. Stir constantly with a whisk until the mixture becomes very thick and glossy (about 5 minutes).

  4. Set the Dough: Grease a square glass dish and pour the hot custard into it, smoothing the top. Cover with plastic wrap (touching the surface to prevent a skin from forming) and refrigerate for at least 3–4 hours (or overnight) until firm.

  5. Cut and Coat: Once set, turn the custard out onto a board and cut into equal squares or rectangles. Dredge each piece first in flour, then dip in the beaten eggs.

  6. Fry: Heat oil in a pan over medium-high heat. Fry the squares for about 2 minutes per side until they are golden brown and crispy.

  7. Sweet Finish: Immediately toss the hot fried milk in the cinnamon-sugar mixture until evenly coated. Serve warm or at room temperature.


Recipe Q&A: Fried Milk

Q: Why is my custard too soft to cut? A: This usually happens if the custard wasn’t cooked long enough on the stove or if it didn’t chill long enough in the fridge. It needs to reach a very thick, paste-like consistency before you take it off the heat.

Q: Can I make this without eggs? A: For an egg-free version, you can dip the custard squares in a thin slurry of flour and water before coating them in breadcrumbs or just flour, though the traditional texture comes from the egg wash.

Q: How do I get a smoother custard? A: Always dissolve the cornstarch in cold milk first. If you add it directly to hot milk, it will clump instantly. If you still see lumps, you can pass the mixture through a fine-mesh sieve before chilling.

Q: Can I air fry these? A: While frying gives the best traditional results, you can air fry them at 200Β°C for about 8–10 minutes. Spray them generously with oil first so the flour and cinnamon sugar can crisp up properly.

Silky Thin Honey Crepes

Silky Thin Honey Crepes

These are light, paper-thin pancakes that are perfect when drizzled with natural honey.

Ingredients

  • 2 Large Eggs.

  • 1.5 cups Milk: Any milk of your choice.

  • 1 cup Flour: Sifted to avoid lumps.

  • 2 tbsp Butter: Melted and cooled slightly.

  • 1 tbsp Honey or Maple Syrup: Plus extra for drizzling.

  • 1/4 tsp Salt.

Step-by-Step Instructions

  1. Blend the Batter: In a blender or mixing bowl, combine eggs, milk, melted butter, honey, and salt. Gradually add the flour while whisking until the batter is completely smooth and thin (like the consistency of heavy cream).

  2. Rest the Batter: Let the batter sit for 10 minutes. This allows the bubbles to settle so the crepes don’t tear.

  3. Heat the Pan: Lightly grease a non-stick skillet over medium heat.

  4. Pour & Swirl: Lift the pan and pour about 1/4 cup of batter into the center. Quickly tilt and swirl the pan so the batter covers the entire bottom in a very thin layer.

  5. Cook: Cook for about 60 seconds until the edges start to turn golden and lift away from the pan.

  6. Flip: Carefully flip the crepe and cook the other side for 30 seconds.

  7. Serve: Fold the crepes into triangles and drizzle generously with honey while warm.

    For the Crepes:

    Q: Why are my crepes breaking when I flip them? A: This usually happens if the pan isn’t hot enough or if the crepe is flipped too early. Wait until the edges are clearly dry and slightly browned before flipping.

    Q: Can I make these flourless? A: You can substitute the flour with Oat Flour or a fine Almond Flour for a gluten-free version. The texture will be slightly more delicate, so handle them with care.

    Q: How do I keep the crepes from sticking together? A: If you are making a large batch, stack them with a small piece of parchment paper between each one.

Old-Fashioned Southern Milk Muffins

Old-Fashioned Southern Milk Muffins

Ingredients

  • All-Purpose Flour: 2 cups

  • Sugar: 1 cup (or a sugar-substitute for a lighter version)

  • Whole Milk: 1 cup, room temperature

  • Butter: Β½ cup (1 stick), melted and cooled

  • Eggs: 2 large, room temperature

  • Baking Powder: 2 teaspoons

  • Vanilla Extract: 1 tablespoon

  • Salt: Β½ teaspoon

  • Optional: A pinch of nutmeg or cinnamon for extra warmth

Detailed Step-by-Step Instructions

  1. Preheat and Prep: Preheat your oven to 190Β°C (375Β°F). Line a 12-cup muffin tin with paper liners or grease it thoroughly with butter.

  2. Whisk Dry Ingredients: In a medium bowl, sift together the flour, baking powder, and salt. Sifting helps keep the muffins airy and prevents lumps.

  3. Cream Eggs and Sugar: In a large mixing bowl, beat the eggs and sugar together until the mixture is pale and slightly frothy (about 2 minutes).

  4. Add Wet Ingredients: Stir in the melted butter, room-temperature milk, and vanilla extract. Whisk until well combined.

  5. Combine: Gradually add the dry flour mixture into the wet ingredients. Fold gently with a spatula just until the flour disappears. Do not overmix, or the muffins will become tough.

  6. Fill the Tin: Scoop the batter into the prepared muffin tin, filling each cup about ΒΎ of the way full.

  7. Bake: Bake for 18–22 minutes. They are done when the tops are golden brown and a toothpick inserted into the center comes out clean.

  8. Cool: Let the muffins rest in the tin for 5 minutes before moving them to a wire rack.


Tips for the Perfect Muffin

  • The “Tops” Trick: For high, domed tops, let the batter rest for 10 minutes before putting it in the oven.

  • Flavor Variation: You can add a handful of blueberries or chocolate chips to the batter for a different twist.

  • Serving: These are best served warm with a small pat of butter.

Crispy Shredded Potato & Egg Breakfast Muffins

Crispy Shredded Potato & Egg Breakfast Muffins

Ingredients

  • Potatoes: 2 medium, peeled and grated

  • Eggs: 2 large

  • Bacon: 6 strips, cooked and crumbled

  • Cheddar Cheese: 1 cup, shredded

  • Parmesan Cheese: ΒΌ cup, grated

  • Milk: Β½ cup

  • Butter: 2 tablespoons, melted

  • Dry Ingredients: ΒΌ cup all-purpose flour + 1 teaspoon baking powder

  • Seasoning: Β½ teaspoon salt, Β½ teaspoon black pepper

  • Optional: 2 tablespoons chopped green onions or chives


Detailed Step-by-Step Instructions

  1. Prepare the Oven and Tin: Preheat your oven to 200Β°C (400Β°F). Generously grease a 12-cup muffin tin with butter or non-stick spray to ensure the potatoes don’t stick.

  2. Squeeze the Potatoes: After grating the potatoes, place them in a clean kitchen towel or fine mesh strainer and squeeze out as much liquid as possible. This is the secret to getting them crispy rather than soggy.

  3. Mix the Base: In a large bowl, whisk together the 2 eggs, milk, melted butter, salt, and pepper.

  4. Combine Ingredients: Stir the grated potatoes, crumbled bacon, shredded cheddar, and Parmesan into the egg mixture. Gradually fold in the flour and baking powder until everything is evenly coated.

  5. Fill the Muffin Tin: Divide the mixture evenly among the 12 muffin cups. Press down slightly so they are packed firmly.

  6. Bake: Place in the oven and bake for 25–30 minutes, or until the tops are golden brown and the edges look crispy.

  7. Garnish and Serve: Let them cool in the pan for 5 minutes before removing. Sprinkle with fresh chives or green onions if desired.


Pro Tips

  • High Protein Version: You can swap the all-purpose flour for almond flour or oat flour for a different texture.

  • Vegetarian Option: Replace the bacon with sautΓ©ed mushrooms or diced bell peppers for a fresh twist.

  • Make Ahead: These freeze beautifully! Just wrap them individually and pop them in the microwave for 45 seconds on busy mornings.

Crispy Air-Fried Cauliflower “Tots”

Crispy Air-Fried Cauliflower “Tots”

Prep time: 10 minutes

Cook time: 15–18 minutes

Servings: 4


Ingredients

  • 1 large head Cauliflower (cut into bite-sized florets)

  • 2 tablespoons Olive Oil (or avocado oil)

  • Β½ cup Grated Parmesan Cheese (The secret to the crispy “breaded” texture)

  • 1 teaspoon Garlic Powder

  • 1 teaspoon Smoked Paprika (for that golden color and smoky flavor)

  • Β½ teaspoon Salt & ΒΌ teaspoon Black Pepper

  • Fresh Parsley (chopped, for garnish)


Detailed Step-by-Step Instructions

  1. Prep the Cauliflower: Wash the cauliflower florets and pat them completely dry with a kitchen towel. If they are damp, they will steam rather than crisp up.

  2. Coat with Oil: In a large bowl, toss the florets with the olive oil until every piece is lightly coated.

  3. The Seasoning Blend: In a small bowl, mix the grated Parmesan, garlic powder, smoked paprika, salt, and pepper.

  4. Toss and Crust: Sprinkle the seasoning mixture over the oiled cauliflower. Toss well, using your hands to ensure the Parmesan and spices “stick” into all the nooks and crannies of the florets.

  5. Air Fry: Arrange the cauliflower in a single layer in the air fryer basket. Do not overcrowd, as air needs to circulate to get them crispy. You may need to cook in two batches.

  6. The Cooking Process: Air fry at 200Β°C (400Β°F) for 15–18 minutes.

  7. Shake it Up: Halfway through (around the 8-minute mark), give the basket a good shake to ensure even browning.

  8. Serve: Once they are deeply golden and the edges look slightly charred (like the photo), remove them from the air fryer. Garnish with fresh parsley.


Dipping Sauce Suggestion

These pair perfectly with a simple “Spicy Mayo” (Greek yogurt mixed with a little Sriracha and lime juice) or a sugar-free ranch dressing.

Flourless Multi-Layered Flatbread

Flourless Multi-Layered Flatbread

Ingredients

  • 1 cup Egg whites (approximately 6–8 eggs)

  • 1/2 cup Unflavored protein powder (Whey or Egg White protein works best for structure)

  • 1/4 cup Greek yogurt (plain and thick)

  • 1/2 tsp Garlic powder

  • 1/4 tsp Salt

  • 1 tbsp Olive oil or Ghee (for the pan)


Step-by-Step Instructions

  1. Mix the Batter: In a blender or using a whisk, combine the egg whites, unflavored protein powder, Greek yogurt, garlic powder, and salt. Blend until completely smooth. The consistency should be similar to a thick crepe batter.

  2. Rest the Batter: Let the mixture sit for 5 minutes. This allows the protein powder to fully hydrate, which is the secret to getting a flexible bread that won’t break when folded.

  3. Heat the Skillet: Place a non-stick skillet over medium heat and lightly coat with a brush of olive oil or ghee.

  4. The Layering Technique: Pour a thin layer of batter into the pan and swirl to cover the bottom. Once the edges start to lift (about 1 minute), drizzle a tiny bit of oil on top and flip.

  5. Achieve the “Pita” Texture: Press down gently with a spatula as it cooks on the second side. This encourages the middle to puff slightly, creating those tender layers seen in the image.

  6. Brown and Finish: Cook for another 1 to 2 minutes until golden brown spots appear on both sides.

  7. Stack and Steams: As you finish each flatbread, stack them on a plate and cover them with a clean kitchen towel. This “steaming” process is vitalβ€”it keeps the bread soft and flexible for rolling.

Honey Lemon Turmeric Gummies

Honey Lemon Turmeric Gummies

Ingredients

  • 1 cup Water

  • 2 tbsp Fresh lemon juice

  • 2 tbsp Raw honey (or a natural liquid sweetener)

  • 1/2 tsp Ground turmeric

  • 1/4 tsp Ground ginger

  • 2 Β½ tbsp Unflavored gelatin

  • Optional: A tiny pinch of black pepper (to help the body absorb the turmeric)


Step-by-Step Instructions

1. Bloom the Gelatin

Pour 1/2 cup of the water into a small bowl. Sprinkle the unflavored gelatin evenly over the surface of the water. Let it sit for about 5 minutes to “bloom” (it will become thick and wrinkled).

2. Heat the Mixture

In a small saucepan, combine the remaining 1/2 cup of water, turmeric, and ginger. Heat over medium-low heat until it is warm and the spices are well incorporated. Do not let it boil.

3. Combine

Add the bloomed gelatin into the warm saucepan. Stir constantly for 2–3 minutes until the gelatin is completely dissolved and the liquid is smooth. Remove the pan from the heat.

4. Add Fresh Ingredients

Once the mixture has cooled slightly (but is still liquid), stir in the fresh lemon juice and the honey. Adding the honey at a lower temperature helps preserve its natural properties.

5. Mold and Set

Pour the liquid into silicone candy molds or a small glass container lined with parchment paper. If you see any bubbles on top, you can gently pop them with a toothpick.

6. Chill

Place the molds in the refrigerator for at least 1 to 2 hours, or until the gummies are completely firm to the touch.

7. Slice and Store

If you used a glass container, lift the block out and slice it into small cubes. Pop the gummies out of the silicone molds and store them in an airtight container in the refrigerator for up to one week.


Quick Tip

If you prefer a “sour” gummy, you can add an extra tablespoon of lemon juice or a tiny pinch of citric acid to the mixture before pouring it into the molds.

Carrot & Ginger Vitality Juice

Carrot & Ginger Vitality Juice

Ingredients

  • 3-4 large Carrots (peeled and chopped)

  • 1 large Lemon (juiced)

  • 1-inch piece Fresh ginger (peeled)

  • 1/2 tsp Turmeric powder (optional, for added benefits)

  • 2 cups Water (filtered)

  • 1 pinch Black pepper (helps with nutrient absorption)


Step-by-Step Instructions

1. Prepare the Produce

Wash the carrots thoroughly and peel them. Slice them into smaller chunks so they blend easily. Peel the fresh ginger using the edge of a spoon.

2. Blend

Place the carrots, ginger, lemon juice, turmeric, and black pepper into a high-speed blender. Add the water. Blend on high for about 1–2 minutes until the mixture is as smooth as possible.

3. Strain for Smoothness

If you prefer a clear juice, pour the mixture through a fine-mesh strainer, a nut milk bag, or a piece of cheesecloth into a glass pitcher. Use a spoon to press down on the pulp to extract all the liquid.

Note: Keeping the pulp provides more fiber, which is beneficial for digestion.

4. Chill and Serve

Serve the juice over ice or store it in the refrigerator. It is best enjoyed fresh, but it will keep in a sealed glass jar for up to 24 hours.


How to Enjoy

  • Consistency: Drinking one glass in the morning and one in the afternoon can help keep you hydrated and satisfied between meals.

  • Variation: You can add a half-inch of fresh parsley for an extra herbal boost and more Vitamin K.


Pro Tip

Don’t throw away the carrot pulp! You can mix it into muffin batter or oatmeal for an extra boost of fiber and nutrients.

Diabetic-Friendly Homemade Sponge Cake

Diabetic-Friendly Homemade Sponge Cake

This classic sponge cake recipe uses simple swaps to create a light, airy treat that is mindful of sugar intake. It is a practical, traditional recipe that yields a beautiful golden crust and a soft interior.

Ingredients

  • 1 Β½ cups Almond flour or ultra-fine whole wheat pastry flour

  • Β½ cup Granulated monk fruit or stevia (sugar substitute)

  • 4 Large eggs (at room temperature)

  • 1 tsp Baking powder

  • 1 tsp Vanilla extract

  • ΒΌ cup Unsweetened applesauce or light olive oil

  • 1 pinch Salt


Step-by-Step Instructions

  1. Preheat and Prep: Preheat your oven to 175Β°C. Lightly coat a loaf pan or small cake tin with non-stick cooking spray or line it with parchment paper for easy removal.

  2. Separate and Whip Eggs: For the fluffiest texture, separate the egg whites from the yolks. In a clean bowl, beat the egg whites with a pinch of salt until stiff peaks form.

  3. Mix Yolks and Sweetener: In a separate large bowl, beat the egg yolks with the sugar substitute and vanilla extract until the mixture is pale and slightly thickened. Stir in the applesauce or olive oil.

  4. Combine Dry Ingredients: Sift the flour and baking powder into the yolk mixture. Gently stir until just combined.

  5. Fold Gently: Using a spatula, take one-third of the whipped egg whites and stir them into the batter to lighten it. Then, very gently fold in the remaining egg whites. Tip: Use a light hand to keep the air in the batter, which gives the cake its “sponge” texture.

  6. Bake: Pour the batter into your prepared pan and smooth the top. Bake for 25–30 minutes, or until a toothpick inserted into the center comes out clean and the top is golden brown.

  7. Cool: Let the cake cool in the pan for 10 minutes before transferring it to a wire rack.


Serving Suggestion

This cake is delicious on its own, but you can serve it with a dollop of Greek yogurt and fresh raspberries for a low-point, elegant dessert.

Air Fryer Grilled Cheese Sandwiches

Air Fryer Grilled Cheese Sandwiches

These sandwiches are a household favorite because they achieve a perfectly golden, crispy exterior with a gooey, melted center using the air fryer. With just three simple ingredients, they are quick to prepare and consistently delicious.

Ingredients

  • 8 Slices of bread (Whole grain or sourdough work well for a hearty crunch)

  • 8 Slices of low-fat sharp cheddar (or your favorite melting cheese)

  • Light butter or olive oil spray (for a golden finish)


Step-by-Step Instructions

  1. Prepare the Bread: Lay out your bread slices and lightly coat one side of each slice with butter or a quick spray of olive oil.

  2. Assemble the Sandwiches: Place two slices of cheese between two slices of bread, ensuring the buttered or oiled sides are facing outward.

  3. Set Up the Air Fryer: Line your air fryer basket with a piece of parchment paper to catch any stray drips of cheese and ensure easy cleanup.

  4. Arrange for Airflow: Place the sandwiches in the basket in a single layer, making sure they do not overlap. This allows the hot air to circulate evenly for maximum crispiness.

  5. Cook to Golden Perfection: Air fry at 180Β°C for about 3–4 minutes.

  6. The Flip: Carefully flip each sandwich over and cook for an additional 2–3 minutes. The sandwiches are done when the bread is toasted to a beautiful golden brown and the cheese is fully melted and bubbling.

  7. Serve Immediately: Remove from the basket and let them sit for one minute before slicing. This keeps the cheese from running out too quickly.


Variations

  • Protein Boost: Add a thin slice of lean turkey or ham inside before air frying.

  • Spice it Up: Sprinkle a tiny pinch of garlic powder or dried oregano on the buttered side for an aromatic twist.

Cheesy Egg Flatbreads

Cheesy Egg Flatbreads

Cheesy Egg Flatbreads are soft, savory, and satisfying, combining simple pantry ingredients into a versatile meal that works for breakfast, lunch, or a quick dinner. These flatbreads are made from a light flour batter enriched with eggs and cheese, then cooked in a skillet until golden and slightly crisp on the outside while remaining tender inside. Fresh herbs add brightness and aroma, while different cheeses allow you to customize flavor from mild and creamy to bold and tangy. They are easy to prepare, require no yeast or long rising time, and can be enjoyed on their own or served with yogurt, chutney, or a fresh salad. Whether you prefer thin crepe-like flatbreads or thicker, fluffy rounds, this recipe adapts easily to your taste and cooking style.

Prep Time:Β 10 minutes
Cook Time:Β 15 minutes
Total Time:Β About 25 minutes
Servings:Β 6 small flatbreads

Ingredients

For the Dough/Batter

1 cup all-purpose flour or whole wheat flour

3/4 cup warm water or milk

2 large eggs

1/2 tsp salt

1/2 tsp baking powder or baking soda (optional, for fluffiness)

2 tbsp oil or ghee for cooking

For the Cheesy Egg Additions

3/4 cup grated cheese (cheddar, parmesan, feta, or cottage cheese)

1/4 cup chopped fresh herbs such as parsley, spring onions, or dill

Instructions

In a mixing bowl, whisk together eggs, warm water or milk, and salt until smooth.

Gradually add flour while whisking to form a lump-free batter or soft dough.

Mix in baking powder if using for a lighter texture.

Stir in grated cheese and chopped herbs evenly throughout the mixture.

Let the batter rest for about 5 minutes to hydrate the flour.

Heat a nonstick skillet over medium heat and add a small amount of oil or ghee.

Pour a ladle of batter into the pan and spread gently into a round shape.

Cook for about 2 to 3 minutes until bubbles form and the bottom turns golden.

Flip carefully and cook another 1 to 2 minutes until cooked through.

Repeat with remaining batter, adding oil as needed. Serve warm.

Tips

Adjust batter thickness depending on whether you want thin or thick flatbreads.

Use freshly grated cheese for better melting and flavor.

Letting the batter rest improves texture and consistency.

Cook on medium heat to prevent burning before the inside cooks.

Use a nonstick or well-seasoned pan for easy flipping.

Add herbs just before cooking to maintain fresh flavor.

If batter thickens too much, add a tablespoon of water or milk.

For extra crisp edges, cook with a little extra ghee.

Try mixing different cheeses for deeper flavor.

Serve immediately for the best texture and taste.

Variations

Spicy Chili Flatbread:Β Add chopped green chilies or chili flakes.

Garlic Herb Version:Β Include minced garlic and extra fresh herbs.

Mediterranean Style:Β Add olives, feta, and oregano.

Protein Boost:Β Add shredded chicken or turkey pieces.

Veggie Loaded Flatbread:Β Mix in grated zucchini or carrots.

Low-Carb Option:Β Replace part of the flour with almond flour.

Paneer Flatbread:Β Substitute cheese with crumbled paneer.

Sweet Savory Twist:Β Add a touch of honey and mild cheese.

Breakfast Wrap Style:Β Cook thin and fill with eggs and vegetables.

Crispy Cheese Crust:Β Sprinkle extra cheese on the pan before adding batter.

Q&A

Can I make the batter ahead of time?
Yes, refrigerate for up to 12 hours and stir before cooking.

Can I bake instead of pan-cooking?
Yes, bake small rounds at 375Β°F (190Β°C) for about 10 to 12 minutes.

What flour works best?
All-purpose flour creates softer flatbreads, while whole wheat gives a heartier texture.

Can I make them gluten-free?
Use a gluten-free flour blend designed for flatbreads.

How do I store leftovers?
Refrigerate in an airtight container for up to 2 days.

How do I reheat them?
Warm in a skillet or toaster oven to restore texture.

Can I freeze flatbreads?
Yes, freeze between parchment sheets for up to one month.

Are they kid-friendly?
Yes, mild cheese versions are usually very popular with kids.

What can I serve with them?
Yogurt dips, salads, chutneys, or soups pair well.

Can I use non-dairy cheese?
Yes, plant-based cheeses can work with slight texture changes.

Nutrition

(Approximate per Flatbread)

Calories: 170 to 200

Protein: 7 g

Fat: 8 g

Carbohydrates: 18 g

Fiber: 1 to 2 g

Sodium: Moderate depending on cheese

Calcium: Good source due to cheese and eggs

Conclusion

Cheesy Egg Flatbreads are a quick, flexible recipe that transforms everyday ingredients into a warm, comforting meal. The combination of eggs, cheese, and herbs creates a savory flavor that pairs well with countless sides and toppings. Easy preparation and customizable ingredients make these flatbreads suitable for busy weeknights, relaxed breakfasts, or casual gatherings. Whether you prefer them thin and crispy or soft and fluffy, they deliver satisfying texture and rich taste without complicated steps. With endless variations and simple cooking methods, this recipe is a reliable addition to any home cook’s collection.

Jam-Filled Square Sponge Cakes

Jam-Filled Square Sponge Cakes

Yields: 12 cakes | Prep time: 10 mins | Bake time: 20-25 mins

Ingredients

  • 3 Large eggs (room temperature)

  • ΒΎ cup Granulated sugar

  • 1 Β½ cups All-purpose flour

  • 1 tsp Baking powder

  • Β½ cup Whole milk

  • 1/3 cup Vegetable oil (or melted butter)

  • 1 tsp Vanilla extract

  • Pinch of Salt

  • Β½ cup Strawberry or Raspberry jam (for the center)


Instructions

1. Prepare Your Equipment Preheat your oven to 175Β°C (350Β°F). Grease a square muffin tin or a standard cupcake tin thoroughly with butter or non-stick spray.

2. Whip the Eggs and Sugar In a large bowl, beat the eggs and sugar together using a hand mixer or stand mixer. Beat on high speed for about 5 minutes until the mixture is thick, pale, and has doubled in volume. This airiness is what makes them “melt in your mouth.”

3. Add Liquid Ingredients Lower the mixer speed and gently pour in the milk, oil, and vanilla extract. Mix just until combined.

4. Sift in Dry Ingredients Sift the flour, baking powder, and salt into the wet mixture. Gently fold the dry ingredients in using a spatula. Do not overmix, or the cakes will become tough rather than fluffy.

5. Layer the Batter and Jam

  • Fill each mold about 1/3 of the way full with batter.

  • Place a small dollop (about 1 teaspoon) of jam directly into the center of the batter in each mold.

  • Cover the jam with more batter until the molds are about 3/4 full.

6. Bake Place in the center rack of the oven and bake for 20–25 minutes. The tops should be golden brown and cracked slightly, as shown in the photo.

7. Cool and Serve Let the cakes cool in the pan for 5 minutes before transferring them to a wire rack. This prevents the jam center from burning you while eating.


Tips for Success

  • Room Temperature: Ensure your eggs and milk are not cold; this helps the batter emulsify better for a smoother crumb.

  • The “5 Minute” Claim: While the baking takes longer, the actual active “work” time for this batter is only about 5 minutes if using an electric mixer.

  • Jam Choice: Use a high-quality, thick jam. If the jam is too watery, it may sink to the bottom of the cake during baking.

Rainbow Garden Vegetable Soup

Rainbow Garden Vegetable Soup

This recipe focuses on maintaining the bright colors and crisp-tender textures seen in your photo.

Ingredients

Category Ingredients
The Base 1 tbsp Olive Oil, 1 medium Onion (finely diced), 2 cloves Garlic (minced)
The Colors 2 large Carrots (diced), 2 stalks Celery (sliced), 1 cup Broccoli florets (cut small)
The Hearty Bits 1 large Potato (peeled and cubed), 1 cup Green Cabbage (shredded or chopped)
The Liquid 6–8 cups Low-sodium Vegetable Broth or Filtered Water
The Seasoning 1 tsp Sea Salt, Β½ tsp Black Pepper, 1 tsp Dried Oregano or Italian Seasoning
The Fresh Finish ΒΌ cup Fresh Parsley (finely chopped), a squeeze of fresh Lemon juice

Step-by-Step Instructions

1. SautΓ© the Foundation

In a large pot, heat the olive oil over medium heat. Add the onion and celery. SautΓ© for about 5 minutes until the onions are soft and translucent. Stir in the garlic and cook for 1 minute more until fragrant.

2. Add Hearty Vegetables

Add the diced carrots and cubed potatoes to the pot. Stir them into the aromatics for 2–3 minutes. This light “toasting” helps the vegetables hold their shape during the simmering process.

3. Simmer the Broth

Pour in the vegetable broth or water. Add the salt, pepper, and dried herbs. Bring the mixture to a gentle boil, then reduce the heat to low. Cover and simmer for 15 minutes, or until the potatoes are just beginning to soften.

4. Add the Delicate Greens

Stir in the shredded cabbage and the small broccoli florets. These cook quickly and stay vibrant if added toward the end. Simmer for an additional 5–7 minutes until the broccoli is tender but still bright green.

5. Adjust and Brighten

Taste the broth and add a little more salt or pepper if needed. Stir in the fresh parsley and a squeeze of lemon juice just before turning off the heat. This adds a “pop” of freshness that complements the savory broth.

6. Serve and Enjoy

Ladle the soup into bowls, ensuring everyone gets a good mix of all the colorful vegetables.


A Couple of Tips

  • Uniformity: Cutting the vegetables into similar small sizes (as seen in your photo) ensures that every spoonful has a bit of everything.

  • Storage: This soup keeps beautifully in the fridge for up to 4 days, and the flavors often deepen by the second day!

20-Minute Easy Coconut Cookies

20-Minute Easy Coconut Cookies

Description

These coconut cookies are soft on the inside, lightly crisp on the outside, and packed with coconut flavor. No mixer, no chilling, and just a handful of pantry ingredients. Perfect for last-minute cravings or surprise guests.

Β Time

  • Prep:Β 5 minutes

  • Bake:Β 12–15 minutes

  • Total:Β ~20 minutes

Ingredients (Simple & Budget-Friendly)

  • 1 cup desiccated coconut

  • Β½ cup all-purpose flour

  • Β½ cup powdered sugar

  • ΒΌ cup melted butter or oil

  • 1 egg

  • Β½ tsp baking powder

  • Β½ tsp vanilla essence (optional)

  • Pinch of salt

Instructions

  1. Preheat oven toΒ 180Β°C (350Β°F). Line a baking tray with parchment paper.

  2. In a bowl, mixΒ egg, sugar, butter, and vanillaΒ until smooth.

  3. AddΒ flour, baking powder, salt, and coconut. Mix into a soft dough.

  4. Scoop small portions, roll into balls, and slightly flatten.

  5. Place on tray, leaving space between cookies.

  6. BakeΒ 12–15 minutesΒ until edges are lightly golden.

  7. Cool for 5 minutes before serving (they firm up as they cool).

Β Servings

  • MakesΒ 10–12 cookies

Β Notes

  • Cookies will feel soft when hotβ€”don’t overbake.

  • For extra crunch, toast the coconut lightly before mixing.

  • Dough should be soft, not sticky. Add 1 tbsp flour if needed.

Β Tips for Best Results

  • UseΒ fine desiccated coconutΒ for smoother texture

  • Don’t flatten too muchβ€”slight thickness keeps them soft

  • For extra flavor, add a pinch ofΒ cardamom or cinnamon

Nutritional Info (Per Cookie – Approx.)

  • Calories:Β 120 kcal

  • Carbohydrates:Β 12 g

  • Fat:Β 7 g

  • Protein:Β 2 g

  • Fiber:Β 1.5 g

(Values are approximate and depend on ingredients used)

Β Health Benefits

  • Coconut providesΒ healthy fatsΒ for energy

  • Quick homemade snack withΒ no preservatives

  • Can be madeΒ egg-free, dairy-free, or gluten-freeΒ with swaps

  • Better than store-bought cookies for portion control


Q & A

Q: Can I make this without eggs?
A: Yes! Replace egg withΒ ΒΌ cup milk or yogurt.

Q: Can I use jaggery or brown sugar?
A: Absolutelyβ€”powder it finely for best texture.

Q: How do I store them?
A: Store in an airtight container forΒ up to 5 days.

Q: Can I freeze the dough?
A: Yes, freeze up toΒ 1 month, bake straight from frozen (+2 mins).

Q: Can I air-fry them?
A: Yes! Air-fry atΒ 160Β°C for 8–10 minutes.

Golden Crispy Cheesy Vegetable Fingers

Golden Crispy Cheesy Vegetable Fingers

The ultimate savory, flourless snack for any time of day!


Ingredients

  • 2 large Potatoes, grated

  • 1 large Carrot, grated

  • 2 Eggs

  • 1 cup Shredded cheese (Cheddar or Mozzarella work best)

  • Β½ cup Green onions, finely chopped

  • To taste: Salt and black pepper

  • Cooking oil: For pan-frying


Step-by-Step Instructions

1. Prepare the Vegetables

Grate the potatoes and the carrot using the medium holes of a box grater.

2. Remove Excess Moisture

This is the most important step for a crispy result. Place the grated potatoes and carrots into a clean kitchen towel or cheesecloth. Twist the cloth and squeeze firmly to remove as much liquid as possible.

3. Mix the Ingredients

In a large mixing bowl, combine the dried vegetables, eggs, shredded cheese, and chopped green onions. Season with a pinch of salt and pepper to enhance the flavors. Stir well until the eggs and cheese have evenly coated the vegetables.

4. Shape the Fingers

Take about two tablespoons of the mixture at a time. Firmly press and roll the mixture between your palms to form small logs or “finger” shapes.

5. Pan-Fry to Perfection

Heat a thin layer of oil in a large skillet over medium heat. Carefully place the vegetable fingers in the pan, leaving space between them. Cook for approximately 4 minutes per side. Flip them gently once they are golden brown and crispy.

6. Drain and Serve

Remove the fingers from the pan and place them on a plate lined with paper towels to soak up any extra oil. Serve warm with your favorite dipping sauce, like Greek yogurt or a light garlic aioli.


Pro Tip: If you want an even firmer texture, you can let the vegetable mixture sit for 5 minutes after mixing to allow the fibers to bind with the egg before shaping.

Fluffy Homemade White Bread

Fluffy Homemade White Bread

This recipe uses a simple kneading technique to develop the structure needed for that “cloud-like” interior seen in your photos.

Ingredients

  • 1 cup Warm water (ensure it is between 105–115Β°F; too hot will kill the yeast)

  • 1 package (2 ΒΌ tsp) Active dry yeast

  • 1 tbsp Sugar (this feeds the yeast and helps with browning)

  • 3 Β½ cups All-purpose flour (plus a little extra for dusting)

  • 1 tsp Salt

  • ΒΌ cup Olive oil (this keeps the crumb soft and moist)


Step-by-Step Instructions

1. Activate the Yeast

In a large bowl, combine the warm water and sugar. Stir until the sugar dissolves. Sprinkle the active dry yeast over the top. Let it sit for about 5–10 minutes until it becomes foamy and smells like fresh bread.

2. Mix the Dough

Add the olive oil and salt to the yeast mixture. Gradually stir in the flour, one cup at a time. Continue mixing until a shaggy dough forms and begins to pull away from the sides of the bowl.

3. Knead for Structure

Turn the dough out onto a lightly floured surface. Knead the dough for 8–10 minutes by hand (or 5 minutes using a stand mixer with a dough hook).

  • The Goal: The dough should become smooth, elastic, and slightly tacky, but it should not stick to your hands. This process builds the strength needed for that high rise shown in your images.

4. The First Rise

Lightly grease a large bowl with a little olive oil. Place the dough inside and turn it once to coat it in oil. Cover the bowl with a clean kitchen towel or plastic wrap. Let it rise in a warm, draft-free spot for 1 to 1 Β½ hours, or until it has doubled in size.

5. Shape the Loaf

Gently “punch down” the dough to release excess air (as seen in the top image of your file). Turn it onto a floured surface and shape it into a rectangle. Roll it up tightly into a log shape and pinch the seams shut. Place the dough into a greased 9×5-inch loaf pan.

6. The Second Rise

Cover the loaf pan and let the dough rise again for about 30–45 minutes. The dough should rise about an inch above the rim of the pan. Preheat your oven to 375Β°F (190Β°C) during this time.

7. Bake to Perfection

Bake for 30–35 minutes. The top should be a beautiful golden brown, and the loaf should sound hollow when you tap the bottom.

  • Optional: Brush the top with a little melted butter or olive oil immediately after taking it out of the oven for an extra soft crust.

8. Cool Completely

Allow the bread to cool in the pan for 10 minutes, then transfer it to a wire rack. Wait at least 30 minutes before slicing to ensure the internal structure is set and stays fluffy.


Tips for the Best Results

  • Temperature Matters: If your kitchen is cold, your dough will take longer to rise. You can place the bowl inside an “off” oven with the oven light turned on for a perfect proofing environment.

  • Don’t Over-Flour: Use only as much flour as needed during kneading. Too much flour will make the bread dense rather than fluffy.

Blueberry Cottage Cheese Breakfast Bake

Blueberry Cottage Cheese Breakfast Bake

A creamy, protein-packed breakfast that tastes like dessert.

Ingredients

  • 1 cup Cottage cheese

  • 1/2 cup Rolled oats

  • 1/2 cup Fresh blueberries

  • 2 Large eggs

  • 1/4 cup Honey or maple syrup

  • 1/2 tsp Cinnamon

  • 1/4 tsp Vanilla extract


Step-by-Step Instructions

1. Preheat and Prep

Preheat your oven to 175Β°C (350Β°F). Lightly grease a small baking dish (about 6×6 inches or a small round pie dish) with a little bit of butter or coconut oil.

2. Blend the Base (Optional)

If you prefer a smooth, cheesecake-like texture, place the cottage cheese, eggs, honey/syrup, vanilla, and cinnamon in a blender and pulse until smooth. If you enjoy a more rustic, textured bake, simply whisk them together in a medium bowl.

3. Combine with Oats

Stir the rolled oats into the mixture. Let it sit for about 5 minutes; this allows the oats to soften slightly and ensures a better “set” once baked.

4. Add the Berries

Gently fold in half of the fresh blueberries. Pour the mixture into your prepared baking dish. Scatter the remaining blueberries over the top so they look beautiful once baked.

5. Bake

Place in the oven and bake for 30–35 minutes. You’ll know it’s ready when the edges are golden brown and the center is set (it should have a slight, firm jiggle but not be liquid).

6. Cool and Set

Allow the bake to cool for at least 10 minutes before slicing. This time is crucial for the cottage cheese and eggs to fully firm up.


Helpful Tips

  • Storage: This keeps well in the refrigerator for up to 3 days, making it an excellent meal-prep option.

  • Serving: You can enjoy this warm, but many people find the flavor and texture are even better when served chilled with an extra dollop of Greek yogurt.

Southwest Cheesy Enchilada Chili Deluxe

Southwest Cheesy Enchilada Chili Deluxe

A rich, creamy fusion of chili and cheesy enchilada flavors.

Ingredients

  • 1 lb Ground turkey (or beef)

  • 2 tbsps Taco seasoning

  • 1/4 cup Water

  • 1 jar Roasted poblano queso dip (or Salsa Con Queso)

  • 1 can Creamy potato soup

  • 1 cup Greek yogurt (or sour cream)

  • 1 can Fire-roasted diced green chilis

  • 1 1/4 cups Beef or chicken broth

  • 1/2 cup Smoky chipotle tomato sauce

  • 1 cup Frozen corn

  • 1 cup Black beans (rinsed and drained)

  • 1/2 cup Diced red bell pepper

  • 1/2 tsp Smoked paprika

  • 1 tsp Garlic powder

  • To taste: Salt and pepper


Instructions

1. Brown the Meat

In a large pot or Dutch oven over medium-high heat, cook the ground turkey (or beef) until fully browned. Drain any excess fat.

2. Season

Add the taco seasoning and 1/4 cup of water to the meat. Stir well and simmer for 2–3 minutes until the water has mostly evaporated and the meat is well-coated.

3. Build the Base

Turn the heat down to medium. Stir in the creamy potato soup, queso dip, and Greek yogurt. Mix until the base is smooth and creamy.

4. Add the Aromatics and Veggies

Stir in the green chilis, diced red bell pepper, corn, and black beans. Add the broth and chipotle tomato sauce to reach your desired chili consistency.

5. Season and Simmer

Add the garlic powder, smoked paprika, and a pinch of salt and pepper. Let the chili simmer gently for 15–20 minutes, stirring occasionally to prevent the cheese base from sticking to the bottom.

6. Serve

Ladle into bowls and top with cilantro, shredded cheese, or tortilla chips for a nice crunch.


Helpful Tips

  • Consistency: If you prefer a thicker chili, let it simmer for an extra 10 minutes. If it’s too thick, add an extra splash of broth.

  • Heat Level: For more kick, add extra diced jalapeΓ±os or a dash of cayenne pepper.

Fluffy Cloud Cupcakes

Fluffy Cloud Cupcakes

Prep time: 15 mins | Bake time: 20-25 mins | Yields: 10-12 cupcakes

Ingredients

The Egg Yolk Base:

  • 3 Large egg yolks

  • 20g Caster sugar

  • 40g Vegetable oil (or any neutral oil)

  • 45g Milk (room temperature)

  • 60g Cake flour (sifted)

  • 1/2 tsp Vanilla extract

The Meringue:

  • 3 Large egg whites (chilled)

  • 40g Caster sugar

  • 1/4 tsp Lemon juice or Cream of Tartar (helps stability)


Step-by-Step Instructions

1. Prepare the Oven and Pan

Preheat your oven to 150Β°C (300Β°F). Line a cupcake tray with paper liners.

2. Create the Yolk Mixture

In a medium bowl, whisk the egg yolks and 20g sugar until pale. Add the oil, milk, and vanilla, whisking until well combined. Sift in the cake flour and whisk gently until the batter is smooth with no lumps. Set aside.

3. Whip the Meringue

In a separate, clean, grease-free bowl, beat the egg whites and lemon juice on medium speed until foamy. Gradually add the 40g sugar in three batches. Continue beating until stiff peaks form (the peaks should stand straight up when you lift the beaters).

4. The Gentle Fold

This is the most important part! Take 1/3 of the meringue and stir it into the egg yolk batter to lighten it. Then, gently fold the remaining meringue into the batter using a spatula. Use a “cut and fold” motion so you don’t deflate the air bubbles. Stop as soon as the color is uniform.

5. Bake to Perfection

Scoop the batter into the liners until they are about 80% full. Tap the tray on the counter once to pop large bubbles. Bake for 20–25 minutes or until the tops are golden and spring back when touched.


Pro-Tips for Success

  • Don’t Grease: Don’t grease the paper liners; the cake needs to “climb” the walls of the liner to stay tall.

  • The Sift: Sifting the flour is mandatory for that “5-minute melt” texture shown in your photo.

  • Cooling: These may shrink slightly as they cool; this is normal for chiffon cakes!

Cream-Filled Brioche Bread

Cream-Filled Brioche Bread

This recipe yields a rich, airy bread that balances the sweetness of the dough with a smooth, savory-sweet cream filling.

Ingredients

For the Dough:

  • 3 Β½ cups All-purpose flour

  • ΒΌ cup Granulated sugar

  • 2 ΒΌ tsp (1 packet) Active dry yeast

  • Β½ tsp Salt

  • Β½ cup Whole milk (warm, about 110Β°F)

  • 3 Large eggs (room temperature)

  • ΒΎ cup Unsalted butter (softened, added one tablespoon at a time)

For the Cream Filling:

  • 8 oz Cream cheese (softened)

  • ΒΌ cup Powdered sugar

  • 1 tsp Vanilla extract

  • 2 tbsp Heavy cream (to thin slightly)


Instructions

  1. Activate the Yeast: In a small bowl, combine warm milk, a tablespoon of the sugar, and the yeast. Let it sit for 5–10 minutes until it becomes foamy.

  2. Mix the Dough: In a stand mixer with a dough hook, mix the flour, remaining sugar, and salt. Add the yeast mixture and eggs. Mix on low until a shaggy dough forms.

  3. Incorporate Butter: Increase speed to medium. Add the softened butter one tablespoon at a time, ensuring each piece is fully absorbed before adding the next. Knead for about 10 minutes until the dough is smooth, elastic, and pulls away from the sides.

  4. First Rise: Place the dough in a greased bowl, cover with a damp cloth, and let rise in a warm spot for 1.5 to 2 hours (or until doubled in size).

  5. Prepare Filling: While rising, whisk together the cream cheese, powdered sugar, vanilla, and heavy cream until smooth. Transfer to a piping bag.

  6. Shape & Fill: Punch down the dough. Roll it into a rectangle. You can either pipe the filling down the center and fold the dough over it, or shape the dough into a loaf, place it in a greased tin, and use a dowel to poke holes and pipe the filling directly into the center.

  7. Final Rise: Let the loaf rise in the pan for another 45 minutes.

  8. Bake: Brush the top with an egg wash (1 egg beaten with 1 tbsp water). Bake at 350Β°F (175Β°C) for 30–35 minutes until the top is deep golden brown.

  9. Cool: Allow it to cool for at least 20 minutes before slicing so the cream center sets.