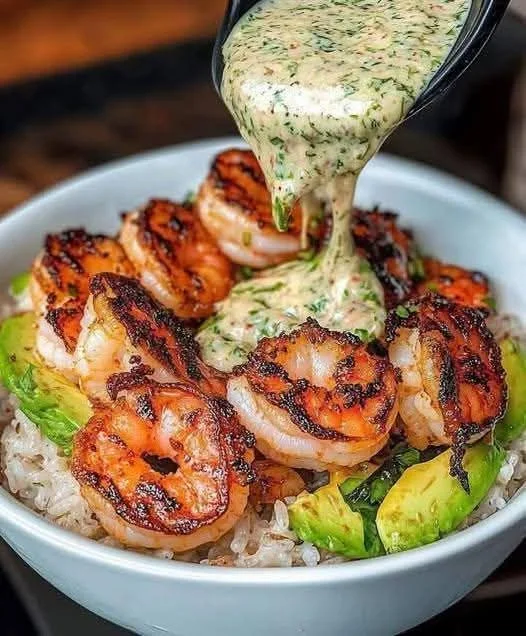
Zero Point Crustless Pumpkin Pie

An easy recipe for a homemade crustless pumpkin pie.  This Zero Point Crustless Pumpkin Pie recipe is perfect for fall-it so good. I won’t regret making this for your next family gathering!

PREP TIME5 minutes

COOK TIME45 minutes

ADDITIONAL TIME5 minutes

TOTAL TIME55 minutes

Ingredients

  • 1 (15 oz) can 100% canned pumpkin purée
  • 1/3 cup zero-point brown sugar substitute – I use Lakanto Golden Monkfruit Sweetener
  • 1 tsp cinnamon
  • 1/2 tsp nutmeg
  • 1/2 tsp vanilla extract
  • 1 tsp pumpkin spice
  • 2 large eggs or 1/2 cup liquid egg substitute
  • 8 oz. unsweetened almond milk, premier protein, unsweetened coconut milk, or Carbmaster no sugar added milk

Instructions

  1. Preheat oven to 375 degrees.
  2. Spray a 9-inch pie dish with nonstick cooking spray.
    In a large mixing bowl, combine all ingredients and mix until all ingredients are well combined.
  3. Pour into prepared pie dish.
  4. Bake for 40-45 minutes or until knife inserted in the center comes out clean.
  5. Remove from oven and let it cool for 10 minutes before serving.
  6. Store in the fridge for up to a week.

0-1 Personal.Points™ p.er slice
*This number shows the PersonalPoints™ range. The points will vary based on your individualized plan.

Notes

Smartpoints for crustless pie: GREEN: Zero Smart.points if using liquid egg substitute or 1 Smart.points per slice if using whole eggs BLUE/PURPLE: Zero SmartPoints per slice

Blueberry Lemon Donuts – 1 WW Point Each 🍋🫐

Bright, fruity, and guilt-free—perfect for a sweet breakfast or snack!

Servings: Varies by donut pan size
W-W Points: 1 (per donut, based on minis)

Ingredients

  • 1 box lemon cake mix

  • 1 can Sprite Zero

  • 1 container fresh blueberries

Instructions

  1. Preheat oven to 350°F (175°C).

  2. In a mixing bowl, combine cake mix and Sprite Zero. The batter will be frothy.

  3. Spray donut pan with nonstick cooking spray.

  4. Fill each donut cavity with the cake batter.

  5. Drop a few blueberries into each donut.

  6. Bake 15–25 minutes, checking frequently (mini donuts take less time).

  7. Cool slightly before removing from the pan.

Tips

  • For extra lemon flavor, add fresh lemon zest to the batter.

  • If using full-sized donut pans, baking time will be closer to the 25-minute mark.

  • Store in an airtight container for up to 3 days or refrigerate for up to 5.

If you’d like, I can make you a W-W recipe binder sheet where these donuts, your tilapia, and other recipes you’ve shared are all in the same clean style. That way, every recipe is easy to find and ready for meal pr

WW Crispy Tilapia (2 Points)

Light, crispy, and full of fresh flavor—perfect for Weight Watchers and quick weeknight meals.

Servings: 4
W-W Points: 2 (per serving)
Calories: 124
Protein: 12g

Ingredients

  • 1/4 cup low-fat mayonnaise

  • 1 tbsp chopped fresh parsley

  • 1 tbsp dill (fresh or dried)

  • 1 tsp garlic powder

  • 1/4 tsp salt (or to taste)

  • 1/4 tsp black pepper

  • 6 oz tilapia fillets

  • 3/4 cup dried potato flakes

  • 1 tsp olive oil

Instructions

Air Fryer Method

  1. Preheat air fryer to 400°F.

  2. In a shallow dish, mix together mayonnaise, parsley, dill, garlic powder, salt, and pepper.

  3. Place potato flakes on a separate plate.

  4. Cut tilapia into chunks or strips. Coat each piece in the mayonnaise mixture, then press into potato flakes until fully coated.

  5. Lightly grease air fryer basket with olive oil. Arrange fish pieces in a single layer.

  6. Air fry for 4–8 minutes, until golden and cooked through.

Oven Method

  1. Preheat oven to 400°F. Line a baking tray with aluminum foil.

  2. Pat tilapia dry with paper towels. Cut into even pieces.

  3. Coat in the mayonnaise mixture, then press into potato flakes.

  4. Lightly coat fish with olive oil, place on the tray, and cover loosely with foil.

  5. Bake for 8–10 minutes, until cooked through.

Serving Suggestions

Pair with:

  • W-W Grilled Corn on the Cob

  • Air Fryer Zucchini Chips

  • Roasted Baby Potatoes

  • Bacon-Wrapped Asparagus

Seasoning Variations

  • Swap garlic powder for onion powder

  • Add cayenne pepper for heat

  • Try Italian, Creole, or Old Bay seasoning for different flavor profiles

Tips

  • Avoid overcooking—tilapia dries out quickly.

  • Use a meat thermometer (145°F internal temp) to check doneness.

  • Fresh lemon juice over the top brightens the flavor.

Do you want me to also make you a one-page printable recipe sheet so you can keep all your W-W recipes in the same format? That way, they’ll look consistent in your binder or digital meal prep folder.

Weight Watchers Raspberry Dessert

A quick, creamy, and zero-guilt treat that’s bursting with berry flavor!

Servings: 2
Prep Time: 5 minutes
Chill Time: 40 minutes (optional for best flavor)
Total Time: 45 minutes
WW Points: 0–1 (varies by milk choice)

Ingredients

  • 1 cup frozen raspberries

  • ¼ cup almond milk (or fat-free milk)

  • 2 tablespoons granulated Swerve sweetener

Instructions

  1. Blend the Base
    Add frozen raspberries, granulated Swerve, and half of the almond milk to a blender or food processor.

  2. Adjust the Consistency
    Blend for 2–4 minutes until smooth. Gradually add more almond milk if needed to reach your desired creamy texture.

  3. Serve & Garnish
    Transfer to a small serving bowl. Top with fresh or frozen raspberry slices for presentation.

Ingredient Notes

  • Raspberries: Frozen gives a thicker, chilled texture and a richer color. Fresh works too for a lighter, fresher feel.

  • Milk: Use fat-free to keep points low. Almond milk adds a subtle nutty flavor.

  • Sweetener: Swerve keeps it sugar-free, but you can swap for erythritol, Monk fruit, or stevia.

Optional Mix-Ins

  • Chopped nuts (almonds, walnuts)

  • Shredded coconut

  • Sugar-free dark chocolate chips

  • Fresh fruits like peaches, blueberries, or strawberries

  • A spoonful of plain or vanilla Greek yogurt

Serving Suggestions

  • Top with a dollop of low-calorie whipped cream

  • Serve alongside tea, coffee, or fresh fruit juice

  • Layer with granola and yogurt for a parfait

  • Fill light cream puffs with the mixture

  • Pair with raspberry sorbet for a frozen dessert duo

Tips

  • Chill for at least 40 minutes to allow flavors to meld

  • Avoid over-chilling to prevent texture loss

  • Garnish with mint leaves or a sprinkle of mini chocolate chips

  • Try with other berries like blueberries or strawberries

Storage

  • Fridge: Store in an airtight container for up to 1 day

  • Freezer: Freeze up to 60 days; thaw in the fridge before serving

Nutrition Facts (per serving)

  • Calories: 58 kcal

  • Carbohydrates: 13 g

  • Total Fat: 1 g

  • Protein: 1 g

  • Sugar: 5 g

  • Dietary Fiber: 6 g

  • Sodium: 2 mg

If you’d like, I can combine this recipe with your other WW breakfast & dessert recipes into a printable mini cookbook so they’re all in one place and point values are clear. That way, you’ll have a handy go-to guide.

WW Friendly Greek Yogurt Pancakes

Fluffy, flavorful, and only 1 SP each — perfect for a guilt-free breakfast!

Servings: 12 pancakes
Prep Time: 5 minutes
Cook Time: 10 minutes
Total Time: 15 minutes
Occasion: Breakfast, Brunch, W-W Low-Point Meal

Ingredients

  • 1 cup self-rising flour

  • ½ cup nonfat Greek yogurt

  • 2 large eggs

  • 1½ teaspoons baking powder

  • 1½ teaspoons vanilla extract

  • ⅛ teaspoon almond extract

  • ⅓ cup + 2 tablespoons water

Instructions

  1. Mix the Batter
    Add all ingredients to a stand mixer, starting with the wet ingredients. Using the whisk attachment, mix until smooth and fully blended.

  2. Preheat the Griddle
    Heat a griddle to medium heat. Lightly grease if needed.

  3. Cook the Pancakes
    Pour batter in ¼-cup portions onto the hot griddle. Cook until bubbles form on the surface, then flip and cook until golden brown on the other side.

  4. Serve & Enjoy
    Enjoy warm with your favorite zero or low-point toppings.

Tips & Notes

  • Fresh fruit, sugar-free syrup, or a dollop of fat-free whipped topping are great low-point pairings.

  • If you don’t have a stand mixer, whisk by hand until smooth.

  • To make them extra fluffy, let the batter rest for 5 minutes before cooking.

Tools You’ll Need

  • Stand mixer with whisk attachment (or mixing bowl & whisk)

  • Griddle or non-stick skillet

  • Measuring cups & spoons

If you’d like, I can also batch these into a “W-W Pancake Collection” with the banana blueberry bake you shared earlier so you’ve got a full W-W breakfast index ready. That would make all your recipes super easy to find.

WW Zero-Point Banana Blueberry Bake

Light, naturally sweet, and surprisingly indulgent — like bread pudding without the bread!

Servings: 1
Prep Time: 3 minutes
Cook Time: 3½ minutes
Total Time: 6–7 minutes
Occasion: Breakfast, Snack, W-W Zero Point Treat

Ingredients

  • 2 ripe bananas, mashed

  • 2 large eggs, lightly beaten

  • A handful of fresh blueberries

Instructions

  1. Mash Bananas
    In a small mixing bowl, mash bananas until mostly smooth.

  2. Mix In Eggs
    Stir in beaten eggs until fully incorporated.

  3. Add Blueberries
    Gently fold in blueberries.

  4. Microwave & Cook
    Pour mixture into a greased 16 oz ramekin or soufflé cup. Microwave on high for about 3½ minutes, or until set to desired firmness.

  5. Serve & Enjoy
    Let cool slightly and enjoy warm — the texture is soft and custardy.

Tips & Notes

  • Try adding cinnamon or a drop of vanilla extract for extra flavor.

  • Frozen blueberries work, but add a few extra seconds to cooking time.

  • Great eaten hot or chilled for a make-ahead snack.

Tools You’ll Need

  • Mixing bowl

  • Fork or whisk

  • 16 oz ramekin or soufflé dish

  • Microwave

If you want, I can also create a “W-W Friendly Breakfasts” category so this one sits alongside other low-point recipes. That way, it’s easier to find all your healthy breakfast ideas in one place.

Sausage Breakfast Hawaiian Sliders

Soft Hawaiian rolls layered with fluffy eggs, savory sausage, and melty cheddar — brushed with a maple butter glaze for the ultimate sweet-and-savory breakfast bite.

Servings: 12 sliders
Prep Time: 15 minutes
Cook Time: 20 minutes
Total Time: 35 minutes
Occasion: Breakfast, Brunch, Holidays, Make-Ahead

Ingredients

Main Ingredients

  • 8 large eggs

  • ¼ cup heavy cream

  • Salt and pepper, to taste

  • 1 tablespoon butter

  • 12 sausage patties

  • 2 cups shredded cheddar cheese, divided

  • 1 (12-ounce) package Hawaiian rolls

Glaze

  • 1 tablespoon maple syrup

  • 2 tablespoons melted butter

Instructions

  1. Prep the Dish
    Preheat oven to 350°F (175°C). Lightly grease a 9×13-inch baking dish with nonstick cooking spray.

  2. Scramble the Eggs
    In a large mixing bowl, whisk together eggs, heavy cream, salt, and pepper. Melt 1 tablespoon butter in a large skillet over medium heat, add egg mixture, and scramble until just set. Remove from heat and set aside.

  3. Cook the Sausage
    In the same skillet, cook sausage patties over medium-high heat until fully cooked. Drain on paper towels.

  4. Assemble the Sliders
    Without separating the rolls, slice the loaf horizontally. Place the bottom half of the rolls in the prepared baking dish. Sprinkle with 1 cup shredded cheddar. Layer with scrambled eggs, sausage patties, and remaining cheddar. Top with the top half of the rolls.

  5. Add the Glaze
    In a small bowl, whisk together melted butter and maple syrup. Brush evenly over the tops of the rolls.

  6. Bake
    Bake uncovered for 15–20 minutes, or until cheese is melted and sliders are heated through. Serve warm.

Tips & Variations

  • Make Ahead: Assemble the sliders, cover, and refrigerate overnight. Add glaze just before baking.

  • Cheese Options: Swap cheddar for pepper jack, Swiss, or Colby Jack for a flavor twist.

  • Protein Swap: Try bacon, ham, or plant-based sausage patties.

  • Serving Idea: Perfect for brunch boards alongside fresh fruit and mini pastries.

Tools You’ll Need

  • Large mixing bowls

  • 12-inch non-stick skillet

  • 9×13-inch baking dish

  • Rotary cheese grater or box grater

  • Serrated knife for slicing rolls

If you want, I can group this with your Crack Croissant Breakfast Casserole and Hissy Fit Hash Brown Casserole into a Breakfast Slider & Casserole Party post so it’s an all-in-one brunch guide for readers. That would make a strong themed article for your blog. Would you like me to do that next?

Crack Croissant Breakfast Casserole

Flaky, cheesy, and loaded with crispy bacon — this make-ahead croissant breakfast bake is perfect for holidays, brunch parties, and lazy weekend mornings.

Servings: 6–8
Prep Time: 20 minutes
Cook Time: 60 minutes
Chill Time: 8–24 hours
Total Time: 9–25 hours (including chilling)
Occasion: Breakfast, Brunch, Make-Ahead Meals

Ingredients

Main Ingredients

  • 3 large bakery-style croissants (about 5 inches each), chopped into 10–12 pieces

  • 1 lb bacon, cooked until crispy and crumbled

  • 1½ cups shredded cheddar cheese (or your choice — see tips)

  • 6 large eggs

  • 1 cup half-and-half (or heavy cream/whole milk)

  • 2 Tbsp ranch dressing mix

Instructions

  1. Prep the Croissants
    Chop each croissant into bite-sized pieces. Arrange evenly in a lightly greased 9×9-inch deep baking dish.

  2. Cook the Bacon
    In a skillet over medium-high heat, cook bacon until crispy. Drain excess fat and crumble into small pieces.

  3. Layer the Base
    Sprinkle cooked bacon and shredded cheddar cheese evenly over the chopped croissants.

  4. Make the Egg Mixture
    In a mixing bowl, whisk together eggs, half-and-half, and ranch dressing mix until smooth.

  5. Combine & Chill
    Pour the egg mixture evenly over the croissant mixture. Gently press down on the croissants so they’re fully submerged. Cover tightly with aluminum foil and refrigerate for at least 8 hours (up to 24 hours) to allow flavors to meld.

  6. Bake
    Preheat oven to 325°F (163°C). Bake covered for 35 minutes, then uncover and bake an additional 25 minutes, or until set and lightly golden on top.

  7. Rest & Serve
    Let the casserole rest for 10 minutes before slicing and serving warm.

Tips & Variations

  • Best Croissants: Use large, buttery bakery croissants — avoid refrigerated crescent rolls for best texture.

  • Cheese Swaps: Gouda, Swiss, Gruyere, or pepper jack all work well.

  • Lighter Option: Use turkey bacon for fewer calories.

  • Make-Ahead Friendly: Assemble up to 24 hours in advance and refrigerate until baking.

  • Freezer Option: Wrap tightly and freeze for up to 3 months. Thaw completely before baking.

  • Double It: For larger gatherings, double the recipe and bake in a 9×13-inch dish, adding 10–15 minutes to the cooking time.

Tools You’ll Need

  • 9×9-inch deep baking dish

  • 10-inch skillet

  • Rotary cheese grater or box grater

  • Whisk

  • Aluminum foil

If you’d like, I can also create a Holiday Brunch Casserole Collection post where this recipe is featured alongside your Hissy Fit Hash Brown Casserole and Crack Chicken Tater Tot Casserole so readers can pick from multiple crowd-pleasers in one article. That could make a strong seasonal blog entry. Would you like me to prepare that next?

Hissy Fit Hash Brown Casserole

Cheesy, hearty, and packed with savory breakfast sausage — this make-ahead friendly casserole is perfect for brunches, holidays, or busy mornings.

Servings: 8–10
Prep Time: 15 minutes
Cook Time: 45–60 minutes
Total Time: 1 hour–1 hour 15 minutes
Occasion: Breakfast, Brunch, Meal Prep

Ingredients

Casserole Base

  • 2 lb hot breakfast sausage

  • 1 (30–32 oz) bag frozen shredded hash browns, thawed

  • 1 tsp salt

  • ½ tsp pepper

  • ¼ tsp garlic powder

  • ¼ tsp onion powder

  • 1 cup shredded muenster cheese

  • 1 cup shredded Velveeta cheese (or see substitutions below)

Egg Mixture

  • 8 large eggs

  • 2 cups milk

  • 1 Tbsp Worcestershire sauce

Instructions

  1. Preheat & Prep
    Heat oven to 350°F (175°C). Lightly spray a 9×13-inch baking dish with non-stick cooking spray.

  2. Cook the Sausage
    In a large skillet, brown sausage over medium heat until fully cooked. Drain any excess fat and set aside.

  3. Brown the Hash Browns
    In the same skillet, cook thawed hash browns until lightly golden (add a drizzle of oil if needed). Transfer to the prepared baking dish, spreading evenly.

  4. Layer the Casserole
    Top the hash browns with cooked sausage, then sprinkle evenly with both cheeses.

  5. Mix the Egg Custard
    In a large bowl, whisk together eggs, milk, Worcestershire sauce, salt, pepper, garlic powder, and onion powder until well combined.

  6. Assemble & Bake
    Pour the egg mixture evenly over the casserole layers. Bake uncovered for 45–60 minutes, or until the center is set and the top is golden.

  7. Serve
    Let the casserole rest for 5–10 minutes before slicing and serving hot.

Tips & Variations

  • Thaw First: Always thaw frozen hash browns before browning for better texture.

  • Cheese Swap: Try cheddar, colby-jack, gouda, or mozzarella instead of Velveeta.

  • Extra Veggies: Add sautéed bell peppers, mushrooms, or onions for more flavor.

  • Make-Ahead: Assemble the night before, refrigerate, then bake in the morning (add 10–15 minutes to the bake time).

  • Freezer-Friendly: Assemble, wrap tightly, and freeze for up to 3 months. Thaw overnight before baking.

Tools You’ll Need

  • 12-inch non-stick skillet

  • Large mixing bowls

  • 9×13-inch baking dish

  • Whisk

If you want, I can also prepare a “Party Brunch Board” serving suggestion where this casserole is the centerpiece, paired with easy sides and garnishes so it’s presentation-ready for gatherings. That could make this recipe even more engaging for a blog audience. Would you like me to add that?

Delicious Ham and Cheese Quiche

Fluffy eggs, smoky ham, and melty cheese baked in a buttery crust — perfect for breakfast, brunch, or even dinner.

Servings: 6–8 slices
Prep Time: 10 minutes
Cook Time: 35–40 minutes
Total Time: 45–50 minutes
Occasion: Breakfast, Brunch, Easy Dinner

Ingredients

  • 1 store-bought pie crust

  • 4 large eggs

  • 1 cup whole milk

  • 1 cup diced ham (smoked or honey-baked)

  • 1 cup shredded cheddar cheese

  • Salt and pepper, to taste

  • Optional: 1 cup fresh spinach or ½ cup diced bell peppers

Instructions

  1. Preheat & Prep the Crust
    Heat oven to 375°F (190°C). Gently unroll the pie crust into a 9-inch pie plate, pressing it into place. Crimp the edges if desired.

  2. Make the Egg Mixture
    In a medium mixing bowl, whisk eggs and milk together until light and frothy. Season with salt and pepper.

  3. Add the Fillings
    Fold in the diced ham, shredded cheddar cheese, and optional vegetables.

  4. Assemble the Quiche
    Pour mixture into the prepared pie crust, spreading it evenly.

  5. Bake
    Bake for 35–40 minutes, or until the center is set and the top is golden brown.

  6. Cool & Serve
    Allow quiche to cool for about 10 minutes before slicing. Serve warm or at room temperature.

Chef’s Tips

  • For a richer flavor, swap half the milk for heavy cream.

  • Pre-sauté spinach or peppers to remove extra moisture before adding to the filling.

  • This quiche reheats well in the oven at 300°F for 10–15 minutes.

Storage

  • Refrigerate: Store covered in the fridge for up to 4 days.

  • Freeze: Wrap slices individually in foil and store up to 2 months. Reheat from frozen at 350°F for 20–25 minutes.

Serving Ideas

  • Pair with a light side salad for brunch.

  • Serve with roasted potatoes or fresh fruit for a complete breakfast spread.

If you’d like, I can also prepare 5 quiche flavor variations so your readers can easily adapt this recipe for different tastes and seasons. That would make this post more versatile for your blog. Would you like me to create that next?

Sausage Breakfast Muffins with Bisquick

Savory, cheesy, and protein-packed — the perfect make-ahead breakfast you can grab and go!

Servings: 12 muffins
Prep Time: 10 minutes
Cook Time: 18–20 minutes
Total Time: 30 minutes
Occasion: Quick Breakfast, Brunch, Meal Prep

Ingredients

Main Ingredients

  • 1 pound breakfast sausage

  • 4 large eggs

  • 1 cup shredded sharp Cheddar cheese

  • 1 cup Bisquick baking mix

Instructions

  1. Prep the Oven & Pan:
    Preheat oven to 175°C (350°F). Grease a 12-cup muffin pan with non-stick spray and set aside.

  2. Cook the Sausage:
    Crumble breakfast sausage into a skillet over medium-high heat. Cook until no longer pink, about 5–7 minutes. Drain excess fat and set aside to cool slightly.

  3. Mix the Batter:
    In a large mixing bowl, lightly beat the eggs. Add shredded cheese, Bisquick, and cooked sausage. Stir until fully combined.

  4. Fill & Bake:
    Divide the mixture evenly into muffin cups, filling each about ¾ full. Bake for 18–20 minutes, or until golden brown on top and set in the center.

  5. Cool & Serve:
    Let muffins cool slightly before removing from the pan. Serve warm or refrigerate for later.

Brief Introduction

These savory breakfast muffins are a busy-morning lifesaver. Packed with sausage, eggs, and cheese, they’re satisfying, portable, and perfect for meal prepping ahead of time.

Step-by-Step Cooking Guide

  • Step 1: Use a well-greased muffin pan to prevent sticking — sausage and cheese can release oils as they bake.

  • Step 2: Allow sausage to cool slightly before mixing with eggs to avoid scrambling them.

  • Step 3: Watch closely near the end of baking to prevent overbrowning.

Ingredient Details & Substitution Tips

  • Sausage: Use pork, turkey, or chicken breakfast sausage. For extra spice, choose hot sausage.

  • Cheese: Sharp cheddar gives the best flavor, but you can substitute with pepper jack, Swiss, or Colby.

  • Bisquick: Can be swapped for other all-purpose baking mixes.

Recipe Variations & Serving Suggestions

  • Veggie Boost: Stir in chopped spinach, bell peppers, or mushrooms.

  • Mini Version: Bake in a mini muffin tin for bite-sized snacks — reduce bake time to about 12 minutes.

  • Freezer-Friendly: Cool completely, freeze, and reheat in the microwave for quick breakfasts.

Storage & Make-Ahead Information

  • Refrigerate: Store in an airtight container for up to 4 days.

  • Freeze: Freeze up to 3 months; thaw overnight in the fridge before reheating.

Nutrition Facts (per muffin, approx.)

Calories: ~180 | Protein: 9g | Carbs: 6g | Fat: 13g | Fiber: 0g | Sugar: 1g

FAQs

Q: Can I make these without Bisquick?
A: Yes, replace with 1 cup flour, 1½ tsp baking powder, and ¼ tsp salt.

Q: How do I keep them from drying out?
A: Avoid overbaking and store in an airtight container once cooled.

Personal Story

I first made these for a Saturday brunch when I didn’t feel like flipping pancakes or frying bacon. My family devoured them before I even got a second cup of coffee — they’ve been a weekend staple ever since.

If you’d like, I can also prepare a “3-in-1 Breakfast Muffin Trio” section for your blog so readers get a sausage version, a veggie version, and a sweet muffin option all in one post. That would make this recipe even more appealing. Want me to put that together?

Garlic Butter Beef and Rice

A one-pan comfort classic — tender rice, savory beef, and a silky garlic butter cheese sauce come together for an easy, hearty dinner.

Servings: 4–6
Prep Time: 10 minutes
Cook Time: 30 minutes
Total Time: 40 minutes
Dietary Badges: Contains Dairy, Contains Gluten-Free Option (with GF broth)

Ingredients

Main Ingredients

  • Ground beef (450g)

  • Long-grain white rice, uncooked (200g)

  • Low-sodium beef broth (720ml)

  • Small onion, diced

  • Garlic cloves, minced

Dairy and Cheese

  • Butter, divided (45g total)

  • Sharp cheddar cheese, shredded (120g)

  • Parmesan cheese, freshly grated (50g)

  • Whole milk (120ml)

Seasoning and Garnish

  • Salt, to taste

  • Black pepper, to taste

  • Italian seasoning (1 tsp)

  • Fresh parsley, chopped (2 tbsp, optional garnish)

Instructions

  1. Sauté Onions: In a large skillet over medium heat, melt 15g butter. Add diced onion and cook 3–4 minutes until translucent.

  2. Brown Beef: Add ground beef and cook, breaking apart with a spoon, until browned. Drain excess fat if needed.

  3. Add Garlic: Stir in minced garlic; cook 1 minute until fragrant.

  4. Add Rice & Liquid: Stir in uncooked rice, beef broth, Italian seasoning, salt, and pepper. Mix well so rice is evenly coated.

  5. Simmer: Bring to a boil, then reduce heat to low, cover, and simmer 18–20 minutes until rice is tender and most liquid absorbed. Avoid lifting the lid too often.

  6. Make Cheese Sauce: While rice cooks, melt remaining 30g butter in a small saucepan over low heat. Add milk, cheddar, and Parmesan, stirring constantly until smooth.

  7. Combine: Pour cheese sauce into skillet with beef and rice; stir until creamy and fully combined.

  8. Finish & Serve: Cook uncovered 2–3 minutes for flavors to meld. Garnish with parsley and serve hot.

Notes:

  • For extra flavor, toast the uncooked rice in the skillet for 1–2 minutes before adding broth.

  • Add veggies like diced bell peppers, mushrooms, or peas for variety.

Brief Introduction

This garlic butter beef and rice is comfort food at its finest — one pan, simple steps, and flavors that hit all the right notes. The creamy cheese sauce elevates it from weeknight meal to irresistible family favorite.

Step-by-Step Cooking Guide

Building the Base

  1. Onion & Beef: Create a savory foundation with sautéed onions and browned beef.

  2. Garlic Boost: Add minced garlic for that warm, aromatic kick.

Cooking the Rice

  1. Simmer to Tender: Let rice absorb broth and seasonings for a flavorful, fluffy finish.

Cheese Sauce Magic

  1. Low & Slow: Melt butter, milk, cheddar, and Parmesan over low heat, whisking constantly until smooth.

Final Blend

  1. Creamy Finish: Stir the sauce into the beef-rice mix and serve while hot and melty.

Ingredient Details & Substitution Tips

  • Beef: Use lean beef for less grease; ground turkey or chicken works too.

  • Rice: Long-grain holds its shape best; jasmine adds a subtle floral note.

  • Cheddar & Parmesan: Freshly shredded melts smoother than pre-packaged.

  • Milk: Swap with half-and-half for richer sauce.

  • Italian Seasoning: Use fresh herbs for a brighter flavor.

Recipe Variations & Serving Suggestions

  • Veggie Boost: Stir in spinach or broccoli before adding cheese sauce.

  • Spicy Kick: Add red pepper flakes or diced jalapeños.

  • Serving Ideas: Serve with a simple side salad or garlic bread.

Storage & Make-Ahead Information

  • Refrigeration: Store in airtight container for up to 4 days.

  • Freezing: Freeze in portions up to 2 months; thaw before reheating.

  • Reheating: Microwave gently, stirring occasionally; add a splash of milk if needed.

  • Make-Ahead: Cook rice and beef mixture ahead; reheat with fresh cheese sauce.

Nutrition Facts (per serving, 6 servings)

Calories: ~430 kcal | Carbs: 32g | Protein: 22g | Fat: 24g | Sodium: 640mg

FAQs

Q: Can I use brown rice?
A: Yes, but increase broth to 900ml and simmer for 35–40 minutes.

Q: Can I skip the cheese sauce?
A: Yes — you’ll have a flavorful garlic butter beef and rice without the creamy element.

Q: How do I keep the sauce smooth?
A: Use low heat and constant stirring to prevent separation or graininess.

Personal Story

I first made this dish as a quick dinner after a busy workday. The cheesy garlic butter sauce was a last-minute addition — and it turned a simple beef and rice skillet into something that tasted like a hug in a bowl.

If you want, I can also create step-by-step photo captions so this is fully ready for the “visual guide” section of your blog posts. Would you like me to prepare those?

Easy Cabbage and Beef Casserole Bake

All the hearty flavors of stuffed cabbage rolls in an effortless, one-pan casserole — no rolling required!

Servings: 8
Prep Time: 15 minutes
Cook Time: 1 hour 30 minutes
Rest Time: 5–10 minutes
Total Time: 1 hour 45 minutes
Dietary Badges: Contains Meat, Gluten-Free (if using GF broth and rice)

Ingredients

Main Ingredients

  • Ground beef

  • Cabbage, chopped

  • White onion, chopped

  • Uncooked white rice

  • Salt

Sauce and Liquid

  • Tomato sauce

  • Beef broth

Instructions

  1. Preheat & Prep: Heat oven to 350°F (175°C). Gather and prep all ingredients.

  2. Brown Beef: In a large skillet over medium-high heat, cook ground beef for 5–7 minutes until browned, breaking up as it cooks. Drain excess grease.

  3. Mix Base: In a large bowl, combine chopped cabbage, tomato sauce, onion, uncooked rice, salt, and cooked beef. Stir well to combine.

  4. Assemble: Transfer mixture to a 9×13-inch casserole dish and spread evenly.

  5. Add Liquid: Pour beef broth evenly over the mixture. Cover tightly with foil.

  6. First Bake: Bake covered for 1 hour.

  7. Stir & Continue Baking: Remove from oven, stir gently, cover again, and bake an additional 20–30 minutes until cabbage is tender and rice is fully cooked.

  8. Rest & Serve: Let casserole rest 5–10 minutes before serving.

Notes:

  • For a cheesy version, add shredded cheese on top during the last 10 minutes of baking.

  • Swap ground beef with turkey or pork for a lighter variation.

Brief Introduction

This casserole delivers the same cozy satisfaction as traditional stuffed cabbage rolls but skips the time-consuming rolling. It’s a simple, budget-friendly dish that makes a big batch — perfect for feeding a crowd or meal prepping.

Step-by-Step Cooking Guide

Preparing the Base

  1. Brown the Beef: Cook in a large skillet until no longer pink. Drain excess fat for a lighter result.

  2. Mix the Ingredients: Combine cabbage, onion, rice, tomato sauce, salt, and beef in a large bowl.

Layering & Baking

  1. Assemble in Dish: Spread the mixture evenly in the casserole dish.

  2. Add Broth & Bake: Pour beef broth over the top, cover tightly, and bake.

  3. Final Bake: Stir after 1 hour, then continue baking until cabbage is soft and rice is tender.

Ingredient Details & Substitution Tips

  • Ground Beef: Use lean beef for less grease; substitute turkey or pork as desired.

  • Cabbage: Green cabbage works best, but savoy or napa cabbage can be used for a softer texture.

  • Rice: White rice cooks evenly in the oven; brown rice or quinoa can be substituted (adjust liquid and baking time).

  • Beef Broth: Use low-sodium broth to control salt levels; vegetable broth works for a lighter flavor.

Recipe Variations & Serving Suggestions

  • Cheesy Top: Sprinkle with mozzarella, cheddar, or Monterey Jack during the last 10 minutes.

  • Extra Veggies: Add chopped bell peppers, carrots, or zucchini for more color and nutrition.

  • Serving Ideas: Pair with crusty bread or a light green salad for a complete meal.

Storage & Make-Ahead Information

  • Refrigeration: Store in an airtight container up to 4 days.

  • Freezing: Portion and freeze for up to 3 months.

  • Reheating: Bake covered at 300°F until hot, or microwave individual servings.

  • Make-Ahead: Assemble up to 24 hours before baking; store covered in the fridge.

Nutrition Facts (per serving, 8 servings)

Calories: ~310 kcal | Carbs: 27g | Protein: 20g | Fat: 14g | Fiber: 4g | Sodium: 720mg

FAQs

Q: Can I use cooked rice?
A: Yes, but reduce the broth to about 1 cup and shorten baking time by 20–25 minutes.

Q: How do I keep it from being watery?
A: Make sure to cover tightly during baking and allow resting time so excess liquid is absorbed.

Q: Can I make it vegetarian?
A: Yes — replace beef with lentils or plant-based crumbles and use vegetable broth.

Personal Story

This casserole was inspired by my grandmother’s cabbage rolls, which she made in huge batches for family gatherings. I wanted the same flavor but without the hours of prep, so I turned it into a bake — and now it’s a weeknight regular in my kitchen.

If you’d like, I can prepare photo captions for each step so you can directly drop them into your blog’s visual guide section, keeping this post fully in line with your outlined recipe structure. Would you like me to do that?

🧀 Copycat Longhorn Parmesan Crusted Chicken

Better than the restaurant version—crispy, cheesy, and full of flavor!

Ingredients

For the Chicken:

  • 4 boneless, skinless chicken breasts

  • 1 tbsp olive oil

  • Salt & pepper, to taste

  • 1 tsp garlic powder

  • 1 tsp paprika

For the Ranch Spread:

  • 1/4 cup ranch dressing

  • 2 tbsp grated Parmesan cheese

For the Parmesan Crust:

  • 1/2 cup shredded Parmesan cheese

  • 1/2 cup shredded provolone or mozzarella cheese

  • 1/4 cup panko breadcrumbs

  • 1 tbsp melted butter

  • 1 tsp dried parsley

Instructions

  1. Preheat oven to 400°F (200°C).

  2. Prep chicken – Pound breasts to an even thickness. Season both sides with salt, pepper, garlic powder, and paprika.

  3. Sear – Heat olive oil in skillet over medium-high heat. Cook chicken 3–4 minutes per side until golden. Transfer to baking dish.

  4. Make ranch spread – Mix ranch dressing with grated Parmesan. Spread evenly over chicken.

  5. Make Parmesan crust – Combine shredded Parmesan, provolone (or mozzarella), panko, melted butter, and parsley. Spoon over chicken and press lightly to adhere.

  6. Bake – 15–18 minutes, until chicken reaches 165°F (74°C) and topping is golden.

  7. Optional broil – Broil for 1–2 minutes for extra crispiness.

  8. Rest & serve – Let rest 5 minutes before serving.

Prep Time: 15 min

Cook Time: 20 min

Total Time: 35 min

Servings: 4 | Calories: ~480 per serving

🥧 Chicken Pot Pie Pasta Bake with Puff Pastry

Ingredients

  • 12 oz penne pasta

  • 3 tbsp unsalted butter

  • 1 medium onion, diced

  • 2 medium carrots, diced

  • 2 celery stalks, diced

  • 2 cloves garlic, minced

  • 1/4 cup all-purpose flour

  • 2 cups chicken broth

  • 1 cup whole milk

  • 3 cups cooked chicken (shredded or chopped, rotisserie recommended)

  • 1 cup frozen peas (no need to thaw)

  • 1/2 tsp dried thyme

  • Salt & pepper, to taste

  • 1 sheet puff pastry, thawed

  • 1 egg, beaten (for egg wash)

Instructions

  1. Preheat oven to 375°F (190°C). Grease a 9×13-inch baking dish.

  2. Cook pasta until just al dente; drain and set aside.

  3. Sauté vegetables – In a large skillet, melt butter over medium heat. Add onion, carrots, and celery; cook 5–7 minutes until softened. Stir in garlic and cook 1 minute more.

  4. Make the sauce – Sprinkle flour over vegetables and cook 1–2 minutes, stirring. Gradually whisk in chicken broth and milk until smooth. Simmer until thickened.

  5. Add fillings – Stir in cooked chicken, peas, thyme, salt, and pepper. Let bubble for a few minutes.

  6. Combine pasta & sauce – Add pasta to skillet and toss gently to coat.

  7. Assemble – Transfer mixture to prepared baking dish. Lay puff pastry over the top, trimming or tucking edges as needed. Brush with beaten egg.

  8. Bake – 25–30 minutes, until puff pastry is golden and filling is bubbly.

  9. Cool slightly – Let rest 5–10 minutes before serving.

Notes & Tips

  • Use rotisserie chicken for quick prep and extra flavor.

  • Don’t overcook pasta—baking will finish it.

  • Make sure sauce is thick before adding pasta to prevent sogginess.

  • Optional: Stir in shredded cheddar or Parmesan before baking for a cheesy twist.

🍡 Deep-Fried Jumbo Marshmallows

Ingredients

  • Jumbo marshmallows

  • Pancake mix (prepared with…)

    • 1 egg

    • Milk (per package instructions)

    • Small drizzle of vegetable oil

  • Vegetable oil (for frying)

  • Optional toppings: whipped cream, chocolate syrup, sprinkles

Instructions

  1. Heat Oil – Pour about 3 inches of vegetable oil into a deep pot and heat to 350°F (175°C).

  2. Make Batter – In a medium bowl, whisk pancake mix, egg, milk, and a drizzle of oil until smooth.

  3. Coat Marshmallows – Dip each jumbo marshmallow into batter, coating completely, and shake off excess.

  4. Fry – Carefully place coated marshmallows into hot oil. Fry 30 seconds–1 minute, turning occasionally, until golden brown.

  5. Drain – Remove with a slotted spoon and drain on paper towels.

  6. Serve & Top – While warm, top with whipped cream, drizzle with chocolate syrup, and sprinkle with sprinkles.

Tips & Variations

  • Keep oil at 350°F for even cooking—too hot and the batter burns before the marshmallow melts; too cool and they get greasy.

  • Fry in small batches to keep oil temperature steady.

  • Fun variations:

    • Roll in cinnamon sugar instead of topping with syrup.

    • Fill marshmallows with chocolate or peanut butter chips before frying.

    • Use caramel sauce for drizzling instead of chocolate.

🍫 Decadent German Chocolate Pecan Pound Cake

Ingredients

For the Cake

  • 1 cup unsalted butter, softened

  • 2 cups white sugar

  • 4 eggs

  • 1 tsp vanilla extract

  • 2 cups all-purpose flour

  • ½ tsp baking powder

  • ¼ tsp salt

  • 1 cup sour cream

  • 1 cup German chocolate, chopped

  • 1 cup pecans, chopped and toasted

For the German Chocolate Pecan Glaze

  • 1 cup German chocolate, chopped

  • ½ cup heavy cream

  • ½ cup pecans, chopped and toasted

Instructions

1. Prepare the Cake

  1. Preheat oven to 325°F (165°C). Grease and flour a 10-inch bundt pan.

  2. In a large bowl, cream butter and sugar until light and fluffy.

  3. Beat in eggs one at a time, then stir in vanilla.

  4. In a separate bowl, whisk flour, baking powder, and salt.

  5. Gradually add dry ingredients to butter mixture, alternating with sour cream. Mix until just combined.

  6. Fold in chopped German chocolate and toasted pecans.

  7. Pour batter into prepared pan and smooth the top.

  8. Bake for 60–70 minutes, or until a toothpick comes out clean.

  9. Cool in pan for 10 minutes, then transfer to a wire rack to cool completely.

2. Make the Glaze

  1. In a small saucepan, heat heavy cream until it begins to simmer.

  2. Remove from heat, add German chocolate, and let sit for 2–3 minutes. Stir until smooth.

  3. Drizzle glaze over cooled cake. Sprinkle with toasted pecans.

Tips for Success

  • Toast Pecans: Spread on a baking sheet and bake at 350°F (175°C) for 5–7 minutes until fragrant.

  • Sour Cream Swap: Use plain Greek yogurt if needed.

  • Storage: Airtight container at room temp for 3 days, or refrigerate for longer. Freezes well wrapped in plastic and foil.

Prep Time: 20 min
🔥 Bake Time: 60–70 min
🍽 Servings: 12–14
📈 Calories: ~450 per serving

🍋 Garlic Herb Lemon Chicken Bites

Ingredients

  • 1 lb chicken breast, cut into bite-sized pieces

  • 1 tsp dried oregano

  • 1 tsp dried basil

  • 2 tbsp fresh parsley, chopped

  • 1 tsp kosher salt

  • ½ tsp black pepper

  • 3 tbsp unsalted butter, divided

  • 3 cloves garlic, minced

  • 2 tbsp fresh lemon juice

Instructions

  1. Season the Chicken

    • In a medium bowl, mix oregano, basil, parsley, salt, and pepper.

    • Toss chicken pieces in the seasoning mix until evenly coated.

  2. Cook the Chicken

    • Heat a large skillet over medium heat.

    • Add 1½ tbsp butter and melt.

    • Place chicken in a single layer and cook 8–10 minutes, flipping halfway, until golden and almost cooked through.

  3. Make the Garlic Butter Sauce

    • Add remaining 1½ tbsp butter to the skillet.

    • Once melted, stir in minced garlic and cook 1 minute until fragrant.

  4. Finish with Lemon

    • Drizzle lemon juice over chicken, toss to coat in the sauce.

    • Remove from heat and serve hot.

💡 Notes & Tips

  • Add red pepper flakes or cayenne for heat.

  • Swap butter for olive oil to make it dairy-free.

  • Fresh parsley can be replaced with dill or cilantro.

  • Toss in quick-cooking vegetables like zucchini or spinach with the garlic step for a complete skillet meal.

Prep Time: 10 min
🔥 Cook Time: 10 min
🍽 Servings: 4

Seven Layer Taco Salad

Ingredients

  • 1 head lettuce, shredded

  • 1 can black beans, rinsed & drained

  • 1 cup cherry tomatoes, halved

  • 1 cup corn, drained

  • 1 cup shredded cheese (cheddar or Mexican blend)

  • 1 cup sour cream

  • 1 package taco seasoning

  • 1 cup salsa

  • Tortilla chips, for topping

Optional Garnish: extra cheese, green onions, fresh cilantro

👨‍🍳 Instructions

  1. Mix the Dressing

    • In a small bowl, combine sour cream and taco seasoning. Set aside.

  2. Layer the Salad (use a clear glass bowl or trifle dish for presentation)

    1. Shredded lettuce

    2. Black beans

    3. Corn

    4. Cherry tomatoes

    5. Shredded cheese

    6. Taco-seasoned sour cream

    7. Salsa

  3. Top & Serve

    • Just before serving, sprinkle crushed tortilla chips on top for crunch.

    • Garnish with extra cheese, green onions, or fresh cilantro if desired.

Prep Time: 15 min
🔥 Cook Time: None
📅 Total Time: 15 min
🍽 Servings: 6–8
Calories: ~320 kcal per serving

💡 Tip: Add guacamole or diced avocado between layers for extra creaminess.

If you want, I can also make a “walking taco salad” version of this that’s perfect for parties or picnics—no bowl needed. Would you like me to write that up?

Creamy Zucchini Soup

Ingredients

  • 2 tbsp butter

  • 1 yellow onion, peeled & diced

  • 3 garlic cloves, peeled & minced

  • ¼ tsp dried rosemary

  • ¼ tsp dried thyme

  • Pinch dried oregano

  • ¼ tsp celery salt

  • Salt & pepper, to taste

  • Dash cayenne pepper (optional)

  • 5 cups fresh zucchini, chopped

  • 3–4 cups chicken broth

  • 1 tbsp soy sauce

  • 1 lb russet potatoes, washed, peeled, & diced

  • ½ cup heavy cream (room temperature)

  • 1¼ cups shredded cheddar cheese (room temperature)

👨‍🍳 Instructions

  1. Sauté Aromatics
    Melt butter in a large Dutch oven over medium heat. Add onion and cook until translucent.
    Add garlic and cook 1 more minute.

  2. Season
    Stir in rosemary, thyme, oregano, celery salt, cayenne, salt, and pepper.

  3. Cook Vegetables
    Add zucchini and cook for 5 minutes, stirring occasionally.

  4. Simmer
    Add potatoes, chicken broth, and soy sauce. Bring to a boil, reduce heat, and simmer 15–20 minutes or until vegetables are tender.

  5. Blend
    Remove from heat and blend soup until smooth using an immersion blender or regular blender (in batches if needed).

  6. Finish with Cream & Cheese
    Stir in heavy cream and cheddar cheese until melted and fully incorporated.

  7. Serve
    Serve warm, garnished with fresh herbs if desired.

💡 Tips:

  • For a vegetarian version, use vegetable broth instead of chicken broth.

  • Add a little extra cayenne or red pepper flakes for a spicy kick.

  • This soup freezes well—just skip adding the cream and cheese until reheating.

If you want, I can also make a printable one-page recipe card for this so it’s ready for your cookbook. Would you like me to do that?

Easy Fajita Chicken Breasts Casserole

The  Fajita Chicken Breasts Casserole is a delightful twist on a classic Tex-Mex favorite, carefully crafted to be both flavorful and health-conscious. This wholesome dish features tender chicken breasts seasoned with a harmonious blend of cumin, chili powder, garlic, and paprika, offering a burst of vibrant flavors with every bite. The addition of colorful bell peppers and minced onions not only adds a pleasing visual appeal but also contributes a delightful crunch and sweetness to the dish. Topped with a generous sprinkling of reduced-fat mozzarella cheese, this casserole bakes to golden perfection, creating a satisfyingly gooey and cheesy layer over the succulent chicken and vegetables.

Thank you for reading this post, don’t forget to subscribe!

Garnished with freshly chopped cilantro or parsley for a final touch of brightness, this dish is as visually stunning as it is delicious. Whether served over cauliflower rice, steamed vegetables, or enjoyed on its own, this Fajita Chicken Breasts Casserole promises to be a comforting and nutritious meal option that’s perfect for any occasion. With its balanced flavors, customizable spice level, and suitability for meal prep, it’s a versatile recipe that’s sure to become a household favorite among those following a  plan or simply looking for a lighter take on a beloved classic.

Ingredients:

  • 3-4 small boneless, skinless chicken breasts (about 1 1/2 lbs/750g), or 2 large chicken breasts, sliced lengthwise
  • 2 bell peppers (1 red and 1 green), seeded and sliced into strips
  • 1 medium onion, minced
  • 1 teaspoon ground cumin
  • 1 1/2 teaspoons chili powder
  • 1 teaspoon garlic powder or minced garlic
  • 2 teaspoons paprika
  • Salt and freshly ground black pepper to taste
  • 1 tablespoon vegetable oil
  • 1 cup grated reduced-fat mozzarella cheese or your favorite reduced-fat cheese
  • Chopped fresh cilantro or parsley for garnish

Directions:

  1. Preheat your oven to 400°F (200°C) and lightly coat a baking dish with cooking spray.
  2. Season chicken breasts on both sides with cumin, chili powder, garlic, paprika, salt, and pepper. Reserve some seasoning for later use.
  3. Place the chicken breasts in the prepared baking dish and drizzle with oil. Top with peppers and onions, and sprinkle with the remaining fajita seasonings. Finish with grated reduced-fat mozzarella cheese.
  4. Bake the chicken fajita casserole for 20 to 30 minutes (depending on thickness) or until the chicken is cooked through and reaches an internal temperature of 165°F (74°C). You can broil the dish for 2 minutes at the end to crisp the top if desired.
  5. Serve immediately over cauliflower rice, steamed vegetables, zucchini noodles, or on its own.
  6. Garnish with chopped fresh cilantro or parsley before serving.

Points:

  • This recipe makes approximately 4 servings.
  • Points per serving (without accompaniments): Each serving is approximately 4-5  SmartPoints, depending on specific ingredients used.

Notes:

  • Adjust the spiciness according to your preference by increasing or decreasing the amount of chili powder and black pepper.
  • For a smoky flavor, you can substitute the paprika with smoked paprika.
  • This recipe is great for meal prep as it can be easily reheated for a quick and delicious lunch or dinner.

Honey Lemon Chicken & Avocado Rice Stack

Mediterranean Honey Lemon Chicken & Avocado Rice Stack
Table of Contents
This Mediterranean Honey Lemon Chicken & Avocado Rice Stack is a vibrant, layered dish that combines warm, zesty chicken with a fragrant herb rice base and creamy avocado. It’s not only visually stunning but also packed with bold flavors and nutritious ingredients. Perfect for a summer lunch, light dinner, or a meal-prep-friendly option, this recipe brings together the brightness of the Mediterranean with a modern presentation. Think of it as a wholesome grain bowl—stacked!

Total Time:
Prep Time: 15 minutes

Cook Time: 20 minutes

Total Time: 35 minutes

Servings: 2–3 stacks

Ingredients:
For the Chicken:
2 boneless, skinless chicken breasts

2 tablespoons extra virgin olive oil

1 tablespoon honey

Juice of 1 lemon (about 2 tablespoons)

2 garlic cloves, minced

1 teaspoon dried oregano

½ teaspoon dried thyme

Salt and black pepper, to taste

For the Rice Layer:
1 cup cooked basmati or brown rice

1 tablespoon olive oil

½ teaspoon dried mint or parsley

Pinch of salt

For the Avocado Layer:
1 ripe avocado, diced

Juice of ½ lemon

Salt and pepper, to taste

Optional Toppings:
Cherry tomatoes, halved

Cucumber, finely diced

Crumbled feta cheese

Chopped fresh parsley or basil

See also Mushroom Rice
Drizzle of extra virgin olive oil

Instructions:
1. Marinate and Cook the Chicken:
In a bowl, combine olive oil, honey, lemon juice, minced garlic, oregano, thyme, salt, and pepper.

Add the chicken breasts and coat well. Marinate for at least 15 minutes (or overnight if time allows).

Heat a skillet or grill pan over medium heat. Cook the chicken 5–6 minutes per side until golden brown and cooked through.

Let it rest for 5 minutes, then slice thinly.

2. Prepare the Rice Layer:
In a bowl, toss the cooked rice with olive oil, dried mint or parsley, and a pinch of salt.

Warm slightly if desired or use at room temperature.

3. Make the Avocado Layer:
In a separate bowl, gently mix the diced avocado with lemon juice, salt, and pepper.

Mash slightly for a chunky texture, or keep in cubes depending on preference.

4. Assemble the Stack:
Use a food ring mold or a clean measuring cup to layer the stack (lightly oil it if needed).

Press a layer of herbed rice into the bottom.

Add a layer of avocado mix and press gently.

Top with sliced honey lemon chicken.

Gently lift the mold to reveal your stack.

5. Garnish and Serve:
Top with cherry tomatoes, diced cucumber, crumbled feta, chopped herbs, and a drizzle of olive oil.

Serve immediately for the best presentation and flavor.

Tips for Success:
Marinate Longer for Deeper Flavor:
If time permits, marinate the chicken for 2–4 hours or overnight in the fridge. The longer soak enhances the lemon-honey-garlic notes.

Use a Mold for a Clean Stack:
A stainless steel food ring or a 1-cup measuring cup works great for clean layering. Lightly oil the inside to release easily.

See also Rotisserie Chicken Mushroom Soup
Keep Avocado Fresh:
Toss avocado with lemon juice immediately after dicing to prevent browning. Assemble just before serving for the best color and texture.

Warm or Room Temp:
The rice can be served warm, but make sure the avocado isn’t hot when layering. Keep components at similar temperatures for best stacking and taste.

Slice Chicken Thinly:
For the best bite and presentation, let the chicken rest after cooking and then slice it thinly across the grain.

Customize Texture:
You can mash the avocado slightly for a creamier middle layer or keep it cubed for a chunkier, fresher feel.

Variations:
Grain Swap:
Substitute the rice with:

Quinoa for extra protein

Farro for a nutty bite

Cauliflower rice for a low-carb option

Protein Options:

Swap chicken with grilled shrimp, salmon, or chickpeas for a pescatarian or vegetarian version.

Spicy Kick:
Add red pepper flakes or a dash of harissa paste to the chicken marinade for a spicy Mediterranean flair.

Avocado Sauce Alternative:
Blend the avocado with a bit of yogurt, lemon, olive oil, and garlic to create a smooth avocado cream layer or drizzle.

Add Crunch:
Top with toasted pine nuts, crispy chickpeas, or crushed pita chips for added texture.

Make It a Bowl:
If you don’t want to stack, simply layer all components in a bowl and serve as a deconstructed version.

Vegan Version:
Use maple syrup instead of honey, and substitute chicken with grilled tofu, tempeh, or roasted vegetables.

Q&A: Frequently Asked Questions
Q1: Can I make this ahead of time?
Yes, you can prep the components (chicken, rice, and avocado) ahead of time. Store them separately in airtight containers. Assemble the stacks just before serving for best texture and presentation.

See also Mediterranean-Style Creamy Beef & Tortellini Pasta
Q2: What can I use if I don’t have a food ring mold?
You can use a 1-cup measuring cup or even a cleaned tuna can with both ends removed. Lightly oil it for easy release.

Q3: How do I store leftovers?
Store leftovers in separate containers. Avocado may brown over time, so it’s best eaten fresh. Add lemon juice to slow oxidation.

Q4: Can I serve this cold?
Yes! This recipe works well chilled, especially in summer. Just let the rice and chicken cool completely before stacking.

Q5: Is this gluten-free?
Yes—this dish is naturally gluten-free as long as you use certified gluten-free rice and ingredients.

Estimated Nutrition (Per Stack – serves 2–3)
Note: Values are estimates and may vary based on exact portions and toppings.

Calories: ~450–500 kcal

Protein: 28–32g

Carbohydrates: 35–40g

Fat: 22–25g

Fiber: 5–7g

Sugar: 6–8g

Sodium: ~400–500mg

Includes chicken, avocado, rice, olive oil, and toppings like feta and vegetables.

Conclusion
The Mediterranean Honey Lemon Chicken & Avocado Rice Stack is a perfect harmony of flavors—sweet, citrusy, herbaceous, and creamy—all layered into a stunning stack. Whether you’re preparing a beautiful brunch, an elegant lunch, or simply want a fresh, wholesome meal-prep idea, this dish fits the bill. It’s easy to adapt, impressively presented, and bursting with Mediterranean goodness.

Try it once, and you’ll be stacking it again and again!

One-Pan Garlic Herb Chicken with Potatoes & Green Beans Recipe

One-Pan Garlic Herb Chicken with Potatoes & Green Beans Recipe

‼️

Ingredients
For the Chicken
4 boneless, skinless chicken breasts 🍗
2 tbsp olive oil 🛢
2 tsp garlic powder
1 tsp onion powder
1 tsp dried oregano 🌿
1 tsp paprika 🌶
Salt &  black pepper to taste 🧂
For the Vegetables
3 cups baby potatoes 🥔 (quartered)
2 cups fresh green beans 🥦
2 tbsp olive oil 🛢
2 garlic cloves 🧄 (minced)
1 tsp dried thyme 🌱
1 tsp smoked paprika 🌶
Salt &  pepper to taste 🧂
For the Sauce
1/4 cup chicken bone broth 🍲
Juice of 1 lemon 🍋
1 tbsp Dijon mustard 🥄
Directions
Preheat the oven: Preheat to 400°F (200°C) and lightly grease a large  baking dish.
Season the chicken: Rub chicken breasts with olive oil, garlic powder, onion powder, oregano, paprika, salt, and pepper. Set aside.
Prepare the veggies: Toss potatoes and green beans in olive oil, minced garlic, thyme, paprika, salt, and pepper. Spread evenly in the baking dish.
Assemble the dish: Nestle the chicken breasts on top of the veggies.
Make the sauce: Whisk together chicken broth, lemon juice, and Dijon mustard. Drizzle over the chicken and vegetables.
Bake: Roast for 40-45 minutes or until the chicken reaches an internal temperature of 165°F (74°C) and the potatoes are tender.
Serve & enjoy: Let rest for 5 minutes before slicing the chicken. Plate with veggies and drizzle any remaining sauce from the pan for extra flavor!
Notes & Variations
Veggie swap: Use carrots, zucchini, or bell peppers instead of green beans.
Make it spicy: Add a dash of chili flakes for a kick. 🌶
Add cheese: Sprinkle Parmesan over the dish during the last 10 minutes of baking for a cheesy finish. 🧀

Apple Salad with Honeycrisp Apples, Celery, Grapes, Pecans, and Dried Cranberrie

Introduction: A Fresh, Flavorful, and Nutrient-Dense Salad
Salads are a cornerstone of healthy eating, and when prepared thoughtfully, they can serve as both a satisfying and nutrient-packed meal. This WW Apple Salad with Honeycrisp Apples, Celery, Grapes, Pecans, and Dried Cranberries brings together the best of fresh fruits, crunchy vegetables, and healthy fats for a refreshing dish that’s perfect for any occasion. Whether you’re seeking a light lunch, an energizing snack, or a flavorful side dish, this salad delivers on both taste and health benefits while keeping SmartPoints low.

Made with the crisp sweetness of Honeycrisp apples, the freshness of celery, and the sweetness of grapes and dried cranberries, this salad is bursting with vibrant flavors and textures. Pecans add a delightful crunch while also providing healthy fats and protein, making the dish more filling. It’s the perfect balance of sweet, savory, and satisfying, without being too heavy.

by TaboolaSponsored Links
You May Like
Play War Thunder now for free
War Thunder
War Thunder – Register now for free and play against over 75 Million real Players
War Thunder
Villas For Sale in Dubai Might Surprise You
Villas In Dubai | Search Ads
In this comprehensive guide, we’ll take you through the step-by-step process of creating this Apple Salad, providing the exact measurements, detailed instructions, and nutritional information. Whether you’re following the WW program, a Keto lifestyle, or simply want to enjoy a refreshing and delicious salad, this recipe will suit all your needs.

Ingredients for WW Apple Salad with Honeycrisp Apples, Celery, Grapes, Pecans, and Dried Cranberries
The key to making this WW Apple Salad both tasty and nutritious is the careful selection of fresh ingredients. Each component adds its own unique texture, flavor, and nutritional value, resulting in a delightful mix of sweetness, crunch, and tang.

For the Salad:
2 medium Honeycrisp apples (or any other variety you prefer) – Honeycrisp apples are known for their crisp texture and perfect balance of sweetness and tartness. This variety of apple is ideal for a fresh salad, providing a refreshing crunch and natural sweetness.
2 stalks celery, finely chopped – Celery adds a refreshing, crunchy texture and is low in calories, which makes it the perfect low-carb ingredient. It’s also packed with fiber and antioxidants.
1 cup red or green grapes, halved – Grapes are naturally sweet, which complements the apples and dried cranberries in this salad, adding a burst of juiciness.
1/2 cup pecans, roughly chopped – Pecans provide healthy fats, fiber, and protein, making them a great addition to balance the sweetness of the fruit and offer some crunch.
1/4 cup dried cranberries, unsweetened or lightly sweetened – Dried cranberries provide a chewy texture and a pop of color, while also contributing some natural sweetness and antioxidants.
1/4 cup crumbled feta cheese (optional) – Feta cheese adds a salty, tangy flavor that enhances the sweetness of the fruit, though you can omit it if you’re looking for a dairy-free version.
For the Dressing:
1/4 cup plain Greek yogurt – The creamy base of this dressing, Greek yogurt, is rich in protein and provides a tangy, smooth texture. For a lighter version, you can substitute it with non-fat yogurt.
1 tablespoon honey or maple syrup – A touch of honey or maple syrup adds a natural sweetness to balance the tartness of the apples and cranberries.
1 tablespoon apple cider vinegar – Apple cider vinegar is a great addition to the dressing for a tangy kick that balances out the sweetness of the honey and fruits.
1 tablespoon fresh lemon juice – Lemon juice adds a fresh and zesty flavor that brightens up the dressing and helps tie all the flavors together.
1 teaspoon Dijon mustard – Adds a mild kick and depth of flavor to the dressing, perfectly complementing the sweetness and creaminess.
Salt and pepper, to taste – Season the dressing to taste with salt and black pepper to enhance the overall flavor.
1 teaspoon olive oil (optional) – For a little extra creaminess and smooth texture, you can add a small amount of olive oil to the dressing.

Step-by-Step Instructions
Now that we’ve gathered all the ingredients for the WW Apple Salad, let’s walk through the process of making this delicious, healthy dish. The steps are simple and easy to follow, and the salad can be prepared in about 15-20 minutes. Let’s get started:

Step 1: Prepare the Ingredients
Start by prepping all your ingredients before assembling the salad. This ensures everything is ready to go when you’re ready to toss everything together.

Chop the apples: Core and slice the Honeycrisp apples into bite-sized pieces. You can choose to leave the skin on for added fiber, or peel them if you prefer a smoother texture. To prevent the apples from browning, you can toss them in a small amount of lemon juice or apple cider vinegar.
Chop the celery: Wash and chop the celery stalks into small pieces. Celery adds a wonderful crunch and is low in calories, so it’s a perfect base for the salad.
Prepare the grapes: Wash the grapes thoroughly, then slice them in half. Grapes add a sweet burst of flavor, so be sure to evenly distribute them throughout the salad.
Chop the pecans: Roughly chop the pecans. If you prefer, you can toast them for an added flavor boost, though this is optional.
Prepare the cranberries: If you’re using dried cranberries, make sure they’re unsweetened or lightly sweetened to keep the carb count low. If the cranberries are too sticky, you can lightly coat them with a dusting of cornstarch or arrowroot powder to keep them from clumping together.
Crumbled feta: If using, crumble the feta cheese into small pieces and set aside. It will be sprinkled on top at the end.
Step 2: Make the Dressing
While the salad ingredients are being prepped, make the creamy dressing.

In a small bowl, combine the Greek yogurt, honey, apple cider vinegar, lemon juice, and Dijon mustard. Whisk them together until smooth and well combined.
Taste the dressing and adjust the seasoning. Add salt and pepper as needed to enhance the flavors. If you prefer a slightly thinner dressing, you can add a small amount of water or additional lemon juice.
Step 3: Assemble the Salad
Once all the ingredients are ready, it’s time to assemble the salad.

In a large mixing bowl, add the prepared Honeycrisp apples, celery, grapes, pecans, and dried cranberries.
Pour the dressing over the salad and toss gently to combine. Be sure that each piece of fruit and vegetable is coated in the creamy dressing.
If using, sprinkle the crumbled feta cheese over the top and toss again lightly.
Step 4: Serve and Enjoy
Serve the salad immediately or refrigerate it for later use. This WW Apple Salad is a perfect side dish for grilled chicken or as a standalone meal. It’s perfect for meal prepping and can last for up to 2-3 days when stored in an airtight container in the fridge.

Tips for Making the Best WW Apple Salad
Use fresh ingredients: The key to a flavorful salad is using the freshest ingredients you can find, especially when it comes to the apples and grapes. Honeycrisp apples are sweet and crisp, which makes them ideal for this salad.
Dressing options: If you prefer a dairy-free version of this salad, you can swap the Greek yogurt for a plant-based yogurt (such as coconut or almond milk yogurt). Additionally, you can opt for agave syrup or stevia as a substitute for honey if you’re avoiding sugar.
Make it a meal: To turn this side salad into a more substantial meal, consider adding some grilled chicken, shrimp, or a scoop of your favorite protein. It will help balance out the macronutrients and keep you full for longer.
Keep it crunchy: If you plan to make the salad ahead of time, it’s a good idea to keep the dressing separate until just before serving to ensure the fruits and vegetables stay crisp.
Add extra texture: If you’re looking for additional crunch, try adding some chopped almonds, walnuts, or sunflower seeds for a boost of healthy fats.
Nutritional Breakdown
This WW Apple Salad is not only delicious but also a healthy choice, providing a good balance of vitamins, antioxidants, and fiber with low SmartPoints. Here’s the nutritional breakdown per serving:

Per Serving (1/4 of the recipe):
Calories: 140 kcal
Protein: 2g
Fat: 9g
Carbohydrates: 17g
Fiber: 3g
Net Carbs: 14g
Sugar: 12g
Sodium: 90mg
SmartPoints Breakdown (Weight Watchers):
Blue Plan: 4 SmartPoints per serving
Green Plan: 5 SmartPoints per serving
Purple Plan: 4 SmartPoints per serving
Conclusion
This WW Apple Salad is an ideal dish for anyone following the Weight Watchers program or anyone simply looking for a nutritious, low-carb salad option. It’s packed with fresh fruits, vegetables, healthy fats, and a creamy dressing that ties everything together in a delightful way. Whether served as a side dish or enjoyed as a standalone meal, this salad will keep you satisfied and on track with your dietary goals.

Enjoy it as a refreshing snack, a light lunch, or a side at your next gathering—this salad is sure to become a favorite in your meal prep rotation!

Two Ingredient Cupcakes

Ingredients
– 1 1/2 cups all-purpose flour
– 1 cup granulated sugar
– 1 1/2 tsp baking powder
– 1/2 tsp salt
– 1/2 cup vegetable oil
– 1/2 cup milk
– 2 large eggs
– 1 tsp vanilla extract
Instructions
Preheat your oven to 350°F (175°C) and line a muffin tin with cupcake liners.
In a bowl, whisk together the flour, sugar, baking powder, and salt.
In another bowl, combine the vegetable oil, milk, eggs, and vanilla extract. Mix until smooth.
Gradually add the wet ingredients to the dry ingredients, mixing until just combined. Be careful not to overmix.
Fill each cupcake liner about 2/3 full with batter.
Bake for 18-20 minutes, or until a toothpick inserted into the center comes out clean. Let the cupcakes cool in the pan for a few minutes, then transfer to a wire rack to cool completely.
Enjoy your budget-friendly vanilla cupcakes!