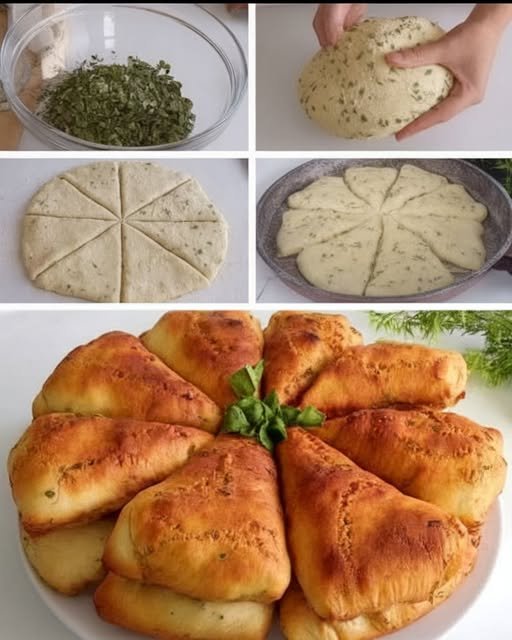
Yeast-Free Savory Cheese & Herb Triangles
Soft, pan-cooked or baked cheese-filled bread triangles made without yeast. Ideal for breakfast, tea time, or a light savory snack.
Preparation Time
-
Prep: 15 minutes
-
Resting: 5 minutes
-
Cooking: 10–12 minutes (pan) or 20–25 minutes (oven)
-
Total: About 30–35 minutes
Yield
-
Makes 8 medium triangles
Ingredients
Dairy & Eggs
-
2 large eggs (room temperature)
-
90 ml milk (about 1 tea glass)
-
80 g feta cheese or white cheese, crumbled
-
80 g cheddar or mozzarella cheese, grated
Fresh Herbs
-
3 green onions, finely chopped
-
5–6 sprigs fresh parsley, finely chopped
Dry Ingredients
-
3 cups all-purpose flour (approximately 360 g)
-
1 packet baking powder (10 g)
-
1 teaspoon salt (adjust depending on cheese saltiness)
For Cooking
-
1–2 tablespoons olive oil or vegetable oil (for greasing the pan or tray)
Step-by-Step Instructions
1. Prepare the Wet Mixture
In a large mixing bowl, crack the eggs and whisk lightly until the yolks and whites are combined. Add the milk and mix until smooth.
Add the crumbled white cheese and grated cheese. Stir gently so the cheeses are evenly distributed throughout the mixture.
2. Add Herbs and Seasoning
Add the finely chopped green onions and parsley to the bowl. Sprinkle in the salt. Mix well to ensure the herbs are spread evenly.
3. Form the Dough
Sift the baking powder into the flour. Add the flour gradually to the bowl, one cup at a time, mixing with a spoon or your hand.
Once the mixture begins to come together, knead gently until a soft, smooth dough forms.
Dough texture guide:
-
If the dough feels sticky, add 1 tablespoon of flour at a time.
-
If the dough feels dry or crumbly, add 1–2 teaspoons of milk.
The dough should be soft and easy to handle, not stiff.
4. Shape the Dough
Lightly flour your work surface. Place the dough on it and gently press or roll it into a round shape about 1 cm (½ inch) thick.
Using a knife or pizza cutter, divide the dough into 8 equal triangles, similar to slicing a pizza.
5. Cooking Options
Pan Method
-
Lightly grease a non-stick pan with oil.
-
Place the triangles in the pan, leaving a little space between them.
-
Cover with a lid and cook over medium-low heat for about 5 minutes.
-
Turn the triangles carefully and cook the other side for another 4–5 minutes until both sides are evenly cooked.
Keep the heat moderate so the inside cooks properly without browning too quickly.
Oven Method
-
Preheat the oven to 180°C (350°F).
-
Line a baking tray with parchment paper or lightly grease it.
-
Arrange the triangles on the tray.
-
Bake for 20–25 minutes, turning once if needed, until cooked through.
6. Serving
Serve warm for the best texture and flavor. These cheese and herb triangles pair well with:
-
Fresh tomatoes or cucumbers
-
Olives
-
Yogurt or labneh
-
A light salad
Helpful Tips
-
You may replace parsley with dill or cilantro if preferred.
-
A small pinch of black pepper or mild paprika can be added for extra flavor.
-
These can be prepared ahead and reheated gently in a pan or oven.
Storage
-
Store leftovers in an airtight container in the refrigerator for up to 2 days.
-
Reheat on a pan over low heat or in the oven until warm.


 Ingredients (8 pieces)
 Variations