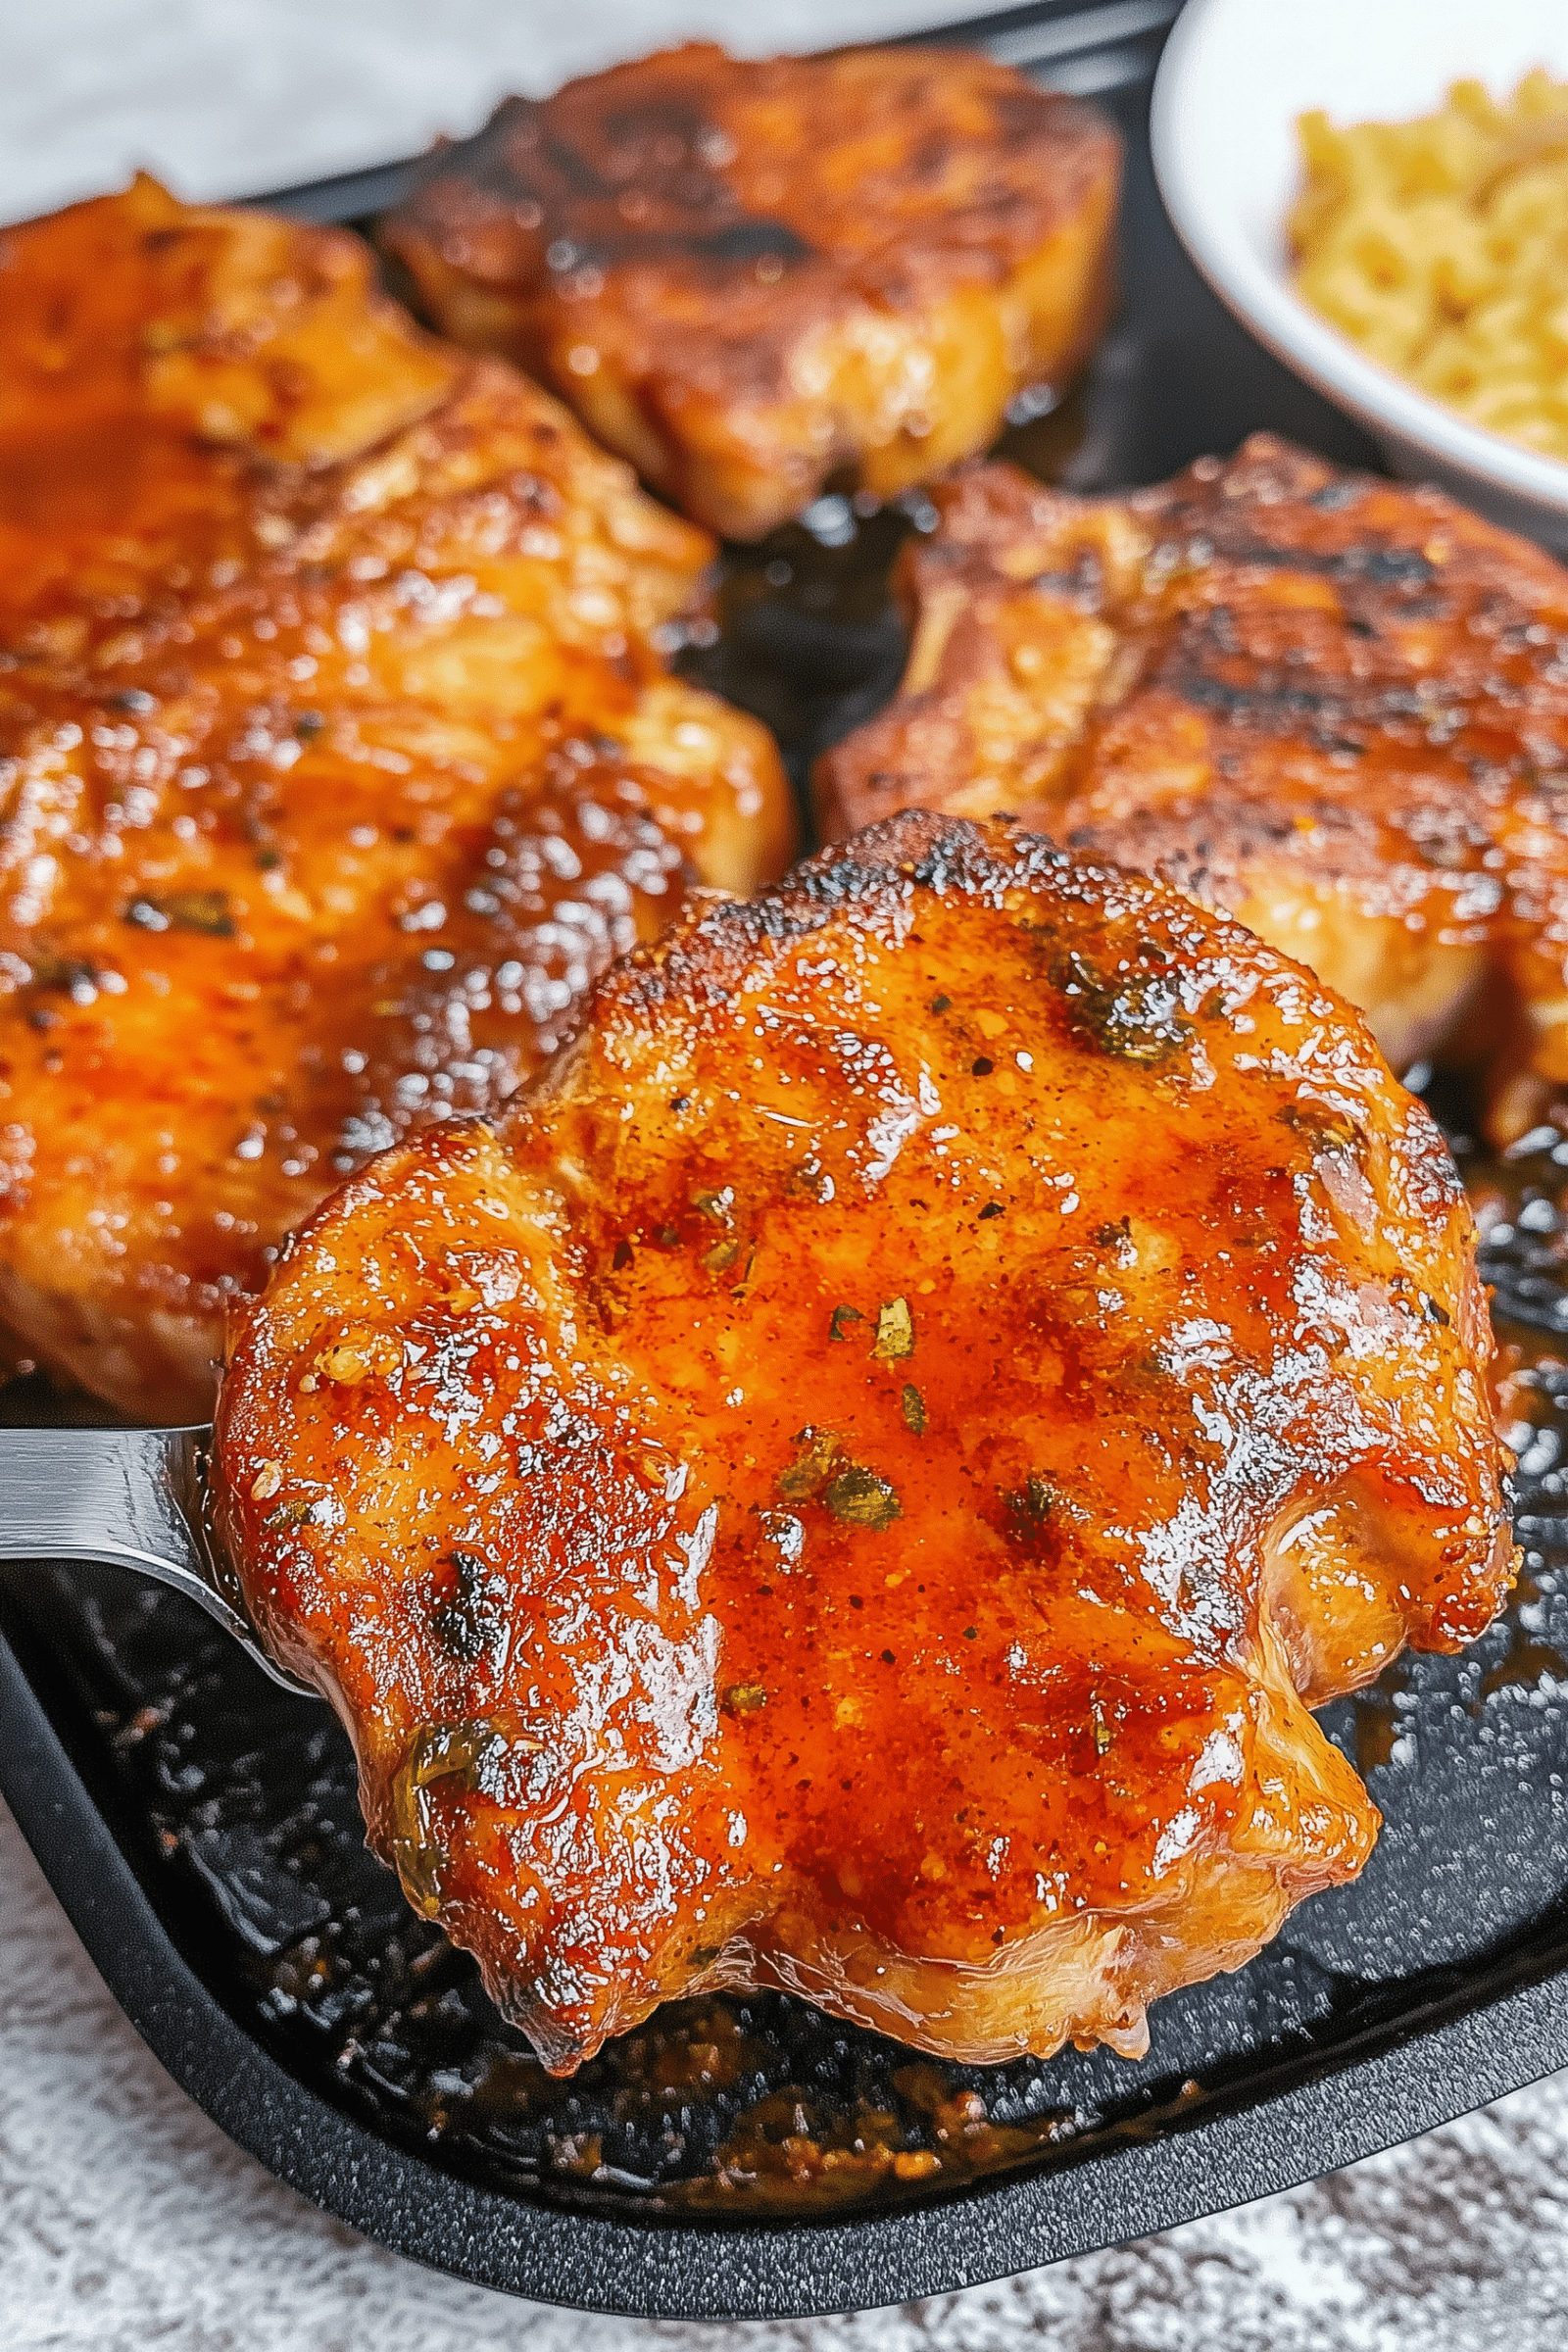
THE ULTIMATE STAIN REMOVER

THE ULTIMATE STAIN REMOVER THAT ACTUALLY WORKS ON A SERIOUSLY SET IN STAIN ! NEVER BUY OXYCLEAN AGAIN

Stains are a frustrating household problem. Even with the best efforts of prevention and care, from time to time accidental spills or messes will occur. The good news is that there are many natural recipes for organic and DIY stain removers. These alternatives offer a safe and effective way for homeowners to clean up and remove stains without exposing themselves to harsh chemicals. In this article, we look at some of the most tried-and-true organic stain removal solutions you should not ignore when it comes to cleaning up messes around the house.

No doubt most of us have had this situation: You put on a new shirt for the first time, and as you eat lunch, a giant stain of ketchup in the center of the shirt falls directly onto your chest, or perhaps peanut butter or spaghetti pasta sauce. Regardless of the type of stain, it always gives an unsightly appearance and can be difficult to remove. Did you know that there are different types of stains and that each requires different types of cleaning methods to remove it? If you try to clean a mustard stain, for example, with a bathroom cleanser, you may not get good results. Why is stain type important? In our activity today we’ll explore some of the different types of stains, and try to determine the best way to clean and remove them!

Many people think that only chemical-based cleaners and detergents can do the job of removing organic stains from clothes and fabrics. However, this is not true; there are actually natural stain removal solutions that have been used for centuries. From homemade recipes to store-bought organic stain removers, there are plenty of diy cleaners and natural ingredients that you can use to safely and effectively remove tough stains from nearly any fabric in your home. In this article, we will discuss why you should consider these natural options when looking for an effective organic stain removal solution.

Getting the Perfect Stain Remover – Tips on Where to Source the Right Ingredients

  • 1 small spoon Bleuu Dawn Dish washing liquiid.
  • 2 large spoon bakiing soda .
  • 4 large spoon hydrogen peroxiide .

This blending is super simple & fast to making , you necessity just to blend 3 ingredients together in a bowl, until very well mixed .

Directions :

I taking a yucky stained shiirt, & I poured 1 cup warm water on stains, then I sweetly agitated mixture employ a toothbrush on old stairs, I permit mixture sit for 1 hour, also I washing & iron as habitual .

Pressure Cooker Breakfast Bundt Cake

Here’s a yummy pressure cooker breakfast bundt cake full of eggs, biscuits, ham or bacon & more! Make it in your Instant Pot or Ninja Foodi and enjoy it for brunch today.

Here’s a yummy pressure cooker breakfast bundt cake full of eggs, biscuits, ham & more! Load it up and enjoy it for brunch. 30 minutes in your Instant Pot! 

Prep Time: 5 mins

Cook Time: 28 mins

Total Time: 35mins

Course: Breakfast, Main Course, Snack

Cuisine: American

Servings: 6 

INGREDIENTS:

1 tube refrigerated biscuits I used Grands, only used 7 out of 8 biscuits

1/4 onion diced

3/4 c ham precooked, diced – could use 1/2 c. real bacon bits instead

1 tsp garlic salt

1/2 tsp seasoned salt I used Lawry’s

4 eggs

1/4 c cheese

INSTRUCTIONS:

Scramble your eggs in a bowl.

Cut each Grands refrigerated biscuit into 9 pieces and put into the bowl with the egg.

Add your diced ham, garlic and seasoned salt and diced onions. (could add 1/4 c. cheese too, I didn’t this time for pics but have other times and it is great)

Fold this mixture together until biscuits are coated well with egg.

Spray the inside of your 7″ bundt pan with non stick spray and pour your mixture in.

Cover it with foil allowing the top to be a bit domed so it can rise inside the pan a bit.

Put 1 1/2 c. of water inside your pressure cooker and put a trivet at the bottom.

Make a sling out of foil and lower your breakfast bundt cake down on to the trivet.

Set to pressure high for 30 minutes.

Allow it to naturally release (I waited 20 minutes).

Uncover and cool a bit so when you flip it over it stays in tact.

Slice and enjoy!

Nutritional Info:

Serving: 3oz | Calories: 367kcal | Carbohydrates: 37g | Protein: 12g | Fat: 18g | Saturated Fat: 3g | Cholesterol: 120mg | Sodium: 1556mg | Potassium: 269mg | Fiber: 1g | Sugar: 2g | Vitamin A: 160IU | Vitamin C: 0.3mg | Calcium: 54mg | Iron: 3.2mg

Brown Sugar Pound Cake with Butter Pecan Glaze

Y’all are going to love this recipe for brown sugar pound cake with butter pecan glaze. The cake is dense, but moist, and is topped with a smooth, creamy, and sweet buttery pecan glaze.

PREP TIME: 25 minutes

COOK TIME: 55 minutes

ADDITIONAL TIME: 10 minutes

TOTAL TIME: 1 hour 30 minutes

INGREDIENTS:

Pound Cake

1-1/2 cups butter, softened

2-1/4 cups light brown sugar, packed

3 cups all-purpose flour

1 teaspoon baking powder

1/4 teaspoon salt

5 eggs

1 Tablespoon vanilla extract

1 cup of sour cream

Butter Pecan Glaze

1/2 cup butter

1/4 cup half and half

1/2 cup brown sugar

3/4 cup chopped pecans

INSTRUCTIONS:

Brown Sugar Pound Cake

Preheat oven to 350 degrees.

Grease and flour a 10 inch, or larger bundt pan.

Add the softened butter and the brown sugar to a large bowl and cream for one to two minutes.

Next, sift the flour, baking powder, and salt. Add to the butter mixture in the mixing bowl and mix.

Add the vanilla extract and eggs, one at a time, and mix well.

Finally, add the sour cream and mix well. Pour the batter into the greased and floured bundt pan and place in the preheated oven.

Bake for approximately 55 minutes or until a cake tester or inserted toothpick comes out clean.

Allow the cake to cool for 10 minutes and invert onto a cake plate.

Butter Pecan Glaze

Add the butter to a saucepan and melt.

Next, add the brown sugar and combine.

Pour the half and half into the pan and combine.

Bring to a boil and turn the heat down to simmer.

Simmer for five minutes and remove from heat. Stir in pecans and pour over the top of the cake.

Notes:

TIP: If you don’t have sour cream, you can use yogurt instead.

TIP: Pour the glaze over the cake after adding the pecans because the glaze will thicken fast.

Nutrition Information:

YIELD: 16 SERVING SIZE: 1

Amount Per Serving: CALORIES: 429TOTAL FAT: 28gSATURATED FAT: 17gTRANS FAT: 1gUNSATURATED FAT: 9gCHOLESTEROL: 128mgSODIUM: 283mgCARBOHYDRATES: 41gFIBER: 1gSUGAR: 23gPROTEIN: 5g

Meditarean Falafel Burger Recipe

This insanely tasty falafel burger is easy and bursting with Mediterranean flavor! Smother in sauce for an epic vegetarian or vegan dinner

Prep Time: 15 minutes

Cook Time: 30 minutes

Yield: 4 

INGREDIENTS:

For the falafel burgers (double to make leftovers*)

15-ounce can chickpeas (1 1/2 cups cooked)

2 tablespoons sesame seeds

1 large carrot

½ red onion

3 garlic cloves

1/2 cup cilantro leaves and tender stems, loosely packed (or parsley)

6 tablespoons flour (or gluten-free flour)

2 teaspoons cumin

2 teaspoons coriander

1 teaspoon kosher salt

½ teaspoon black pepper

3 tablespoons grapeseed or vegetable oil (for frying)

For serving

4 buns

Tomato

Cucumber slices

Red onion slices

Lettuce

Quick Cucumber Sauce, Dill Sauce, Tahini Sauce (vegan) or Cilantro Sauce (vegan)

Cook Mode Prevent your screen from going dark

INSTRUCTIONS:

Preheat the oven to 375°F.

Drain and rinse the chickpeas. Dab the chickpeas with a paper towel to remove extra moisture, then place them in the bowl of a food processor. Add the sesame seeds, then process until a paste-like consistency is formed. (If you don’t have a food processor, use a potato masher or fork to mash them in a bowl until they’re mostly mashed.) Scrape the mixture into a bowl.

Add the carrot, red onion, garlic, and cilantro to the bowl of the food processor; pulse until finely ground. (If you don’t have a food processor, use a large size grater to grate the onion and carrot, then finely grate the garlic and finely chop the cilantro.) Scrape the vegetables into the bowl with the chickpeas.

Stir in the flour, cumin, coriander, kosher salt, and black pepper. Mix with a spoon until combined, then form 4 round patties and place them on a baking sheet.

In a medium frying pan, heat 1/4 cup oil over medium heat. Carefully add the patties to the pan. If you have one, top with a splatter screen. Fry for about 3 to 4 minutes until golden brown on one side. Flip and fry for another 3 to 4 minutes until golden brown, turning down the heat as necessary.

Transfer the patties to a parchment lined baking sheet. Bake for 20 minutes until golden brown and baked through. Remove the patties from the oven and let them cool for at least 15 minutes to firm up.

Meanwhile, make the falafel sauce. To serve, place on a bun with tomato, cucumber, red onion, and lettuce, and top with sauce. The burgers save well in the refrigerator for 1 week, so they’re great to make ahead and eat throughout the week. They also freeze well!

Notes:

*It’s easy to make 8 and freeze the rest for eating later: they also save well refrigerated for up to 1 week. Just double everything!

Nutritional Info:

Serves 4

Calories Per Serving: 281

% DAILY VALUE

20%Total Fat 15.4gSaturated Fat 2.1g11%Total Carbohydrate 30.2g25%Dietary Fiber 6.9gSugars 1.8g17%Protein 8.3g18%Vitamin A 159.5µg4%Vitamin C 4mg9%Calcium 111.9mg19%Iron 3.5mg0%Vitamin D 0µg14%Magnesium 58.2mg7%Potassium 324.6mg39%Vitamin B6 0.7mg0%Vitamin B12 0µg

No-Bake Blueberry Cheesecake Recipe

No Bake Blueberry Cheesecake with a graham cracker crust is an easy summer dessert recipe.

Prep Time: 20mins

Additional Time: 6hrs

Total Time: 6 hrs 20mins

Course: Dessert

Cuisine: American

Servings: 15 servings

INGREDIENTS:

For the Crust

½ cup butter melted

¼ cup granulated sugar

2 cups graham cracker crumbs finely crushed

For the cheesecake

1½ cup powdered sugar

11 ounces cream cheese softened

3 tablespoons milk

1 teaspoon vanilla

16 ounces whipped topping

For the blueberry topping

2 cups blueberry pie filling (this is one recipe’s worth)

INSTRUCTIONS:

Stir together the melted butter, graham cracker crumbs, and sugar. Press into the bottom of a 9 x 13 baking dish.

In a large bowl, beat together the powdered sugar, cream cheese, milk and vanilla until smooth. Carefully spread on top of the crust, being careful not to break it. Top with the whipped topping or homemade whipped cream.

Carefully spread on the blueberry pie filling. Chill for at least 6 hours before serving. Store in the refrigerator. Best eaten within a few days.

Nutritional Info:

Serving: 1piece | Calories: 259kcal | Carbohydrates: 28g | Protein: 2g | Fat: 16g | Saturated Fat: 9g | Polyunsaturated Fat: 6g | Cholesterol: 38mg | Sodium: 185mg | Sugar: 18g

Low Syn Cheesy Taco Salsa Spaghetti Bake Recipe

Cheesy Taco Salsa Spaghetti Bake – Are you looking for a scrumptious and hassle-free family meal that will have everyone at the dinner table asking for seconds? Look no further! We have a mouthwatering treat for you – Imagine flavourful taco meat sauce, tangy salsa, and al dente spaghetti baked together to perfection, topped with a generous layer of gooey melted cheese and colorful bell peppers. It’s a delightful blend of Tex-Mex flavors that will instantly become a family favourite.

The magic of this Baked Cheesy Taco Spaghetti lies in its incredible flavor fusion. When it comes to satisfying my family’s taste buds, there’s nothing quite like a variety of tacos—they simply adore the delicious combinations. With this recipe, I aimed to bring a fresh twist to the table by blending the best elements of a taco with the comfort of pasta. It’s a delightful fusion dish that promises to be a new family favourite!


Jump to:

Calories in Cheesy Taco Salsa Spaghetti Bake

Ingredients for Cheesy Taco Salsa Spaghetti Bake

Family-Friendly and Easy to Prepare

Variations on the Recipe

Sides for Taco Spaghetti Bake

More Pasta Bake Recipes

Cheesy Taco Salsa Spaghetti Bake

Calories in Cheesy Taco Salsa Spaghetti Bake

Enjoy this cheesy taco pasta bake, which serves four people and has 542 calories per serving.


If you’re looking for more recipes within the same calorie range, you’ll find an abundance of options in my dedicated collection of 500+ calorie recipes.


If you’re following a calorie-controlled diet or a healthy eating plan, it’s important to calculate your daily calorie intake using a reliable calorie calculator. Please note that the calorie counts provided are estimates and can vary based on specific ingredients and serving sizes. Personalizing your calculations is essential to meet your individual needs. By using a calorie calculator, you can make informed choices and stay on track with your dietary goals.


close up of taco spaghetti bake in white oven proof dish

Ingredients for Cheesy Taco Salsa Spaghetti Bake

To prepare this delectable Taco Spaghetti Bake, here are some notes on the ingredients used:


Ground Beef (beef mince) – Opt for 5% fat extra lean beef mince for a healthier option, but any ground meat will work just as well. Feel free to switch to turkey or chicken if you prefer.

Garlic and Onion – Essential base ingredients for enhancing the flavour of most recipes. For the best taste, use fresh ingredients.

Taco Seasoning – You can either my suggested blend of spices for taco seasoning or a ready-made taco spice mix for convenience.

Fresh Salsa – For optimal flavor, choose a mild fresh salsa from a tub. However, jarred salsa works fine too. If you enjoy spicier dishes, you can swap for a medium or hot version instead of mild

Variations on the Recipe

Here are some delicious variations you can try for the ingredients in the Taco Spaghetti Bake:

Meat Variations:

Diced Chicken: Swap the ground meat for some diced uncooked chicken and fry it in the taco spices. Chicken thigh will offer better flavor, but chicken breast is fine too.

Vegetarian Option: Substitute the meat with plant-based alternatives like crumbled tofu, cooked lentils, or black beans for a flavorful vegetarian version.

Pasta Variations:

Whole Wheat or Gluten-Free Pasta: Use whole wheat spaghetti or gluten-free pasta to make the dish healthier or suitable for those with gluten sensitivities.

Lower Carb Ideas: If you are trying to reduce the carbs or calories, you could also try swapping out the pasta for some spiralized vegetables or spaghetti squash if it is available.

Spice Level:

Extra Spicy: If you love heat, add chopped fresh or pickled jalapeños or red pepper flakes to the taco meat sauce and use hot salsa for an extra kick.

Cheese Variations:

Pepper Jack Cheese: Swap the cheddar cheese with pepper jack cheese to add a spicy and zesty flavor to the dish.

Monterey Jack: Use Monterey Jack cheese for a milder and creamier cheesy topping.

Vegetable and Bean Additions:

Corn: Add sweet corn kernels to the taco meat sauce for extra texture and sweetness.

Zucchini or Spinach: Incorporate grated zucchini or chopped spinach to sneak in some extra veggies.

Beans: Half the ground meat used and instead add in some black beans to bulk out the dish.

Soured Cream Alternatives:

Coconut Milk: Use coconut milk instead of soured cream for a unique and slightly tropical flavor profile.

Low-Fat Single Cream or Half and Half: If you prefer a creamier dish, you can swap the soured cream for some single cream or half and half.

Light Cream Cheese: Light cream cheese is also a great addition instead of soured cream. However, if you opt for this, you may need to stir in a little more stock.

Yoghurt: If you prefer to use yoghurt instead, I recommend skipping the step of stirring it into the sauce to prevent curdling. Instead, serve a dollop on top of the dish once it’s dished up.

Seasoning Experimentation:

Homemade Taco Seasoning: Create your own custom taco seasoning blend using your favorite spices and adjust the flavors to your liking.

Chipotle or Smoked Paprika: Introduce a smoky element by adding chipotle powder or smoked paprika to the seasoning mix.

Remember to adjust the quantities and cooking times accordingly when making these variations to ensure a well-balanced and delicious Taco Spaghetti Bake that suits your preferences. Enjoy experimenting and creating your perfect family meal!

serving of taco spaghetti bake in white oven proof dish on turquoise and white plate with fork to left

Sides for Taco Spaghetti Bake

For a family meal centered around Taco Spaghetti Bake, you can complement the main dish with a variety of delicious sides. Here are some ideas to serve in the middle of the table:

Mixed Salad – this is my preferred choice as it’s so quick and easy to prepare and can combine any salad items you like. For my mixed salad I use crisp romaine lettuce, halved grape tomatoes, red onion slices, baby cucumber, and shredded carrot. Add it to a big bowl and place in the middle of the table with the spaghetti bake.

Mexican Corn Salad: A refreshing and colourful salad made with grilled corn kernels, finely diced bell peppers, cherry tomatoes, red onions, and chopped cilantro, dressed with a little lime juice and salt and pepper. This side adds a burst of freshness and balances the richness of the bake.

Cilantro-Lime Coleslaw: Prepare a tangy coleslaw with shredded cabbage, carrots, and a dressing made with plain fat free yoghurt, lime juice, cilantro, honey, and a dash of hot sauce. The crisp and refreshing coleslaw complements the rich and cheesy bake.

Grilled or Roasted Vegetables: Lightly grilled or roasted vegetables, such as courgette (zucchini), bell peppers, and onions, add a healthy touch to the meal and bring a burst of natural sweetness to counterbalance the spices in the bake.

Remember, the key to a balanced and filling meal is to pair the main dish with some low-calorie sides, such as vegetables, which will bulk out your plate and add extra nutritional value.

With this diverse selection of sides, your Taco Spaghetti Bake family meal is sure to be a hit, satisfying everyone’s taste buds and creating a memorable dining experience. Enjoy!

Cheesy Taco Salsa Spaghetti Bake – flavourful taco meat sauce, tangy salsa, and al dente spaghetti baked together to perfection, topped with a generous layer of gooey melted cheese and colourful bell peppers. It’s a delightful blend of Tex-Mex flavors that will instantly become a family favourite.

INGREDIENTS:

455g (1lb) of extra lean ground beef (mince)

1 onion, finely diced

2 cloves of garlic, crushed

250g (8.5oz) of uncooked spaghetti

4 tablespoons of tomato paste

1 cup (250g) of salsa (mild of medium)

1 cup (240ml) of chicken or beef stock

6 tablespoons of reduced fat soured cream

50g (1.8oz) of mozzarella, grated

50g (1.8oz) of cheddar or red leicester, grated

½ red bell pepper, finely diced

½ green bell pepper, finely diced

salt and pepper

olive oil spray

For the Taco seasoning:

1 tablespoon paprika (not smoked)

1.5 teaspoon of cumin

1.5 teaspoon mild chilli​ powder

½ teaspoon of oregano

½ teaspoon garlic powder

½ teaspoon onion powder

¼ teaspoon of cayenne pepper (can add more or less depending on your preferred spice level)

INSTRUCTIONS:

Combine the taco seasoning ingredients in a small bowl

Heat a frying pan over a medium high heat, add the mince, onion and garlic and fry until mince is browned and onion is softened.

Add in the taco seasoning, tomato paste, salsa and stock, bring to a boil and then simmer for 10 mins

Cook spaghetti in boiling salted water as per package directions, reserve ⅓ cup (80ml) of pasta water, drain, spray spaghetti with olive oil spray and toss to coat.

Add the pasta to the meat mixture with the soured cream and reserved pasta water and mix to combine. Taste and season with salt and black pepper as needed.

Preheat oven to 190c, 170c fan, 375f or gas mark 5

Add spaghetti mixture to an ovenproof dish and top with cheese, add diced bell peppers

Cover tightly with foil and bake for 20 mins then remove foil and bake uncovered for an additional 10 minutes until cheese is melted and golden.

Serve and enjoy

Notes:

WW Points and other Slimming or Weight Loss programs: due to plans regularly changing and updating, we recommend calculating with the official tools you get as a member to those plans to ensure accuracy of values

Gluten Free Friendly – use gluten free pasta and stock

Suitable for Freezing ❄️

If you wish to share this recipe, then please do so by using the share buttons provided at top of this post.

NUTRITIONAL INFO:

Yield: 4

Serving Size: 1 SERVING

Amount Per Serving

Calories:542Total Fat:16gSaturated Fat:8gTrans Fat:0gUnsaturated Fat:7gCholesterol:56mgSodium:427mgCarbohydrates:56gFiber:5gSugar:6gProtein:41g

Syn Free Slow Cooker Maxican Casserole

This is the first time I have tried quinoa in this type of dish and it’s ideal- it provides a filling bulk that cooks nicely but doesn’t go mushy or squishy, and actually quinoa itself is packed full of protein and high in fibre. If you feel a bit unsure about the quinoa I urge you to try it- it’s a common enough ingredient that you can buy it almost anywhere these days and it is such a useful ingredient! It’s great for bulking out a meal like this, but also as an alternative to breadcrumbs or pasta.

You may think it odd that I have used cup measures here when I usually use grams for my recipes, but this one is ideal for the easy of using a cup- if you don’t have an ‘official’ measuring cup, a regular sized teacup or coffee cup will do- one of the joys of this recipe is that there is no need to be precise- it’ll taste great even if you end up with a bit extra of one ingredient.

I use 2 chicken breasts in this (which feeds 4 people)- there is extra protein in both the black beans and the quinoa and once shredded this is plenty of chicken. It really does make a difference buying free-range fillets- they are more expensive (hence using less), but at least you know that they aren’t factory farmed, and they have the consistency and taste that chicken should have.

If you end up with leftovers of this, you can use it to fill wraps, cook into a quesadilla… it’s a great easy lunch to reheat too!

 Total Time: 5 minutes

Yield: 4 servings 

A tasty Mexican ‘dump dinner’

Syn-free

INGREDIENTS:

1 large onion (finely diced (or 1 cup of frozen pre-chopped onion))

2 chicken breasts

1 tin black beans (drained)

1 red pepper (1 green pepper, deseeded and diced)

1 cup frozen sweet corn

1 tin chopped tomatoes (refill with water, and also add 1 tin of water)

1 cup uncooked quinoa

Juice of 1 lime

1 tsp garlic granules

1 tsp paprika

1 tsp oregano

1 tsp cumin

1/2 cup pickled jalapenos (roughly chopped)

salt & pepper

Low calorie cooking spray (or spray oil if you prefer)

Coriander to serve

INSTRUCTIONS:

Into your slow-cooker pot add in the onion, whole chicken breasts, quinoa, black beans, sweet corn, pepper, chopped tomatoes, water, lime juice

Add in the garlic granules, paprika, oregano, cumin, jalapenos and salt and pepper

Give everything a little mix together, and put the slow-cooker on

Cook on high for 3 hours, or low for 7-8 hours.

Once cooking time is finished, shred the chicken breasts using 2 forks and mix everything together

Serve with fresh lime wedges and chopped coriander.

Notes:

If you want to take it to the next level then serve into portions, cover with grated cheddar, and pop under the grill to melt the cheese before serving.


Best Kale Smoothie Recipe

Here’s how to make the very best kale smoothie, bright green with the most irresistible fruity flavor! It’s the tastiest way to eat your greens.
Why it’s the best kale smoothie

Really, this one’s the best kale smoothie…which is saying something, because we’ve made lots of kale smoothies that are too bitter, too thick, or too icy. This one has all the right ingredients to make an irresistibly tasty green puree. Why make this smoothie?

It’s got pure, sweet tart flavor. Really, you won’t be able to stop drinking it! No bitterness here.

It’s got a silky smooth, frosty texture. Just the right thickness for sipping!

It’s full of healthy ingredients. No sugary juices to make it taste good.

It’s plant-based. There’s no need to use milk or yogurt: it’s all fruit and leafy greens!

Baby kale vs Tuscan kale vs curly kale

There are several types of kale that you can use in this smoothie. Here’s a breakdown of each type:

Baby kale: Baby kale works well in a smoothie because it has a sweeter, mild flavor. It’s a young version of kale, harvested before it matures. You can find it sold in boxes at the grocery or bags at your local farmers market.

Tuscan kale: Tuscan kale is the next best option: it’s got a mild flavor and flat, dark green leaves. It’s also labeled as dinosaur kale or Lacinato kale.

Curly kale: Curly kale works too, but it has a pretty spicy flavor that’s more bitter than the other two. If you use this variety, you may want to start with less and add it to taste.

The trick to blending

Here’s a trick to blending this kale smoothie: first, blend the softer room temperature fruits and liquid. In this case, it’s the banana, apple, kale and water. Then add in the frozen ingredients: the frozen pineapple and ice. This helps it to blend easier: so you won’t need to endlessly stop, scrape, and start again!

Add-ins & variations

This kale smoothie is pretty perfect as is: but you can always mix it up with tasty additions! Here are a few options:

Ginger: Add ½ teaspoon grated ginger to the mix.

Mint or basil. Add a few fresh mint or basil leaves for an herbaceous spin.

Coconut. A handful of shredded coconut adds a tropical flair.

Smoothie storage

Smoothies are best eaten immediately. But this kale smoothie actually lasts 1 to 2 days refrigerated, stored in a sealed container or a mason jar with the lid on. It may separate, which is perfectly natural. Just shake it up and you’re good to go!

This kale smoothie recipe is…

Vegetarian, vegan, plant-based, dairy-free, and gluten-free.

Prep Time: 5 minutes

Cook Time: 0 minutes

Yield: 2 smoothies

INGREDIENTS:

1 large green apple

1 banana

2 cups baby kale leaves, loosely packed (or Tuscan or curly kale, roughly chopped)

1/2 cup water

10 ice cubes

2 cups frozen pineapple or mango

1 tablespoon fresh squeezed lemon juice

INSTRUCTIONS:

Chop the apple, leaving the skin on. Break the banana into pieces and place them both in the blender. Add the water and baby kale leaves. Blend until smooth.

Add the ice, frozen pineapple or mango, and lemon juice. Blend again until smooth.

Stress Less Smoothie Recipe

For maximum wellness in a single cup, you can’t do better than this delicious drink, all from Prevention’s new book, Smoothies & Juices. If you don’t have hemp seeds, add a tablespoon of almond butter for a comparable boost of magnesium, the key ingredient here for lowering stress.

YIELDS: 1 serving(s)

TOTAL TIME: 5 mins

CAL/SERV: 222

INGREDIENTS:

1 1/2 c. plain full-fat kefir, chilled

1/2 c. raspberries

1 tbsp. hemp seeds

1 peach, pitted and sliced

1/2 c. ice

Directions:

In blender, puree kefir, raspberries, hemp seeds, peach, and ice until smooth, about 30 sec.

NUTRITION (per serving): 222 cal, 9 g pro, 29 g carb, 6 g fiber, 21 g sugars (0 g added sugars), 9 g fat (3 g sat fat), 18 mg chol, 54 mg sodium

Lemon Honey Jam Recipe

Ingredients:

  • 12 cups chopped apples
  • 2 cups lemons juice I used a combination of freshly squeezed Meyer lemon juice and bottled
  • 2 cups honey
  • 3 cups sugar
  • 1 envelope of liquid pectin can be omitted if you use a few firm, green apples
  • zest of three lemons

Instructions:

  1. Prepare your canning pot, as well as seven pint jars, lids and rings.
  2. Combine the chopped apples and lemon juice in a large, heavy-bottomed pot (an enameled Dutch oven works well here) and cook over medium-low heat, stirring frequently, until the apples have broken down. When you’ve got a nice, chunky applesauce, add the honey and sugar and stir to incorporate.
  3. Bring the fruit to a boil and cook for at least five minutes at a roll (watch out though, it will bubble and depending on the size of your pot, can get a little splashy). Add pectin and boil for a few minutes more, to active the pectin. When it seems nice and jammy, turn off the heat and stir in the lemon zest.
  4. Fill jars, wipe rims (this jam is sticky, so you may need to add a bit of white vinegar to your towel, to help ensure a clean rim), apply lids and screw on bands.
  5. Process in a boiling water canner for ten minutes (if you are above 1,000 feet in altitude, adjust your processing time accordingly).
  6. Eat on toast, spoon on muffins or use to glaze roasted chicken pieces.

Fresh Asparagus-Tomato Salad

Topped with Parmesan cheese and pine nuts, this tasty green salad is perfect for any barbeque or picnic.

Prep Time: 20 mins

Total Time: 20 mins

Diabetes Appropriate Egg Free Gluten-Free Healthy Immunity Heart Healthy Low Carbohydrate Low Sodium Low-Calorie Soy-Free Vegetarian

Ingredients:

2 cups mixed salad greens or baby spinach

1 pound thin fresh asparagus, trimmed and cut diagonally into 1 1/2-inch pieces

1 cup cherry tomatoes, halved

½ cup fresh basil leaves, large leaves torn

2 tablespoons white wine vinegar

4 teaspoons olive oil

1 teaspoon honey

⅛ teaspoon salt

⅛ teaspoon black peppera

2 tablespoons shredded Parmesan cheese

2 tablespoons pine nuts or chopped walnuts, toasted

Directions:

In a large bowl combine salad greens, asparagus, tomatoes and basil.

For vinaigrette, in a small screw-top jar combine vinegar, oil, honey, salt and pepper. Cover and shake well.

Pour vinaigrette over greens mixture; toss gently to coat. Sprinkle with cheese and nuts.

Nutritional Info:

Serving Size 1 1/4 cups

calories 112 total carbohydrate 7g dietary fiber 2g total sugars 4g protein 4g total fat 8g saturated fat 1g cholesterol 2mg vitamin a 1387iu vitamin c 12mg folate 43mcg sodium 123mg calcium 72mg iron 2mg magnesium 33mg potassium 341mg

Chocolate Peanut Butter Cheesecake Recipe

If there’s nothing you love more in the world than the combination of chocolate and peanut butter, you must try this Chocolate Peanut Butter Cheesecake recipe! Oreo crust, creamy peanut butter cheesecake filling with chocolate chips, milk chocolate ganache, and a pile of chopped Reese’s cups on top, equals pure bliss!

Prep Time: 40 minutes

Cook Time: 1 hour 10 minutes

Yield: 16 slices

Category: Dessert

Method: Oven

Cuisine: American

Ingredients:

FOR OREO CRUST:

2 cups Oreo crumbs

4 Tbsp. unsalted butter-melted

PEANUT BUTTER CHEESECAKE FILLING:

32 oz. cream cheese- softened

1 and 1/3 cup sugar

4 large eggs

1 cup smooth peanut butter

2 tsp. vanilla

1/3 cup heavy cream

1 ¼ cups miniature chocolate chips

FOR MILK CHOCOLATE GANACHE:

½ cup heavy cream

1 ½ cups milk chocolate chips or 9.5 oz. milk chocolate-finely chopped

FOR GARNISH:

Chopped Reese’s cups

Crushed roasted peanuts

Instructions:

First, coat a 9-inch springform pan with cooking spray and line the bottom with parchment paper. Wrap pan with two layers of aluminum foil and bring the foil up the sides of the pan and make sure it is tight and secure so no water gets in during the baking in the water bath!!!!

TO MAKE THE CRUST:

In a food processor finely ground whole Oreo cookies with the filling to get fine crumbs. Combine the crumbs with melted butter and stir until evenly moistened.

Press the mixture into the bottom of the springform pan and set it in the fridge to firm while making the filling.

TO MAKE THE CHEESECAKE FILLING:

Preheat the oven to 350 F.

Beat softened cream cheese with sugar until smooth.

Mix in peanut butter, heavy cream, and vanilla.

Add eggs one at a time beating after each addition just to combine, do not over mix it.

Stir in chocolate chips and spread the mixture over chilled crust. Smooth the top and place the springform pan in a roasting pan. Pour hot water into a roasting pan (about a quarter of the way).

Bake for 55-70 minutes, until the cheesecake, is set around the edges and slightly loose in the center. Tent the top of the springform pan with aluminum foil if it starts browning too quickly.

Remove the cheesecake from the water bath and set it on a cooling rack to cool. Remove aluminum foil and refrigerate (at least 5 hours or overnight).

GANACHE:

When the cake is completely cooled run a thin knife around the edge and release the ring of the springform pan, then transfer the cake on a serving plate.

On medium heat bring heavy cream to boil. Place half of the milk chocolate chips (or chopped chocolate) in a heatproof bowl and pour the cream over the chocolate, stir until the chocolate is melted completely. Add the remaining chocolate and stir until it’s melted and smooth. Set aside to cool. The ganache should be pourable but not too thin.

Spread the ganache on top all over to the edges and let it drip down the sides. I suggest you do this in two layers to avoid the ganache run down too much and cover the whole edges of the cake. Also if the ganache won’t drip enough you can slightly reheat the second batch and drizzle it with the spoon. Let the ganache set slightly then sprinkle with chopped peanuts and pile with coarsely chopped Reese’s.

Set in the fridge until ready to serve.

Porcupine Meatballs Recipe

Tender beef meatballs with rice in a rich and delicious tomato sauce – A perfect recipe for the whole family.

Porcupine Beef Meatballs

Despite the name, these delicious meatballs definitely do not contain any porcupine, intead they get their name from because they resemble little porcupine balls from the rice that is combined into the meatball mix.

These are one of my kids favourites. I mean what is not to love about meatballs in a yummy rich sauce. So simple to make an will be a regular feature on your meal plan.

Best Rice For Porcupine Meatballs

I use just basic long grain rice for these meatballs, this is neither Jasmine (a sticky long grain rice) or Basmati which is an extra long grain rice.

Sides for Meatballs

Because these meatballs contain rice, they are quite filling, so my family likes to enjoy these just a they are in a bowl with a little grated cheese (parmesan or cheddar0 on top and then vegetables on the side.

You can serve these with any vegetables you like, but some of my favourites are:

  • Grilled Zucchini
  • Roasted Green Beans
  • Roasted Asparagus
  • Broccoli or Cauliflower

If you prefer a more substantial side, these are great with some mashed potatoes, or a baked potato too.

YIELD: SERVES 4

PREP TIME: 15 minutes

COOK TIME: 40 minutes

TOTAL TIME: 55 minutes

INGREDIENTS:

For the meatballs

500g (17.5oz) extra lean beef mince (ground beef)

2 tablespoons of tomato paste (puree)

60ml of water

90g (½ cup) of uncooked long grain rice

1.5 tablespoons of fresh chopped parsley

1 teaspoon of onion powder

½ teaspoon of garlic powder

1 teaspoon of salt

1 teaspoon of Worcestershire sauce

pinch of black pepper

spray oil

For the sauce

400g (14oz) of passata (sieved tomatoes)

2 tablespoons of tomato paste (puree)

300ml of chicken stock

1 tablespoon of maple syrup

1 tablespoon of balsamic vinegar

½ tablespoon of paprika

1 teaspoon of Worcestershire sauce

salt and black pepper

fresh chopped parsley to serve

INSTRUCTIONS:

Combine all the ingredients for the meatballs together in a bowl and form into meatballs (I make 16).

Spray a frying pan over a medium high heat with spray oil, add the meatballs a lightly brown.

Mix all the sauce ingredients together ina large bowl.

Pour into the frying pan, bring a to a boil, reduce heat, then cover and simmer for approx 30-35 minutes, carefully turning once to cover in sauce.

Sauce should have reduced down and thickened around meatballs and rice in meatballs should be cooked after this time. If it the sauce reduces too much just add in a little more stock or water.

Taste and season as needed with salt and black pepper.

Sprinkle with some fresh chopped parsley

Enjoy with your favourites sides.

Notes:

WW Points and other Slimming or Weight Loss programs – due to plans regularly changing and updating, we recommend calculating with the official tools you get as a member to those plans to ensure accuracy of values.

NUTRITIONAL INFO:

Yield: 4

Serving Size: 1 SERVING

Amount Per Serving

Calories:304/Total Fat:7g/Saturated Fat:3g/Trans Fat:0g/Unsaturated Fat:0g/Cholesterol:21mg/Sodium:844mg/Carbohydrates:31g/Fiber:2g/Sugar:9g/Protein:28g


No-Bake Biscuit Cake Recipe

This No Bake Chocolate Biscuit Cake Recipe is one of the most delicious desserts. The cake takes no time at all to whip up, is so simple and easy to make and doesn’t require an oven which makes it perfect to get kids involved. Add your own spin with nuts or fruit or keep it as is!

A no-bake chocolate biscuit cake is cake that reminds memories of childhood for many of us. Such an easy to make cake, but yet, we all love it. What’s makes it so popular is probably the simple ingredients, digestive biscuits, butter, cocoa powder and other basic ingredients that we all have at home. Chocolate fridge cake is one of my favorite cake and I hope you will like it too.

YIELDS: 12 

PREP TIME: 20 Minutes 

WORK TIME: 20 Minutes 

INGREDIENTS:

For the cake:

500g Digestive biscuits/crackers

150g Walnuts/hazelnuts/almonds, roasted (optional)

3/4 cup (150g) Sugar

2/3 cup (150g) Butter

1/2 cup (50g) Cocoa powder

1 cup (240ml) Water/coffee

For the ganache:

120g Dark chocolate

1/2 cup (120ml) Heavy cream

DIRECTIONS:

Crush/ break the biscuits into small pieces. Place them in a large bowl. if you are using nuts, crush them as well and add to the bowl. set aside.

In a saucepan combined sugar, butter, cocoa powder and water/coffee. Place the saucepan over medium heat and bring to a boil. Cook for 5-6 minutes, stirring constantly.

Pour chocolate syrup over the biscuits and stir until well coated.

Transfer the mixture into a 9-inch (23cm) pan. Press firmly to create flat surface cake. Refrigerate while making the ganache.

Make chocolate ganache: chop the chocolate and place in a heatproof bowl. In a small saucepan heat the cream, when starts to simmer remove from heat and pour over the chocolate. Let sit for 1-2 minutes and stir until melted and smooth.

Pour the ganache over the cake and refrigerate for at least 2-3 hours before serving.

Decorate with nuts.

Chocolate Cake Recipe

An easy to make, rich Chocolate Cake is the most craved cake recipe. One bowl, minimal ingredients = a fluffy, tender-moist chocolate cake!

Prep Time

15 mins

Cook Time: 30 mins

Total Time: 45 mins

Servings: 12 serves

Ingredients:

CHOCOLATE CAKE

1 3/4 cups all purpose flour, or (plain flour), (8 oz | 227 g)

3/4 cup unsweetened cocoa powder, (2.6 oz | 75 g) or regular Hershey’s cocoa powder

1 1/2 teaspoon baking powder

1 1/2 teaspoon baking soda, (or bi-carb soda)

1 teaspoon salt

2 cups white granulated sugar, (14 oz | 410 g)

2 large eggs

1 cup milk, (250 ml)

1/2 cup vegetable oil, (125 ml)

2 teaspoons pure vanilla extract

1 cup boiling water (250 ml)

CHOCOLATE BUTTERCREAM FROSTING

4 oz butter, (120 g | 1/2 cup)

2/3 cup unsweetened cocoa powder, or regular HERSHEY’S (2.4 oz | 65 g)

3 cups powdered sugar, (confectioners or icing sugar)

1/3 cup milk

1 teaspoon pure vanilla extract

Instructions:

CHOCOLATE CAKE

Preheat oven to 350°F (180°C) standard or 320°F (160°C) fan/convection.

Lightly grease 2x 9-inch (22cm) round cake pans with butter. Line base with parchment paper.

Sift together flour, cocoa, baking powder, baking soda and salt into a large bowl. Whisk in sugar, then add eggs, milk, oil and vanilla. Whisk well to combine until lump free, about 30 seconds.

Pour boiling water into batter, mixing well. Cake batter is thin in consistency.

Pour batter into cake pans and bake for 30-35 minutes or until a wooden skewer inserted into the centre comes out clean.

Let cool for 10 minutes, then turn out onto wire racks to cool completely before frosting.

CHOCOLATE BUTTERCREAM FROSTING

Melt butter, then whisk in cocoa powder. Alternately add powdered sugar and milk, beating to spreading consistency (add a small amount of additional milk, if needed). Stir in vanilla.

Notes:

COCOA POWDER:

I use a combination of 1/2 cup Dutch processed and 1/4 cup regular unsweetened cocoa powder for a richer cake.

COFFEE:

For a richer chocolate flavour, DISSOLVE 2 teaspoons instant coffee or espresso in the boiling water before adding into the batter. You can’t taste the coffee!

SUGAR:

White granulated sugar is used here. You can also use superfine or caster sugar.

VARIATIONS FOR CHOCOLATE CAKE SIZES FROM HERSHEY’S

Preheat oven to 350°F (180°C) standard or 320°F (160°C) fan/convection.

ONE-PAN CAKE: Use 13x9x2-inch baking pan. Bake 35-40 minutes.

THREE LAYER CAKE: You’ll need 8-inch round baking pans. Bake 30-35 minutes.

BUNDT CAKE: Use a 12-cup fluted tube pan. Bake 50-55 minutes.

CUPCAKES: Line muffin cups (2-1/2 inches in diameter) with paper bake cups. Fill cups 2/3 full with batter. Bake 22-25 minutes. Makes about 30 cupcakes.

Nutritional Info:

Calories: 351kcal | Carbohydrates: 55g | Protein: 6g | Fat: 16g | Saturated Fat: 12g | Fiber: 4g | Sugar: 36g

Greek Yogurt Smoothie Recipe

A creamy Greek yogurt smoothie garnished with blueberries.

Greek Yogurt Smoothie

A healthy Greek yogurt smoothie recipe to use as a base! Try this fun combo of pineapple and berries, or explore your own favorite flavors. The sky is the limit.

A Greek Yogurt Smoothie is a great way to start the day off with beneficial probiotics, protein, and a variety of fruits and vegetables. It’s super creamy, and turns smoothies into a dessert-like consistency. Turn this recipe into your favorite flavor combo! Add strawberries, blueberries, mango, bananas, a variety of greens, or even flavors like cocoa powder or chai spice.

A GREEK YOGURT SMOOTHIE FORMULA

Smoothies are a great way to pack in nutrients. I love starting my day with a smoothie, and knowing I am front-loading my day with protein, fruits, veggies, and healthy fats.

They are ideal for busy lifestyles. I can’t imagine an easier way to get such a variety of healthy foods in! When the mood strikes, a smoothie is a perfect quick snack.

Greek yogurt has long been a favorite smoothie addition of mine. It adds a creamy and tangy flavor. The Greek yogurt taste compliments the sweetness fruit!

When making smoothies, I like to think of this balanced approach:

1-2 servings of vegetables (think spinach, kale, cauliflower, and zucchini)

1-2 servings of fresh fruits (fruit is high in sugar, but that is mediated by the fiber and protein in a balanced smoothie!)

1 T healthy fat (coconut oil, MCT oil, avocado, or nut butter)

20-45 g of protein (depending on whether it’s a meal or a snack. This can be a combination of Greek yogurt and protein powder).

Unsweetened liquid (such as almond milk, coconut milk, oat milk, or green tea. Avoid apple juice or other liquids that add sugar without fiber.)

Extra Ingredients: Add flavor and healthy nutrients by throwing in some superfoods! Matcha, cinnamon, turmeric, vanilla extract, and cacao powder are great options

WHY IS GREEK YOGURT GOOD FOR SMOOTHIES?

Greek yogurt has a range of health benefits!

It’s a great way to add protein to a smoothie. 1/2 cup of Greek yogurt has 15-20 grams of protein. It’s a great option for people who prefer not to use protein powders. Adding protein to smoothies makes them more satiating.

Greek yogurt is UBER creamy! Honestly, yogurt adds a tangy flavor and creamy consistency that makes smoothies dessert-like. I use it in my Chocolate Chip Mint Smoothie!

It’s a fermented food, meaning it has probiotics that help improve gut health. Be sure to buy a plain, high quality Greek yogurt with multiple bacteria strains for the most benefits.

IS IT BETTER TO PUT MILK OR YOGURT IN A SMOOTHIE?

Dairy milk is often difficult to digest. Yogurt contains bacteria that is more beneficial to digestion. In addition, Greek yogurt has more concentrated protein.

Non-dairy milks are great for thinning smoothies out. I recommend a combination of unsweetened, non-dairy milk and plain, unsweetened Greek yogurt.

Creamy yogurt also gives smoothies a tangy flavor and better consistency!


A healthy Greek yogurt smoothie recipe to use as a base! Try this fun combo of pineapple and berries, or explore your own favorite flavors. The sky is the limit.

Prep Time: 5 mins

Cook Time: 0 mins

Total Time: 5 mins

Course: Breakfast

Cuisine: American

Servings: 1 smoothie

Ingredients

1/2 cup pineapple frozen

1/2 cup strawberries frozen

1/2 cup blueberries frozen

2 cups fresh spinach

1/2 cup Greek yogurt

1/2 cup almond milk

collagen protein

protein powder I like unflavored whey isolate

Instructions

All all ingredients into a blender.

Process on high for about a minute, until the smoothie is very smooth and creamy. Adjust the thickness by adding more/less almond milk, or throwing in a few extra frozen berries.

Notes

Strawberry Greek Yogurt Smoothie

A delicious strawberry banana Greek yogurt smoothie, perfect for those who enjoy sweet and fruity flavors!

1 cup frozen strawberries

1/2 frozen banana

1/2 cup Greek Yogurt

1/2 cup almond milk

Optional: Greens or frozen zucchini

Optional: Protein Powder or Collagen

Blueberry Greek Yogurt Smoothie

This banana-free Greek yogurt smoothie is packed with antioxidants. I have heard nutrition experts claim that blueberries are the most beneficial food to include in your diet daily. Opt for wild blueberries for the maximum benefits.

1 1/2 cups frozen blueberries

1/2 cup Greek Yogurt

1/2 cup almond milk

Optional: Greens or frozen zucchini

Optional: Protein Powder or Collagen

Optional: Chia seeds, cinnamon, MCT oil, coconut oil

Mango Greek Yogurt Smoothie

Sweet mango tastes delicious with a burst of orange flavor! Other great flavors with mango are strawberry, banana, or dragon fruit. You might also love this Dragon Fruit Smoothie.

1 cup frozen mango

1 frozen mandarin orange (or 1/4 cup orange juice)

1/2 cup Greek Yogurt

1/2 cup almond milk

Optional: Greens

Optional: Protein Powder or Collagen

Optional: Matcha, MCT oil, coconut oil

Chocolate Greek Yogurt Smoothie

I love using MCT oil in my Greek yogurt smoothie. It adds a great creamy texture, and is known to be energizing for your body and brain. If you’d rather, opt for a nut butter.

1 frozen banana (cut into quarters)

1/2 cup Greek Yogurt

1/2 cup almond milk (or full fat coconut milk!)

2 tablespoons cacao powder

1 tablespoon MCT or Coconut Oil (adds creaminess)

Optional: Greens

Optional: Protein Powder or Collagen

Chai Spice Greek Yogurt Banana Smoothie

The sky is the limit when it comes to adding flavor! Chai spice, cinnamon, turmeric, ginger, and vanilla are great flavor enhancers for smoothies (and it doesn’t hurt that they all have anti inflammatory properties!).

1 frozen banana (cut into quarters)

1/2 cup Greek Yogurt

1/2 cup almond milk (or full fat coconut milk!)

1-2 teaspoons chai spice (depending on how spicy you like it!)

1-2 teaspoons of honey or maple syrup, if desired

1 tablespoon MCT or Coconut Oil (adds creaminess)

Optional: Greens

Optional: Protein Powder or Collagen

Amp up your Greek Yogurt Fruit Smoothie!

Add superfoods and spices to give your smoothie more power!

Hemp seeds (for more protein + fiber)

Chia Seeds (fiber!)

Matcha Green Tea powder (flavor + antioxidants)

MCT Oil or MCT Oil Powder (creamy consistency plus ketone-producer, which helps with mental clarity. Studies have shown it increases brain energy by 8-9%.)

Spirulina (has a dense nutrient content, including protein, iron, and copper. Make things really fun by using a BLUE spirulina!

Nut Butters (healthy fats!): Sunflower seed butter, cashew butter, or almond butter are my favs. If you opt for peanut butter, find one without added oils or sugars.

A little bit of honey. Honey has anti microbial and anti viral properties, in addition to adding a sweet flair to your smoothie.

Nutritional Info:

Calories: 199kcal | Carbohydrates: 33g | Protein: 14g | Fat: 3g | Saturated Fat: 0.2g | Polyunsaturated Fat: 1g | Monounsaturated Fat: 1g | Trans Fat: 0.01g | Cholesterol: 5mg | Sodium: 248mg | Potassium: 733mg | Fiber: 6g | Sugar: 23g | Vitamin A: 5727IU | Vitamin C: 106mg | Calcium: 347mg | Iron: 2mg

Strawberry Cheesecake Recipe

The perfect summer dessert, this Strawberry Cheesecake recipe comes together easily in a few straightforward steps. A rich, creamy, and smooth cheesecake topped with strawberries, you won’t be able to get enough of it!

Course: Dessert

Cuisine: American

Prep Time: 30mins

Cook Time: 1hr 35mins

Total Time: 9hrs 5 mins

Servings: 8 servings

Ingredients:

For the Crust:

2 ¼ cups graham cracker crumbs (270 g)

3 tablespoons granulated sugar

5 tablespoons unsalted butter melted (70 g)

For the Filling:

3 blocks cream cheese room temperature (8-ounce/227g)

1 ¼ cups granulated sugar (250 g)

¼ teaspoon salt

½ cup sour cream room temperature (120 g)

2 teaspoons lemon zest

2 teaspoons vanilla extract

3 large eggs room temperature, and lightly beaten

For the Topping:

2 pounds fresh strawberries halved and divided (900g)

½ cup granulated sugar (100g)

2 teaspoons vanilla extract

2 teaspoons cornstarch

¾ cup water (180ml)

Instructions:

For the Crust:

Preheat the oven to 350°F. Lightly spray a 9-inch springform pan with baking spray.

In a medium bowl, combine the graham cracker crumbs and sugar. Stir in butter until well incorporated and mixture holds together when tightly squeezed. Transfer the mixture to the prepared pan. Using a tall flat-bottomed glass, press the graham cracker mixture into the bottom and 1 inch up the sides of the pan. (I find it easiest to start with the sides, then press the remaining crumbs into the bottom.) Place the pan on a rimmed baking sheet.

Bake for 10 to 15 minutes or until the crust is fragrant and starting to turn golden brown on the edges. Let cool completely.

For the Filling:

In the bowl of a stand mixer fitted with a whisk attachment, add the cream cheese. Beat on medium-low speed until very smooth, about 2 minutes. Add the sugar and salt and beat until fully incorporated, about 2 minutes more, stopping to scrape down the sides of the bowl a few times during mixing.

Add the sour cream, lemon zest, and vanilla. Beat on medium speed until fully incorporated, about 1 minute. Scrape down bowl. Add the eggs, and beat just until fully combined, about 1 minute, stopping to scrape down the bowl once during mixing. Pour the filling into the cooled crust. (It should come up over the side of the crust and will be very full).

Bake for 15 minutes. Reduce the oven temperature to 300°F and bake until lightly puffed, the filling around edges is set, and the center has a slight jiggle, about 1 hour. Leaving the oven door shut, turn the oven off, and allow the cheesecake to cool for 1 hour. Remove the cheesecake from the oven and let it cool to room temperature. Loosely cover with a tea towel or paper towel and refrigerate overnight or for at least 6 hours.

For the Topping:

In a medium saucepan, combine 1 pound of strawberries, water, and sugar. Sprinkle with cornstarch and stir to combine.

Place the saucepan over medium heat and bring the mixture to a boil, stirring frequently. Boil for 5 minutes. Using a potato masher, mash the strawberries until they are very broken down. Continue cooking until the sauce is thickened, about 10 minutes. Remove from the heat and stir in the remaining 1 pound of strawberries and vanilla. Transfer to a bowl and let cool until lukewarm.

When ready to serve, run a knife around the edge of the cheesecake. Release the spring and removed the sides. Transfer the cheesecake to a serving plate and top with the cooled strawberry sauce. Refrigerate the cheesecake covered for up to 4 days.

Notes:

Do not overwhip the filling as it will introduce too much air to the batter. Overwhipping the batter will make the cheesecake rise too much and collapse in the middle.

Do not open the oven to peek at your strawberry cheesecake. The hot air from the oven will escape, and the cold air enters the oven, causing the cheesecake to fall or crack.

Make sure you budget enough time to make this cheesecake, as it requires several hours to cool.

Room temperature ingredients are ideal as they mix easier without accidentally over mixing. If your eggs are cold, place them in a bowl of warm water.

To bring your cream cheese to room temperature, leave it out the night before or heat it in the microwave for 20 seconds at 50% power.

Nutritional Info:

Calories: 449kcal | Carbohydrates: 76g | Protein: 5g | Fat: 15g | Saturated Fat: 7g | Polyunsaturated Fat: 1g | Monounsaturated Fat: 4g | Trans Fat: 1g | Cholesterol: 97mg | Sodium: 265mg | Potassium: 267mg | Fiber: 3g | Sugar: 60g | Vitamin A: 428IU | Vitamin C: 67mg | Calcium: 66mg | Iron: 2mg

Low Syn Skinny Trifle Recipe

Delicious Fruity Low Syn Skinny Trifle – a perfect summer time treat

We have had some glorious summer weather here the last few days and so I really fancied a summery fruity treat to enjoy while sat out in the garden.

I don’t know why but summer time always makes me crave jelly, probably because it is nice and cold and fruit when out of the fridge.

However rather than just make up a bowl of jelly, I decided on this lovely Skinny Trifles, which are perfect for enjoying while sat out in the garden.

Traditionally Trifle is Jelly with sponge fingers, thick creamy custard and fresh cream. My mum made the most amazing trifles, occasionally though she would add Sherry, but truth be told, I hated it with sherry and wasn’t keen on the sponge fingers either. I much prefer just jelly, custard and cream with a few sprinkles on top.

As these are a skinny trifle version, I’ve skipped the custard and instead gone for a layer of banana yoghurt and berries. It’s a perfect combination, lovely and fruity and refreshing for a warm summers day.

YIELD: 4 SERVINGS

PREP TIME: 10 minutes

TOTAL TIME: 10 minutes

Ingredients:

  • 1 box of sugar free jelly (I used raspberry) – 2 syns
  • 4x80g fat free yoghurt (I used banana)
  • 1.5 cups of mixed berries
  • 4×4 tbs of light aerosol cream – 6 syns
  • 1 tbs of rainbow sprinkles – 1 syn

Instructions:

  1. Make up the jelly by packet instructions
  2. Equally divided among 4 glasses and refrigerate too set.
  3. Top each glass with 80g of yoghurt and mixed berries, then 4 tbs of light aerosol cream.
  4. Sprinkle each glass with 1 tsp of sprinkles.
  5. If only using one, I recommend layering when ready to eat.
  6. Add to a glass, top with the yoghurt, then some fresh fruit and lastly the squirty cream.
  7. ENJOY!!!

A yummy and quick dessert

Notes

This recipe is gluten free, Slimming World and Weight Watchers friendlyExtra Easy – 2.5 syns per servingOriginal – 2.5 syns per servingGreen – 2.5 syns per servingWW Smart Points – 3Gluten Free – ensure all toppings are gluten free

Nutritional information is an estimate and is to be used for informational purposes only.

Nutritional Info:

Yield: 4

Serving Size: 1 serving

Amount Per Serving

Calories99TotalFat2.4gSaturatedFat2.1gSodium97mgCarbohydrates13.2gFiber1.9gSugar9.4gProtein4.6g

Fruit And Yogurt Smoothie Recipe

This easy fruit smoothie recipe calls for just three ingredients: yogurt, fruit juice and frozen fruit. Mix up your fruit combinations from day to day for a healthy breakfast or snack that never gets boring.

Active Time: 10 mins

Total Time: 10 mins

INGREDIENTS:

  • 3/4 cup nonfat plain yogurt
  • 1/2 cup 100% pure fruit juice
  • 1 1/2 cups (6 1/2 ounces) frozen fruit, such as blueberries, raspberries, pineapple or peaches

Directions:

  1. Puree yogurt with juice in a blender until smooth.
  2. With the motor running, add fruit through the hole in the lid and continue to puree until smooth.

Nutritional Info:

Serving Size 2 cups 

Calories279 total carbohydrate 56g dietary fiber 7g total sugars 46g protein 12g total fat 2g saturated fat 0g cholesterol 4mg vitamin a 121iu vitamin c 9mg folate 38mcg sodium 149mg calcium 394mg iron 1mg magnesium 53mg potassium 719mg

Chocolate banana protein smoothie

Red lentils give this smoothie a plant-based protein boost. To make this smoothie vegan, try using unsweetened coconut beverage or almond milk in place of the dairy milk.

Prep Time: 5 mins

Total Time: 5 mins

INGREDIENTS:

1 banana, frozen

½ cup cooked red lentils

½ cup nonfat milk

2 teaspoons unsweetened cocoa powder

1 teaspoon pure maple syrup

Directions:

  1. Combine banana, lentils, milk, cocoa and syrup in a blender.
  2. Puree until smooth.

Nutritional Info:

Serving Size 1 smoothie 

Calories 310 total carbohydrate 64g dietary fiber 9g total sugars 25g added sugars 4g protein 15g total fat 2g saturated fat 1g cholesterol 3mg vitamin a 348iu vitamin c 11mg folate 109mcg sodium 57mg calcium 185mg iron 4mg magnesium 87mg potassium 939mg

Carrot Smoothie Recipe

This type of drink tends to be pricey in the big city juice bars. Now you can make the recipe at home.

Prep Time: 10 mins

Additional Time: 25 mins

Total Time: 35 mins

INGREDIENTS:

  • 1 cup sliced carrots
  • ½ teaspoon finely shredded orange peel
  • 1 cup orange juice
  • 1 ½ cups ice cubes
  • 3 (1 inch) pieces Orange peel curls

Directions:

  1. In a covered small saucepan, cook carrots in a small amount of boiling water about 15 minutes or until very tender.
  2. Drain well. Cool.
  3. Place drained carrots in a blender.
  4. Add finely shredded orange peel and orange juice.
  5. Cover and blend until smooth. Add ice cubes; cover and blend until smooth.
  6. Pour into glasses. If desired, garnish with orange peel curls.

Nutritional Info:

Serving Size 5 ounces

Calories 55 total carbohydrate 13g dietary fiber 1g protein 1g sodium 16mg

Strawberry Blueberry Banana Smoothie Recipe

A smoothie with strawberries, blueberries and banana is delicately sweet and entirely kid-friendly, even with a boost of protein from hemp seeds. Freeze the fruits ahead of time for an extra frosty texture once blended.

Prep Time: 5 mins

Total Time: 5 mins

INGREDIENTS:

½ cup frozen strawberries

½ cup frozen blueberries

1 small ripe banana (frozen, if desired)

¾ cup chilled unsweetened cashew milk, plus more if needed

1 tablespoon cashew butter

1 tablespoon hulled hemp seeds

Directions:

  1. Combine strawberries, blueberries, banana, cashew milk, cashew butter and hemp seeds in a blender.
  2. Process until smooth, adding more cashew milk, if needed, for desired consistency.
  3. Serve immediately.

Nutritional Info:

Serving Size 2 cups

Calories335 total carbohydrate 46g dietary fiber 7g total sugars 24g protein 7g total fat 17g saturated fat 2g vitamin a 510iu vitamin c 42mg folate 58mcg sodium 115mg calcium 115mg iron 3mg magnesium 166mg potassium 705mg

Syn Free HomeMade Chicken Nuggets

A Healthy Slimming World Fakeaway Recipe

If you love a good Fakeaway, then you’ll love these Homemade Syn Free Chicken Nuggets! They’re the same texture as the unhealthy kind you’d buy at a fast food restaurant, but are oven baked and 100% syn free using your Healthy Extra B on Slimming World.

Not only are these the perfect Slimming World family dinner recipe, they’re also freezer friendly, packed with flavour and super simple to make. You can freeze them before cooking, once you’ve covered the chicken with the breadcrumbs (best done flat to avoid the nuggets losing their shape), or you can freeze once cooked.

This recipe for Homemade Syn Free Chicken Nuggets is a healthy, family friendly recipe that knocks any unhealthy takeaway out of the park!

This recipe uses breadcrumbs to coat the chicken, mixed with some delicious spices to give them tonnes of flavour! The recipe below shows you how to make your breadcrumbs from scratch using wholemeal bread, which keeps these totally syn free too. The full recipe includes two Healthy Extra B servings on Slimming World, which simply needs to be divided between the number of servings.

These Syn Free Chicken Nuggets are a delicious Slimming World fakeaway recipe that the whole family will love!

Prep Time: 15 min

Cook Time: 20 min

Total Time: 35 min

Serves: 6

INGREDIENTS:

Breadcrumbs

120g Wholemeal Bread (2-3 slices aprox.)

1/2tsp Garlic Powder

1/2tsp Salt

1/2tsp Paprika

1/4tsp Mustard Powder

1/2 Chicken Oxo Cube (crushed)

1/4tsp Cumin

Chicken Nuggets

2x Chicken Breasts

1/2tsp Garlic Powder

1/2tsp Salt

Handful Fresh Parsley

Low Calorie Cooking Spray

2x Eggs (plus a pinch of salt)

INSTRUCTIONS:

  1. Break 120g wholemeal bread into chunks and toast until browned and crispy.
  2. Blitz the toasted bread in a food processor with the remaining breadcrumb ingredients until you have an evenly textured mixture.
  3. Whisk two eggs with a pinch of salt. The salt helps to break down the egg yolk and makes it easier to bread your syn free chicken nuggets.
  4. Chop two chicken breasts and combine with garlic powder, salt and fresh parsley and blitz in the food processor until you have a chunky paste.
  5. Wet your hands and shape the chicken mince into nuggets by rolling out balls of the mixture and then pressing them flat between your fingers.
  6. Once formed, dip your syn free chicken nuggets into the whisked egg yolks and then into the breadcrumbs, making sure to completely coat each one.Place on to a baking tray sprayed liberally with low calorie cooking spray.
  7. Bake your syn free chicken nuggets at 180 degrees for 20-25 minutes, or until crispy and cooked all the way through. Serve with your choice of sides and sauces!

NOTES:

Serves 2-4 people depending on the size of the nuggets. Recipe is SYN FREE on Slimming World using 2x Healthy Extra B portions. Divide the number of Healthy Extra B portions by the number of servings made. This recipe is the property of Basement Bakehouse (owned by Atuin Digital Ltd) and is therefore subject to Copyright laws. Do not copy, or use the images or text in this recipe or blog post without permission.

If cooking raw from frozen, cook for aprox. 30 minutes or until cooked through and crispy. To reheat frozen cooked nuggets, you can use the microwave or oven. Please ensure that they are piping hot all the way through before serving.

Easy Cheesecake Recipe

Today I’m so excited to show you how to make the best Cheesecake Recipe of your life. Simple, classic, and no water bath required!! The texture is smooth, rich, and creamy, served over a crisp homemade graham cracker crust. 

I’ve included tons of detailed tips and important info in today’s post so you can make the perfect creamy cheesecake every time. For a visual how-to, be sure to check out my step-by-step video beneath the recipe!

How to make the creamiest, BEST Cheesecake Recipe! Oh, and there’s no water bath required!

Course: Dessert

Cuisine: American

Prep Time: 20minutes

Cook Time: 1hour 15minutes 

Cooling Time: 6hours

Total Time: 7hours 35minute

Servings: 12 slices


INGREDIENTS:

  • Graham Cracker Crust¹
  • 1 ½ cups graham cracker crumbs (170g)
  • 2 Tablespoons sugar
  • 1 Tablespoon brown sugar (can substitute white)
  • 7 Tablespoons butter melted
Cheesecake
  • 32 oz cream cheese² softened to room temperature (910g)
  • 1 cup sugar (200g)
  • ⅔ cups sour cream (160g)
  • 1 ½ teaspoons vanilla extract
  • ⅛ teaspoon salt
  • 4 large eggs room temperature, lightly beaten

INSTRUCTIONS:

  1. Preheat oven to 325F (160C).
  2. Prepare Graham Cracker crust first by combining graham cracker crumbs, sugar, and brown sugar, and stirring well. Add melted butter and use a fork to combine ingredients well.
  3. Pour crumbs into a 9” Springform pan and press firmly into the bottom and up the sides of your pan. Set aside.
Cheesecake
  1. In the bowl of a stand mixer or in a large bowl (using a hand mixer) add cream cheese and stir until smooth and creamy (don’t over-beat or you’ll incorporate too much air).
  2. Add sugar and stir again until creamy.
  3. Add sour cream, vanilla extract, and salt, and stir until well-combined. If using a stand mixer, make sure you pause periodically to scrape the sides and bottom of the bowl with a spatula so that all ingredients are evenly incorporated.
  4. With mixer on low speed, gradually add lightly beaten eggs, one at a time, stirring just until each egg is just incorporated. Once all eggs have been added, use a spatula to scrape the sides and bottom of the bowl again and make sure all ingredients are well combined.
  5. Pour cheesecake batter into prepared springform pan. To insure against leaks, place pan on a cookie sheet that’s been lined with foil.
  6. Transfer to the center rack of your oven and bake on 325F (160C) for about 75 minutes. Edges will likely have slightly puffed and may have just begun to turn a light golden brown and the center should spring back to the touch but will still be Jello-jiggly. Don’t over-bake or the texture will suffer, which means we all suffer.
  7. Remove from oven and allow to cool on top of the oven³ for 10 minutes. Once 10 minutes has passed, use a knife to gently loosen the crust from the inside of the springform pan (this will help prevent cracks as your cheesecake cools and shrinks). Do not remove the ring of the springform pan.
  8. Allow cheesecake to cool another 1-2 hours or until near room temperature before transferring to refrigerator and allowing to cool overnight or at least 6 hours. I remove the ring of the springform pan just before serving then return it to the pan to store. Enjoy!

NOTES:

I have not tested this recipe in a convection oven.

1) For more details on making this crust or to use whole graham crackers, please see my Graham Cracker Crust Recipe.

2) Make sure that you use the brick-style cream cheese, not the spreadable version that is available in tubs.

3) I recommend the top of the oven because it is usually the warmest place in my house (after it’s been on for over an hour). This will help to cool the cheesecake more gradually and will also help avoid cracks).

NUTRITIONAL INFO:

Serving: 1slice | Calories: 500kcal | Carbohydrates: 32g | Protein: 8g | Fat: 36g | Saturated Fat: 22g | Polyunsaturated Fat: 1g | Monounsaturated Fat: 3g | Cholesterol: 179mg | Sodium: 450mg | Potassium: 45mg | Fiber: 1g | Sugar: 24g | Vitamin A: 1200IU | Calcium: 80mg | Iron: 0.9mg


Blue Smoothie Recipe

Move over green smoothie, make way for the new kid on the block. ♥️

There’s a new color in the world of smoothies and it is my favorite one!

What are your thoughts on a Blue Smoothie? Yay or nay? I am personally a huge fan of blue so it is definitely a yay for me.The color comes from blue spirulina, a nutrient dense aqua botanical that is rich in protein, vitamins, minerals and antioxidants. Besides the high nutritional content, it is known to boost the immune system and increases energy too. Powerful algae I have to say!

There’s a whole lot of goodness in just 1 serving of this people!

This blue smoothie recipe starts with frozen fruits. I love making smoothies using frozen fruits as the smoothies get really thick and yummy, just like an ice cream! Furthermore, frozen fruits can easily be stored in the freezer for a long time, so you can blend up some smoothies whenever you need one.

Actually, I think I need one right NOW

Prep time: 10 mins

Total time: 10 mins

Serves: 2

Ingredients:

  • 2 tsp blue spirulina
  • 1 large frozen banana or 2 small frozen bananas
  • ¼ cup frozen blueberries
  • ¼ cup frozen strawberries
  • ⅓-1/2 cup plain yogurt (depending on how sour you like it)
  • ⅔ – 1 cup milk (depending on the thickness you prefer)
  • 1.5 tbsp sweetener of your choice (I used honey)

Instructions:

  1. In a blender, add all of the above ingredients and blend till smooth.
  2. Pour into 2 glasses and serve immediately.