Golden No-Knead Homemade Bread

Golden No-Knead Homemade Bread

This recipe is incredibly simple and cost-effective, yielding two beautiful loaves with a crispy crust and a soft, airy center. Because there is no kneading involved, the yeast does all the heavy lifting for you.

Ingredients

  • 6 cups all-purpose flour (plus a little extra for dusting)

  • 3 cups warm water (not boiling)

  • 1 tbsp active dry yeast

  • 1 tbsp salt

  • 1 tbsp sugar or honey


Preparation Steps

  1. Activate the Yeast: In a large bowl, combine the warm water, sugar, and yeast. Let it sit for about 5–10 minutes until the mixture becomes foamy.

  2. Mix the Dough: Add the flour and salt to the yeast mixture. Stir with a large wooden spoon until a shaggy, sticky dough forms and no dry flour remains. Do not worry about the texture; it is supposed to be sticky.

  3. First Rise: Cover the bowl with a clean kitchen towel or plastic wrap. Place it in a warm, draft-free spot and let the dough rise for about 1 to 1.5 hours, or until it has doubled in size.

  4. Shape the Loaves: Gently deflate the dough using a spatula. Grease two standard loaf pans. Divide the dough into two equal portions and place them into the prepared pans. Smooth the tops with a damp hand.

  5. Second Rise: Cover the pans and let the dough rise again for about 30–45 minutes while you preheat your oven to 375°F.

  6. Bake: Place the pans in the oven and bake for 35–40 minutes. The tops should be a deep golden brown and the loaves should sound hollow when tapped on the bottom.

  7. Cool: Remove the bread from the pans immediately and let them cool on a wire rack. This prevents the crust from becoming soggy.

Golden Scallion Flatbreads

Golden Scallion Flatbreads

These flatbreads are incredibly soft, flexible, and easy to make. They use a simple pourable batter technique that results in a light, golden crust with a tender center. They are perfect for wrapping around savory fillings or enjoying on their own.

Ingredients

  • 2 cups all-purpose flour

  • 1 tsp salt

  • 1 tsp sugar

  • 1 tsp baking powder

  • 3/4 cup warm water (you may need up to 1 cup for a pourable consistency)

  • 2 tbsp olive oil

  • 1/4 cup finely chopped scallions (green onions)


Preparation Steps

  1. Mix the Dry Ingredients: In a large mixing bowl, whisk together the flour, salt, sugar, and baking powder until well combined.

  2. Form the Batter: Gradually pour the warm water and olive oil into the dry mixture. Whisk continuously until the batter is smooth and free of lumps. The consistency should be thick but pourable, similar to a pancake batter.

  3. Add Flavor: Fold in the finely chopped scallions. Let the batter rest for 10 minutes; this allows the flour to fully hydrate for a softer texture.

  4. Heat the Pan: Lightly grease a non-stick skillet with a drop of oil and set it over medium heat.

  5. Cook the Flatbreads: Pour about 1/3 cup of batter into the center of the hot pan. Use the back of a spoon to spread it into a thin, even circle.

  6. Flip and Finish: Cook for 2–3 minutes until the edges look dry and small bubbles form on the surface. Flip the flatbread and cook the other side for another 2 minutes until light golden brown spots appear.

  7. Keep Soft: Place the finished flatbreads on a plate and cover them with a clean kitchen towel while you cook the rest. This steam keeps them soft and pliable.

Crispy Golden Chicken Cutlets

Crispy Golden Chicken Cutlets

These cutlets are perfectly seasoned, tender on the inside, and satisfy that craving for a deep, golden crunch. This method ensures the coating stays attached and stays crispy until the very last bite.

Ingredients

  • 2 large boneless, skinless chicken breasts (sliced thin into cutlets)

  • 1 cup almond flour

  • 1/2 cup grated Parmesan cheese

  • 2 large eggs, beaten

  • 1 tsp garlic powder

  • 1 tsp onion powder

  • 1/2 tsp paprika

  • Salt and black pepper to taste

  • 2 tbsp olive oil or avocado oil for pan-frying


Preparation Steps

  1. Prepare the Chicken: Place the chicken cutlets between two sheets of plastic wrap. Use a meat mallet or a heavy skillet to gently pound them to an even thickness. This ensures they cook quickly and uniformly. Season both sides lightly with salt and pepper.

  2. Set Up the Breading Station: In one shallow bowl, whisk the eggs. In a second shallow bowl, combine the almond flour, Parmesan cheese, garlic powder, onion powder, and paprika. Mix the dry ingredients thoroughly.

  3. Coat the Cutlets: Dip each piece of chicken into the egg wash, letting the excess drip off. Immediately press the chicken into the almond flour mixture, coating both sides firmly so the breading sticks.

  4. Heat the Pan: Add the oil to a large skillet over medium heat. Wait until the oil is shimmering but not smoking.

  5. Cook to Perfection: Place the cutlets in the skillet. Cook for 3–4 minutes per side. The exterior should be a deep golden brown, and the chicken should reach an internal temperature of 165°F.

  6. Rest and Serve: Remove the cutlets from the pan and let them rest on a wire rack or a paper-towel-lined plate for 2 minutes before serving. This keeps the bottom from getting soggy.

Blood Sugar Support Herbal Tea

Blood Sugar Support Herbal Tea

Description

This warming herbal tea blends cinnamon, ginger, green tea, and cloves—ingredients traditionally used to support metabolism and insulin sensitivity. It’s naturally low-calorie, soothing, and easy to make at home. Many people with diabetes enjoy it as part of a balanced lifestyle that includes proper diet, movement, and medical guidance.

Important note: This tea is not a cure for diabetes. It may help support healthy blood sugar levels, but always follow your doctor’s advice and medication plan.

 Ingredients (1 serving)

  • 1 cup water

  • 1 green tea bag or 1 tsp loose green tea

  • ½ tsp cinnamon powder or 1 small cinnamon stick

  • 3–4 thin slices fresh ginger

  • 2 whole cloves (optional but helpful)

  • Lemon slice (optional)

  • Honey or sweetener (optional — use sparingly or skip)

 Instructions

  1. Bring water to a gentle boil.

  2. Add ginger, cinnamon, and cloves.

  3. Simmer for 5–7 minutes.

  4. Turn off heat and add green tea.

  5. Steep for 2–3 minutes only (to avoid bitterness).

  6. Strain, add lemon if desired, and enjoy warm.

Servings

  • 1 cup per serving

  • Recommended: 1–2 cups daily, preferably after meals

 Why These Ingredients Work (Supportive Benefits)

  • Cinnamon – May help improve insulin sensitivity

  • Ginger – Supports digestion and glucose metabolism

  • Green tea – Rich in antioxidants; may help regulate blood sugar

  • Cloves – Traditionally used for blood sugar balance

  • Lemon – Adds flavor and vitamin C without spiking glucose

Nutritional Information (Approx. per cup)

  • Calories: 5–10 kcal

  • Sugar: 0 g

  • Carbohydrates: <1 g

  • Fat: 0 g

  • Caffeine: Low (from green tea)

Tips for Best Results

  • Drink without sweeteners for maximum benefit

  • Use Ceylon cinnamon if possible (gentler on the liver)

  • Pair with a high-fiber meal

  • Monitor your blood sugar when trying new herbs

  • Stay consistent — benefits come from routine, not one cup

Q & A

Q: Can this tea replace diabetes medication?
A: ❌ No. This tea is a supportive habit, not a treatment replacement.

Q: Is it safe for type 1 and type 2 diabetes?
A: Generally safe in moderation, but always check with your doctor—especially if you’re on insulin or blood sugar–lowering meds.

Q: When is the best time to drink it?
A: After meals or in the morning to help manage post-meal glucose spikes.

Q: Can I drink it every day?
A: Yes, 1–2 cups daily is usually fine for most people.

Q: Can pregnant or breastfeeding women drink this?
A: Consult a healthcare professional first.

Honey Lemon Turmeric Gummies

Honey Lemon Turmeric Gummies

Ingredients

  • 1 cup Water

  • 2 tbsp Fresh lemon juice

  • 2 tbsp Raw honey (or a natural liquid sweetener)

  • 1/2 tsp Ground turmeric

  • 1/4 tsp Ground ginger

  • 2 ½ tbsp Unflavored gelatin

  • Optional: A tiny pinch of black pepper (to help the body absorb the turmeric)


Step-by-Step Instructions

1. Bloom the Gelatin

Pour 1/2 cup of the water into a small bowl. Sprinkle the unflavored gelatin evenly over the surface of the water. Let it sit for about 5 minutes to “bloom” (it will become thick and wrinkled).

2. Heat the Mixture

In a small saucepan, combine the remaining 1/2 cup of water, turmeric, and ginger. Heat over medium-low heat until it is warm and the spices are well incorporated. Do not let it boil.

3. Combine

Add the bloomed gelatin into the warm saucepan. Stir constantly for 2–3 minutes until the gelatin is completely dissolved and the liquid is smooth. Remove the pan from the heat.

4. Add Fresh Ingredients

Once the mixture has cooled slightly (but is still liquid), stir in the fresh lemon juice and the honey. Adding the honey at a lower temperature helps preserve its natural properties.

5. Mold and Set

Pour the liquid into silicone candy molds or a small glass container lined with parchment paper. If you see any bubbles on top, you can gently pop them with a toothpick.

6. Chill

Place the molds in the refrigerator for at least 1 to 2 hours, or until the gummies are completely firm to the touch.

7. Slice and Store

If you used a glass container, lift the block out and slice it into small cubes. Pop the gummies out of the silicone molds and store them in an airtight container in the refrigerator for up to one week.


Quick Tip

If you prefer a “sour” gummy, you can add an extra tablespoon of lemon juice or a tiny pinch of citric acid to the mixture before pouring it into the molds.

Carrot & Ginger Vitality Juice

Carrot & Ginger Vitality Juice

Ingredients

  • 3-4 large Carrots (peeled and chopped)

  • 1 large Lemon (juiced)

  • 1-inch piece Fresh ginger (peeled)

  • 1/2 tsp Turmeric powder (optional, for added benefits)

  • 2 cups Water (filtered)

  • 1 pinch Black pepper (helps with nutrient absorption)


Step-by-Step Instructions

1. Prepare the Produce

Wash the carrots thoroughly and peel them. Slice them into smaller chunks so they blend easily. Peel the fresh ginger using the edge of a spoon.

2. Blend

Place the carrots, ginger, lemon juice, turmeric, and black pepper into a high-speed blender. Add the water. Blend on high for about 1–2 minutes until the mixture is as smooth as possible.

3. Strain for Smoothness

If you prefer a clear juice, pour the mixture through a fine-mesh strainer, a nut milk bag, or a piece of cheesecloth into a glass pitcher. Use a spoon to press down on the pulp to extract all the liquid.

Note: Keeping the pulp provides more fiber, which is beneficial for digestion.

4. Chill and Serve

Serve the juice over ice or store it in the refrigerator. It is best enjoyed fresh, but it will keep in a sealed glass jar for up to 24 hours.


How to Enjoy

  • Consistency: Drinking one glass in the morning and one in the afternoon can help keep you hydrated and satisfied between meals.

  • Variation: You can add a half-inch of fresh parsley for an extra herbal boost and more Vitamin K.


Pro Tip

Don’t throw away the carrot pulp! You can mix it into muffin batter or oatmeal for an extra boost of fiber and nutrients.

15-Minute Creamy Garlic Chicken

15-Minute Creamy Garlic Chicken

Ingredients

  • 1 lb Chicken breast (sliced into thin cutlets or tenders for faster cooking)

  • 2 tbsp Olive oil or butter

  • 4 cloves Garlic, minced (use more if you love garlic!)

  • 1/2 cup Chicken broth (low sodium)

  • 1/2 cup Heavy cream or full-fat coconut milk

  • 1/2 tsp Onion powder

  • 1/2 tsp Dried oregano or Italian seasoning

  • Salt and pepper to taste

  • Fresh parsley, chopped (for garnish)

  • Optional: A handful of fresh spinach to stir in at the end.


Step-by-Step Instructions

1. Season the Chicken

Pat the chicken pieces dry with a paper towel. Season both sides generously with salt, pepper, and onion powder.

2. Sear to Golden Perfection

Heat the olive oil or butter in a large skillet over medium-high heat. Once the pan is hot, add the chicken. Cook for about 3–5 minutes per side until golden brown and cooked through. Remove the chicken from the pan and set it aside on a plate.

3. Sauté the Garlic

Turn the heat down to medium. In the same pan, add the minced garlic. Sauté for about 30–60 seconds until fragrant, but be careful not to let it brown or burn.

4. Simmer the Sauce

Pour in the chicken broth to deglaze the pan, scraping up any flavorful brown bits from the bottom. Stir in the heavy cream and the dried herbs. Let the sauce simmer for 2–3 minutes until it begins to slightly thicken.

5. Combine and Serve

Add the chicken (and any juices from the plate) back into the skillet. Spoon the sauce over the chicken and let it simmer for one more minute to heat through. If you are using spinach, stir it in now until it wilts.

6. Garnish

Top with fresh parsley and serve immediately.


Why It Works

Because this recipe avoids flour and sugar, it’s a fantastic option for keeping energy levels stable without a “sugar crash.” It’s rich enough to be satisfying but clean enough to fit into a healthy routine.

Lemon Cloud Bites (Low-Carb & Sugar-Free)

Lemon Cloud Bites (Low-Carb & Sugar-Free)

Ingredients

  • 2 cups Super-fine almond flour

  • 1/2 cup Powdered monk fruit or erythritol (plus extra for rolling)

  • 1 large Egg (room temperature)

  • 2 tbsp Butter or coconut oil, melted

  • 2 tbsp Fresh lemon juice

  • Zest of 2 lemons

  • 1/2 tsp Baking powder

  • 1/4 tsp Salt


Step-by-Step Instructions

1. Preparation

Preheat your oven to 325°F (165°C). Line a baking sheet with parchment paper so the bites don’t stick.

2. Mix the Dry Ingredients

In a medium bowl, whisk together the almond flour, powdered sweetener, baking powder, and salt. Make sure to break up any lumps in the almond flour.

3. Add the Wet Ingredients

In a separate small bowl, whisk the egg, melted butter/oil, lemon juice, and lemon zest. Pour the wet mixture into the dry ingredients and stir until a soft dough forms. It should be slightly tacky but manageable.

4. Roll the Bites

Scoop about one tablespoon of dough at a time and roll it into a small ball (about 1 inch in diameter).

Optional: Roll the balls in a small bowl of extra powdered sweetener for that classic “snowball” look.

5. Bake

Place the balls on the prepared baking sheet, spacing them about an inch apart. Bake for 10–12 minutes. You want the bottoms to be very lightly golden, but the tops should remain pale.

6. Cool

Let them cool on the baking sheet for at least 15 minutes. Almond flour treats are very fragile when warm but firm up perfectly as they cool.


Quick Tip

For an even stronger lemon flavor, you can add 1/4 teaspoon of lemon extract to the wet ingredients. Store these in an airtight container in the fridge to keep them “snappy” and fresh!

Lemon & Ginger Wellness Tonic

Lemon & Ginger Wellness Tonic

This tonic is packed with ingredients known for supporting digestion and providing a natural energy boost.

Ingredients

  • 2 large Lemons (thoroughly washed)

  • 3-inch piece Fresh ginger root (peeled and sliced)

  • 1 tsp Ground turmeric (or 1-inch fresh turmeric root)

  • 1 tbsp Apple cider vinegar (with “the mother”)

  • 1 pinch Black pepper (this helps your body absorb the turmeric)

  • 1 cup Filtered water

  • Optional: 1 tsp Raw honey or a natural sweetener (if desired)


Step-by-Step Instructions

1. Prepare the Ingredients

Slice the lemons into thin rounds. If you are using fresh ginger or turmeric, grate them finely to release as much juice and fiber as possible.

2. Blend or Steep

There are two ways to make this:

  • Method A (Smoothie Style): Place the lemons, ginger, turmeric, pepper, and water into a high-speed blender. Blend until completely smooth.

  • Method B (Infusion Style): Simmer the ginger and turmeric in the water for 10 minutes. Remove from heat, let it cool slightly, and then stir in the fresh lemon juice and apple cider vinegar.

3. Strain (Optional)

If you prefer a clear liquid, pour the mixture through a fine-mesh strainer or cheesecloth into a clean glass jar. Press down on the solids to get every drop of nutrient-rich liquid.

4. Store

Pour the tonic into a glass bottle and store it in the refrigerator. It will stay fresh for up to 5–7 days.


How to Use

  • Serving Size: Take 1 to 2 tablespoons daily.

  • Mixing: You can take it as a concentrated “shot” or stir it into a mug of warm (not boiling) water to enjoy as a soothing tea.


Pro Tip

Drinking this first thing in the morning on an empty stomach is a great way to “wake up” your digestive system and keep you hydrated.

Garlic Butter Ritz Bites

Garlic Butter Ritz Bites

Prep time: 5 minutes

Cook time: 8–10 minutes

Yields: 1 sleeve of crackers

Ingredients

  • 1 sleeve Ritz Crackers (or any buttery round cracker)

  • 4 tbsp Unsalted butter, melted

  • 1/2 tsp Garlic powder (or 1 clove fresh garlic, finely minced)

  • 1/2 tsp Onion powder

  • 1/2 tsp Dried parsley (plus a little extra for garnish)

  • 2 tbsp Grated Parmesan cheese (the fine, powdery kind works best here)

  • Optional: A pinch of red pepper flakes if you like a tiny bit of heat.


Instructions

  1. Preheat and Prep: Preheat your oven to 300°F (150°C). Line a large baking sheet with parchment paper or a silicone mat to prevent sticking and make cleanup easy.

  2. Make the Garlic Butter: In a small microwave-safe bowl, melt the butter. Stir in the garlic powder, onion powder, dried parsley, and Parmesan cheese. Mix until well combined.

  3. Coat the Crackers: Place the crackers in a large mixing bowl. Pour the butter mixture over the crackers. Use a rubber spatula or your hands to very gently toss them until every cracker is lightly coated.

    Pro Tip: Try not to over-mix, as Ritz crackers are fragile and can break easily.

  4. Arrange: Spread the crackers out in a single layer on your prepared baking sheet. Try to keep them from overlapping so they get crispy on all sides. Sprinkle a little extra parsley or Parmesan on top if desired.

  5. Bake: Bake for 8 to 10 minutes. You are looking for them to turn a light golden brown and for the butter to be fully absorbed. Keep a close eye on them during the last 2 minutes, as they can go from golden to burnt very quickly.

  6. Cool and Serve: Remove from the oven and let them cool on the pan for about 5 minutes. They will crisp up significantly as they cool. Serve warm or at room temperature.


Serving Suggestion

These are fantastic on their own, but they also pair beautifully with a warm marinara dipping sauce or as a crunchy topper for a bowl of tomato soup.

Top 9 Best Vegetables for Diabetics

Top 9 Best Vegetables for Diabetics

  1. Zucchini—Very low in carbs, high in fiber, and supports blood sugar balance.

  2. Spinach—Rich in magnesium, may improve insulin sensitivity.

  3. Broccoli—Contains sulforaphane, linked to better glucose control.

  4. Bitter Melon—Traditionally used to support blood sugar regulation.

  5. Okra—High in soluble fiber, it slows sugar absorption.

  6. Cauliflower—Low glycemic load, great rice/potato substitute.

  7. Kale—Packed with antioxidants and fiber.

  8. Cabbage—low carb, supports gut health.

  9. Bell Peppers—Low sugar, high vitamin C.

⚠️ Important: No vegetable “cures” diabetes, but these can help manage blood sugar as part of a balanced diet.

 Zucchini & Spinach Blood Sugar Balance Stir-Fry

🍽 Servings

2 servings

⏱ Prep Time

10 minutes

⏱ Cook Time

10 minutes
Total: 20 minutes

 Ingredients

  • 2 medium zucchinis, sliced

  • 2 cups fresh spinach

  • 1 cup broccoli florets

  • ½ cup chopped bell peppers

  • 1 tablespoon olive oil

  • 2 cloves garlic (minced)

  • 1 teaspoon grated ginger

  • ½ teaspoon turmeric

  • ¼ teaspoon black pepper

  • ½ teaspoon sea salt (or to taste)

  • 1 tablespoon lemon juice

  • Optional: chili flakes

 Instructions

  1. Heat olive oil in a pan over medium heat.

  2. Add garlic and ginger; sauté for 30 seconds.

  3. Add broccoli and cook 3–4 minutes.

  4. Add zucchini and bell peppers; stir-fry 4–5 minutes.

  5. Stir in spinach, turmeric, salt, and pepper.

  6. Cook until spinach wilts (1–2 minutes).

  7. Turn off heat and add lemon juice.

  8. Serve warm.

 Recipe Notes

  • Do not overcook vegetables to preserve nutrients.

  • Pair with grilled chicken, tofu, or fish for a balanced meal.

  • Can be served over cauliflower rice for lower carbs.

Tips for Blood Sugar Control

  • Eat vegetables first before carbs.

  • Add healthy fats (olive oil, avocado) to reduce glucose spikes.

  • Keep portion sizes balanced.

  • Monitor blood sugar response individually.

 Nutritional Information (Per Serving – Approximate)

  • Calories: 120

  • Carbohydrates: 10g

  • Fiber: 4 g

  • Net Carbs: 6g

  • Protein: 3 g

  • Fat: 8 g

  • Glycemic Load: Low

 Health Benefits

  • Supports steady blood sugar levels

  • High fiber improves digestion

  • Rich in antioxidants

  • Anti-inflammatory properties

  • Heart-health supportive

Q & A

Q1: Can this recipe replace diabetes medication?
No. It supports healthy eating but does not replace prescribed treatment.

Q2: Is zucchini juice better than whole zucchini?
Whole zucchini is better due to fiber content.

Q3: Can I eat this daily?
Yes, as part of a balanced meal plan.

Q4: Is it good for type 1 and type 2 diabetes?
Yes, but individual carb tolerance varies.

Q5: Can I meal prep this?
Yes. Store in an airtight container for up to 3 days.

Golden Cottage Cheese Pancakes (Flourless & Sugar-Free)

Golden Cottage Cheese Pancakes (Flourless & Sugar-Free)

These are high-protein, incredibly soft, and taste like a treat without the sugar crash.

  • Prep time: 5 minutes

  • Cook time: 10 minutes

  • Yields: 8–10 small pancakes


Ingredients

  • Cottage Cheese: 1 cup (use full fat for the best flavor)

  • Eggs: 2 large

  • Banana: ½ ripe banana, mashed (acts as the natural sweetener and binder)

  • Flour Substitute: ½ cup almond flour (perfect for staying low-carb)

  • Leavening: 1 tsp baking powder

  • Flavor: 1 tsp vanilla extract and a pinch of salt

  • Cooking Fat: A little butter or coconut oil for the griddle


Step-by-Step Instructions

  1. Blend for Smoothness: For that perfectly smooth “original” pancake look in your photo, place the cottage cheese, eggs, mashed banana, and vanilla into a blender. Pulse until the mixture is completely smooth and creamy.

  2. Combine: Pour the blended mixture into a bowl and stir in the almond flour, baking powder, and salt. Let the batter sit for 2–3 minutes to thicken slightly.

  3. Heat the Griddle: Lightly grease a large non-stick skillet or griddle and heat over medium-low. These pancakes cook best at a lower temperature to ensure the center sets without burning the outside.

  4. Pour and Cook: Drop about 2 tablespoons of batter per pancake onto the hot surface. Cook for 3–4 minutes until small bubbles form on the edges.

  5. The Flip: Carefully flip and cook for another 2 minutes until both sides are a beautiful golden brown.

  6. Serve: Stack them high and enjoy plain, or top with a little extra butter.


Quick Tips

  • Keep them small: Because these are flourless, smaller pancakes (about 3 inches wide) are much easier to flip.

  • Zero Sugar: Since you haven’t eaten sugar in a year, the hint of sweetness from the banana is usually more than enough!

Garlic Broccoli Cream Soup That Saved My Stomach: A Comforting Anti-Parasite Inspired Recipe

Garlic Broccoli Cream Soup That Saved My Stomach: A Comforting Anti-Parasite Inspired Recipe

 If you are looking for a warm, comforting soup that supports digestion and gut health, this creamy garlic broccoli soup is one recipe worth trying. Garlic has long been valued in traditional kitchens for its natural antimicrobial properties, while broccoli is packed with fiber and nutrients that support a healthy digestive system.

This roasted garlic broccoli cream soup is rich, velvety, and incredibly satisfying. The roasted garlic gives it a deep flavor, while potatoes provide a creamy texture without needing too much cream. Topped with crunchy garlic croutons and fresh broccoli, it becomes a bowl of comfort that many people swear by for soothing their stomach.

Let’s dive into this simple homemade recipe that’s both nourishing and delicious.


Why Garlic and Broccoli Are Great for Your Gut

Garlic: Nature’s Powerful Kitchen Remedy

Garlic has been used for centuries not only as a seasoning but also for digestive support. It contains compounds such as allicin, which are believed to have antimicrobial properties.

Many natural health enthusiasts believe garlic may help:

  • Support a healthy gut environment

  • Encourage balanced digestion

  • Provide natural antimicrobial effects

  • Reduce bloating and stomach discomfort

Roasting garlic softens its strong flavor and creates a sweet, buttery taste that blends perfectly into soups.

Broccoli: A Fiber-Rich Super Vegetable

Broccoli is another star ingredient in this recipe. It provides:

  • Dietary fiber that supports digestion

  • Vitamin C and antioxidants

  • Sulforaphane, a compound linked to detox support

  • Nutrients that nourish beneficial gut bacteria

Combined with garlic, broccoli creates a nutrient-dense soup that feels both comforting and wholesome.


Creamy Garlic Broccoli Soup Recipe

Ingredients

For the Soup

For the Garlic Croutons

  • Bread

  • Olive oil

  • Salt

  • Dried garlic

  • Red pepper flakes


Step 1: Roast the Garlic

  1. Preheat your oven to 200°C (400°F).

  2. Cut the garlic heads in half.

  3. Drizzle with olive oil.

  4. Roast for 25 minutes until soft and golden.

Roasted garlic becomes sweet, creamy, and easy to blend into soups.


Step 2: Prepare the Vegetable Base

  1. Chop the onions, celery, and green onions.

  2. Heat olive oil in a large pot over medium heat.

  3. Sauté the vegetables until soft and fragrant.

This step builds the aromatic foundation of the soup.


Step 3: Add the Potatoes and Roasted Garlic

Peel and dice the three potatoes, then add them to the pot.

Once the garlic is roasted:

  1. Remove it from the oven.

  2. Peel the cloves from the skins.

  3. Add the soft roasted garlic to the pot.

Mix everything together and pour in enough vegetable broth to cover the ingredients.

Bring to a boil and simmer for about 20 minutes, or until the potatoes are tender.


Step 4: Cook the Broccoli

Cut the broccoli into florets.

  1. Add the broccoli to the soup.

  2. Season with salt.

  3. Bring to a boil and cook for about 2 minutes.

Cooking it briefly keeps the broccoli vibrant and nutritious.


Step 5: Make Crispy Garlic Croutons

Cut bread into cubes.

In a skillet:

  1. Heat olive oil.

  2. Add bread cubes.

  3. Season with salt, dried garlic, and red pepper flakes.

  4. Cook over medium heat until golden and crispy.

These crunchy croutons add the perfect texture to the creamy soup.


Step 6: Blend the Soup

Once all vegetables are tender:

  1. Blend the soup until smooth using a blender or immersion blender.

  2. Season with salt and black pepper.

  3. Add 200 ml plant-based cream and stir well.

The result is a silky, rich, and comforting soup.


Step 7: Serve and Enjoy

Pour the soup into bowls and top with:

  • Extra broccoli florets

  • Garlic croutons

  • A drizzle of olive oil

Serve warm and enjoy this delicious garlic broccoli cream soup.


Why This Soup Feels So Good for the Stomach

Many people enjoy this recipe because it combines comfort food with nourishing ingredients.

Potential benefits include:

  • Gentle on digestion

  • Rich in fiber and nutrients

  • Warm and soothing for the stomach

  • Packed with flavorful roasted garlic

While it’s not a medical treatment, it’s certainly a healthy homemade dish that many people find satisfying and gut-friendly.


Final Thoughts

If you love creamy vegetable soups with deep flavor, this roasted garlic broccoli soup is a must-try. It’s simple, affordable, and packed with ingredients that support a balanced diet.

The combination of roasted garlic, tender potatoes, fresh broccoli, and crunchy croutons creates a comforting bowl that’s perfect for chilly evenings or whenever you want something nourishing.

Give this recipe a try — you might just discover your new favorite homemade soup.

Slow Cooker Cabbage & Potato Comfort Dish

Slow Cooker Cabbage & Potato Comfort Dish

 Servings

4 servings

 Cooking Time

  • Prep Time: 10 minutes

  • Cook Time: 4–5 hours (Low) or 2–3 hours (High)

 Ingredients

  • 1 medium green cabbage (cut into wedges)

  • 3–4 medium potatoes (quartered)

  • 1 small onion (optional, sliced)

  • 2 cloves garlic (minced)

  • 1 cup vegetable broth

  • 1 tbsp olive oil

  • ½ tsp salt

  • ½ tsp black pepper

  • ½ tsp paprika (optional)

 Instructions

1️⃣ 
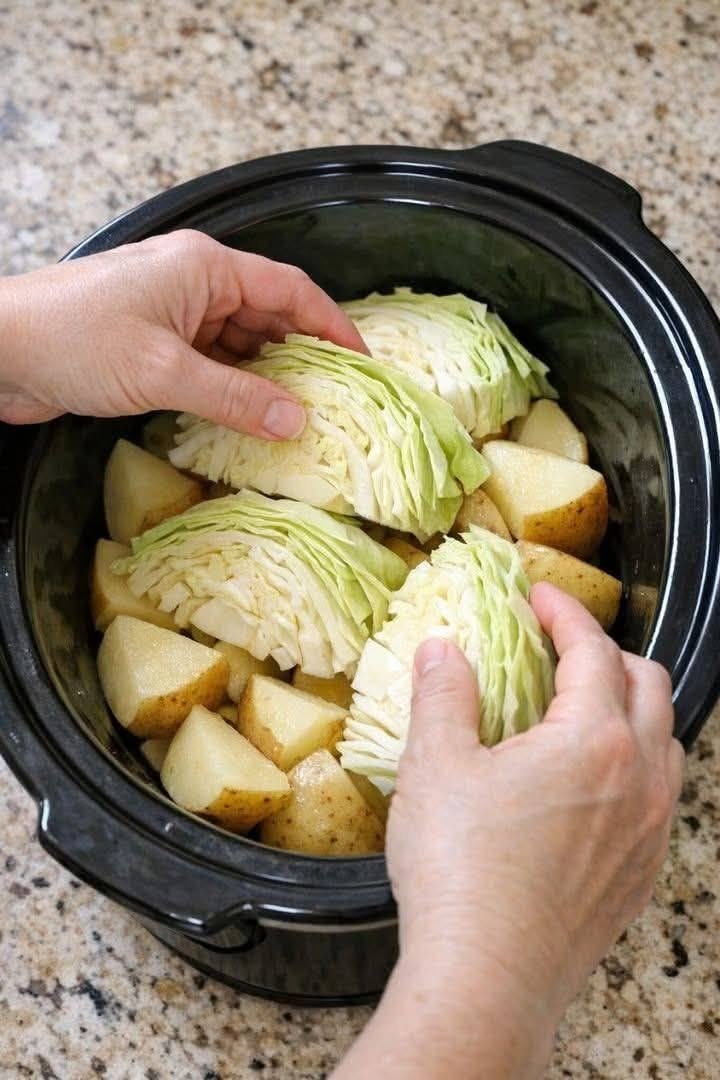
Place the quartered potatoes in the bottom of the slow cooker.
2️⃣ Add sliced onion and garlic on top of the potatoes.
3️⃣ Stack cabbage wedges over the potatoes.
4️⃣ Drizzle olive oil and pour vegetable broth into the cooker.
5️⃣ Sprinkle salt, pepper, and paprika.
6️⃣ Cover and cook on LOW for 4–5 hours or HIGH for 2–3 hours until vegetables are tender.

 Recipe Notes

  • Use red cabbage if you want a stronger flavor.

  • You can add carrots or celery for extra nutrition.

  • For more protein add beans or tofu.

 Tips

✔ Cut cabbage into large wedges so it doesn’t become mushy.
✔ Place potatoes at the bottom because they take longer to cook.
✔ Add a little butter or lemon juice before serving for extra flavor.

 Nutritional Information (Approx per serving)

  • Calories: 140

  • Carbohydrates: 28g

  • Fiber: 6g

  • Protein: 4g

  • Fat: 3g

 Health Benefits

✅ Cabbage

  • Rich in antioxidants

  • Supports digestion

  • May help reduce inflammation

✅ Potatoes

  • Good source of potassium

  • Provide natural energy

  • High in fiber when skin is included

Q & A

Q: Is this recipe good for diabetics?
Yes, in moderate portions. Cabbage is low-glycemic and fiber helps control blood sugar.

Q: Can I cook it without a slow cooker?
Yes. You can cook it in a covered pot for about 30–40 minutes on low heat.

Q: Can I add meat?
Yes. Chicken sausage, turkey, or bacon can be added for more flavor.

Q: Can I store leftovers?
Yes, store in the refrigerator for 3–4 days in an airtight container.

Creamy Chopped Salad Dip

Creamy Chopped Salad Dip

  • Prep time: 20 minutes

  • Servings: 8–10 people

  • Difficulty: Easy (mostly chopping!)

Ingredients

The Base:

  • 2 cups Romaine lettuce, very finely shredded

  • 1 cup English cucumber, finely diced

  • 1 cup Cherry tomatoes, quartered and seeded

  • 1/2 cup Red onion, minced

  • 1/2 cup Bell pepper (any color), finely diced

  • 1/2 cup Chickpeas, rinsed and smashed slightly

  • 1/4 cup Fresh parsley, chopped

The Creamy Dressing:

  • 1/2 cup Greek yogurt (or Sour Cream)

  • 1/4 cup Mayonnaise

  • 1 tbsp Red wine vinegar

  • 1 tsp Dried oregano

  • 1/2 tsp Garlic powder

  • Salt and black pepper to taste

  • 1/2 cup Crumbled Feta or Goat cheese (optional)

Instructions

  1. Chop Small: The secret to a good salad dip is the “dice.” Every vegetable should be roughly the size of a pea so you can get a bit of everything in one scoop.

  2. Dry the Veggies: After chopping the cucumber and tomatoes, pat them dry with a paper towel. This prevents the dip from becoming “watery” after an hour.

  3. Whisk the Dressing: In a small bowl, combine the yogurt, mayo, vinegar, and spices. Whisk until smooth.

  4. The Big Mix: In a large bowl, toss all the chopped vegetables together. Pour the dressing over the top and fold gently until everything is coated.

  5. Finish & Serve: Fold in the crumbled cheese. Serve immediately with sturdy crackers, toasted pita chips, or sliced baguette.

Tips for Success

  • The “Seeding” Rule: Always remove the watery seeds from the cucumbers and tomatoes. If you skip this, your dip will turn into a salad soup within 20 minutes.

  • Texture Contrast: Add 1/4 cup of toasted sunflower seeds or pine nuts right before serving for an extra crunch.

  • Make it Spicy: A pinch of red pepper flakes or some diced pickled jalapeños adds a great kick.

Nutritional Information (Per Serving)

Estimate based on 1/10th of the recipe:

Nutrient Amount
Calories 115 kcal
Total Fat 8g
Carbohydrates 7g
Protein 4g
Fiber 2g

Health Benefits

  • Hydration: High water content from cucumbers and lettuce.

  • Probiotics: If using Greek yogurt, you’re getting a nice boost for gut health.

  • Phytonucleants: A rainbow of vegetables means a wide spectrum of antioxidants like Lycopene (tomatoes) and Vitamin C (peppers).

Common Questions (Q&A)

Q: Can I make this ahead of time?

A: You can chop the vegetables and make the dressing separately up to 24 hours in advance. However, do not mix them until about 30 minutes before serving, or the salt will draw moisture out of the veggies and make it soggy.

Q: What is the best thing to dip in it?

A: Sturdy options are best. Pita chips, toasted sourdough slices, or even large “scoopable” corn chips work wonders.

Q: How can I make this vegan?

A: Simply swap the Greek yogurt and mayo for your favorite plant-based versions and use a vegan feta or omit the cheese entirely.

Healthy Chocolate Chip Pancakes

Healthy Chocolate Chip Pancakes

These pancakes are light, fluffy, and designed to be a satisfying treat while staying mindful of your goals. By using a few simple swaps, you can enjoy a classic breakfast that feels indulgent but fits perfectly into a balanced lifestyle.

Ingredients

  • 1 cup All-purpose flour (or white whole wheat flour for extra fiber)

  • 1 tbsp Granulated monk fruit or stevia (sugar substitute)

  • 1 tsp Baking powder

  • ½ tsp Baking soda

  • ¼ tsp Salt

  • 1 cup Unsweetened almond milk or skim milk

  • 1 Large egg (or ¼ cup egg whites)

  • 1 tsp Vanilla extract

  • 2 tbsp Sugar-free mini chocolate chips


Step-by-Step Instructions

  1. Whisk Dry Ingredients: In a medium mixing bowl, combine the flour, sugar substitute, baking powder, baking soda, and salt. Whisk gently to ensure there are no lumps and the leavening agents are evenly distributed.

  2. Combine Wet Ingredients: In a separate small bowl, whisk together the milk, egg, and vanilla extract until well combined.

  3. Mix the Batter: Pour the wet ingredients into the dry ingredients. Use a spatula to fold them together until just combined. Tip: Do not overmix; a few small lumps in the batter are perfectly fine and help keep the pancakes fluffy.

  4. Add the Chips: Gently fold in the sugar-free mini chocolate chips.

  5. Preheat the Pan: Heat a non-stick skillet or griddle over medium-low heat. Lightly coat with a small amount of cooking spray.

  6. Cook: Scoop about 2 to 3 tablespoons of batter onto the skillet for each pancake. Cook for 2–3 minutes until bubbles begin to form on the surface and the edges look set.

  7. Flip: Carefully flip the pancakes and cook for another 1–2 minutes on the other side until golden brown.

  8. Serve: Enjoy these warm! They pair beautifully with a tablespoon of sugar-free syrup or a handful of fresh berries.


Alternative Flourless Variation

If you are looking for a version without flour, you can blend 1 cup of rolled oats into a fine powder and use it as a direct replacement for the all-purpose flour. This adds a nutty flavor and more staying power to your breakfast!

Mediterranean Red Onion & Black Bean Skillet

Mediterranean Red Onion & Black Bean Skillet

A blood-sugar–friendly savory dish

Description

This colorful Mediterranean-style skillet combines red onions, black beans, sweet potatoes, and fresh herbs. It’s rich in fiber, plant protein, and healthy fats—key nutrients that help support steady blood sugar levels when part of a balanced diet.

 Ingredients (Serves 4)

  • 1 large red onion, thinly sliced

  • 2 medium sweet potatoes, diced small

  • 1 cup cooked black beans (rinsed)

  • ½ cup corn kernels (optional)

  • 1 red bell pepper, diced

  • 2 cloves garlic, minced

  • 2 tablespoons olive oil

  • 1 teaspoon ground cumin

  • ½ teaspoon smoked paprika

  • ½ teaspoon oregano

  • Salt & pepper to taste

  • 1 tablespoon lemon juice

  • Fresh parsley or cilantro for garnish

  • Optional: ½ avocado, diced

 Instructions

  1. Sauté the Onion
    Heat olive oil in a skillet over medium heat. Add sliced red onion and cook 5–7 minutes until softened and slightly caramelized.

  2. Cook Sweet Potatoes
    Add diced sweet potatoes. Cover and cook 8–10 minutes, stirring occasionally, until fork-tender.

  3. Add Remaining Ingredients
    Stir in garlic, black beans, bell pepper, corn, and spices. Cook another 5 minutes.

  4. Finish
    Add lemon juice, adjust seasoning, and garnish with herbs and avocado.

Serve warm.

 Notes & Tips

  • Slice onions thinly to maximize caramelization (this enhances natural sweetness without added sugar).

  • Pair with a protein (grilled chicken, tofu, or Greek yogurt) to slow glucose absorption.

  • Keep portions moderate—sweet potatoes and beans contain carbs.

  • Monitor blood sugar individually, as responses vary.

Servings

Makes 4 servings
Serving size: About 1–1¼ cups

 Estimated Nutritional Info (Per Serving)

Approximate values:

  • Calories: 280–320

  • Carbohydrates: 40–45g

  • Fiber: 9–11g

  • Protein: 8–10g

  • Fat: 10–14g

  • Glycemic impact: Moderate (balanced by fiber and fat)

 Potential Benefits

  • Red onion: Contains antioxidants like quercetin

  • Black beans: High fiber & plant protein

  • Sweet potatoes: Provide complex carbs & beta-carotene

  • Olive oil: Heart-healthy fats

These ingredients may help support stable blood sugar as part of an overall healthy lifestyle—but they do not replace medical treatment.

Q & A

Q: Can this cure diabetes?
No. There is currently no cure for type 1 diabetes and most cases of type 2 require ongoing management.

Q: Can onions lower blood sugar?
Some small studies suggest onions may have mild glucose-lowering effects, but they are not a substitute for prescribed medication.

Q: Is this safe for diabetics?
Generally yes, in appropriate portions—but always consult your healthcare provider and monitor blood glucose.

Q: Can I make it lower carb?
Yes. Reduce or remove sweet potatoes and corn, and add more non-starchy vegetables like zucchini or spinach.

🍵 Warm Ginger & Clove Tonic

🍵 Warm Ginger & Clove Tonic

This recipe is designed to be a concentrated infusion. You can drink it warm as a tea, or let it cool and dilute it with sparkling water for a refreshing botanical drink.

Ingredients

  • Ginger: 1 large knob (about 3–4 inches), sliced or roughly chopped.

  • Whole Cloves: 1 tablespoon.

  • Fresh Mint: 2–3 sprigs (plus extra for garnish).

  • Water: 4 cups (approx. 1 liter).

  • Optional: 1–2 tablespoons of honey or a squeeze of fresh lemon.

Instructions

  1. Prep the Ginger: Wash the ginger well. You don’t need to peel it, but slicing it thinly or bruising it with a heavy knife will help release more of its natural oils.

  2. Simmer: Place the water, ginger slices, and whole cloves in a pot. Bring to a gentle boil, then reduce the heat and let it simmer for 10–15 minutes. The longer it simmers, the “spicier” it will be.

  3. Infuse the Mint: Turn off the heat. Add the fresh mint leaves to the pot. Cover and let it steep for another 5 minutes.

  4. Strain and Serve: Strain the liquid into a mug or a glass bottle.

  5. Sweeten: Add honey or lemon to taste while the liquid is still warm.


A Few Tips

  • Strength: If you find the clove flavor too intense, start with just 5–6 cloves the first time.

  • Storage: This infusion keeps well in the fridge for up to 3 days. It’s excellent served cold over ice!

  • Safety Note: While ginger and cloves are generally great, they can be quite potent. If you have specific health conditions or are on blood-thinning medication, it’s always a good idea to check with a doctor before making this a daily habit.

Golden Spice Wellness Drink

Golden Spice Wellness Drink

(Turmeric, Ginger & Cinnamon Herbal Tea)

⚠️ Important Note: This drink may support overall wellness, but it is not a cure for diabetes, high cholesterol, kidney disease, fibroids, high blood pressure, or arthritis. If you have any medical condition or take medications (especially blood thinners, diabetes meds, or BP meds), consult your healthcare provider first.

 Ingredients (2 Servings)

  • 2 cups water

  • 1 teaspoon ground turmeric (or 1 tablespoon fresh grated turmeric)

  • 1 teaspoon freshly grated ginger (or ½ teaspoon ground ginger)

  • 1 small cinnamon stick (or ½ teaspoon ground cinnamon)

  • 1 teaspoon fresh lemon juice (optional)

  • 1–2 teaspoons raw honey (optional)

  • Pinch of black pepper (important for turmeric absorption)

 Instructions

  1. Bring 2 cups of water to a gentle boil.

  2. Add turmeric, ginger, cinnamon, and black pepper.

  3. Reduce heat and simmer for 10–15 minutes.

  4. Strain into cups.

  5. Add lemon and honey if desired.

  6. Drink warm.


📝 Description

This golden herbal infusion combines anti-inflammatory and antioxidant-rich spices traditionally used in natural wellness practices. It’s warming, slightly spicy, and mildly sweet if honey is added.


💡 Tips

  • Use Ceylon cinnamon if drinking daily (lower coumarin content).

  • Add black pepper to enhance curcumin absorption.

  • For a creamier version, add a splash of unsweetened almond milk.

  • Best consumed once daily.

  • Avoid excessive intake (1 cup per day is usually enough).

Servings

Makes 2 cups (2 servings)
Serving size: 1 cup

 Approximate Nutritional Info (per serving)

  • Calories: 15–25 (without honey)

  • Carbs: 3–5g

  • Fat: 0g

  • Sugar: 0g (without honey)

  • Sodium: 0mg

(Honey will increase calories and carbs.)

 Potential Benefits (Evidence-Based Overview)

1️⃣ Diabetes Support

  • Ginger and cinnamon may help improve insulin sensitivity.

  • Does not replace medication.

2️⃣ Cholesterol

  • Some studies show turmeric and cinnamon may help reduce LDL cholesterol.

3️⃣ Blood Pressure

  • Ginger may mildly support circulation.

  • Effects are modest.

4️⃣ Arthritis

  • Turmeric contains curcumin, which has anti-inflammatory properties.

5️⃣ Kidney “Detox”

  • The kidneys naturally detox the body.

  • This drink supports hydration but is not a detox cure.

6️⃣ Fibroids

  • No strong scientific evidence this drink shrinks fibroids.

  • Anti-inflammatory foods may support overall hormonal balance.

Q & A

Q: How often can I drink it?
A: 1 cup daily is generally safe for most people.

Q: Can diabetics add honey?
A: It’s better to skip honey or use a small amount of a low-glycemic sweetener.

Q: Can I drink it on an empty stomach?
A: Yes, unless you have acid reflux — ginger may irritate some people.

Q: How long before I see results?
A: Herbal drinks support overall wellness gradually. They are not quick-fix remedies.

Q: Who should avoid this drink?

  • People on blood thinners

  • Those with gallstones

  • Pregnant women (large amounts of turmeric/ginger)

  • People with kidney stones (turmeric is high in oxalates)

Cottage Cheese & Spinach Crustless Quiche

Cottage Cheese & Spinach Crustless Quiche

Ingredients

  • 2 cups Cottage cheese (small curd preferred)

  • 1 cup Shredded Mozzarella or Swiss cheese

  • 4 Large eggs

  • 2 cups Fresh spinach (roughly chopped)

  • ¼ cup Parmesan cheese (grated)

  • 3 tbsp All-purpose flour (or almond flour for a gluten-free option)

  • 1 tsp Baking powder

  • ½ tsp Garlic powder

  • ¼ tsp Salt and black pepper to taste

  • Optional: A pinch of nutmeg or dried dill for extra depth.


Step-by-Step Instructions

  1. Preparation: Preheat your oven to 350°F (175°C). Grease a 9-inch round pie dish or springform pan thoroughly with butter or non-stick spray.

  2. Sauté the Spinach: Briefly sauté the fresh spinach in a pan over medium heat just until it wilts. Important: Place the wilted spinach in a paper towel and squeeze out all excess moisture to ensure the quiche doesn’t become watery.

  3. Mix the Wet Base: In a large mixing bowl, whisk the 4 eggs until light and frothy. Stir in the cottage cheese, shredded mozzarella, and the squeezed spinach.

  4. Incorporate Dry Ingredients: Gently stir in the flour, baking powder, garlic powder, salt, and pepper. The small amount of flour and baking powder helps give the quiche the “fluffy” lift seen in the photo.

  5. Assemble: Pour the mixture into your prepared baking dish. Use a spoon to level the top. Sprinkle the grated Parmesan cheese evenly over the surface to create a golden, savory crust.

  6. Bake: Bake in the center rack for 35–45 minutes. The quiche is done when the center is set (it shouldn’t jiggle much when shaken) and the top is a beautiful golden brown.

  7. Resting Period: Remove from the oven and let it sit for 10–15 minutes before slicing. Like many egg-based dishes, it needs this time to firm up so you can cut clean, beautiful wedges as shown in the picture.


Pro-Tips for Success

  • Texture: If you prefer a completely smooth, custard-like texture, you can blend the eggs and cottage cheese together in a blender before stirring in the spinach and other cheeses.

  • Variations: Feel free to add sautéed mushrooms or diced red peppers to the mix for additional color and flavor.

Creamy Broccoli & Cauliflower Bake

Creamy Broccoli & Cauliflower Bake

Prep time: 15 mins | Cook time: 30 mins | Servings: 6-8

Ingredients

  • Vegetables: 900g broccoli, 450g cauliflower.

  • Aromatics: 1 onion, 1 carrot, 1 bell pepper, 1 garlic clove.

  • Liquid & Seasoning: 5 cups milk, salt to taste, 2 tablespoons olive oil, parsley to taste.

  • Topping: 200g red cherry tomatoes.

  • Note: For the cheesy topping seen in the photo, you will also need about 1-2 cups of shredded mozzarella or cheddar cheese.


Step-by-Step Instructions

1. Prepare the Vegetables

  • Wash the broccoli and cauliflower thoroughly.

  • Cut them into bite-sized florets.

  • Steam or boil the florets in lightly salted water for about 5 minutes until they are tender-crisp. Drain well and place them into a large baking dish.

2. Sauté the Aromatics

  • Finely dice the onion, carrot, and bell pepper. Mince the garlic.

  • Heat the olive oil in a pan over medium heat. Add the onion and sauté until translucent.

  • Add the carrot, bell pepper, and garlic. Cook for another 3–4 minutes until softened.

3. Create the Creamy Base

  • In a large bowl, whisk the 5 cups of milk with salt and parsley.

  • If you prefer a thicker sauce, you can whisk 3 tablespoons of flour into the milk before heating it gently in a saucepan until it slightly thickens.

  • Stir your sautéed vegetables into this milk mixture.

4. Assemble the Bake

  • Pour the creamy mixture over the broccoli and cauliflower in the baking dish.

  • Arrange the 200g of cherry tomatoes on top.

  • Sprinkle a generous layer of shredded cheese over the entire surface to achieve the golden crust shown in the picture.

5. Bake

  • Preheat your oven to 200°C (400°F).

  • Bake for 20–25 minutes, or until the sauce is bubbling and the cheese is melted and browned into a beautiful crust.

6. Serve

  • Let the dish rest for 5 minutes before serving to allow the sauce to set.


Pro-Tip

To make it even more “melt-in-your-mouth,” ensure the broccoli and cauliflower are drained very well after boiling so the extra water doesn’t thin out your creamy milk sauce.

Flourless Apple Oatmeal Breakfast Bites

Flourless Apple Oatmeal Breakfast Bites

No Sugar • No Flour • Naturally Satisfying

Description

These Flourless Apple Oatmeal Breakfast Bites are soft, lightly sweet, and incredibly nourishing. Made with oats, apples, eggs, and milk, they’re naturally sweetened by fruit and perfect for weight-conscious eating. Great for breakfast, snacks, or even a light dessert—no refined sugar, no flour, and very filling.

Ingredients

  • 1 cup oatmeal (90 g)

  • 150 ml warm milk (about ⅔ cup)

  • 2 apples, peeled and diced

  • 20 g butter (1½ tbsp), melted

  • 2 large eggs

  • ½ tsp vanillin or vanilla extract

Optional additions (still healthy):

  • Cinnamon or nutmeg

  • Chopped nuts

  • Raisins or dried cranberries

Instructions

  1. Preheat Oven
    Preheat oven to 350°F (180°C). Lightly grease a muffin pan or silicone mold.

  2. Soak the Oats
    Place oatmeal in a bowl and pour warm milk over it. Let soak for 5–10 minutes until softened.

  3. Prepare the Batter
    Add eggs, melted butter, vanillin, and diced apples to the soaked oats. Mix until fully combined.

  4. Fill Molds
    Spoon the mixture evenly into the prepared molds, filling about ¾ full.

  5. Bake
    Bake for 25–30 minutes, until golden on top and set in the center.

  6. Cool & Serve
    Let cool for 5 minutes before removing. Enjoy warm or chilled.

Notes

  • Texture is soft and moist, similar to baked oatmeal

  • Apples provide natural sweetness—no sugar needed

  • Silicone molds release best

Tips for Best Results

  • Dice apples finely for even baking

  • Add cinnamon for enhanced sweetness without sugar

  • For extra protein, add 1 tbsp Greek yogurt

  • Store in fridge and reheat gently

Servings

Makes: 10–12 oatmeal bites
Serving Size: 1–2 bites

Nutritional Information (Approximate, per bite)

  • Calories: 85–95

  • Protein: 4 g

  • Carbohydrates: 12 g

  • Fiber: 2 g

  • Fat: 3 g

  • Sugar: Naturally occurring from apples only

Health Benefits

  • Oats support digestion and fullness

  • Apples provide fiber and antioxidants

  • Eggs add high-quality protein

  • No refined sugar or flour

  • Helps control hunger and cravings

Recipe Q & A

Q: Can I eat these for weight loss?
A: Yes—these are filling, low in added sugars, and portion-controlled.

Q: Can I make them dairy-free?
A: Yes—use almond, oat, or soy milk and plant-based butter.

Q: How long do they last?
A: Up to 5 days refrigerated or 2 months frozen.

Q: Can I blend the batter?
A: Yes—for a smoother, cake-like texture.

Q: Can kids eat these?
A: Absolutely—great healthy snack for all ages.

Diluted Apple Cider Vinegar Skin Toner

Diluted Apple Cider Vinegar Skin Toner

Ingredients

  • 1 tablespoon raw apple cider vinegar

  • 3 tablespoons water (minimum dilution)

  • Cotton pad

Instructions

  1. Mix ACV and water thoroughly

  2. Dip a cotton pad into the mixture

  3. Gently dab only on the dark spot (not the whole hand/face)

  4. Leave on for 5–10 minutes max

  5. Rinse with cool water

  6. Apply a gentle moisturizer

⏱ Use 1–2 times per week only

Servings

  • About 4–5 spot applications

Nutritional Information (Topical Use)

Not nutritionally relevant when applied to skin
(ACV nutrients do not absorb meaningfully through skin)

Potential Benefits (Limited & Not Guaranteed)

  • Mild exfoliation

  • Temporary brightening

  • Smoother skin texture

Risks & Warnings (Very Important)

❌ Never use undiluted ACV
❌ Do not use on broken, sensitive, or acne-prone skin
❌ Stop immediately if stinging, redness, or burning occurs
❌ Always wear sunscreen — acids increase sun sensitivity

Patch test required (inside of arm, wait 24 hours)

Better, Safer Options That Actually Work

If your goal is fading dark spots, these are proven and safer:

  • Sunscreen (SPF 30+) – most important

  • Vitamin C

  • Niacinamide

  • Azelaic acid

  • Retinoids (with adult/doctor guidance)

  • Dermatologist treatments (chemical peels, lasers)

Q & A

❓ Does ACV permanently remove age spots?

No. At best, it may slightly lighten them temporarily.

❓ Why does it look like it works in pictures?

Lighting, editing, makeup, or temporary exfoliation effects.

❓ Can ACV make spots worse?

Yes — irritation can trigger post-inflammatory hyperpigmentation.

❓ Is it safe for teens?

Only rare, cautious use, diluted, and not on the face. Sunscreen is far more important.

❓ Should I try it?

If you do, do it carefully, but understand it’s not a real treatment.

Lentil Bread (Gluten-Free, Sugar-Free, and Yeast-Free)

Lentil Bread (Gluten-Free, Sugar-Free, and Yeast-Free)


Ingredients:

  • 200 g lentils (preferably green or brown lentils)

    • Provides the base for the bread and a healthy source of protein and fiber.

  • 30 ml olive oil

    • Adds moisture and richness to the bread.

  • 1/2 teaspoon salt

    • Enhances the flavors of the lentils and other ingredients.

  • 1/2 teaspoon baking powder

    • Helps the bread rise slightly, giving it a light texture.

  • 1 tablespoon pumpkin seeds (optional, for topping)

    • Adds crunch and a nice visual touch on top of the bread.

  • Water as needed to blend the lentils

    • Helps achieve the right dough consistency.


Instructions:

  1. Prepare the Lentils:

    • Rinse the lentils thoroughly under cold water.

    • Boil the lentils in a pot with enough water to cover them. Simmer for about 15-20 minutes, or until the lentils are soft. Drain any excess water and let them cool down slightly.

  2. Blend the Lentils:

    • In a blender or food processor, add the cooked lentils, olive oil, salt, and baking powder. Blend until smooth, adding water gradually to reach a thick, dough-like consistency. The dough should be thick enough to hold its shape but not too dry.

  3. Prepare the Baking Dish:

    • Preheat your oven to 350°F (175°C).

    • Grease a loaf pan with olive oil or line it with parchment paper for easy removal of the bread later.

  4. Pour the Mixture into the Loaf Pan:

    • Transfer the blended lentil mixture into the prepared loaf pan, smoothing the top with a spatula. Sprinkle some pumpkin seeds on top for extra crunch and decoration.

  5. Bake the Bread:

    • Place the loaf pan in the preheated oven and bake for about 40-45 minutes, or until the top is golden brown, and a toothpick inserted into the center comes out clean.

  6. Cool and Serve:

    • Let the bread cool in the pan for 10 minutes before transferring it to a wire rack to cool completely. Slice and serve.


Benefits:

  • Gluten-Free: Made entirely from lentils, this bread is naturally free from gluten, making it suitable for those with gluten sensitivity or celiac disease.

  • High in Protein and Fiber: Lentils are a great source of plant-based protein and fiber, helping to keep you full and support digestion.

  • Sugar-Free: This bread is completely sugar-free, making it ideal for those on a low-sugar or ketogenic diet.

  • Quick and Simple: With just a few ingredients, this bread is easy to make and doesn’t require yeast or rising time.


Nutritional Info (Approximate per slice, based on 10 servings):

  • Calories: 120-140 kcal

  • Carbohydrates: 20-22 g

  • Protein: 8-9 g

  • Fat: 5-6 g

  • Fiber: 6-7 g

  • Sodium: 200-250 mg

Tips:

  • Add Flavors: For added flavor, you can include herbs or spices like garlic powder, onion powder, or dried rosemary in the dough before baking.

  • Storage: Store leftover bread in an airtight container at room temperature for up to 3 days. It also freezes well for up to 3 months.

  • Make it Savory or Sweet: To make it savory, you can add diced vegetables like onions, bell peppers, or spinach to the dough. For a sweeter version, add a small amount of honey or cinnamon.

  • Mixing the Dough: If you prefer a chunkier bread, you can leave the lentils slightly less blended for more texture.

Frequently Asked Questions (Q/A):

Q1: Can I use canned lentils for this recipe?
A1: Yes, you can use canned lentils. Just make sure they are drained and rinsed well before blending.

Q2: Can I substitute the olive oil with another oil?
A2: Yes, you can substitute the olive oil with coconut oil or avocado oil if preferred.

Q3: Can I make this bread in a different shape or size?
A3: Absolutely! If you want to make smaller or larger loaves, adjust the baking time accordingly. Just ensure the bread is cooked through before serving.

Q4: How can I make this bread more fluffy?
A4: You can experiment with adding a small amount of baking soda in place of some of the baking powder, but because this bread is naturally dense, don’t expect it to be as airy as traditional wheat bread.

Flaxseed Cardiovascular Support Drink

Flaxseed Cardiovascular Support Drink

(Not a cure – a supportive wellness beverage)

 Description

A nutrient-dense drink rich in fiber, omega-3s, and antioxidants that may help support heart health, circulation, and blood sugar balance when combined with a healthy lifestyle.

Servings

1 serving (can be taken once daily)

 Ingredients

  • 1 tablespoon ground flaxseed (never whole)

  • 1 cup warm water or unsweetened almond milk

  • ½ teaspoon ground cinnamon (optional)

  • 1 teaspoon lemon juice (optional)

  • Optional additions (choose one):

    • Hibiscus tea (cooled)

    • A few berries

    • Small piece of avocado (for creaminess)

 Instructions

  1. Grind flaxseed fresh (or use pre-ground).

  2. Add to liquid of choice.

  3. Stir well or blend for 20–30 seconds.

  4. Drink immediately.

Important Notes

  • Always use ground flaxseed – whole seeds pass undigested.

  • Drink water afterward (fiber expands).

  • This is not a replacement for medication or treatment.

 Tips for Best Results

  • Take in the morning or with meals

  • Start with 1 teaspoon if new to flax

  • Store ground flaxseed refrigerated

  • Do not exceed 1–2 tablespoons daily

 Nutritional Information (Approx. per serving)

  • Calories: 55

  • Fiber: 3g

  • Protein: 2g

  • Fat: 4g (mostly omega-3 ALA)

  • Net Carbs: ~0.5g

  • Sugar: 0g

 Evidence-Based Benefits (Supported by Research)

Flaxseed may help:

  • ✔ Support heart health

  • ✔ Improve cholesterol levels

  • ✔ Aid blood sugar control

  • ✔ Reduce inflammation

  • ✔ Support digestive health

  • ✔ Improve blood vessel function

⚠️ It does NOT cure cancer, diabetes, or hypertension.

 Q & A

Q: Can flaxseed cure cancer?
❌ No. It may support overall health but cannot cure cancer.

Q: Does it lower blood pressure?
✔ It may help modestly as part of a healthy diet.

Q: Can diabetics use this?
✔ Often yes, but only with medical guidance.

Q: How long before benefits appear?
⏳ Typically 2–6 weeks with consistent use and proper diet.

Q: Who should avoid flaxseed?

  • People with bowel obstruction

  • Hormone-sensitive conditions (ask a doctor)

  • Those on blood thinners (consult first)