No-Sugar Healthy Oatmeal Cookies

No-Sugar Healthy Oatmeal Cookies

Naturally Sweet • Wholesome • Easy to Make

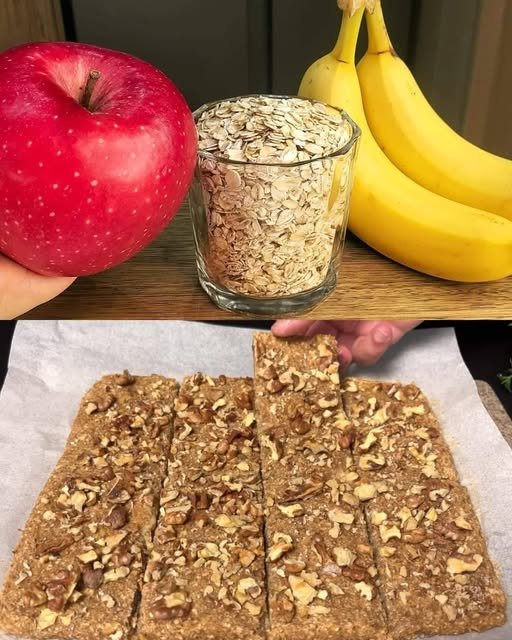
These no-sugar oatmeal cookies are gently sweetened with fruit and stevia, making them a great option for everyday snacking. They are soft, lightly chewy, and full of natural texture from oats, nuts, and dried fruit. No refined sugar, no butter, and no flour are needed.

Prep Time

10 minutes

Bake Time

15–20 minutes

Yield

8–10 cookies


Ingredients

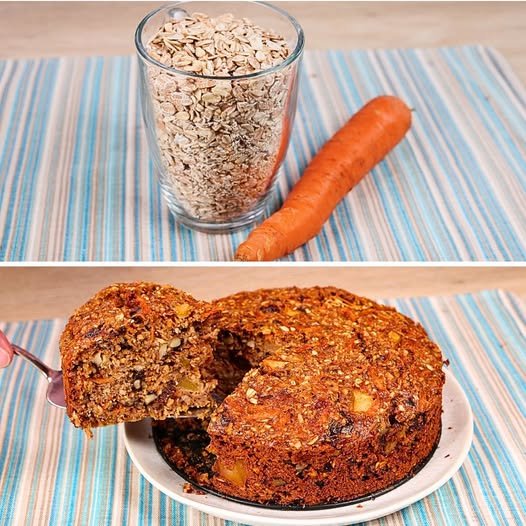
  • 1 cup (90 g) rolled oats

  • 50 g oat flakes (for added texture)

  • 1 medium apple, peeled, cored, and finely diced

  • 1 ripe banana

  • 80 g nuts (almonds, walnuts, or pecans), roughly chopped

  • 50 g dried cranberries

  • 1 tablespoon stevia (adjust to taste)

  • 1 tablespoon sesame seeds

  • 1 teaspoon vanillin or vanilla powder (optional)


Instructions

1. Prepare the Oven

Preheat your oven to 350°F (180°C).
Line a baking sheet with parchment paper or lightly grease it.

2. Mash the Banana

Place the banana in a large mixing bowl and mash thoroughly with a fork until smooth and creamy. This will act as the main binder for the cookies.

3. Combine the Base

Add the diced apple, rolled oats, oat flakes, and vanillin (if using) to the mashed banana.
Stir well until everything is evenly coated and the mixture begins to hold together.

4. Add Texture and Flavor

Fold in the chopped nuts, dried cranberries, stevia, and sesame seeds.
Mix gently until fully combined. The mixture should be thick and slightly sticky. If it feels too dry, add 1–2 teaspoons of water.

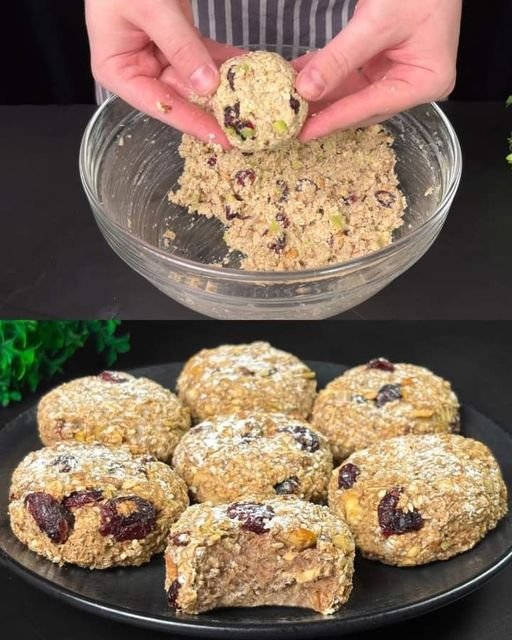
5. Shape the Cookies

Scoop about 2 tablespoons of the mixture for each cookie.
Roll gently into a ball, then flatten slightly into a thick disc.
Place cookies on the prepared baking sheet, leaving a little space between each one.

6. Bake

Bake for 15–20 minutes, or until the edges turn lightly golden and the cookies feel set when touched.

7. Cool

Remove from the oven and let the cookies cool on the baking sheet for 5 minutes, then transfer to a plate or cooling rack.
They will firm up more as they cool.


Helpful Tips

  • For softer cookies, bake closer to 15 minutes.

  • For firmer, slightly crisp edges, bake closer to 20 minutes.

  • You can replace cranberries with raisins or chopped dates if preferred.

  • Store cookies in an airtight container at room temperature for up to 2 days, or refrigerate for up to 5 days.

Carrot Cake with Cream Cheese Frosting

Carrot Cake with Cream Cheese Frosting

Prep Time: 25 minutes
Bake Time: 25–35 minutes
Cooling & Assembly: 60 minutes
Yield: 1 two-layer 8-inch cake or one 9×13-inch cake

This carrot cake has a moist crumb, balanced spice flavor, and a smooth cream cheese frosting. It is suitable for gatherings, celebrations, or everyday desserts.


Ingredients

For the Carrot Cake

  • 2 cups (250 g) all-purpose flour

  • 1½ cups (300 g) granulated sugar or brown sugar

  • 1 teaspoon baking powder

  • 1 teaspoon baking soda

  • ½ teaspoon salt

  • 1 tablespoon ground cinnamon

  • ½ teaspoon ground nutmeg

  • ½ teaspoon ground ginger

  • ¼ teaspoon ground cloves (optional)

  • 3 large eggs, room temperature

  • ¾ cup (180 ml) vegetable oil

  • ½ cup (120 ml) buttermilk or milk

  • 1 teaspoon vanilla extract

  • 2½ cups (260 g) finely grated carrots

  • ½ cup chopped walnuts or pecans (optional)

  • ½ cup raisins, sultanas, or dried cranberries (optional)

  • Zest of 1 orange (optional)


For the Cream Cheese Frosting

  • 200 g cream cheese, softened

  • ½ cup (113 g) unsalted butter, softened

  • 2½ cups (300 g) powdered sugar

  • 1 teaspoon vanilla extract

  • ½ teaspoon orange zest (optional)


Detailed Instructions

1. Prepare the Oven and Pans

Preheat the oven to 350°F (175°C).

Grease and line:

  • Two 8-inch round cake pans, or

  • One 9×13-inch baking pan

Set aside.


2. Mix Dry Ingredients

In a large bowl, whisk together:

  • Flour

  • Sugar

  • Baking powder

  • Baking soda

  • Salt

  • Cinnamon

  • Nutmeg

  • Ginger

  • Cloves

Whisk until evenly combined and free of lumps.


3. Mix Wet Ingredients

In a separate bowl, whisk together:

  • Eggs

  • Vegetable oil

  • Buttermilk

  • Vanilla extract

Mix until smooth and fully combined.


4. Combine Batter

Pour the wet ingredients into the dry ingredients.

Using a spatula, gently fold until just combined.

Add:

  • Grated carrots

  • Nuts (if using)

  • Dried fruit (if using)

  • Orange zest

Fold gently. Do not overmix, as this can affect texture.


5. Bake

Divide the batter evenly between prepared pans.

Bake for 25–35 minutes, or until:

  • The center springs back lightly when touched

  • A toothpick inserted in the center comes out clean

Remove from the oven and allow cakes to cool in pans for 10 minutes. Transfer to a wire rack and cool completely before frosting.


Cream Cheese Frosting

6. Prepare the Frosting

In a large bowl, beat the softened cream cheese and butter until smooth and creamy.

Gradually add powdered sugar, mixing on low speed until incorporated.

Add vanilla extract and orange zest (if using).

Increase speed and beat until light and smooth.


7. Assemble the Cake

If using layered pans:

  • Place one cake layer on a serving plate

  • Spread frosting evenly on top

  • Place the second layer on top

Frost the top and sides evenly.

For a sheet cake:

  • Spread frosting evenly over the cooled cake


Optional Garnishes

  • Chopped nuts

  • Dried fruit

  • Thin carrot curls

  • Light dusting of powdered sugar


Storage

  • Store refrigerated in an airtight container for 3–4 days

  • Bring to room temperature before serving

  • Cake layers can be frozen (unfrosted) for up to 2 months

Homemade White Bread

Homemade White Bread

Soft, fluffy loaf with a tender golden crust

Prep Time: 20 minutes
Rise Time: 1½–2½ hours
Bake Time: 30–35 minutes
Total Time: About 3 hours
Yield: 1 standard loaf

This homemade white bread is light, soft, and versatile. It works well for sandwiches, toast, or serving warm with butter. The recipe uses simple pantry ingredients and straightforward techniques suitable for beginners.


Ingredients

For the Bread

  • 4 cups all-purpose flour

  • 2 teaspoons instant yeast

  • 2 teaspoons salt

  • 2 tablespoons sugar

  • 2 tablespoons unsalted butter, softened

  • 1½ cups warm water (about 105–110°F / 40–43°C)

Optional Topping

  • 1 tablespoon milk

  • 1 tablespoon unsalted butter, melted


Step-by-Step Instructions

1. Activate the Yeast

In a small bowl, combine the warm water, sugar, and yeast. Stir gently and let sit for 5–10 minutes, until the mixture becomes foamy. This indicates the yeast is active.


2. Prepare the Dough

In a large mixing bowl, add:

  • Flour

  • Salt

  • Softened butter

Pour in the yeast mixture. Mix until a shaggy dough forms.

Transfer the dough to a lightly floured surface and knead for 8–10 minutes, until smooth, elastic, and slightly tacky but not sticky.

(If using a stand mixer, knead with a dough hook on medium speed for 6–7 minutes.)


3. First Rise

Lightly grease a clean bowl and place the dough inside, turning once to coat. Cover with a clean kitchen towel or plastic wrap.

Let rise in a warm, draft-free place for 1–2 hours, or until doubled in size.


4. Shape the Loaf

Gently press the dough to release excess air. Shape it into a loaf by rolling it tightly and pinching the seam closed.

Place the shaped dough seam-side down into a greased 9 × 5-inch loaf pan.


5. Second Rise

Cover the pan and allow the dough to rise again for 30–45 minutes, until it rises slightly above the edge of the pan.


6. Preheat the Oven

Preheat oven to 375°F (190°C).

If using the topping, mix the milk and melted butter in a small bowl.


7. Bake

Brush the top of the loaf with the milk-butter mixture if desired.

Bake for 30–35 minutes, until:

  • The top is golden brown

  • The loaf sounds hollow when tapped

For accuracy, the internal temperature should reach 190–200°F (88–93°C).


8. Cool

Remove the bread from the pan and place it on a wire rack. Allow to cool completely before slicing to ensure the best texture.


Storage

  • Store at room temperature in an airtight container for 2–3 days

  • Refrigeration is not recommended

  • Freeze sliced bread for up to 2 months


Helpful Tips

  • Warm water should not be hot, as high heat can damage yeast.

  • For a softer crust, brush the loaf with butter after baking.

  • Measure flour accurately by spooning into the cup and leveling off.

Italian Lemon Yogurt Cake (Sugar-Free)

Italian Lemon Yogurt Cake (Sugar-Free)

Moist, fragrant, and naturally sweetened

Prep Time: 15 minutes
Bake Time: 45–50 minutes
Total Time: 1 hour
Yield: 1 loaf (8–10 slices)

This Italian-style lemon yogurt cake is light, moist, and full of bright citrus flavor. It’s sweetened with stevia instead of refined sugar, making it a better option for those reducing sugar intake while still enjoying a classic homemade cake.


Ingredients

Dry Ingredients

  • 1½ cups all-purpose flour

  • 2 teaspoons baking powder

  • ½ teaspoon kosher salt

Wet Ingredients

  • 1 cup plain coconut yogurt (or whole milk yogurt)

  • Stevia powder, to taste
    (use the amount equivalent to ¾–1 cup sugar, depending on brand strength)

  • 3 large eggs

  • 2 teaspoons finely grated lemon zest (from about 2 lemons)

  • ⅓ cup freshly squeezed lemon juice

  • ½ teaspoon pure vanilla extract

  • ½ cup olive oil

Lemon Soaking Syrup (Sugar-Free)

  • ¼ cup lemon juice

  • Stevia powder, equivalent to ¼ cup sugar

Sugar-Free Lemon Glaze (Optional)

  • Juice of 1 lemon

  • Powdered stevia sweetener, to taste
    (or sugar-free confectioner’s sweetener blend)


Step-by-Step Instructions

1. Prepare the Pan

Preheat oven to 350°F (180°C).
Grease an 8½ × 4¼ × 2½-inch loaf pan and line the bottom with parchment paper, or lightly coat with baking spray.


2. Mix Dry Ingredients

In a large bowl, sift together:

  • Flour

  • Baking powder

  • Salt

Set aside.


3. Mix Wet Ingredients

In a separate bowl, whisk together:

  • Yogurt

  • Stevia powder

  • Eggs

  • Lemon zest

  • Lemon juice

  • Vanilla extract

Whisk until smooth and well combined.


4. Combine Batter

Gradually whisk the dry ingredients into the wet mixture until just combined.
Do not overmix.


5. Add Oil

Gently fold in the olive oil using a spatula until fully incorporated.
The batter should be smooth and slightly thick.


6. Bake

Pour the batter into the prepared loaf pan and smooth the top.

Bake for 45–50 minutes, or until a toothpick inserted into the center comes out clean.


7. Prepare the Lemon Syrup

While the cake bakes, combine:

  • ¼ cup lemon juice

  • Stevia powder

Heat gently in a small saucepan just until dissolved. Do not boil. Set aside.


8. Soak the Cake

Allow the cake to cool in the pan for 10 minutes.
While still warm, slowly pour the lemon syrup over the cake so it absorbs evenly.

Let the cake cool completely.


9. Prepare the Sugar-Free Glaze (Optional)

Mix powdered stevia with lemon juice until a pourable glaze forms.
Drizzle over the cooled cake.

Allow glaze to set for about 1 hour before slicing.


Tips for Best Results

  • Use fine powdered stevia for smooth texture.

  • Olive oil gives authentic Italian flavor; use light olive oil if preferred.

  • For extra moisture, wrap the cooled cake and rest overnight before serving.

  • Skip the glaze for a lighter, breakfast-style cake.


Storage

  • Store covered at room temperature for 2 days

  • Refrigerate for up to 5 days

  • Freeze slices for up to 2 months

Refreshing Ginger Water

This method is best for extracting the most gingerols, the active compounds responsible for ginger’s metabolic benefits.

Ingredients

  • 1–2 inches fresh ginger root (peeled and thinly sliced or grated)

  • 4 cups filtered water

  • Optional: 1 tsp raw honey and juice of ½ lemon (added after cooling)

Instructions

  1. Prep: Peel the ginger (using a spoon is easiest) and slice it thinly to increase surface area.

  2. Boil: Bring the water to a boil in a medium pot.

  3. Simmer: Add the ginger, reduce heat, and simmer for 10–15 minutes.

    • Tip: Do not exceed 15 minutes, as it can become overly bitter.

  4. Strain: Pour through a fine-mesh strainer into a pitcher or jar.

  5. Finish: Allow it to cool slightly before adding lemon or honey if desired. Serve warm or chilled.


2. Cucumber & Mint Ginger Water (Cold-Infusion)

Perfect for all-day sipping and staying hydrated during warmer months.

Ingredients

  • 1 inch fresh ginger (thinly sliced)

  • 1 medium cucumber (sliced)

  • 1 lemon (thinly sliced)

  • 5–10 fresh mint leaves

  • 8 cups cold water

Instructions

  1. Combine: Add the ginger, cucumber, lemon, and mint to a large pitcher.

  2. Infuse: Pour in the cold water and stir gently.

  3. Chill: Refrigerate for at least 2–4 hours, or overnight for a stronger flavor.

  4. Serve: Sip throughout the day in place of sugary beverages.


Important Health Notes

  • Best Time to Drink: Many people find success drinking one cup on an empty stomach in the morning to “kickstart” metabolism.

  • Consult a Doctor: Avoid or limit ginger water if you are on blood thinners, have gallstones, or are in the late stages of pregnancy.

  • Skip the Sugar: For weight loss goals, it is best to enjoy this drink without added sugars or honey, as extra calories can negate the metabolic benefits.

More Apples Than Dough” Pie

More Apples Than Dough” Pie

  • Prep time: 15 minutes

  • Cook time: 40–50 minutes

  • Total time: ~1 hour

  • Servings: 4–6


Ingredients

  • 4–5 medium apples, peeled and thinly sliced

  • 2 eggs

  • ½ cup sugar (100 g)

  • 1 tsp vanilla sugar

  • ⅓ cup milk (100 ml)

  • 1 ½ tbsp melted butter (20 g)

  • Zest of 1 lemon

  • Juice of ½ lemon (to drizzle over apples)

  • ⅔ cup wheat flour (80 g)

  • 1 tsp baking powder

  • A pinch of salt

  • Powdered sugar (for dusting)


Instructions

  1. Prepare Apples: Peel, core, and slice the apples very thinly (using a mandoline is recommended for uniform slices). Drizzle them with the juice of ½ a lemon to prevent browning and add flavor.

  2. Mix Wet Ingredients: In a mixing bowl, beat the 2 eggs with a pinch of salt. Add the sugar and vanilla sugar, beating until the mixture is frothy and light in color.

  3. Combine Remaining Liquids: Stir in the milk, melted butter, and lemon zest.

  4. Add Dry Ingredients: Gradually whisk in the flour and baking powder until the batter is smooth. Note that the batter will be quite thin and watery.

  5. Coat Apples: Gently fold the apple slices into the batter, ensuring every slice is thoroughly coated.

  6. Assemble: Grease an 8-inch (20 cm) baking pan and line it with parchment paper. Pour the apple-batter mixture into the pan, smoothing the top so the slices lie flat.

  7. Bake: Bake in a preheated oven at 350°F (180°C) for 40–50 minutes. The cake is done when the top is golden brown and a toothpick inserted into the center comes out clean.

  8. Cool and Serve: Allow the cake to cool completely in the pan to set its creamy, custard-like texture. Dust with powdered sugar before serving.


Recipe Tips

  • Consistency: The batter is meant to be thin; it serves primarily to bind the apple layers together into a custard.

  • Apple Choice: Use firm baking apples like Granny Smith, Honeycrisp, or Fuji to ensure the slices hold their shape.

  • Storage: This pie is excellent served cold and can be stored in an airtight container in the fridge for up to 4–5 days.

Stuffed Potato Patties with Mushroom Filling

Stuffed Potato Patties with Mushroom Filling

Crispy on the outside, creamy inside, with a savory mushroom and cheese center and a bright dill yogurt sauce

Prep Time: 40–50 minutes
Cook Time: 20–25 minutes
Total Time: 1 hour 10–15 minutes
Servings: 6

These patties combine smooth mashed potatoes, flavorful mushroom filling, and melty mozzarella, coated and fried to golden perfection. Served with dill yogurt sauce, they make an elegant appetizer or a hearty main course.


Ingredients

For the Potato Mixture

  • 1 kg (2.2 lbs) starchy potatoes (Russet or Yukon Gold)

  • 2 large eggs, beaten

  • 15 g (2 tablespoons) all-purpose flour

  • 1 teaspoon fine sea salt

  • ½ teaspoon freshly ground black pepper

For the Mushroom Filling

  • 400 g (14 oz) fresh mushrooms, finely chopped

  • 1 medium onion, finely diced

  • 1 large carrot, grated

  • 45 g (3 tablespoons) unsalted butter

  • 100 g (3.5 oz) mozzarella, cut into small cubes

  • Salt and pepper to taste

For Coating and Frying

  • 120 g (1 cup) all-purpose flour

  • 1 large egg, beaten

  • Additional butter for frying

For the Dill Yogurt Sauce

  • 2 tablespoons (30 g) plain yogurt

  • 2 tablespoons fresh dill, finely chopped

  • Pinch of salt


Step-by-Step Instructions

1. Prepare the Mashed Potatoes

  1. Peel and cut potatoes into uniform chunks.

  2. Place in cold, salted water and bring to a boil.

  3. Cook until tender when pierced with a fork (about 15–20 minutes).

  4. Drain thoroughly and return potatoes to the pot over low heat for 1–2 minutes to remove excess moisture.

  5. Mash while hot until completely smooth.

  6. Add 2 beaten eggs, 2 tablespoons flour, salt, and pepper. Mix until combined but do not overmix.

  7. Let the mixture cool until comfortable to handle.


2. Make the Mushroom Filling

  1. Finely chop mushrooms with a knife or food processor.

  2. Melt butter in a large skillet over medium heat.

  3. Add diced onion and cook until soft and translucent (5–6 minutes).

  4. Add grated carrot and cook 2–3 minutes until softened.

  5. Add chopped mushrooms and increase heat to medium-high. Cook, stirring frequently, until all moisture evaporates (8–10 minutes).

  6. Season generously with salt and pepper.

  7. Transfer to a bowl and let cool completely.


3. Assemble the Patties

  1. Place 1 cup of flour on a shallow plate for coating.

  2. Take about 3 tablespoons of the potato mixture and flatten in your palm.

  3. Make a small well in the center.

  4. Place 1 tablespoon mushroom filling and a cube of mozzarella in the well.

  5. Fold edges over to enclose filling completely. Shape into an oval patty about 3 inches long.

  6. Coat thoroughly in flour, shaking off excess.

  7. Repeat with remaining mixture.


4. Cook the Patties

  1. Heat 2 tablespoons butter in a large skillet over medium heat.

  2. Dip flour-coated patties in beaten egg.

  3. Place patties in the hot pan without overcrowding.

  4. Fry 3–4 minutes per side until golden brown and crispy.

  5. Transfer to paper towels to drain excess butter.

  6. Keep warm in a 200°F oven while cooking remaining batches.


5. Prepare the Dill Yogurt Sauce

  • In a small bowl, combine yogurt, chopped dill, and a pinch of salt.

  • Refrigerate until ready to serve.


Tips for Success

  • Use starchy potatoes for a fluffy, smooth texture.

  • Ensure mashed potatoes and filling are cooled before assembly to prevent breakage.

  • If the potato mixture is too soft, chill in the refrigerator for 30 minutes.

  • Test oil temperature with a small piece of mixture; it should sizzle gently.

  • Don’t flip patties too early—wait until a golden crust forms.


Storage and Reheating

  • Uncooked Patties: Store between layers of parchment paper in the fridge for up to 24 hours.

  • Cooked Patties: Keep in an airtight container in the fridge for 2–3 days. Reheat in a 350°F oven for 10–12 minutes.

  • Dill Sauce: Refrigerate for up to 3 days.


Nutrition (Per Serving, Serves 6)

  • Calories: 380 kcal

  • Total Fat: 15 g

  • Saturated Fat: 8 g

  • Cholesterol: 120 mg

  • Sodium: 450 mg

  • Total Carbohydrates: 52 g

  • Dietary Fiber: 4 g

  • Protein: 12 g

  • Iron: 10% DV

  • Calcium: 15% DV

Egg Muffins – Quick & Nutritious Breakfast

Egg Muffins – Quick & Nutritious Breakfast

High in protein, low in carbs, and fully customizable

Prep Time: 10 minutes
Cook Time: 18–22 minutes
Total Time: 30 minutes
Yield: 6 muffins

Egg muffins are a versatile breakfast or snack option. You can add your favorite vegetables, meats, or cheeses, making them ideal for low-carb, keto, or meal-prep-friendly diets.


Ingredients

  • 6 large eggs

  • ¼ cup (60 ml) milk (or unsweetened almond/oat milk for dairy-free)

  • ½ cup shredded cheese (cheddar, feta, or your choice; optional for dairy-free)

  • ½ cup chopped vegetables (bell peppers, spinach, green onions, mushrooms, zucchini, etc.)

  • ¼ cup cooked bacon or ham (optional)

  • Salt and pepper to taste

  • ½ teaspoon garlic powder (optional)

  • ½ teaspoon paprika (optional)


Step-by-Step Instructions

1. Preheat the Oven

Preheat your oven to 375°F (190°C).
Lightly grease a 6-cup muffin tin with cooking spray, oil, or butter. Silicone muffin cups can also be used.


2. Prepare Ingredients

  • Chop your vegetables into small pieces.

  • Dice cooked bacon or ham if using.

  • Pre-sauté watery vegetables (like mushrooms or spinach) for 2–3 minutes to prevent soggy muffins.


3. Whisk the Eggs

In a large bowl, whisk together the eggs, milk, salt, pepper, garlic powder, and paprika until smooth and slightly frothy.
This ensures fluffy muffins with evenly distributed seasoning.


4. Assemble the Muffins

  • Divide the chopped vegetables and cooked meat evenly among the muffin cups.

  • Pour the egg mixture over the fillings, filling each cup about ¾ full.

  • Top each with shredded cheese, if using.


5. Bake

Place the muffin tin in the preheated oven.
Bake for 18–22 minutes, or until the egg muffins are set and lightly golden on top.
A toothpick inserted in the center should come out clean.


6. Cool and Serve

  • Allow the muffins to cool for a few minutes before removing them from the tin.

  • Serve warm, or store for meal prep.


Tips for Perfect Egg Muffins

  • Grease Well: Prevents sticking; silicone cups work best.

  • Whisk Thoroughly: Ensures light, fluffy muffins.

  • Do Not Overfill: Fill ¾ full to prevent overflow.

  • Cool Slightly Before Removing: Prevents breaking.

  • Storage & Reheating: Refrigerate in an airtight container for up to 5 days; microwave for 30–45 seconds to reheat.

  • Freezing: Let muffins cool completely, then freeze in airtight containers or freezer bags for up to 3 months. Reheat 1–2 minutes in the microwave.

Garlic, Lemon, and Honey Drink for Respiratory Comfort

Garlic, Lemon, and Honey Drink for Respiratory Comfort

A natural remedy to soothe the throat, reduce coughing, and support lung health

Prep Time: 5 minutes
Cook/Steep Time: 5 minutes
Yield: 1–2 servings

This simple drink combines garlic, lemon, and honey to create a soothing beverage that may help reduce coughing, clear mucus, and support respiratory wellness. It is a gentle, natural option that can be prepared easily at home.


Ingredients

  • 2 cloves garlic, peeled and crushed
    Garlic has natural antibacterial and antiviral properties that may support respiratory health.

  • 1 lemon, juiced
    Rich in vitamin C and antioxidants to support the immune system.

  • 1 tablespoon honey (preferably raw or organic)
    Soothes the throat and adds mild antimicrobial properties.

  • 2 cups water


Step-by-Step Instructions

1. Prepare the Ingredients

  • Peel and crush the garlic cloves to release their natural oils.

  • Juice the lemon carefully, removing any seeds.


2. Boil the Water

  • In a small pot, bring 2 cups of water to a gentle boil.


3. Steep Garlic and Lemon

  • Add the crushed garlic and lemon juice to the boiling water.

  • Reduce the heat to low and let it simmer for 5 minutes to extract the beneficial compounds from the garlic and lemon.


4. Strain and Sweeten

  • Pour the liquid through a strainer into a cup to remove the garlic pieces (optional: you may leave them in for a stronger flavor).

  • Stir in 1 tablespoon of honey while the liquid is still warm until fully dissolved.


5. Serve

  • Drink the beverage warm.

  • Recommended intake: 1–2 cups per day, for up to three days.


Notes and Tips

  • Gentle on the Stomach: If you have a sensitive stomach, reduce the garlic to 1 clove or drink the mixture with food.

  • Stronger Flavor: Leaving the garlic in the drink will intensify the flavor and medicinal potency.

  • Adjust Sweetness: You can add extra honey if desired, but keep in mind it increases sugar content.

  • Storage: Best consumed fresh. Any leftovers can be stored in the refrigerator for up to 24 hours and warmed before drinking.


Benefits

  • Respiratory Support: Helps soothe the throat, reduce coughing, and may loosen mucus.

  • Immune Boosting: Garlic and lemon provide antioxidants and compounds that support the immune system.

  • Natural Relief: Offers a simple, chemical-free way to ease mild bronchial discomfort.


Safety and Considerations

  • Not a Cure: This drink helps relieve symptoms but does not cure bronchitis. Consult a healthcare professional if symptoms are severe or persistent.

  • Allergies: Ensure you are not allergic to garlic, honey, or citrus before consuming.

  • Children: Honey should not be given to children under 1 year old.

Homemade 3-Ingredient Strawberry Ice Cream

Homemade 3-Ingredient Strawberry Ice Cream

No gelatin, no ice cream machine—just creamy, fruity goodness

Prep Time: 10 minutes
Freeze Time: 4–6 hours
Yield: About 4–6 servings

This recipe is simple, naturally creamy, and customizable. You can swap strawberries for other fruits, chocolate chips, or even cookie pieces.


Ingredients

  • 500 ml (2 cups) whipping cream
    Use full-fat cream for best results; it creates a rich, creamy texture.

  • 150 g (2/3 cup) sweetened condensed milk
    Provides sweetness and helps the ice cream hold its shape without gelatin.

  • 100 g (3/4 cup) fresh strawberries, diced
    Adds natural fruit flavor. You can substitute raspberries, blueberries, or mango if desired.


Step-by-Step Instructions

1. Whip the Cream

Pour the cold whipping cream into a large mixing bowl.
Using an electric mixer, whip on medium-high speed until stiff peaks form.

  • Stiff peaks mean the cream holds its shape when the beaters are lifted.

  • Do not overwhip, or the cream may turn into butter.


2. Fold in the Condensed Milk

Gently add the sweetened condensed milk to the whipped cream.
Use a spatula to fold it in carefully, preserving the air in the whipped cream.
The mixture should become smooth and slightly glossy.


3. Add the Fruit

Fold in the diced strawberries (or your chosen fruit) until evenly distributed.
Be gentle to keep the whipped cream light and airy.


4. Transfer and Freeze

Pour the mixture into a freezer-safe container.
Smooth the top with a spatula and cover the container with a lid or plastic wrap.

Freeze for at least 4 hours, or until firm.
For best flavor, you can refrigerate the mixture for 1–2 hours before freezing to let the flavors meld, but this step is optional.


5. Serve

Scoop the ice cream into bowls and enjoy immediately.
Optional toppings: fresh berries, chocolate shavings, or a drizzle of fruit syrup.


Tips & Variations

  • Fruit Variations: Mango, banana, or mixed berries all work well.

  • Chocolate Strawberry: Fold in 50 g of finely chopped chocolate with the fruit.

  • Nutty Option: Add 2–3 tablespoons chopped nuts for texture.

  • Storage: Keep covered in the freezer for up to 7 days. For softer scooping, let ice cream sit at room temperature for 5 minutes before serving.

Lemon Crinkle Cookies

Lemon Crinkle Cookies

Soft, bright cookies with a delicate citrus flavor and a classic cracked sugar finish

Prep Time: 15 minutes
Chill Time: 30–60 minutes
Bake Time: 10–12 minutes
Yield: About 20–24 cookies

These Lemon Crinkle Cookies are tender on the inside with lightly crisp edges. Fresh lemon zest and juice give them a refreshing citrus taste, while the powdered sugar coating creates the signature crinkled appearance as they bake.


Ingredients

Cookie Dough

  • 1½ cups (180 g) all-purpose flour
    Provides structure for the cookies.

  • 1 teaspoon baking soda
    Helps the cookies spread slightly and crack on top.

  • ½ teaspoon baking powder
    Adds lightness to the texture.

  • ¼ teaspoon salt
    Balances the sweetness and enhances flavor.

  • 1 cup (227 g) unsalted butter, softened
    Creates a rich, tender cookie.

  • 1 cup (200 g) granulated sugar
    Sweetens and helps create a soft crumb.

  • 1 large egg
    Binds the dough and adds moisture.

  • 1 tablespoon fresh lemon zest
    Provides bright lemon aroma.

  • 2 tablespoons fresh lemon juice
    Adds natural citrus flavor.


For Coating

  • ½ cup powdered sugar
    Creates the classic crinkle finish.

  • Optional: 2–3 tablespoons granulated sugar
    Helps form a slight crust before rolling in powdered sugar.


Step-by-Step Instructions

1. Prepare the Dough

In a large bowl, beat the softened butter and granulated sugar together until pale, light, and fluffy. This usually takes 2–3 minutes with an electric mixer.

Add the egg and mix until fully incorporated.
Stir in the lemon zest and lemon juice until evenly combined.


2. Mix the Dry Ingredients

In a separate bowl, whisk together the flour, baking soda, baking powder, and salt.

Gradually add the dry ingredients to the wet mixture. Mix just until a soft, smooth dough forms. Avoid overmixing.


3. Chill the Dough

Cover the bowl and refrigerate the dough for 30–60 minutes.
This step firms the dough, improves texture, and helps prevent excessive spreading.


4. Shape and Coat

Preheat the oven to 175°C (350°F).
Line baking sheets with parchment paper.

Scoop the dough into tablespoon-sized portions and roll into balls.

For best results:

  1. Roll each dough ball lightly in granulated sugar (optional).

  2. Roll generously in powdered sugar, completely coating the surface.

Place the coated dough balls on the baking sheet, spacing them about 2 inches apart.


5. Bake

Bake for 10–12 minutes, until:

  • The edges are set

  • The tops are cracked and puffed

  • The centers remain soft

Do not overbake; the cookies will continue to set as they cool.


6. Cool

Let the cookies rest on the baking sheet for 5 minutes, then transfer them to a wire rack to cool completely.


Tips for Perfect Crinkle Cookies

  • Extra Cracks: Roll the dough in powdered sugar twice for a thicker white coating.

  • Strong Lemon Flavor: Add a drop of lemon extract if desired.

  • Soft Centers: Remove cookies when the centers still look slightly underbaked.

  • Storage: Store in an airtight container at room temperature for up to 4 days.

Vanilla Peach Cake with Cream and White Chocolate

Vanilla Peach Cake with Cream and White Chocolate

A light vanilla sponge layered with fruit, fluffy cream, and delicate white chocolate

Prep Time: 30 minutes
Total Time: About 1 hour + chilling time
Servings: 12–15 slices

This Vanilla Peach Cake is a refreshing, elegant dessert made with a soft sponge base, juicy peaches, smooth vanilla cream, and a snowy topping of white chocolate. It’s light, creamy, and perfect for celebrations, summer gatherings, or make-ahead desserts.


Ingredients

For the Sponge Cake

  • 3 large eggs
    Create structure and lightness.

  • 100 g granulated sugar
    Sweetens the cake and helps trap air for a fluffy texture.

  • 100 g all-purpose flour
    Forms the base of the sponge.

  • 1 teaspoon baking powder
    Provides gentle lift.

  • 1 teaspoon vanilla extract
    Adds classic vanilla flavor.


For the Cream Layer & Topping

  • 480 g canned peaches or apricots, drained
    Adds fruit sweetness and moisture.

  • Reserved fruit juice (from the can)
    Used to lightly moisten the sponge.

  • 300 ml (1¼ cups) cold milk

  • 250 ml (1 cup) cold whipping cream (36% fat)
    Creates a rich yet airy cream layer.

  • 2 packets instant vanilla cream or pudding mix
    Provides structure and vanilla flavor.

  • 100 g white chocolate, well chilled
    Used for garnish.


Step-by-Step Instructions

1. Prepare the Sponge Base

Preheat the oven to 180°C (350°F).
Line a 9×13-inch (23×33 cm) rectangular springform pan with parchment paper.

In a large bowl, beat the eggs and sugar using an electric mixer for 5–8 minutes, until the mixture becomes pale, thick, and nearly triples in volume.

Sift the flour and baking powder together.
Gently fold them into the egg mixture using a spatula, working slowly to keep the batter airy. Add the vanilla extract.

Pour the batter evenly into the prepared pan and smooth the surface.

Bake for 20–25 minutes, or until lightly golden and springy to the touch.
Allow the sponge to cool completely in the pan.


2. Prepare the Fruit

Drain the peaches well and reserve the juice.

Once the sponge has cooled, lightly prick the surface with a fork.
Drizzle 3–4 tablespoons of the reserved fruit juice evenly over the sponge to keep it moist.

Cut the peaches into small, bite-sized pieces and set aside.


3. Make the Vanilla Cream

In a large chilled bowl, combine:

  • Cold milk

  • Cold whipping cream

  • Instant vanilla cream mix

Beat on low speed for 30 seconds, then increase to high speed and beat for about 3 minutes, until thick, smooth, and holding stiff peaks.

Gently fold in the diced peaches until evenly distributed.


4. Assemble the Cake

Spread the peach and vanilla cream mixture evenly over the cooled sponge base.
Smooth the top using an offset spatula or the back of a spoon.

Using a fine grater, grate the chilled white chocolate generously over the entire surface of the cake.


5. Chill and Serve

Refrigerate the cake for at least 2–4 hours, or preferably overnight.
This allows the cream to set fully and makes slicing neat and clean.

Slice and serve chilled.


Helpful Tips & Variations

  • Cold Ingredients Matter: Keep milk, cream, and mixing bowl cold for best cream consistency.

  • Fruit Options: Apricots, mango, or mixed fruit can be used instead of peaches.

  • Extra Flavor: Add lemon zest to the cream for a brighter taste.

  • Storage: Store covered in the refrigerator for up to 3 days.

Italian Peach Crumble Cake

Italian Peach Crumble Cake

A soft, airy sponge topped with sweet peaches and a buttery crumb

Prep Time: 15 minutes
Bake Time: 35–40 minutes
Yield: One 9-inch (23 cm) round cake

This Italian-style Peach Crumble Cake is loved for its light, tender crumb and simple preparation. The delicate vanilla sponge gently supports juicy peaches, while the golden crumble topping adds texture and richness. It’s perfect for afternoon tea, dessert, or a casual gathering.


Ingredients

For the Cake Batter

  • 2 large eggs
    Provide structure and richness.

  • 100 g granulated sugar
    Sweetens the cake and helps create a light texture.

  • 8 g vanilla sugar (or 1 teaspoon vanilla extract)
    Adds gentle aroma and flavor.

  • 100 ml sunflower oil
    Keeps the cake moist and soft.

  • 100 ml milk
    Adds tenderness to the crumb.

  • 200 g all-purpose flour
    Forms the base of the sponge.

  • 12 g baking powder
    Helps the cake rise evenly.

  • 150 g peaches in syrup, drained and sliced
    Adds sweetness and juiciness. Fresh ripe peaches may also be used.


For the Crumble Topping

  • 50 g butter, softened
    Creates a rich, crumbly texture.

  • 50 g granulated sugar
    Sweetens and helps the topping turn golden.

  • 3 tablespoons all-purpose flour
    Binds the crumble together.


Step-by-Step Instructions

1. Prepare the Cake Batter

In a large mixing bowl, add the eggs, granulated sugar, and vanilla sugar.
Whisk until the mixture becomes pale, slightly thick, and airy.

Slowly pour in the sunflower oil and milk. Whisk again until fully combined.

Sift the flour and baking powder directly into the bowl.
Using a spatula or whisk, gently fold until the batter is smooth and free of lumps. Avoid overmixing.

Pour the batter into a greased and parchment-lined 9-inch round cake pan, spreading it evenly.


2. Arrange the Peaches

Place the sliced peaches gently on top of the batter in a circular or fan-shaped pattern.
Lightly press them into the surface so they sit neatly without sinking too deeply.


3. Make the Crumble Topping

In a small bowl, combine the softened butter, sugar, and flour.

Using your fingertips or a fork, rub the mixture together until it resembles small crumbs.

Sprinkle the crumble evenly over the peaches, covering the surface generously.


4. Bake the Cake

Preheat your oven to 180°C (350°F).

Bake the cake for 35–40 minutes, or until:

  • The top is golden and lightly crisp

  • A toothpick inserted into the center comes out clean

If the top browns too quickly, loosely cover with foil during the last few minutes.


Cooling & Serving

Allow the cake to cool in the pan for 10–15 minutes, then transfer to a wire rack.

Before serving, you may lightly dust the top with powdered sugar for a classic bakery-style finish.


Helpful Tips & Variations

  • Fresh Peaches: Use ripe, peeled peaches when in season.

  • Extra Flavor: Add a pinch of cinnamon or lemon zest to the crumble.

  • Storage: Keep covered at room temperature for 1 day or refrigerate for up to 3 days.

  • Serving Ideas: Enjoy plain, with whipped cream, or alongside vanilla yogurt.


Healthy Apple & Oat Breakfast Bake

Healthy Apple & Oat Breakfast Bake

A naturally sweet, nourishing breakfast perfect for meal prep

Prep Time: 15 minutes
Bake Time: 35–40 minutes
Yield: 6–8 servings

This Healthy Apple & Oat Breakfast Bake is a comforting, nutrient-rich dish made with whole ingredients and no refined sugar. Sweetness comes naturally from apples, banana, raisins, and cranberries, while oats and nuts provide lasting energy and fiber. It’s ideal for busy mornings, light breakfasts, or a satisfying snack.


Ingredients & Their Purpose

  • 1 cup (100 g) rolled oats
    Forms the base of the bake and provides fiber for sustained energy.

  • 3 medium apples, grated
    Adds moisture, natural sweetness, and a soft texture. Keep the peel on for added fiber.

  • 1 ripe banana, mashed
    Acts as a natural binder and sweetener.

  • 1/2 cup (120 ml) water
    Helps soften the oats and create a tender texture.

  • 2 large eggs
    Adds protein and helps the bake set properly.

  • 3.5 oz (100 g) dried cranberries
    Adds gentle tartness and natural sweetness.

  • 3.5 oz (100 g) raisins
    Enhances sweetness and moisture.

  • 1/2 cup (50 g) chopped nuts
    Walnuts, almonds, or pecans add crunch, healthy fats, and flavor.

  • 1 teaspoon baking powder
    Gives the bake a light lift.

  • 1 teaspoon ground cinnamon (optional)
    Adds warmth and aroma.


Step-by-Step Instructions

1. Prepare the Dried Fruit

Place the raisins and dried cranberries in a bowl. Cover them with hot water and let soak for 5 minutes.
Drain thoroughly and set aside. This step softens the fruit and prevents dryness in the bake.


2. Soak the Oats

In a large mixing bowl, combine the rolled oats and water.
Let sit for 5–10 minutes so the oats absorb the liquid and soften slightly.


3. Prepare the Fruit Base

  • Mash the banana until smooth.

  • Grate the apples using a coarse grater.

Add both the mashed banana and grated apples to the soaked oats. Stir well to combine.


4. Add the Eggs

In a separate bowl, lightly whisk the eggs.
Pour them into the oat mixture and stir until evenly incorporated.


5. Build Flavor & Texture

  • Sprinkle in the baking powder and cinnamon.

  • Fold in the soaked cranberries, raisins, and chopped nuts.

Mix gently to distribute everything evenly without overworking the batter.


6. Bake

  • Preheat oven to 180°C (350°F).

  • Lightly grease or line a 9×9-inch baking dish.

  • Pour the mixture into the dish and smooth the top.

Bake for 35–40 minutes, until:

  • The top is lightly golden

  • The center feels firm when gently pressed


Cooling & Serving

Let the bake cool in the pan for 10–15 minutes before slicing.
This allows it to set and makes cleaner slices.

Serve:

  • Warm on its own

  • With plain yogurt or a drizzle of nut butter

  • With fresh fruit on the side


Helpful Tips & Variations

  • Softer Texture: Blend oats briefly before soaking for a smoother result.

  • Dairy-Free: This recipe is naturally dairy-free.

  • Egg-Free Option: Replace eggs with 2 tablespoons ground flaxseed mixed with 5 tablespoons water (let rest 5 minutes).

  • Storage: Store slices in an airtight container in the refrigerator for up to 4 days.

  • Reheating: Warm in the microwave for about 30 seconds.

Golden Pan-Fried Flatbread

Golden Pan-Fried Flatbread

Yields: 8–10 flatbreads | Prep time: 90 mins | Cook time: 20 mins

Ingredients

  • The Dough:

    • 850g (30 oz) All-purpose flour

    • 400ml (14 fl oz) Warm water

    • 200ml (6.8 fl oz) Warm milk

    • 30ml (1 fl oz) Vegetable oil

    • 8g (0.3 oz) Dried yeast (about 2.5 tsp)

    • 10g (0.4 oz) Sugar (about 1 tbsp)

    • 1 tsp Salt (optional, but recommended for flavor)

  • The Filling/Finish:

    • 150g (5.3 oz) Soft butter (for brushing between layers or finishing)


Instructions

1. Prepare the Yeast

In a large mixing bowl, combine the warm water, warm milk, sugar, and yeast. Stir gently and let it sit for about 5–10 minutes until it becomes slightly frothy.

2. Mix the Dough

Add the vegetable oil to the yeast mixture. Gradually stir in the flour (and salt if using). Knead the dough for about 8–10 minutes until it is smooth, elastic, and no longer sticking to your hands. If it’s too sticky, add a tablespoon of flour at a time.

3. First Rise

Place the dough in a lightly greased bowl, cover it with a damp cloth or plastic wrap, and let it rise in a warm spot for 1 hour, or until it has doubled in size.

4. The “Trick” & Shaping

  • Punch the dough down to release air.

  • Poke a hole in the center of the dough ball and stretch it out into a large ring (as shown in your image).

  • Cut the ring into 8–10 equal portions.

  • Roll each portion into a ball, then use a rolling pin to flatten them into circles about 1/2 inch (1 cm) thick.

5. Cooking

  • Heat a non-stick skillet or frying pan over medium heat (no oil is needed in the pan, but you can add a tiny bit if preferred).

  • Place one flatbread in the pan. Cook for about 2–3 minutes until bubbles form on top and the bottom is golden brown.

  • Flip and cook the other side for another 2 minutes.

6. The Buttery Finish

Immediately after removing the bread from the pan, brush both sides generously with the soft butter. Stack them on top of each other to keep them soft and warm.


Top Tip for Success

If you want these to be extra flaky (like Katmer), spread some of the soft butter on the rolled-out dough, roll it up like a cigar, coil it into a spiral, and roll it flat again before frying. This creates beautiful buttery layers!

🍎 Apple-Banana Oat Weight Loss Bars

🍎 Apple-Banana Oat Weight Loss Bars

These bars are chewy, naturally sweet, and perfect for meal prepping. Since they use whole ingredients, they keep you full for longer, helping to curb those mid-day cravings.

Ingredients

  • 1 cup Rolled oats (oatmeal)

  • 1 large Apple, peeled and finely chopped (or grated)

  • 1 large Banana, ripe and mashed

  • 1 tsp Cinnamon

  • 2 tbsp Coconut oil, melted

  • 40g Walnuts, roughly chopped

  • Optional: A pinch of salt to enhance the flavor.


Instructions

  1. Prep the Oven: Preheat your oven to 180°C (350°F) and line a small baking dish with parchment paper.

  2. Combine the Wet Ingredients: In a large mixing bowl, mash the banana until smooth. Stir in the melted coconut oil and the finely chopped (or grated) apple.

  3. Add the Dry Ingredients: Add the oats and cinnamon to the fruit mixture. Stir well until the oats are completely coated and the mixture is sticky.

  4. Layer and Topping: Transfer the mixture into your prepared baking dish. Use a spatula to press it down firmly into an even layer (about 1–2 cm thick). Sprinkle the chopped walnuts over the top and press them down slightly so they stick.

  5. Bake: Place in the oven and bake for 20–25 minutes until the edges are golden brown and the center feels firm.

  6. Cool and Slice: Allow the bars to cool completely in the pan before lifting them out. This is crucial—if you cut them while hot, they may crumble. Slice into rectangles or squares.

Spinach Artichoke Crescent Roll Bake

🥬 Spinach Artichoke Crescent Roll Bake

Yields: 8–10 rolls
Prep Time: 20 minutes
Bake Time: 18–22 minutes

A warm, cheesy appetizer that combines creamy spinach and artichokes inside golden, buttery crescent rolls. Perfect for parties, snacks, or cozy meals.


📝 Ingredients

For the Filling:

  • 1 cup frozen chopped spinach, thawed and well-drained

  • 1 cup canned artichoke hearts, chopped and well-drained

  • 4 oz (115 g) cream cheese, softened

  • ¼ cup sour cream

  • ¼ cup mayonnaise

  • ½ cup shredded mozzarella cheese

  • ¼ cup grated Parmesan cheese

  • 1 clove garlic, minced

  • Salt & pepper, to taste

For the Rolls:

  • 1 can (8 oz / 225 g) refrigerated crescent roll dough (sheet or regular)

  • 1 egg, beaten (optional, for brushing tops)

  • Extra mozzarella or Parmesan for topping (optional)

  • Fresh parsley, chopped (for garnish, optional)


👩‍🍳 Step-by-Step Instructions

Step 1 — Preheat & Prepare the Dish

  1. Preheat oven to 375°F (190°C).

  2. Lightly grease a baking dish or oven-safe skillet with butter or cooking spray.


Step 2 — Make the Filling

  1. In a medium bowl, combine cream cheese, sour cream, and mayonnaise. Mix until smooth.

  2. Stir in mozzarella, Parmesan, and garlic.

  3. Add the spinach and artichokes, mixing until evenly combined.

  4. Season with salt and pepper to taste.

Optional: Add a pinch of red pepper flakes or Italian seasoning for extra flavor.


Step 3 — Prepare the Dough

  1. Unroll the crescent dough onto a clean surface. If using perforated crescent rolls, pinch the seams to form a solid rectangle.

  2. Spread the spinach artichoke filling evenly over the dough, leaving about ½ inch from the edges.

  3. Starting from one long edge, roll the dough into a log (like a jelly roll).

  4. Using a sharp knife or unflavored dental floss, slice the log into 1-inch rolls (about 8–10 pieces).


Step 4 — Assemble & Bake

  1. Place the rolls cut side up in the prepared baking dish.

  2. Optional: Brush tops with beaten egg for a golden finish.

  3. Optional: Sprinkle extra mozzarella or Parmesan on top.

  4. Bake for 18–22 minutes or until golden brown and puffed.


Step 5 — Garnish & Serve

  1. Remove from oven and let cool for 5 minutes.

  2. Garnish with fresh parsley if desired.

  3. Serve warm as an appetizer, snack, or side dish.


💡 Tips for Success

  • Drain Well: Squeeze out excess liquid from spinach and artichokes to avoid soggy rolls.

  • Cheese Variations: Try Monterey Jack, cheddar, or Gruyère for different flavors.

  • Make Ahead: Assemble rolls and refrigerate for up to 8 hours before baking. Add 2–3 minutes to baking time.

  • Freezing: Bake, cool, and freeze in an airtight container for up to 1 month. Reheat at 350°F until warmed through.


🍴 Serving Ideas

  • Pair with tomato soup for a cozy meal.

  • Serve alongside a fresh garden salad for lunch.

  • Offer with marinara or garlic dip for extra indulgence.


⏱ Summary Table

Step Time Key Notes
Preheat Oven 5 min Grease baking dish
Make Filling 10 min Drain spinach well
Prepare Dough 5 min Roll tightly for neat slices
Bake 18–22 min Golden brown top
Serve Best served warm

Chocolate-Coated Peanut and Cookie Balls (No-Bake)

Chocolate-Coated Peanut and Cookie Balls (No-Bake)

Yields: About 30 balls
Prep Time: 20–25 minutes
Chill Time: 30–60 minutes

A no-bake treat that combines crushed cookies, peanuts, and chocolate. Crispy, nutty, and easy to make, these bite-sized balls are perfect for snacks, parties, or homemade gifts.


📋 Ingredients

For the Filling:

  • 500 g (17.6 oz) cookies, crushed

  • 120 g (4.2 oz) peanuts, crushed

  • 120 g (½ cup) sugar

  • 60 g (½ cup) cocoa powder

  • 250 ml (1 cup) milk

  • 150 g (⅔ cup) butter

  • A pinch of vanillin or a few drops of vanilla extract

For the Chocolate Glaze:

  • 80 g (2.8 oz) dark chocolate

  • 80 g (2.8 oz) milk chocolate

  • 20 ml (1½ tbsp) vegetable oil

  • 50 g (1.8 oz) peanuts, chopped


👩‍🍳 Step-by-Step Instructions

Step 1: Prepare the Filling

  1. Crush Cookies and Peanuts: Crush the cookies into small pieces using a food processor or a rolling pin in a sealed bag. Roughly chop the peanuts and mix them with the crushed cookies in a large bowl.

  2. Make Chocolate Mixture: In a medium saucepan over medium heat, combine the milk, sugar, cocoa powder, and vanilla. Stir continuously until the sugar dissolves completely.

  3. Add Butter: Add the butter to the saucepan and stir until fully melted and smooth.

  4. Combine: Pour the warm chocolate mixture over the crushed cookies and peanuts. Stir thoroughly until everything is evenly coated. The mixture should be thick and sticky enough to form balls.


Step 2: Shape the Balls

  1. Scoop small portions of the mixture and roll them into balls about the size of a walnut.

  2. Place the balls on a tray lined with parchment paper or a silicone mat.

  3. Chill in the refrigerator or freezer for about 30 minutes to firm up.


Step 3: Prepare the Chocolate Glaze

  1. Combine the dark chocolate, milk chocolate, and vegetable oil in a heatproof bowl.

  2. Melt using a double boiler or microwave in 20–30 second intervals, stirring until smooth.

  3. Stir in the chopped peanuts for extra texture.


Step 4: Coat the Balls

  1. Remove the chilled balls from the fridge.

  2. Using a fork or skewer, dip each ball into the chocolate glaze, ensuring it is fully coated.

  3. Place the coated balls back on the tray and chill for 20–30 minutes until the glaze hardens.


Step 5: Serve and Store

  • Serve immediately, or arrange in a box for gifting.

  • Store in an airtight container in the refrigerator for up to 1 week.

  • For longer storage, freeze in an airtight container for up to 1 month.


💡 Tips for Success

  • Nut Variations: Substitute peanuts with almonds, hazelnuts, or walnuts for a different flavor.

  • Texture: Keep cookie pieces slightly larger for a chunkier consistency.

  • Glaze Tip: If you want a shinier coating, add a tiny extra teaspoon of oil to the melted chocolate.


These no-bake chocolate peanut cookie balls are crunchy, chocolaty, and easy to make, with no oven required. Perfect for snacks, dessert tables, or homemade gifts!

Decadent Chocolate Cake with Wine Glaze

🍫 Decadent Chocolate Cake with Wine Glaze

Servings: 8–10
Prep Time: 15 minutes
Bake Time: 1 hour
Total Time: 1 hour 15 minutes

A moist, flavorful chocolate cake with a subtle hint of cinnamon, topped with a smooth wine glaze. Perfect for any occasion or a special treat.


📋 Ingredients

For the Cake:

  • 1 box yellow cake mix

  • ¼ cup brown sugar

  • ¼ cup white sugar

  • 1 packet instant vanilla pudding mix

  • 2 teaspoons cinnamon

  • 4 large eggs

  • ¾ cup water

  • ¾ cup vegetable oil

  • ½ cup white wine

For the Wine Glaze:

  • 1 stick (½ cup) unsalted butter

  • 1 cup white sugar

  • ¼ cup white wine


👩‍🍳 Step-by-Step Instructions

Step 1: Preheat the Oven

  1. Preheat the oven to 350°F (175°C).

  2. Grease a bundt pan or cake mold generously with butter or cooking spray.


Step 2: Prepare the Cake Batter

  1. In a large mixing bowl, combine the cake mix, brown sugar, white sugar, vanilla pudding mix, and cinnamon. Mix well.

  2. Add eggs, water, oil, and white wine.

  3. Mix by hand or with an electric mixer until smooth and fully combined.


Step 3: Bake the Cake

  1. Pour the batter evenly into the prepared bundt pan.

  2. Bake in the preheated oven for 1 hour, or until a toothpick inserted into the center comes out clean or with a few moist crumbs.

  3. Remove from the oven and allow the cake to cool in the pan for 5–10 minutes.


Step 4: Prepare the Wine Glaze

  1. While the cake is baking, melt the butter in a small saucepan over medium heat.

  2. Stir in the white sugar and white wine.

  3. Cook, stirring constantly, until the sugar dissolves and the mixture is smooth. Remove from heat.

  4. Optional: Simmer for a few extra minutes for a thicker glaze.


Step 5: Glaze the Cake

  1. Carefully invert the slightly cooled cake onto a serving plate or wire rack.

  2. Pour the warm glaze slowly over the cake, letting it soak and drip down the sides.


Step 6: Serve

  • Allow the cake to cool completely before slicing, or serve slightly warm.

  • Optional: Serve with whipped cream or vanilla ice cream.


💡 Tips & Notes

  • Oil Measurement: Ensure the oil is ¾ cup, not ¾ teaspoon, for proper texture.

  • Wine Choice: Any white wine is fine—dry (Chardonnay) or sweet (Riesling) both work.

  • Storage: Keep leftovers in an airtight container at room temperature for up to 3 days or in the refrigerator for up to 1 week.


🔄 Variations

  • Add ¼ teaspoon espresso powder to intensify chocolate flavor.

  • Substitute the glaze with a simple chocolate ganache for a richer finish.

  • Sprinkle chopped nuts or chocolate chips on top before serving.

🍯 Honey Infusion with Ginger, Garlic & Onion

🍯 Honey Infusion with Ginger, Garlic & Onion

Yields: 1 small jar
Preparation Time: 10 minutes
Infusion Time: 12–24 hours

This honey-based infusion combines aromatic ingredients with natural sweetness to create a richly flavored syrup. It can be used in warm drinks, drizzled over foods, or enjoyed in small amounts as part of a balanced diet.


📋 Ingredients

  • 1 cup raw honey

  • 1 large red onion, finely diced

  • 3–4 garlic cloves, peeled and thinly sliced or lightly crushed

  • 1 tablespoon fresh ginger, finely grated or thinly sliced

  • 2 tablespoons fresh lemon juice


👩‍🍳 Step-by-Step Instructions

Step 1: Prepare the Ingredients

  1. Peel and finely dice the red onion.

  2. Peel the garlic cloves and slice them thinly or lightly crush them to release flavor.

  3. Peel the ginger and grate it finely or cut it into very thin strips.


Step 2: Layer the Jar

  1. Use a clean, dry glass jar.

  2. Add the onion, garlic, and ginger to the jar in layers.

  3. Pour the lemon juice evenly over the ingredients.


Step 3: Add the Honey

  1. Slowly pour the honey into the jar.

  2. Make sure all ingredients are fully submerged.

  3. Leave about 2–3 cm (1 inch) of space at the top, as the mixture may release liquid over time.


Step 4: Infuse

  1. Seal the jar tightly.

  2. Place it in the refrigerator or a cool, dark area.

  3. Allow the mixture to infuse for 12–24 hours.

  4. During this time, the honey will thin slightly and absorb the flavors.


Step 5: Use and Store

  1. Stir gently before each use.

  2. Use small amounts as desired:

    • Stir into warm (not hot) water or tea

    • Drizzle over roasted vegetables

    • Add to salad dressings or marinades

  3. Keep refrigerated and use within 2 weeks.


💡 Helpful Notes

  • The flavor is strong at first but becomes more balanced as it infuses

  • Honey helps soften the sharp taste of onion and garlic

  • Always use clean utensils when scooping to maintain freshness


🔄 Optional Flavor Additions

  • A cinnamon stick for warmth

  • A small pinch of ground spice for depth

  • Orange or lemon peel for citrus aroma


🧊 Storage Tips

  • Store in a sealed glass jar

  • Keep refrigerated after opening

  • Discard if you notice unusual odor or appearance

Easy Cherry Vanilla Oven Cake

🍒 Easy Cherry Vanilla Oven Cake

Serves: 8
Preparation Time: 10 minutes
Baking Time: 30–35 minutes

This cherry vanilla cake is soft, lightly sweet, and simple to prepare. A tender sponge base combined with juicy cherries makes it suitable for everyday baking, family gatherings, or serving with tea.


📋 Ingredients

  • 1½ cups (190 g) all-purpose flour

  • 1 cup (200 g) granulated sugar

  • 3 large eggs

  • ½ cup (115 g) unsalted butter, melted and cooled

  • ½ cup (120 ml) milk

  • 1½ teaspoons baking powder

  • 1 teaspoon vanilla extract

  • A small pinch of salt

  • 1 cup fresh or canned cherries, pitted and well drained


👩‍🍳 Step-by-Step Instructions

Step 1: Prepare the Oven and Pan

  1. Preheat the oven to 350°F (175°C).

  2. Grease a round cake pan or line it with parchment paper.


Step 2: Mix the Wet Ingredients

  1. In a large bowl, whisk the eggs and sugar together.

  2. Continue whisking until the mixture becomes light in color.

  3. Add the melted butter, milk, and vanilla extract.

  4. Whisk until smooth and well combined.


Step 3: Add the Dry Ingredients

  1. Sift the flour, baking powder, and salt into the bowl.

  2. Gently fold the dry ingredients into the wet mixture using a spatula.

  3. Mix only until smooth; avoid overmixing.


Step 4: Add Cherries and Bake

  1. Pour the batter evenly into the prepared pan.

  2. Scatter the cherries over the top.

  3. Place the pan in the oven and bake for 30–35 minutes.

  4. The cake is ready when a toothpick inserted in the center comes out clean.


Step 5: Cool and Serve

  1. Allow the cake to cool in the pan for 10 minutes.

  2. Transfer to a wire rack or serving plate.

  3. Serve as is or lightly dust with powdered sugar if desired.


🧊 Storage Tips

  • Store in an airtight container at room temperature for up to 2 days

  • Refrigerate for up to 5 days if needed


💡 Helpful Notes

  • Drain canned cherries well to prevent excess moisture

  • Gently press cherries into the batter for even distribution

  • Let the cake cool fully before slicing for clean pieces


🔄 Variations

  • Replace cherries with blueberries, raspberries, or sliced peaches

  • Add lemon or orange zest for extra flavor

  • Serve with plain yogurt or whipped cream if desired

Homemade Blueberry Chia Seed Jam

Homemade Blueberry Chia Seed Jam

Yields: About 1 cup
Preparation Time: 5 minutes
Cooking Time: 10 minutes

This homemade blueberry chia seed jam is simple to prepare and made with just a few basic ingredients. It thickens naturally using chia seeds and works well as a spread, topping, or filling.


📋 Ingredients

  • 2 cups fresh or frozen blueberries

  • 2 tablespoons chia seeds

  • 1 tablespoon fresh lemon juice

  • 1–2 tablespoons honey or maple syrup (optional, to taste)

  • ½ teaspoon vanilla extract (optional)


👩‍🍳 Step-by-Step Instructions

Step 1: Cook the Blueberries

  1. Place the blueberries in a small saucepan.

  2. Set the pan over medium heat.

  3. Cook for 5–10 minutes, stirring occasionally.

  4. The berries will soften and release their juices as they heat.


Step 2: Mash the Fruit

  1. Once the berries are soft and gently bubbling, remove the pan from heat.

  2. Use a fork or potato masher to mash the berries.

  3. Mash lightly for a chunky texture or more thoroughly for a smoother result.


Step 3: Add Remaining Ingredients

  1. Stir in the chia seeds.

  2. Add the lemon juice.

  3. Mix in honey or maple syrup if using.

  4. Add vanilla extract if desired.

  5. Stir well to combine.


Step 4: Allow the Jam to Thicken

  1. Let the mixture sit uncovered for 10–15 minutes.

  2. Stir once or twice during this time.

  3. The chia seeds will absorb liquid and thicken the mixture.


Step 5: Cool and Store

  1. Transfer the jam to a clean glass jar or container.

  2. Allow it to cool completely.

  3. Seal and refrigerate.


🧊 Storage Tips

  • Store in the refrigerator for up to 7 days

  • Freeze in a sealed, freezer-safe container for up to 3 months

  • Thaw in the refrigerator before use


💡 Helpful Notes

  • Adjust sweetness based on the natural flavor of the berries

  • Stir well before serving if the jam thickens unevenly

  • Chop larger fruits if using this method with other berries


🍽️ Serving Ideas

  • Spread on toast or crackers

  • Spoon over yogurt or oatmeal

  • Use as a filling for baked goods

  • Serve with pancakes or waffles

Butter Biscuits & Soft Melting Cookies

Butter Biscuits & Soft Melting Cookies

Yields: Approximately 40–50 biscuits
Preparation Time: 20 minutes
Baking Time: 10–12 minutes

These butter-based biscuits are light, tender, and gently crisp at the edges. The same dough can be shaped in different ways to create both simple butter biscuits and soft, swirl-style cookies. They are perfect for sharing, gifting, or enjoying with tea.


📋 Ingredients

  • 500 g butter, softened at room temperature

  • 1 cup fine or granulated sugar

  • 3 large eggs

  • 3 tablespoons neutral oil

  • 1 teaspoon vanilla flavoring

  • 5 cups all-purpose flour, sifted

  • 4 teaspoons baking powder

  • ¼ teaspoon bicarbonate of soda

Optional Decorations

  • Glacé cherries, finely chopped

  • Fruit jam (such as apricot or strawberry)

  • Melted chocolate for drizzling


👩‍🍳 Step-by-Step Instructions

Step 1: Prepare the Butter Mixture

  1. Place the softened butter and sugar in a large mixing bowl.

  2. Beat together until light in color and creamy in texture.

  3. Add the oil and vanilla flavoring.

  4. Beat in the eggs one at a time, mixing well after each addition.


Step 2: Add Dry Ingredients

  1. In a separate bowl, sift together the flour, baking powder, and bicarbonate of soda.

  2. Gradually add the dry mixture to the butter mixture.

  3. Mix gently until a soft, smooth dough forms.

  4. Stop mixing once combined to keep the biscuits tender.


Step 3: Shape the Biscuits

  1. Preheat the oven to 180°C (350°F).

  2. Lightly grease or line baking trays with parchment paper.

For Swirl-Style Cookies

  • Transfer the dough to a piping bag fitted with a large star nozzle.

  • Pipe small swirls onto the tray.

  • Add a small amount of jam or a piece of cherry in the center if desired.

For Simple Butter Biscuits

  • Roll small portions of dough into balls and flatten gently with a fork,
    or

  • Roll the dough out and cut into shapes using a cutter.


Step 4: Bake

  1. Place trays in the preheated oven.

  2. Bake for 10–12 minutes, until the edges are lightly colored.

  3. The biscuits should remain pale for a soft texture.


Step 5: Cool and Finish

  1. Remove biscuits from the oven.

  2. Allow them to cool completely on a wire rack.

  3. Once cooled, drizzle with melted chocolate if desired.


🧊 Storage Tips

  • Store in an airtight container at room temperature for up to 2 weeks

  • Flavors develop further after resting for a day


💡 Helpful Notes

  • Butter should be soft, not melted, before mixing

  • Avoid overmixing to maintain a light texture

  • Use similar-sized portions for even baking

Homemade Whole Wheat Digestive Biscuits

🍪 Homemade Whole Wheat Digestive Biscuits

Yields: Approximately 15–20 biscuits
Preparation Time: 20 minutes
Chilling Time: 30 minutes
Baking Time: 15–18 minutes

These homemade digestive-style biscuits are crisp, lightly sweet, and made with simple pantry ingredients. They are ideal for enjoying with tea, coffee, or as a light snack.


📋 Ingredients

Dry Ingredients

  • 1½ cups (240 g) whole wheat flour

  • ½ cup (75 g) powdered sugar

  • 1 teaspoon baking powder

  • ¼ teaspoon salt (use only if butter is unsalted)

Fat

  • ½ cup (130 g) cold butter, cut into small cubes

Liquid

  • 5 tablespoons cold milk


👩‍🍳 Step-by-Step Instructions

Step 1: Combine Dry Ingredients

  1. In a large mixing bowl, sift together the whole wheat flour, powdered sugar, and baking powder.

  2. Add salt if using unsalted butter.

  3. Whisk until evenly mixed.


Step 2: Add the Butter

  1. Add the cold butter cubes to the flour mixture.

  2. Using your fingertips or a pastry cutter, rub the butter into the flour.

  3. Continue until the mixture resembles fine crumbs.
    Keeping the butter cold helps create a crisp texture.


Step 3: Form the Dough

  1. Add the cold milk one tablespoon at a time.

  2. Mix gently until the dough just comes together.

  3. Avoid kneading; the dough should be firm, not soft.

  4. If the mixture feels too dry, add 1 teaspoon of milk.


Step 4: Chill the Dough

  1. Shape the dough into a flat disc.

  2. Wrap it and refrigerate for 30 minutes.
    Chilling helps with rolling and improves texture.


Step 5: Roll and Shape

  1. Preheat the oven to 180°C (350°F).

  2. Place the chilled dough between two sheets of parchment paper.

  3. Roll to about 5 mm thickness.

  4. Cut into rounds using a cookie cutter.

  5. If desired, lightly press or mark the surface with a fork or toothpick.


Step 6: Bake

  1. Arrange the biscuits on a parchment-lined baking tray.

  2. Leave a little space between each biscuit.

  3. Bake for 15–18 minutes, or until the edges turn lightly golden.


Step 7: Cool Completely

  1. Remove the tray from the oven.

  2. Transfer biscuits to a wire rack.

  3. Allow them to cool fully; they will become crisp as they rest.


🍽️ Serving Suggestions

  • Enjoy with tea, coffee, or warm milk

  • Serve with fruit spreads or nut butter

  • Use as a base for layered desserts


🧊 Storage Tips

  • Store in an airtight container at room temperature for up to 1 week

  • Keep away from moisture to maintain crispness


💡 Helpful Notes

  • For less sweetness, reduce powdered sugar slightly

  • Butter can be replaced with chilled plant-based fat if needed

  • Thinner biscuits will bake faster and become crisper

Wholesome Carrot Cake (No Refined Flour, No Added Sugar)

🥕 Wholesome Carrot Cake (No Refined Flour, No Added Sugar)

Serves: 6 slices
Preparation Time: 15 minutes
Baking Time: 45–50 minutes

This carrot cake is soft, naturally sweet, and easy to prepare using simple ingredients. It relies on oats, fruits, and nuts for structure and flavor, making it suitable for breakfast, snacks, or a light dessert. No special equipment is needed—just a bowl, a spoon, and an oven.


📋 Ingredients

  • 2 cups (200 g) oat flakes

  • 1 teaspoon baking powder

  • 1 cup (240 ml) milk of choice

  • 1 medium carrot, finely grated

  • 1 medium apple, finely grated

  • 4 tablespoons raisins, rinsed and drained

  • ¼ cup (50 g) walnuts, chopped

  • 3 large eggs

  • 2 tablespoons olive oil

  • 4 tablespoons stevia or preferred sweetener

  • ½ teaspoon vanilla flavoring (optional)


👩‍🍳 Step-by-Step Instructions

Step 1: Prepare the Oats

Place the oat flakes in a mixing bowl. For a softer texture, you may blend them briefly to create a coarse flour.


Step 2: Add Dry Ingredients

Add the baking powder to the oats and mix well to distribute evenly.


Step 3: Prepare Fruits and Vegetables

Grate the carrot and apple using a fine grater. Add them directly to the oat mixture.


Step 4: Add Liquid Ingredients

Crack the eggs into the bowl. Pour in the milk and olive oil. Add the sweetener and vanilla flavoring if using.


Step 5: Mix the Batter

Stir everything together until well combined. The batter will be thick.
Let it rest for 5 minutes so the oats can absorb moisture.


Step 6: Add Raisins and Nuts

Gently fold in the raisins and chopped walnuts until evenly distributed.


Step 7: Prepare the Baking Tin

Line an 18 cm (7-inch) round cake tin with parchment paper or lightly grease it.


Step 8: Bake

  1. Preheat the oven to 180°C (360°F).

  2. Pour the batter into the prepared tin and smooth the top.

  3. Bake for 45–50 minutes, until the top is set and lightly golden.

  4. Insert a toothpick into the center; it should come out clean.


Step 9: Cool and Serve

Remove the cake from the oven and allow it to cool completely before slicing.


🍽️ Serving Ideas

  • Serve warm or chilled

  • Pair with plain yogurt or fresh fruit

  • Slice into smaller portions for snacks or packed meals


🧊 Storage Tips

  • Store in an airtight container in the refrigerator for up to 5 days

  • Individual slices can be frozen for up to 2 months

  • Warm briefly before serving if desired


💡 Helpful Notes

  • Walnuts can be replaced with seeds for a nut-free version

  • Raisins may be replaced with chopped dates

  • Apples with natural sweetness work best