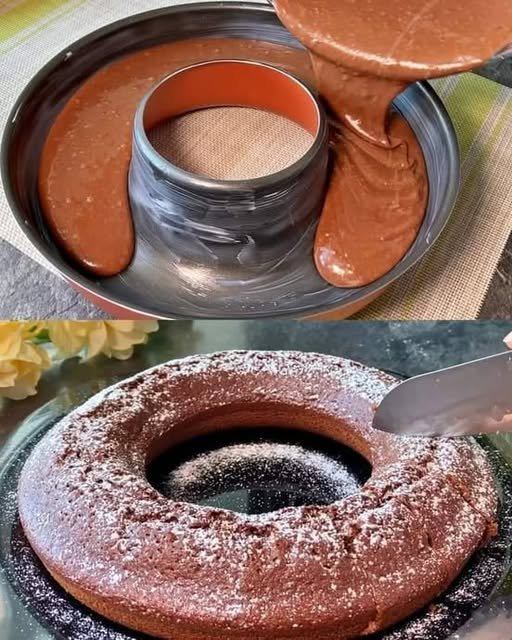
Loaded Tater Tot Breakfast Bowls

Golden, crispy tater tots loaded with savory sausage gravy, melty cheddar, and perfectly cooked eggs — a hearty, diner-style breakfast you can make at home.

Prep Time: 15 minutes
Cook Time: 25–30 minutes
Total Time: ~45 minutes
Servings: 4
Dietary: Comfort food, Make-ahead friendly

Ingredients

  • Frozen tater tots (32 oz / 900 g) – baked until golden and crispy

  • Beef breakfast sausage (1 lb / 450 g) – casings removed, crumbled

  • Unsalted butter (2 tbsp) – for the gravy base

  • All-purpose flour (2 tbsp) – for thickening

  • Whole milk (2 cups / 480 ml) – preferably warmed

  • Salt & freshly ground black pepper – to taste

  • Large eggs (4) – cooked your way (scrambled, fried, or poached)

  • Shredded sharp cheddar cheese (1 cup / 100 g) – for melty, cheesy goodness

  • Fresh chives (2 tbsp) – chopped, for garnish

Instructions

  1. Bake the tots – Preheat oven and cook frozen tater tots per package directions until golden and crisp. For extra crunch, use convection or broil settings for the last few minutes.

  2. Brown the sausage – In a large skillet over medium heat, cook crumbled sausage until no pink remains. Transfer to a plate, leaving the rendered fat in the pan.

  3. Make the roux – Melt butter in the same skillet, stir in flour, and cook for 1–2 minutes until lightly golden.

  4. Make the gravy – Gradually whisk in warm milk, scraping up any browned bits. Cook 3–5 minutes until thickened. Return sausage to the skillet, season with salt and pepper, and keep warm on low.

  5. Cook the eggs – In a separate pan, cook eggs to your liking (scrambled, fried, or poached). Season lightly.

  6. Assemble bowls – Divide crispy tater tots among 4 bowls. Top with eggs, ladle sausage gravy over, sprinkle with cheddar, and finish with chives. Serve hot.

Quick Notes & Pro Tips

  • Make ahead: Cook the gravy and sausage up to 2 days in advance. Reheat gently over low heat.

  • Milk tip: Warm milk before whisking into the roux to avoid lumps.

  • Eggs: For poached eggs, add a splash of vinegar to the water for perfectly set whites.

  • Extra crispy tots: Broil for 1–2 minutes after baking.

  • Assembly: Keep components separate until serving to maintain the best textures.

Why You’ll Love It

This dish is diner comfort food done right: crunchy tots, creamy sausage gravy, cheesy goodness, and eggs made just how you like them. It’s indulgent enough for weekend brunch but simple enough for a make-ahead weekday breakfast bowl.

Step-by-Step Cooking Guide

1. Baking the Tots

  • Bake until deep golden brown — a crispy base is key for holding up the gravy.

2. Making the Sausage Gravy

  • Cook sausage until browned. Use its drippings for the roux for maximum flavor.

  • Gradually whisk in warmed milk to create a smooth, thick gravy.

3. Eggs Your Way

  • Scrambled for easy eating, fried for a runny yolk, or poached for elegance.

4. Building the Bowl

  • Tots first, then eggs, a generous ladle of gravy, and a cheesy-chive finish.

Ingredient Details & Substitutions

  • Sausage: Use pork sausage for classic flavor or turkey for a lighter bowl.

  • Cheese: Swap cheddar for pepper jack for a little heat.

  • Eggs: Try soft-boiled eggs for a runny, jammy yolk.

  • Milk: Substitute with half-and-half for an extra rich gravy.

Variations & Serving Suggestions

  • Spicy kick: Add hot sauce, jalapeños, or Cajun seasoning to the gravy.

  • Veggie boost: Mix in sautéed mushrooms, bell peppers, or spinach.

  • Brunch spread: Serve with fresh fruit or a simple side salad for balance.

  • Crowd-style: Make it in a casserole dish with layers of tots, gravy, and cheese.

Storage & Make-Ahead

  • Refrigeration: Store components separately for up to 3 days.

  • Freezing: Freeze gravy and sausage mixture for up to 2 months; thaw overnight in the fridge.

  • Reheating: Warm gravy on the stovetop; bake tots in the oven for crispness.

FAQs

Q: Can I make this vegetarian?
A: Yes — use plant-based sausage and veggie gravy.

Q: How can I make this for a crowd?
A: Double the recipe and serve “buffet style” with toppings on the side.

Q: Can I use hash browns instead of tater tots?
A: Absolutely! Shredded or diced hash browns work well.

Personal Note

This bowl is my go-to for weekends when I crave a hearty breakfast that feels like a treat. It’s also one of my favorite “brunch-for-dinner” recipes — it never fails to hit the spot.

Your turn!
If you try these Loaded Tater Tot Breakfast Bowls, leave a review or share your creation — I’d love to see how you make it your own!

Do you want me to add a “crowd-sized casserole version” (for serving at brunch parties)?
Or keep it as individual bowls for a customizable breakfast setup?

Cheesy Taco Bean Dip

A warm, creamy, and cheesy dip layered with seasoned beef, beans, salsa, and melty cheese — perfect for game days, parties, or an easy weeknight snack!

Prep Time: 15 minutes
Cook Time: 25 minutes
Total Time: ~40 minutes
Servings: 8–10
Dietary: Gluten-Free (when served with GF chips), Make-Ahead Friendly

Ingredients

  • Ground beef – or use turkey sausage for a lighter option

  • Taco seasoning – one packet (or homemade)

  • Water – to help the seasoning blend

  • Refried beans – one can (vegetarian works too)

  • Cream cheese – softened for smooth mixing

  • Sour cream – for tang and creaminess

  • Salsa – chunky style preferred

  • Garlic powder – for extra flavor

  • Shredded Mexican cheese blend – cheddar, Monterey Jack, or a combo

  • Chopped green onions or jalapeños – for garnish

  • Tortilla chips – for serving

Instructions

  1. Preheat oven – Set to 350°F (175°C). Grease a 9×13-inch baking dish.

  2. Cook the meat – Brown ground beef (or sausage) in a skillet over medium heat. Drain fat, add taco seasoning + water, and simmer for 2–3 minutes.

  3. Make the creamy base – In a large bowl, mix softened cream cheese, sour cream, refried beans, salsa, and garlic powder until smooth.

  4. Combine – Fold the cooked meat into the bean-cheese mixture.

  5. Assemble – Spread evenly into the prepared dish. Top with shredded cheese.

  6. Bake – Bake uncovered for 20–25 minutes, until bubbly and slightly golden.

  7. Serve – Garnish with green onions or jalapeños. Serve warm with tortilla chips, veggies, or pita chips.

Quick Notes & Pro Tips

  • Cream cheese tip: Fully soften before mixing for a lump-free base.

  • Make-ahead: Assemble up to 24 hours ahead; refrigerate, then bake before serving.

  • Slow cooker method: Combine ingredients (minus toppings) and heat on LOW for 2–3 hours.

  • Adjust spice: Use mild or spicy salsa and add jalapeños or hot sauce for a kick.

Why You’ll Love It

This dip is hearty enough to double as a burrito filling and crowd-pleasing enough to disappear fast at parties. It’s a creamy, cheesy, taco-inspired dish with customizable heat levels and plenty of texture.

Step-by-Step Cooking Guide

Seasoning & Meat

  • Brown beef or sausage, season with taco mix, and simmer to enhance flavor.

  • Tip: Drain excess fat well to avoid a greasy dip.

Mixing the Base

  • Blend softened cream cheese, sour cream, beans, salsa, and garlic.

  • Tip: Use a hand mixer for a super smooth, creamy consistency.

Assembling & Baking

  • Spread in the dish, top with shredded cheese, and bake until bubbly.

  • Troubleshooting: If the top cheese browns too quickly, cover loosely with foil for the last 5 minutes.

Ingredient Details & Substitutions

  • Meat: Swap ground beef with turkey, chorizo, or plant-based crumbles.

  • Beans: Replace refried beans with black beans or pinto beans for texture.

  • Cheese: Use pepper jack for a spicier kick or extra cheddar for more tang.

  • Salsa: Try corn salsa or verde salsa for a flavor twist.

Variations & Serving Suggestions

  • Party version: Make mini individual dips in ramekins for easy serving.

  • Buffet style: Keep warm in a slow cooker during parties.

  • Repurpose it: Use leftovers as a burrito, quesadilla, or nacho topping.

Storage & Make-Ahead

  • Refrigeration: Store leftovers in an airtight container for up to 4 days.

  • Freezing: Not ideal (dairy may separate), but works for up to 1 month if tightly wrapped.

  • Reheating: Warm in the oven at 325°F until heated through or microwave in short bursts.

FAQs

Q: Can I make this vegetarian?
A: Yes — replace the meat with black beans, lentils, or plant-based crumbles.

Q: Can I use homemade taco seasoning?
A: Definitely. Mix 1 tbsp chili powder, 1 tsp paprika, ½ tsp cumin, ½ tsp garlic powder, ½ tsp onion powder, ½ tsp oregano, and a pinch of cayenne.

Q: Can I make this spicier?
A: Use hot salsa, add diced jalapeños, or sprinkle with crushed red pepper.

Personal Note

This recipe came together for a last-minute game-day snack — and it’s been a go-to for parties ever since. It’s hearty, versatile, and the kind of dip everyone hovers over until it’s gone.

Your turn!
If you try this Cheesy Taco Bean Dip, leave a comment or tag me on social media — I’d love to see your version!

Would you like me to add a quick “homemade taco seasoning” recipe card for readers who want to skip the packet?
Also, should I make a “party platter version” (baked in a cast-iron or served in a skillet for presentation)?

Cheesy Beef & Noodle Casserole

Creamy, cheesy egg noodles layered with savory ground beef sauce – the ultimate family-friendly comfort bake.

Prep Time: 20 minutes
Cook Time: 30 minutes
Total Time: ~50 minutes
Servings: 6–8
Dietary: Kid-friendly, Make-ahead, Freezer-friendly

Ingredients

  • Egg noodles (12 oz) – cooked al dente

  • Ground beef (1 lb)

  • Yellow onion – chopped

  • Garlic – minced (2 cloves)

  • Tomato sauce (1 can, 15 oz)

  • Diced tomatoes – drained (1 can, 14.5 oz)

  • Worcestershire sauce (1 tbsp)

  • Smoked paprika (1 tsp)

  • Red pepper flakes (½ tsp, optional)

  • Salt & pepper – to taste

  • Sour cream (1 cup)

  • Cottage cheese (1 cup)

  • Parmesan cheese – grated (½ cup)

  • Cheddar cheese – shredded (2 cups)

  • Fresh parsley – chopped (2 tbsp)

  • Olive oil – for tossing noodles

Instructions

  1. Preheat & prep: Preheat oven to 350°F (175°C). Grease a 9×13 baking dish.

  2. Cook noodles: Boil egg noodles until al dente. Drain, rinse under cold water, and toss with a drizzle of olive oil.

  3. Cook beef & aromatics: In a large skillet, brown ground beef. Drain excess fat. Add onion and garlic; sauté until soft and fragrant.

  4. Make the sauce: Stir in tomato sauce, diced tomatoes, Worcestershire sauce, smoked paprika, red pepper flakes, salt, and pepper. Simmer for a few minutes to thicken.

  5. Mix creamy noodles: In a large bowl, combine sour cream, cottage cheese, Parmesan, and cooked noodles until well-coated.

  6. Assemble casserole: Layer half the creamy noodle mixture in the baking dish, top with half the beef sauce, and sprinkle with cheddar. Repeat layers, finishing with cheddar on top.

  7. Bake: Bake uncovered for 25–30 minutes until bubbly and golden.

  8. Serve: Let rest for 5 minutes. Garnish with parsley and serve warm.

Quick Notes & Pro Tips

  • Don’t overcook noodles: Slightly undercook them so they stay firm after baking.

  • Make it spicier: Add extra red pepper flakes or a pinch of cayenne.

  • Cheese swap: Try mozzarella or Monterey Jack instead of cheddar for a different flavor.

  • Shortcut: Use pre-shredded cheese and pre-chopped onions for faster prep.

Why You’ll Love It

This casserole hits every comfort food note – creamy, cheesy, hearty, and full of flavor. It’s simple enough for weeknights but satisfying enough for a Sunday family dinner. Bonus: it reheats beautifully for leftovers.

Step-by-Step Cooking Guide

1. Make the Beefy Sauce

  • Brown ground beef, then sauté with onion and garlic.

  • Stir in tomato sauce, diced tomatoes, Worcestershire, paprika, and seasonings.

  • Tip: Let it simmer for a few minutes so the flavors meld.

2. Mix the Creamy Noodles

  • Combine noodles with sour cream, cottage cheese, and Parmesan.

  • Tip: Use full-fat dairy for extra richness.

3. Layer & Bake

  • Assemble in a 9×13 dish: creamy noodles, beef sauce, cheddar cheese – repeat.

  • Bake uncovered until bubbly and golden on top.

Ingredient Details & Substitutions

  • Ground beef: Swap with ground turkey or Italian sausage for a different flavor.

  • Dairy: Use Greek yogurt instead of sour cream for a tangier, higher-protein version.

  • Cheese: Parmesan adds saltiness – you can also add mozzarella for extra stretch.

  • Noodles: Any short pasta (penne, rotini) works if you don’t have egg noodles.

Variations & Serving Suggestions

  • Make it spicy: Add chopped jalapeños or hot sauce to the beef mixture.

  • Veggie boost: Stir in spinach, bell peppers, or zucchini for extra nutrition.

  • Pair it: Serve with garlic bread and a crisp side salad.

Storage & Make-Ahead

  • Refrigeration: Store leftovers in an airtight container for up to 4 days.

  • Freezing: Assemble unbaked casserole, wrap tightly, and freeze up to 3 months. Bake from frozen (add 15–20 minutes to baking time).

  • Reheating: Reheat in a 350°F oven, covered, for 15–20 minutes or until warmed through.

FAQs

Q: Can I make this ahead of time?
A: Yes – assemble fully, cover, and refrigerate up to 24 hours before baking.

Q: Can I skip the cottage cheese?
A: Yes – replace it with an equal amount of sour cream or ricotta.

Q: Can I double the recipe?
A: Absolutely – use two 9×13 dishes or one deep casserole dish.

Personal Note

This casserole is inspired by the kind of hearty bakes my family would gather around on cold evenings – it’s cozy, creamy, and always a crowd-pleaser.

Your turn!
If you make this Cheesy Beef & Noodle Casserole, leave a review or tag me on social media – I’d love to see your version!

Would you like me to add a simple nutrition breakdown (calories, macros per serving) for this one?
Also – do you want a “Make it one-pot” variation (so it all cooks in one skillet + baking dish)? Or keep it as is for layering?

Chicken Bacon Ranch Stromboli

Cheesy, crispy, and loaded with flavor – this stromboli combines creamy ranch, smoky bacon, juicy chicken, and melty mozzarella all wrapped in golden pizza dough.

Prep Time: 15 minutes
Cook Time: 25–30 minutes
Total Time: ~45 minutes
Servings: 4–6
Dietary: Kid-friendly, Party-friendly, Freezer-friendly


Ingredients You’ll Need

  • Pizza dough (store-bought or homemade) – for a crispy, chewy crust

  • Ranch dressing – creamy, tangy base

  • Mozzarella cheese – shredded for melty goodness

  • Cooked bacon – crumbled for salty crunch

  • Cooked chicken – diced (rotisserie chicken works perfectly)

  • Red onion – thinly sliced (mild bite, optional to sauté)

  • Fresh parsley – chopped for garnish (optional)

  • Egg – beaten, for brushing over the crust

Instructions

  1. Prep the dough

    • Preheat oven to 375°F (190°C).

    • Lightly flour a surface and roll out pizza dough into a large rectangle.

    • Tip: Let the dough rest at room temp for 10–15 minutes to make rolling easier.

  2. Build the filling

    • Spread ranch dressing evenly, leaving a border around the edges.

    • Layer on mozzarella, bacon, chicken, and red onion.

  3. Roll it up

    • Starting from one long side, roll tightly like a jelly roll.

    • Pinch the seams and ends to seal. Place seam-side down on a parchment-lined baking sheet.

  4. Finish for baking

    • Brush with beaten egg for a golden crust.

    • Use a sharp knife to make shallow slits across the top (to release steam).

  5. Bake

    • Bake for 25–30 minutes, until golden brown and puffed.

  6. Slice & serve

    • Cool for 5 minutes to make slicing easier. Garnish with parsley, cut, and enjoy warm!

Quick Notes & Pro Tips

  • Don’t overstuff: Too much filling makes it hard to roll and may leak.

  • Seal well: Pinch edges to prevent cheese and ranch from oozing.

  • Cool before slicing: Let rest for 5 minutes so the filling sets.

  • Reheating: Oven or air fryer keeps it crispy; skip the microwave if you want crunch.

Why You’ll Love It

This isn’t just dinner – it’s comfort food you can hold in your hands. The ranch gives a tangy twist, bacon adds smokiness, and mozzarella ties it all together in a golden crust. Perfect for weeknight dinners, game-day snacking, or as a party appetizer.

Step-by-Step Cooking Guide

Rolling & Filling

  • Roll out dough into a rectangle. Spread ranch evenly (don’t overdo it).

  • Layer chicken, bacon, mozzarella, and onions.

  • Tip: Keep fillings light near the edges to make sealing easier.

Rolling & Sealing

  • Roll tightly, jelly-roll style, pinching seams closed.

  • Transfer carefully to a parchment-lined sheet, seam-side down.

Finishing Touches

  • Brush with egg for a glossy finish.

  • Cut shallow slits for steam release.

Baking & Cooling

  • Bake until puffed and golden.

  • Troubleshooting: If the crust browns too quickly, tent with foil for the last 10 minutes.

Ingredient Details & Substitutions

  • Pizza dough: Store-bought saves time, but homemade works for extra flavor.

  • Chicken: Leftover rotisserie or grilled chicken works best. Swap with turkey for a lighter version.

  • Cheese: Use cheddar or Monterey Jack for a different twist.

  • Ranch dressing: Swap for Caesar or garlic cream sauce if preferred.

  • Veggies: Add spinach, bell peppers, or sautéed mushrooms for more texture.

Variations & Serving Suggestions

  • Flavor twist: Add jalapeños for heat or swap ranch for Buffalo sauce for a spicy version.

  • Party-ready: Slice into bite-sized pieces for a fun appetizer.

  • Pair it: Serve with extra ranch, marinara, or sriracha mayo.

  • Balance it: Pair with a Caesar or garden salad for a fresh contrast.

Storage & Make-Ahead

  • Refrigeration: Wrap cooled slices in foil or store in an airtight container for up to 3 days.

  • Freezing: Wrap unbaked or baked stromboli tightly in plastic wrap + foil. Freeze up to 2 months. Thaw overnight in the fridge if baked before freezing.

  • Reheating: Oven or air fryer at 375°F for 5–8 minutes keeps the crust crispy.

FAQs

Q: Can I make this ahead of time?
A: Yes – assemble, wrap tightly, and refrigerate for up to 24 hours before baking.

Q: Can I use a different cheese?
A: Absolutely – cheddar, provolone, or even pepper jack add great flavor.

Q: Can I make it vegetarian?
A: Yes – swap chicken and bacon for roasted veggies and a sprinkle of feta or extra cheese.

Personal Note

This recipe was born from my love of game-day snacks and weeknight meals that don’t require utensils. It’s cheesy, hearty, and has that perfect mix of creamy, smoky, and tangy flavors that make everyone ask for seconds.

Your turn!
Tried this Chicken Bacon Ranch Stromboli? Drop a comment, rate the recipe, or tag me on social media – I’d love to see your creation!

Do you want me to add a nutrition label (calories, protein, carbs, fat per slice) to make it more like a fully optimized recipe card?
Also, should I make a party-sized version (two smaller strombolis) for serving at gatherings?

Oven-Baked Cabbage Burger

The other night, I prepared these cabbage burgers, and they were a huge hit! Delicious, cheesy, oven-roasted delight that fits perfectly into a low-carb or keto lifestyle—without the buns or the guilt. This is how I went about it:


🛒 What You’ll Need:

  • 1 medium green cabbage (cut into thick slices,0ne inch)

  • 1 lb lean ground beef

  • ½ cup tomato sauce/sugar-free ketchup

  • ½ cup shredded cheese

  • ½ tsp salt & black pepper

  • ½ tsp red chili flakes (for a little kick)

  • ONE tsp grated garlic

  • ½ cup chopped green onions

  • ½ cup fresh chopped parsley


👨‍🍳 How to Make Them:

Step 1: Prep
Set your oven’s temperature to 400°F, or around 200°C, first. Arrange the pieces of cabbage on a baking sheet (if you like less cleanup, use parchment paper). Drizzle them with a little olive oil and season with salt and pepper. To slightly soften them, roast them in the oven for ten minutes. They cook more evenly with the meat later on thanks to this process.

Step 2: Beef Mixture
Take out a large mixing dish and start roasting your cabbage. Grated garlic, chopped green onion, parsley, chili flakes, salt, pepper, half of the shredded cheese, and ground meat should all be added. Combine the ingredients and form into four burger patties.

Step 3: Assemble
Remove from the oven the cabbage. Spread a dollop of tomato sauce over each slice. Place a beef burger directly on top of it after adding a little cheese. Add a final little grating of cheese on top of the meat.

Step 4: Bake
Place the tray back in the oven and continue baking for another 10 to 12 minutes, or until the cheese is brown and bubbling and the beef is cooked through. If you want that cheesy crust, you can broil it for the final one to two minutes.

Step 5: Serve
Remove them, garnish with more parsley if you want to be fancy, and serve hot. They taste fantastic by themselves or served with cauliflower mash or a side of salad.


Oven-Baked Cabbage Burger

💡 Bonus Tip:

Feel free to add hot sauce or jalapeños to the meat mixture if you prefer your burgers hotter. If you don’t like beef, you can also use ground chicken or turkey.

Pizza Enchiladas Ground Beef

Flour tortillas filled with beef, pepperoni, and cheese, baked under pizza sauce and melted mozzarella, perfect for family nights.

Ingredients

→ Filling

 1 lb lean ground beef
 1 cup diced yellow onion
 1 medium green bell pepper, diced
 3 oz pepperoni, chopped
 1 tablespoon chopped garlic
 1/3 cup pizza sauce
 1 tablespoon Italian seasoning
 1 cup ricotta cheese
 1 cup shredded mozzarella cheese
 1/3 cup crumbled bacon
 8 large flour tortillas

→ Topping

 2 cups pizza sauce
 2 1/2 cups shredded mozzarella cheese
 3 oz pepperoni slices
 1/4 cup crumbled bacon

Steps

Preheat oven to 375F.

Drop the lean ground beef into a large skillet over medium-high heat. Crumble the ground beef well as it cooks.

Once the ground beef is fully browned, add the diced onions, bell peppers, and chopped pepperoni to the skillet. Stir well and continue cooking until the vegetables have softened.

Add the chopped garlic to the skillet. Stir well and continue cooking for 2 minutes.

Remove the skillet from heat. Add the pizza sauce, Italian seasoning, ricotta cheese, shredded mozzarella, and crumbled bacon to the skillet. Stir until all ingredients are well combined.

Lay out the flour tortillas and scoop some of the ground beef mixture down the center of each tortilla. Roll up the tortillas tightly.

Spray a baking sheet with cooking spray. Place the rolled-up tortillas onto the baking sheet.

Pour the pizza sauce over the rolled-up tortillas. Sprinkle the shredded mozzarella, pepperoni slices, and crumbled bacon on top.

Place the baking sheet in the oven and bake the enchiladas until the cheese is fully melted and just starting to brown around the edges, about 20 to 25 minutes.

Serve warm and enjoy your pizza enchiladas.

Required Tools

  • Large skillet
  • Baking sheet
  • Cooking spray

Allergy Information

Always check each ingredient for allergens, and consult a medical professional if unsure.

Nutritional Information (per serving)

These details are shared for general guidance and don’t replace professional advice.


Low Point Hearty Beef Enchiladas

Ingredients

  • 2 packages of the Mission White Corn  Tortillas, super size
  • 1 ( 16 oz. ) can of fat free refried beans
  • 1 (20 oz.) can red enchilada sauce
  • 2 Tbsp diced olives
  • 1 (4 oz.) can green chiles
  • 1 pound 96%  ground lean beef or 99% ground turkey
  • 1/2 cup reduced fat shredded  cheese ( I use Trader Joe’s lite 3 cheese blend)
  • 1/2 Tbsp taco seasoning

Instructions

  1. Preheat oven to 350 degrees.
  2. Spray a large skillet pan with non stick cooking spray. Cook ground beef over medium heat until meat is no longer pink.
  3. Add taco seasoning and 2 tsp of water and reduce heat to low for 60 seconds. Remove from heat and set aside.
  4. In a large mixing bowl combine, refried beans, green chiles and cooked ground beef. Stir until well combined.
  5. Spray a 13 x 9 baking dish or 2 ( 8 x 8) baking dish with non stick cooking spray.
  6. If you prefer the tortilla crispy, then you will want to first cook tortillas in a skillet, sprayed with non stick cooking spray for 1-2 over medium heat on each side.
  7. Then top each tortilla with 1/4 cup of beef mixture. Roll up and place seam down in prepared baking dish.
  8. IIf you use two (8 x 8 ) baking dishes-you will add 7 enchiladas per dish.
  9. Repeat for all 14 tortillas.
  10. Pour enchilada sauce evenly over enchiladas. Sprinkle cheese evenly over the top of sauce.Add diced olives.
  11. Bake for 20 minutes or until bubbly.

Makes 14 enchiladas

3 Points® per enchilada

Notes

  • Source” Thepounddropper.com

Three Ingredient Oatmeal muffins

Oatmeal Muffins Directions:

  • Preheat the oven to 350°F.
  • Mash the bananas in a large bowl.
  • Add the oats and vanilla extract, mixing everything together until well combined.
  • Spoon the mixture into a muffin tin lined with paper cups.
  • Bake for 15 minutes or until golden and a toothpick inserted comes out clean.

WW Points Calculation:

  • 4 bananas: 0 pts
  • 1 cup old-fashioned rolled oats: 7 pts
  • 1 tsp vanilla extract: 0 pts

Total Points: 7
Servings: 12
Per Serving: 0.58 points

Nutrition Information:

  • Calories: 60
  • Fat: 1g
  • Protein: 1g
  • Carbohydrates: 14g
  • Sugar: 7g
  • Sodium: 0mg

I’m waiting for your comments! Enjoy!

Weight Watchers Energy Balls

Ingredients

  • 2 ripe bananas
  • 1 cup old fashioned rolled oats
  • 1 Tbsp protein powder
  • 1/2 teaspoon ground cinnamon
  • 1/4 cup mini chocolate chips

Instructions

  1. Preheat the oven to 350 F and line a  baking sheet with parchment paper.
  2. In a large bowl, add the ripe bananas and mash it with a fork. Add the oats, protein powder, ground cinnamon and the mini  chocolate chips. Mix it till it is well combined.
  3. Using a small  cookie scoop, form the mixture into approximately 1 inch balls. This should make 20 balls.
  4. Place the balls on the parchment lined baking sheet.
  5. Bake for 15 minutes.
  6. Let it cool and then store it in an air-tight container.

Recipe Notes

On the current WeightWatchers Program (2023) it is 2 points per serving.

Serving size is 2 energy balls.

Nutrition Facts

Weight Watchers Energy Balls

Amount Per Serving

Calories 75Calories from Fat 18

% Daily Value*

Fat 2g3%

Saturated Fat 1g6%

Cholesterol 1mg0%

Sodium 4mg0%

Potassium 114mg3%

Carbohydrates 14g5%

Fiber 2g8%

Sugar 6g7%

Protein 2g4%

Vitamin A 25IU1%

Vitamin C 2.1mg3%

Calcium 11mg1%

Iron 0.5mg3%

Fluffy Carnivore Mug Cake

Craving something cake-like on a strict carnivore diet? This mug cake is 100% animal-based—no coffee, no chocolate, no plant ingredients. It comes together in just minutes, delivering a quick, protein-rich treat without compromising your carnivore lifestyle!

🥩 Why You’ll Love It

  • Zero Plant Ingredients: Strictly eggs, dairy, and beef-sourced collagen—nothing else.
  • Quick & Easy: Mix in one mug, microwave, and you’re done in under 2 minutes.
  • Satisfies Cravings: Enjoy a soft, cake-like texture while staying fully carnivore.

🍳 Ingredients (All From Animal Sources)

  • 1 Large Egg
  • 1 Tbsp Heavy Cream (full-fat)
  • 3/4 Tbsp Butter (melted)
  • 1 Tsp Collagen Powder (bovine-sourced)
  • Pinch of Salt (optional, but can enhance flavor)
(No coffee, cocoa, sweeteners, or plant-based spices!)

🔥 How to Make It

  • Melt Butter: Place butter in your mug and microwave for 10–15 seconds until just melted.
  • Combine Wet Ingredients: In a separate small bowl or directly in the mug, whisk together eggheavy cream, and collagen.
  • Add Butter: Swirl the melted butter around the mug to coat the sides, then pour any remaining butter into the egg mixture. Stir to fully combine.
  • Microwave: Microwave on high for 45–60 seconds. Check after 45 seconds—if it still looks runny, microwave in 5–10 second increments until set.
  • Enjoy: Let it cool slightly, then dig into your fluffy, carnivore-friendly mug cake!

🥚 Carnivore Diet Benefits

By focusing on animal-based foods—meat, eggs, dairy—and avoiding plants entirely, many people find it easier to manage cravings, maintain steady energy, and simplify meal decisions. This mug cake offers a hint of “dessert” without stepping outside carnivore principles.

🧈 Pro Tips

  • Watch the Time: Every microwave is different; overcooking can make the cake rubbery.
  • Extra Creaminess: Add an extra splash of heavy cream for a richer texture.
  • Flavor Twist: A tiny pinch of salt can bring out the natural richness of butter and cream.
Indulge in this Fluffy Carnivore Mug Cake whenever you want a quick, all-meat “dessert.” It’s proof you don’t need plants to treat yourself! 🥩✨

Keto Philly Cheesesteak Pasta

Keto Philly Cheesesteak Pasta is classic and delicious pasta. It is made with a combination of steak shreds, bell pepper, sautéed onions, & mushrooms along with cheesy sauce with keto pasta made with almond flour. This pasta is prepared quickly in only thirty minutes, so this pasta is a great dish to make for busy days. This dish is easily customizable, so we can easily use alternate ingredients of choice to prepare this dish. It is not dairy-free, so we can consume dairy-free cheese and vegan cream cheese to prepare dairy-free cheese. We can serve this Keto Philly Cheesesteak Pasta with Cesar or arugula salad, or with roasted zucchini or cauliflower for a filling dinner or lunch.


STATS:

  • Overall Time: 30 mints.
  • Portion size: 1.5 cups
  • Time of Prep: 10 mints.
  • Portions: 4
  • Cuisine: American
  • Caloric content: 450 Kcal
  • Course: Dinner
  • Time of Cook: 20 mints.
  • Diet: Keto & Low-Carb

EQUIPMENT:

  • Large skillet
  • Saucepan
  • Mixing spoon
  • Cutting board
  • Knife
  • Colander

INGREDIENTS:

  • 12 oz. keto pasta
  • 1 lb. shaved beef steak
  • 1 tbsp. olive oil
  • 1 green bell pepper
  • 1 small onion
  • 1 cup mushrooms
  • 1 tsp. garlic powder
  • Salt & pepper
  • 4 oz. cream cheese
  • ½ cup beef broth
  • ½ cup provolone
  • ¼ cup Parmesan cheese

INGREDIENT NOTES:

KETO PASTA:

  • We have to sue keto pasta made with almond flour or use Shirataki noodles or zoodles to prepare this dish.

SHAVED BEEF:

  • We have to utilize rib-eye or sirloin steak, which works great for this purpose.

BELL PEPPER:

  • We use different color of bell pepper to prepare this pasta dish and it also adds crunch and classic flavor of Philly cheesesteak with less carbs.

ONIONS:

  • We have to use yellow or white onions to prepare this dish to include the natural aroma and sweet flavor.

MUSHROOMS:

  • They are added to the dish to include the umami flavor, and they also deepen the flavor of this dish.

CREAM CHEESE:

  • It is included to make the indulgent smooth base of sauce to prepare this pasta.

BEEF BROTH:

  • We have to use the beef broth to prepare the sauce, and it is also used to adjust the consistency of this sauce.

MOZZARELLA OR PROVLONE CHEESE:

  • We use provolone and mozzarella cheese to prepare this dish to add a smooth and melty texture to this pasta.

PARMESAN CHEESE:

  • It is used to add a sharp flavor, and it also helps to thicken the consistency of sauce.

GARLIC POWDER:

  • It is added to include the garlic flavor without the use of fresh garlic.


INSTRUCTIONS:

  1. We can boil the keto pasta as directed on the package than drain and put the pasta in corner.
  2. Then we can add oil in the skillet on a moderate setting.
  3. We can add bell pepper, mushrooms, and onions and saute them to make the veggies tender.
  4. Then we can add beef shreds along with black pepper, garlic seasoning, and salt and cook to brown the meat.
  5. We can set the flame on a low setting and add the cream cheese and beef broth to the pan and stir to form a
  6. smooth consistency of sauce.
  7. Then we can add parmesan & provolone cheese & mingle to smooth the cheese in sauce.
  8. Now we can add the pasta and stir to combine with the sauce, and simmer for around three minutes and serve warm.

SERVING SUGGESTIONS:

  • We can garnish this pasta with parsley or green onions.
  • Serve this cheesesteak pasta with a Caesar or arugula salad.
  • We can pair this pasta with roasted zucchini or cauliflower for dinner or lunch.
  • You can top this pasta with additional provolone and broil to prepare the golden crust.
  • Serve this pasta in a skillet for rustic presentation.
  • We can add some chili flakes as we like to make the spicy pasta.

TIPS:

  • We can freeze the shaved beef so it gets sliced easily.
  • You would use the different color bell pepper to add color.
  • We don’t have to overcook the noodles as they get mushy.
  • You can add cream cheese slowly so that clumps will not get created.
  • We can stir the cheese constantly to form the smooth sauce.

STORAGE INFORMATION:

FRIDGE:

  • We can palace pasta in container and preserve this dish for 3 days.

FREEZER:

  • We can make and store separate portions for one month.

FAQs:

Can I prepare this pasta with the ground beef?

  • We can easily prepare this pasta with ground beef, and it cooks quickly as well.

Will I make this pasta dairy-free?

  • We can make the dairy-free pasta and use dairy-free cheese and vegan cream cheese to prepare dairy-free pasta.


NUTRITIONAL INFORMATION:

Fiber: 2g
Net carbs: 7g
Protein: 35g
Total carbs: 9g
Fat: 32g
Sodium: 580mg
Caloric content: 450 kcal
Potassium: 550mg
Serving size: 1.5 cups

Zero Point Strawberry ice Cream

Introduction:

Indulging in a delicious frozen treat while sticking to your Weight Watchers plan is made possible with this 0-Point Strawberry Ice Cream. Packed with the natural sweetness of strawberries and tailored to meet Weight Watchers’ zero-point food list, this homemade ice cream is a guilt-free delight that satisfies your dessert cravings without compromising your health goals.

Ingredients:

Gather the following simple ingredients to prepare this delightful 0-Point Strawberry Ice Cream:
2 cups fresh strawberries, hulled and halved
1 cup fat-free Greek yogurt
1 teaspoon vanilla extract
Sweetener to taste (such as Stevia or monk fruit)

Instructions:
Prepare Strawberries:

Begin by thoroughly washing and hulling the fresh strawberries. Cut them into halves, ensuring they are ripe and flavorful.

Freeze Strawberries:

Spread the halved strawberries on a tray lined with parchment paper and freeze them until firm. This step enhances the creaminess of the ice cream and intensifies the strawberry flavor.

Blend Strawberries:

Once the strawberries are frozen, place them in a blender along with fat-free Greek yogurt, vanilla extract, and your chosen sweetener. Blend the ingredients until smooth and creamy.

Adjust Sweetness:

Taste the mixture and adjust the sweetness according to your preference. Add more sweetener if needed, keeping in mind that the sweetness may vary depending on the natural sugars in the strawberries.

Freeze the Mixture:

Transfer the blended mixture into a freezer-safe container, spreading it evenly. Cover the container and place it in the freezer for at least 4-6 hours or until the ice cream reaches a firm consistency.

Serve and Enjoy:

Once the 0-Point Strawberry Ice Cream is fully frozen, scoop it into bowls or cones. Garnish with fresh strawberry slices for an extra burst of flavor. This refreshing treat is perfect for satisfying your sweet tooth on warm days or as a guilt-free dessert option.

Conclusion:

Indulging in a tasty frozen treat is made healthier with the 0-Point Strawberry Ice Cream, specially crafted for Weight Watchers. By using fresh strawberries and fat-free Greek yogurt, this homemade delight offers a satisfying and flavorful dessert option that aligns with your weight management goals. Enjoy the sweetness of strawberries without any added points, making this guilt-free ice cream a delightful addition to your Weight Watchers journey.
Someone posted this 0 point strawberry ice cream recipe, made it today and it’s just perfect😋☺️ taste absolutely yum

Ingredients:

2 cups frozen strawberries (unsweetened)

1 ripe banana, frozen (this will add natural sweetness)

1/2 cup fat-free Greek yogurt

1 teaspoon vanilla extract (optional for added flavor)

Sweetener of your choice (if desired, but keep in mind this will add points)

Instructions:

Prepare the Fruit:

Slice the ripe banana into small pieces and freeze them along with the strawberries. It’s best to freeze them overnight for a creamier texture.

Blend the Ingredients:

In a blender or food processor, combine the frozen strawberries, frozen banana slices, fat-free Greek yogurt, and vanilla extract (if using).

Blend Until Smooth:

Blend the mixture until it’s smooth and creamy. You may need to stop and scrape down the sides of the blender a few times to ensure everything is well combined.

Taste and Sweeten (If Desired):

Taste the mixture and decide if it’s sweet enough for your liking. If you want it sweeter, you can add a small amount of your preferred sweetener. Keep in mind that this may add points if you’re following Weight Watchers, so use it sparingly.

Serve or Freeze:

You can serve the strawberry “ice cream” immediately for a soft-serve consistency.

For a firmer texture, transfer the mixture to a container with a lid and freeze it for an additional 1-2 hours.

Enjoy:

Scoop out your strawberry “ice cream” and enjoy it as a guilt-free and zero-point treat!

Weight Watchers Chicken Salad on Croissants

Yield: 4 servings
Prep Time: 15 minutes
Total Time: 15 minutes

For the Chicken Salad:

  • 2 cups cooked and shredded skinless, boneless chicken breast
  • 1/2 cup non-fat Greek yogurt
  • 1/4 cup light mayonnaise
  • 1 celery stalk, finely chopped
  • 1/4 cup red onion, finely chopped
  • 1/4 cup grapes, halved
  • 1 tablespoon Dijon mustard
  • Salt and pepper, to taste

For Serving:

  • 4 small whole wheat croissants

Instructions:

  1. Prepare the Chicken Salad:
    • In a large bowl, combine shredded chicken, non-fat Greek yogurt, light mayonnaise, chopped celery, chopped red onion, halved grapes, Dijon mustard, salt, and pepper. Mix until well combined.
  2. Assemble the Sandwiches:
    • Slice the whole wheat croissants in half. Place an equal amount of chicken salad onto the bottom half of each croissant.
  3. Serve:
    • Place the top half of the croissants on the chicken salad to create sandwiches.

SmartPoints Information:

  • The SmartPoints value will depend on the specific ingredients and brands used. Be sure to calculate the points based on your Weight Watchers plan and the ingredients you choose. Consider using light or fat-free alternatives to reduce points.

Enjoy your Weight Watchers Chicken Salad on Croissants, a delicious and point-friendly lunch option!

Frozen chocolate peanut butter bark

Serves 8 Frozen chocolate peanut butter bark is a delightful fruity spin on the more traditional frozen yogurt bark. This is 2 weight watchers points per serving! Simply arrange banana slices on a sheet pan, and mash them down until they flatten and form a base for your toppings—in this case, reconstituted powdered peanut butter and melted dark chocolate. After the bark freezes, cut or break it into pieces, and store it in a freezer-safe container for up to 2 weeks.

Ingredients

  • Banana
  • 2 large cut into 1/2-inch-thick slices
  • Powdered peanut butter
  • ¾ cup s
  • Lily’s Dark chocolate baking chips
  • 3 oz or similar product
  • Flaky salt
  • ¼ tsp

Instructions

  1. Line a sheet pan with foil or parchment paper. Arrange the banana slices on the pan to form a rectangle (about 8 x 5 inches). Cover the banana slices with a sheet of parchment paper; press the slices using the bottom of a glass or a dry measuring cup so that they flatten and touch each other. Carefully peel off the top sheet of parchment.
  2. In a small bowl, stir together the powdered peanut butter and 7 to 8 tablespoons of water until smooth; spread the peanut butter over the bananas.
  3. In a small microwave-safe bowl, microwave the chocolate chips on High until melted and smooth, about 1 minute, stopping to stir every 20 seconds. Drizzle the chocolate evenly over the peanut butter and gently spread to cover. Sprinkle evenly with the salt. Freeze until fully firm, at least 1 hour. Cut or break into 8 pieces.
  4. Serving size: 1 piece

Carnivore Pizza Recipe

Ingredients:

For the Crust:

  • 1 1/2 cups (180g) mozzarella cheese, shredded
  • 1/4 cup (60g) cream cheese
  • 1 large egg
  • 1 cup (100g) almond flour
  • 1/2 tsp garlic powder (optional)
  • 1/4 tsp salt
  • 1/4 tsp baking powder

For the Toppings:

  • 1/2 cup (120g) pizza sauce (optional, can omit for strict carnivore)
  • 1 1/2 cups (180g) shredded mozzarella cheese
  • 1/2 cup (75g) cooked ground beef
  • 1/2 cup (75g) cooked sausage, crumbled
  • 4 slices pepperoni or other carnivore-friendly deli meats
  • 2 slices cooked bacon, chopped
  • 1/2 cup (60g) cooked chicken breast, shredded
  • 1/4 cup (30g) Parmesan cheese (optional, for extra flavor)

Instructions:

  1. Preheat Oven:
    • Preheat your oven to 400°F (200°C) and line a baking sheet with parchment paper or use a pizza stone if you have one.
  2. Make the Crust:
    • In a microwave-safe bowl, combine the shredded mozzarella and cream cheese. Microwave for 30-45 seconds until melted and easy to stir.
    • Stir in the egg, almond flour, garlic powder, salt, and baking powder. Mix until smooth and dough-like.
    • Transfer the dough to the prepared baking sheet and shape it into a pizza crust about 1/4-inch thick.
  3. Bake the Crust:
    • Bake the crust in the preheated oven for 10-12 minutes or until golden and firm.
  4. Assemble the Pizza:
    • Once the crust is done, spread a thin layer of pizza sauce (optional) over the crust. Sprinkle a generous amount of shredded mozzarella cheese over the sauce.
    • Top with your carnivore toppings: ground beef, sausage, pepperoni, bacon, and chicken.
  5. Bake Again:
    • Return the pizza to the oven and bake for an additional 5-7 minutes, until the cheese is melted and bubbly. Optionally, sprinkle Parmesan on top for extra flavor.
  6. Serve:
    • Slice and enjoy your delicious, low-carb carnivore pizza!

Tip: Customize with any other meats or toppings that fit your carnivore diet!

Street Corn Chicken Rice

The keto bowl of Street Corn Chicken Rice is a satisfying & healthy meal that is perfect for those on low-carb/strict-keto diets. We have crafted the recipe to smartly swap the corns & rice for their low-carb counterparts. These bowls feature cauliflower rice & corns(extremely keto), marinated cooked chicken slices, lime crema with keto mayo, sour cream, lime, etc., & all keto toppings like wedges of lime, avocado slices, crumbled cheese, chopped cilantro. This keto bowl of Street Corn Chicken Rice is perfectly seasoned, packed with healthy fats, proteins, and many essential nutrients.


NUMERICAL OVERVIEW:

  • Diet: Ketogenic
  • Course: Main course
  • Cuisine: Fusion/Tex-Mex
  • Time for prep: Fifteen mins
  • Twenty-five mins for cooking
  • Working time(in total): Forty minutes
  • Size/serving: A bowl/person
  • Yield in total: 4 bowls
  • Mode of cooking: Grill(grill pan) + stovetop
  • Level of difficulty: Easy to normal

TOOLS:

  • Board & knife for cutting & chopping
  • A grill pan/skillet
  • Rice grater/food processor(for making the rice from cauliflower)
  • Bowls for mixing
  • Tongs/spatula
  • Baking sheet/tray
  • Spoons & cups, to measure

INGREDIENTS:

FOR THE CHICKEN:

  • One tsp. of cumin
  • 2 tbsps. of oil(olive)
  • Chili powder, 1/2 tsp
  • 2 breasts of chicken, boneless & skinless
  • To taste of salt & pepper
  • 1 tsp. of paprika, smoked
  • Fresh juice of half a lime

STRICT KETO VERSION OF THE STREET CORN:

  • 1/4th tsp. of powdered garlic
  • Florets of cauliflower, 1.5 cups
  • 0.25 tsp. of paprika
  • To taste of salt
  • 1 tbsp. of oil(avocado)

CREMA:

  • Fresh juice of a lime
  • 0.5 cup of sour cream, full-fat
  • To taste of salt & pepper
  • 1/4th cup of mayonnaise(avocado-oil based)
  • To taste of salt & pepper
  • 1 clove of minced garlic
  • Chopped cilantro, one tbsp.

RICE BASE:

  • 1 tbsp. of coconut oil/butter
  • Rice of cauliflower, 2 cups
  • To taste of salt

TOPPINGS:

  • Wedges of lime
  • 1/2 sliced avocado
  • Cojita cheese(crumbled), two tbsps.
  • 1/4thc up of fresh cilantro, chopped


INSTRUCTIONS:

COOKING CHICKEN:

  1. Include & mix the paprika, juice of lime, cumin, pepper(black), oil of olives, salt, powdered chili, & garlic in a bowl.
  2. Add chicken to the above marinade you just made.
  3. Coat all the chicken properly & refrigerate while covered it for a minimum of fifteen mins.
  4. Place a skillet on the stove over a normal-fulll flame.
  5. Add the marinated chicken to that skillet.
  6. After ~seven mins, turn the side of the chicken.
  7. Fry for the same precise length of time on the other side.
  8. Check that the chicken must be tender from inside & golden & crisp from the outer side.
  9. If it’s done, dish it out, cool it, then slice/dice the chicken.

PREPARING THE STRICT KETO VERSION OF CORN:

  1. First, prepare the corn-sized bits of cauliflower florets.
  2. Then coat them properly with the mixture of salt, paprika, oil of avocado, & powdered garlic.
  3. Spread the seasoned corn-sized cauliflower bits on the baking sheet/tray.
  4. Shift that baking tray to the oven for roasting the cauliflower bits for ~twenty mins at 200 °C.
  5. After ~ten mins mix them to change their position for even roasting.
  6. Check them after twenty mins, and remove them from the oven if they are crisp & golden.

LIME CREMA:

  1. Mix juice of lime, sour cream, pepper, mayo, salt, minced garlic, & chopped cilantro in a bowl.
  2. Now, you can refrigerate your lime crema.

COOKING OF CAULIFLOWER RICE:

  1. Include oil/butter in a skillet over a normal flame.
  2. Include the cauliflower rice in that melted butter/hot oil.
  3. Sprinkle the salt, mix & cook them until tender(~five mins).

ASSEMBLING:

  1. Grab the four serving bowls.
  2. Add an equal amount of cauliflower rice in each bowl.
  3. Now, top the rice with chicken slices, cauliflower”corn”, avocado slices, drizzle of lime crema, cheese, & fresh cilantro one by one.
  4. Finally, press half a fresh lime’s juice into each bowl.
  5. Your strict keto bowls of Street Corn Chicken Rice are ready to serve!

TIPS:

  • Use an airfryer to have the extra crispy cauliflower corns
  • You may use the leftover/rotisserie chicken for the quick work.
  • You may use the chipotle/jalapenos for the spicy version.
  • Longer marination of chicken & longer refrigerating of crema will give you deep flavor.

HOW TO PRESERVE(LEFTOVERS):

NOTE: Never store an assembled rice bowl

CHILLING:

  • Save every component individually in the containers(sealed). Refrigerate them all for ~four days. Bring all components to the surrounding temperature while rewarming the rice & chicken. Then assemble them for quick serving.

FREEZING:

  • You may save the chicken & rice of cauliflower individually in the container with sealed lids. Freeze them for ~sixty days. Never freeze the crema & topping. Defrost & reheat the chicken, prepare the lime crema & toppings fresh. Assemble them all to serve.

FAQs:

What can I use in place of the dairy cheese?

  • You may use extra cream, paste of avocado, or almond-based crumbled cheese in place of dairy cheese. You can also skip the cheese if you want.

Will the frozen cauliflower rice work?

  • Absolutely! You need to defrost & drain extra water properly, then your cauliflowers are good to go.


NUTRITIONAL FACTS/SERVING:

Size/serve: 1 Bowl
Calories: ~395 kcal
Carbs in total: Nine grams
Fiber: 4 g
Net carbohydrates: Five grams
Fats: 27 grams
Sugar: Two grams
Proteins: 27 g
Sodium: 510 mg

Weight Watchers-Friendly Sausage and Egg Breakfast Muffins

1 Point Egg Muffins
Introduction: Indulge in a culinary masterpiece with our delectable 1-Point Egg Muffins, a delightful fusion of flavors and textures that will elevate your breakfast experience. Packed with pre-cooked ham, finely diced bell pepper, and onion, these savory muffins are a perfect blend of protein and vegetables. Whether you’re seeking a convenient meal prep option or a sophisticated brunch dish, our egg muffins are a versatile addition to your culinary repertoire.
Ingredients:
1/2 lb pre-cooked ham, diced (bacon or sausage can be substituted)
1 bell pepper, finely diced
1/2 onion, finely diced
10 eggs
1/2 tsp salt
1/2 tsp pepper
2 tbsp avocado oil (bacon fat can be used for added flavor)
Instructions:
Preheat Oven to Perfection: Begin by preheating your oven to 375°F, ensuring the ideal temperature for achieving the perfect texture and flavor in our egg muffins.
Chop with Precision: Meticulously dice the pre-cooked ham, bell pepper, and onion to create bite-sized pieces that will be evenly distributed throughout each muffin, providing a burst of flavor in every bite.
Whisk and Mix with Finesse: Crack the eggs into a spacious bowl and whisk them to perfection. Add the meticulously chopped ingredients, along with 1/2 teaspoon of salt and pepper each, creating a harmonious blend of flavors.
Grease for Success: Ensure the muffin tin is generously coated with your preferred fat or oil, preventing any sticking issues during baking. Alternatively, opt for muffin tin liners for a hassle-free baking experience.
Spoonfuls of Culinary Art: Carefully spoon the egg mixture into each section of the muffin tin, filling them almost to the brim. Anticipate a delightful puffing up as they bake, promising an aesthetically pleasing presentation.
Bake to Perfection: Place the muffin tin in the preheated oven and let the magic happen for approximately 20 minutes. The result? A golden-brown exterior with a perfectly cooked, fluffy interior.
Cooling Elegance: Allow the egg muffins to cool slightly before serving, enhancing the overall texture and ensuring a delightful dining experience.
Nutritional Information (Per Serving):
Calories: 311kcal
Carbohydrates: 3g
Protein: 26g
Fat: 20g

Two Ingredient Cloud Cake

Yields: 8-10 servings
Prep time: 30 minutes
Cook time: 60-70 minutes
Ingredients:
For the Batter:
3 large eggs, separated (yolks and whites)
1/4 cup (56g) light cream cheese, softened (Philadelphia 1/3 less fat or similar)
1/4 cup (60ml) unsweetened almond milk or skim milk
2 tbsp (30g) unsalted butter (or light butter alternative, if available and suitable for baking)
1/4 cup (30g) all-purpose flour, sifted
1 tbsp (8g) cornstarch, sifted
1/4 tsp cream of tartar (optional, but helps stabilize egg whites)
1/2 cup (80g) erythritol or another granular sugar substitute equivalent to 1/2 cup sugar
1/2 tsp vanilla extract
Pinch of salt
For the Water Bath:
Boiling water
For Dusting (Optional):
1-2 tsp powdered erythritol or other powdered sugar substitute
Equipment:
8-inch round springform pan or cake pan with a removable bottom
Parchment paper
Aluminum foil
Large roasting pan (for water bath)
Electric mixer
Spatulas
Whisk
Instructions:
Prepare the Pan: Grease and flour your 8-inch springform pan. Line the bottom with parchment paper. For easy removal and to prevent water from seeping in during the water bath, wrap the outside of the pan securely with 2-3 layers of aluminum foil. Preheat your oven to 325°F (160°C).
Make the Cheese Base:
In a heatproof bowl set over a pot of simmering water (double boiler), combine the softened light cream cheese, unsweetened almond milk (or skim milk), and butter. Whisk constantly until the mixture is smooth and fully combined. Remove from heat.
Whisk in the egg yolks one at a time until fully incorporated.
Sift in the flour and cornstarch into the mixture. Whisk until smooth and no lumps remain. Stir in the vanilla extract and a pinch of salt. Set aside.
Whip the Meringue:
In a very clean, dry bowl (preferably glass or metal), add the egg whites and cream of tartar (if using).
Using an electric mixer, start whipping the egg whites on medium speed until foamy.
Gradually add the erythritol (or sugar substitute) a little at a time while continuing to whip.
Increase the speed to high and whip until you achieve glossy, soft peaks. The to meringue should hold its shape but still be pliable. Do not over-whip to stiff peaks, as this can make the cake dry.
Combine the Batters:
Add about one-third of the meringue to the cheese base mixture. Gently fold it in with a spatula to lighten the batter.
Add the remaining meringue in two additions, gently folding until just combined. Be careful not to deflate the meringue; this is key to the soufflé texture. Overmixing will result in a dense cake.
Bake with Water Bath:
Pour the batter into the prepared springform pan. Gently tap the pan on the counter a few times to release any large air bubbles.
Place the springform pan into the larger roasting pan. Carefully pour boiling water into the roasting pan until it comes about 1 inch up the sides of the springform pan.
Carefully transfer the roasting pan to the preheated oven.
Bake for 60-70 minutes, or until the top is golden brown and the cake is set but still slightly wobbly in the center. An inserted skewer should come out with moist crumbs.
Cooling and Serving:
Once baked, turn off the oven and prop the oven door open slightly with a wooden spoon. Let the cheesecake cool in the oven for about 30-60 minutes. This slow cooling helps prevent the cake from deflating too much.
Remove the cake from the oven and the water bath. Carefully remove the aluminum foil. Let it cool completely on a wire rack before refrigerating for at least 2-3 hours (preferably overnight) to firm up.
Once chilled, carefully run a thin knife around the edge of the pan before releasing the springform.
Dust with powdered erythritol before serving, if desired.
Weight Watchers Point Considerations (Estimate):
Light Cream Cheese: Significantly lower in points than full-fat.
Unsweetened Almond Milk/Skim Milk: Very low or zero points.
Erythritol/Sugar Substitute: Zero points.
Butter: This is where some points will come from. Using a good quality light butter or a smaller amount if you can adjust, helps.
Flour & Cornstarch: These will contribute points.
Eggs: Points depend on the plan, but generally moderate.
To get accurate points for your specific cake, you would need to input all the exact ingredients and their quantities into your WW app and divide by the number of servings. For example, if the entire cake comes out to 30 points and you cut 10 slices, each slice would be 3 points.
Enjoy your light and airy Japanese Soufflé Cheesecake

Carnivore Fluffy Pancakes

Table of Contents

🥞🔥 Carnivore Fluffy Pancakes

Forget flour and sugar—these Carnivore Fluffy Pancakes are a protein-packed, ultra-satisfying alternative that blow traditional pancakes out of the water. With a tender texture and buttery flavor, they’re ideal for low-carb, keto, and carnivore diets alike. Bonus: they’re quick to whip up and endlessly customizable with zero guilt.

📝 Ingredients (Base Version):

  • 4 large eggs
  • 4 oz cream cheese (or 1/2 cup, softened)
  • 2 tbsp beef gelatin (gives the “fluffy” texture – like flour!)
  • 1 tbsp butter or ghee (for cooking)
  • Pinch of salt
  • Optional: splash of vanilla extract or cinnamon (for more flavor, if tolerated)

👨‍🍳 Instructions:

  1. Blend the Batter
    • In a blender or mixing bowl, combine eggs, cream cheese, gelatin, and salt.
    • Blend or whisk until very smooth—no lumps. Let it sit for 2–3 minutes to activate the gelatin.
  2. Heat the Pan
    • Heat a nonstick or cast iron skillet over medium-low heat. Add a small amount of butter or ghee.
  3. Cook the Pancakes
    • Pour small rounds of batter (about 3–4 inches wide) into the pan.
    • Cook for 2–3 minutes per side, flipping once bubbles form and the edges firm up.
    • Repeat until all batter is used.
  4. Serve & Enjoy!
    • Serve warm with a pat of butter, whipped cream cheese, or even bacon slices on top!

🍽️ Servings:

Makes 6–8 small pancakes (Serves 2)

🔍 Notes:

  • Beef gelatin is key for fluffiness! It mimics the structure that flour provides in regular pancakes.
  • You can double the batch and refrigerate the leftovers—great for meal prep.

💡 Tips:

  • For extra richness, separate the eggs and whip the egg whites until fluffy—fold into the batter for extra airy pancakes.
  • Want it sweeter (but still carnivore-ish)? Add a pinch of cinnamon or vanilla extract.
  • Use a ring mold for perfect circular shapes and even thickness.
  • Make a savory version: add shredded cheese or crispy bacon bits to the batter!

🧾 Nutritional Info (per serving, approx. 3–4 pancakes):

  • Calories: ~320
  • Protein: ~20g
  • Fat: ~26g
  • Carbs: <1g
  • Fiber: 0g
  • Sugar: 0g

🌿 Carnivore Health Benefits:

  • Zero carbs: Supports ketosis, fat burning, and blood sugar stability
  • High in protein & healthy fats: Keeps you full and fuels your body
  • Gelatin: Great for joint health, skin elasticity, and gut support
  • Eggs & cream cheese: Rich in essential vitamins like A, D, B12, and choline

❓ Q&A:

Q: Can I use bone broth protein powder instead of gelatin?
A: Yes! It works similarly but may be less fluffy—great for added nutrition though.

Q: What toppings are allowed on carnivore?
A: Try butter, whipped cream cheese, unsweetened mascarpone, or melted cheese. For keto-carnivore, a small drizzle of sugar-free syrup may be okay.

Q: Can I prep the batter in advance?
A: Yes! Store in the fridge up to 24 hours. Let it sit at room temp for 10 mins before cooking for best texture.

Q: Can I make these dairy-free?
A: Use duck fat or tallow for cooking and replace cream cheese with a mix of egg yolks and beef tallow.

Q: Are these freezer-friendly?
A: Absolutely. Freeze in layers with parchment paper. Reheat in a skillet or toaster oven.

Keto Drop Biscuits Recipe

Keto Drop Biscuits are a delightful and low-carb alternative to traditional biscuits. They are perfect for those following a ketogenic diet or anyone looking to reduce their carbohydrate intake. These biscuits are tender, buttery, and easy to make. Enjoy them as a side dish with keto-friendly soups, stews, or as a snack. Here’s a delicious Keto Drop Biscuits recipe with nutrition facts and serving information.


Recipe: Keto Drop Biscuits

Ingredients:

  • 2 cups almond flour
  • 1/4 cup coconut flour
  • 1 tablespoon baking powder
  • 1/2 teaspoon salt
  • 1/2 cup unsalted butter, melted
  • 4 large eggs
  • 1/4 cup unsweetened almond milk or coconut milk
  • 1/2 cup shredded cheddar cheese (optional, for added flavor)
  • 2 tablespoons fresh chives, finely chopped (optional, for added flavor)


Nutrition Facts (Per Serving – Recipe makes approximately 12 biscuits):

  • Calories: 215
  • Total Fat: 19g
  • Saturated Fat: 6g
  • Carbohydrates: 6g
  • Dietary Fiber: 3g
  • Sugars: 1g
  • Protein: 7g


Servings:

This recipe makes approximately 12 Keto Drop Biscuits.


Instructions:

1. Preheat and Prepare:
  • Preheat your oven to 350°F (175°C). Line a baking sheet with parchment paper.
2. Mix Dry Ingredients:
  • In a large mixing bowl, whisk together the almond flour, coconut flour, baking powder, and salt.
3. Add Wet Ingredients:
  • Add the melted butter, eggs, and unsweetened almond milk to the dry ingredients. Mix until a thick, uniform dough forms.
4. Optional Additions:
  • If desired, stir in the shredded cheddar cheese and finely chopped chives for added flavor.
5. Form Biscuits:
  • Using a spoon or your hands, drop approximately 2 to 2.5 tablespoons of dough onto the prepared baking sheet to create each biscuit. Leave some space between each one.
6. Bake:
  • Place the baking sheet in the preheated oven and bake for about 15-20 minutes, or until the biscuits are golden brown and cooked through.
7. Serve:
  • Once baked, remove the biscuits from the oven and let them cool for a few minutes. Enjoy your Keto Drop Biscuits as a side to your favorite keto dishes, or as a snack with butter or cream cheese.

Weight Watchers Blueberry Muffins

Ingredients:
1 cup plain nonfat Greek yogurt
1 cup unsweetened applesauce
2 eggs
1 ½ cups self-rising flour
1 tsp vanilla extract
¼ cup sweetener (like Stevia, Monk Fruit, or erythritol – adjust to taste)
1 cup fresh or frozen blueberries (if frozen, do not thaw)
Optional: dash of cinnamon or lemon zest for flavor boost
Instructions:
Preheat oven to 350°F (175°C). Line a 12-cup muffin tin with paper liners or spray with nonstick spray.
Mix wet ingredients: In a large bowl, whisk together Greek yogurt, applesauce, eggs, and vanilla.
Add dry ingredients: Stir in the self-rising flour and sweetener until just combined. Don’t overmix — a few lumps are okay.
Fold in blueberries gently.
Divide batter evenly among the 12 muffin cups.
Bake for 18–22 minutes, or until a toothpick inserted in the center comes out clean.
Cool in the pan for 5 minutes, then transfer to a wire rack.

Blueberry Yogurt Protein Bites

Prep time: 5 mins Total time: 5 mins

Ingredients :

1 cup plain yogurt

2 T honey

1 cup fresh blueberries

½ cup slivered almonds

Preparation :

Mix honey and yogurt. Stir in blueberries and almonds. Place them in a tray to freeze. Freeze 2 hours for solid results. 18-25 frozen protein bites.

Nutritional Info :

Smart points 2
Title: Wholesome Blueberry Yogurt Protein Bites: A Quick and Nutrient-Packed Delight

Introduction: Elevate your snacking experience with our delectable Blueberry Yogurt Protein Bites – a nutritious blend of fresh blueberries, slivered almonds, and the goodness of plain yogurt. In just five minutes, you can prepare a delightful treat that not only satisfies your sweet cravings but also provides a boost of protein. These frozen protein bites are a testament to simplicity meeting indulgence, making them an ideal addition to your healthy snack repertoire.

Ingredients: Gather the following wholesome ingredients to embark on your journey to creating Blueberry Yogurt Protein Bites:

1 cup plain yogurt
2 tablespoons honey
1 cup fresh blueberries
1/2 cup slivered almonds
Preparation: In a few simple steps, transform these ingredients into frozen bites of delight:

Begin by mixing honey and yogurt in a bowl, ensuring a smooth and well-incorporated blend.
Stir in fresh blueberries and slivered almonds into the honey-yogurt mixture. The vibrant blueberries add a burst of antioxidants, while the slivered almonds contribute a satisfying crunch and an extra dose of protein.
Place the concoction into a tray, spreading it evenly for uniform freezing.
Allow the Blueberry Yogurt Protein Bites to freeze for a minimum of two hours to achieve a solid and refreshing consistency.
Once frozen, enjoy the fruits of your minimal effort – 18 to 25 bite-sized, frozen protein delights.
Nutritional Information: Savor the satisfaction of a healthy treat with just 2 SmartPoints per Blueberry Yogurt Protein Bite. This nutritional transparency allows you to indulge without compromising your wellness goals, making them an excellent choice for those on a mindful eating journey.

Tips and Variations: Experiment with different yogurt varieties such as Greek yogurt for an extra protein punch or flavored yogurts to add a hint of sweetness. Consider swapping almonds for other nuts like walnuts or pecans to tailor the recipe to your taste preferences.

Conclusion: Blueberry Yogurt Protein Bites are not just a snack; they are a celebration of health and flavor in every bite. Perfect for a quick energy boost or a guilt-free dessert alternative, these frozen delights offer a symphony of textures and tastes. Share this delightful recipe with your friends and family, and let the goodness of fresh blueberries and slivered almonds redefine your approach to wholesome snacking.

2 Minute Yogurt Ice Cream

Yoghurt ice cream in 2 minutes I make this every year

INGREDIENTS

2 tsp vanilla flavor
2 cups yoghurt
3 tbsp honey
2 tsp vanilla flavorFrozen dessert
2 cups of yogurt in total (500 ml)
3 tbsp milk
Topping as desired

Preparation

It’s so quick and tastes like store-bought ice cream!

First mix all the ingredients well in a plastic bowl for the yogurt ice cream without an ice cream maker.
Place the bowl in the freezer for at least 4 hours. Decorate as desired. Enjoy!
Bon appetit

WW Crustless Pizza Bowls

Introduction

Pizza night just got a whole lot healthier! Say hello to your new favorite guilt-free indulgence: the WW Low Carb Crustless Pizza Bowl. If you’re on the Weight Watchers plan or simply trying to eat healthier without sacrificing taste, this dish delivers everything you love about pizza—melty cheese, rich marinara, savory toppings—without the extra carbs, fat, or SmartPoints that come with a traditional crust.

Made with simple ingredients, this recipe is low in carbohydrates, high in protein, and incredibly satisfying. Plus, it’s quick to prepare, customizable to your liking, and perfect for meal prep or a cozy weeknight dinner. Whether you’re watching your weight, managing carbs, or just looking for a delicious low-effort meal, this pizza bowl will check all your boxes.


Why This Recipe Works for Weight Watchers

Unlike traditional pizza, which can easily rack up points thanks to crust and high-fat toppings, this bowl skips the bread entirely—meaning lower SmartPoints without compromising on flavor. By layering lean proteins, fresh vegetables, and part-skim mozzarella in a bowl and baking it to bubbly perfection, you get all the pizza satisfaction at a fraction of the cost to your daily points budget.

This recipe is also versatile and can be adjusted for WW Blue, Green, and Purple plans depending on the ingredients you use.


Key Features

  • ✅ Low in carbs and calories
  • ✅ High in protein
  • ✅ Only 3–5 WW SmartPoints per serving
  • ✅ Completely customizable
  • ✅ No crust, no problem!
  • ✅ Gluten-free, keto-friendly, and diabetic-friendly

Ingredients

Serves: 2
Serving Size: 1 full pizza bowl

  • ½ cup no-sugar-added marinara sauce (such as Rao’s or homemade)
  • ¾ cup part-skim shredded mozzarella cheese
  • ½ cup cooked lean ground turkey (93% lean) or diced grilled chicken breast
  • ¼ cup turkey pepperoni slices (about 15 slices)
  • ¼ cup diced green bell pepper
  • ¼ cup chopped red onion
  • ¼ cup sliced mushrooms
  • 1 tablespoon grated Parmesan cheese
  • 1 teaspoon Italian seasoning
  • 1/4 teaspoon garlic powder
  • Crushed red pepper flakes (optional)
  • Fresh basil or parsley (for garnish)

All ingredients are WW-friendly and designed to keep points low while maximizing taste.


Nutrition Information (Per Serving)

  • Calories: 280
  • Protein: 28g
  • Carbohydrates: 8g
  • Fat: 15g
  • Fiber: 2g
  • Sugars: 4g (naturally from vegetables & sauce)
  • WW SmartPoints (approx.):
    • Blue: 4
    • Green: 5
    • Purple: 3

SmartPoints were calculated using the WW Recipe Builder with low-fat, low-carb ingredients. Adjust based on your plan and chosen brands.


Step-by-Step Instructions

Step 1: Prepare the Base

Preheat your oven to 400°F (200°C). While the oven heats, grab two oven-safe bowls or small baking dishes.

Spoon ¼ cup of marinara sauce into the bottom of each bowl, spreading it evenly to cover the base.

Step 2: Layer the Protein

Divide your cooked lean ground turkey or chicken evenly between the bowls. This adds hearty protein without spiking your SmartPoints. If you’re using pepperoni, set half aside for the top layer and layer the rest here.

Step 3: Add Vegetables

Top the protein with your chopped onions, mushrooms, and peppers. These non-starchy veggies are zero points on most WW plans and add bulk, nutrition, and flavor without any guilt.

Step 4: Sprinkle with Seasoning

Sprinkle Italian seasoning, garlic powder, and crushed red pepper flakes (if desired) over the veggies. This enhances the flavor without adding calories or points.

Step 5: Add the Cheese

Top each bowl with approximately ⅜ cup of shredded part-skim mozzarella cheese. It may not seem like much, but when melted, it delivers all the gooey satisfaction you expect from pizza.

Finish with a few turkey pepperoni slices on top and a sprinkle of grated Parmesan cheese for that classic pizzeria vibe.

Step 6: Bake to Perfection

Place bowls on a baking tray and bake for 12–15 minutes, or until the cheese is bubbling and golden brown. For a crispier top, broil on high for an additional 1–2 minutes—but watch closely to avoid burning.

Step 7: Garnish and Serve

Remove from the oven and let sit for 2–3 minutes. Garnish with fresh basil or chopped parsley, and enjoy immediately. The aroma and appearance will convince even the biggest pizza lovers that this is the real deal!


Why This Recipe Is Healthy

  • No refined grains: Skipping the crust cuts out unnecessary calories and carbs.
  • High in lean protein: Keeps you full longer, supports metabolism, and aids recovery.
  • Low sugar: Using a no-added-sugar marinara keeps this low-glycemic.
  • Nutrient-dense vegetables: Add fiber, vitamins, and volume to keep you satisfied.

This pizza bowl turns a comfort food favorite into a nutrient-packed, guilt-free indulgence.


Tips for Success

  1. Use a high-quality marinara sauce with no added sugars and minimal ingredients.
  2. Pre-cook the meat before layering to ensure food safety and even flavor.
  3. Don’t over-bake – the goal is melted cheese and warm toppings, not dried-out protein.
  4. Portion wisely – each bowl is a hearty serving. Pair with a light side salad for balance.
  5. Make it microwaveable – assemble the bowl in a glass container for a fast WW lunch!

Flavor Variations

  • Spicy Italian: Add turkey Italian sausage, crushed red pepper, and black olives.
  • Veggie Deluxe: Omit meat and load up on spinach, zucchini, olives, and artichokes.
  • BBQ Chicken: Swap marinara for sugar-free BBQ sauce, use diced chicken and red onion, and top with a bit of reduced-fat cheddar.
  • White Pizza Bowl: Use ricotta and garlic as your base, top with spinach and mushrooms.

Each variation can be adapted to fit into WW-friendly point limits.


Substitutions

  • Dairy-Free: Use a dairy-free mozzarella alternative. Points may vary.
  • Vegetarian: Omit meat and double the veggies or add plant-based crumbles.
  • No Turkey Pepperoni? Try lean turkey bacon or omit for a lower-fat version.
  • Low Sodium: Use a low-sodium sauce and cheese to reduce salt intake.

Make-Ahead & Storage

  • Meal prep: Assemble all ingredients in a storage-safe dish and refrigerate for up to 3 days.
  • Freezer friendly: Freeze the assembled (unbaked) bowls. Thaw overnight and bake as directed.
  • Reheating: Microwave in 1-minute bursts or reheat in the oven at 350°F until warmed through.

Serving Suggestions

  • Serve with a WW-friendly side salad with balsamic vinaigrette.
  • Pair with steamed vegetables or roasted broccoli.
  • Enjoy with a glass of sparkling water with lemon for a full, balanced meal.

Frequently Asked Questions

Q: Can I use store-bought rotisserie chicken?
Yes! Just make sure it’s skinless and check the sodium content for SmartPoint tracking.

Q: Is this keto-friendly?
Absolutely. It’s low in carbs and high in protein, making it suitable for both keto and WW plans.

Q: Can I eat this cold?
While best hot, it’s tasty chilled like leftover pizza—though cheese will firm up.


Final Thoughts

The WW Low Carb Crustless Pizza Bowl is proof that you can enjoy your favorite comfort foods without compromising your health goals. It’s delicious, filling, and loaded with flavor while staying well within your SmartPoint allowance.

From quick dinners to satisfying meal prep, this recipe is one you’ll want to bookmark and return to again and again. With endless variations and only minutes to prepare, it’s the perfect solution for busy, health-conscious pizza lovers.

Keto Creamy Custard Cake

This Keto Creamy Custard Cake is a very delicious, decadent dessert, and it is also low in carbs. This dessert has a smooth and velvety custard base and a light, airy top. This dessert is ideal for anyone on a ketogenic or gluten-free diet because it features low-carb components like almond milk, coconut flour, and Erythritol. This cake has a special texture that makes this dessert different and appealing. As the batter bakes, it separates into different layers and forms a soft sponge top & creamy custard underneath. This cake has a subtle vanilla flavor and it is mildly sweet, & is filling without a strong taste. We can have this Keto Creamy Custard Cake without anything, or we can add some whipped cream and fresh berries to enhance the taste.

STATS:

  • Serving size: 1 slice
  • Cook time: Fifty mins
  • Cuisine: American
  • Total time: One hour, five mins
  • Calories: 210 kcal
  • Prep time: Fifteen mins
  • Course: Dessert
  • Diet: Keto, Gluten-Free
  • Serving: 8 servings

EQUIPMENT:

  • Baking pan
  • Parchment paper
  • Beater
  • Spatula
  • Whisk
  • Knife

INGREDIENTS:

  • 4 large eggs
  • 1/3 cup Erythritol powder
  • 2 tbsp. coconut flour
  • ¼ tsp. xanthan gum
  • ¼ tsp. salt
  • 1 & ½ cups almond milk
  • ½ cup heavy cream
  • 1 tbsp. vanilla extract
  • Butter

INGREDIENTS NOTES:

EGGS:

  • We utilize the eggs which should be at the ambient temperature for the best texture and volume.

ERYTHRITOL POWDER:

  • Erythritol powder is used to make this dessert and it dissolves easily and quickly.

COCONUT FLOUR:

  • Coconut flour is required in very small amounts as it absorbs moisture very effectively.

XANTHAN GUM:

  • Xanthan gum is added to thicken the consistency and stabilize the layers.

SALT:

  • Salt is added to balance the sweetness & improve the flavor overall.

ALMOND MILK:

  • Almond milk without sugar is used to make this custard cake and it is low in carbs and preserves the lightness of the custard.

HEAVY CREAM:

  • It is added in the dessert to prepare the rich & creamy dessert.

VANILLA EXTRACT:

  • It is added to the dessert to make this dish warm and rich.

BUTTER:

  • Butter is used to grease the dish as it helps the easy removal of the cake.

INSTRUCTION:

  1. We can preheat the oven to three-twenty-five degrees F.
  2. Then we can apply the butter in the pan to grease the dish.
  3. We can divide the eggs sprinkle salt and beat the eggs till we get the stiff peaks.
  4. Then add the Erythritol and yolks in another bowl till they get light and fluffy.
  5. We can add the xanthan gum and coconut flour and stir.
  6. Now we can add the heavy cream, vanilla, and warm almond milk to the dry ingredients by mixing continuously till it gets smooth.
  7. We can carefully fold the egg whites in three parts as the batter will be runny.
  8. Now we can add the batter in the pan and smooth the top layer with the spatula.
  9. We can put the cake to bake for 45 to 50 minutes, or until the center jiggles a little and the top is brown.
  10. When the cake gets cool down we can place the cake in the fridge to get set.
  11. We can slice the Keto Creamy Custard Cake with a knife and serve.

SERVING IDEAS:

  • We can top this custard cake with the keto whipped cream.
  • You can also dust the Erythritol powder on the cake.
  • We can also add fresh raspberries or strawberries to the cake.
  • You can also pour some keto-friendly chocolate sauce on the cake.
  • We can also garnish the mint on the cake.
  • You can also serve this cake with keto-friendly tea or coffee.

TIPS:

  • We should use the eggs at the ambient temperature.
  • You don’t have to mix the egg whites too much and fold them softly with the batter otherwise the egg whites will get deflated.
  • We can use a glass or metal pan for even baking.
  • You have to properly cool down the cake so we can make the clean slices.

STORAGE INFORMATION:

FRIDGE:

  • We can put the cake in a sealed box and preserve the cake for 5 days.

FREEZER:

  • We can cover the slice of the cake in plastic wrap and preserve the cake for one month.

FAQs:

Can we make this cake with the almond flour?

  • No, we can’t make this cake with the almond flour & we just have to use the coconut flour to make this cake as it absorbs moisture well; we have to reformulate the ingredients if we have to use the almond flour.

How to make a dairy-free cake?

  • We can use full-fat coconut cream in place of heavy cream to make this cake dairy-free.

NUTRITIONAL INFORMATION:

Fiber: 2g
Net Carbs: 4g
Protein: 6g
Fat: 18g
Sodium: 95mg
Calories: 210 kcal
Potassium: 120mg
Serving size: 1 slice
Total Carbs: 6g