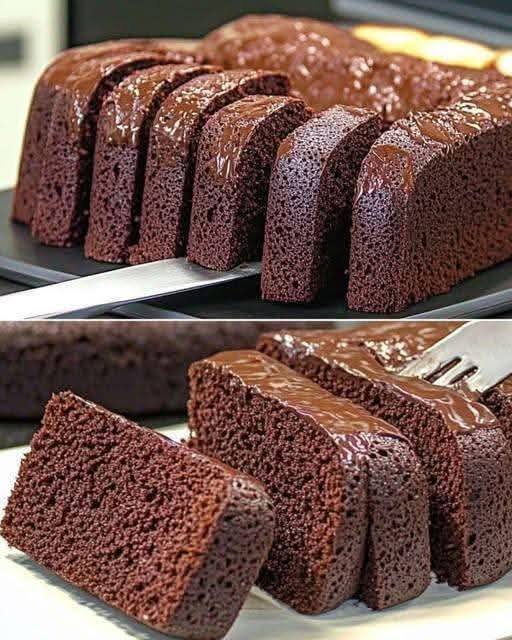
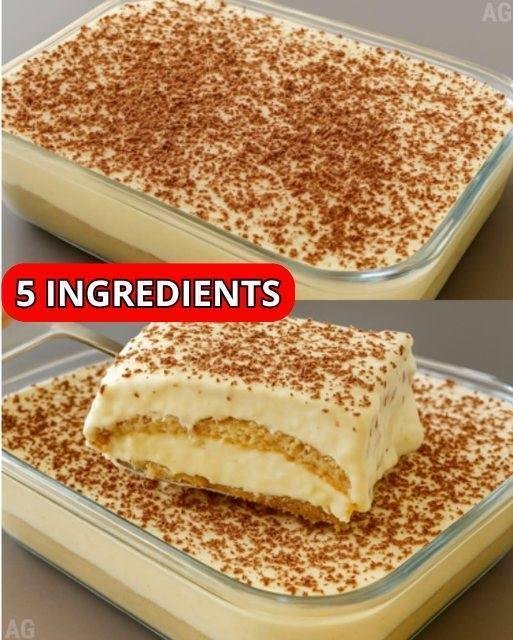
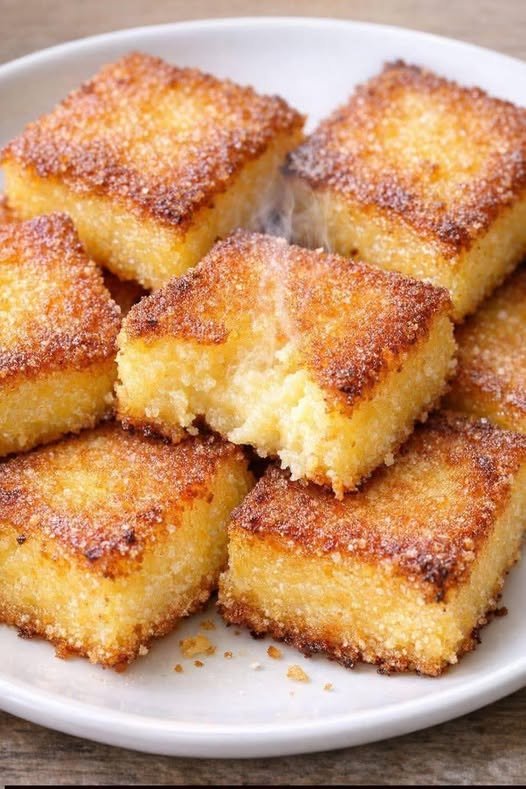
Lentil Salad with Roasted Vegetables

Lentil Salad with Roasted Vegetables

Ingredients

Roasted Vegetables:

1 sweet potato, diced

(250 g)

1 red bell pepper, chopped

(150 g)

1 zucchini, sliced

(150 g)

1 red onion, cut into wedges

(120 g)

2 tablespoons olive oil

(30 ml)

½ teaspoon salt

(3 g)

¼ teaspoon black pepper

(1 g)

½ teaspoon smoked paprika or cumin

(1 g)

Lentil Salad:

1 cup dry green or brown lentils

(200 g)

3 cups water or vegetable broth

(720 ml)

½ teaspoon salt

(3 g)

Fresh Add-Ins:

½ cup cherry tomatoes, halved

(75 g)

¼ cup chopped parsley or cilantro

(10 g)

¼ cup crumbled feta (optional)

(35 g)

Lemon Dressing:

3 tablespoons olive oil

(45 ml)

1½ tablespoons lemon juice

(22 ml)

1 teaspoon Dijon mustard

(5 g)

1 small garlic clove, grated

Salt and pepper, to taste

Directions

Preheat oven to 425°F / 220°C.

Toss sweet potato, bell pepper, zucchini, and red onion with olive oil, salt, pepper, and smoked paprika. Spread on a baking tray and roast for 30–35 minutes, flipping once, until tender and caramelized.

Meanwhile, rinse lentils and simmer in water or broth with salt for 18–22 minutes until just tender but not mushy. Drain and cool slightly.

Whisk together olive oil, lemon juice, Dijon, garlic, salt, and pepper to make the dressing.

In a large bowl, combine lentils, roasted vegetables, cherry tomatoes, and herbs. Toss gently with dressing.

Finish with feta if using. Serve warm or at room temperature.

Prep Time: 15 minutes

Cooking Time: 35 minutes

Total Time: 50 mi

nutes

Calories: ~380 kcal per serving

Servings: 4

Viral Creamy Protein Salad

Viral Creamy Protein Salad

This “everything but the kitchen sink” protein bowl is designed to keep you full for hours while hitting those savory, tangy cravings.


Ingredients

  • Protein Base:

    • 1 cup Cooked shredded chicken (rotisserie chicken works great here)

    • 1 Large boiled egg, chopped

  • The “Cream” Factor:

    • ½ cup Low-fat cottage cheese (small curd works best for texture)

    • 1 tbsp Light mayo or plain Greek yogurt

  • The Crunch & Zing:

    • ¼ cup Cucumber, finely diced

    • ¼ cup Pickles or pickled jalapeños, chopped

  • Seasonings:

    • ¼ tsp Garlic powder

    • Salt and black pepper to taste

    • Optional: 1 tsp Everything Bagel seasoning or a sprinkle of sharp cheddar


Instructions

  1. Prep the Base: In a medium mixing bowl, combine the shredded chicken and the chopped boiled egg. Use a fork to slightly mash the egg if you prefer a more cohesive “salad” texture.

  2. Add the Creaminess: Fold in the cottage cheese and the mayo (or Greek yogurt). Stir until the protein is evenly coated.

  3. Mix in the Crunch: Add the diced cucumbers and your choice of pickles or jalapeños.

  4. Season: Sprinkle in the garlic powder, salt, and pepper. Give it one final, thorough toss.

  5. Chill & Set: For the best flavor, cover and refrigerate for at least 15 minutes. This allows the seasonings to meld and the cottage cheese to firm up slightly.

  6. Serve: Enjoy it on its own, scooped into large romaine lettuce leaves, or as a high-protein dip with bell pepper slices or seed crackers.

Potato Cutlets

Potato Cutlets 

Potato Cutlets are a beloved comfort food found in various forms across the globe. Whether you call them Aloo Tikki, croquettes, or patties, the essence remains the same: a crispy, golden-brown exterior giving way to a soft, spiced mashed potato center. They are incredibly versatile—perfect as a tea-time snack, a party appetizer, or even as a patty for a homemade veggie burger.

Recipe Details

  • Prep time: 20 minutes

  • Cook time: 15 minutes

  • Servings: 4 (makes approx. 10–12 cutlets)

  • Dietary: Vegetarian, Gluten-free (if using GF breadcrumbs)

Ingredients

  • Potatoes: 4 large (boiled, peeled, and mashed)

  • Vegetables: ½ cup green peas (boiled) or finely chopped carrots (optional)

  • Aromatics: 1 medium onion (finely chopped), 2 green chilies (minced), 1 tsp ginger-garlic paste

  • Spices: 1 tsp cumin powder, 1 tsp chaat masala, ½ tsp red chili powder, ¼ tsp turmeric, salt to taste

  • Binding: 3 tbsp breadcrumbs or cornstarch

  • Fresh Herbs: ¼ cup fresh cilantro (chopped)

  • Oil: For shallow frying

Instructions

  1. Prepare the Base: In a large mixing bowl, combine the mashed potatoes and boiled peas. Ensure the potatoes are cooled to prevent the mixture from becoming sticky.

  2. Season: Add the chopped onions, chilies, ginger-garlic paste, cilantro, and all the dry spices. Mix thoroughly.

  3. Bind: Add the breadcrumbs or cornstarch. This absorbs excess moisture and ensures the cutlets don’t break apart while frying.

  4. Shape: Grease your palms with a little oil. Take a small portion of the mixture and roll it into a ball, then flatten it into a disc (about ½ inch thick).

  5. Fry: Heat oil in a non-stick skillet over medium heat. Place the cutlets in the pan (do not overcrowd). Fry for 3–4 minutes on each side until they reach a deep golden brown.

  6. Drain: Remove and place on paper towels to soak up any excess oil.

Nutritional Info (Per Serving – 3 Cutlets)

Nutrient Amount
Calories 210 kcal
Carbohydrates 32g
Protein 4g
Fat 8g (depending on oil used)
Fiber 5g

Tips for Success

  • Cold Potatoes: Use potatoes that have been boiled and refrigerated for an hour. This makes them less mushy and easier to shape.

  • Texture Check: If the mixture feels too wet, add an extra tablespoon of breadcrumbs.

  • High Heat: Don’t fry on low heat, or the cutlets will absorb too much oil and become greasy. Medium-high is the “sweet spot.”

Benefits

  • Energy Boost: High in complex carbohydrates, providing a steady release of energy.

  • Potassium Rich: Potatoes are an excellent source of potassium, which supports heart health and nerve function.

  • Customizable: You can easily sneak in finely grated beets or spinach to increase the fiber and vitamin content for kids.

Q&A

Q: Can I make these in an Air Fryer? A: Absolutely! Lightly brush the cutlets with oil and air fry at 200°C for 12–15 minutes, flipping halfway through.

Q: My cutlets are falling apart in the pan. Why? A: This usually happens if there is too much moisture in the potatoes or not enough binding agent. Try adding more breadcrumbs or a little bit of rice flour to the mix.

Q: Can I freeze them? A: Yes. Shape the patties and place them on a tray in the freezer for an hour. Once firm, transfer them to a zip-top bag. They stay fresh for up to a month. Fry them directly from frozen!

These healthy blueberry muffins

These are dense, flavorful, and naturally sweetened. The honey keeps them moist for days, and the whole wheat flour provides a satisfying heartiness that makes them perfect for a quick breakfast.Prep time: 10 minutesCook time: 18–22 minutesServings: 12 muffinsIngredientsIngredientAmountWhole wheat flour2 cupsBaking powder1 tspBaking soda½ tspFine sea salt½ tspGround cinnamon½ tspHoney (liquid)½ cupCoconut oil (melted) or Olive oil⅓ cupEggs (large, room temperature)2Greek yogurt (plain)½ cupVanilla extract1 tspFresh or frozen blueberries1 ½ cupsInstructionsPrep: Preheat your oven to 350°F (175°C). Grease a 12-cup muffin tin or line with paper liners.Dry Ingredients: In a large bowl, whisk together the flour, baking powder, baking soda, salt, and cinnamon.Wet Ingredients: In a medium bowl, whisk the honey and oil until combined. Add the eggs one at a time, beating well. Stir in the Greek yogurt and vanilla.Combine: Pour the wet ingredients into the dry. Fold gently with a spatula until just combined. Do not overmix, or the muffins will be tough.The Fruit: Gently fold in the blueberries. If using frozen, do not thaw them first (this prevents the batter from turning purple).Bake: Divide the batter evenly among the muffin cups. Bake for 18–22 minutes, or until a toothpick inserted into the center comes out clean.Cool: Let them sit in the tin for 5 minutes before transferring to a wire rack.Recipe Notes & TipsDon’t Overmix: This is the golden rule for whole wheat baking. Once the flour streaks disappear, stop stirring.Room Temp Eggs: Cold eggs can cause melted coconut oil to re-solidify into clumps. To warm eggs quickly, soak them in a bowl of warm water for 5 minutes.Blueberry Trick: Toss your blueberries in a teaspoon of flour before adding them to the batter; this helps prevent them from sinking to the bottom.Nutritional Info (Per Muffin)Calories: 185 kcalFiber: 3gProtein: 5gHealthy Fats: 7gSugars: 12g (Natural from honey/fruit)

Hearty Anti-Inflammatory Vegetable Soup

This soup is a vibrant, golden-hued bowl of wellness. It combines earthy root vegetables with the warmth of ginger and the “superfood” punch of turmeric. It’s light enough for a quick lunch but hearty enough to serve as a main course when paired with a crusty slice of sourdough.
Prep time: 15 mins
Cook time: 30 mins
Servings: 6 bowls
Ingredients
2 tbsp Extra virgin olive oil (or avocado oil)
1 medium Red onion, diced
3 cloves Garlic, minced
1 tbsp Fresh ginger, grated
1 tbsp Fresh turmeric, grated (or 1 tsp ground)
2 large Carrots, sliced into rounds
2 stalks Celery, chopped
1 large Sweet potato, peeled and cubed
1 head Broccoli, cut into small florets
1 can (15 oz) Chickpeas, rinsed and drained
6 cups Low-sodium vegetable broth
2 cups Kale or Spinach, de-stemmed and chopped
½ tsp Black pepper (crucial for turmeric absorption!)
1 tsp Sea salt (to taste)
1 tbsp Lemon juice (freshly squeezed)
Instructions
Sauté the Aromatics: In a large pot or Dutch oven, heat the oil over medium heat. Add the onion, celery, and carrots. Sauté for 5–7 minutes until the onion is translucent.
Add the “Healers”: Stir in the garlic, ginger, and turmeric. Cook for 1–2 minutes until fragrant, being careful not to burn the garlic.
Simmer the Veggies: Add the sweet potato cubes and chickpeas. Pour in the vegetable broth. Bring to a boil, then reduce heat to low. Cover and simmer for 15–20 minutes, or until the sweet potatoes are fork-tender.
The Green Finish: Stir in the broccoli and let it cook for another 4–5 minutes (this keeps it vibrant green and slightly crisp).
Final Touch: Turn off the heat. Stir in the kale (or spinach) and lemon juice. The residual heat will wilt the greens perfectly. Season with salt and black pepper.

Burn Belly Fat Like Crazy

Burn Belly Fat Like Crazy

INGREDIENTS
A small piece of ginger washed and diced into thin stripes
A cup of water
Freshly squeezed juice of half a lemon
Roasted jeera (cumin) powder

INSTRUCTIONS
Add the ginger and water in a blender and mix it well till it forms a smooth mixture.
Now pour this out into a glass and add the lemon juice.
Mix this well.
Add a pinch of roasted jeera powder and mix it well again.
Your ginger lemon water is ready to drink.

ASimple”RiceMethod”ThatLiquifiesFatEvery24Hours


It’s true… I sank from 207 to a lean 135… And I’ll never forget the look on my doctor’s face when I walked into his office for my annual exam.

He stuttered out, “Are you doing that Exotic Rice Hack I told you about?”

So I told him I’d been doing it for a few months now, and it completely changed my life and health.

The best part? People are noticing and asking what I’m doing differently.

This is the first time in a very long time I’ve felt this good about myself.

So maybe this can help you too?

Orange & Carrot Ginger Glow Juice

Orange & Carrot Ginger Glow Juice

Ingredients

  • 3 Large Oranges: Peeled and halved (Navel or Valencia oranges work best for juice).

  • 2 Large Carrots: Scrubbed, peeled, and chopped into chunks.

  • 1-inch knob of Fresh Ginger: Peeled (adjust based on how much “zing” you like).

  • Optional: A splash of lemon juice for extra brightness or a pinch of turmeric for anti-inflammatory benefits.

  • For Smoothie Version: Add 1/2 cup of water or coconut water and some ice cubes.


Instructions

Option 1: Using a Juicer (Best for a clear juice)

  1. Prep: Wash all produce thoroughly. Peel the oranges and ginger.

  2. Juice: Feed the carrots, ginger, and oranges through your juicer one by one.

  3. Serve: Stir the juice to combine the flavors and pour into a glass over ice. Drink immediately for the most nutrients.

Option 2: Using a Blender (Best for a fiber-rich smoothie)

  1. Prep: Peel the oranges and remove as much of the white pith as possible. Peel and roughly chop the carrots and ginger.

  2. Blend: Place all ingredients into a high-speed blender. Add 1/2 cup of water or ice to help it blend smoothly.

  3. Liquify: Blend on high until completely smooth.

  4. Strain (Optional): If you prefer a thinner juice without the pulp, pour the mixture through a fine-mesh nut milk bag or sieve, pressing down with a spoon to extract all the liquid.


Tips for the Best Flavor

  • Sweetness: If your carrots aren’t very sweet, you can add a small slice of red apple to the mix.

  • Coldness: Chill your fruits and vegetables in the fridge beforehand so the juice is cold and refreshing the moment it’s made.

  • Storage: Fresh juice is best consumed within 24 hours. Store it in a glass jar with a tight lid in the refrigerator.

Triple Berry Cream Smoothie

Triple Berry Cream Smoothie

Ingredients

  • 1 cup frozen mixed berries (blueberries, raspberries, and strawberries)

  • 1 ripe banana (fresh or frozen for extra thickness)

  • 1 cup milk of your choice (dairy, almond, or oat milk work great)

  • 1/2 cup Greek yogurt (plain or vanilla)

  • 1 tbsp honey or maple syrup (optional, for added sweetness)

  • A splash of vanilla extract


Instructions

  1. Prep the Fruit: If you are using fresh berries instead of frozen, add 1/2 cup of ice to the blender to ensure you get that thick, chilled consistency seen in the photo.

  2. Combine: Add the milk and yogurt to the blender first. Adding liquids first helps the blades spin more freely and prevents sticking.

  3. Add Solids: Add the mixed berries, banana, and your sweetener of choice.

  4. Blend: Start the blender on a low setting and gradually increase to high. Blend for 45–60 seconds until completely smooth and the berry skins are finely incorporated.

  5. Serve: Pour into a tall glass. If you want to match the image perfectly, garnish with a few fresh berries on the side!


Tips for the Perfect Texture

  • For a Thicker Smoothie: Use a frozen banana. It acts like “healthy ice cream” and creates a much creamier texture than ice cubes.

  • For Extra Nutrition: Feel free to toss in a small handful of spinach (it won’t change the flavor much) or a tablespoon of chia seeds.

  • Adjusting Consistency: If it’s too thick, add a splash more milk. If it’s too thin, add more frozen fruit or a few ice cubes.

Creamy Ice Cream with Condensed Milk

Creamy Ice Cream with Condensed Milk

Description

This Creamy Ice Cream with Condensed Milk is a rich, velvety, and easy-to-make frozen dessert that requires no eggs or special machine. It’s made using only a few simple ingredients — condensed milk, whipped cream, and vanilla — resulting in a luscious, smooth texture and melt-in-your-mouth goodness. Perfect for a hot summer day or any time you crave a sweet treat!

 Ingredients For Creamy Ice Cream with Condensed Milk

  • 2 cups (480 ml) heavy whipping cream, chilled

  • 1 can (14 oz / 400 g) sweetened condensed milk

  • 1 tsp vanilla extract (or any preferred flavoring)

  • Optional mix-ins: chocolate chips, nuts, caramel, fruit puree, etc.]

Instructions:

  1. Whip the Cream:
    In a large chilled bowl, beat the heavy cream with an electric mixer on medium-high speed until stiff peaks form (about 3–4 minutes).

  2. Mix Condensed Milk & Flavoring:
    In another bowl, whisk together the condensed milk and vanilla extract (or other flavors like cocoa powder, coffee, or fruit puree).

  3. Combine:
    Gently fold the whipped cream into the condensed milk mixture. Use a spatula to mix carefully — keep the mixture airy for that light, creamy texture.

  4. Add Mix-ins (Optional):
    Fold in chocolate chips, fruit bits, or nuts if desired.

  5. Freeze:
    Pour the mixture into an airtight container, smooth the top, and cover with plastic wrap or a lid.
    Freeze for at least 6 hours or overnight until firm.

  6. Serve:
    Scoop and enjoy! For easier scooping, let the ice cream sit at room temperature for 5 minutes before serving.

 Notes:

  • Keep your cream very cold before whipping — it helps create better volume and texture.

  • Don’t overmix after combining; it can make the texture dense.

  • You can divide the base into smaller containers and flavor each one differently (chocolate, strawberry, coffee, etc.).

 Tips:

  • Add a pinch of salt to balance sweetness.

  • For chocolate ice cream: mix ¼ cup cocoa powder with the condensed milk before folding in the whipped cream.

  • For fruity flavors: swirl in ½ cup fruit puree like mango or strawberry before freezing.

  • Use sweetened condensed milk, not evaporated milk.

 Servings:

Makes about 6–8 scoops (4–5 servings).

 Nutritional Info (per serving):

Nutrient Amount
Calories ~290 kcal
Protein 4 g
Fat 18 g
Carbohydrates 28 g
Sugar 26 g
Calcium 110 mg

Benefits:

  • Homemade & preservative-free – You control the ingredients.

  • Quick & easy – No machine or eggs required.

  • Customizable – Add your favorite mix-ins or flavorings.

  • Rich in calcium & energy, making it a delicious indulgence.

❓ Q&A:

Q1: Can I make this without heavy cream?
A: You can use chilled whipping cream or non-dairy alternatives like coconut cream, but texture may vary.

Q2: How long does it last?
A: Store in an airtight container in the freezer for up to 2 weeks.

Q3: Can I make it sugar-free?
A: Yes! Use sugar-free condensed milk and unsweetened whipping cream.

Q4: How can I make it extra creamy?
A: Add 1 tbsp of cream cheese or milk powder to the condensed milk before mixing.

Fresh Mint & Ginger Lemonade

Fresh Mint & Ginger Lemonade

Ingredients

  • Fresh Mint: 1 large handful (stems removed).

  • Lemon: 1 to 2 large lemons (juiced).

  • Ginger: A 1-inch piece (peeled and sliced).

  • Water: 2 to 3 cups of chilled water (or coconut water for extra electrolytes).

  • Sweetener (Optional): 1 tablespoon of honey, maple syrup, or a few drops of stevia.

  • Ice: For serving.

Instructions

  1. Prep the Ingredients: Wash the mint leaves thoroughly and peel the ginger skin using the edge of a spoon or a peeler.

  2. Blend: Place the mint leaves, ginger slices, lemon juice, and sweetener (if using) into a high-speed blender. Add 1 cup of water.

  3. Liquefy: Blend on high until the mint and ginger are completely broken down and the liquid is a bright, frothy green.

  4. Dilute: Add the remaining water and pulse briefly to combine.

  5. Strain (Optional): If you prefer a very smooth juice (like the one in the bottom-right photo), pour the mixture through a fine-mesh strainer or nut milk bag into a pitcher. If you like the extra fiber, you can skip this step.

  6. Serve: Pour into glasses over ice. Garnish with a fresh mint sprig and a lemon slice.


Quick Tips

  • For a Fizz: Replace the still water with sparkling water or club soda just before serving.

  • Spice Level: Ginger can be quite strong! If you aren’t used to it, start with a smaller half-inch piece and add more to taste.

  • Temperature: This drink is best served ice-cold.

Creamy Avocado & Banana Power Smoothie

Creamy Avocado & Banana Power Smoothie

Prep time: 5 minutes | Servings: 1-2


Ingredients

1 ripe avocado (pitted and peeled)


1 large ripe banana (frozen slices work best for a thicker texture)


1/4 cup raw almonds (or 1 tablespoon of almond butter)


1 1/2 cups almond milk (unsweetened)


1 tablespoon honey or maple syrup (optional, for extra sweetness)


A handful of ice cubes (if using fresh fruit instead of frozen)


Instructions

Prep the base: Place the almonds in the blender first and pulse until they are finely ground to ensure a smooth texture.


Combine: Add the avocado, banana, almond milk, and sweetener (if using) to the blender.


Blend: Start on a low speed and gradually increase to high. Blend for about 45–60 seconds until the mixture is completely smooth and pale green.


Adjust: If the smoothie is too thick, add a splash more almond milk. If you prefer it colder, add a few ice cubes and blend again.


Serve: Pour into glasses and garnish with a few almond slivers or a slice of banana on top.


Nutritional Benefits

Healthy Fats: The avocado provides monounsaturated fats which are great for heart health.


Potassium: Both the banana and avocado are excellent sources of potassium.


Fiber: This combination keeps you feeling full and satisfied for longer.

Raspberry Banana Crunch Parfaits

Raspberry Banana Crunch Parfaits

Yields: 2 large parfaits | Prep time: 20 minutes

Ingredients

The Fruit Layers

  • Fresh Raspberries: 2 cups (divided)

  • Banana: 1 large, sliced into rounds

  • Raspberry Jam: 2 tablespoons (to sweeten the berry layers)

The Creamy Layers

  • Greek Yogurt or Vanilla Pudding: 1.5 cups (you can use pink-tinted raspberry yogurt for the darker pink layers and plain vanilla/white for the center stripe)

  • Whipped Cream: 1 cup (heavy cream whipped with a little powdered sugar)

The Crunch & Toppings

  • Granola or Honey-Roasted Nuts: ½ cup (chopped walnuts or peanuts work great)

  • Dark Chocolate: 2 oz, melted (for the drizzle)

  • Extra Toppings: A few whole raspberries and banana slices for the garnish


Instructions

  1. Prepare the Raspberry Compote: In a small bowl, lightly mash 1 cup of the raspberries with the raspberry jam. This creates that juicy, deep red layer seen in the photo. Keep the remaining whole raspberries for the middle and top.

  2. Melt the Chocolate: Break the chocolate into pieces and melt it in 20-second intervals in the microwave, stirring until smooth. Set aside to cool slightly.

  3. Build the Base: In two tall glasses, start with a thick layer of pink raspberry yogurt. Follow this with a spoonful of your mashed raspberry compote.

  4. Create the Contrast: Add a thin, clean layer of white vanilla yogurt or whipped cream to create that bright center stripe.

  5. Add Texture: Add another layer of pink yogurt, followed by a layer of whole raspberries and a generous handful of granola or chopped nuts.

  6. The Topping: Pipe or spoon a large swirl of whipped cream onto the very top.

  7. Final Flourish: Arrange a few banana slices and whole raspberries on top of the cream. Drip the melted chocolate over the fruit and cream so it runs down the sides. Sprinkle a few more nuts over the top.


Pro-Tips for Presentation

  • Clean Lines: Use a long spoon or a piping bag to drop the yogurt into the glass without smearing the sides.

  • Chill: Let the parfaits sit in the fridge for about 15 minutes before serving to help the layers set.

Sugar-Free Banana & Blueberry Pancakes

Sugar-Free Banana & Blueberry Pancakes

Soft, satisfying, and ready in just 15 minutes.

  • Prep time: 5 minutes

  • Cook time: 10 minutes

  • Servings: 2–3 people

Ingredients

  • 1 Large Ripe banana (the riper it is, the sweeter your pancakes will be)

  • 1 Large egg

  • 1 cup All-purpose flour (you can also use whole wheat or oat flour)

  • 1 tsp Baking powder

  • ½ cup Fresh blueberries

  • For cooking: A small amount of butter or coconut oil


Instructions

  1. Mash the Banana: In a medium mixing bowl, mash the banana with a fork until it reaches a smooth, puree-like consistency.

  2. Mix Wet Ingredients: Add the egg to the mashed banana and whisk until well combined and homogenous.

  3. Add Dry Ingredients: Stir in the flour and baking powder. Mix until you have a smooth batter. If the batter feels too thick, you can add a splash of milk to reach your desired consistency.

  4. Gently Fold: Add the blueberries to the batter and fold them in gently with a spatula, taking care not to crush the berries.

  5. Heat the Pan: Lightly grease a non-stick skillet or griddle and place it over medium heat.

  6. Cook: Spoon about one tablespoon of batter per pancake onto the hot pan.

  7. Flip: Once bubbles begin to form on the surface, flip the pancakes. Cook both sides until they are a beautiful golden brown.

  8. Serve: Enjoy them warm! Feel free to top them with honey, nut butter, or extra fresh fruit for added flavor.


Attractive Social Media Captions

Option 1: The “Healthy Start” Caption

🍌🫐 No Sugar, All Flavor! 🥞✨

Looking for a breakfast that’s incredibly filling and guilt-free? These 15-minute Banana Blueberry Pancakes are a total game-changer. Naturally sweet and perfectly fluffy!

#HealthyBreakfast #SugarFreeRecipes #PancakeArt #CleanEating #BreakfastIdeas

Option 2: The “Simple & Practical” Caption

Breakfast or coffee break? Why not both! ☕️ These pancakes are so practical and easy to whip up. Top them with a drizzle of honey or some dark chocolate for the ultimate treat. 😍

#QuickRecipes #HealthySnacks #BananaPancakes #BlueberryLove #EasyCooking

Option 3: The “Family Favorite” Caption

A recipe the kids will love and you can feel good about serving! 👶🍼 Nutrient-dense, sugar-free, and packed with fruit. Save this for your next weekend brunch! 👇🏼

#FamilyMeals #KidFriendlyFood #HealthyPancakes #SugarFreeKids #BrunchGoals

Creamy Potato & Cheese Bake with Savory Layers

Creamy Potato & Cheese Bake with Savory Layers

There’s something so comforting about a warm dish of Potato and Cheese Bake. This recipe has become a favorite among home cooks, and it’s easy to see why! It combines tender potatoes with creamy cheese and savory ingredients, creating a deliciously rich and satisfying meal. Perfect for family dinners or when you’re having friends over, this dish not only fills your stomach but also your heart. Plus, it’s super easy to make, even if you’re not a seasoned chef!


What Goes Into This Potato and Cheese Bake

Here’s what you’ll need to whip up this delightful dish:


1 kilogram (about 2.2 pounds) of potatoes

3 tablespoons olive oil

2 teaspoons salt

Black pepper to taste

5 eggs

300 ml (about 1 ¼ cups) cooking cream

1 tomato, diced

A bunch of green onions, diced

100 grams (about 3.5 ounces) of ham, diced

200 grams (about 7 ounces) of yellow cheese, grated

Garlic powder to taste

2 tablespoons butter

1 tablespoon breadcrumbs

How to Make Potato and Cheese Bake

Follow these simple steps to create your own Potato and Cheese Bake:


Start by peeling the potatoes and slicing them into rounds. In a bowl, toss the sliced potatoes with olive oil, salt, and black pepper. Mix in 50 grams of grated yellow cheese for extra flavor.

Grease a baking dish with butter and sprinkle the bottom with breadcrumbs. Arrange the seasoned potatoes in the dish, making sure to cover the sides. Bake in a preheated oven at 200 degrees Celsius (about 400 degrees Fahrenheit) for 15 minutes.

While the potatoes are baking, grab a separate bowl and beat together the eggs, cooking cream, a pinch of black pepper, salt, and a sprinkle of garlic powder.

Next, wash, peel, and dice the tomato, green onions, and ham. Don’t forget to grate the remaining yellow cheese. Add all these ingredients to the egg mixture and combine well.

Once 15 minutes is up, take the potatoes out of the oven and gently pour the cream mixture over them. Return the dish to the oven and bake for an additional 30 minutes at 180 degrees Celsius (about 350 degrees Fahrenheit), until everything is set and golden.

Why This Potato and Cheese Bake Is So Popular Right Now

People are loving this Potato and Cheese Bake for a few key reasons. First, it’s a fantastic comfort food option that warms you up, especially in colder weather. With the rise of home cooking trends, this dish offers a nostalgic taste that many are eager to recreate. It’s also incredibly convenient; using simple ingredients, you can whip up a filling meal without spending hours in the kitchen. Taking just one hour from start to finish makes it a quick choice for weeknight dinners too!

Best Ways to Serve It

You can enjoy Potato and Cheese Bake for any meal of the day! It makes a fabulous breakfast alongside fresh fruit or a light salad at lunch. For dinner, pair it with steamed vegetables or a crisp garden salad to balance out the richness. Want to add a special touch? Top it with some fresh herbs right before serving or a dollop of sour cream for that extra creamy finish.


Helpful Tricks

Storage Tips: If you have leftovers, store them in an airtight container in the refrigerator for up to 3 days. Reheat in the oven for best results.

Flavor Variations: Feel free to add more veggies like bell peppers or spinach to boost the nutrition.

Cheese Swap: You can experiment with different types of cheese. A sharp cheddar or a creamy gouda can add new flavors!

Potato and Cheese Bake FAQs

Can I freeze Potato and Cheese Bake?


Yes, you can freeze it! Just make sure to let it cool completely before wrapping it tightly and placing it in the freezer. It should last for up to 3 months.


How do I know when it’s done baking?

The dish is ready when the top is golden brown and a knife inserted in the center comes out clean.


Can I use a different kind of cream?


Absolutely! If you want a lighter option, you can use half-and-half or even milk for a lower-fat version.


Try making this Potato and Cheese Bake at home and enjoy the comforting flavors it brings to your table. It’s an easy recipe that’s sure to please everyone! Happy cooking!

Cheesy Herb Bread Bake (10-Minute Prep)

Cheesy Herb Bread Bake (10-Minute Prep)

Description

This ultra-comforting Cheesy Herb Bread Bake is crisp and golden on the outside, soft and melty inside, and bursting with garlic, herbs, and cheese. It comes together in just 10 minutes of prep, bakes beautifully in a loaf pan, and disappears fast at parties. Perfect as a side dish, appetizer, or cozy dinner companion.


Ingredients

1 loaf crusty bread or French bread (about 12–14 oz), cubed or sliced


2 cups shredded mozzarella cheese


1 cup shredded cheddar or Gruyère


3 large eggs


1 cup whole milk or half-and-half


3 tbsp melted butter


2 cloves garlic, finely minced


1 tbsp fresh dill or parsley, chopped (plus more for topping)


1 tsp dried thyme or Italian seasoning

½ tsp salt


½ tsp black pepper


Instructions

Preheat oven to 375°F (190°C). Grease a loaf pan.


Layer bread evenly in the pan.


In a bowl, whisk eggs, milk, butter, garlic, salt, pepper, and herbs.


Pour mixture evenly over bread.


Sprinkle cheeses generously on top.


Bake uncovered for 30–35 minutes until bubbly and deeply golden.


Rest 5 minutes, garnish with herbs, and serve warm.


Tips & Notes

Use day-old bread for best texture.

Swap dill for chives or rosemary if preferred.


For extra richness, add ¼ cup sour cream to the egg mixture.


Want a crispier top? Broil for the last 2 minutes.


Servings

6–8 servings


Nutritional Information (per serving, approx.)

Calories: 290


Protein: 14g


Fat: 18g


Carbohydrates: 18g


Calcium: 25% DV


Benefits

High in protein & calcium

Comforting yet simple ingredients


Crowd-pleasing and kid-friendly


Great way to use leftover bread


Recipe Q & A

Q: Can I make this ahead of time?

Yes! Assemble, cover, and refrigerate up to 12 hours. Bake fresh.


Q: Can I freeze it?

Absolutely. Freeze after baking, reheat covered at 350°F.


Q: Can I add extras?

Yes—crispy bacon, caramelized onions, or sautéed mushrooms are excellent additions.


Q: What should I serve it with?

Soups, salads, roasted chicken, or as a standalone appetizer


Creamy Lemon Cheesecake Mousse (No-Bake Dessert)

Creamy Lemon Cheesecake Mousse (No-Bake Dessert)

This smooth and creamy lemon dessert combines the richness of cream cheese with fresh citrus flavor. It requires no oven and can be prepared in minutes.

Preparation Time: 10 minutes
Chilling Time (optional but recommended): 30 minutes
Servings: 4


🧾 Ingredients

  • 225 g (8 oz) cream cheese, softened at room temperature

  • 240 ml (1 cup) heavy whipping cream, cold

  • 120 g (½ cup) powdered sugar, adjust to taste

  • 60 ml (¼ cup) freshly squeezed lemon juice

  • 1 tablespoon lemon zest, finely grated

  • 1 teaspoon vanilla extract


👩‍🍳 Instructions

Step 1: Whip the Cream

  1. Place a mixing bowl and beaters in the refrigerator for 10 minutes before use (this helps the cream whip properly).

  2. Pour the cold heavy whipping cream into the chilled bowl.

  3. Beat using an electric mixer on medium-high speed until thick and firm peaks form.

  4. Place the whipped cream in the refrigerator while preparing the base mixture.


Step 2: Prepare the Cream Cheese Mixture

  1. Add the softened cream cheese to a large mixing bowl.

  2. Beat with an electric mixer on medium speed until completely smooth.

  3. Add the powdered sugar gradually and continue beating until fully blended and free of lumps.


Step 3: Add Flavoring

  1. Pour in the lemon juice slowly while mixing on low speed.

  2. Add lemon zest and vanilla extract.

  3. Mix just until evenly combined. Do not overmix.


Step 4: Combine Mixtures

  1. Remove the whipped cream from the refrigerator.

  2. Add it to the lemon cream cheese mixture in three portions.

  3. Gently fold using a spatula with slow, circular movements until fully blended.
    (Do not stir aggressively — this keeps the texture light and smooth.)


Step 5: Portion and Chill

  1. Spoon or pipe the mousse into serving glasses or bowls.

  2. Refrigerate for at least 30 minutes for better texture and flavor.


🍋 Garnishing Ideas (Optional)

  • Sprinkle with fresh lemon zest

  • Add thin lemon slices

  • Top with crushed biscuits or cookie crumbs

  • Add a few fresh mint leaves


✅ Storage

Keep refrigerated in a covered container for up to 2 days.

Mediterranean Fruit & Nut Shortbread

Mediterranean Fruit & Nut Shortbread

Buttery, zesty, and perfectly crisp cookies studded with jewel-toned fruits and crunchy nuts.

  • Prep time: 15 minutes (plus chilling)

  • Bake time: 12–15 minutes

  • Yields: Approx. 24 cookies

Ingredients

The Dry Base

  • 2 cups All-purpose flour

  • ¼ cup Fine semolina (adds a traditional, delicate crunch)

  • ½ tsp Baking powder

  • ¼ tsp Sea salt

The Aromatics & Fats

  • ¾ cup Unsalted butter, softened (For a true Mediterranean profile, use ½ cup butter + ¼ cup mild olive oil)

  • ¾ cup Powdered sugar (confectioners’ sugar)

  • 1 tbsp Fresh lemon or orange zest

  • 1 tsp Pure vanilla extract

The Textures

  • ½ cup Dried cranberries or cherries, roughly chopped

  • ½ cup Pistachios or almonds, chopped

  • Optional: 1 tbsp sesame seeds or a pinch of ground anise for extra depth.


Instructions

  1. Cream the Base: In a large bowl, beat the softened butter (and olive oil, if using) with the powdered sugar until the mixture is pale, light, and smooth. Stir in the citrus zest and vanilla extract until fragrant.

  2. Combine Dry Ingredients: In a separate medium bowl, whisk together the flour, semolina, baking powder, and salt.

  3. Form the Dough: Gradually fold the dry ingredients into the butter mixture. Mix just until a cohesive dough forms—do not overwork it, or the shortbread will lose its tender texture.

  4. Fold in Jewels: Gently fold in your chopped dried fruits, nuts, and any optional seeds/spices until evenly distributed.

  5. Shape and Chill: Place the dough on a piece of plastic wrap or parchment paper. Shape it into a log approximately 5 cm (2 inches) in diameter. Wrap it tightly and refrigerate for at least 1–2 hours. This step is crucial to ensure the cookies hold their shape when sliced.

  6. Prep the Oven: Preheat your oven to 170°C (340°F) and line a large baking sheet with parchment paper.

  7. Slice and Bake: Use a sharp knife to slice the chilled log into rounds about 1 cm (½ inch) thick. Place them on the prepared tray, leaving a little space between each. Bake for 12–15 minutes or until the edges are just barely golden.

  8. Cool: Allow the cookies to firm up on the baking sheet for 5 minutes before transferring them to a wire rack to cool completely.

Crispy Air Fryer Baked Potatoes

Crispy Air Fryer Baked Potatoes

Prep time: 5 minutes | Cook time: 35–45 minutes

Ingredients

  • Russet potatoes (as many as you need, but do not crowd the air fryer)

  • 1-2 tbsp Olive oil

  • Salt (to taste)

  • Preferred Toppings: Butter, sour cream, chives, or shredded cheese


Instructions

  1. Prep the Potatoes: Scrub the potatoes thoroughly under cold water to remove any dirt. Pat them completely dry with a towel. Dry skin is the secret to maximum crispiness.

  2. Pierce the Skin: Use a fork to prick each potato 5–6 times. This allows steam to escape during the cooking process.

  3. Oil and Season: Rub the outside of each potato generously with olive oil. Sprinkle with salt, ensuring an even coating.

  4. Air Fry: Place the potatoes in the air fryer basket. Ensure there is space between them for air to circulate.

  5. Cook Time: Cook at 200°C (400°F) for 35–45 minutes. Halfway through (at about the 20-minute mark), use tongs to flip the potatoes over to ensure even browning.

    • Note: Smaller potatoes may take 30 minutes, while very large ones may need up to 50 minutes. They are done when the skin is crisp and the center feels soft when pierced with a knife.

  6. Serve: Carefully remove the potatoes. Slice them down the center, fluff the insides with a fork, and add your favorite sugar-free toppings like butter and fresh chives.

4-Ingredient Low-Carb Butter Cookies

4-Ingredient Low-Carb Butter Cookies

Prep time: 10 minutes | Cook time: 15 minutes | Total time: 25 minutes

Ingredients

  • 1 ½ cups Almond flour (super-fine provides the best texture)

  • 1/3 cup Unsalted butter, softened to room temperature

  • 3 tbsp Powdered monk fruit sweetener (or your preferred powdered sugar substitute)

  • 1 tsp Vanilla extract


Instructions

  1. Cream the Base: In a medium mixing bowl, cream together the softened butter and the powdered sweetener until the mixture is pale and fluffy. Stir in the vanilla extract.

  2. Incorporate Flour: Gradually add the almond flour to the butter mixture. Stir with a spatula until a soft, uniform dough forms. It should be pliable but not overly sticky.

  3. Shape the Cookies: Preheat your oven to 175°C (350°F) and line a baking sheet with parchment paper. To achieve the beautiful swirled look seen in the image, transfer the dough to a piping bag fitted with a large star tip. Pipe 1-inch swirls onto the baking sheet.

    • Note: If the dough is too thick to pipe, you can roll them into small balls and flatten them slightly with a fork or a stamp.

  4. Bake: Bake for 12–15 minutes. Watch them closely—they are done when the edges just start to turn a very light golden brown.

  5. The Cooling Rule: These cookies are very delicate when warm. Let them cool completely on the baking sheet for at least 15 minutes. They will firm up and develop that classic “snap” as they cool.


Why This Recipe is a Winner

  • Beginner Friendly: With no eggs or leavening agents to worry about, it is nearly impossible to mess these up.

  • Low Carb: By using almond flour instead of wheat flour, these cookies are naturally gluten-free and keto-friendly.

  • Quick Treat: You can go from craving to eating in less than half an hour.

Zesty Salmon Bites with Mustard Cream Sauce

Zesty Salmon Bites with Mustard Cream Sauce

A high-protein, heart-healthy dish that’s elegant enough for guests but easy enough for a weeknight.

Ingredients

For the Salmon:

  • 1 lb (450g) skinless salmon fillet, cut into 1-inch bite-sized cubes

  • 1 tbsp olive oil

  • 1/2 tsp garlic powder

  • Salt and black pepper, to taste

  • Optional: A pinch of paprika or chili flakes for a gentle warmth

For the Mustard Cream Sauce:

  • 2 tbsp Dijon mustard

  • 1/4 cup Greek yogurt or sour cream (unsweetened)

  • 1 tsp lemon juice

  • 1/2 tsp garlic powder

  • Salt and pepper to taste

Toppings:

  • Fresh chopped chives or parsley for a burst of color and freshness


Instructions

  1. Season the Salmon: In a medium bowl, gently toss the salmon cubes with olive oil, garlic powder, salt, pepper, and your optional spices until every piece is evenly coated.

  2. Sear to Perfection: Heat a large non-stick skillet over medium-high heat. Once hot, add the salmon cubes in a single layer (do not overcrowd the pan).

  3. The Golden Crust: Sear the cubes for 2–3 minutes per side. You want a beautiful golden-brown crust while keeping the inside tender. Remove from heat and set aside on a plate.

  4. Whisk the Sauce: In a small bowl, combine the Dijon mustard, Greek yogurt, lemon juice, and seasonings. Whisk until smooth and creamy.

  5. Assemble: Arrange the salmon bites on a serving platter. Drizzle a small amount of the mustard cream sauce over each piece, or place a neat dollop on top using a small spoon.

  6. Garnish: Finish with a generous sprinkle of fresh chives or parsley. Serve warm.

Mediterranean Creamy Lemon Mousse

Mediterranean Creamy Lemon Mousse

Creamy Lemon Mousse is one of those desserts that feels light, refreshing, and indulgent all at once. It’s smooth, airy, and perfectly balanced between sweet and tangy, making it an ideal finish to almost any meal. What makes this version especially appealing is its simplicity. With just a handful of ingredients, you can create a dessert that looks elegant enough for guests but is easy enough for everyday cravings. The cold whipping cream provides a fluffy base, condensed milk adds richness and sweetness, and fresh lemon juice brings everything to life with bright citrus flavor. Served chilled and topped with lemon zest, this mousse is proof that simple desserts can still feel special.

Prep Time: 15 minutes

Chilling Time: 2 hours

Total Time: 2 hours 15 minutes

Servings: 4 to 6

Ingredients

1½ cups heavy whipping cream, very cold

¾ cup sweetened condensed milk

¼ cup fresh lemon juice (about 2 lemons)

Zest of 1 lemon, for garnish

Extra lemon zest for serving

Optional: additional lemon juice for extra tang

Optional: whipped cream for topping

Optional: mint leaves for garnish

Optional: crushed biscuits for serving

Optional: pinch of extra zest mixed into the mousse

Instructions

Place the cold heavy whipping cream into a large mixing bowl.

Using a hand mixer or stand mixer, whip the cream on medium speed until soft peaks form.

Reduce the mixer speed to low and slowly pour in the condensed milk.

Continue mixing gently until the condensed milk is fully incorporated.

See also  Simply Mix Together 1 Cup of Oatmeal and Zucchini: Better than Pizza, Eat at Least Daily

Add the fresh lemon juice gradually while mixing on low speed.

Increase the speed slightly and mix until the mousse thickens and holds its shape.

Taste the mousse and adjust with a little more lemon juice if needed.

Spoon the mousse into serving glasses or bowls.

Cover and refrigerate for at least 2 hours to fully set.

Garnish with lemon zest just before serving.

Tips

Make sure the whipping cream is very cold for maximum volume.

Chill the mixing bowl for a few minutes before whipping for better results.

Add the condensed milk slowly to avoid deflating the cream.

Use freshly squeezed lemon juice for the best flavor.

Add lemon juice gradually so you can control the tartness.

Stop mixing as soon as the mousse thickens to avoid overwhipping.

If the mousse feels loose, chill it longer rather than remixing.

Zest the lemon before juicing it for easier handling.

Keep the mousse refrigerated until just before serving.

Garnish at the last moment for the freshest look.

Variations

Make it extra tangy by increasing the lemon juice slightly.

Fold a little lemon zest directly into the mousse for stronger citrus aroma.

Serve layered with crushed biscuits for added texture.

Pipe the mousse into glasses for a more polished presentation.

Top with a swirl of whipped cream for added richness.

Serve in small portions for a lighter dessert option.

Chill overnight for an even firmer texture.

Use lime juice instead of lemon for a different citrus twist.

Add a thin biscuit base at the bottom of each glass.

Garnish with mint leaves for a fresh finish.

See also  Shrimp broth is a traditional coastal dish

Q & A

Why did my mousse not thicken?
The cream may not have been cold enough or was underwhipped.

Can I make this dessert ahead of time?
Yes, it can be made up to 24 hours in advance.

Can I freeze lemon mousse?
Freezing is not recommended as it can affect the texture.

Is this mousse very sweet?
It’s balanced, but you can add more lemon juice to reduce sweetness.

Can I use bottled lemon juice?
Fresh lemon juice is best, but bottled can work in a pinch.

How long does it keep in the fridge?
Up to 2 days when covered properly.

Can I overwhip the cream?
Yes, overwhipping can make the mousse grainy.

Does the lemon juice help thicken it?
Yes, lemon juice reacts with condensed milk to help set the mousse.

Can I serve it immediately?
It’s best chilled so it fully sets and develops flavor.

Is this dessert suitable for kids?
Yes, it’s gentle and refreshing, perfect for all ages.

Nutrition

(Per Serving, Approximate)

Calories: 320

Protein: 5 g

Fat: 22 g

Carbohydrates: 26 g

Sugar: 24 g

Fiber: 0 g

Sodium: 90 mg

Conclusion

Creamy Lemon Mousse is a dessert that delivers maximum satisfaction with minimal effort. Its light texture, bright lemon flavor, and smooth finish make it a reliable favorite for both casual meals and special occasions. Because it uses just a few basic ingredients, it’s easy to prepare anytime a dessert craving strikes. Whether served plain or dressed up with garnishes, this mousse feels fresh, comforting, and timeless. Once you try it, you’ll likely find yourself returning to this recipe again and again.

Garlic Toast Sloppy Joe Melts

Garlic Toast Sloppy Joe Melts

A robust, comforting dinner that comes together quickly.

Ingredients

For the Filling:

  • 1 lb (450g) Lean ground beef or ground turkey

  • 1 small Yellow onion, finely diced

  • 1 Green bell pepper, finely diced

  • 2 cloves Garlic, minced

  • 8 oz (225g) Tomato sauce (ensure it is “no sugar added”)

  • 1 tbsp Tomato paste

  • 1 tbsp Worcestershire sauce

  • 1 tsp Smoked paprika

  • 1/2 tsp Chili powder

  • Salt and black pepper, to taste

For the Sandwich:

  • 4-6 thick slices of Sourdough or whole-grain bread

  • 2 tbsp Butter (softened)

  • 1/2 tsp Garlic powder

  • 1/2 tsp Dried parsley

  • 4-6 slices Provolone or Swiss cheese (as seen in the image)


Instructions

  1. Sauté the Meat and Veggies: In a large skillet over medium-high heat, brown the ground beef until no longer pink. Drain any excess fat. Add the diced onion and bell pepper. Sauté for 5 minutes until the vegetables are soft.

  2. Season: Stir in the minced garlic, tomato paste, smoked paprika, and chili powder. Cook for 1 minute until fragrant.

  3. Simmer the Sauce: Add the tomato sauce and Worcestershire sauce. Reduce heat to low and simmer for 10 minutes. The sauce should thicken and coat the meat perfectly. Season with salt and pepper to taste.

  4. Prepare the Garlic Toast: While the meat simmers, mix the softened butter with garlic powder and dried parsley. Spread this generously on both sides of your bread slices.

  5. Toast the Bread: Heat a separate griddle or skillet over medium heat. Toast the bread slices until golden brown on one side.

  6. Assemble: Flip the bread. On half of the slices, place a slice of cheese, then a generous scoop of the meat mixture, then another slice of cheese. Top with the remaining bread slices (toasted side out).

  7. Melt and Serve: Cover the skillet for 1-2 minutes to help the cheese melt completely. Serve hot and enjoy!


Why This Is a Great “Post-Work” Meal

  • High Protein: Helps with muscle recovery and keeps you full throughout the night.

  • Customizable: You can easily swap the beef for lentils if you want a plant-based version similar to the flatbreads we discussed earlier.

  • Time-Efficient: The filling can be made in one pan in under 20 minutes.

Freezer-Set Layered Chocolate & Grain Bars

Freezer-Set Layered Chocolate & Grain Bars


Recipes

Cereal Base

  • 1 C.: Clarified unsalted dairy fat (Butter)
  • 3 ¼ C.: Rolled dried grain flakes (Old fashioned oats)
  • ½ C.: Moist molasses sweetener Brown sugar
  • ½ tsp.: Ground warming spice Cinnamon
  • 2 tsp.: Concentrated vanilla essence Vanilla extract

Rich Filling

  • 1 Bag: Dark cocoa chips
  •  C.: Creamy ground legume spread Peanut butter

Instructions

  • In a saucepan placed over medium heat, combine the clarified dairy fat, moist molasses sweetener, and concentrated vanilla essence. Warm the mixture until both the fat and sweetener are completely liquified.
  • Introduce the rolled, dried grain flakes and the ground warming spice into the saucepan. Stir the mixture and continue cooking for a duration of 2 to 3 minutes.
  • Evenly press exactly half of the cooked grain flake mixture into the base of a well-greased 9×9 inch baking dish.
  • In a separate microwave-safe container, place the dark cocoa chips and the creamy ground legume spread. Heat these ingredients in 30-second increments until the cocoa chips are fully melted and the components are smoothly combined.
  • Distribute the majority of the melted chocolate mixture over the pressed grain flake layer in the baking dish, reserving a small portion specifically for final garnishing.
  • Form the remaining cooked grain flakes into a second, distinct layer situated atop the chocolate filling.
  • Drizzle the small reserved portion of the melted chocolate mixture over the very top surface of the bars. Transfer the entire dish to the freezer to fully set for a minimum period of one hour before slicing and presentation.

Dark Chocolate Pistachio Date Bites

Dark Chocolate Pistachio Date Bites

If you’re looking for a simple and delicious snack that’s both satisfying and nutritious, these Dark Chocolate Pistachio Date Bites are just the ticket! With their rich, velvety dark chocolate coating and delightful crunch from the pistachios, these bites pack a punch of flavor and texture. Plus, they’re made with wholesome ingredients that make them a treat you can feel good about enjoying anytime—whether it’s a quick pick-me-up or a sweet finish to your meal.

What You’ll Need for Dark Chocolate Pistachio Date Bites

  • 1 cup dates (about 200g, pitted)
  • 1 cup pistachios (about 135g, shelled)
  • 1/2 cup almond flour (about 50g)
  • 2 tablespoons cocoa powder (about 15g)
  • 3/4 cup dark chocolate (about 120g, chopped)
  • 2 tablespoons coconut oil (about 30g)

How to Make Dark Chocolate Pistachio Date Bites

  1. In a food processor, blend the dates, pistachios, almond flour, and cocoa powder until the mixture becomes sticky and crumbly.
  2. Once combined, take small portions of the mixture and roll them into bite-sized balls using your hands.
  3. Place the formed balls onto a baking sheet or plate lined with parchment paper.
  4. Put the bites in the refrigerator for about 30 minutes to chill and firm up.
  5. While the bites are chilling, melt the dark chocolate and coconut oil together in a microwave-safe bowl or over a double boiler until smooth.
  6. Once melted, dip each chilled bite into the chocolate mixture, ensuring they are fully coated.
  7. Return the chocolate-covered bites back to the lined baking sheet and refrigerate again until the chocolate is set, about 15-20 minutes.

Why Everyone Is Loving This Dark Chocolate Pistachio Date Bites

These Dark Chocolate Pistachio Date Bites are trending right now for a few good reasons. As people are seeking more nutritious snack options that still satisfy their sweet tooth, this recipe hits the mark! With the combination of natural sweetness from the dates, protein and healthy fats from the pistachios, and the antioxidant boost from dark chocolate, it’s no wonder that these bites have become a popular choice for health-conscious individuals. Plus, they’re super easy to make and can be whipped up in just a few minutes!

Best Ways to Serve It

These tasty bites are perfect for any occasion! Serve them as a quick afternoon snack, a post-workout treat, or even as a sweet addition to your breakfast spread—think yogurt or smoothie bowls. They also make a great dessert to impress your guests at dinner or a delightful treat to bring to gatherings. Feel free to enjoy them as is, or sprinkle some crushed nuts or coconut flakes on top for an extra flair!

Helpful Tricks

  • Storage Tips: Keep your Dark Chocolate Pistachio Date Bites in the refrigerator in an airtight container. They’ll stay fresh for up to 2 weeks—if they last that long!
  • Flavor Variations: Consider adding a pinch of sea salt on top before refrigerating for a delightful sweet-salty combo, or swap out the pistachios for your favorite nuts, like almonds or walnuts, for a different taste.
  • Make It Vegan: Ensure your dark chocolate is dairy-free or vegan-friendly, and enjoy these bites completely plant-based!

Dark Chocolate Pistachio Date Bites: Frequently Asked Questions

1. Can I use other nuts besides pistachios?
Absolutely! Feel free to use your favorite nuts or seeds—almonds, walnuts, or even sunflower seeds work great.

2. How can I make these bites less sweet?
You can reduce the number of dates or use less cocoa powder, depending on your preference for sweetness.

3. Can these bites be frozen?
Yes, they freeze well! Just make sure to store them in a freezer-safe container, and they’ll keep for about 3 months.

Now that you’ve got this easy and nutritious recipe for Dark Chocolate Pistachio Date Bites, it’s time to give it a go! Enjoy making them at home and savor each delicious bite. Happy cooking!

Banana Kiwi Oatmeal Protein Bake

Banana Kiwi Oatmeal Protein Bake


This Banana Kiwi Oatmeal Protein Bake is a nourishing, gluten-reduced breakfast or snack option that combines the natural sweetness of ripe bananas and tart kiwis with the hearty texture of blended oats, walnuts, and dried cranberries. Enhanced by a touch of baking powder for lift and enriched with egg whites for added protein, this bake emerges from the oven as a golden, custardy loaf studded with vibrant fruit and crunchy nuts. Perfect for meal prep, it slices beautifully and pairs seamlessly with coffee, yogurt, or a scoop of nut butter. Whether you’re fueling an early morning workout, packing a lunchbox treat, or simply craving a comforting, wholesome bite, this recipe delivers balanced energy and flavor in every slice.

Cooking Time

  • Preparation & Blending: 15 minutes

  • Mixing & Assembly: 10 minutes

  • Baking: 40 minutes

  • Cooling: 15 minutes

  • Total Active Time: 25 minutes

  • Total Time: Approximately 1 hour 15 minutes

Ingredients

  • Dry Base & Leavening

    • 200 g (≈2 cups) rolled oats, finely ground in a blender until flour-like

    • ¼ tsp fine salt

    • 1 tsp baking powder

  • Fruit & Liquid

    • 2 medium ripe bananas, peeled

    • 50 g water (≈3 Tbsp)

    • 2 kiwis, peeled and roughly chopped

  • Protein & Binding

    • 2 large eggs, whites separated from yolks

  • Add-Ins

    • 50 g (≈½ cup) chopped walnuts

    • 2 Tbsp dried cranberries

  • Equipment & Finish

    • Parchment paper, to line the baking pan

Step-by-Step Cooking Directions

  1. Preheat & Prepare Pan
    Preheat your oven to 180 °C (360 °F). Line a standard loaf pan (≈9×5 inches) with parchment paper, leaving an overhang for easy removal.

  2. Blend the Oats
    Place 200 g rolled oats in a high-speed blender. Process until a fine oat flour forms. Transfer to a large mixing bowl.

  3. Add Leavening & Salt
    Stir 1 tsp baking powder and ¼ tsp salt into the oat flour, ensuring even distribution of the dry ingredients.

  4. Process Bananas & Water
    In the same (unwashed) blender, combine the two bananas and 50 g water. Blend into a smooth purée. Pour into the oat-flour mixture.

  5. Incorporate Kiwi
    Fold in the roughly chopped kiwis, allowing bursts of color and tartness throughout the batter.

  6. Whip Egg Whites
    In a separate bowl, whip the two egg whites with a clean whisk or electric mixer until stiff peaks form. This aerates the bake, creating a lighter crumb.

  7. Combine Yolks & Batter
    In another small bowl, beat the two egg yolks lightly, then stir into the main batter until uniformly colored.

  8. Fold in Egg Whites
    Gently fold the whipped egg whites into the batter in three additions, preserving as much volume as possible.

  9. Add Nuts & Cranberries
    Fold in 50 g chopped walnuts and 2 Tbsp dried cranberries for crunch and sweetness.

  10. Bake
    Pour the batter into the prepared pan, smoothing the top. Bake for 40 minutes, or until a toothpick inserted into the center comes out clean and the top is lightly golden.

  11. Cool & Slice
    Allow the bake to cool in the pan for 10 minutes, then lift out via the parchment overhang. Cool on a rack for another 5 minutes before slicing.

  12. Serve
    Enjoy warm or at room temperature, plain or with a smear of nut butter, Greek yogurt, or a drizzle of honey.

Nutritional Information (per slice; yields 8 slices)

  • Calories: 180 kcal

  • Protein: 6 g

  • Carbohydrates: 24 g

    • Fiber: 4 g

    • Sugars: 8 g

  • Fat: 7 g

    • Saturated Fat: 1 g

  • Sodium: 150 mg

The Origins and Popularity of the Recipe

Oat-based bakes trace back to traditional porridge dishes across northern Europe, where oats provided affordable sustenance. Sweet loaves incorporating fruit, nuts, and eggs evolved as a portable, shelf-stable comfort food. In recent years, the health-food movement has embraced oat flour and fruit-sweetened loaves for their gluten-free potential, fiber content, and natural sweetness. The addition of protein via egg whites and nuts caters to contemporary interest in balanced macronutrients. Social-media trends around “healthy loaf cakes” and “breakfast bakes” have further propelled recipes like this into mainstream kitchens worldwide.

Reasons Why You’ll Love the Recipe

  • Naturally Sweetened: No added refined sugar—bananas and cranberries provide sweetness.

  • High Fiber & Protein: Oat flour, egg whites, and walnuts promote fullness and sustained energy.

  • Gluten-Reduced: While not strictly gluten-free, oat flour is a lower-gluten alternative to wheat.

  • Make-Ahead Friendly: Bakes keep 3–4 days refrigerated, and slices freeze well.

  • Kid-Friendly: Mild sweetness and familiar textures appeal to younger eaters.

Health Benefits

  • Oats: Rich in beta-glucan soluble fiber, which helps lower cholesterol and regulate blood sugar.

  • Bananas & Kiwis: Provide potassium, vitamin C, and antioxidants for immune support and heart health.

  • Egg Whites: Offer lean protein without extra fat.

  • Walnuts: Supply omega-3 fatty acids, promoting brain and cardiovascular health.

  • Dried Cranberries: Contain phenolic compounds that support urinary tract health.

Serving Suggestions

  • Breakfast: Top with Greek yogurt, fresh berries, and a sprinkle of chia seeds.

  • Afternoon Snack: Serve alongside a cup of tea or coffee for a satisfying pick-me-up.

  • Lunchbox Addition: Pack slices with a small container of almond butter.

  • Dessert: Warm with a scoop of vanilla ice cream and a drizzle of honey.

Common Mistakes to Avoid

  • Overmixing: Deflates whipped egg whites—fold gently to retain air.

  • Undercooking: Ensure the center is set by extending bake time 3–5 minutes if needed.

  • Too Much Liquid: Measure water precisely; excess makes batter too wet to hold shape.

  • Skipping Parchment: The overhang ensures easy removal and clean edges.

Cooking Tips

  • Banana Ripeness: Use bananas with speckled skins for maximum sweetness and moisture.

  • Kiwi Texture: Firm but ripe kiwis hold shape; overly soft ones may make pockets of moisture.

  • Nut Alternatives: Substitute chopped pecans or almonds if preferred.

  • Freezing: Freeze individual slices between parchment squares in airtight bags.

Similar Recipes to Try

  • Apple Cinnamon Oat Loaf

  • Blueberry Lemon Protein Bread

  • Pumpkin Spice Oat Bars

  • Chocolate Banana Oat Muffins

Variations to Try

  • Chocolate Chips: Stir in 2 Tbsp dark chocolate chips for a decadent twist.

  • Spiced: Add 1 tsp cinnamon and ¼ tsp nutmeg for warming fall flavors.

  • Seed Boost: Fold in 2 Tbsp chia or flaxseed for extra fiber and omega-3s.

  • Citrus Zest: Add 1 tsp lemon or orange zest to the batter for bright aroma.

Ingredient Spotlight: Oat Flour

Oat flour, milled from whole rolled oats, retains the grain’s heart-healthy beta-glucan fiber and nutrients like magnesium and thiamine. Its naturally sweet, nutty flavor makes it a versatile gluten-reduced baking option that creates moist, tender loaves.

Conclusion

The Banana Kiwi Oatmeal Protein Bake is a testament to how simple, whole-food ingredients can yield a nourishing, flavor-packed loaf that fits any part of your day. From vibrant fruit pockets to satisfying oat structure and protein-rich egg whites, it balances taste and nutrition with effortless prep. Try it fresh from the oven or slice and freeze for busy mornings—this versatile bake will quickly become a favorite in your healthy-baking repertoire.

Frequently Asked Questions
  1. Can I use frozen berries instead of kiwis?
    Yes—use 100 g frozen berries; fold in directly, and extend bake time 2–3 minutes.

  2. Is this recipe dairy-free?
    It is naturally dairy-free if your egg wash (for slicing ease) is omitted—no milk required.

  3. How do I store leftovers?
    Refrigerate in an airtight container up to 4 days; reheat slices briefly in toaster or microwave.

  4. Can I make it vegan?
    Replace eggs with flax eggs (2 Tbsp flaxseed + 6 Tbsp water) and omit egg whites; texture will be denser.

  5. My bake is too dry—what happened?
    Increase water to 60 g or add 1–2 Tbsp unsweetened applesauce to boost moisture.

  6. Why whip egg whites separately?
    Aerates the batter, creating a lighter crumb; skip if you prefer a denser loaf.

  7. Can I halve the recipe?
    Yes—bake in a smaller loaf pan for 30–35 minutes.

  8. What other fruits work?
    Apples, pears, peaches, and pineapple are all excellent choices.

  9. Why use parchment paper?
    Prevents sticking and allows easy removal without loaf breakage.

  10. Can I sprinkle sugar on top?
    Yes—dust with 1–2 tsp coconut sugar or turbinado sugar before baking for a crunchy crust.