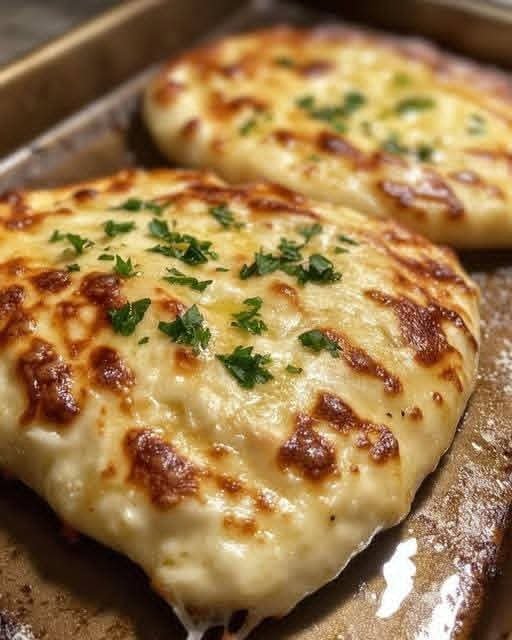
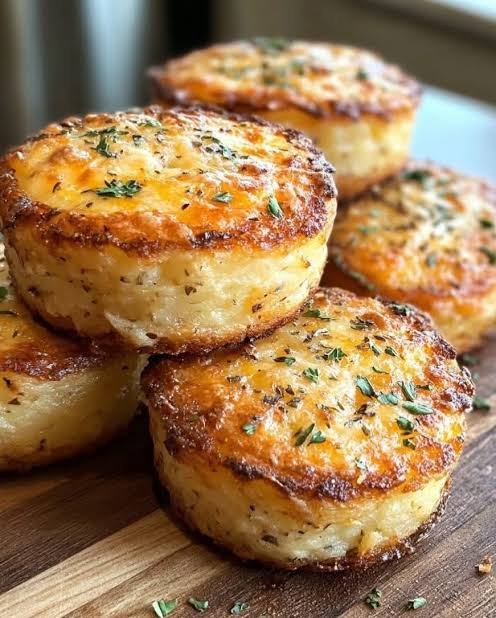
Pineapple Dream Dessert

Pineapple Dream Dessert

Prep Time: 15 minutes
Chill Time: 4 hours minimum (overnight is ideal)
Servings: 12–15

Ingredients

For the Crust & Topping:

  • 2 ½ cups graham cracker crumbs (divided)

  • ½ cup unsalted butter, melted

For the Creamy Filling:

  • ½ cup unsalted butter, softened to room temperature

  • 2 cups powdered sugar

  • 1 package (8 oz) cream cheese, softened to room temperature

  • 1 can (20 oz) crushed pineapple, well-drained

  • 1 container (8 oz) whipped topping (like Cool Whip) or 2 cups stiffly whipped heavy cream


Instructions

Step 1: Prepare the Crust

  1. Preheat your oven to 350°F (175°C) if you prefer a slightly firmer crust. (Optional: You can skip baking for a softer crust.)

  2. In a medium bowl, combine 2 cups of graham cracker crumbs with the ½ cup melted butter. Mix until the texture resembles wet sand.

  3. Reserve ½ cup of this crumb mixture for the topping later.

  4. Firmly press the remaining crumbs into the bottom of a 9×13 inch baking dish to form an even crust layer.

  5. Optional: Bake for 8–10 minutes for a slightly crisp crust. Let it cool completely before adding the filling.


Step 2: Make the Creamy Base

  1. In a large mixing bowl, add the softened butter and cream cheese. Beat with an electric mixer on medium speed until smooth and creamy (about 2–3 minutes).

  2. Gradually add powdered sugar and continue to beat until the mixture is fluffy and well combined (about 3–5 minutes).


Step 3: Fold in the Pineapple

  1. Drain the crushed pineapple very well. Press through a fine-mesh strainer with a spoon to remove excess juice, which could make the dessert runny.

  2. Gently fold the drained pineapple into the cream cheese mixture using a spatula, ensuring it is evenly distributed.


Step 4: Add the Whipped Topping

  1. Gently fold in the whipped topping or stiffly whipped heavy cream until fully combined.

  2. Be careful not to overmix; you want to keep as much air in the mixture as possible for a light, fluffy texture.


Step 5: Assemble the Dessert

  1. Spread the creamy pineapple filling evenly over the graham cracker crust.

  2. Sprinkle the reserved ½ cup of graham cracker crumbs evenly on top as a finishing touch.


Step 6: Chill

  1. Cover the dish with plastic wrap or a lid.

  2. Refrigerate for at least 4 hours, but for best results, chill overnight. This allows the layers to firm up and the flavors to meld beautifully.


Tips for Perfect Pineapple Dream Dessert

  • Drain the pineapple thoroughly: Use a fine-mesh strainer and press gently with a spoon to remove extra juice.

  • Room temperature ingredients: Make sure your butter and cream cheese are soft before mixing to avoid lumps in the filling.

  • Gentle folding: Folding preserves the air in the whipped topping, keeping the dessert light and airy.

  • Optional garnishes: Top with toasted coconut, chopped nuts, or extra pineapple chunks for a decorative touch.

Blueberry Baked Oatmeal


Blueberry Baked Oatmeal

Prep time: 10 mins | Bake time: 35-40 mins | Servings: 4-6


Ingredients

Oats: 2 cups old-fashioned rolled oats (not instant or steel-cut).


Sweetener: 1/4 cup maple syrup or honey.


Leavening: 1 tsp baking powder.


Spice: 1 tsp cinnamon and a pinch of salt.


Liquid: 2 cups milk (dairy or almond/oat milk work great).


Egg: 1 large egg (or a flax egg for a vegan option).


Fat: 2 tbsp melted butter or coconut oil.


Flavor: 1 tsp vanilla extract.


Fruit: 1.5 cups fresh or frozen blueberries.


Instructions

Preheat & Prep: Heat your oven to 375°F (190°C). Lightly grease an 8×8 inch baking dish (similar to the red one in your photo).


Mix Dry: In a large bowl, stir together the oats, baking powder, cinnamon, and salt.


Mix Wet: In a separate bowl, whisk the milk, egg, maple syrup, melted butter, and vanilla extract until well combined.


Layer: Pour the dry oat mixture into the prepared baking dish. Scatter about 1 cup of the blueberries over the oats.


Combine: Pour the liquid mixture over the oats. Gently wiggle the dish to ensure the milk settles into all the crevices.


Top: Sprinkle the remaining blueberries on top (just like the picture!).


Bake: Bake for 35 to 40 minutes, or until the top is golden brown and the oats have absorbed all the liquid.


Serve: Let it cool for a few minutes before slicing. It’s great served warm with a splash of cold milk or a dollop of yogurt.


Quick Tips

Crunch: If you like a little texture, add 1/2 cup of chopped walnuts or pecans to the dry mix.


Storage: This keeps beautifully in the fridge for up to 5 days. Just reheat a square in the microwave for about 45 seconds.

🍦 Pistachio & Almond Delight Recipe


🍦 Pistachio & Almond Delight Recipe

Ingredients

The Base: 2 cups heavy cream, 1 cup whole milk, and ¾ cup granulated sugar.


The Flavor: 1 cup shelled, unsalted pistachios (plus extra for topping).


The Texture: 4 large egg yolks and a pinch of sea salt.


The Crunch: ½ cup toasted slivered almonds.


The Secret Touch: ½ tsp almond extract and 1 tsp vanilla extract.


Step-by-Step Instructions

Prepare the Pistachio Paste: Place the pistachios in a food processor. Pulse until they turn into a fine, smooth paste. If it’s too dry, add a teaspoon of the milk to help it come together.


Heat the Dairy: In a medium saucepan, combine the milk, sugar, salt, and half of the heavy cream. Warm over medium heat until the sugar dissolves and it just begins to steam (do not let it boil). Stir in your pistachio paste.


Temper the Eggs: In a separate bowl, whisk the egg yolks. Slowly pour about half a cup of the warm milk mixture into the yolks while whisking constantly. This prevents the eggs from scrambling. Pour the egg mixture back into the saucepan.


Thicken the Custard: Cook over low heat, stirring constantly, until the mixture thickens enough to coat the back of a spoon. Remove from heat immediately.


Chill and Infuse: Stir in the remaining heavy cream, vanilla, and almond extract. Pour the mixture through a fine-mesh strainer into a bowl to ensure it’s perfectly smooth. Cover and refrigerate for at least 4 hours (overnight is best).


Churn: Pour the chilled mixture into your ice cream maker and churn according to the manufacturer’s directions. In the last 5 minutes of churning, add your chopped almonds and extra crushed pistachios.


Freeze: Transfer to an airtight container and freeze for 2–4 hours until firm.


Pro Tips for the Perfect Scoop

Bright Green Color: If your pistachios aren’t giving you that bright green hue, you can blanch them in boiling water for 1 minute and peel off the brown skins before making the paste.


Serving: Use a metal bowl (like the one in your photo) and pre-chill it in the freezer to keep the scoops from melting while you garnish.

Simple Honey Pancakes

Simple Honey Pancakes

Prep Time: 10 minutes
Cook Time: 10–15 minutes
Servings: 4

Fluffy, golden pancakes with a touch of sweetness—perfect for breakfast or a quick snack. Serve them hot with honey for that irresistible finish.


Ingredients

  • 250 ml milk

  • 1 large egg

  • 1.5 tablespoons sugar

  • ½ teaspoon salt

  • 2 tablespoons sunflower oil (plus extra for frying)

  • 240 g all-purpose flour

  • Honey, for serving


Directions

  1. Warm the Milk: Heat the milk gently for about 1 minute until slightly warm (not boiling).

  2. Make the Batter: In a large mixing bowl, combine the warm milk, egg, sugar, salt, and sunflower oil. Gradually add the flour and stir until a smooth, homogeneous batter forms.

  3. Fry the Pancakes: Heat a non-stick pan over medium heat and lightly coat with oil. Pour a small ladle of batter into the pan and cook until bubbles appear on the surface and the edges look set. Flip and cook the other side until golden brown. Repeat with the remaining batter.

  4. Serve: Serve the pancakes hot, drizzled generously with honey.


Tips & Variations

  • Extra Fluffy: Let the batter rest for 5–10 minutes before frying.

  • Flavor Boost: Add a pinch of cinnamon or vanilla extract to the batter.

  • Healthy Swap: Use whole wheat flour for a nuttier flavor and extra fiber.

  • Serving Ideas: Top with fresh fruit, nuts, or a dollop of yogurt along with honey.

Carnivore Sandwich Bread (Egg & Cheese)

Carnivore Sandwich Bread (Egg & Cheese)

Ingredients

  • 6 large eggs (room temperature)

  • 1½ cups shredded mozzarella or mild cheddar

  • 2 tbsp cream cheese (softened)

  • ½ tsp salt (optional)

  • ½ tsp baking powder (optional but helps rise)

  • 1 tbsp butter or beef tallow (for greasing)


Equipment

  • Blender or food processor

  • Small loaf pan or square baking dish

  • Oven


Instructions

  1. Preheat oven

    • Set oven to 350°F (175°C).

    • Grease your pan with butter or tallow.

  2. Blend

    • Add eggs, shredded cheese, cream cheese, salt, and baking powder to the blender.

    • Blend until completely smooth (no cheese chunks).

  3. Bake

    • Pour batter into prepared pan.

    • Bake for 30–35 minutes, until:

      • The top is lightly golden

      • Center is set

      • The toothpick comes out clean

  4. Cool

    • Let cool in pan for 10–15 minutes.

    • Remove and cool fully before slicing (important for sandwich texture).


How to Slice & Use

  • Slice into thin slices for sandwiches

  • Toast lightly in butter for best texture

  • Great for:

    • Bacon & eggs sandwich

    • Burger bread

    • Grilled cheese (extra cheese!)


Storage

  • Fridge: 5 days in airtight container

Simple Baked Pork Chops with Sweet and Savory Rub

Simple Baked Pork Chops with Sweet & Savory Rub

Total Time: 30 minutes
Servings: 8

This pork chop recipe is your ultimate weeknight lifesaver: three ingredients, minimal effort, and maximum flavor. The sweet brown sugar rub combines with Italian herbs to create a tender, juicy chop with a golden, caramelized crust. Perfect for picky eaters and hungry teens alike!


Ingredients

  • 8 boneless pork loin chops

  • 1 envelope (about 1 oz / 28 g) dry Italian seasoning mix

  • ½ cup packed light brown sugar


Instructions

  1. Preheat Oven: Preheat your oven to 425°F (220°C). Line a 9×13 inch baking dish with aluminum foil for easy cleanup.

  2. Make the Rub: In a small bowl, combine the Italian seasoning packet and brown sugar until well mixed.

  3. Season the Chops: Generously rub the mixture onto both sides of each pork chop.

  4. Bake: Arrange the seasoned pork chops in the prepared baking dish. Bake for 20–25 minutes, until the internal temperature reaches 145°F (63°C).

  5. Broil for Finish: Switch the oven to broil for 2–3 minutes to caramelize the tops, creating a slightly crisp, golden crust.

  6. Serve: Remove from oven and serve immediately.


Tips & Variations

  • Juiciness Tip: Baking on aluminum foil helps trap moisture and makes cleanup easy.

  • Bone-In Option: Use bone-in chops, but add 5–10 extra minutes of baking time.

  • Add Heat: Sprinkle a pinch of red pepper flakes into the rub for a subtle kick.

  • Savory Swap: Try ranch seasoning or garlic-herb blend instead of Italian seasoning.

  • Low-Sugar Option: Replace brown sugar with a keto-friendly brown sugar substitute.

  • Storage: Store cooled leftovers in an airtight container in the fridge for up to 3 days.

  • Freezing: Chops can be frozen after cooking, though reheated texture may slightly change.


FAQs

Q: How do I know when the pork chops are done?
A: Use a meat thermometer at the thickest part. Target 145°F (63°C) for juicy, safe pork.

Q: Why broil at the end?
A: Broiling caramelizes the sugar in the rub, forming a delicious, golden crust while sealing in juices.

Q: Can I use thick-cut chops?
A: Yes, but increase baking time before broiling to ensure they cook through.

Q: Do I need to add extra salt or pepper?
A: Usually not—your seasoning mix has enough.

Q: How can I prevent drying out?
A: Don’t overcook. Rely on a thermometer, and the brown sugar rub helps retain moisture.

Q: Can I use this rub for chicken?
A: Absolutely! Just ensure chicken reaches 165°F (74°C) internally.

Fresh Blueberry & Mint Smoothie

Fresh Blueberry & Mint Smoothie

Prep time: 5 minutes | Servings: 1 large glass


Ingredients

  • 1 ½ cups Frozen blueberries (using frozen gives it that thick, chilled texture)

  • 1 cup Greek yogurt (plain or vanilla)

  • ½ cup Milk of your choice (dairy, almond, or oat)

  • 4–5 Fresh mint leaves (plus more for garnish)

  • 1 tbsp Honey or maple syrup (optional, for sweetness)

  • A squeeze of fresh lemon juice (to brighten the berry flavor)

Instructions

  1. Combine: Add the milk and yogurt to your blender first (liquid on the bottom helps it blend smoother).

  2. Add Solids: Toss in the frozen blueberries and the fresh mint leaves.

  3. Blend: Start on a low setting and gradually increase to high. Blend for about 45–60 seconds until the mint is fully incorporated and the texture is velvety.

  4. Adjust: If it’s too thick, add a splash more milk. If you want it sweeter, add your honey now and pulse briefly.

  5. Serve: Pour into a tall glass. Top with a few fresh blueberries and a sprig of mint, just like in your photo!


Tips for the Perfect Blend

  • The “Frosty” Look: If you want it extra thick (like a smoothie bowl), use less milk and add 3–4 ice cubes.

  • Added Nutrition: Feel free to throw in a tablespoon of chia seeds or flax seeds; they won’t change the flavor but will add a nice boost of fiber.

Veggie-Packed Crustless Quiche

Veggie-Packed Crustless Quiche

Prep time: 15 mins | Bake time: 25-30 mins | Serves: 4-6


Ingredients

The Base:

  • 8 large eggs

  • 1/2 cup milk (whole milk or heavy cream makes it richer)

  • 1 cup shredded cheese (Mozzarella or Sharp Cheddar work best)

  • 1/2 tsp salt and 1/4 tsp black pepper

The Fillings (as seen in your photo):

  • 1/2 cup red bell pepper, diced

  • 1/2 cup red onion, finely diced

  • 1 cup fresh spinach, roughly chopped

  • 1/2 cup mushrooms, thinly sliced

  • Optional: A pinch of garlic powder or dried oregano


Instructions

  1. Prep the Oven and Pans: Preheat your oven to 375°F (190°C). Generously grease two 9-inch round cake pans (like the ones in your photo) with butter or non-stick spray.

  2. Sauté the Veggies: In a skillet over medium heat, sauté the onions, peppers, and mushrooms for about 5 minutes until soft. Add the spinach at the very end just until it wilts.

    Pro Tip: Sautéing first prevents the quiche from becoming watery!

  3. Mix the Egg Base: In a large bowl, whisk the eggs, milk, salt, and pepper until well combined and slightly frothy.

  4. Assemble: Distribute the sautéed vegetables evenly across the bottom of the two pans. Sprinkle the shredded cheese over the veggies. Pour the egg mixture over the top.

  5. Bake: Place in the oven for 25–30 minutes. You’ll know they are done when the centers are set (not jiggly) and the edges are slightly golden brown.

  6. Rest and Serve: Let them cool for about 5 minutes before slicing. This helps the eggs firm up so you get clean wedges.


Variations to Try

  • Add Protein: Crumbled bacon or diced ham would fit perfectly here.

  • Spice it up: Add a dash of hot sauce or red pepper flakes to the egg mix.

Best Walnut & Raisin Banana Bread

Best Walnut & Raisin Banana Bread

This recipe produces a moist, dense loaf with a crunchy, nutty topping. For the best flavor, use bananas that have plenty of brown spots on the skin.


Ingredients

The Base:

  • 3 ripe bananas, thoroughly mashed

  • 1/2 cup butter (1 stick), softened to room temperature

  • 3/4 cup white sugar (or 1 scant cup of honey)

  • 1 large egg, beaten (the image shows 3, but 1-2 is standard for a single loaf to keep it from becoming too “rubbery”)

  • 1 tsp vanilla extract

  • 1 tsp baking soda

  • Pinch of salt

  • 1 ½ cups all-purpose flour

The Mix-ins:

  • 1/2 cup walnuts, chopped and lightly toasted

  • 1/2 cup raisins (soak them in warm water for 5 minutes and drain for extra plumpness)


Instructions

  1. Prep the Oven and Pan: Preheat your oven to 350°F (175°C). Grease a 4×8-inch loaf pan with butter or non-stick spray.

  2. Toast the Walnuts: Place chopped walnuts in a dry skillet over medium heat for 3–5 minutes until fragrant. Set aside to cool.

  3. Cream Butter and Sugar: In a large bowl, cream together the softened butter and sugar (or honey) until smooth.

  4. Mix Wet Ingredients: Add the beaten egg and vanilla extract to the butter mixture. Stir in the mashed bananas until well combined.

  5. Add Dry Ingredients: Sprinkle the baking soda and salt over the mixture and stir. Gently fold in the flour. Do not overmix; stop as soon as the white streaks of flour disappear.

  6. Fold in Texture: Gently fold in the raisins and half of the toasted walnuts.

  7. Bake: Pour the batter into the prepared loaf pan. Sprinkle the remaining walnuts on top (as seen in your photo). Bake for 50 to 60 minutes.

  8. The Test: Insert a toothpick into the center; if it comes out clean or with just a few moist crumbs, it’s done.

  9. Cool: Let the bread cool in the pan for 10 minutes, then transfer to a wire rack.

Tzatziki Chicken Salad

Tzatziki Chicken Salad – Light, Fresh, and Flavorful!

This Tzatziki Chicken Salad is a refreshing and satisfying dish packed with Mediterranean flavors! Perfect for a light lunch or dinner, it’s loaded with fresh veggies, tender chicken, and a creamy homemade tzatziki sauce.

Ingredients:

For the Tzatziki Sauce:

1 cup + 2 Tbsp plain Greek yogurt

½ cucumber, grated

2-3 garlic cloves, pressed

2 Tbsp olive oil

2 Tbsp fresh dill, chopped

Salt and pepper, to taste

For the Salad:

2 cups cooked chicken, chopped

2 cups romaine lettuce, chopped

1 cup grape tomatoes, halved

½ cup pepperoncini peppers, sliced

½ cup Kalamata olives, sliced

¼ cup red onion, chopped

½ cup feta cheese, crumbled

Instructions:

Prepare the Tzatziki Sauce:

In a bowl, mix together Greek yogurt, grated cucumber, garlic, olive oil, and fresh dill.

Season with salt and pepper to taste. Set aside.

Assemble the Salad:

In a large bowl, toss together romaine lettuce, grape tomatoes, pepperoncini, Kalamata olives, and red onion.

Add the Chicken:

Layer the chopped cooked chicken over the salad base.

Dress the Salad:

Drizzle or dollop the prepared tzatziki sauce generously over the salad.

Garnish:

Top with crumbled feta cheese for the perfect finishing touch.

Pro Tip: Serve with warm pita bread or a side of crispy pita chips for added texture and a complete Mediterranean-inspired meal!

This Tzatziki Chicken Salad is a delightful blend of creamy, tangy, and savory flavors that’s sure to please your palate.

Garbage Bread Recipe

Garbage Bread Recipe

Ingredients

  • 1 pound pizza dough store-bought or homemade
  • 1 tablespoon olive oil
  • ½ pound ground beef or Italian sausage
  • ½ cup onion finely chopped
  • ½ cup bell pepper diced
  • 1 cup shredded mozzarella cheese
  • ¼ cup grated Parmesan cheese
  • ½ cup pepperoni slices chopped
  • ½ teaspoon garlic powder
  • ½ teaspoon Italian seasoning
  • ¼ teaspoon black pepper
  • 1 egg beaten (for egg wash)
  • Optional: marinara sauce for dipping

Instructions

  • Preheat the oven to 375°F (190°C) and line a baking sheet with parchment paper.
  • In a skillet over medium heat, cook the ground meat with onion and bell pepper until browned. Drain excess grease and season with garlic powder, Italian seasoning, and pepper.
  • Roll the pizza dough into a large rectangle on a lightly floured surface.
  • Spread the cooked meat mixture evenly over the dough, leaving a small border around the edges.
  • Sprinkle mozzarella, Parmesan, and chopped pepperoni on top.
  • Carefully roll the dough lengthwise into a tight log, sealing the edges. Place seam-side down on the baking sheet.
  • Brush the top with beaten egg for a golden finish.
  • Bake for 22–25 minutes, or until golden brown and fully cooked through.
  • Let rest for 5 minutes before slicing. Serve warm with marinara sauce if desired.

Double Chocolate Loaf Cake

🍫 Double Chocolate Loaf Cake

A rich, moist chocolate loaf packed with chocolate chips. Perfect for breakfast, dessert, or an afternoon treat.


📝 Ingredients

  • 2 large eggs

  • ⅓ cup (100 g) sugar

  • ⅓ cup (80 ml) neutral oil (vegetable or canola)

  • ⅓ cup (80 ml) milk

  • 1 teaspoon vanilla extract

  • 1 cup (125 g) all-purpose flour

  • ¼ cup (20 g) cocoa powder

  • 1 teaspoon baking powder

  • ½ teaspoon baking soda

  • 3 tablespoons chocolate chips (white or dark, or a mix)

  • Extra chocolate chips for topping


👩‍🍳 Instructions

1️⃣ Mix the Wet Ingredients

  1. In a medium bowl, whisk the eggs and sugar until slightly pale and well combined.

  2. Add the oil, milk, and vanilla extract. Stir until smooth.


2️⃣ Combine with Dry Ingredients

  1. Sift together the flour, cocoa powder, baking powder, and baking soda.

  2. Gently fold the dry ingredients into the wet mixture until just combined. Avoid overmixing to keep the cake tender.

  3. Fold in 3 tablespoons of chocolate chips.


3️⃣ Prepare for Baking

  1. Preheat the oven to 175°C (350°F).

  2. Grease a standard loaf pan or line it with parchment paper.

  3. Pour the batter into the pan and smooth the top with a spatula.

  4. Sprinkle extra chocolate chips over the surface.


4️⃣ Bake

  1. Bake for 35–45 minutes.

  2. Test doneness by inserting a toothpick into the center; it should come out clean or with a few moist crumbs.

  3. Let the cake cool in the pan for 10 minutes, then transfer to a wire rack to cool completely.


🍽 Serving Suggestions

  • Serve slightly warm so chocolate chips are melty

  • Pair with a cold glass of milk or a cup of coffee

  • Slice thick for an indulgent snack


🧁 Tips

✔️ Use high-quality cocoa powder for deeper flavor
✔️ Fold gently to keep the cake soft and airy
✔️ Store in an airtight container for 2–3 days
✔️ Freeze slices for up to 1 month

Quick Pickled Red Onions

🧅 Quick Pickled Red Onions

Bright, tangy, and crisp, these quick pickled red onions add a punch of flavor and color to sandwiches, salads, bowls, and more. Ready in just one hour!


📝 Ingredients

  • 2 small red onions

  • 2 cups white vinegar

  • 2 cups water

  • 1/3 cup cane sugar

  • 2 tablespoons sea salt

  • 2 garlic cloves (whole or lightly smashed)

  • 1 teaspoon mixed peppercorns


👩‍🍳 Instructions

1️⃣ Prepare the Onions

  1. Peel the red onions.

  2. Slice into thin rings or half-moons.

  3. Peel the garlic cloves; leave whole or smash slightly to release flavor.


2️⃣ Make the Pickling Liquid

  1. In a medium saucepan, combine:

    • Vinegar

    • Water

    • Sugar

    • Salt

  2. Heat over medium heat, stirring occasionally, until the sugar and salt dissolve. No need to boil — just hot enough to fully dissolve the solids.


3️⃣ Pack the Jar

  1. Place the sliced onions into a clean, heat-proof jar (Mason jar works well).

  2. Add garlic cloves and mixed peppercorns.


4️⃣ Add the Pickling Liquid

  1. Carefully pour the hot liquid over the onions until fully submerged.

  2. Use a spoon to press down gently and remove any air bubbles.

  3. Let sit uncovered at room temperature for 30–60 minutes. The onions will turn a vibrant pink.


5️⃣ Storage

  1. Once cooled, seal the jar with a lid.

  2. Store in the refrigerator.

Tip: Onions are ready after 1 hour, but the flavor deepens after 24 hours. Keeps well for up to 2 weeks.


🍽 Serving Suggestions

  • Top avocado toast

  • Add to burgers or sandwiches

  • Serve in Mediterranean bowls

  • Include in tacos or grain bowls for acidity and crunch


🧂 Tips

✔️ Slice onions uniformly for even pickling
✔️ Use a heat-proof jar to avoid cracking
✔️ For extra flavor, add a bay leaf or chili slice
✔️ Press onions down to minimize air bubbles

3-Ingredient Garlic Chili Oil

🌶 3-Ingredient Garlic Chili Oil

A fragrant, spicy oil perfect for drizzling over noodles, dumplings, stir-fries, or as a dipping sauce base.


📝 Ingredients

  • 10 cloves garlic, finely chopped

  • ¼ cup red chili flakes

  • 1 cup neutral oil (canola, vegetable, or grapeseed)


👩‍🍳 Instructions

1️⃣ Prepare the Aromatics

  1. Peel and finely mince the garlic.

  2. Place the garlic and chili flakes into a heat-proof jar or small metal bowl. Make sure the container is completely dry to avoid oil splatters.


2️⃣ Heat the Oil

  1. Pour the oil into a small saucepan.

  2. Heat over medium heat for 3–5 minutes until hot but not smoking.

Tip: Drop a single chili flake into the oil; if it sizzles immediately, the oil is ready. If it smokes, remove from heat and let it cool slightly.


3️⃣ Infuse the Flavors

  1. Carefully pour the hot oil over the garlic and chili flakes.

  2. The mixture will bubble and sizzle — this releases the flavors from the garlic and chili.

  3. Stir gently with a dry spoon to distribute the garlic evenly.


4️⃣ Cool and Store

  1. Let the oil cool completely to room temperature.

  2. The oil will deepen to a vibrant red color as it cools.

  3. Seal with a tight-fitting lid.

Storage: Keep in a cool, dark place or in the refrigerator for up to 2–3 weeks. Always use a clean, dry spoon to avoid contamination.


🍽 Serving Suggestions

  • Drizzle over noodles, fried rice, or stir-fried vegetables

  • Add to soy-sauce-based dipping sauces for dumplings

  • Spoon over grilled meats or roasted vegetables


🧂 Optional Customizations

  • Add 1 tsp toasted sesame seeds after the oil cools

  • Add a pinch of salt for extra flavor

  • For more heat, include crushed fresh chilies along with chili flakes

Fluffy Custard-Filled Braid Buns

🥐 Fluffy Custard-Filled Braid Buns

Soft, lightly sweet yeast buns filled with smooth vanilla custard and finished with a light dusting of powdered sugar.


📝 Ingredients

For the Dough

  • 180 ml lukewarm milk

  • 1 egg (room temperature)

  • 3 tablespoons sugar

  • 1 teaspoon instant dry yeast

  • ½ teaspoon salt

  • 40 g (2 tablespoons) unsalted butter, melted and cooled

  • 400 g all-purpose flour (about 2½ cups)

For the Custard Filling

  • 250 ml milk

  • 1 egg yolk

  • 2 tablespoons sugar

  • 1 tablespoon cornstarch

  • ½ teaspoon vanilla extract

For Brushing & Finishing

  • 1 egg yolk

  • 1 teaspoon milk

  • Powdered sugar (for dusting)


👩‍🍳 Instructions

1️⃣ Prepare the Dough

  1. In a large bowl, mix:

    • Lukewarm milk

    • Sugar

    • Yeast

  2. Let sit for 5 minutes until slightly foamy.

  3. Add:

    • Egg

    • Melted butter

  4. Mix well.

  5. Gradually add flour and salt and mix until a dough forms.

  6. Knead for 8–10 minutes until smooth and elastic.

  7. Place dough in a lightly greased bowl, cover, and let rise for 1 hour or until doubled in size.


2️⃣ Make the Custard Filling

  1. In a saucepan, whisk together:

    • Egg yolk

    • Sugar

    • Cornstarch

  2. Slowly add milk while whisking.

  3. Cook over medium heat, stirring constantly, until thick and smooth.

  4. Remove from heat and stir in vanilla.

  5. Cover the custard with plastic wrap touching the surface and allow to cool completely.


3️⃣ Shape the Buns

  1. Gently deflate the risen dough.

  2. Divide into 8–10 equal pieces.

  3. Roll each piece into a rope about 25–30 cm (10–12 inches) long.

  4. Fold rope in half and twist the strands together.

  5. Join the ends to form a braided loop or figure-eight shape.

  6. Place on parchment-lined baking tray.

  7. Cover and let rise for 20 minutes.


4️⃣ Fill and Bake

  1. Preheat oven to 180°C (350°F).

  2. Mix egg yolk with milk.

  3. Brush dough lightly with egg wash.

  4. Transfer cooled custard to a piping bag.

  5. Pipe custard into the open centers or loops of each braid.

  6. Bake for 20–25 minutes until golden brown.


5️⃣ Finish

  1. Cool slightly.

  2. Dust edges lightly with powdered sugar (avoid custard centers).


🧁 Tips

✔️ Custard must be fully cooled before piping
✔️ Do not overfill
✔️ Keep buns covered while resting
✔️ Best eaten fresh
✔️ Store in airtight container up to 2 days

Sugar-Free Apple & Oat Mug Cakes

🍎 Sugar-Free Apple & Oat Mug Cakes

Soft, naturally sweet mug cakes made with oats, apple, and dried fruit. These are quick to prepare and suitable for microwave or oven baking.


📝 Ingredients

  • 1 cup (100 g) oatmeal (rolled oats or quick oats)

  • 1 large egg

  • ½ teaspoon ground cinnamon

  • 1 teaspoon baking powder

  • 1 pinch salt

  • 3 tablespoons raisins

  • 10–12 dried apricots

  • 1 medium apple, grated or finely diced

  • ¼ cup milk (optional, use only if batter is too dry)

  • Small amount of butter or oil for greasing mugs


👩‍🍳 Instructions

1️⃣ Prepare the Fruit

  1. Place raisins and dried apricots in hot water for 5 minutes to soften.

  2. Drain well.

  3. Finely chop the apricots.

  4. Core the apple and grate it or cut into very small cubes.


2️⃣ Mix the Batter

  1. In a mixing bowl, combine:

    • Oats

    • Cinnamon

    • Baking powder

    • Salt

  2. Add:

    • Egg

    • Grated apple

  3. Stir until well mixed.

  4. Fold in:

    • Raisins

    • Chopped apricots

  5. If batter seems too thick or dry, add milk a little at a time until you get a thick, spoonable batter.


3️⃣ Fill the Mugs

  1. Lightly grease 2–3 microwave-safe mugs or ramekins.

  2. Divide batter evenly between mugs.

  3. Fill only up to ¾ full to allow rising.


4️⃣ Cook

Microwave Method

  • Cook each mug on high power for 1½ to 2 minutes.

  • The top should look set and spring back lightly when touched.

Oven Method

  • Preheat oven to 180°C (350°F).

  • Bake for 15–20 minutes until lightly golden and firm in the center.


🍽 Serving Ideas

  • Serve warm

  • Top with yogurt

  • Sprinkle with extra cinnamon

  • Add sliced apples


🧁 Tips

✔️ Finely chopped fruit gives better texture
✔️ Do not overcook or cakes will dry out
✔️ Best eaten fresh
✔️ Can be made with pears instead of apples
✔️ Use almond or oat milk if desired

Traditional French Crêpes

Traditional French Crêpes

Thin, soft crêpes with lightly crisp edges. Perfect for both sweet and savory fillings.


📝 Ingredients

  • 250 g plain flour, sifted

  • 3 large eggs (room temperature)

  • 500 ml whole milk (semi-skimmed also works)

  • 20 g unsalted butter, melted and slightly cooled

  • 3 tablespoons caster sugar (or granulated sugar)

  • ⅛ teaspoon vanilla extract

  • 1 pinch salt

  • Extra butter for greasing the pan


👩‍🍳 Instructions

1️⃣ Mix the Dry Ingredients

  1. In a large bowl, whisk together:

    • Flour

    • Sugar

    • Salt

  2. Make a well in the center of the mixture.


2️⃣ Add the Wet Ingredients

  1. Crack the eggs into the well.

  2. Begin whisking the eggs, slowly pulling flour from the sides into the center.

  3. Gradually pour in the milk while whisking continuously to prevent lumps.

  4. When smooth, whisk in:

    • Melted butter

    • Vanilla extract

The batter should be thin and pourable, similar to heavy cream.


3️⃣ Rest the Batter

  1. Cover the bowl.

  2. Refrigerate for 30 minutes to 2 hours.

This resting time improves texture and helps produce tender crêpes.


4️⃣ Prepare the Pan

  1. Heat a non-stick skillet or crêpe pan over medium heat.

  2. Lightly grease with butter and wipe off excess using a paper towel.

The pan should be lightly coated, not oily.


5️⃣ Cook the Crêpes

  1. Pour about ¼ cup batter into the center of the pan.

  2. Immediately tilt and swirl the pan to spread the batter thinly.

  3. Cook for 1–2 minutes until edges lift and the underside is light golden.

  4. Flip carefully and cook the second side for 30–45 seconds until small golden spots appear.

  5. Transfer to a plate and repeat with remaining batter.


🍽 Serving Ideas

Sweet Fillings

  • Jam or fruit preserves

  • Fresh lemon juice with sugar

  • Chocolate spread

  • Whipped cream and berries

Savory Fillings

(Leave out sugar and vanilla from batter)

  • Cheese and ham

  • Sautéed mushrooms

  • Spinach and egg

  • Chicken and cream sauce


🧁 Tips

✔️ Batter should be thin and smooth
✔️ Resting improves flexibility
✔️ Keep pan temperature steady
✔️ Stack cooked crêpes with parchment between
✔️ Store in refrigerator up to 2 days

3-Ingredient Lemon Cream Ice Cream

🍋 3-Ingredient Lemon Cream Ice Cream

A smooth, creamy, no-churn ice cream with a fresh lemon flavor. This recipe requires no ice cream machine and uses only simple ingredients.


📝 Ingredients

  • 400 ml (1 can) sweetened condensed milk, well chilled

  • 500 ml (2 cups) heavy whipping cream (35% fat or higher), very cold

  • 60 ml (¼ cup) freshly squeezed lemon juice

  • Optional: 1 tablespoon finely grated lemon zest


👩‍🍳 Instructions

1️⃣ Whip the Cream

  1. Place the cold whipping cream into a large chilled mixing bowl.

  2. Using an electric mixer, whip on medium-high speed until stiff peaks form.

  3. Stop as soon as the cream holds its shape. Do not over-whip.


2️⃣ Mix the Lemon Base

  1. In a separate bowl, combine:

    • Sweetened condensed milk

    • Lemon juice

    • Lemon zest (if using)

  2. Whisk gently until smooth.

  3. The mixture will naturally thicken slightly due to the lemon juice.


3️⃣ Combine

  1. Pour the lemon mixture into the whipped cream.

  2. Using a spatula, fold gently:

    • Cut down the center

    • Lift and fold over

    • Rotate the bowl and repeat

Mix just until evenly blended while keeping the mixture light and airy.


4️⃣ Freeze

  1. Transfer the mixture to a freezer-safe container or loaf pan.

  2. Smooth the top evenly.

  3. Cover tightly, pressing the covering directly against the surface to reduce ice crystals.

  4. Freeze for at least 6 hours, preferably overnight.


🍨 Serving Suggestions

  • Scoop directly from the freezer

  • Serve with fresh berries

  • Garnish with mint leaves

  • Use as a filling for lemon sandwiches or cake layers


🧁 Tips

✔️ Use very cold cream for best volume
✔️ Fresh lemon juice gives the best flavor
✔️ Do not stir once frozen
✔️ Keeps well frozen for up to 2 weeks
✔️ Let sit 2–3 minutes before scooping if very firm

Delicious dessert, with few ingredients and ready quickly! I sent it to whoever sent it Hi.

Delicious dessert, with few ingredients and ready quickly!

Here’s a delicious dessert that uses very few ingredients and is ready super quickly 😍
Perfect when you want something sweet without much effort.


🍮 Quick & Easy Milk Dessert (3–4 Ingredients)

⏱ Time

  • Prep: 5 minutes
  • Cook: 10 minutes
  • Chill: optional
  • Total: 15 minutes

🍨 Servings

  • 3–4 bowls

📝 Ingredients

  • 2 cups milk
  • 2 tbsp cornflour (cornstarch)
  • 3 tbsp sugar (adjust to taste)
  • ½ tsp vanilla essence (optional)

👩‍🍳 Instructions

1️⃣ Mix

  1. In a bowl, dissolve cornflour in ½ cup cold milk.
  2. Make sure there are no lumps.

2️⃣ Cook

  1. Heat remaining milk in a pan.
  2. Add sugar and stir.
  3. Pour in cornflour mixture while stirring continuously.
  4. Cook on low heat until thick and creamy (5–7 minutes).
  5. Add vanilla essence and mix.

3️⃣ Serve

  • Pour into bowls or cups.
  • Serve warm or chilled.
  • Garnish if desired.

🌟 Optional Toppings (Not Required)

  • Crushed biscuits
  • Chocolate syrup
  • Coconut flakes
  • Nuts
  • Cinnamon powder

🔥 Tips

  • Stir constantly to avoid lumps
  • For richer taste, replace half the milk with cream
  • Can be set in molds like custard

✅ Why You’ll Love It

✔ Few ingredients
✔ Budget-friendly
✔ No oven
✔ Kid-friendly
✔ Ready in minutes

Turkish Mini Breads (Sütlü Ekmek / Sandviç Ekmeği)

Turkish Mini Breads (Sütlü Ekmek / Sandviç Ekmeği)

These soft Turkish rolls have a thin, lightly crisp crust and a fluffy interior. They are ideal for breakfast, sandwiches, or serving with butter and jam.


📝 Ingredients

For the Dough

  • 200 ml lukewarm water

  • 200 ml lukewarm milk

  • 1 packet (7–10 g) instant dry yeast

  • 1 tablespoon sugar

  • 1 teaspoon salt

  • 2 tablespoons vegetable oil

  • 600–650 g all-purpose flour (about 5 cups), sifted

For the Topping

  • A small bowl of water (for brushing)

  • Extra flour (for dusting)


👩‍🍳 Instructions

1️⃣ Prepare the Yeast Mixture

  1. In a large mixing bowl, combine:

    • Lukewarm water

    • Lukewarm milk

    • Sugar

  2. Sprinkle the yeast over the liquid and mix gently.

  3. Let stand for 5 minutes until slightly foamy.


2️⃣ Mix and Knead the Dough

  1. Add:

    • Vegetable oil

    • Salt

  2. Gradually add flour, mixing until a dough forms.

  3. Transfer dough to a lightly floured surface and knead for 8–10 minutes until:

    • Smooth

    • Elastic

    • Soft

    • Slightly tacky but not sticky

  4. Place dough in a lightly oiled bowl, cover, and let rise in a warm place for 1 hour or until doubled in size.


3️⃣ Shape the Rolls

  1. Gently deflate the dough.

  2. Divide into 12–15 equal pieces.

  3. Roll each piece into a ball, then shape into an oval or short log.

  4. Place on parchment-lined baking tray, spacing them apart.

  5. Cover and rest for 20–30 minutes.


4️⃣ Prepare for Baking (Signature Finish)

  1. Lightly brush each roll with water.

  2. Dust lightly with flour using a sieve.

  3. With a sharp knife, make one long cut along the top of each roll.


5️⃣ Bake

  1. Preheat oven to 200°C (400°F).

  2. Optional: Place a small oven-safe bowl of hot water in the oven for steam.

  3. Bake for 20–25 minutes until golden and hollow-sounding when tapped underneath.

  4. Transfer to a wire rack to cool.


🍽 Serving Ideas

  • Serve warm with butter and honey

  • Use for mini sandwiches

  • Enjoy with cheese, olives, tomatoes, and tea


🧁 Tips

✔️ Dough should be soft, not dry
✔️ Flour dusting should be light, not thick
✔️ Steam helps produce a crisp crust
✔️ Store in airtight container for 2 days
✔️ Freeze up to 1 month

Walnut Cinnamon Sweet Buns

Walnut Cinnamon Sweet Buns

Soft, fluffy buns filled with buttery cinnamon sugar and crunchy walnuts, twisted into beautiful knots and baked until golden.


📝 Ingredients

For the Dough

  • 200 ml lukewarm milk

  • 100 ml lukewarm water

  • 5 tbsp (60 g) sugar

  • 1 packet (7 g) instant dry yeast

  • ½ cup (115 g) unsalted butter, melted and cooled

  • 1 large egg (room temperature)

  • 550–600 g all-purpose flour (about 4½ cups)

  • ½ tsp salt

For the Filling

  • 1½ cups walnuts, finely chopped

  • ½ cup brown sugar (or white sugar)

  • 1 tbsp ground cinnamon

  • 4 tbsp butter, softened

For Brushing

  • 1 egg yolk

  • 1 tbsp milk


👩‍🍳 Instructions

1️⃣ Prepare the Dough

  1. In a large bowl, combine:

    • Lukewarm milk

    • Lukewarm water

    • Sugar

    • Yeast

  2. Mix gently and let stand for 5–10 minutes until foamy.

  3. Add:

    • Melted butter

    • Egg
      Whisk until well combined.

  4. Gradually add flour and salt. Mix until a soft dough forms.

  5. Knead for 8–10 minutes until:

    • Smooth

    • Elastic

    • Slightly tacky but not sticky

  6. Place dough in a lightly greased bowl. Cover and let rise in a warm place for 1 to 1½ hours, or until doubled in size.


2️⃣ Prepare the Filling

In a bowl, mix:

  • Walnuts

  • Sugar

  • Cinnamon

Set aside.


3️⃣ Shape the Buns

  1. Punch down the dough.

  2. Roll into a large rectangle about ¼ inch thick.

  3. Spread softened butter evenly over the dough.

  4. Sprinkle the walnut-cinnamon mixture evenly over the surface.

  5. Fold dough into thirds (like a letter).

  6. Cut into strips about 1–2 inches wide.


4️⃣ Twist and Form

  1. Stretch each strip slightly.

  2. Twist several times.

  3. Roll into a spiral or knot.

  4. Tuck ends underneath.

Place on parchment-lined baking tray.

Cover and rest for 30 minutes.


5️⃣ Bake

  1. Preheat oven to 180°C (350°F).

  2. Brush buns with egg yolk and milk mixture.

  3. Bake for 20–25 minutes until golden brown.


✨ Optional Sugar Syrup Finish (for shine & softness)

Heat together:

  • ¼ cup sugar

  • ¼ cup water

Simmer 2–3 minutes until clear.
Brush over hot buns after baking.

Iowa Party Bites

If you’re gearing up for football season or simply looking for a crowd pleasing snack, Iowa Party Bites are just the thing! These delicious little bites combine the crunch of tortilla chips with a cheesy, creamy filling that will have everyone coming back for more. There’s nothing better than a poppable, handheld food when you’ve got a big crowd! The best part might be how incredibly easy they are to whip up. Just a handful of ingredients come together to create a snack that’s packed with flavor and guaranteed to be a hit with the whole crew.


Ingredients

  • 1 (10 oz ) tostitos scoops tortilla chips
  • 1 (8 0z) block cream cheese, softened
  • 8 oz shredded mozzarella cheese
  • 1 egg
  • 1 (15 oz) can sweet corn, drained
  • 1 (4 oz) can green chiles, mild or medium
  • 1 teaspoon garlic powder
  • 1 teaspoon salt
  • ½ teaspoon black pepper
  • ½ cup grated parmesan cheese, for tops

How to Make Iowa Party Bites

  1. Preheat oven to 425 degrees F.
  2. Lightly grease two large baking sheets or line them with parchment paper. Tightly arrange chips on the sheets cup side up.
  3. In a large bowl, mix together cream cheese, mozzarella, egg, corn, chiles, garlic, salt, and pepper.
  4. Scoop filling into chips, about 1 tablespoon in each one.
  5. Sprinkle tops with parmesan cheese.
  6. Bake for 13-15 minutes or until tops begin to brown and cheese is bubbling.
  7. Serve warm and enjoy

Egg Salad Recipe

This Egg Salad Recipe is a classic, creamy, and satisfying dish made with perfectly boiled eggs, a rich mayo-based dressing, and simple seasonings. It’s quick to prepare, packed with flavor, and perfect for sandwiches, wraps, or a light lunch.


Ingredients

6 large eggs

1/3 cup mayonnaise

1 teaspoon Dijon mustard

1 tablespoon fresh lemon juice or white vinegar

  • 1/4 teaspoon salt adjust to taste
  • 1/4 teaspoon black pepper
  • 1 tablespoon finely chopped red onion optional
  • 1 tablespoon chopped fresh parsley or chives optional

How to Make Egg Salad Recipe

  • Place the eggs in a saucepan and cover with cold water. Bring to a boil over medium-high heat.
  • Once boiling, cover the pan, remove from heat, and let the eggs sit for 10 minutes.
  • Transfer eggs to cold water, then peel and chop them into small pieces.
  • In a mixing bowl, combine mayonnaise, mustard, lemon juice, salt, and pepper.
  • Add the chopped eggs, onion, and herbs. Gently mix until well combined.
  • Taste and adjust seasoning as needed. Chill for 15 minutes before serving for best flavor.

Canadian Cheese Soup

There are plenty of things about Disney that are magical, but one of the best is their food offerings. A visit to Epcot Center lets you try dozens of countries’ food in a single visit and it seems like each thing is more delicious than the last. This Canadian Cheese Soup is one of the standouts! Served at the Le Cellier steakhouse in Epcot, it’s the kind of thing you think about long after you’ve tasted it and has developed somewhat of a cult following. But since a Disney visit isn’t always in the cards, it’s great news that you can make it right in your home kitchen with this official Disney recipe

INGREDIENTS

1/2 lb bacon, chopped

1 medium onion, finely chopped

3 celery ribs, finely chopped

2 cloves garlic, minced

4 tablespoons (1/4 cup) butter

1 cup all-purpose flour

3 cups chicken stock

4 cups milk

1 lb sharp cheddar cheese, grated

1 tablespoon Tabasco sauce

1 tablespoon Worcestershire sauce

1/2 cup pale or golden lager, preferably Canadian

Kosher salt and freshly ground black pepper, to taste

Chopped green onion or chives, for serving (optional)

PREPARATION

  1. In a large heavy-bottomed pot or Dutch oven, cook bacon over medium heat until lightly browned, about 5 minutes.
  2. Add onion, celery, garlic, and butter and cook until onion has softened, about 5 minutes more.
  3. Add flour and cook, stirring constantly, until it starts to turn golden and smell nutty, about 4 minutes.
  4. Whisk in chicken stock and bring to a boil. Let boil 1 minute, then reduce heat to a simmer and cook 15 minutes, stirring occasionally.
  5. Add milk and continue simmering for 15 minutes. Make sure not to boil once milk is added.
  6. Remove from heat and stir in cheese. Tabasco, Worcestershire sauce, salt, and pepper.
  7. Using an immersion blender, blend until soup is mostly smooth.
  8. Stir in beer and adjust seasoning as needed. Serve garnished with green onion.

Slow Cooker Cowboy Casserole

Slow Cooker Cowboy Casserole

Ingredients

1 pound lean ground beef

1 cup finely diced sweet yellow onions

1 tablespoon minced garlic

1 (16-ounce) can dark red kidney beans, undrained

1 (14.5-ounce) can petite diced tomatoes with juice

1 (10-ounce) can diced tomatoes with fire roasted hatch chilies, with juice

1 cup frozen corn

1 teaspoon kosher salt

½ teaspoon freshly cracked black pepper

¼ teaspoon chipotle powder

1½ pounds Yukon Gold potatoes, sliced about ⅛ inch thick

Instructions

Step 1: Lightly spray your crockpot with nonstick cooking spray.

Step 2: In a 10-inch nonstick skillet over medium-high heat, brown 1 pound ground beef, 1 cup diced onions, and 1 tablespoon minced garlic until the beef is no longer pink.

Step 3: Drain any excess grease from the skillet and transfer the cooked mixture to the prepared crockpot.

Step 4: Add the following to the crockpot:

16 oz undrained kidney beans

14.5 oz petite diced tomatoes with juice

10 oz diced tomatoes with chilies and juice

1 cup frozen corn

1 teaspoon kosher salt

½ teaspoon black pepper

¼ teaspoon chipotle powder

Stir everything together until well combined.

Step 5: Remove 1½ cups of the meat mixture and set it aside.

Step 6: Layer or wedge 1½ pounds of sliced Yukon Gold potatoes into the crockpot. Sprinkle the reserved meat mixture evenly over the top.

Step 7:Cover and cook:

On high for 5 hours

Or on low for 7 hours

Step 8:Before serving, sprinkle 1¼ cups shredded Colby and Monterey Jack cheese over the top. Cover again and let it melt completely.

Serve hot and enjoy!