French Onion Meatloaf with Melted Swiss Cheese
A rich, savory meatloaf inspired by the deep flavors of classic French onion soup. Sweet caramelized onions are folded into a tender beef-pork meat mixture and topped with melted Swiss cheese for a comforting and satisfying dinner.
Recipe Information
-
Course: Main Dish
-
Cuisine: American / French-Inspired
-
Preparation Time: 30 minutes
-
Cooking Time: 60 minutes
-
Total Time: 1 hour 30 minutes
-
Servings: 6
-
Estimated Calories: 485 kcal per serving
Ingredients
For the Caramelized Onions
For the Meatloaf
-
1½ pounds (680 g) ground beef
-
½ pound (225 g) ground pork
-
1 cup breadcrumbs
-
2 large eggs
-
¼ cup milk
-
1 tablespoon Worcestershire sauce
-
1 teaspoon salt
-
½ teaspoon black pepper
-
1 teaspoon dried thyme
Topping
Equipment
Step-by-Step Instructions
1. Prepare the Oven
Preheat the oven to 350°F (175°C).
Lightly grease a 9×5 inch loaf pan or line it with parchment paper for easier removal.
2. Caramelize the Onions
Heat butter in a large skillet over medium heat.
Add:
Cook slowly, stirring occasionally.
Continue cooking for about 20 minutes until the onions become:
-
deep golden brown
-
soft
-
sweet-smelling
Remove from heat and allow them to cool slightly.
Reserve about ¼ cup of the onions for topping.
3. Prepare the Meat Mixture
In a large mixing bowl combine:
-
ground beef
-
ground pork
-
breadcrumbs
-
eggs
-
milk
-
Worcestershire sauce
-
salt
-
black pepper
-
dried thyme
Mix gently with your hands or a spoon until just combined.
Do not overmix because it can make the meatloaf dense.
4. Add the Onions
Fold most of the caramelized onions into the meat mixture.
Mix lightly to distribute them evenly.
5. Shape the Meatloaf
Transfer the mixture into the prepared loaf pan.
Press gently to shape it into an even loaf.
Spread the reserved caramelized onions over the top.
6. First Bake
Place the loaf pan in the oven.
Bake for 45 minutes until the meatloaf is mostly cooked and lightly browned.
7. Add the Cheese
Remove the meatloaf from the oven.
Sprinkle shredded Swiss cheese evenly over the top.
Return it to the oven.
Bake an additional 15 minutes until:
8. Rest the Meatloaf
Remove from the oven and let it rest for 10 minutes before slicing.
This step helps the juices redistribute and keeps slices neat.
Serving Suggestions
Serve the meatloaf with classic comfort-food sides such as:
Expert Cooking Tips
1. Caramelization is key
Properly browned onions create the signature French onion flavor. Cook them slowly for best results.
2. Use a meat blend
The combination of beef and pork creates a juicier meatloaf than beef alone.
3. Avoid overmixing
Overworking the meat can make the texture firm.
4. Check temperature
The safest internal temperature for ground meat dishes is 160°F (71°C).
5. Let it rest
Resting ensures clean slices and better texture.
Make-Ahead Instructions
You can prepare the meatloaf up to 24 hours in advance:
-
Assemble the meatloaf in the pan.
-
Cover tightly.
-
Refrigerate.
When ready to bake, add 5–10 extra minutes to the cooking time.
Storage
Reheat slices in the oven at 350°F (175°C) until warm.
Variations
Gruyère Version
Replace Swiss cheese with Gruyère for a more traditional French onion soup flavor.
Dijon Flavor Boost
Add 1 tablespoon Dijon mustard to the meat mixture.
Spicy Version
Add ¼ teaspoon cayenne pepper or chopped chili.
Gluten-Free Option
Use gluten-free breadcrumbs or crushed rice crackers.


 Important: No vegetable “cures” diabetes, but these can help manage blood sugar as part of a balanced diet.
 Servings
 Prep Time
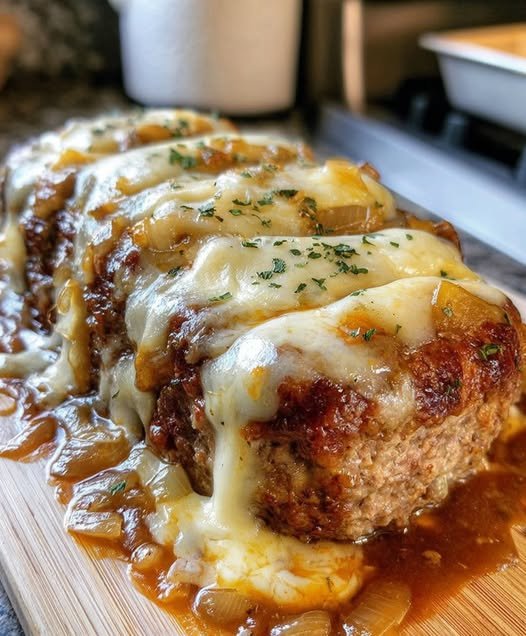


 Fat-free Greek yogurt (makes it creamy like cream cheese, but 0 points)
 Use hominy instead of corn

 Apple Yogurt Cake