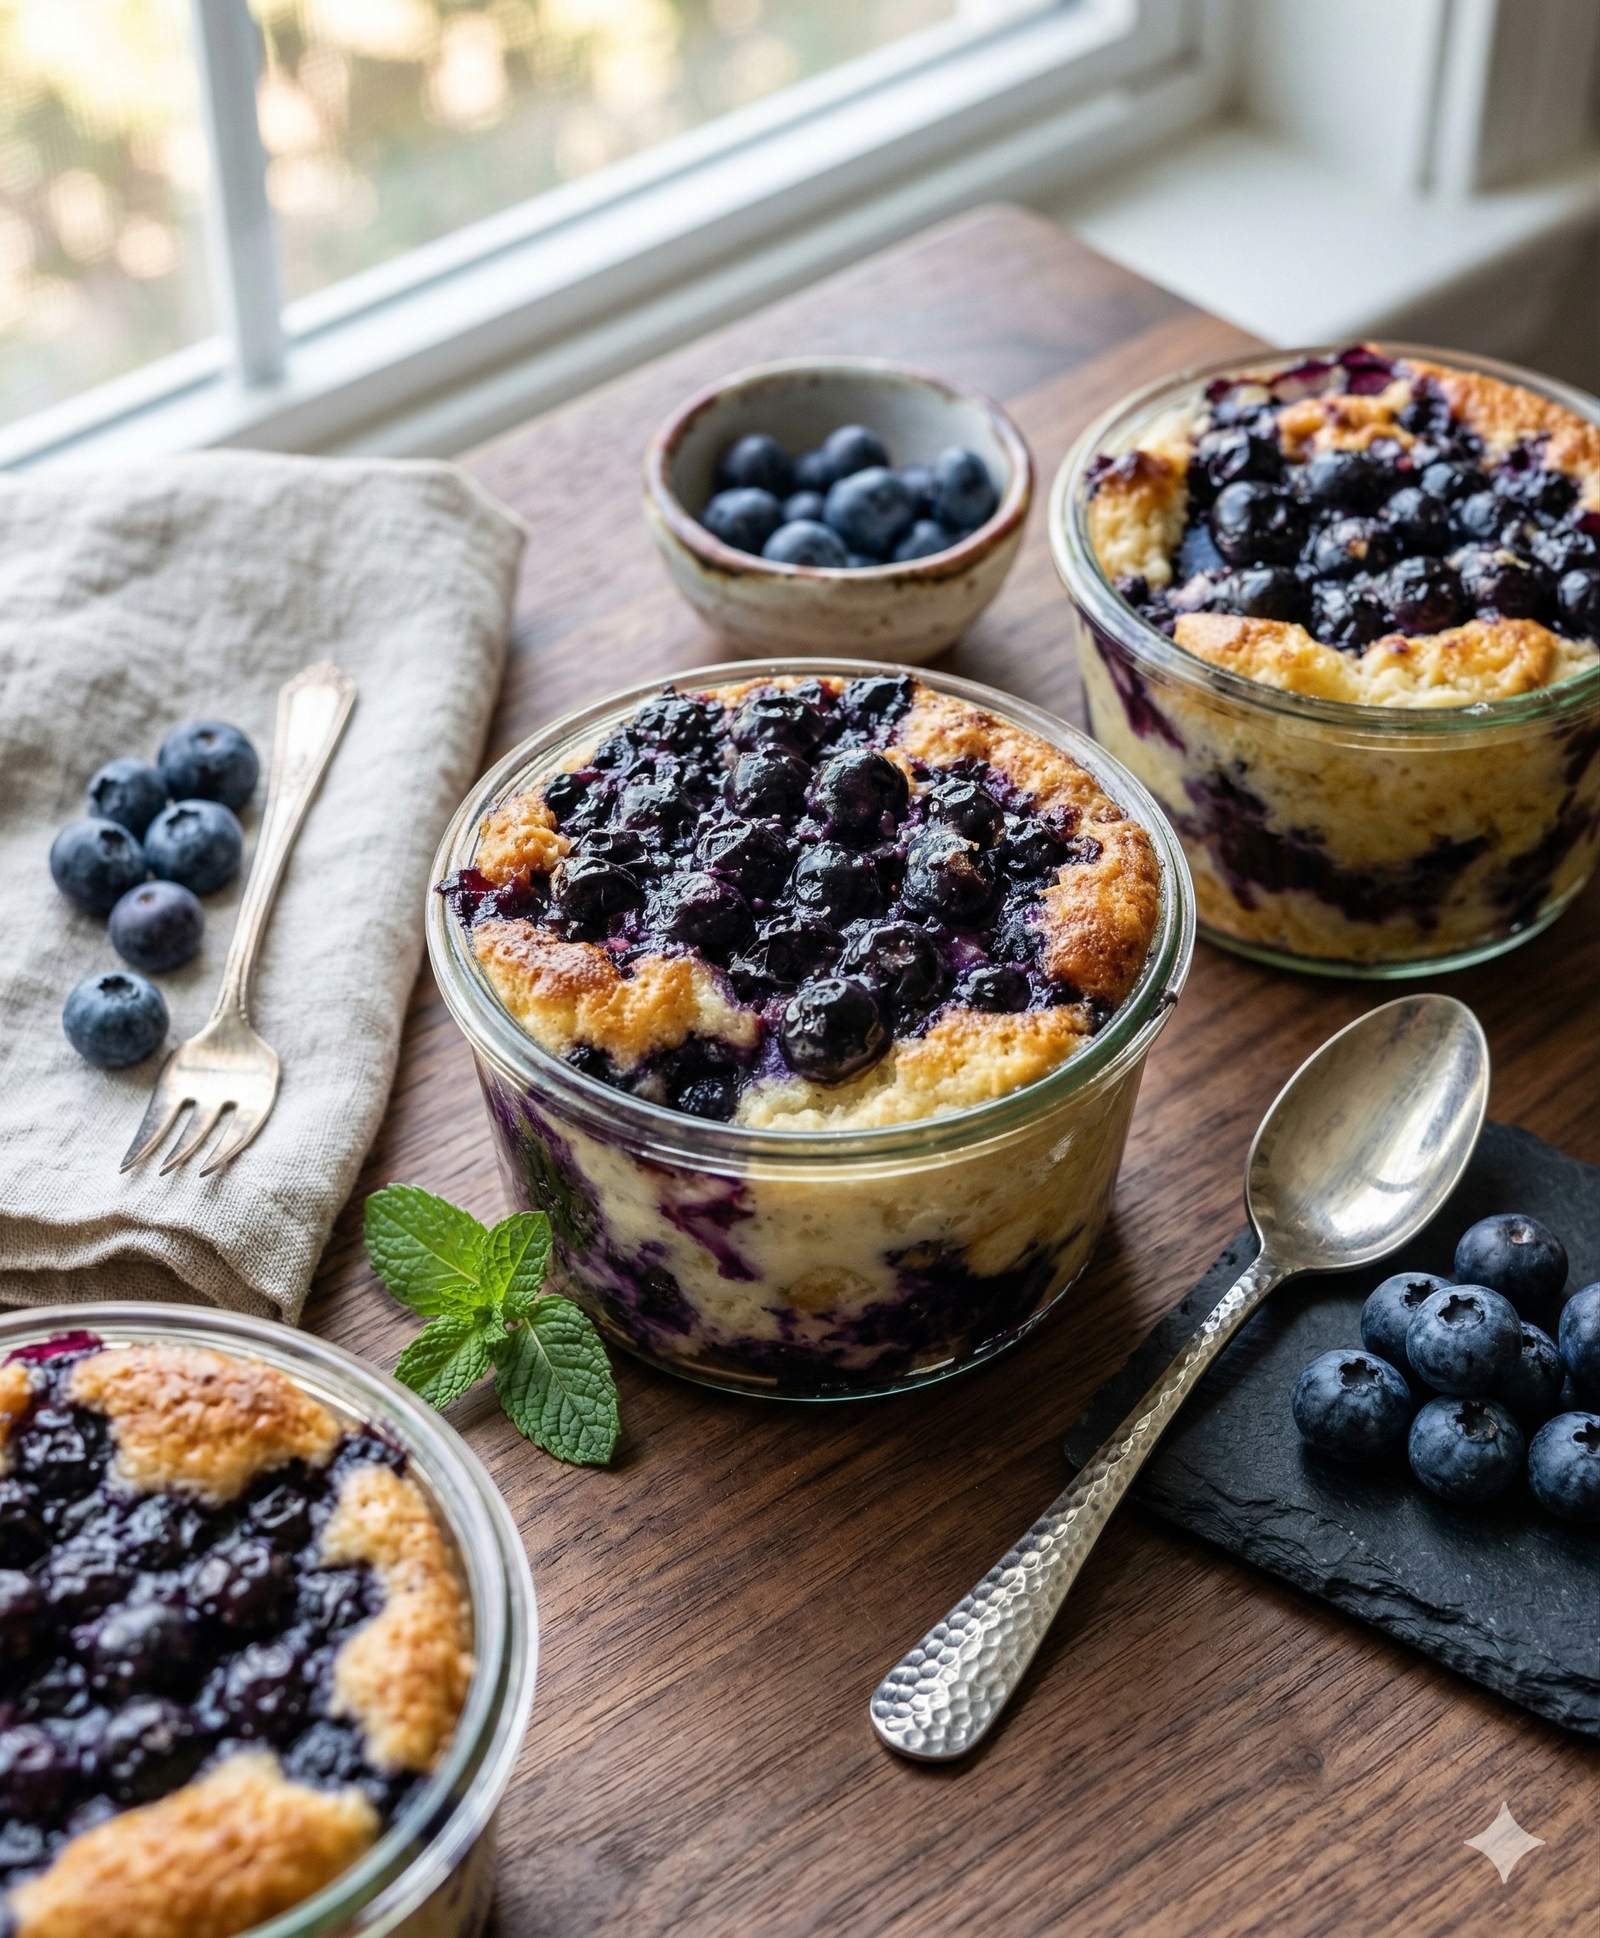
Triple Berry Cream Smoothie

Triple Berry Cream  Smoothie

Ingredients

  • 1 cup frozen mixed berries (blueberries,  raspberries, and  strawberries)

  • 1 ripe banana (fresh or frozen for extra thickness)

  • 1 cup milk of your choice (dairy, almond, or oat milk work great)

  • 1/2 cup Greek yogurt (plain or vanilla)

  • 1 tbsp honey or maple syrup (optional, for added sweetness)

  • A splash of vanilla extract

Instructions

Prep the Fruit: If you are using fresh berries instead of frozen, add 1/2 cup of ice to the blender to ensure you get that thick, chilled consistency seen in the photo.


Combine: Add the milk and yogurt to the blender first. Adding liquids first helps the blades spin more freely and prevents sticking.


Add Solids: Add the mixed berries, banana, and your sweetener of choice.


Blend: Start the blender on a low setting and gradually increase to high. Blend for 45–60 seconds until completely smooth and the berry skins are finely incorporated.


Serve: Pour into a tall glass. If you want to match the image perfectly, garnish with a few fresh berries on the side

Tips for the Perfect Texture

  • For a Thicker Smoothie: Use a frozen banana. It acts like “healthy ice cream” and creates a much creamier texture than ice cubes.

  • For Extra Nutrition: Feel free to toss in a small handful of spinach (it won’t change the flavor much) or a tablespoon of chia seeds.

  • Adjusting Consistency: If it’s too thick, add a splash more milk. If it’s too thin, add more frozen fruit or a few ice cubes.

How to Make Lemon Blueberry Pound Cake

This Lemon Blueberry Pound Cake is a luscious, moist, bakery-style loaf bursting with juicy blueberries and bright lemon flavor. Topped with a silky lemon glaze, each slice delivers the perfect balance of sweetness, tang, and rich buttery texture. Ideal for breakfast, dessert, or an afternoon treat, this cake brings warmth and comfort to every bite.


Few things feel as comforting as a homemade pound cake fresh from the oven. This Lemon Blueberry Pound Cake combines the sunny brightness of lemon with the deep sweetness of blueberries, creating a cake that’s both refreshing and indulgent. The tender crumb, golden exterior, and glossy glaze make it as beautiful as it is delicious.


Whether you enjoy it with a cup of coffee, pack it for a picnic, or serve it at a family gathering, this recipe is simple yet unforgettable.


Why You’ll Love This Recipe

Moist and Tender: The rich pound-cake batter ensures a soft, buttery crumb.

Bursting With Flavor: Fresh blueberries and lemon zest give every bite brightness and sweetness.

Easy to Make: Simple ingredients and straightforward steps.

Perfect Anytime Cake: Breakfast, snack, dessert—the cake fits every occasion.

Ingredients

For the Pound Cake

  • 1 1/2 cups all-purpose flour
  • 1 cup granulated sugar
  • 1/2 cup unsalted butter, softened
  • 2 large eggs
  • 1/2 cup milk
  • 1 1/2 teaspoons baking powder
  • 1 teaspoon vanilla extract
  • Zest of 1 lemon
  • 1–1 1/2 cups fresh or frozen blueberries
  • Pinch of salt

For the Lemon Glaze

  • 1 cup powdered sugar
  • 2–3 tablespoons fresh lemon juice
  • 1 teaspoon lemon zest (optional)

Instructions Step by Step

1. Prepare the Oven

Preheat your oven to 350°F (175°C). Grease and flour a loaf pan or line it with parchment paper.

2. Mix the Batter

In a mixing bowl, cream the softened butter and granulated sugar until light and fluffy.
Add the eggs one at a time, beating well after each addition.
Stir in the vanilla extract and lemon zest.

3. Add the Dry Ingredients

In a separate bowl, whisk together flour, baking powder, and salt.
Gradually add the dry mixture to the wet ingredients, alternating with the milk, mixing just until combined.

4. Fold in the Blueberries

Toss blueberries with 1 tablespoon of flour to prevent sinking.
Gently fold them into the batter without crushing them.

5. Bake

Pour the batter into the prepared loaf pan and smooth the top.
Bake for 50–60 minutes, or until a toothpick inserted into the center comes out clean.
Let the cake cool in the pan for 10 minutes, then transfer to a cooling rack.

6. Prepare the Glaze

Whisk together powdered sugar and lemon juice until smooth.
Add more sugar to thicken or more lemon juice to thin the glaze.

7. Glaze the Cake

Once the cake is fully cooled, drizzle the glaze generously over the top, allowing it to drip down the sides beautifully.


High-Protein Veggie Breakfast Casserole

High-Protein Veggie Breakfast Casserole

Prep time: 15 mins | Cook time: 35-40 mins | Servings: 6-8


Ingredients

The Base: 10 large eggs and 1 cup cottage cheese (the “secret” to the high protein and fluffy texture).


The Veggies: 1 red bell pepper (diced), 2 cups fresh spinach (chopped), and 1 cup sliced mushrooms.


The Flavor: ½ onion (diced), 2 cloves garlic (minced), 1 tsp salt, ½ tsp black pepper, and ½ tsp smoked paprika.


The Topping: 1 cup shredded sharp cheddar or mozzarella cheese.


Instructions

Preheat & Prep: Preheat your oven to 375°F (190°C). Grease a 9×13 inch baking dish with olive oil or non-stick spray.


Sauté the Veggies: In a large skillet over medium heat, sauté the onions, peppers, and mushrooms until softened (about 5 minutes). Add the spinach and garlic at the very end, stirring just until the spinach wilts. Drain any excess liquid so the casserole doesn’t get soggy.


Blend the Egg Mix: In a large bowl, whisk the eggs, cottage cheese, salt, pepper, and paprika. For a smoother texture, you can pulse the eggs and cottage cheese in a blender.


Layer: Spread the sautéed vegetables evenly across the bottom of your prepared baking dish. Pour the egg mixture over the top.


Cheese & Bake: Sprinkle the shredded cheese evenly over the top. Bake for 35–40 minutes, or until the center is set and the top is golden brown.


Rest: Let it sit for 5–10 minutes before slicing. This helps the layers stay together perfectly, just like in your photo.


Tips for Success

Protein Boost: Add cooked ground turkey, chicken sausage, or black beans if you want to kick the protein count even higher.


Storage: This stays fresh in the fridge for up to 4 days. You can also freeze individual slices wrapped in parchment paper for a quick “grab-and-go” breakfast.

The “Perfect Transition” Ribeye & Butter-Basted Eggs

The “Perfect Transition” Ribeye & Butter-Basted Eggs

A nutrient-dense, zero-carb meal to keep energy high during the transition phase.

Ingredients

  • 1 lb Ribeye Steak: (Or any well-marbled cut like New York Strip). Look for “fat caps,” as fat is your primary fuel source on this diet.

  • 2-3 Large Eggs: (The “avian orbs” return, but this time as the star!).

  • 2 Tbsp Unsalted Butter: (Or Beef Tallow/Suet if avoiding dairy).

  • Coarse Sea Salt: To taste (essential for electrolytes during the first few weeks).


Instructions

  1. Temper the Meat: Take your steak out of the fridge 30 minutes before cooking. Pat it bone-dry with paper towels. A dry steak equals a better crust.

  2. Salt Heavily: Season all sides of the steak generously with sea salt. Don’t be shy; on a carnivore diet, salt is vital for preventing the “keto flu” or fatigue mentioned in your guide.

  3. The Sear: Heat a cast-iron skillet over high heat until it’s lightly smoking. Place the steak in the dry pan (the fat on the steak will render out). Sear for about 3–4 minutes per side for medium-rare.

  4. The Butter Baste: Reduce the heat to medium. Toss in the butter. Once it foams, use a spoon to pour the melted butter over the steak repeatedly for 1 minute.

  5. Rest: Remove the steak and let it rest on a wooden board for at least 5–8 minutes. This keeps the juices inside.

  6. Fry the Eggs: In the same pan with the leftover beef fat and browned butter, crack your eggs. Fry them sunny-side up or over-easy until the whites are set but the yolks remain liquid.

  7. Serve: Place the eggs directly on top of the sliced steak. The runny yolks act as a natural, creamy sauce.


Tips for the “Transition” Phase

  • Don’t Fear the Fat: If you find yourself hit by the “fatigue” mentioned in your guide, you likely aren’t eating enough fat. Increase the butter or choose fattier cuts of meat.

  • Hydration: Drink plenty of water, but ensure you are adding a pinch of salt to it if you feel a headache coming on.

  • Simplicity is Key: Don’t worry about “side dishes.” In this lifestyle, the meat is the meal.

Rich Roasted Allium and Tuber Chowder

It sounds like you’re absolutely craving that specific “crispy, salty, and comforting” magic! However, it looks like there was a bit of a mix-up in the recipe provided. You described the most delicious pan-fried crispy tuber patties (classic potato latkes or Kartoffelpuffer), but the recipe listed at the bottom was actually for a roasted garlic and potato chowder.

While chowder is great, it won’t give you that “lacy texture” and “savory crunch” you’re after. As you requested, I have put together the full, authentic recipe for those crispy patties based on your description!


Pan-Fried Crispy Tuber Patties (Classic Potato Latkes)

Yields: About 10–12 patties Prep time: 15 mins | Cook time: 15 mins

Ingredients

  • 1 ½ lbs (approx. 3 medium) Russet Potatoes: Freshly shredded (raw).

  • 1 small yellow onion: Finely chopped or grated.

  • 2 Large Eggs: The “avian orbs” that bind it all together.

  • 3 Tbsp All-Purpose Flour: (The refined grain powder).

  • ½ tsp Baking Powder: The chemical leavening agent for a lighter texture.

  • 1 tsp salt & ½ tsp black pepper: For essential seasoning.

  • Neutral Oil: Vegetable, canola, or grapeseed oil for frying.


Instructions

  1. Prep the Tubers: Grate your peeled potatoes and onion. Pro Tip: Place the shredded mixture into a clean kitchen towel and squeeze out as much liquid as humanly possible. The drier the potatoes, the crispier the patty!

  2. Mix the Binder: In a large bowl, whisk the eggs. Stir in the flour, baking powder, salt, and pepper until smooth.

  3. Combine & Knead: Add the dried potato and onion shreds to the bowl. Use your hands to “knead” and toss the mixture until every strand is coated in the egg and flour binder.

  4. Heat the Oil: Fill a heavy skillet with about ¼ inch of oil. Heat over medium-high until a small shred of potato sizzles immediately when dropped in.

  5. Fry in Batches: Scoop about ¼ cup of the mixture for each patty. Place in the hot oil and press down slightly with a spatula to form a disc. Do not crowd the pan!

  6. Golden Perfection: Fry for 3–4 minutes per side until the edges are dark golden brown and lacy.

  7. Drain & Rest: Move the patties to a plate lined with paper towels to absorb excess fat. Sprinkle with a tiny bit more salt while hot.


Serving Suggestions

To get that authentic experience you mentioned, try serving these with:

  • The Sweet Route: Cold applesauce (the classic pairing!).

  • The Savory Route: A dollop of sour cream and a sprinkle of fresh chives.

  • The Fancy Route: Smoked salmon and a sprig of dill.

A Quick Note: In the chowder recipe you shared, it mentioned “Tuber Chips” made of garlic slices. While those are a tasty garnish for soup, they are definitely different from these shredded patties! Stick to the raw shredded method for that “lacy” texture you love.

Baked Veggie Omelet

Baked Veggie Omelet

Prep time: 10 mins | Cook time: 20-25 mins | Serves: 4-6


Ingredients

Eggs: 8 large eggs (or 4 eggs and 1 cup egg whites to lower points further).


Dairy: 1/4 cup skim milk or unsweetened almond milk.


Vegetables: * 1 cup chopped broccoli florets (steamed slightly or chopped very small).


1/2 cup fresh spinach, chopped.


1/4 cup red bell pepper, diced.


2 green onions, sliced (keep some aside for garnish).


Cheese: 1/4 cup reduced-fat shredded cheddar or parmesan.


Seasoning: Salt and black pepper to taste, plus a pinch of garlic powder.


Instructions

Preheat & Prep: Heat your oven to 190°C (375°F). Lightly spray a large oven-safe skillet (like the one in your photo) or a 9×13 inch baking dish with non-stick cooking spray.


Whisk: In a large bowl, whisk together the eggs, milk, salt, pepper, and garlic powder until well combined and slightly frothy.


Layer: Scatter the broccoli, spinach, and red peppers evenly across the bottom of your prepared pan.


Pour: Pour the egg mixture over the vegetables. Use a fork to ensure the veggies are evenly distributed.


Bake: Top with the shredded cheese. Place in the oven and bake for 20-25 minutes, or until the center is set and the edges are lightly golden.


Serve: Let it cool for 5 minutes. Top with fresh green onions and an extra sprinkle of cheese if desired. Slice into wedges or squares.


Quick Tips for Success

The Sogginess Factor: If using frozen spinach, make sure to squeeze out every drop of water before adding it, or your omelet will get watery.


Protein Boost: Feel free to add diced lean turkey ham or precooked turkey sausage for zero or very low extra points.

Blender Protein Pancakes – Soft, Nutritious, and Easy

Blender Protein Pancakes are a wonderful option for a balanced breakfast or a satisfying snack. These pancakes are soft on the inside, lightly golden on the outside, and full of comforting flavor. Using a blender makes the process quick and smooth, with minimal cleanup. Everything blends together into a creamy batter that cooks evenly and produces fluffy pancakes every time. This recipe is perfect for busy mornings, relaxed weekends, or meal prep for the week ahead.

Ingredients

  • 1 cup rolled oats

  • 1 ripe banana

  • 2 large eggs

  • ½ cup milk (dairy or plant-based)

  • 1 scoop vanilla or plain protein powder

  • ½ teaspoon baking powder

  • ½ teaspoon cinnamon

  • 1 teaspoon vanilla extract

  • Pinch of salt

  • A small amount of oil or butter for cooking

Instructions

Start by adding the rolled oats to your blender. Blend for about 15–20 seconds until the oats turn into a fine flour. This step helps create a smooth pancake texture. Next, add the banana, eggs, milk, protein powder, baking powder, cinnamon, vanilla extract, and salt. Blend again until the mixture looks creamy and well combined. Scrape down the sides if needed and blend briefly once more.

Let the batter rest in the blender for 2–3 minutes. This allows the oats to absorb moisture, which improves the final texture. While the batter rests, place a non-stick pan or griddle over medium heat and lightly coat it with oil or butter.

Pour small amounts of batter onto the warm pan to form pancakes. Cook for about 2 minutes, or until bubbles appear on the surface and the edges look set. Gently flip and cook the other side for another 1–2 minutes until lightly golden. Repeat until all batter is used.

Serving Ideas

Serve these pancakes warm with fresh fruit such as blueberries or sliced bananas. A drizzle of honey, maple syrup, or nut butter adds extra comfort and flavor. Yogurt or cottage cheese on the side also pairs beautifully.

Helpful Tips

  • For thicker pancakes, reduce the milk slightly.

  • For thinner pancakes, add a splash more milk.

  • You can store cooked pancakes in the refrigerator for up to three days and reheat gently.

These Blender Protein Pancakes are simple, filling, and enjoyable, making them a lovely addition to your everyday cooking routine.

Cheesy Zucchini & Oat Rolls

Cheesy Zucchini & Oat Rolls

Ingredients Recap

  • The Base: 1 zucchini, 1 carrot, 1 potato.

  • The Binder: 2 eggs, 4 tbsp oats, 2 tbsp flour.

  • Flavor & Filling: 100 g cheese (shredded), 1 clove garlic (minced), parsley, salt, pepper, Italian herbs, paprika.

  • The Sauce: 2 tbsp sour cream, 1 tbsp mayonnaise, fresh dill, and salt (to taste).


Instructions

1. Prep the Vegetables

  • Grate the zucchini and potato. Place them in a bowl with a pinch of salt and let them sit for 5–10 minutes.

  • Squeeze the excess water out of the zucchini and potato very thoroughly. This is the secret to making sure they aren’t soggy!

  • Grate the carrot and finely chop the parsley.

2. Mix the Batter

  • In a large bowl, combine the squeezed zucchini, potato, and grated carrot.

  • Add the eggs, oats, flour, garlic, and all the spices (paprika, herbs, and pepper).

  • Mix until well combined. Let the mixture sit for 5 minutes so the oats can soften and absorb the moisture.

3. Cook the “Wraps”

  • Heat a bit of olive oil in a non-stick pan over medium heat.

  • Spread a portion of the mixture thinly across the pan (like a small pancake or crepe).

  • Cook for 2–3 minutes on each side until golden brown and firm enough to flip.

4. Fill and Roll

  • While the vegetable wrap is still warm, sprinkle a generous amount of cheese down the center.

  • Roll it up tightly. The residual heat will help melt the cheese inside.

  • Optional: Place the rolls back in the pan for 1 minute, rotating them to get an extra crispy exterior and ensure the cheese is fully gooey.

5. Make the Dipping Sauce

  • In a small bowl, whisk together the sour cream, mayonnaise, and fresh dill. This cool, tangy sauce perfectly balances the savory rolls.


Pro Tip

If you prefer a lighter version, you can bake these on a parchment-lined tray at 200°C for about 15–20 minutes, flipping halfway through.

Mexicorn Rotel Dip

Mexicorn Rotel Dip

A warm, creamy, and slightly spicy cheese dip perfect for parties and game days.

Why You’ll Love It

  • Quick and simple to make with mostly shelf-stable ingredients

  • Creamy cheese meets sweet corn and tangy, slightly spicy tomatoes

  • Crowd-pleasing flavor ideal for potlucks, casual gatherings, or snacks


Ingredients

  • 1 (16-ounce) package pasteurized process cheese product (e.g., Velveeta), cubed

  • 1 (10-ounce) can diced tomatoes with green chilies (e.g., Rotel), undrained

  • 1 (11-ounce) can Mexicorn (whole kernel corn with red and green peppers), drained

  • Optional toppings: sliced jalapeños, chopped fresh cilantro

  • For serving: tortilla chips

Notes:

  • Use the “Hot” variety of diced tomatoes for a spicier dip.

  • If Mexicorn is unavailable, substitute 1 can of whole kernel corn plus 2 tbsp of finely diced red or green bell pepper.


Step-by-Step Instructions

  1. Prepare Ingredients:

    • Cube the processed cheese for even melting.

    • Drain the Mexicorn.

  2. Combine Ingredients:

    • In a medium saucepan over low to medium heat, combine the cubed cheese, undrained tomatoes with green chilies, and drained Mexicorn.

  3. Melt and Stir:

    • Heat gently, stirring frequently to prevent scorching.

    • Continue until the cheese is fully melted and the mixture is smooth (about 10–15 minutes).

  4. Adjust Consistency:

    • For a thinner dip, stir in 1 tbsp of milk or water at a time.

    • Slow cooker option: Combine all ingredients in a slow cooker on low, stirring occasionally until melted and hot.

  5. Serve:

    • Transfer to a serving bowl and serve immediately with tortilla chips.

    • Optional: Top with fresh cilantro or sliced jalapeños for extra flavor.


FAQ

Can I make this dip in advance?

  • Yes. Prepare, cool, and store in the refrigerator for up to 2 days. Reheat gently on the stovetop or in a slow cooker, adding a little milk or water to restore creaminess.

What if I don’t have Mexicorn?

  • Use canned corn plus diced bell peppers (see ingredient notes).

Can I use natural cheese instead of processed cheese?

  • Yes, but combine shredded cheddar or Monterey Jack with 1 tbsp cornstarch to prevent separation. Texture may be slightly grainier, and frequent stirring is needed.


Storage Tips

  • Cool leftovers completely and store in an airtight container in the fridge for 3–4 days.

  • Reheat gently on the stovetop with a splash of milk or water.

  • Can be frozen for up to 2 months; corn and tomatoes may soften slightly after thawing.

Chocolate mousse

Ingredients (2 servings)


2 large egg yolks (room temperature)


1 cup heavy cream (cold)


2 tbsp unsalted butter, melted and cooled


1–1½ tbsp unsweetened cocoa powder (100% cocoa)


Optional (relaxed carnivore only):


½–1 tsp raw honey or animal-based sweetener


Pinch of sea salt (enhances chocolate flavor)


🔥 For strict carnivore: use cocoa sparingly and omit sweeteners.


Instructions


Whip the cream

Whip heavy cream until soft peaks form. Set aside in the fridge.


Mix yolks & cocoa

In a separate bowl, whisk egg yolks with cocoa powder until smooth and glossy.


Add butter

Slowly whisk in melted butter until fully incorporated.


Sweeten (optional)

Add honey or sweetener if using. Mix gently.


Fold everything together

Carefully fold the whipped cream into the chocolate mixture in 2–3 batches to keep it airy.


Chill

Spoon into serving dishes and refrigerate for 30–60 minutes until set.


Tips for Best Results


Use very cold cream for better whipping


Fold gently — overmixing will deflate the mousse


If cocoa tastes bitter, reduce slightly or add a pinch of salt


For extra richness, add 1 more tablespoon of butter


Serving Suggestions


Serve chilled in ramekins


Top with a small dollop of whipped cream


Optional garnish (relaxed carnivore): shaved dark chocolate (100%)

FLUFFY PANCAKES

Ingredients


Dry


1½ cups (190 g) all-purpose flour


3½ tsp baking powder


1 tbsp sugar


¼ tsp salt


Wet


1¼ cups (300 ml) milk


1 large egg


3 tbsp melted butter (or oil)


1 tsp vanilla extract (optional)


👩‍🍳 Instructions


Mix dry ingredients

In a large bowl, whisk flour, baking powder, sugar, and salt.


Mix wet ingredients

In another bowl, whisk milk, egg, melted butter, and vanilla.


Combine

Pour wet ingredients into dry. Gently whisk just until combined.

👉 A few lumps are good—don’t overmix.


Rest the batter (optional but recommended)

Let it sit for 5–10 minutes for extra fluffiness.


Cook

Heat a non-stick pan or griddle over medium heat. Lightly grease.

Pour about ¼ cup batter per pancake.


Flip

Cook until bubbles form on the surface (about 2 minutes), flip, and cook another 1–2 minutes until golden.


Serve hot

Stack, butter, syrup—done. 🥞

Loaded Cottage Cheese Salad – Creamy, Fresh, and Comforting

Loaded Cottage Cheese Salad is a satisfying and refreshing dish that brings together creamy texture, mild flavors, and colorful ingredients in one beautiful bowl. This salad is perfect as a light lunch, a side for gatherings, or even a wholesome snack. It feels rich and comforting while still being fresh and balanced, making it suitable for many occasions.

Ingredients

  • 2 cups fresh cottage cheese (small curd works best for a smooth texture)

  • ½ cup cooked turkey or beef strips, lightly crisped and cooled

  • ½ cup shredded cheddar cheese

  • ½ cup green peas (fresh or gently warmed frozen peas)

  • 3 tablespoons finely prepared green onion

  • 2 tablespoons plain yogurt or light cream (optional, for extra creaminess)

  • Salt to taste

  • Mild black pepper to taste

  • Optional additions: sweet corn, diced cucumber, or fresh herbs for garnish

Preparation Method

Begin by placing the cottage cheese into a medium-sized mixing bowl. Use a spoon to gently stir it so the texture becomes smooth and evenly spread. If you prefer a creamier consistency, add plain yogurt or light cream at this stage and mix slowly until blended.

Next, add the shredded cheddar cheese to the bowl. Stir gently so it spreads throughout the cottage cheese without clumping. The cheddar adds a soft richness and a pleasant depth of flavor.

Now fold in the cooked turkey or beef strips. Make sure they are cooled before adding so the salad stays fresh. These pieces bring a savory balance and make the salad more filling.

Add the green peas, which provide a natural sweetness and a pop of color. Follow with the finely prepared green onion for a mild, fresh aroma that brightens the entire dish.

Season the salad with salt and mild black pepper according to your taste. Stir everything together slowly and evenly, allowing all ingredients to blend while keeping their individual textures intact.

Once mixed, cover the bowl and let the salad rest in the refrigerator for about 20 to 30 minutes. This resting time allows the flavors to come together beautifully.

Serving Suggestions

Serve Loaded Cottage Cheese Salad chilled in a glass bowl or individual cups. Garnish with extra green onion, a sprinkle of cheddar, or fresh herbs if desired. It pairs well with toasted bread, wraps, or fresh vegetables.

This salad is creamy, comforting, and full of simple goodness, making it a reliable and enjoyable choice for everyday meals.


Zucchini, Potato, Carrot & Cheese Muffins🧁🥒

Why You’ll Love This Recipe

🥒 Hidden veggies your kids might actually eat!

🧀 Cheesy, savory, and satisfying

💛 Moist texture, never dry or dense

⏱️ 20 minutes prep, then bake

💸 Costs under $6—makes 12 muffins

🌾 Naturally nut-free & easily gluten-free

Ingredients You’ll Need

(Makes 12 standard muffins)


Veggie Base:

  • 1 cup (120g) grated zucchini, squeezed dry
  • ¾ cup (90g) grated carrot
  • ¾ cup (100g) cooked & cooled shredded potato (or raw, peeled russet)
  • ½ cup (60g) finely diced onion (optional but recommended)

Batter:

  • 1½ cups (190g) all-purpose flour (or GF 1:1 blend)
  • 1 tsp  baking powder
  • ½ tsp baking soda
  • ½ tsp salt
  • ½ tsp garlic powder
  • ¼ tsp black pepper
  • 2 large eggs, room temperature
  • ½ cup (120ml) plain yogurt or sour cream
  • ¼ cup (60ml) olive oil or melted butter
  • 1½ cups (6 oz) sharp cheddar  cheese, shredded

Step-by-Step Instructions (Savory, Fluffy, Foolproof)

1. Prep the Veggies

  • Place zucchini in a clean towel; squeeze out as much liquid as possible.
  • If using raw potato, soak in cold water 5 mins to remove starch; drain and pat dry.

2. Mix Dry Ingredients

  • In a bowl, whisk flour, baking powder, baking soda, salt, garlic powder, and pepper.

3. Combine Wet & Veggies

  • In a large bowl, whisk eggs, yogurt, and oil.
  • Stir in zucchini, carrot, potato, onion, and cheese.

4. Fold Together

  • Gently fold dry ingredients into wet mixture until just combined. Do not overmix.

5. Bake to Golden Perfection

  • Preheat oven to 375°F (190°C). Line muffin tin with papers or grease well.
  • Fill cups ¾ full. Optional: top with extra cheese or sesame seeds.
  • Bake 20–25 minutes, until golden and a toothpick comes out clean.
  • Cool 5 minutes in pan, then transfer to wire rack.

Old-Fashioned Shortcake Nothing beats homemade!

Ingredients You’ll Need

For the Shortcakes (Makes 6–8)

2 cups (250g) all-purpose flour

¼ cup (50g) granulated sugar, plus extra for sprinkling

1 tbsp baking powder

½ tsp salt

½ cup (1 stick / 115g) cold unsalted butter, cubed

¾ cup (180ml) cold heavy cream (plus extra for brushing)

For the Berries:

4 cups fresh strawberries (or mixed berries), hulled and sliced

2–3 tbsp granulated sugar

1 tsp lemon juice (optional)

For the Whipped Cream:

1 cup (240ml) cold heavy cream

2 tbsp powdered sugar

½ tsp pure vanilla extract

Step-by-Step Instructions

1. Macerate the Berries

  • Toss berries, sugar, and lemon juice in a bowl. Let sit 30+ minutes at room temp.

2. Make the Shortcake Biscuits

  • Preheat oven to 425°F (220°C). Line baking sheet with parchment.
  • In a bowl, whisk flour, sugar, baking powder, and salt.
  • Cut in cold butter until mixture resembles coarse crumbs with pea-sized bits.
  • Stir in ¾ cup cold cream until just combined (dough will be shaggy).
  • Turn onto floured surface; gently pat into 1-inch thick round.
  • Cut into 6–8 rounds with a floured biscuit cutter (or glass).
  • Place on sheet; brush tops with cream and sprinkle with sugar.

3. Bake to Golden Perfection

  • Bake 14–16 minutes, until golden brown. Cool 5 minutes.

4. Whip the Cream

  • Beat cold cream, powdered sugar, and vanilla until soft peaks form.

5. Assemble & Serve

  • Split warm shortcakes in half.
  • Spoon berries + juices over bottom halves.
  • Top with whipped cream, then shortcake tops.
  • Drizzle with extra berry syrup.

Soft & Fluffy No-Knead Bread — Simple, Affordable, and Perfect for Any Meal”

Introduction

There’s nothing more comforting than a soft, fluffy slice of homemade bread, especially when it’s easy, no-knead, and budget-friendly. This recipe delivers all the classic bread flavor and texture without the fuss of kneading or shaping.

Perfect for slimming, Weight Watchers, Mediterranean, and high-protein meal plans, and adaptable for keto/low-carb versions, this bread is versatile, wholesome, and perfect for daily meals. From sandwiches and toast to sides for soups and salads, it’s your go-to homemade bread recipe.

With minimal ingredients and maximum fluff, this bread proves that homemade baking doesn’t need to be complicated or expensive.


Look at the recipe.

  • Texture & Visual: Soft, airy interior with a lightly golden crust.
  • Flavor Highlight: Mild, buttery flavor that complements both sweet and savory dishes.
  • Diet Benefit: Can be made low-carb, high-protein, or whole grain-friendly depending on flour choice.

Ingredients Needed

Basic Bread

  • 3 cups all-purpose flour (or almond flour + psyllium husk for the keto/low-carb version)
  • 1 tsp salt
  • 1 tsp sugar or low-calorie sweetener (optional)
  • 1 tsp instant yeast
  • 1 ½ cups warm water
  • 1 tbsp olive oil (optional)

How to Make Our Easy No-Knead Bread

  1. Combine dry ingredients:
    In a large bowl, mix flour, yeast, salt, and sugar (if using).
  2. Add water:
    Pour in warm water and olive oil. Stir with a wooden spoon until a sticky dough forms. No kneading needed.
  3. Let it rise:
    Cover the bowl with plastic wrap or a kitchen towel. Let dough rise at room temperature for 2–3 hours until doubled in size.
  4. Shape & prepare for baking:
    Gently transfer dough to a floured surface. Fold edges over to shape a rough loaf. Place in a greased or parchment-lined loaf pan.
  5. Bake:
    Preheat oven to 450°F (230°C). Bake covered with foil or a lid for 20 minutes, then remove the cover and bake 15–20 minutes more until golden brown and hollow-sounding when tapped.
  6. Cool & serve:
    Let bread cool on a wire rack for at least 15 minutes before slicing.

Storage & Serving Suggestions

  • Store: Keep in an airtight container at room temperature for up to 3 days.
  • Freeze: Slice and freeze for up to 1 month. Toast directly from frozen.
  • Serving Ideas:
    • Perfect for sandwiches, avocado toast, or with soups and salads.
    • Use as a base for keto-friendly bread by substituting with almond flour and psyllium husk.
    • Brush with garlic butter or olive oil for Mediterranean-style toast.

Tips & FAQs

1. Can I make this keto-friendly?
Yes—use almond flour with 1–2 tbsp psyllium husk and reduce water slightly. Bake at the same temperature but for 30–35 minutes.

2. Can this be slimming-friendly?
Yes—use wholemeal flour and skip butter; enjoy as part of your Healthy Extra B allowance.

3. How many Weight Watchers points per slice?
Approximately 3–4 points, depending on the flour and oil used.

4. Can I make it whole grain or high-protein?
Yes — substitute 1 cup of flour with whole wheat flour and/or 2 tbsp of whey protein powder for a protein boost.

5. Can I bake this in a Dutch oven?
Absolutely—a covered Dutch oven creates a perfect crust. Bake covered for 20 minutes, then uncover for 15 minutes.

Loaded Baked Cauliflower Casserole

Loaded Baked Cauliflower Casserole

This is effectively the “solid” version of the soup you just made—perfect as a hearty side dish or a vegetarian main (if you skip the bacon).

  • Prep time: 15 mins

  • Cook time: 20 mins

  • Servings: 6

Ingredients

  • 1 large head cauliflower, cut into bite-sized florets

  • 6 slices bacon, cooked and crumbled

  • 1/2 cup sour cream (or softened cream cheese)

  • 1/4 cup heavy whipping cream

  • 2 cloves garlic, minced

  • 1 1/2 cups sharp cheddar cheese, shredded (divided)

  • 1/4 cup green onions, sliced

  • Salt and black pepper to taste

  • 1/2 teaspoon smoked paprika (optional for a smoky kick)

Directions

  1. Steam the Cauliflower: Preheat your oven to 400°F (200°C). Place cauliflower florets in a steamer basket over boiling water for 5–8 minutes, or until fork-tender but not mushy. Drain well and pat dry (this prevents a watery casserole).

  2. Create the Sauce: In a large mixing bowl, whisk together the sour cream, heavy cream, minced garlic, half of the shredded cheese, and half of the crumbled bacon. Season with salt, pepper, and paprika.

  3. Combine: Toss the steamed cauliflower into the bowl with the cream mixture until every floret is well-coated.

  4. Assemble: Spread the mixture into a greased 9×9 inch baking dish. Top with the remaining cheddar cheese and the rest of the bacon crumbles.

  5. Bake: Bake for 15–20 minutes until the cheese is bubbly and starting to turn golden brown.

  6. Garnish: Remove from the oven and sprinkle with fresh green onions before serving.

Healthy Oatmeal Apple Banana Bites

Healthy Oatmeal Apple Banana Bites

Ingredients:

2 cups oat flakes (rolled oats)

160g (5.5 oz) yogurt (plain or Greek)

1 teaspoon baking powder

1 apple, chopped

1 banana, mashed

2 eggs


Instructions:

Preheat your oven to 350°F (175°C).

In a large bowl, combine the oats and baking powder.

Add yogurt, mashed banana, and eggs. Mix well.

Fold in the chopped apple.

Spoon the mixture into a greased or lined mini muffin tin or small baking dish.

Bake for about 20-25 minutes or until golden and set.

Let cool slightly before removing and serving.


🥤 Creamy Peanut Butter Honey Smoothie

🥤 Creamy Peanut Butter Honey Smoothie

📝 Description

This Peanut Butter Honey Smoothie is a smooth, indulgent drink with a perfect balance of nutty richness and natural sweetness. The creamy texture comes from ripe banana and milk, while peanut butter adds depth and protein. Honey provides gentle sweetness, and vanilla gives a warm, aromatic finish. Ideal for breakfast, post-workout energy, or a healthy dessert-style drink.

🧾 Ingredients (Serves 1–2)

2 tablespoons creamy peanut butter


1 large ripe banana, sliced


1½ cups cold milk (dairy or almond/oat milk)


1–2 tablespoons pure honey (adjust to taste)


½ teaspoon vanilla extract


4–5 ice cubes (optional, for thicker texture)


1 tablespoon chia seeds or flaxseeds (optional, for nutrition)


👩‍🍳 Step-by-Step Instructions

Prepare the Ingredients

Peel and slice the banana for easier blending. Measure all ingredients in advance to ensure smooth preparation.


Add to Blender

Pour the milk into the blender first. Add banana slices, peanut butter, honey, vanilla extract, and seeds (if using).


Blend Until Smooth

Blend on high speed for 30–45 seconds until the smoothie becomes thick and creamy. Add ice cubes if you prefer a colder, milkshake-like consistency.


Taste & Adjust

Taste the smoothie and adjust sweetness with extra honey or thin it with a splash of milk if needed.


Serve

Pour into a tall glass. Drizzle honey or peanut butter along the inside of the glass for a decorative swirl, just like the image.


🌟 Tips & Variations

Add ½ cup Greek yogurt for extra creaminess and protein


Use frozen banana instead of ice for a richer texture


Add cocoa powder for a chocolate-peanut twist


Sprinkle crushed peanuts on top for crunch


🥗 Nutritional Benefits

High in protein and healthy fats


Provides long-lasting energy


Naturally sweetened with honey


Supports muscle recovery and fullness


🍏 Apple Cinnamon Oatmeal Smoothie

🍏 Apple Cinnamon Oatmeal Smoothie

Prep time: 5 minutes | Servings: 1


Ingredients

1 medium Green Apple: (Granny Smith works best for tartness), cored and chopped.


1/4 cup Rolled Oats: Provides a creamy texture and keeps you full.


1 cup Milk of choice: (Dairy, Almond, or Oat milk all work great).


1/4 cup Greek Yogurt: For extra creaminess and protein.


1/2 tsp Ground Cinnamon: For that classic warm flavor.


1 tsp Honey or Maple Syrup: (Optional) Adjust based on your preferred sweetness.


A handful of Ice cubes: To keep it chilled and thick.

Instructions

  1. Prepare the Apple: Wash the apple thoroughly. You can leave the skin on for extra fiber (as seen in the garnish) or peel it for a smoother consistency.

  2. Combine: Place the chopped apple, oats, milk, yogurt, cinnamon, and sweetener into a high-speed blender.

  3. Blend: Start on a low speed and gradually increase to high. Blend for about 45–60 seconds until the oats are completely pulverized and the mixture is silky smooth.

  4. Check Consistency: If it’s too thick, add a splash more milk. If you want it colder, add a few more ice cubes and pulse again.

  5. Serve: Pour into a glass. Garnish with a sprinkle of dry oats, a thin apple slice, and a sprig of fresh mint as shown in your photo.


Pro Tips for the Best Result

  • Soak the Oats: If you don’t have a high-powered blender, soak the oats in your milk for 5–10 minutes before blending to ensure there’s no “gritty” texture.

  • Add Protein: You can easily add a scoop of vanilla protein powder to make this a complete meal replacement.

  • Healthy Fats: Toss in a tablespoon of chia seeds or almond butter for added nutrients.

Creamy Vanilla Almond Ice Cream Delight

Creamy Vanilla Almond Ice Cream Delight

This creamy vanilla almond ice cream delight is a comforting and elegant dessert that feels special while remaining easy to prepare at home. The smooth texture, light sweetness, and nutty topping make it perfect for family gatherings, celebrations, or a relaxing moment after a meal. This recipe focuses on simple ingredients, careful preparation, and patience, resulting in a dessert that tastes rich and refreshing.


Ingredients

2 cups fresh cream (well chilled)


1 cup full-cream milk


¾ cup powdered sugar (adjust to taste)


1 teaspoon pure vanilla essence


2 tablespoons condensed milk (optional for extra creaminess)


¼ cup finely chopped almonds


2 tablespoons almond flakes for topping


1 tablespoon warm milk (for softening almonds if desired)


Preparation Method

Begin by placing a clean mixing bowl in the refrigerator for about 15 minutes. This helps maintain a smooth texture while mixing. Pour the chilled cream into the cold bowl and gently whisk until it becomes thick and airy. Take your time during this step, allowing the cream to increase in volume naturally without rushing.


In a separate bowl, combine milk, powdered sugar, vanilla essence, and condensed milk. Stir slowly until the sugar dissolves completely and the mixture looks smooth. Gradually add this mixture to the prepared cream. Using a gentle folding motion, blend everything together until fully combined. The goal is to keep the mixture light and even.


Add the chopped almonds to the mixture and stir softly so they spread evenly. Transfer the prepared mixture into a freezer-safe container. Cover it tightly and place it in the freezer for about 2 hours. After this time, remove it and stir gently to improve texture. Repeat this step once more if possible, then return it to the freezer for 4–6 hours or until fully set.


Once frozen, allow the ice cream to rest at room temperature for a few minutes before serving. Scoop the ice cream into a serving dish, just like the image shows, with smooth rounded scoops. Sprinkle almond flakes on top for added crunch and visual appeal.


Serving Suggestions

Serve this dessert on its own or with a light drizzle of sweet cream or warm milk. It pairs beautifully with fresh fruit or soft baked treats. The flavor is calming, rich, and enjoyable for all ages.


This homemade vanilla almond ice cream is a delightful way to create something special using simple ingredients, care, and love.

“This potato salad

Prep & Cook Time


Prep: 20 minutes


Cook: 20 minutes


Chill: 1 hour (recommended)


Total: ~1 hour 40 minutes


🍽️ Servings


6–8 servings


🧾 Ingredients

Potato Salad


2½ lbs (about 1.1 kg) potatoes (Yukon Gold or russet)


4 large eggs, hard-boiled


½ cup red onion, finely diced


½ cup celery or green onion, finely chopped


Salt, to taste (for boiling water)


Creamy Dressing


¾ cup mayonnaise


2 tablespoons yellow or Dijon mustard


1 tablespoon apple cider vinegar or pickle juice


½ teaspoon sugar (optional, for balance)


½ teaspoon black pepper


¾ teaspoon salt (adjust to taste)


Optional: ½ teaspoon paprika


👩‍🍳 Instructions


Cook the Potatoes


Peel (or leave skins on) and cut potatoes into bite-size chunks.


Boil in well-salted water for 10–12 minutes, until fork-tender but not mushy.


Drain and let cool slightly.


Prepare the Eggs


Chop hard-boiled eggs into small pieces.


Make the Dressing


In a large bowl, whisk together mayonnaise, mustard, vinegar (or pickle juice), sugar, salt, pepper, and paprika.


Assemble


Gently fold warm potatoes into the dressing (they absorb flavor better when slightly warm).


Add eggs, onion, and celery/green onion.


Mix carefully to keep texture intact.


Chill & Serve


Cover and refrigerate for at least 1 hour.


Taste and adjust seasoning before serving.

No flour, no sugar! Coconut cake in 5 minutes!

Full recipe>>> Time & Yield

Prep time: 5 minutes

Cook time: 20–25 minutes

Total time: ~30 minutes

Servings: 6 slices

📝 Ingredients

2 cups unsweetened shredded coconut

3 large eggs

½ cup plain yogurt (or Greek yogurt)

1 ripe banana, mashed (natural sweetness)

1 tsp baking powder

1 tsp vanilla extract (optional)

Pinch of salt

1–2 tbsp coconut oil (for greasing)

👩‍🍳 Instructions

Preheat oven to 180°C / 350°F. Grease a small baking dish with coconut oil.

In a bowl, whisk the eggs until slightly frothy.

Add mashed banana, yogurt, vanilla, and salt. Mix well.

Stir in shredded coconut and baking powder until fully combined.

Pour batter into the prepared dish and smooth the top.

Bake for 20–25 minutes, until golden and set in the center.

Let cool for 5 minutes before slicing. Serve warm or chilled.

💡 Notes & Tips

Use fine shredded coconut for a smoother texture.

If you like it sweeter, add 1–2 tbsp honey or maple syrup (still refined-sugar-free).

For extra flavor, add lemon zest or cinnamon.

This cake firms up more as it cools—don’t overbake.

Can also be cooked in an air fryer (160°C / 320°F for 15–18 min).

🥗 Nutritional Information (per serving – approx.)

Calories: 180 kcal

Protein: 6 g

Healthy fats: 13 g

Carbohydrates: 9 g

Fiber: 4 g

Sugar: 4 g (naturally occurring)

Values may vary based on ingredients used.

Sticky Beef with Caramelized Onions

INGREDIENTS:

1 lb Flat Iron steak , thinly sliced against the grain

1/4 cup Coconut Oil

3 Green onions , cut into 1-inch long diagonal slices

Low Carb Mongolian Beef Marinade:

1/4 cup Coconut Aminos

1 teaspoon Fresh root ginger, peeled and ginger , Do not use powdered ginger!

2 cloves Garlic , chopped

INSTRUCTIONS:

1.Scroll up to watch the short recipe video first!

2.Cut the Flat Iron Steak into very thin slices against the grain.

3.Add the sliced beef to a small ziplock bag and add the coconut aminos, peeled and grated root ginger (do not use powdered ginger), and garlic. Let marinate for 1 hour in the fridge.

4.When you are ready to cook, drain the meat from the marinade but reserve the liquid for later.

5.Add the coconut oil to a large wok or cast iron skillet and heat it until it’s almost smoking, the oil must be hot so you can get the nice crispy edges on the beef.

6.Add the beef to the very hot oil (you may need to do it in two batches, don’t crowd the pan) and keep stir frying over a high heat, taking care not to burn it for just 1-3 minutes.

When the last batch of meat is in, add the green onions and cook for the last 30 seconds to 1 minute.

7.If you want more ‘sauce’ to serve with the meat quickly cook the remaining marinade for just a minute or two in your wok after the last batch of beef has been cooked, and serve with the beef.

8.Serve immediately!

I eat vegetable casserole

Full recipe>>> Servings


4 large servings

(You can eat it twice a day comfortably)


🧺 Ingredients


1 medium zucchini, sliced


1 medium eggplant, cubed


1 red bell pepper, chopped


1 green bell pepper, chopped


1 medium onion, sliced


2 medium tomatoes, chopped


2 cups cauliflower florets


1 cup mushrooms, sliced


2 cloves garlic, minced


1 tsp olive oil (optional but recommended)


½ tsp salt (or to taste)


½ tsp black pepper


1 tsp dried oregano or Italian seasoning


½ tsp paprika or chili flakes (optional)


½ cup low-sodium vegetable broth


👩‍🍳 Instructions


Preheat oven to 375°F (190°C).


Lightly grease a casserole dish with olive oil or cooking spray.


Add all vegetables to the dish and mix well.


Add garlic, salt, pepper, oregano, paprika, and vegetable broth.


Toss everything gently to coat.


Cover with foil and bake for 35 minutes.


Remove foil and bake uncovered for 15–20 more minutes until vegetables are soft and slightly roasted.


Let rest for 5 minutes before serving.


🔥 Nutritional Information (per serving – approx.)


Calories: 120–140 kcal


Protein: 4–5 g


Carbohydrates: 18–20 g


Fiber: 6–8 g


Fat: 3 g


Sugar: 6–7 g


Sodium: Depends on broth/salt used


(Naturally cholesterol-free)

Jalapeño Cheddar Cornbread Muffins

Jalapeño Cheddar Cornbread Muffins

Servings: 10–12 muffins
Prep Time: 15 minutes
Cook Time: 18–20 minutes
Total Time: 35 minutes

A buttery, cheesy, slightly spicy muffin perfect for chili nights, BBQs, or a savory snack.


🧾 Ingredients

  • 1 cup (120 g) all-purpose flour

  • ⅓ cup (40 g) finely ground cornmeal

  • 2 tsp baking powder

  • ½ tsp baking soda

  • 3 tbsp (35 g) sugar

  • ½ tsp salt

  • ¼ cup (60 g) butter, melted and cooled

  • 1 large egg

  • ¾ cup (180 ml) cream or milk (or dairy alternative)

  • 1 cup (100 g) cheddar cheese, shredded

  • ¾ cup (120 g) corn kernels, fresh or canned (drained)

  • 2 green onions, chopped

  • 2 jalapeños – 1 chopped (seeds optional for heat), 1 sliced for garnish


👩‍🍳 Instructions


1️⃣ Preheat the Oven

  • Preheat oven to 350°F (175°C).

  • Spray a 10–12 cup muffin tin with nonstick cooking spray or line with paper liners.


2️⃣ Mix the Dry Ingredients

  • In a large bowl, whisk together:

    • All-purpose flour

    • Cornmeal

    • Baking powder

    • Baking soda

    • Sugar

    • Salt


3️⃣ Combine the Wet Ingredients

  • In a separate bowl, whisk together:

    • Melted butter

    • Egg

    • Cream (or milk alternative)

  • Pour the wet mixture into the dry ingredients.

  • Stir until just combined—do not overmix.


4️⃣ Fold in the Flavor

  • Gently fold in:

    • Corn kernels

    • Chopped green onions

    • Chopped jalapeño

    • Shredded cheddar cheese


5️⃣ Fill the Muffin Cups

  • Scoop the batter evenly into the prepared muffin cups.

  • Top each muffin with a slice of fresh jalapeño for a bakery-style finish.


6️⃣ Bake

  • Bake for 18–20 minutes, or until a toothpick inserted into the center comes out clean.

  • Let cool slightly before serving.


7️⃣ Serve & Enjoy

  • Serve warm as a side with chili, BBQ, or enjoy on their own.

  • Optional: Spread with butter or a drizzle of honey for a sweet-savory touch.


💡 Tips for Success

  • Use sharp cheddar for stronger flavor.

  • Drain canned corn well to prevent soggy muffins.

  • Keep some lumps in the batter—overmixing can make muffins dense.

  • For extra heat, leave the seeds in the jalapeños.


🔁 Variations

  • Smoky Twist: Add cooked bacon pieces.

  • Sweet & Spicy: Stir in 1 tbsp honey.

  • Gluten-Free: Swap flour for a 1:1 gluten-free blend.