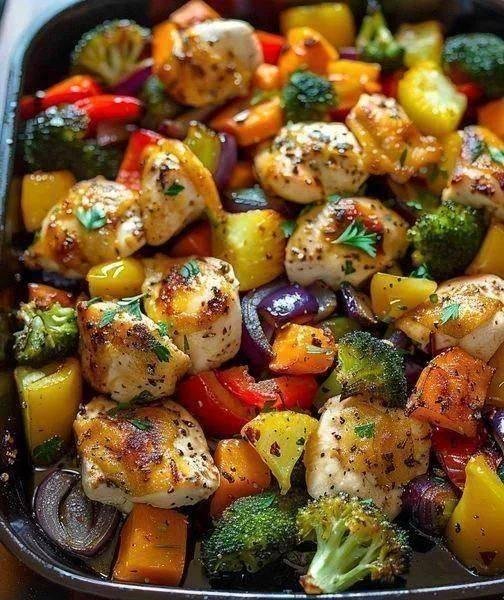
Mediterranean 15 Minute Healthy Roasted Chicken and Veggies (One Pan)
If you need a balanced, Mediterranean-style dinner in a hurry, this 15-Minute Healthy Roasted Chicken and Veggies is your go-to. Featuring juicy chicken, a medley of colorful veggies, and aromatic herbs, all roasted on one pan, this dish keeps cleanup minimal and flavor maximal. It’s a perfect weeknight lifesaver packed with protein, fiber, and healthy fats — all in a single dish.
Time Required:
Prep Time: 10 minutes
Cook Time: 15 minutes (at high heat or broiler setting)
Total Time: ~25 minutes
Ingredients:
For the Chicken:
2 boneless, skinless chicken breasts or
2 bone-in, skin-on chicken thighs
(Cut into large bite-sized chunks if desired for faster cooking)
For the Vegetables:
1 cup baby red potatoes (halved) or regular potatoes (cubed)
1 cup carrots (peeled and cut into sticks or rounds)
1 cup broccoli florets
1 bell pepper (red or green, chopped)
1 small red onion (cut into wedges or large chunks)
Seasonings & Fats:
2–3 tablespoons olive oil or avocado oil
2 garlic cloves, minced (or 1 tsp garlic powder)
1 teaspoon fresh rosemary or thyme (or ½ tsp dried Italian seasoning)
Salt & black pepper, to taste
Optional: ½ teaspoon smoked paprika or chili powder for extra depth
Instructions:
Preheat oven to 450°F (230°C) or set to high broil for quicker roasting. Line a large baking sheet with parchment or foil for easy cleanup.
Prep the chicken & veggies:
Cut chicken into evenly sized pieces if needed.
Chop vegetables into similar-sized chunks for even roasting.
Toss ingredients:
In a large bowl, combine chicken, potatoes, carrots, broccoli, bell peppers, and onion.
Add olive oil, garlic, herbs, salt, pepper, and any optional spices. Toss to coat everything well.
Spread on a baking sheet:
Arrange the chicken and veggies in a single layer, leaving a bit of space between items for browning.
Roast or broil:
Roast for 15–18 minutes or broil for 12–15 minutes, stirring once halfway through, until the chicken is cooked through (internal temp 165°F/74°C) and veggies are tender with slight char.
- Serve hot:
Garnish with fresh herbs or a squeeze of lemon juice if desired. Enjoy warm straight from the pan or over couscous, quinoa, or salad.
Tips:
Cut even sizes:
Ensure chicken and veggies are chopped into uniform sizes so they roast evenly and finish at the same time.
Use high heat or broiler:
A high oven temp (450°F/230°C) or broiler setting creates crisp edges and quick cooking — ideal for a 15-minute meal.
Don’t overcrowd the pan:
Spread the ingredients out to avoid steaming and ensure browning. Use two pans if needed.
Dry ingredients before roasting:
Pat chicken and veggies dry before seasoning. This helps them crisp up rather than steam.
Meal prep friendly:
Chop everything ahead of time and store it in the fridge. You can marinate the chicken overnight for even more flavor.
Variations:
Protein swaps:
Try shrimp, turkey breast, or firm tofu for different dietary needs.
Vegetable flexibility:
Swap or add veggies like zucchini, cherry tomatoes, green beans, cauliflower, or eggplant.
Add a carb base:
Serve over cooked couscous, quinoa, brown rice, or even warm pita wedges for a heartier meal.
Spice it up:
Add a pinch of cayenne, harissa, or chili flakes for a spicy Mediterranean twist.
Finish with flavor:
Drizzle with balsamic glaze, tahini lemon sauce, or top with crumbled feta or olives before serving.
Make it creamy:
Add a dollop of tzatziki or hummus on the side for dipping.
Q&A
Q: Can I use frozen vegetables or chicken?
A: Yes! Just be sure to thaw and pat dry both chicken and veggies before roasting to avoid excess moisture and ensure crisping.
Q: How do I know when the chicken is cooked through?
A: Use a meat thermometer — the internal temperature should reach 165°F (74°C) for chicken breast and 170°F (77°C) for thighs.
Q: Can I meal prep this in advance?
A: Absolutely. Chop all veggies and marinate the chicken ahead of time. Store in separate containers or combined, and bake when ready.
Q: What herbs go best with this recipe?
A: Mediterranean herbs like oregano, thyme, rosemary, basil, and parsley add the most flavor. Dried Italian seasoning is a good shortcut.
Q: Can I make it vegan or vegetarian?
A: Yes — replace the chicken with chickpeas, tofu, or tempeh, and season generously.
Nutrition Facts
(Estimated Per Serving – 1 of 4)
Calories: ~350
Protein: ~30g
Fat: ~18g
Carbs: ~22g
Fiber: ~5g
Sugar: ~5g
Sodium: ~500mg (depending on salt used and veggies)
Values will vary slightly based on the vegetables and chicken cuts you use.
Conclusion
This Mediterranean 15-Minute Healthy Roasted Chicken and Veggies dish is a weeknight lifesaver — quick, colorful, and customizable. It’s packed with lean protein, antioxidant-rich veggies, and Mediterranean herbs that add tons of flavor without extra calories. Whether you’re meal-prepping or feeding a hungry family, this one-pan wonder is hearty, balanced, and endlessly versatile. Serve it as-is, or pair with grains, dips, or warm pita for a complete, crave-worthy meal!