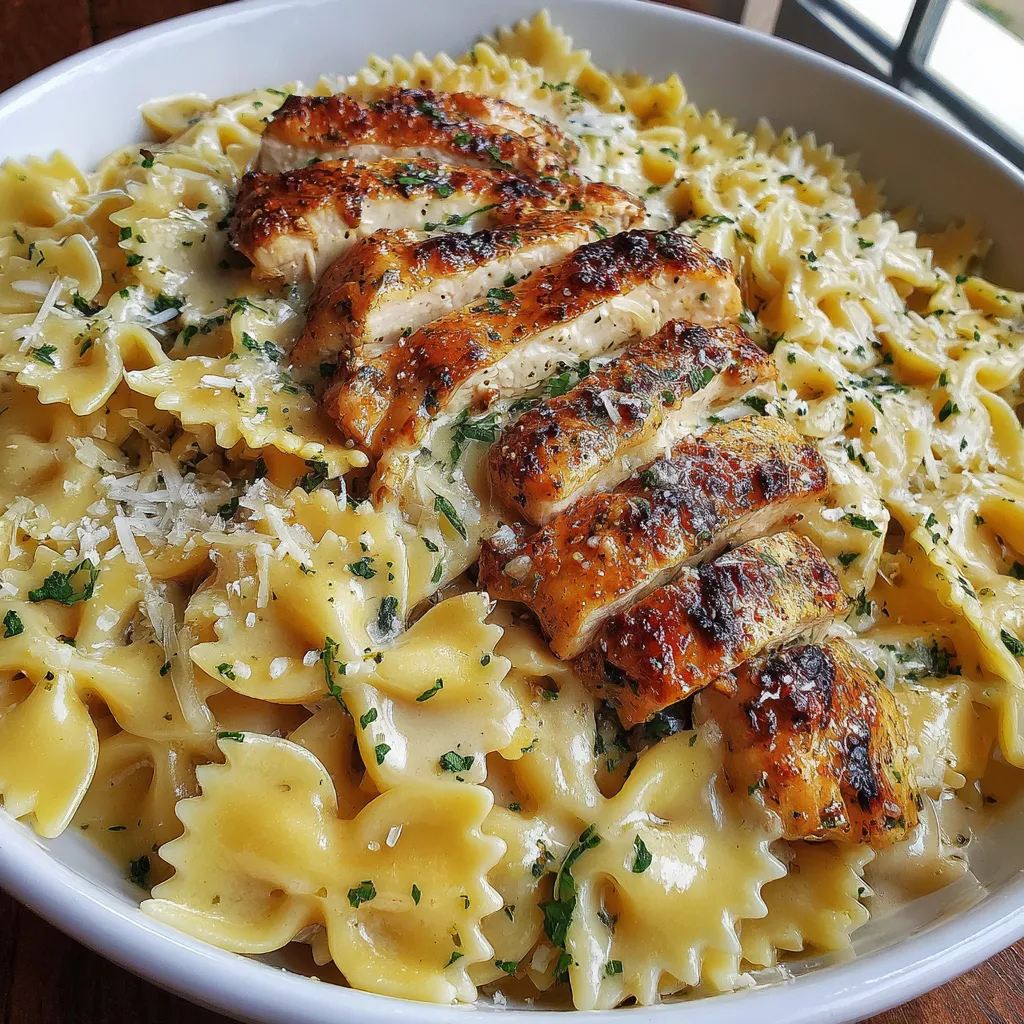
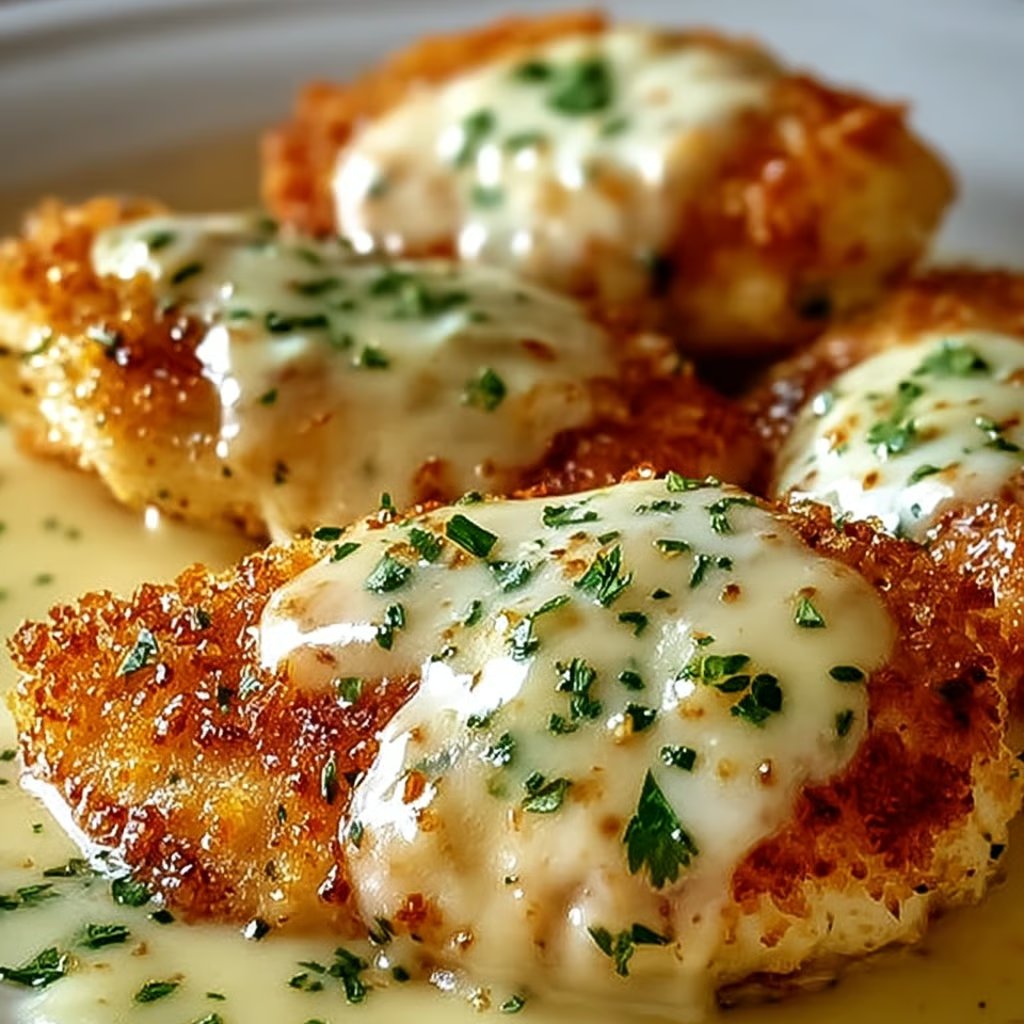
Beef and Chicken Chimichangas

Beef and cheese chimichangas are large tortillas filled with savory beef, beans, and cheese, then fried to a golden perfection. The perfect quick and easy dinner solution, and even great to make ahead and freeze.

While you are here, you gotta check out these Cheesy Bacon Loaded Breakfast Burritos. Also, be sure to drizzle them with some of this Creamy Jalapeno Salsa, or this amazing Chipotle Salsa.

WHAT IS A CHIMICHANGA?

A chimichanga is a large tortillas, stuffed with various proteins and starches, and deep fried until they are golden brown. You will usually find them in the “Tex-mex” style dishes versus traditional Mexican food dishes.

WHAT IS THE DIFFERENCE BETWEEN A BURRITO AND A CHIMICHANGA?

In essence, both of these are made the same. Use a large tortilla, and roll different fillings inside of it. The biggest difference however, is that the chimichanga is fried! Even more, often times a burrito will be served wrapped in foil or parchment paper, and eaten by hand.

YIELD: 6 CHIMICHANGAS

Beef and cheese chimichangas are made with large tortillas, and filled with savory beef, beans, and cheese, then fried to a golden perfection. The perfect quick and easy dinner solution, and even great to make ahead and freeze.

PREP TIME: 10 minutes

COOK TIME: 20 minutes

TOTAL TIME: 30 minutes

INGREDIENTS:

  • 6 large Flour tortillas
  • 1 pound Ground beef
  • 1 cup Water (to add to cooked and seasoned beef)
  • 2 cups Cheese, shredded
  • 1 can Refried pinto beans
  • 2 cups Vegetable oil (to fry chimichangas)
  • Seasoning for ground beef
  • 1 tablespoon Chili powder
  • 1/2 tablespoon Seasoned salt
  • 1/2 tablespoon Ground cumin
  • 1 teaspoon Black pepper
  • 1 teaspoon Garlic salt (or garlic powder)
  • 1/2 teaspoon dried Oregano
  • 1/2-1 cup Water
Topping Ideas
  • Sour cream
  • Shredded lettuce
  • Salsa
  • Chopped tomatoes

INSTRUCTIONS:

  1. Brown the ground beef in a skillet over medium heat. The meat is fully cooked when there is no longer any pink visible. Use a strainer to drain any excess grease from the skillet.
  2. Put the meat back into the skillet over medium heat. Add all of the seasonings, and water and mix it together thoroughly. Continue to simmer until the water is absorbed.
  3. Heat the vegetable oil in a separate skillet over medium heat. While the oil is heating up, begin assembling the burritos.
  4. Place about one tablespoon of beans on one side of the tortilla and smear it across, somewhat close to the edge. Next place one to two tablespoons of the meat mixture, then a sprinkle of cheese (a generous sprinkle)!
  5. Begin to roll the tortilla up over the mixture, once half way rolled, fold in the sides towards the middle, then continue rolling all the way until it is closed. Roll as tight as possible so that the mixture does not ooze out.
  6. Continue rolling until all of the burritos are made or you run out of mixture.
  7. Place the burritos into the hot oil SEAM SIDE DOWN. Fry on each side for one to two minutes, or until they turn golden brown. Be sure to flip, and fry the sides of the burritos as well,
  8. Remove from the oil and drain on a baking sheet or a bed of paper towels. Top with your favorite garnishes and salsas. Enjoy!

NUTRITION INFO:

YIELD: 6 SERVING SIZE: 1

Amount Per Serving: CALORIES: 419TOTAL FAT: 53gSATURATED FAT: 9gTRANS FAT: 3gUNSATURATED FAT: 37gCHOLESTEROL: 86mgSODIUM: 379mgCARBOHYDRATES: 29gFIBER: 5gSUGAR: 1gPROTEIN: 37g

Maxican Chicken Doritos Casserole Recipe

A chicken casserole makes for a convenient dish. Chicken is a great base for every meal and its neutral taste means it works well with a variety of flavorings.

With a casserole, home cooks can get creative adding any ingredients that may be lying around the kitchen.

If you like your chicken casserole with a kick, read on to find out more about our Mexican chicken casserole and other variations you can make for your family.

Mexican Chicken with Doritos and Velveeta

When we think of Mexican food, we think of ingredients like salsa, beans, and guacamole. This dish takes Mexican in a slightly different direction with the addition of Doritos and Velveeta. This makes for a meal that is a well-deserved guilty pleasure for your hard-working family

Total Time: 50 minutes

Get Mexican flair on the table with this easy Mexican Chicken Casserole. With only 6 ingredients, it comes together in no time. Filled with creamy cheese and layered with Doritos, this will easily satisfy even picky eaters.

INGREDIENTS:

  • 6 chicken breasts, boneless
  • 10 oz. Velveeta cheese
  • 1 can cream of mushroom soup mixed with 1 cup milk
  • 1 can Rotel tomatoes
  • 1 bag Doritos tortilla chips

INSTRUCTIONS:

  1. Boil chicken until cooked throught.Cut into bite sized pieces.
  2. Combine Velveeta, soup mixture and tomatoes; bring to a boil.
  3. Add chicken and simmer 5-10 minutes, stirring often.
  4. Place a layer of Doritos in long casserole dish, then add a layer of the chicken mixture.
  5. Add another layer of chips, another layer of the chicken mixture, ending with chips on top.
  6. Bake at 350 degrees F for 30 minutes.

Puff Pastry Recipe

Leave those frozen sheets on the store shelf! This is the best-tasting, easiest homemade puff pastry recipe ever! Plus, it comes together in just 15 minutes.

Puff pastry: It’s the kind of thing that makes things feel like a special occasion. All those light, flaky layers and that rich buttery flavor!

Prep Time: 15mins

Cook Time: 25mins

Chill Time: 3hrs

Total Time: 3 hrs 40mins

Course: Breakfast, Brunch, Dessert Cuisine: American

Keyword: Homemade Puff Pastry, puff pastry, puff pastry desserts, puff pastry recipe easy, puff pastry recipes, puff pastry sheets

Servings: 8 

Ingredients:

  • 2 cups all-purpose flour
  • 1 teaspoon salt
  • 1 1/4 cups unsalted butter (2 1/2 sticks), cold
  • 1/2 cup cold water

Instructions:

  1. Place the flour and salt in a large bowl and whisk to combine.
  2. Cut the cold butter into 1/4-inch slices and add to the flour mixture, tossing to coat.
  3. Stir in the cold water until a thick dough forms.
  4. Gather the dough into a ball, flatten it into a disk-shape, and wrap in plastic wrap.
  5. Chill for 1 hour in the fridge, or 20 to 30 minutes in the freezer.
  6. Unwrap the dough, dust the work surface with flour, and roll the dough into a rough rectangle shape.
  7. Fold the dough in thirds, like a letter.
  8. Turn 90 degrees, roll and fold again.
  9. Repeat about 2 to 4 times, wrap the dough in plastic wrap, and chill for 2 hours or overnight.*

Notes:

Tips for Making Homemade Puff Pastry

Brush the pastry with an egg beaten with a couple of teaspoons of water before baking for a beautiful sheen.

When you’re ready to bake the pastry, make sure it is COLD and the oven is HOT.

Bake times will vary based on exactly what you are making, so follow your recipe!

The dough can also be frozen. It will keep for several weeks in the freezer, tightly wrapped. Thaw in the refrigerator.

This recipe makes approximately 24 ounces, or 685 grams, of dough.

Nutritional Info:

Serving: 1pastry | Calories: 418kcal | Carbohydrates: 23g | Protein: 3g | Fat: 34g | Saturated Fat: 21g | Cholesterol: 91mg | Sodium: 296mg | Potassium: 43mg | Vitamin A: 1065IU | Calcium: 15mg | Iron: 1.5mg

Potato Bread In Sarten

This Potato Bread recipe combines the best of pizza, flatbread, and calzones into one. The secret to the soft and fluffy bread is the potato. Adding potato to bread is a trick that artisan bread bakers have used for many years. It increases the dough’s starch content which helps with moisture retention. The result? Fluffy bread that doesn’t dry out easily. The bread is filled with typical pizza ingredients like salami and cheese, and then fried in a pan—no oven necessary! It will be a hit among the pickiest of eaters, and you can serve it as a light lunch or as a main meal with a side of fries.

What is Potato Bread

Adding potato to bread might sound strange, but it’s an age-old trick used by artisan bakers—a secret to light and fluffy bread.

Because of its ability to hold water, potato starches help to increase the moisture content in baked goods. It also prevents too much gluten formation, which means bread (and even pastries) is lighter and fluffier!

Potato Bread Ingredients

Potato – choose a high-starch potato (like the Russet variety)

Egg – the egg adds richness to the dough

Parsley – use fresh herbs for the best flavor

Cheese – for more flavor, use mature cheddar cheese

Salami – use a high-quality salami that is not too fatty

For added crunch, brush the bread with melted and sprinkle with sesame seeds, freshly ground salt, or everything bagel seasoning before serving.

Don’t like salami? Feel free to add other meats like crispy bacon, chopped ham, smoked chicken, or even smoked salmon.

You can also add other ingredients (the same as you would add on pizzas): olives, jalapenos, sun-dried tomatoes, or sauteed mushrooms will all work well. Be careful not to overfill, otherwise, the filling will spill out during baking.

You can add herbs like oregano, thyme, or basil.

Use cheddar cheese, mozzarella, cheese, or Swiss cheese.

How to Store Potato Bread

Leftovers can be stored in the fridge for up to 3 days. Reheat in the oven or Airfryer to make the surface crispy again. Microwaving it will make the bread soggy.

Can I Make Potato Bread in the Airfryer?

Yes, you can! Simply brush the bread with melted butter and air-fry for 15 minutes at 180°C/360°F, turning halfway.

Can I Make It Ahead of Time?

The dough can be made a day ahead and kept in the fridge. Roll out, fill, and cook the potato bread before serving.

Prep Time: 25min

Cook Time:20min

Total Time: 45min

Ingredients:

  • 1 egg
  • 500ml (2 cups) water
  • 800g (6 3/8 cups) flour
  • 2 tbsp olive oil
  • 1kg (2 lbs) boiled potatoes
  • 50g (4 tbsp) butter
  • 1/2 tsp salt
  • 1/2 tsp black pepper
  • 250g (2 heaped cups) cheese
  • 140g (5 oz) salami slice

Instructions:

  1. In a large mixing bowl, mix together the olive oil, water, and salt.
  2. Sift in the flour and mix gently with a spatula.
  3. Knead the dough until smooth and elastic. Let the dough rest for 10 minutes.
  4. In another bowl mix together boiled potatoes with butter, salt, and pepper.
  5. Divide the dough into four pieces.
  6. Flatten the dough slightly with your hands.
  7. Then roll out with a wooden rolling pin.
  8. Brush the flattened dough with oil.
  9. Fold the dough into thirds.
  10. Then fold the longer sides toward the center.
  11. Spread the mashed potato onto the folded dough.
  12. Place the salami on top of the mashed potato.
  13. Top with grated cheese.
  14. Bring the corners toward the center.
  15. Fry in the pan from both sides until golden brown, about 4-6 minutes.
  16. Enjoy!

Farmer’s Casserole Recipe

This farmer’s casserole recipe is loaded with deliciousness. It has crispy hash brown potatoes, bacon, fluffy eggs, and a flavorful, creamy sauce with melted shredded cheese. Each bite is unforgettable, and this is a breakfast egg casserole even the picky eaters will love!

This farmers breakfast casserole is a hearty, comforting, and satisfying breakfast you won’t be able to get enough of.

Every bite is filled with a combination of flavors and textures that you just can’t get in any other breakfast casserole. From the crispy hash browns, salty bacon, melted cheddar cheese, and creamy egg mixture, there’s a whole lot to love about this casserole. 

It’s the perfect recipe to make if you need a delicious Christmas morning breakfast, weekend brunch, or even a nutritious dinner. You can serve it with something like these Bisquick pancake recipe or Krusteaz waffles for a breakfast-style spread everyone won’t be able to stop talking about!

TIPS TO MAKE THE BEST RECIPE
  • Substitute bacon for breakfast sausage, cooked diced ham, or Canadian bacon.
  • Use a blend of monterey jack cheese, pepper jack cheese, mozzarella cheese, or any shredded cheese you want.
  • Add a teaspoon of onion powder to the egg mixture for a savory flavor.

PREP TIME: 10 minutes

COOK TIME: 45 minutes

TOTAL TIME: 55 minutes

INGREDIENTS:

  • 6 cups shredded hash brown potatoes
  • 2 cups cheddar cheese
  • 2 cups bacon, diced
  • ¼ cup green onion, sliced
  • 4 eggs
  • ¾ cup milk
  • 2 Tablespoons Dijon mustard
  • Salt and pepper, to taste
  • ½ cup sour cream

INSTRUCTIONS:

  1. Preheat the oven to 350°F (180°C). Grease a 3-quart baking dish with nonstick cooking spray. Arrange potatoes evenly in the bottom of the dish.
  2. Sprinkle with the bacon, 1 cup of cheddar cheese, and green onions.
  3. In the bowl, whisk eggs, salt and pepper, milk, sour cream, and Dijon mustard.
  4. Pour egg mixture over the hash browns.
  5. Sprinkle with remaining shredded cheese and bake uncovered for 40-45 minutes or until a knife inserted near the center comes out clean.
  6. Remove from the oven and let rest for 10 minutes before serving.

NUTRITION INFORMATION:

SERVING SIZE: 1 cup

Amount Per Serving: CALORIES: 592TOTAL FAT: 38gSATURATED FAT: 0gTRANS FAT: 0gUNSATURATED FAT: 0gCHOLESTEROL: 0mgSODIUM: 0mgCARBOHYDRATES: 31gFIBER: 3gSUGAR: 0gPROTEIN: 32g

Garlic Butter Steak and Potato Foil Packets

These Garlic Butter Steak and Potato Foil Packets are an easy family dinner recipe for summer. They turn out so delicious with plenty of buttery and garlicky flavor.

Cook them on the grill/campfire or in the oven for a simple dinner at home or on the road!

These Garlic Butter Steak and Potato Foil Packets are an easy family dinner recipe for summer. Cook them on the grill/campfire or in the oven!

Prep Time: 15 mins

Cook Time: 25 mins

Total Time: 40 mins

INGREDIENTS:

  • 1 ½ pounds steak sirloin is my favorite cut here
  • 1 pound baby potatoes cut into ½ inch pieces (halving or quartering usually does it for me)
  • 1 onion peeled, halved and then thinly sliced
  • 1 tablespoon olive oil
  • 2 tablespoons chopped fresh parsley
  • 1 tablespoon minced garlic or more to taste
  • 1 tablespoon Italian seasoning
  • salt and pepper to taste
  • 2 tablespoons butter cubed

INSTRUCTIONS:

Par-boil the potatoes (highly recommended):

Place the sliced potatoes in a pot of boiling, salted water and cook for 5 minutes. Drain immediately and place in a large bowl. Allow to sit until cool enough to handle, about 10 minutes.

Make the foil packets:

Prep the steak: Cut the steak into pieces (2.5 – 3 inches for well done, 3 – 4 inches for medium, 5 inches for rarer steak). Marinate it if you like.

Combine ingredients: Place the steak, potatoes, onion, olive oil, parsley, garlic, Italian seasoning, salt and pepper in a large bowl and toss well.

Assemble foil packets: Set out 4 pieces of aluminum foil, at least 12×12 inches. Evenly divide the steak and potatoes between the middles of the foil sheets. Top with butter cubes, then fold the foil over the steak and potatoes and seal well.

Cook the foil packets:

  1. On the grill/fire: On a HOT grill, cook the foil packets for 8-10 minutes per side, or until the potatoes are tender (exact grilling time can vary depending on type of foil used, exact oven temperature, size of steak, etc.! I recommend an oven thermometer to check on the steak after about 10 minutes to gauge how much longer it will need!)
  2. If you’re cooking the packets on a fire without a grilling rack, place them on a 2-inch bed of coal.
  3. In the oven: Bake the steak foil packets at 425°F for around 20 minutes, or until done to your liking (exact baking time can vary depending on type of foil used, exact oven temperature, size of steak, etc.! I recommend an oven thermometer to check on the steak after about 15 minutes to gauge how much longer it will need!). If you want a char on the steaks, open the packets and broil for 1-2 minutes at the end.
  4. Careful when opening the packets – hot steam and juices ahead!

Notes:

Steak: It’s important to use a cut that stays tender when cooked this way. Top sirloin is definitely my preferred cut for foil packets – and what I usually use when I make these.

Potatoes: I use fingerling or baby potatoes, or smaller Yukon Golds. I prefer these over others, because they don’t need to be peeled and are quicker/easier to prep.

Olive oil: This is my preferred oil for this recipe, but feel free to use a different vegetable oil you use in your kitchen.

Garlic: For a more intense garlic flavor (my amount is on the kid-friendly side ?), double the amount of garlic used.

More flavor: If you want to make the potatoes more decadent, mix some chopped bacon and/or shredded cheddar cheese into them before sealing the packets.

Vegetables? If you want to cook some vegetables right along the steak and potatoes in the foil packets, green peppers, asparagus or green beans can be added.

Best steak cuts

It’s important to use a cut that stays tender when cooked this way.

Top sirloin is definitely my preferred cut for foil packets – and what I usually use when I make them. But cuts like ribeye or porterhouse work great, too. They are less lean though!

Recipe tips

  • Careful when opening the foil packets! There are a lot of juices in the packets, and there will be steam escaping from them when you open them up. Make sure you place each on a plate and open them on a table surface, or place them all on a sheet pan to open. Never open/eat foil packets holding them in your lap, not even when camping!
  • I highly recommend pre-boiling the potatoes. It’s an extra step, but it’s worth it to avoid ending up with overcooked steak and/or raw potatoes.
  • Please be aware that this is meant to be used as a quick/easy dinner or to make when camping, not as a way to cook the perfect steak. The perfect steak, I believe, is only achieved when you cook a steak by itself and can solely focus on getting the perfect doneness on your meat. I still love this recipe for its ease and simplicity, but again, it’s not a recipe for perfectly cooked steak.
If your potatoes aren’t cooked through
  • If your steak is done way ahead of your potatoes (this can happen due to several factors; happens less if you parboil the potatoes), carefully remove the steak from the foil packets and place it on a plate and cover with a fresh piece of foil to rest. Continue cooking the potatoes until they’re done.

Make ahead tips

  • You can make these ahead, but not too long because the potatoes tend to start oxidizing.
  • I would only recommend making them ahead a few hours before you’re planning to cook them.
  • They’re great to assemble at home and then transport in your cooler to eat when you arrive at your campsite!
About the foil

Foil packets are definitely one of my favorite easy summer meals, even though I mostly avoid using foil in my kitchen otherwise. I do buy recycled aluminum foil from If You Care.

Nutritional Info:

Serving: 1foil packet | Calories: 402kcal | Carbohydrates: 24g | Protein: 41g | Fat: 15g | Saturated Fat: 6g | Cholesterol: 115mg | Sodium: 155mg | Potassium: 1152mg | Fiber: 4g | Sugar: 2g | Vitamin A: 365IU | Vitamin C: 28mg | Calcium: 84mg | Iron: 4mg

Creamy Potato Soup Recipe

An easy and delicious creamy potato soup recipe that can be made in just one pot! Loaded with bacon and creamy potato goodness, this is a favorite comfort food in my household. Tips for Perfect Creamy Potato Soup Cut your potatoes into pieces no larger than ¾″ and try to keep them around the same … Read more

HasselBack Scalloped Potatoes Recipe

An easy and delicious recipe for cheesy, garlicky, crazy-delicious Hasselback Scalloped Potatoes. They are the perfect side dish for a family dinner!

 Prep Time: 10minutes

 Cook Time: 1hour

 Total Time: 1hour 10minutes

 Servings8 servings

Ingredients:

For the potatoes
  • 2 pounds Yukon gold potatoes
  • 2 tablespoons butter melted
  • 2 tablespoons olive oil
  • 1/4 teaspoon salt
  • 1/4 teaspoon black pepper ground
For the sauce
  • 3 tablespoons butter
  • 3 tablespoons all-purpose flour
  • 3 cups milk
  • 2 medium garlic cloves minced
  • 1/2 teaspoon salt adjust to your tastes
  • 1/2 teaspoon black pepper ground
  • 2 cups cheddar and Colby cheese grated

Instructions:

For the potatoes
  1. Place a potato between the handles of 2 wooden spoons or 2 chopsticks.
  2. Slice the potato into thin slices, leaving 1/4 inch at the bottom unsliced. (The spoon handles will prevent you from slicing the potato all the way through.)
  3. Cut all the potatoes this way and place in a 7×11-inch casserole dish, skillet, or another oven-safe dish.
For the sauce
  1. Combine melted butter, oil, salt, and pepper and brush or pour over the potatoes.
  2. Bake in a 425-degree oven for 40 to 50 minutes. Baking time will depend on how large your potatoes are.
  3. Meanwhile, in a medium saucepan on medium heat melt 3 tablespoons butter.
  4. Add the flour and minced garlic and cook, stirring for 1 minute.
  5. Add the milk, whisking while you slowly add it. Bring to a boil and simmer until the sauce is thick.
  6. Remove the sauce from the heat and stir in 1 cup of the cheese, salt, and pepper. Stir until the cheese is melted.
  7. When potatoes are fork tender, remove them from the oven and pour the sauce over the potatoes.
  8. Sprinkle the remaining cheese on top of the potatoes and return to the oven at 350 degrees for 15 to 20 minutes.
  9. Cool 10 minutes before serving.
NUTRITIONAL INFO:

Calories: 330kcal | Carbohydrates: 30.2g | Protein: 10.1g | Fat: 18.2g | Saturated Fat: 8.9g | Sodium: 200mg | Fiber: 2.3g | Sugar: 1.1g

Garlic Chicken Stir Fry Recipe

This garlic chicken stir fry is a quick and easy dinner that’s perfect for those busy weeknights. Cubes of chicken are cooked with colorful veggies and tossed in a flavorful garlic sauce for a meal that’s way better than take out!

Stir fry is almost a complete meal by itself. Just add some Egg Rolls, a Fruit Salad and some Cream Cheese Wontons for a complete meal!

When I am looking for a speedy dinner, I often turn to stir fry. It’s so easy to make and super versatile. It is fast and easy and curbs that temptation to hit the drive-thru. Stir fry is also a guarantee that I can get my kids to eat their vegetables. They love the combination of chicken and sauce. It is always a meal I can count on to feed the masses and they will leave the table with full bellies and smiles.

This garlic chicken stir fry is a quick and easy dinner that’s perfect for those busy weeknights! Cubes of chicken are cooked with colorful veggies and tossed in a flavorful garlic sauce for a meal that’s way better than take out!

PREP TIME: 5MINS

COOK TIME: 15MINS

TOTAL TIME: 20MINS

SERVINGS: 4 PEOPLE

Ingredients:

  • 1 lb. Boneless skinless chicken breast cut into cubes
  • 1 tbsp + 1 tsp Olive oil divided
  • 1 Yellow bell pepper sliced
  • 1 c Sliced mushrooms
  • 2-3 c Broccoli Florets
  • 4 Cloves garlic minced
  • Salt and pepper to taste
  • 1 tbsp Soy sauce
  • ¾ c. Chicken broth
  • 1 ½ tsp Sugar
  • 2 tsp Sesame oil
  • 2 tsp Cornstarch
How To Make Garlic Chicken Stir Fry
  1. Heat 1 tbsp of olive oil in a skillet over medium-high heat.
  2. Add the broccoli, sliced mushrooms and yellow bell pepper to the heated skillet, and cook for 5-6 minutes until the vegetables begin to become tender. Remove the vegetables, cover them and set aside for later.
  3. Place one teaspoon of olive oil in the heated skillet, and add the chicken breast pieces. Cook until the chicken is no longer pink in the center and cooked through. Add salt and pepper to taste.
  4. Mix the vegetables back into the skillet.
  5. In a separate bowl, combine the soy sauce, sugar, chicken broth, sesame oil and cornstarch, and mix well.
  6. Pour the sauce over the chicken and vegetables in the skillet, and stir to coat. Cook for 2-3 minutes until everything is coated well and the sauce has thickened.
  7. Serve over white rice if you desire.
NUTRITIONAL INFO:

Serves: 4

Calories183kcal (9%)

Carbohydrates 7g (2%)

Protein 26g (52%)

Fat 5g (8%)

Saturated Fat1g (5%)

Cholesterol 73mg (24%)

Sodium554mg (23%)

Potassium676mg (19%)

Fiber 1g (4%)

Sugar 2g (2%)

Vitamin A235IU (5%)

Vitamin C79.9mg (97%)

Calcium 22mg (2%)

Iron 1mg (6%)

Creamy Mashed Potato Salad Recipe

Creamy Mashed Potato Salad is a deliciously different way to enjoy leftover Mashed Potatoes!

Need a last-minute salad but all you have are leftovers? This take on a favorite Potato Salad uses up your leftovers and a handful of ingredients you likely have on hand.

Recipe Tips:
  • No leftover mashed potatoes? Use leftover roasted potatoes and give them a little squish with a masher.
  • Make hard-boiled eggs the day before and keep them in the refrigerator until they are ready to use (the air fryer is the easiest way to do this). This will help keep the salad cold!
  • Make an extra batch of the dressing, it’s great on macaroni salad too!
  • The dressing will keep in the refrigerator for up to 2 weeks in a salad dressing cruet or mason jar


PREP TIME: 15minutes

COOK TIME: 9minutes

TOTAL TIME: 24minutes

SERVINGS: 6

This flavorful Mashed Potato Salad is the perfect way to use up leftover mashed potatoes. Sour cream & vinegar, plus mayo give it a delicious creamy tang!

INGREDIENTS:

  • 3-4 cups prepared mashed potatoes leftover
  • 4 hard-boiled eggs chopped (optional)
  • 1 cup celery diced
  • 3 green onions sliced
  • ¼ teaspoon paprika for garnish, optional

Dressing

  • ½ cup mayonnaise
  • ¼ cup sour cream
  • ¼ cup relish (sweet or dill pickle)
  • 2 tablespoons cider vinegar
  • 1 ½ tablespoons yellow mustard or dijon
  • 1 teaspoon sugar
  • ½ teaspoon salt or to taste
  • ½ teaspoon pepper or to taste
  • ¼ teaspoon garlic powder

INSTRUCTIONS:

  1. Mix all dressing ingredients in a bowl.
  2. Combine mashed potatoes with dressing & remaining ingredients. Mix well.
  3. Refrigerate at least one hour before serving.

Notes:

This recipe is intended to be made with leftover mashed potatoes which have a creamy consistency from the addition of butter & milk with seasonings.

If you are making mashed potatoes for this recipe specifically, cook about 1 ½ to 2 pounds potatoes. Peel & boil 15 minutes or until tender. Add butter, milk, seasonings & mash. Cool completely in the fridge before using in this recipe.

NUTRITIONAL INFO:

Calories: 324, Carbohydrates: 30g, Protein: 8g, Fat: 20g, Saturated Fat: 4g, Trans Fat: 1g, Cholesterol: 137mg, Sodium: 561mg, Potassium: 471mg, Fiber: 3g, Sugar: 3g, Vitamin A: 445IU, Vitamin C: 26mg, Calcium: 52mg, Iron: 1mg

Cucumber Bites Recipe

Quick, easy, and fresh, these cucumber bites are the perfect cold appetizer with a dill cream cheese mixture piped on top of cucumber slices and topped with juicy tomatoes.

Prep Time: 15mins

Cook Time: 0mins

Total Time: 15mins

Servings: 24 

INGREDIENTS:

  • 2 cucumbers
  • 4 ounces cream cheese, softened
  • 1 tablespoon mayonnaise
  • 3 tablespoons Ranch dressing
  • 1 tablespoon fresh dill, minced fine
  • ¼ teaspoon garlic salt
  • ¼ teaspoon Italian seasoning
  • 12 cherry or grape tomatoes
  • Black pepper, for garnish

INSTRUCTIONS:

  1. Wash, peel, and slice the cucumbers into half-inch slices discarding the ends.
  2. Remove a little of the center of the cucumber with a small measuring spoon making a divot in the cucumber.
  3. Mix together the cream cheese, mayonnaise, and ranch dressing until smooth and creamy.
  4. Add dill, garlic salt, and Italian seasoning and mix until combined.
  5. Place the filling into a piping bag with a star tip and pipe about 1 tablespoon of filling onto each cucumber.
  6. Slice the tomatoes in half and place a piece onto each cucumber filling.
  7. Sprinkle with black pepper and serve.

Notes: 

A small melon baller would also work to make the divots in the center of the cucumbers.

Make sure your cream cheese is at room temperature so that it blends well with the rest of the ingredients and doesn’t leave lumps.

No piping or pastry bag? Fill a sandwich baggie and clip the corner off.

SUBSTITUTIONS AND ADDITIONS:

MAYONNAISE: You could also substitute the mayonnaise for plain Greek yogurt or sour cream in this easy recipe if you’d like.

TOMATOES: You could also top them with red bell peppers.

CREAM CHEESE: If you want to change up the flavor of the cream cheese mixture on top or to save time and eliminate the fresh herbs and spices (you’ll still need to add the ranch dressing and mayo to thin it out), there are plenty of herbed cream cheese flavors available that would be delicious

GARNISH: You could top these bites with sesame seeds, poppy seeds, or chives as well. If you like a little kick, you could add finely chopped jalapeno or crushed red pepper flakes.

VARIATIONS: Cucumbers are the perfect base for lots of yummy toppings. You could also top them with buffalo chicken dip, smoked salmon, hummus, egg salad, or tuna salad.

NUTRITIONAL INFO:

Calories: 33.79kcal | Carbohydrates: 1.21g | Protein: 0.53g | Fat: 3.08g | Saturated Fat: 1.14g | Cholesterol: 6.06mg | Sodium: 64.55mg | Potassium: 60.67mg | Fiber: 0.29g | Sugar: 0.78g | Vitamin A: 152.26IU | Vitamin C: 2.03mg | Calcium: 9.56mg | Iron: 0.12mg

Prime Rib Recipe

The only prime rib recipe you’ll ever need. Follow our step-by-step instructions for a prime rib roast that’s cooked to perfection. It’s a must for holidays and special gatherings!

PREP TIME: 5 mins

COOK TIME: 2 hrs 30 mins

BRING TO ROOM TEMP: 3 hrs

TOTAL TIME: 5 hrs 35 mins

SERVINGS: 10 servings

YIELD: 1 (10-pound) rib roast

Older cookbooks will sometimes instruct you to remove excess fat from the roast. “Excess” fat is any fat more than an inch thick on the roast. Fat is what you need to give the roast flavor and to make it juicy and tender. Prime rib is expensive and you are paying good money for that fat, so leave it on. Your butcher should have removed any excess fat already.

The most important piece of advice I can give you regarding cooking a prime rib roast is to use a good meat thermometer! With a remote thermometer, you can tell exactly what the temperature of the meat is without having to open the oven door.

Ingredients:

For the prime rib roast
  • 1 (10-pound) standing rib roast, 3 to 7 ribs (estimate serving 2-3 people per rib), bones cut away from the roast and tied back to the roast with kitchen string (ask your butcher to prepare the roast this way)
  • Salt
  • Freshly ground black pepper
For the gravy
  • 1/4 cup fat and drippings from the pan
  • 1/4 cup all-purpose flour
  • 3 to 4 cups water, milk, stock, or beer
  • Salt, to taste
  • Freshly ground black pepper, to taste

Method:

Salt the roast and let sit at room temp:

Remove the beef roast from the refrigerator 3 hours before you start to cook it. Sprinkle it with salt all over and let it sit, loosely wrapped in butcher paper. Roasts should be brought close to room temperature before they go into the oven to ensure more even cooking.

Tie with kitchen string:

If your butcher hasn’t already done so, cut the bones away from the roast and tie them back on to the roast with kitchen string. This will make it much easier to carve the roast, while still allowing you to stand the roast on the rib bones while cooking.

Preheat the oven and season the roast:

Preheat your oven to 500°F (or the highest temp your oven reaches, if it’s less than 500°F). Pat the roast dry with paper towels (pre-salting should have made the roast release some moisture), and sprinkle the roast all over with salt and pepper.

Place the roast fat-side-up in a roasting pan:

Insert an ovenproof meat thermometer into the thickest part of the roast, making sure that the thermometer isn’t touching a bone.

There are so many variables involved that affect cooking time, this is why you should use a meat thermometer. A prime rib roast is too expensive to “wing it”. Err on the rare side, you can always put the roast back in the oven to cook it a bit longer, if it’s too rare for your tastes.

Brown the roast at high temperature:

Brown the roast at 500°F (or as high as your oven will go) for 15 minutes.

Lower the oven to 325°F to finish roasting:

Reduce the oven temperature to 325°F. Roast in the oven until the thermometer registers 115°F for rare or 120° for medium rare, and 130°F for medium.

To estimate the total cooking time, allow about 11 to 12 minutes per pound for rare and 13 to 15 minutes per pound for medium rare. The actual cooking time will depend on the shape of the roast, how chilled your roast still is when it goes into the oven, and your particular oven. A flatter roast will cook more quickly than a thicker one. A chilled roast will take more time than one closer to room temp.

Check the temperature of the roast using a meat thermometer an hour before you expect the roast to be done. For example, with a 10 pound roast, you would expect 2 hours of total cooking time for rare (15 minutes at 500° and 1 3/4 hours at 325°). In this case, check after 1 hour 15 minutes of total cooking time, or 1 hour after you lowered the oven temp to 325°. (A benefit of using a remote thermometer is that you don’t have to keep checking the roast, you’ll be able to see exactly what the temperature is by looking at the thermometer outside of the oven.)

Simple Tip!

If the roast is cooking too quickly, lower the oven temperature to 200°F.

Let the roast rest:

Once the roast has reached the temperature you want, remove it from the oven and place it on a carving board. Cover it with foil and let it rest for 15 to 30 minutes before carving. The internal temperature of the roast will continue to rise while the roast is resting.

Slice the roast:

Cut away the strings that were used to hold the roast to the rack of rib bones. Remove the bones (you can save them to make stock for soup later.)

Then, using a sharp carving knife, slice meat across the grain for serving, making the slices about 1/2-inch to 3/4-inch thick.

Make the gravy:

To make the gravy, remove the roast from the pan. Remove excess fat, leaving 1/4 cup of fat plus the browned drippings and meat juices in the roasting pan.

Place the roasting pan on the stovetop on medium high heat. Use a metal spatula to scrape up drippings that might be sticking to the pan.

When the fat is bubbly, sprinkle 1/4 cup of flour over the fat and drippings in the pan.

Stir with a wire whisk to incorporate the flour into the fat. Let the flour brown (more flavor that way and you don’t have the taste of raw flour in your gravy.)

Slowly add 3 to 4 cups of water, milk, stock, or beer to the gravy. Continue to cook slowly and whisk constantly, breaking up any flour lumps.

The gravy will simmer and thicken, resulting in about 2 cups of gravy.

Season the gravy with salt and pepper and herbs to taste.

Nutrition Facts (per serving)

|677|CALORIES|54g|FAT|0gCARBS|0g|PROTEIN|45g|

Cranberry Salad Recipe

This creamy cranberry salad is a blend of fresh cranberries, pineapple, marshmallows, pecans, coconut and apples, all tossed in a creamy dressing. A unique and colorful salad that’s perfect for the holidays!

I’m always looking for fun ways to serve cranberries other than your standard cranberry sauce. This cranberry salad is perfectly sweet and full of different flavors and textures. If you are a cranberry fan, make sure to also bake up a loaf of fresh cranberry bread to celebrate the season!

HOW DO YOU MAKE CRANBERRY SALAD?

This recipe starts with a bag of fresh cranberries. The cranberries are chopped, then mixed with sugar. The cranberries need to sit in the sugar for at least 3 hours to temper some of the natural tart flavor of the berries.

Cranberry salad garnished with cranberries, marshmallows, pecans and apples.

This creamy cranberry salad is a blend of fresh cranberries, pineapple, marshmallows, pecans, coconut and apples, all tossed in a creamy dressing. A unique and colorful salad that’s perfect for the holidays!

Prep Time: 10mins

Cook Time: 1mins

Chill Time: 3hrs

Total Time: 11mins

Servings: 10

Ingredients:

  • 12 ounces fresh cranberries chopped
  • 2/3 cup granulated sugar
  • 1 cup chopped apple I use Granny Smith
  • 1 cup chopped pineapple fresh or canned
  • 1 cup miniature marshmallows
  • 1/2 cup chopped pecans
  • 1/4 cup shredded coconut
  • 8 ounces frozen whipped topping thawed
  • fresh cranberries, apples and marshmallows for garnish optional

Instructions:

  1. Place the cranberries and sugar in a glass or plastic bowl (do not use metal). Stir to combine.
  2. Cover the bowl and chill for at least 3 hours.
  3. Add the apple, pineapple, marshmallows, pecans and coconut to the bowl.
  4. Add the whipped topping to the bowl and fold gently to combine all the ingredients. Garnish with additional cranberries, apples and marshmallows if desired, then serve.

Nutritional Info:

Calories: 178kcal | Carbohydrates: 27g | Protein: 1g | Fat: 7g | Saturated Fat: 3g | Sodium: 27mg | Potassium: 99mg | Fiber: 2g | Sugar: 22g | Vitamin A: 45IU | Vitamin C: 12.4mg | Calcium: 25mg | Iron: 0.3mg

Chicken Fitters Recipe

If you’re looking for some delicious chicken snacks, these Chicken Fritters are perfect for you! They’re fried chicken patties that are crispy on the outside, and soft, juicy, and tender on the inside with a hint of garlic! You’re going to instantly fall in love with them as soon as you have a bite!

This chicken fritters recipe is special because it combines the classic flavors of fried chicken with a unique twist. The fritters are made with a combination of chicken breasts, garlic, onion, and seasonings that give them an amazing flavor.

These Chicken Fritters are quick and easy to make and are crispy on the outside, and soft, juicy, and tender on the inside with a hint of Garlic

Ingredients:

  • 5 lbs. – chicken breast
  • 2 large – eggs
  • 1 small – yellow onion
  • 2 large – garlic cloves
  • ¼ cup – mayonnaise
  • 1 tsp. – Mrs. Dash seasoning
  • 1 tsp. – salt (or to taste)
  • ¼ tsp. – black ground pepper (or to taste)
  • ½ cup – flour
  • Olive oil for sautéing

Instructions:

How to Prep Chicken for Chicken Fritters
  1. Start by soaking clean chicken breasts in cold water for a couple of hours, and changing the water periodically. This is certainly optional, but it’s my preferred way to cook meat while ensuring that it’s thoroughly clean.
  2. Cut all fat off the chicken breasts and rinse well, again. Place clean beasts into a strainer for excess water to drain.
  3. Then cut the chicken into tiny cubes, about ¼”. Place chicken cubes into a large mixing bowl for easier mixing.
How to Make Chicken Mixture for Chicken Fritters
  1. Next, add eggs, shredded yellow onion, crushed garlic, mayonnaise, Mrs. Dash seasoning, salt, and black ground pepper to the chicken.
  2. Stir everything together, then add flour and mix it again. The mixture should thicken a little after adding the flour.
How to Cook Chicken Fritters
  1. Now heat a large non-stick skillet or large frying pan over medium-low heat. That will be 3.5 if your stove is digital.
  2. Add 2-3 tablespoons of olive oil to the pan. When oil gets hot, place one large ice cream scoop of chicken mix onto the pan and pat down to flatten into a fritter.
  3. I like to cover the pan with a Frying Pan Splatter Screen Guard as the fritters splatter during sautéing, the guard contains most of the splatter. A regular lid traps the steam while a screen guard releases the steam but contains the splattering.
  4. This is an optional step but I love the results with it; I’ve noticed that covering with a pan lid causes the fritters to water, release their juice, then later become too dry.
  5. Sauté fritters for 5 minutes on each side. I prefer sautéing a tad longer on a lower temp to ensure the meat is well done. Then flip the fritters over and sauté for 5 more minutes.
  6. Once done, place sautéed fritters onto a plate or cutting board lined with paper towels to soak in excess oil, then place the fritters onto a serving dish of your choice before transferring another set of sautéed fritters to the lined paper towel surface.
  7. You may need to replace the paper towels every couple of batches as they get oily fast.

Banana Bread Recipe

PREP TIME: 10 mins

COOK TIME: 60 mins

TOTAL TIME: 70 mins

SERVINGS: 8 to 10 servings

YIELD: 1 loaf

No need for a mixer for this recipe! Clean-up is easy, too. If you want, you can mix everything in one bowl.

This recipe calls for an 8- x 4-inch loaf pan. If you are baking in an 8 1/2- x 4 1/2-inch pan, bake for 47 to 57 minutes. If baking in a 9- x 5-inch pan, bake for 45 to 55 minutes. Note that the larger pan size will produce a flatter loaf.

The best bananas to use for banana bread are those that are over-ripe. The yellow peels should be at least half browned, and the bananas inside squishy and browning.

Ingredients:

  • 2 to 3 medium (7″ to 7-7/8″ long) very ripe bananas, peeled (about 1 1/4 to 1 1/2 cups mashed)
  • 1/3 cup (76g) butter, unsalted or salted, melted
  • 1/2 teaspoon baking soda (not baking powder)
  • 1 pinch salt
  • 3/4 cup (150g) sugar (1/2 cup if you would like it less sweet, 1 cup if more sweet)
  • 1 large egg, beaten
  • 1 teaspoon vanilla extract
  • 1 1/2 cups (205g) all-purpose flour

Method:

Preheat the oven and prepare the pan:

Preheat the oven to 350°F (175°C), and butter an 8 x 4-inch loaf pan.

Mash the bananas and add the butter:

In a mixing bowl, mash the ripe bananas with a fork until completely smooth. Stir the melted butter into the mashed bananas.

Mix in the remaining ingredients:

Mix in the baking soda and salt. Stir in the sugar, beaten egg, and vanilla extract. Mix in the flour.

Bake the bread:

Pour the batter into your prepared loaf pan.

Bake for 55 to 65 minutes at 350°F (175°C), or until a toothpick or wooden skewer inserted into the center comes out clean. A few dry crumbs are okay; streaks of wet batter are not. If the outside of the loaf is browned but the center is still wet, loosely tent the loaf with foil and continue baking until the loaf is fully baked.

Cool and serve:

Remove from oven and let cool in the pan for a few minutes. Then remove the banana bread from the pan and let cool completely before serving. Slice and serve. (A bread knife helps to make slices that aren’t crumbly.)

Wrapped well, the banana bread will keep at room temperature for 4 days. For longer storage, refrigerate the loaf up to 5 days, or freeze it.

Nutritional Info:

220/CALORIES/7g/FAT/37g/CARBS/3g/PROTEIN

Mexican Ground Beef Casserole with Rice

No more boring beef mince recipes….. Kick off the week with THIS flavour packed Mexican Ground Beef Casserole!! With corn, capsicum/bell peppers and black beans, this rice casserole is juicy, cheesy, and packed with big Mexican flavours.

One pot, quick dinner idea that’s on the table in 30 minutes! 

 Big juicy pot of beef and rice loaded with Mexican flavours! The rice is tender and perfectly cooked, and the tomato sauce is generously flavoured with a Mexican Spice mix. A quick dinner made in one pot with not much prep!

Prep Time: 10mins

Cook Time: 20mins

Total Time: 30mins

Servings: 5 

Ingredients:

  • 2 tbsp olive oil
  • 1 onion , finely chopped
  • 3 garlic cloves , minced
  • 500g (1 lb) ground beef (mince), lean
  • 1/3 cup tomato paste
  • 1 1/4 cup long grain white rice , uncooked (Note 1)
  • 2.5 cups (625 ml) chicken broth/stock , low sodium
  • 400g (14oz) can corn kernels , drained (Note 2)
  • 400g (14oz) can black beans , drained (or other beans)
  • 1 capsicum/bell pepper , diced
  • 1 cup green onions/shallots
  • 2 cups (200g) cheese , shredded (anything that melts! Note 3)

MEXICAN SPICES:

  • 0.5 tsp cayenne pepper (Note 4)
  • 1.5 tbsp dried oregano
  • 3 tsp cumin
  • 3 tsp coriander
  • 3 tsp onion powder
  • 2 tsp paprika
  • 1.5 tsp salt

Instructions:

  1. Heat oil in a large pot over high heat. Add garlic and onion, cook 1 1/2 minutes until onion is translucent.
  2. Add beef and cook, breaking it up as you go, until you no longer see raw meat (about 2 minutes).
  3. Add Mexican Spices and cook for 30 seconds.
  4. Add capsicum and cook for 1 minute.
  5. Add tomato paste and broth, stir to mix in.
  6. Add rice, corn and black beans.
  7. Stir, bring to simmer then cover and lower heat to medium low (simmering gently). Cook 15 minutes.
  8. Remove lid, quickly stir through green onion and HALF the cheese.
  9. Smooth top then sprinkle on remaining cheese. Cover and leave for 1 minute just to melt cheese.
  10. Remove from stove and serve immediately, garnished with more green onion if desired.

Notes:

1. Rice – recipe works best with long grain white rice. Will also work with medium or short white rice grain, “standard” (unspecified) white rice, jasmine* or basmati rice*. Recipe as written won’t work with: brown rice, wild rice, risotto, paella rice, quinoa.

2. Corn – can also use frozen, 1 3/4 cups.

3. Cheese – use anything that melts! Cheddar, mozzarella, tasty, Monterey Jack, Colby.

4. Cayenne adds spiciness, this amount across a vast volume of rice is barely noticeable. Increase or eliminate if desired.

5. Leftovers will keep for 3 days in the fridge, reheat in microwave. I haven’t tried freezing but I don’t see why it wouldn’t freeze ok!

6. Nutrition per serving, this is quite a generous serving (about 2 packed cups, and it’s dense so very filling!). Every cup of cheese adds 100 calories per serving, so if you want to cut back on calories, halve the cheese (don’t skip completely!).

Nutritional Info:

Calories: 715cal | Carbohydrates: 73g | Protein: 45g | Fat: 28g | Saturated Fat: 13g | Cholesterol: 109mg | Sodium: 2039mg | Potassium: 1258mg | Fiber: 10g | Sugar: 7g | Vitamin A: 2254IU | Vitamin C: 54mg | Calcium: 437mg | Iron: 7mg


Italian Bomboloni Recipe

These Italian Donuts better known as a Bomboloni are made with a soft yeast dough, fried, rolled in sugar then filled with your favourite pastry cream filling. Served for breakfast and snack or just about anytime you want.

What is the Difference Between Doughnuts and Bomboloni?

Though bomboloni can is a type of doughnut, they’re a little different because they use fresher ingredients. They’re also a bit thicker and deep-fried rather than baked.

How to Serve Italian Bomboloni?

Try to serve bomboloni as a dessert or a snack when your kids are good. They go well with milk and other refreshing drinks, so try to mix them up a little in this way.

Italian Bomboloni Cooking Tips:
  • Make sure you brown each side before flipping
  • Add the Nutella slowly to avoid overstuffing
  • Plan for at least three bomboloni per family member
Variations of Italian Bomboloni:
  • Add a chocolate cream instead of Nutella
  • Top with a whipped cream for more flavor
  • Let the dough rise longer to produce thicker doughnuts

Prep Time: 1hr 30min

Cook Time: 1hr 7min

Total Time: 2hrs 37mins

Servings: 12 Donuts

Looking for a delicious dessert that goes above and beyond your traditional doughnut? You need to try out this Italian bomboloni recipe. Decided to blend well with fantastic pasta dishes and other Italian favorites, it’s a relatively simple and tasty dessert your family will adore.

Ingredients:

  • 3 c Flour
  • 2 ¼ tsp Dry Yeast
  • 2 tsp Salt
  • ¼ c Sugar
  • 1 lemon zested
  • 2 eggs
  • ¾ c Milk
  • 4 tbsp Butter
  • 1 tsp Vanilla
  • Nutella

Instructions:

  1. In a mixer combine the flour, yeast, salt, sugar, and lemon zest.
  2. Add in eggs one at a time, then the milk, butter, and vanilla and knead for 2 minutes.
  3. Put dough on a floured bench and knead until a bit sticky, yet smooth and stretchy. About 5 minutes.
  4. Place dough in a greased bowl and cover. Let rise for an 1hr until doubled in size.
  5. Roll out the dough to ¾ thick and use a cup sized cutter to cut them into circles.
  6. Cover on a baking sheet and let rise for another hour.
  7. Heat oil in a deep pan until 175 degrees C and fry in batches until golden brown. Flipping halfway.
  8. Remove and place on paper towels to remove excess oil.
  9. Use a piping bag to fill each with Nutella then top with icing sugar.
  10. Serve and enjoy!

Nutritional Info:

Serving: 1g | Calories: 204kcal | Carbohydrates: 31g | Protein: 5g | Fat: 6g | Saturated Fat: 4g | Polyunsaturated Fat: 2g | Cholesterol: 42mg | Sodium: 440mg | Fiber: 1g | Sugar: 6g

Apple Dumplings Recipe

Is there anything better than warm Homemade Apple Dumplings? Not today there isn’t! I am obsessed with this apple dumplings recipe! I was management in a family style restaurant in the town I lived in many years ago. I worked 5 days a week. During the Fall I would take one of my days off and go to the restaurant and make triple batches of these apple dumplings.

These apple dumplings are delicious and so easy to make. The homemade dough is easy to make, the recipe comes together fast, the results are wonderful.

Prep Time: 20mins

Cook Time: 35mins

Total Time: 55mins

Servings: 6

Ingredients

Sauce Ingredients

  • 1 cup sugar
  • 1 cup water
  • 1 tsp cinnamon
  • 2 Tbls butter

Dough Ingredients

  1. 2 cups all flour
  2. 2 tsps baking powder
  3. 1 tsp salt
  4. 2/3 cup Crisco shortening
  5. 1/2 cup milk
  6. 6 small Macintosh or Gala Apples about 3 inches in diameter Peeled and cored. Do not cut in half I used Gala, leave them whole.

Instructions:

  1. Make the sauce first so it has time to cool down.
  2. Make the dough and refrigerate it until you have peeled and cored your apples.

Sauce Directions

  1. I put all the sauce ingredients together in a medium saucepan. When it comes to a boil, I let it boil a minute or two to thicken a little bit.

For the dough

  1. Place the flour, baking powder and salt into a large bowl. Cut the shortening into the flour mixture with a pastry blender. Add milk all at once.
  2. Stir with a fork until the dough just forms a ball. Place in the refrigerator until you have peeled and cored the apples.
  3. Peel and core the apples. You can keep the apples from turning brown by placing them in cold water while you work.
  4. I divide the dough into six equal portions and roll them out on a lightly floured surface individually.
  5. You can also roll the dough out on a lightly floured surface long enough to fit 6 apples on it and cut the dough into six squares.
  6. Place the apples on a dough square, fill the center with butter, sprinkle sugar over top then sprinkle cinnamon over top.
  7. Mold the dough around the apple, making sure there are no opening for the filling to escape from.
  8. Place the apples in a 13×9 inch baking pan. Spacing them about an inch apart.
  9. Pour the sauce over the dumplings , then sprinkle with sugar. Bake in a preheated 375 degree oven for 35 minutes.
  10. Spoon the sauce on the bottom of the pan over the apple dumplings after they come out of the oven.
Nutritional Info:

Calories: 121kcal, Carbohydrates: 26g, Fat: 2g, Saturated Fat: 1g, Polyunsaturated Fat: 1g, Cholesterol: 6mg, Sodium: 18mg, Fiber: 1g, Sugar: 23g

Baked Barbeque Back Ribs Recipe

Fall-off-the-bone, tender bbq back ribs made with a flavorful homemade dry rub and baked in the oven to juicy perfection.

PREP TIME: 20mins

COOK TIME: 3 hrs

TOTAL TIME: 3 hrs 20mins

SERVINGS: 4 servings

INGREDIENTS:

Dry Rub
  • 2 tablespoons brown sugar
  • 2 tablespoons smoked paprika
  • 2 tablespoons garlic powder
  • 1 tablespoon onion powder
  • 1 tablespoon cumin
  • 1 tablespoon kosher salt
  • 1 teaspoon black pepper
  • 1 teaspoon cayenne powder
Baby Back Ribs
  • 2 1/2 lbs baby back ribs thawed
  • 1 tablespoon liquid smoke
  • 2 tablespoons apple cider vinegar

INSTRUCTIONS:

  1. Preheat oven to 300 degrees F. Place a wire rack inside a large baking sheet. Set aside.
  2. Gently remove the thin membrane from the back of the rack of ribs with a knife or your hands. It should pull right off.
  3. In a bowl, mix together all your dry rub ingredients.
  4. Generously season your ribs with the dry rub on both sides making sure to coat every inch of the rack.
  5. Place the ribs on a large piece of aluminum foil, top side down, then splash them with the apple cider vinegar and liquid smoke.
  6. Fold the aluminum foil all around the ribs, sealing it entirely and securely, so no liquid leaks out.
  7. Place in the oven and bake for 3 hours or until very tender. Remove them from the oven.
  8. Remove the aluminum foil from the ribs and generously brush them with bbq sauce.
  9. Place the ribs back in the oven and broil them for 5 minutes until caramelized. Serve and enjoy!

NUTRITIONAL INFO:

Serving: 1 serving

Calories: 462 kcal/Carbohydrates: 13 g/Protein: 36 g/Fat: 30 g/Saturated Fat: 10 g/Cholesterol: 123 mg/Sodium: 1919 mg/Potassium: 623 mg/Fiber: 2 g/Sugar: 7 g/Vitamin A: 1990 IU/Vitamin C: 1 mg/Calcium: 92 mg/Iron: 3 mg

Did You Make This?


Japanese Cheesecake Recipe

Light, jiggly, and fluffy, Japanese Cheesecake (Soufflé Cheesecake) is seriously the most delicious treat to serve for a crowd. It has the melt-in-your-mouth combination of creamy cheesecake and airy soufflé. A second (or more) serving is a guarantee!

Japanese cheesecake (also goes by soufflé cheesecake) is a glorious dessert known for its ultra-creamy, super luxurious, slightly tangy flavor and airy, soufflé-like character. It has swept the food world by storm and almost every dessert fanatic goes wild for it.

Why is it so popular? What’s the difference between Japanese cheesecake and regular cheesecake? For a start, I think it has the ideal texture that appeals to everyone. With elements of both a rich velvety custard and a cottony sponge cake, the dessert simply hits all the right notes. It is not heavy and a lot less sweet than typical Western-style cheesecakes. Even those who are not into cheesecake will fall head over heels for this delicious treat.

What is Japanese Cheesecake?

This particular Japanese cheesecake recipe is a soufflé-style cheesecake that incorporates whipped egg whites in the cake mixture and is baked in a bain-marie (water bath), which results in its characteristically light and fluffy texture. Yes, it is basically the cheesecake version of the Japanese soufflé pancakes!

As there are a few varieties of cheesecakes in Japan, we call this cheese soufflé or soufflé cheesecake. Outside of Japan, however, it becomes synonymous with the generic “Japanese cheesecake”. Because of its unique texture, it is also called jiggly cake or Japanese cotton cheesecake. I agree, that’s a lot of names for a cheesecake!

Light, jiggly, and fluffy, Japanese Cheesecake is seriously the most delicious treat to serve for a crowd. 

Prep Time: 25mins

Cook Time: 1hr 25mins

Chilling Time: 2hrs

Total Time: 1hr 50mins

 Servings: 1 9-inch (23-cm) cake

Ingredients:

  • 1 Tbsp unsalted butter (for greasing the pan and parchment paper)
  • 6 large eggs (50 g each w/o shell) (10.6 oz, 300 g without shell)
  • 10.6 oz cream cheese
  • 4 Tbsp unsalted butter
  • ¾ cup heavy (whipping) cream (¾ cup + 4 tsp, to be precise)
  • 4½ Tbsp sugar (for the cream cheese mixture)
  • ⅔ cup cake flour (weigh your flour or use the “fluff and sprinkle“ method and level it off; you can make your own Homemade Cake Flour)
  • ½ lemon (for the zest)
  • 2 Tbsp lemon juice (from ½ large lemon)
  • ½ cup sugar (for beating the egg whites)
  • 2 Tbsp apricot jam (for the glaze)
  • 2 tsp hot water (for the glaze)

Instructions:

Before You Start

I highly encourage you to weigh your ingredients in metric using a kitchen scale for this recipe. Click on the “Metric” button at the top of the recipe to convert the ingredient measurements to metric. If you‘re using a cup measurement, please follow the “fluff and sprinkle“ method: Fluff your flour with a spoon, sprinkle the flour into your measuring cup, and level it off. Otherwise, you may scoop more flour than you need. Please read the blog post for more detailed information that I shared about this recipe.

To Prepare the Cake Pan

Use a 9-inch (23-cm) cake pan that is 4 inches (10 cm) high. Cut parchment paper to line the bottom and sides of the cake pan. Cut one circle 9 inches (23 cm) in diameter for the bottom and one rectangular strip 4 x 30 inches (10 x 76 cm) for the sides of the cake pan. In addition, cut two strips of paper 2 x 30 inches (5 x 76 cm) each. We will use these as “straps” to lift the baked cake from the pan.

With 1 Tbsp unsalted butter, grease the cake pan and the parchment paper (for the bottom and the sides only; grease the paper on one side). You don‘t need to use all the butter.

Place the two parchment paper “straps” crisscross on the bottom of the cake pan so they form an “X.” Allow the excess paper to hang over the sides. Then, line the bottom and sides with the greased parchment paper. The greased side of the paper circle should face up, and the greased side of the rectangular strip should face in toward the center of the pan.

To Preheat the Oven and Prepare a Double Boiler

Preheat the oven to 350ºF (180ºC). For a convection oven, reduce the cooking temperature by 25ºF (15ºC). Note: You will be baking at 320ºF (160ºC). However, when you open the oven to place the cheesecake, you’ll lose some heat, so we’ll start off a bit higher.

Prepare a double boiler: Set a medium saucepan filled with 2 inches (5 cm) of water over high heat and bring to a simmer. Once simmering, cover and reduce the heat to maintain a steady simmer.

To Gather the Ingredients

Gather all the ingredients. Please note that it is very important to measure all your ingredients before starting. Separate 6 large eggs (50 g each w/o shell) into yolks and whites. Refrigerate the egg whites.

To Make the Cake Batter

In a large bowl, add 10.6 oz cream cheese, 4 Tbsp unsalted butter, ¾ cup heavy (whipping) cream, and 4½ Tbsp sugar. Rest the bowl on the saucepan above the simmering water.

Using a silicone spatula, mash the cream cheese and butter. Once they are melted, use a whisk to blend everything together. Remove from the heat.

While whisking, add the egg yolks into the warm cream cheese mixture, one at a time. Make sure each yolk is blended well with the cream cheese mixture before adding the next one.

Using a fine-mesh strainer, sift ⅔ cup cake flour into the batter. Whisk and blend together.

Then, pass the batter through the same fine-mesh strainer into a clean large bowl. This creates a silky texture for the batter.

Add the zest of ½ lemon into the batter. Make sure you only zest the flavorful yellow part and not the bitter white pith. Into a separate small bowl, squeeze the juice from the lemon. Measure 2 Tbsp lemon juice and add it to the batter. Whisk well to blend and set aside.

To Set Up the Bain-Marie

Put the baking sheet inside the preheating oven and pour in hot water until it is halfway up the sides or ½ inch deep. Close the oven door.

To Beat and Incorporate the Egg Whites

Add the cold egg whites into the dry, clean mixing bowl of a stand mixer. Make sure there is no oil or water in the bowl. If you have space in your refrigerator, I highly recommend keeping the mixing bowl cold until you’re ready to use it. Start whisking on medium speed (Speed 4) until the egg whites become opaque, foamy, and bubbly, about 2 minutes. Then, slowly add ½ cup sugar, one-third of it at a time, while the mixer runs.

Once you’ve added all the sugar, increase the mixer speed to high (Speed 8–9) and beat the egg whites until you have firm peaks. When you lift the whisk and turn it upside down, the egg whites should still cling to the whisk and hold their shape fairly well, but the tip of the peak folds back on itself.

Using a hand whisk, mix one-third of the egg whites into the cream cheese mixture until incorporated. Then, gently fold another one-third into the mixture.

Lastly, pour the mixture back into the mixer bowl (with the last one-third of the egg whites still in it) and fold very gently until just combined.

Pour the mixture into the cake pan all at once, avoiding air pockets while pouring. Tap the cake pan a few times on the kitchen counter to release any air pockets in the batter.

To Bake the Cheesecake

Open the oven and place the cake pan onto the baking sheet with the bain-marie. Reduce the oven temperature to 320ºF (160ºC)—25ºF (15ºC) lower for a convection oven—and bake for 70–75 minutes. Then, reduce the oven temperature to 300ºF (150ºC) and bake for another 10 minutes, or until the top is golden brown. To test if the cake is done, open the oven door slightly and insert a skewer into the cake. If it comes out without a wet liquid batter, it‘s done.

To Cool

Turn off the oven and leave the oven door slightly ajar for 15–20 minutes with the cake inside. If you take the cake out immediately to the kitchen counter, the sudden change in temperature could cause the cake to collapse. You want the cake to slowly shrink down to half the height, roughly from 4 inches to 2 inches high. After 15–20 minutes, remove the pan from the oven. Gently pull out the cake from the cake pan using the two parchment paper straps (with help from another set of hands).

Place the cake on a plate. Remove the parchment paper around the sides of the cake (but leave the bottom paper). Combine 2 Tbsp apricot jam and 2 tsp hot water in a small bowl. Brush the apricot mixture over the top of the cheesecake. Let cool to room temperature.

To Serve

You can serve the cake at room temperature (fluffiest!) or chill the cake for 1–2 hours before serving.

To Store

You can store the cake in the refrigerator for up to 3–4 days or in the freezer for 3–4 weeks. Defrost the cake overnight in the refrigerator. The cold cheesecake is dense, so leave it on the counter until just chilled or at room temperature before serving.

Notes:

All-Purpose Flour vs. Cake Flour:

All-purpose flour and cake flour do not perform the same. Cake flour is more delicate, and if you use all-purpose flour instead of cake flour, the texture will be dense and tough. If you can’t find cake flour, use this substitutions

To Make Cake Flour:

Take one level cup of all-purpose flour, remove 2 Tbsp, and then add 2 Tbsp of corn starch back in. (1 cup of AP flour – 2 Tbsp of AP flour + 2 Tbsp of cornstarch = 1 cup of cake flour).

Be sure to sift the flour 3–4 times to distribute the cornstarch well.

Tips for Beating Egg Whites:

Make sure your beaters and mixing bowl are clean and dry. A speck of oil, water, or egg yolk on either one can minimize the volume of the beaten egg whites.

Avoid plastic bowls—even clean ones may hold oily residue that can affect the successful whipping of the egg whites.

Use a bowl that’s wide enough to keep the beaters from being buried in the egg whites.

Nutritional Info:

Serving: 9 inch cake · Calories: 3560 kcal · Carbohydrates: 266 g · Protein: 70 g · Fat: 252 g · Saturated Fat: 142 g · Trans Fat: 2 g · Cholesterol: 1838 mg · Sodium: 1488 mg · Potassium: 1137 mg · Fiber: 3 g · Sugar: 189 g · Vitamin A: 10053 IU · Vitamin C: 21 mg · Calcium: 631 mg · Iron: 8 mg

Cheesy Chicken Pasta Bake

Chicken Pasta Bake – Pasta, chicken and a variety of veggies baked in a creamy tomato sauce with a tasty cheesy topping.

WHY CHICKEN PASTA BAKE IS A FAMILY-FRIENDLY DISH

Make-Ahead: This dish can be prepared the night before or earlier in the day to make dinner time a breeze!

5 Different Veggies: Although it may not appear to have a lot of veggies, it does actually contain quite a few (onion, bell pepper (capsicum), spinach, tomatoes and peas) Serve with a side of vegetables for an extra nutritional boost!

Easy to Adapt: This recipe is pretty flexible. Mix up the veggies and miss out the chicken, depending on what you have available or to suit your family’s tastes.

Prep Time: 20mins

Cook Time: 40mins

Total Time: 1 hr

 Servings: 6

Ingredients:

  • 400g (14 oz) Dried Rigatoni Pasta
  • 1 tablespoon Olive Oil
  • 1 Onion, finely chopped
  • 1 teaspoon Garlic, minced
  • 1 Red Capsicum (Bell Pepper), finely chopped
  • 2 tablespoon Tomato Paste (Puree)
  • 1 teaspoon Dried Oregano
  • 400g (14oz) Canned Chopped Tomatoes
  • 250ml (1 cup) Chicken Stock
  • 125ml (½ cup) Double Cream (thickened cream)
  • 120g (4.2 oz) Spinach Leaves
  • 380g (3 cups) Cooked Shredded Chicken *See notes if you would prefer measurements and cooking instructions for using raw chicken.
  • 75g (½ cup) Peas
  • 80g (½ cup) Mozzarella, grated
  • 80g (½ cup) Cheddar, grated
Instructions:

  1. Pre-heat oven to 190C/ 375F
  2. Bring a large pot of water to the boil. Add pasta and cook per packet directions MINUS 1 minute, drain.
  3. In a large frying pan, or saucepan, heat the oil over medium heat. Add the onion and cook for 2 minutes.
  4. Then add the garlic and capsicum (bell pepper) and gently saute until onion is translucent (around 3 mins.)
  5. Add the tomato paste and dried oregano and stir for a further minute.
  6. Add the chopped tomatoes and chicken stock and bring to a gentle bubble.
  7. Then stir in the double cream. Add the spinach and continue to stir until the spinach has wilted.
  8. Taste and season accordingly. (do not season for babies and young children)
  9. Add the chicken, cooked pasta and peas.
  10. Gently stir to combine and then transfer to a large baking dish.
  11. Top with the grated mozzarella and cheddar. Place in the oven for 20-25 minutes.
  12. The dish should be hot throughout and the cheese golden and bubbly.

Notes:

PASTA: Rigatoni is used but you can substitute with most pasta shapes (e.g penne, fusilli, shells etc)

CHICKEN: This recipe uses cooked shredded chicken. If you prefer the texture of chicken pieces or only have raw chicken available then chop two large (or 3 smaller) raw chicken breasts into bite sized pieces. Before cooking the sauce, saute the chicken pieces in a little olive oil over medium heat until sealed, around 5 mins. Remove from the pan and add back into the dish at the same point you add the pasta.

STOCK: I used chicken stock but you can also use vegetable stock. If serving a baby make sure to use homemade stock to reduce sodium levels. Alternatively you can replace with a second can of chopped tomatoes.

CHEESE: A mix of mozzarella and mature cheddar is used for the topping. Mozarella melts really well and has that nice stretch, and isn’t as oily. You can replace the cheddar with other cheeses such as Gruyere, Monterey Jack, Colby, Provolone & Tasty. A little grated parmesan will also add good flavour. Bee mindful of sodium content when cooking for babies / young children. You may wish to reduce the cheese or serve a portion with less cheese topping.

Refrigeration: This chicken pasta bake can be stored, covered, in the refrigerator for 2-3 days.

Freezing: Assemble and allow to cool. Do not bake, just cover and freeze it.

Nutritional Information is a ROUGH guide only, calculated using an online nutrition calculator.

Nutritional Info:

Calories: 592kcal | Carbohydrates: 61g | Protein: 35g | Fat: 23g | Saturated Fat: 11g | Cholesterol: 101mg | Sodium: 394mg | Potassium: 758mg | Fiber: 5g | Sugar: 7g | Vitamin A: 3307IU | Vitamin C: 45mg | Calcium: 254mg | Iron: 4mg

Spanakopita Triangles Recipe

These delicious Spanakopita Triangles are fabulous as an appetiser or on-the-go snack. Super yummy crispy phyllo pastry filled with spinach, feta and lots of herbs.

Spanakopitakia Spinach and Feta Triangles / mini spinach pies) are the cute offspring of Greek spinach pie! Just as delicious, portable and with even more crispy phyllo to filling ratio 🙂

I love making these spanakopita triangles as an appetizer – hugely popular with vegetarians and meat eaters alike. But I also love them for lunch with a side serving of Greek Salad! 

Using good quality barrel aged Greek feta makes all the difference in terms of flavor. But you can also use feta and ricotta or cream cheese if you like.

TIPS FOR MAKING THIS RECIPE

The filling can be prepared up to three days in advance – useful if you are making these for a party! 

Keep your phyllo covered with a very slightly damp cloth so that it doesn’t dry out while you assemble the spinach pies.

Always worth having some extra pastry to hand, in case any sheets tear or you have filling left over!

You can use fresh instead of frozen spinach if you prefer. Rinse the spinach and wild in pan before draining and using.

Taste the filling before adding the eggs. Feta cheese can be quite salty but you still need to add salt, to taste.

These delicious Spanakopita Triangles are fabulous as an appetiser or on-the-go snack. Super yummy crispy phyllo pastry filled with spinach, feta and lots of herbs.

Prep Time: 20mins

Cook Time: 35 mins

Total Time: 1hr

Servings: 50 triangles

Ingredients:

  • 500 g (17 ½ oz ) frozen spinach (or fresh, chopped)
  • 2 tbsp olive oil or as needed
  • 8 spring onions (scallions) finely chopped
  • 2 leeks white part only, finely chopped
  • 1 tsp salt or more, as needed
  • 100 g (about ½ cup) fresh parsley chopped
  • 100 g (about ½ cup) fresh dill chopped
  • 2 large eggs
  • 200 g (7oz) feta cheese crumbled
  • 200 g (7oz) cream cheese / ricotta or more feta cheese
  • 1 lemon zest only
  • 25 sheets of phyllo pastry thawed if frozen (note: you might need extra!)
  • 80 ml (⅓ cup) light olive oil or as needed
  • 2 tbsp sesame seeds optional

Instructions

Make the filling

  1. Thaw the spinach and squeeze most of the moisture out.
  2. If using fresh spinach you will need to wilt it in a pan before using and then strain to remove the juices.
  3. Sauté the green onions and leeks in a pan with a splash of olive oil.
  4. Add the salt and herbs and cook for a couple more minutes, or until softened.
  5. Stir in the spinach and leave to cool before adding the feta and eggs.
  6. Mix in the crumbled feta / cream cheese and have a taste, adding more salt if needed.
  7. Add the eggs and lemon zest, mix well to combine and set aside.

Assemble the pies

  1. Preheat the oven to 180C (350F) and place a tray on the middle shelf.
  2. Open up your pastry and use a sharp knife to cut through the phyllo vertically so you have 40 long strips.
  3. Brush one phyllo with olive oil and put a second strip of pastry on top.
  4. Doubling up the pastry will create crispy spinach hand pies and keep the filling from bursting out.
  5. Place a tablespoon (or just over) of the filling at the end of the strip. Don’t be tempted to over fill!
  6. Fold the end of your strip with the filling over to encase the filling and form a triangle.
  7. Continue folding the pastry, brushing sparingly with olive oil, until you have a tightly packed triangle.
  8. Brush with oil and sprinkle with sesame seeds (optional).

Bake

  1. Put the spanakopita triangles onto a lined baking sheet, spaced slightly apart.
  2. Bake in a preheated oven until golden brown and transfer to a wire rack to cool.
  3. Don’t stack them as the steam with soften the pastry.

Notes

TIPS FOR MAKING THIS RECIPE

Keep your phyllo covered with a very slightly damp cloth so that it doesn’t dry out while you assemble the spinach pies.

You can use fresh instead of frozen spinach if you prefer. Rinse the spinach and wild in pan before draining and using.

Nutritional Info 

Calories: 478kcal | Carbohydrates: 76g | Protein: 12g | Fat: 13g | Saturated Fat: 4g | Trans Fat: 1g | Cholesterol: 15mg | Sodium: 801mg | Potassium: 192mg | Fiber: 3g | Sugar: 1g | Vitamin A: 1655IU | Vitamin C: 7mg | Calcium: 67mg | Iron: 5mg

Easy Tiramisu Cake Recipe

Tiramisu is a classic Italian no-bake dessert made with layers of coffee-soaked ladyfingers and incredible mascarpone cream. The custard-like cream is excellent and contains no raw egg. This easy recipe is truly the best homemade tiramisu and always gets rave reviews.

We love classic Italian desserts like Panna Cotta, Affogato, and of course Berry Tiramisu. Classic Tiramisu is probably the most iconic Italian treat and this one does not disappoint!

What is Tiramisu?

The word Tiramisu (tirami su in Italian) means “cheer me up” or “pull me up,” which is very appropriate because one bite will put you in a good mood! An authentic Tiramisu dessert that has 2 main layers: sponge cake ladyfingers soaked in coffee and liqueur and the mascarpone cream layer. This classic dessert often contains raw egg yolks, but we use a different process to create a custard-like cream with amazing texture and flavor.

Can I Substitute the Rum?

We used golden rum but you can use dark rum. You can also substitute the rum with a little Grand Marnier, or amaretto. If you prefer to omit it completely, you can just leave out the rum or add a little bit of vanilla extract to taste.

What are LadyFingers?

Lady Fingers are essentially sponge cake batter piped into strips then baked and dried into biscuits. They are known “savoiardi” in Italian and are perfect for tiramisu because they absorb the syrup well without getting soggy. Ladyfingers are great in other no-bake desserts such as the incredible Charlotte Cake, these individual Mousse Cups, and even a trifle.

Tips for the Best Tiramisu:
  • Quick Dip – Dip ladyfingers one or two at a time. A quick dip on each side is enough. There will be some syrup left behind.
  • Do not over-soak the ladyfingers or the layers may collapse.
  • Water Bath – When whisking yolks and sugar over steam, make sure the bowl is not touching the water beneath it.
  • Allow the yolk mixture to cool until it’s just slightly warm – whisking off the heat will help cool it down faster.
  • Use cold HEAVY whipping cream and beat until stiff peaks form – whip slowly over time for the cream to remain more stable (don’t under beat or overbeat)
  • Do not over-mix – When folding cream into Mascarpone, do not overmix the cream or it may turn grainy.
  • Chill the cake at least 6 hours in the refrigerator or overnight and it will be very easy to slice.
  • Tiramisu keeps well so you can make it a day or two ahead.
  • Leftovers are good refrigerated up to 5 days because there are no raw eggs in the cake.
Can I Substitute the Coffee?

Traditionally, coffee or espresso is used in Tiramisu. If you are concerned about caffeine, you can use decaf coffee so you can still enjoy the same classic flavor. If you prefer a different flavor profile, you can turn this into a Berry Tiramisu and omit the cocoa powder.


Prep Time: 30 minutes

Cook Time: 10 minutes

Resting/Chilling Time: 6hours 

Total Time: 6 hours 25 minutes

Servings: 12 slices of cake

Ingredients:


  • 1 1/2 cups espresso , (or strong coffee), room temperature
  • 6 Tbsp golden rum, divided
  • 40 ladyfingers
  • 6 egg yolks, (large)
  • 3/4 cup granulated sugar
  • 16 oz mascarpone, cold
  • 2 cups heavy whipping cream, cold*
  • 2-3 Tbsp unsweetened cocoa powder, to dust the top
Instructions:
  1. In a bowl, stir together 1 1/2 cups espresso and 3 Tbsp rum.
  2. Quickly dip half of the ladyfingers, one at a time and arrange in a single layer in the bottom of a 9×13 casserole dish.
  3. Dip once on each side so they are moist but do not soak ladyfingers or the cake will collapse.
  4. In a separate rimmed* medium glass bowl, whisk together yolks and sugar.
  5. Place over steam (on a saucepan with simmering water) and whisk 10 minutes on low heat until the mixture is lighter in color, slightly thickened and not grainy when you rub between your fingers.
  6. Remove from heat and whisk for a few minutes off the heat to help it cool down then set aside to cool while doing step 3.
  7. Beat together 16 oz mascarpone and 3 Tbsp rum.
  8. Use an electric hand mixer to beat in the warm yolk mixture until well incorporated.
  9. In a separate bowl, beat cold heavy whipping cream until stiff peaks form*.
  10. Use a spatula to gently fold half of the whipped cream into mascarpone cream then blend in remaining whipped cream, just until incorporated.
  11. Do not overfold or it will become grainy.
  12. Spread half of the cream over the first layer of ladyfingers.
  13. Dip and arrange remaining ladyfingers. Spread remaining cream. Refrigerate overnight.
  14. Dust with cocoa powder before serving. It is ok to dust with cocoa ahead of time – it will just darken it in color from the moisture.
Recipe Notes:

*Be sure to use very cold HEAVY whipping cream and not light cream.

**A mixing bowl with a little rim around the edge helps to keep the steam and condensation out of the bowl.

***Beating heavy cream slowly will help the cream remain more stable without turning watery. Start on low speed then increase to medium speed over the next 5 minutes or until thick and stiff peaks form.

Notes:

Alcohol: Tiramisu can be made with or without alcohol. This recipe calls for coffee flavored liqueur because I like that it enhances the coffee flavor, but other options are marsala wine or brandy.

Make Ahead Instructions: Tiramisu is even better when made in advance, allowing the flavors to blend! It will keep in the refrigerator for 2 to 3 days.

Freezing Instructions: Make completely, but don’t dust with cocoa powder. Cover tightly with plastic wrap and then tinfoil and freeze for up to 3 months. Thaw in the refrigerator overnight and dust with cocoa powder a few hours before serving.

Nutritional Info:

Calories297kcalCarbohydrates26gProtein5gFat18gSaturatedFat11gPolyunsaturatedFat1gMonounsaturatedFat2gCholesterol88mgSodium:77mgPotassium: 124mgFiber: 1gSugar: 11gVitamin A: 618IUVitamin C: 1mgCalcium: 90mgIron: 1mg

Ground Beef Casserole Recipe

Ground beef pasta is a favorite family meal and is easy to make in just a few steps. You can’t go wrong with meat, sauce, pasta, and cheese!

This Ground Beef Casserole has everything you want in a baked pasta dish – savory browned beef, pasta, marinara sauce, and a cheesy layer of mozzarella for an easy weeknight dinner. Toss everything together and bake until the cheese is golden and bubbly, or freeze for a quick meal that’s ready to heat up on busy nights.

Casseroles are a lifesaver, especially for busy families, and with this hamburger casserole, you can bring it all together quickly and let it finish in the oven. Trying to get dinner to the table even quicker? Skip the oven and serve this ground beef pasta recipe straight from the stovetop by adding the cooked pasta to the sauce, sprinkling with mozzarella, and then adding a lid to allow the heat to melt the cheese.

Casseroles are a lifesaver, especially for busy families, and with this hamburger casserole, you can bring it all together quickly and let it finish in the oven. Trying to get dinner to the table even quicker? Skip the oven and serve this ground beef pasta recipe straight from the stovetop by adding the cooked pasta to the sauce, sprinkling with mozzarella, and then adding a lid to allow the heat to melt the cheese.

WHY YOU’LL LOVE THIS GROUND BEEF CASSEROLE WITH PASTA

Perfect comfort food. This pasta bake hits the spot for a comforting dish with layers of tomato sauce, penne pasta, ground beef, and melty cheese in every bite. Warm up those cold nights with a home-cooked meal that warms your soul – you can’t go wrong with beef casseroles!

Very kid-friendly. Give the kids what they want, and you’re sure they’ll eat! It’s like spaghetti but with different pasta and everything tossed together into an oven-baked casserole.

Freezer-friendly. I love family-sized freezer-friendly dinners! You can freeze the sauce to add to freshly cooked pasta before baking or assemble the ground beef casserole with noodles in a baking pan, cover it with foil, and freeze it as a whole meal ready to bake.

Well-balanced meal. A complete meal to fill you up and keep you full of good carbs, protein, and veggies. Swap out the pasta for whole wheat or gluten-free pasta for a healthier alternative. Toss in some diced eggplant, zucchini, or spinach to add another layer of veggies with the tomatoes and onions.

POPULAR SUBSTITUTIONS & ADDITIONS

Add vegetables. You can easily up the nutritional value of ground beef pasta casserole by adding chopped vegetables when cooking the onions and beef mixture: Sauté zucchini, eggplant, spinach, kale, or even diced carrots to the sauce base. The smaller the dice, the less likely picky eaters will notice the addition.

Use ground turkey. If you’re looking for a lighter pasta casserole, then ground turkey makes an excellent substitution for ground beef. Check out my ground turkey casserole for the full recipe!

Make it Vegetarian! Want to enjoy a hearty casserole but avoid meat? It’s super easy to do by swapping out the ground beef for either lentils or chickpeas. With either of these options, you still get a full meal with all the benefits of meat, like protein. You could also load the sauce with vegetables instead of beef for a wholesome meal.

Add some heat. Want to kick your pasta sauce up a notch with some fiery spices? Add some red pepper flakes or cayenne pepper to the sauce when adding the seasonings.

HOW TO STORE & REHEAT GROUND BEEF CASSEROLE

Store leftover beef casserole with pasta in an airtight container in the fridge.

Reheat in the microwave or preheated oven until heated through.

HOW LONG WILL BEEF PASTA CASSEROLE LAST IN THE FRIDGE?

When stored properly, leftovers will keep in an airtight container in the fridge for 3 to 4 days.

CAN I FREEZE BEEF CASSEROLES?

Yes! To freeze, prepare the casserole in a baking dish and cover with a layer of foil followed by plastic wrap to securely cover the dish. You can freeze ground beef casserole with pasta up to 3 months and bake straight from frozen by simply adding an additional 20 minutes or so to the cook time.

Ground beef pasta is a favorite family meal and is easy to make in just a few steps. You can’t go wrong with meat, sauce, pasta, and cheese!

 Prep Time: 15mins

 Cook Time: 25mins

 Total Time: 40mins

 Servings: 8 servings

 Calories: 411kcal

Ingredients:
  • 16 ounces penne pasta
  • 1 tablespoon olive oil
  • 1 pound lean ground beef
  • 1 large onion diced
  • 2 teaspoons Italian seasoning
  • ½ teaspoon salt
  • ½ teaspoon pepper
  • 2 garlic cloves minced
  • 1 25-ounce jar marinara sauce store-bought or homemade
  • ¼ cup Fresh basil torn, plus more for garnishing
  • 1 ½ cups shredded mozzarella cheese
Instructions:
  1. Preheat the oven to 375°F. Bring a large pot of salted water to a boil. Add pasta and cook al dente according to package instructions.
  2. Drain, reserve ½ cup pasta water, and transfer the pasta to a 9×13 baking dish.
  3. In a large deep skillet over medium-high, heat the olive oil. Add the ground beef and onions and season with Italian seasoning, salt and pepper.
  4. Cook the ground beef and onions, breaking up the beef into smaller pieces with the back of a wooden spoon until browned, about 10 minutes.
  5. Add the garlic and cook until fragrant, 1 more minute.
  6. Stir in the marinara and basil, then transfer the sauce on top of the pasta in the baking dish and toss gently to combine.
  7. Add as much of the reserved pasta water as desired until the sauce looks glossy.
  8. Sprinkle the shredded mozzarella cheese on top and bake in the preheated oven until the cheese is lightly golden, about 15 minutes.
  9. Garnish with fresh basil and serve immediately.
Notes:

Leftovers will keep in an airtight container in the fridge for 3 to 4 days, and you can reheat it in the oven or microwave. Freeze up to 3 months and bake from frozen by adding an additional 20 minutes to the cook time.

Nutritional Info:

Calories: 411kcal | Carbohydrates: 50g | Protein: 25g | Fat: 12g | Saturated Fat: 5g | Polyunsaturated Fat: 1g | Monounsaturated Fat: 5g | Trans Fat: 0.4g | Cholesterol: 50mg | Sodium: 738mg | Potassium: 630mg | Fiber: 4g | Sugar: 6g | Vitamin A: 535IU | Vitamin C: 8mg | Calcium: 212mg | Iron: 3mg

Apple Fitters Recipe

Craving something sweet and delicious? Look no further than this amazing air fryer apple fritters recipe! Deliciously golden and crisp on the outside, with a soft and sweet center filled with tender apples, these apple fritters are sure to become a family favorite.

Apple Fritters are luscious deep fried donuts filled with apples, and cinnamon and drizzled with an easy three-ingredient glaze. You can have these scrumptious warn apple fritters in your hands in less than thirty minutes. Make sure you stash a couple for yourself, or you might blink your eyes, and they will be gone. These are one of my darling daughter’s favorite goodies. She can not get enough of them!

WHY THIS RECIPE WORKS!
  • Homemade warm sweet apple fritters that are better than your local bakery.
  • Only wholesome natural ingredients with no artificial colors or preservatives.
  • Easy and quick to mix and fry.
  • The fritters can be fried up in a fryer, Dutch oven, or heavy stock pot.
HOW TO MAKE APPLE FRITTERS?

First peel, core and dice a couple of Granny Smith or Honey Crisp apples. I like to dice them somewhere between 1/4-1/2 inch. That way you get a good taste of that sweet apple. Now grab a large bowl and add the flour, sugar, baking powder, salt and cinnamon. Whisk it around and get it all mixed together. Make a well in the middle and add the milk, egg and applesauce. Now stir the mixture just until it is combined.

Fill a dutch oven or large heavy stock pot with about 1 1/2 inches of canola oil. Use a candy thermometer and bring the oil to 375 degrees. Carefully drop about 1/4 cup of batter per fritter into the hot oil. I like to spread the batter a little while I am pouring it so that the fritter does not end up too fat and so it cooks all the way through. Cook each side until golden brown. It takes about 2 minutes per side. Remove to paper towels to drain.

Once they have cooled whisk together the milk, powdered sugar and vanilla. Finally dunk the fritters in the glaze turning over to make sure each side is coated. Place on wire racks to air dry and drip.

CAN YOU BAKE THESE FRITTERS?

This is a question that I am asked quite frequently. Yes I am sure there are lots of great recipes out there for baked apple fritters however this particular recipe really needs to be fried. Do your best to keep the oil at 375 degrees so the fritter absorbs less of the oil.

RECIPE NOTES AND HELPFUL TIPS
  • Don’t over-mix the batter as it may make the fritters tough.
  • Don’t overcrowd the pan when frying so the donuts cook better and the oil temperature is easier to maintain.
  • Use a candy thermometer to track the temperature of the oil.
  • A dutch oven or heavy pot helps the oil hold its temperature.
  • Try to maintain a constant temperature of 375 degrees. When you add the batter the temperature will drop so you must increase the heat a tad. Likewise when you remove the fritters from the oil the temperature will increase so you need to turn the heat down a tad.
  • Remove the fried fritters to paper towels to drain.
  • Store the cooled cooked fritters wrapped loosely in paper towels in a brown paper bag.

These Apple Fritter Donuts are as scrumptious as the ones at your neighborhood bakery at a fraction of the cost. Make a batch for your family today and get ready to enjoy all the complements.

 Prep Time: 10min

Cook Time: 10min

Total Time: 20mins

Yield: 10 fritters 

INGREDIENTS:
APPLE FRITTERS
  • 1 1/2 cups all purpose flour
  • 1/4 cup sugar
  • 2 teaspoons baking powder
  • 1/2 teaspoon salt
  • 1 1/2 teaspoons cinnamon
  • 1/3 cup milk
  • 2 eggs
  • 3 tablespoons applesauce
  • 2 large Granny Smith apples or Honey Crisp apples peeled, cored and diced
  • canola oil or vegetable oil for frying
GLAZE
  • 2 cups powdered sugar
  • 1/4 cup milk
  • 1/2 teaspoon vanilla extract
INSTRUCTIONS:
  1. Whisk together flour, sugar, baking powder, salt, and cinnamon in medium bowl.
  2. Make a well in the center and add 1/3 cup milk, eggs and applesauce. Stir just to combine. Fold in apples.
  3. Heat 1 1/2 inches of oil in heavy skillet, dutch oven or deep fryer to 375 degrees.
  4. Drop about 1/4 cup of batter per fritter into hot oil; spreading it out as you drop.
  5. Cook each side until golden brown; approximately 2 minutes per side.
  6. Use a slotted spoon to remove to paper towels to drain.
  7. Whisk together 1/4 cup milk, powdered sugar and vanilla.
  8. Dunk each fritters in the glaze turning over to make sure both sides coated.
  9. Place on wire racks to air dry and drip.
NOTES:
  • Don’t over-mix the batter as it may make the fritters tough.
  • Don’t overcrowd the pan when frying so the donuts cook better and the oil temperature is easier to maintain.
  • Use a candy thermometer to track the temperature of the oil.
  • A dutch oven or heavy pot helps the oil hold its temperature.
  • Try to maintain a constant temperature of 375 degrees. When you add the batter the temperature will drop so you must increase the heat a tad. Likewise when you remove the fritters from the oil the temperature will increase so you need to turn the heat down a tad.
  • Remove the fried fritters to paper towels to drain.
  • Store the cooled cooked fritters wrapped loosely in paper towels in a brown paper bag.
Nutritional Info:

Serving Size: 1 fritter

Serves: 10

Calories 286%Total Fat 10.3g 13%Cholesterol 39.3mg 13%Sodium 143.5mg 6%Total Carbohydrate 46g 17%Sugars 28.8g Protein 4g 8%