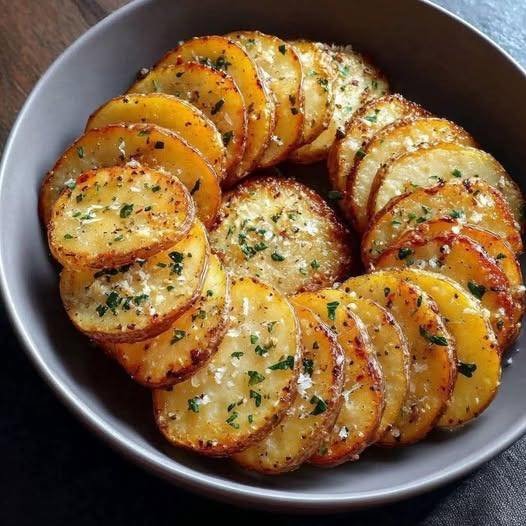
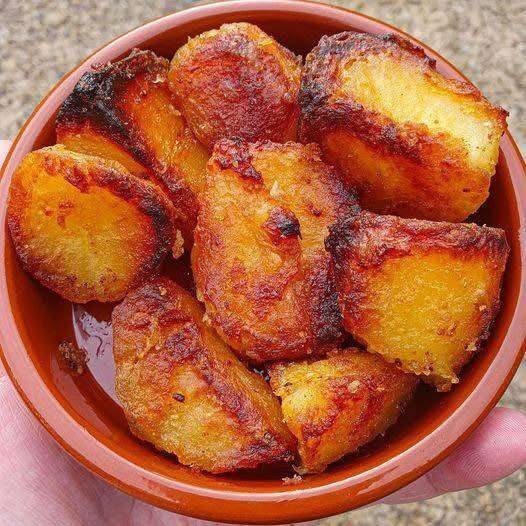
Butter Castella Cake Recipe

🍰 Butter Castella Cake Recipe

Ingredients (for one 8-inch loaf pan or a small square pan)

  • 1 cup (120 g) cake flour
    (You can use all-purpose flour sifted 2–3 times for extra lightness.)
  • 6 large eggs, at room temperature
  • ¾ cup (150 g) granulated sugar
  • 3 tbsp (45 ml) honey (or golden syrup)
  • 4 tbsp (60 g) unsalted butter, melted
  • 3 tbsp (45 ml) whole milk, warmed
  • 1 tsp vanilla extract

Instructions

1. Prepare the Pan and Oven

  • Preheat oven to 325°F (160°C).
  • Line your baking pan with parchment paper, leaving some extra on the sides so the cake can be lifted out easily after baking.
  • In a small bowl, mix the warm milk, melted butter, and honey. Set aside.

2. Beat Eggs and Sugar

  • In a heatproof bowl, combine eggs and sugar.
  • Place the bowl over a pot of simmering water (double boiler style).
  • Whisk constantly until the mixture is warm to the touch and the sugar granules have dissolved.
  • Remove from heat and beat using an electric mixer on high speed for about 5–7 minutes, until the mixture becomes pale, thick, and tripled in volume.

3. Fold in the Flour

  • Sift the cake flour in 2–3 additions into the whipped egg mixture.
  • Gently fold with a spatula each time, being careful not to deflate the airy batter.

4. Add Flavoring

  • Pour in the butter-milk-honey mixture and vanilla extract.
  • Fold gently until just combined. Avoid overmixing — this keeps the cake soft and fluffy.

5. Bake the Cake

  • Pour the batter into the prepared pan and tap lightly to remove large air bubbles.
  • Bake for 35–45 minutes, or until the top is golden brown and a skewer inserted in the center comes out clean.

6. Cool and Set

  • Remove the cake from the oven and, while still warm, cover the top with plastic wrap to retain moisture.
  • Once completely cooled, wrap the entire cake in plastic wrap and refrigerate overnight.
    This resting time gives the Castella its signature moist, dense, and slightly sticky texture.
  • Slice into thick pieces and serve at room temperature.

Tips & Variations

  • For a chewier texture, substitute bread flour for cake flour.
  • For a different flavor, replace honey with maple syrup or golden syrup.
  • For Matcha Castella, add 1–2 tsp of matcha powder when sifting the flour.
  • To ensure even baking, place the pan on the middle rack and avoid opening the oven during the first 30 minutes.

Healthy Apple & Oat Breakfast Cake

Healthy Apple & Oat Breakfast Cake

Moist, naturally sweet, and packed with fiber and healthy fats—perfect for breakfast or a wholesome snack


Recipe Overview

  • Prep Time: 15 minutes

  • Bake Time: 35–45 minutes

  • Pan Size: 20×8 cm (8×3 inch loaf pan)

  • Yield: 8–10 slices


Ingredients

  • 150 g (1 ½ cups) oat flakes (use certified gluten-free if needed)

  • 2 large apples, peeled and chopped into small cubes

  • 2 large eggs, at room temperature

  • 50 g (1/3 cup) raisins

  • 30 g (¼ cup) walnuts, chopped (for topping)

  • 1 tsp ground cinnamon

  • 1 ½ tsp (6 g) baking powder

  • Hot water (enough to soak the raisins)

  • Optional: 1 tsp vanilla extract or 1 tbsp honey for extra sweetness


Step-by-Step Instructions

1. Hydrate the Raisins

  • Place the raisins in a small bowl and cover them with hot water.

  • Let them soak for 10 minutes to plump up, then drain thoroughly.


2. Prepare the Oat Base

  • For a smoother, cake-like texture, pulse the oat flakes in a blender for a few seconds until they resemble flour.

  • For a more rustic, chewy texture, leave the oats whole.


3. Mix the Wet Ingredients

  • In a large bowl, whisk the eggs until well combined.

  • If using honey or vanilla extract, stir it in at this stage.


4. Incorporate the Fruit

  • Fold the chopped apples, soaked raisins, and ground cinnamon into the egg mixture.

  • The moisture from the apples will naturally hydrate the oats during baking.


5. Combine with Oats and Baking Powder

  • Add the oats and baking powder to the wet mixture.

  • Mix gently until all the oats are evenly moistened and the fruit is distributed throughout the batter.

  • Avoid overmixing, which can make the loaf dense.


6. Prepare the Pan

  • Preheat your oven to 350°F (180°C).

  • Grease a 20×8 cm loaf pan with a small amount of vegetable oil or butter, or line it with parchment paper for easier removal.


7. Top and Bake

  • Pour the batter into the prepared pan and smooth the top with a spatula.

  • Evenly sprinkle the chopped walnuts over the surface.

  • Bake for 35–45 minutes, or until the top is golden brown and a toothpick inserted in the center comes out clean.


8. Cool

  • Let the cake cool in the pan for at least 15 minutes.

  • This allows the oats to set so the slices remain firm when cut.

  • Slice and enjoy warm, or let it cool completely for later.


Tips for Success

  • Texture Variation: Blend oats for a fine crumb or leave them whole for extra chewiness.

  • Natural Sweetness: The combination of apples and raisins provides enough natural sugar; additional sweeteners are optional.

  • Healthy Fats: Walnuts add crunch and heart-healthy omega-3s.

  • Storage: Keep leftovers in an airtight container in the refrigerator for 3–4 days.

  • Flavor Enhancements: Add a pinch of nutmeg, cardamom, or a handful of shredded coconut for extra aroma.

Zesty California Spaghetti Salad

Zesty California Spaghetti Salad

A colorful, chilled pasta salad with crisp vegetables and a zesty dressing

This refreshing pasta salad combines tender spaghetti with fresh vegetables, olives, and a flavorful zesty Italian dressing. Chilling allows the flavors to meld, making it a versatile side dish for picnics, potlucks, or weekday meals.


Recipe Overview

  • Prep Time: 20 minutes

  • Chill Time: 3 hours (essential)

  • Total Time: About 3 hours 20 minutes

  • Servings: 8–10


Ingredients

Pasta & Vegetables

  • 1 lb (450 g) spaghetti, broken into thirds before cooking

  • 1 large cucumber, diced (peeled or unpeeled)

  • 2 large Roma tomatoes, seeded and diced

  • 1 small red onion, finely chopped

  • 1 green bell pepper, diced

  • 1 red bell pepper, diced

  • 1 can (6 oz) sliced black olives, drained

  • Optional: ½ cup grated Parmesan cheese

Zesty Dressing

  • 1 bottle (16 oz) zesty Italian dressing

  • ½ cup grated Parmesan cheese

  • 1 tablespoon sesame seeds

  • 1 teaspoon poppy seeds

  • ½ teaspoon paprika

  • ½ teaspoon celery seed

  • ¼ teaspoon garlic powder


Step-by-Step Instructions

1. Cook the Pasta

  • Bring a large pot of salted water to a boil.

  • Add the spaghetti pieces and cook according to package directions until al dente.

  • Drain and rinse thoroughly under cold water to stop the cooking process and prevent sticking.

  • Drain well and set aside.


2. Prepare the Vegetables

  • While the pasta cools, dice the cucumber and bell peppers into small, bite-sized pieces.

  • Seed and dice the tomatoes.

  • Finely chop the red onion.

  • Drain the sliced black olives.

  • Place all vegetables in a large mixing bowl.


3. Make the Dressing

  • In a medium bowl, whisk together:

    • Zesty Italian dressing

    • Parmesan cheese

    • Sesame seeds

    • Poppy seeds

    • Paprika

    • Celery seed

    • Garlic powder

  • Mix thoroughly until uniform.


4. Combine Pasta and Vegetables

  • In a large mixing bowl (or large serving tray), combine the cooled spaghetti and all the chopped vegetables.

  • Pour the dressing over the pasta and vegetables.

  • Toss gently but thoroughly to ensure all strands of spaghetti are coated with the dressing.


5. Chill the Salad

  • Cover the bowl or tray with plastic wrap or a lid.

  • Refrigerate for at least 3 hours, preferably longer, to allow the pasta to absorb the flavors.


6. Serve

  • Give the salad a quick toss before serving.

  • If it appears slightly dry after chilling, add a small splash of additional Italian dressing or olive oil.

  • Optional: Sprinkle with extra Parmesan cheese before serving.


Tips for Success

  • Even chopping: Cut vegetables into similar-sized pieces for consistent texture and presentation.

  • Make-ahead: This salad tastes best after chilling, making it ideal for meal prep or entertaining.

  • Customization: Add grilled chicken, chickpeas, or cooked shrimp to turn it into a complete meal.

  • Storage: Keep leftovers in an airtight container in the refrigerator for 2–3 days.

Apple & Banana Oatmeal Breakfast Loaf

Apple & Banana Oatmeal Breakfast Loaf

A moist, naturally sweet loaf perfect for breakfast or a snack

This wholesome breakfast loaf combines the fiber of oats with the natural sweetness of apples and banana. Raisins, cherries, and a crunchy nut topping make it a satisfying treat for mornings or anytime you want a nutritious snack.


Recipe Overview

  • Prep Time: 15 minutes

  • Bake Time: 45–50 minutes

  • Total Time: About 1 hour 5 minutes

  • Yield: 1 loaf


Ingredients

  • 1 cup (100 g) rolled oats or oatmeal

  • 2 medium apples, peeled and grated

  • 1 ripe banana, mashed

  • 2 large eggs

  • 100–120 ml water

  • 100 g raisins (or sultanas)

  • 100 g pitted cherries

  • 1 teaspoon baking powder

  • 50 g Brazil nuts, chopped (for topping)

  • Vegetable oil (for greasing the pan)


Step-by-Step Instructions

1. Hydrate the Oats

  • In a large mixing bowl, combine the oats with 100–120 ml of water.

  • Let the mixture sit for about 10 minutes so the oats soften and absorb moisture.


2. Prepare the Fruit

  • Peel and grate the apples.

  • In a small bowl, mash the banana with a fork until smooth.


3. Mix the Batter

  • Add the mashed banana and eggs to the soaked oatmeal. Whisk together until fully incorporated.

  • Stir in the grated apples, raisins, and cherries. Mix gently to combine.


4. Add Baking Powder

  • Sprinkle the baking powder over the mixture.

  • Fold everything together carefully with a spatula until evenly distributed. Avoid overmixing, which can make the loaf dense.


5. Prepare the Pan

  • Preheat your oven to 350°F (180°C).

  • Grease a loaf pan with vegetable oil.

  • Optional: Line a standard metal pan with parchment paper for easier removal.


6. Top and Bake

  • Pour the batter into the prepared pan and smooth the surface.

  • Evenly sprinkle the chopped Brazil nuts on top.

  • Bake for 45–50 minutes, or until the loaf is golden brown and a toothpick inserted into the center comes out clean.


7. Cool and Serve

  • Allow the loaf to cool in the pan for at least 10 minutes.

  • Remove from the pan and slice.

  • Serve warm or at room temperature.


Tips for Success

  • Smoother texture: Pulse the oats in a blender for a few seconds before hydrating to create a finer, cake-like crumb.

  • Storage: Store leftovers in an airtight container in the refrigerator for 3–4 days.

  • Nut swaps: Use walnuts, almonds, or pecans instead of Brazil nuts for a different flavor.

  • Optional additions: Add a pinch of cinnamon or nutmeg for extra warmth, or a handful of sunflower seeds for extra texture.


This loaf works well for meal prep, breakfast on the go, or as a wholesome afternoon snack.

Turkish Milk Flatbread (Pan-Cooked)

Turkish Milk Flatbread (Pan-Cooked)

Soft, pillowy flatbread with a subtle milk flavor, perfect for sandwiches or dipping

This Turkish milk bread is cooked on a stovetop pan rather than baked, giving it a soft, tender texture with a slightly crisp exterior. A touch of milk enriches the dough, and a drizzle of oil with fresh parsley and chili flakes finishes it beautifully.


Recipe Overview

  • Prep Time: 15 minutes

  • Rising Time: 1 hour

  • Cook Time: 5–6 minutes per flatbread

  • Yield: 6 medium flatbreads


Ingredients

Dough

  • 500 g (about 1 pound) all-purpose flour

  • 150 ml (5 fl. oz) warm milk

  • 150 ml (5 fl. oz) warm water

  • 1 teaspoon salt

  • 2 tablespoons dry yeast

  • 3 tablespoons olive oil

Optional Topping

  • 1–2 tablespoons olive oil or melted butter (for brushing)

  • 2 tablespoons chopped fresh parsley

  • A pinch of chili flakes (optional)


Step-by-Step Instructions

1. Prepare the Dough

  • In a large mixing bowl, combine the flour, salt, and dry yeast. Whisk briefly to distribute evenly.

  • Add the warm milk and warm water. Mix gently with a wooden spoon or your hands until the liquids are mostly absorbed.


2. Knead

  • Add the olive oil.

  • Knead the dough for about 8–10 minutes until it is smooth, soft, and slightly elastic.

  • Shape the dough into a ball.


3. First Rise

  • Lightly oil the mixing bowl. Place the dough ball inside and turn it to coat it with a thin layer of oil.

  • Cover with a clean kitchen towel or plastic wrap.

  • Set aside in a warm place for about 1 hour, or until the dough doubles in size.


4. Divide and Shape

  • Once risen, gently punch down the dough to release air.

  • Divide it into 6 equal pieces.

  • Roll each piece into a smooth ball.

  • Using a rolling pin, roll each ball into a flat circle about ½–1 cm thick.


5. Cook the Flatbreads

  • Heat a non-stick pan or cast-iron skillet over medium-high heat.

  • Place one flatbread in the pan. Cook for 2.5–3 minutes, until bubbles start to form.

  • Flip and cook the other side for another 2.5–3 minutes.

  • The flatbread should puff slightly and form a small pocket in the center.

  • Repeat with the remaining dough, adjusting heat as needed to prevent burning.


6. Finish and Serve

  • Brush each hot flatbread lightly with olive oil or melted butter.

  • Sprinkle with chopped parsley and a pinch of chili flakes, if using.

  • Serve warm as a side, for sandwiches, or with dips.


Tips for Success

  • Warm liquids: Make sure milk and water are warm (not hot) to activate the yeast without killing it.

  • Even thickness: Roll flatbreads to a consistent thickness for even cooking.

  • Pan choice: A heavy-bottomed or non-stick pan helps prevent sticking and ensures even browning.

  • Soft bread: Cover cooked flatbreads with a towel to keep them soft until serving.

Air Fryer Garlic Parmesan Potato Rounds

Air Fryer Garlic Parmesan Potato Rounds

Crisp on the outside, tender on the inside, with garlic and cheese flavor

These air fryer potato rounds are evenly sliced, lightly seasoned, and cooked until golden and crisp. Garlic and Parmesan add depth of flavor, while the air fryer method uses a modest amount of oil to achieve a satisfying texture. This recipe works well as a side dish, snack, or appetizer.


Recipe Overview

  • Prep Time: 15 minutes

  • Soaking Time: 20 minutes

  • Cook Time: 16–18 minutes

  • Total Time: About 55 minutes

  • Servings: 4


Ingredients

For the Potatoes

  • 4 medium potatoes, scrubbed clean and sliced into ½ cm (¼-inch) rounds

  • 2 tablespoons olive oil or avocado oil

  • 3 cloves garlic, finely minced

  • 1 teaspoon sea salt

  • ½ teaspoon freshly ground black pepper

  • ½ teaspoon smoked paprika (optional)

For Finishing

  • ⅓ cup freshly grated Parmesan cheese

  • 1 tablespoon fresh parsley, finely chopped

  • A small pinch of red pepper flakes (optional)


Step-by-Step Instructions

1. Prepare the Potatoes

  • Wash and scrub the potatoes thoroughly.

  • Leave the skins on for texture and flavor.

  • Slice evenly into ½ cm (¼-inch) rounds using a sharp knife or mandoline for uniform thickness.


2. Soak for Better Texture

  • Place the sliced potatoes in a large bowl.

  • Cover with cold water and add 1 teaspoon salt.

  • Let soak for 20 minutes to remove excess surface starch, which helps with even browning.


3. Drain and Dry

  • Drain the potatoes completely.

  • Pat them very dry with a clean kitchen towel or paper towels.

  • Removing surface moisture helps the potatoes cook evenly.


4. Season the Potatoes

  • Transfer the dried potato slices to a large mixing bowl.

  • Add olive oil, minced garlic, salt, black pepper, and smoked paprika (if using).

  • Toss gently until every slice is evenly coated.


5. Air Fry

  • Preheat the air fryer to 200°C (390°F) for 3 minutes.

  • Arrange the potato slices in a single layer in the basket.

  • Cook in batches if needed to avoid overlapping.

  • Air fry for 10 minutes, then flip each slice.

  • Continue cooking for 6–8 minutes, until golden and lightly crisp at the edges.


6. Finish and Serve

  • Transfer the hot potato rounds to a serving bowl or platter.

  • Immediately sprinkle with Parmesan cheese and chopped parsley.

  • Add a small pinch of red pepper flakes if desired.

  • Serve warm.


Helpful Tips & Variations

  • Even cooking: Uniform slices ensure consistent texture.

  • Cheese options: Pecorino Romano can be used for a sharper flavor.

  • Batch cooking: Avoid stacking slices for best results.

  • Serving time: These are best enjoyed shortly after cooking.

  • Flavor additions: Try dried herbs or a squeeze of lemon before serving.


Serving Suggestions

  • Serve with yogurt-based sauce, garlic dip, or ranch-style dressing

  • Pair with grilled vegetables, chicken, or fish

  • Add to salads for added texture


Approximate Nutrition (Per Serving)

  • Calories: ~180

  • Protein: 4 g

  • Carbohydrates: 26 g

  • Fat: 7 g

  • Fiber: 3 g

Bubbly Garlic Cheese Toast

Bubbly Garlic Cheese Toast

Golden, crisp bread topped with a creamy garlic base and melted cheese

This garlic cheese toast features thick slices of bread topped with a smooth garlic cream spread and a generous layer of melted cheese. Baking on a rack keeps the bread crisp underneath, while a short broil at the end creates a lightly browned, bubbly surface.


Recipe Overview

  • Prep Time: 10 minutes

  • Cook Time: 10 minutes

  • Total Time: 20 minutes

  • Yield: 4–6 slices


Ingredients

Garlic Cream Sauce

  • 4 tablespoons unsalted butter, softened

  • 1 tablespoon all-purpose flour

  • ½ cup whole milk or heavy cream

  • 2 garlic cloves, finely minced (or 1 teaspoon garlic powder)

  • ¼ teaspoon salt

  • A small pinch of black pepper

Bread & Cheese

  • 4–6 thick slices sturdy bread (such as Texas toast, sourdough, or brioche)

  • 1½ cups shredded mozzarella or Gruyère cheese

  • ½ cup shredded Parmesan cheese

  • Fresh parsley, finely chopped (optional garnish)


Step-by-Step Instructions

1. Prepare the Oven and Bread

  • Preheat the oven to 400°F (200°C).

  • Line a baking sheet with foil or parchment paper and place a wire rack on top.

  • Arrange the bread slices in a single layer on the rack to allow heat to circulate and keep the bottoms crisp.


2. Make the Garlic Cream Sauce

  • Place a small saucepan over medium heat and melt the butter.

  • Add the garlic and cook gently for about 1 minute, stirring frequently.

  • Whisk in the flour and cook for another 1 minute, creating a smooth base.

  • Slowly pour in the milk or cream while whisking constantly.

  • Continue stirring until the sauce thickens to a spreadable consistency.

  • Remove from heat and season with salt and black pepper.

Tip: For extra coverage, the sauce ingredients can be doubled.


3. Assemble the Toast

  • Spread a generous layer of the warm garlic sauce evenly over each slice of bread, reaching the edges.

  • Sprinkle the mozzarella (or Gruyère) evenly over the sauce.

  • Finish with a layer of Parmesan cheese.


4. Bake

  • Place the tray in the oven and bake for 5–7 minutes, or until the cheese is fully melted.


5. Lightly Brown the Top

  • Switch the oven setting to broil.

  • Broil for 1–2 minutes, watching closely, until the cheese develops light golden spots.


6. Finish and Serve

  • Remove from the oven and allow the toast to rest for 2 minutes.

  • Sprinkle with chopped parsley if desired.

  • Serve warm.


Helpful Tips & Variations

  • Bread choice: Thick, sturdy bread holds the sauce and cheese best.

  • Cheese texture: Freshly shredded cheese melts more smoothly than pre-packaged shredded cheese.

  • Flavor options: Add a pinch of dried herbs or chili flakes to the sauce.

  • Serving idea: Serve alongside soup, salad, or pasta dishes.

Banana Bread Protein Smoothie

Banana Bread Protein Smoothie

A creamy, filling smoothie inspired by classic banana bread flavors

This Banana Bread Protein Smoothie is thick, smooth, and naturally sweet. It blends oats, banana, yogurt, and cottage cheese into a satisfying drink that works well for breakfast, a light meal, or a post-workout refreshment. Once blended, the texture is completely smooth with no lumps.


Recipe Overview

  • Servings: 1

  • Prep Time: 5 minutes

  • Total Time: 5 minutes


Ingredients

Base Ingredients

  • ½ cup old-fashioned rolled oats

  • ½ cup low-fat or 2% cottage cheese

  • 1 large ripe banana (fresh or frozen, cut into chunks)

  • ½ cup plain or vanilla Greek yogurt

  • ½ cup milk of choice (dairy, almond, oat, or soy)

Optional Flavor Additions

  • ½ teaspoon vanilla extract

  • A small pinch of ground cinnamon

  • 1 teaspoon honey or maple syrup (optional, for added sweetness)


Step-by-Step Instructions

1. Prepare the Oats

  • Add the rolled oats to the blender first, before any liquids.

  • Pulse for 10–15 seconds until the oats turn into a fine powder.

  • This step ensures a smooth texture and prevents graininess.


2. Add the Creamy Ingredients

  • Add the cottage cheese and Greek yogurt to the blender.

  • Pour in the milk to help everything blend evenly.


3. Add the Banana and Flavorings

  • Add the banana chunks to the blender.

  • If using, add vanilla extract, cinnamon, and sweetener at this stage.


4. Blend Until Smooth

  • Start blending on low speed, then gradually increase to high.

  • Blend for 45–60 seconds, stopping to scrape down the sides if needed.

  • Continue blending until the mixture is completely smooth and creamy.


5. Adjust Texture (Optional)

  • If the smoothie is too thick, add a small splash of milk and blend again.

  • For a colder drink, add a few ice cubes and blend briefly.


Why This Smoothie Works Well

  • Oats: Help thicken the smoothie and provide steady energy.

  • Cottage cheese: Blends smoothly and adds a rich, creamy consistency.

  • Greek yogurt: Enhances thickness and balances flavor.

  • Banana: Adds natural sweetness and a classic banana bread taste.


Helpful Tips & Variations

  • Extra flavor: Add a pinch of nutmeg or a spoon of peanut butter.

  • Dairy-free option: Use plant-based yogurt and milk alternatives.

  • Thicker texture: Use a frozen banana instead of fresh.

  • Lighter version: Reduce oats slightly and add more milk.

Crispy Golden Baked Cauliflower Steaks

Crispy Golden Baked Cauliflower Steaks

A flavorful oven-baked vegetable dish with crisp edges and a tender center

These baked cauliflower steaks transform a simple vegetable into a satisfying and hearty dish. A well-seasoned coating and high-heat roasting bring out deep flavor and a beautifully golden surface, while the inside stays soft and tender. This recipe works equally well as a main dish or a side.


Recipe Overview

  • Prep Time: 10 minutes

  • Bake Time: 30–40 minutes

  • Total Time: 40–50 minutes

  • Servings: 4


Ingredients

Main Ingredient

  • 1 large head cauliflower, outer leaves removed, core intact

Seasoning & Oil

  • 3 tablespoons olive oil

  • 2 tablespoons finely grated Parmesan cheese (optional)

    • For a plant-based option, use nutritional yeast

  • 1 teaspoon smoked paprika

  • 1 teaspoon garlic powder

  • 1 teaspoon salt, or to taste

  • ½ teaspoon black pepper

Garnish

  • 1 tablespoon fresh parsley, finely chopped


Step-by-Step Instructions

1. Prepare the Oven and Cauliflower

  • Preheat the oven to 400°F (200°C).

  • Line a large baking sheet with parchment paper for easy cleanup.

  • Remove the outer leaves from the cauliflower while keeping the core intact.

  • Using a sharp knife, slice the cauliflower from top to bottom into 1-inch-thick slices.

  • You should get 3–4 full steaks; reserve any loose florets for roasting alongside.


2. Make the Seasoning Mixture

  • In a small bowl, combine:

    • Olive oil

    • Parmesan cheese (if using)

    • Smoked paprika

    • Garlic powder

    • Salt

    • Black pepper

  • Stir until well blended and smooth.


3. Season the Cauliflower

  • Arrange the cauliflower steaks and florets in a single layer on the prepared baking sheet.

  • Brush both sides generously with the seasoning mixture.

  • Make sure the coating reaches all surfaces—this helps develop a golden finish during baking.


4. Bake the First Side

  • Place the baking sheet in the oven.

  • Bake for 15–20 minutes, until the underside begins to turn golden.


5. Flip and Finish Baking

  • Carefully turn each cauliflower piece using a spatula.

  • Return to the oven and bake for another 15–20 minutes, until:

    • The cauliflower is tender when pierced with a fork

    • The edges are deeply golden and lightly crisp


6. Serve

  • Transfer the baked cauliflower to a serving platter.

  • Sprinkle with freshly chopped parsley.

  • Serve immediately while warm.


Helpful Tips & Variations

  • Extra flavor: Add onion powder, dried herbs, or a squeeze of lemon before serving.

  • Crispier finish: Use convection or broil for the last 2 minutes, watching closely.

  • Meal idea: Serve over grains, with a yogurt-based sauce, or alongside roasted vegetables.

  • Leftovers: Reheat in the oven or air fryer to restore crispness.

Chef’s Italian Christmas Bread

Chef’s Italian Christmas Bread

This traditional Italian Christmas bread is softly enriched with butter, eggs, citrus zest, and dried fruit. A slow-rise method allows the dough to develop flavor while keeping the crumb tender and light for several days. Shaped into a festive wreath, it is perfect for celebrations, gifting, or enjoying with coffee or tea.


Recipe Overview

  • Cuisine: Italian

  • Category: Sweet Bread / Holiday Baking

  • Prep Time: 30 minutes (plus rising time)

  • Rising Time: About 2½–3 hours total

  • Bake Time: 30–35 minutes

  • Total Time: About 4 hours

  • Yield: 1 large wreath (10–12 slices)


Ingredients

For the Dough

  • 500 g strong bread flour (about 4 cups)

  • 250 ml warm milk (lukewarm, not hot)

  • 7 g active dry yeast (1 standard sachet)

  • 80 g granulated sugar

  • 1 teaspoon salt

  • 1 large egg + 1 egg yolk, at room temperature

  • 100 g unsalted butter, very soft and cubed

  • Zest of 1 orange

  • Zest of 1 lemon


For the Fruit Filling

  • 150 g mixed dried fruit (raisins, sultanas, dried cranberries)

  • 50 g candied orange peel (optional)

  • 2 tablespoons dark rum or fresh orange juice


For the Glaze & Finish

  • 1 egg beaten with 1 tablespoon milk

  • Pearl sugar or powdered sugar, for topping


Step-by-Step Instructions

1. Soak the Dried Fruit

  • At least 30 minutes before mixing the dough, place the dried fruit and candied peel (if using) in a bowl.

  • Pour over the rum or orange juice and stir.

  • Let soak, then drain well before adding to the dough.

  • This step keeps the fruit soft and prevents it from drawing moisture from the bread.


2. Activate the Yeast

  • In a small bowl, combine:

    • Warm milk

    • Yeast

    • 1 tablespoon of the sugar

  • Stir gently and let stand for 10 minutes, until foamy and slightly bubbly.

  • If no foam appears, the yeast may not be active.


3. Mix the Dough

  • In a large bowl or stand mixer, combine:

    • Flour

    • Remaining sugar

    • Salt

    • Orange and lemon zest

  • Add the yeast mixture, whole egg, and egg yolk.

  • Mix until a rough, shaggy dough forms.


4. Add the Butter (Key to Soft Texture)

  • Begin kneading the dough.

  • Add the softened butter one cube at a time, allowing each piece to fully blend before adding the next.

  • Knead:

    • By hand: about 10 minutes

    • By mixer: 6–7 minutes on medium speed

  • The dough should be smooth, elastic, and slightly tacky but not sticky.

  • Gently knead in the drained dried fruit at the very end.


5. First Rise

  • Shape the dough into a ball and place it in a lightly greased bowl.

  • Cover with a clean cloth.

  • Let rise in a warm place for 1½ to 2 hours, until doubled in size.


6. Shape the Wreath

Option 1: Braided Wreath

  • Gently press down the dough to release excess air.

  • Divide into three equal portions and roll each into a long rope.

  • Braid loosely and join the ends to form a circle.

Option 2: Twisted Wreath

  • Roll the dough into a large rectangle.

  • Roll up tightly into a log.

  • Slice lengthwise down the center.

  • Twist the two halves together, keeping the cut sides facing outward.

  • Shape into a circle and seal the ends.


7. Second Rise

  • Place the shaped wreath on a parchment-lined baking tray or in a greased bundt pan.

  • Cover lightly and let rise for 45 minutes, until puffy.


8. Bake

  • Preheat oven to 180°C (350°F).

  • Brush the top gently with the egg-and-milk glaze.

  • Bake for 30–35 minutes, until:

    • Deep golden brown

    • Bread sounds hollow when tapped underneath


9. Cool and Finish

  • Remove from the oven and allow to cool completely on a wire rack.

  • Finish with pearl sugar or a light dusting of powdered sugar before serving.


Helpful Tips & Variations

  • Extra aroma: Add a pinch of ground cardamom or cinnamon to the dough.

  • Alcohol-free: Use orange juice instead of rum.

  • Storage: Wrap well; the bread stays soft for up to 3 days at room temperature.

  • Serving: Slice and enjoy plain or lightly toasted with butter.

Cheesy Air Fryer Hasselback Potatoes

Cheesy Air Fryer Hasselback Potatoes

Crispy edges, soft centers, and melty cheese in every bite

These Cheesy Air Fryer Hasselback Potatoes are a comforting side dish made with simple ingredients and big flavor. Thinly sliced potatoes fan open as they cook, allowing buttery garlic seasoning and cheese to melt into every layer. The air fryer creates a crisp exterior while keeping the inside tender and fluffy.


Recipe Overview

  • Prep Time: 10 minutes

  • Cook Time: 45 minutes

  • Total Time: 55 minutes

  • Servings: 2


Ingredients

  • 2 medium russet potatoes, scrubbed clean

  • 4 tablespoons butter, melted

  • 1 tablespoon garlic paste or finely minced garlic

  • Kosher salt, to taste

  • Black pepper, to taste

  • 3–5 slices Colby Jack cheese, each slice cut into fourths

Optional Toppings

  • Sour cream

  • Fresh chives, finely chopped


Step-by-Step Instructions

1. Prepare the Potatoes

  • Rinse and scrub the potatoes thoroughly.

  • Slice a very thin piece off the bottom of each potato so it sits flat and stable.


2. Create the Hasselback Cuts

  • Place one potato between two chopsticks or wooden spoons.

  • Using a sharp knife, slice across the potato at ¼-inch intervals.

  • The chopsticks will prevent cutting all the way through, keeping the base intact.

  • Repeat with the second potato.


3. Prepare the Air Fryer Basket (Layer-Lifting Method)

  • Place the small potato slices removed from the bottoms into the air fryer basket.

  • Set the sliced potatoes on top of these pieces.

  • This helps the slices fan open during cooking, allowing better crisping and seasoning.


4. Season the Potatoes

  • In a small bowl, combine:

    • Melted butter

    • Garlic

    • Salt

    • Black pepper

  • Gently fan open the potato slices with your fingers.

  • Brush the garlic butter generously over the tops and into the gaps.

  • Sprinkle lightly with additional salt and pepper.


5. First Air Fry Stage

  • Set the air fryer to 370°F (188°C).

  • Cook the potatoes for 20 minutes.


6. Second Air Fry Stage

  • Remove the basket and brush the potatoes with any remaining garlic butter.

  • Return to the air fryer and cook for 20–25 minutes, until:

    • The edges are crisp

    • The centers are fork-tender

    • The slices are fully opened


7. Add the Cheese

  • Carefully tuck the cheese pieces between the potato slices.

  • You can add cheese to every slice or every other slice, depending on preference.

  • Return to the air fryer and cook for 1–2 minutes, just until the cheese melts and becomes lightly bubbly.


8. Serve

  • Remove from the air fryer and let rest for 2–3 minutes.

  • Top with sour cream and fresh chives if desired.

  • Serve hot as a side dish or light meal.


Helpful Tips & Variations

  • Even cooking: Choose potatoes similar in size.

  • Extra flavor: Add paprika, onion powder, or dried herbs to the butter.

  • Cheese swaps: Cheddar, mozzarella, or Monterey Jack work well.

  • Crispier texture: Brush a little butter between slices halfway through cooking.

Apple & Blueberry Yogurt Cake

Apple & Blueberry Yogurt Cake

A soft, fruit-filled cake with a tender crumb and gentle sweetness

This Apple & Blueberry Yogurt Cake is a simple, rustic dessert made with everyday ingredients. Yogurt gives the cake a moist, creamy texture, while fresh apple slices and blueberries add natural sweetness and bursts of fruit flavor. It’s ideal for tea time, family gatherings, or a light dessert after meals.


Recipe Overview

  • Cuisine: European-style home baking

  • Category: Dessert

  • Prep Time: 15 minutes

  • Bake Time: 40–45 minutes

  • Total Time: About 1 hour

  • Servings: 8–10 slices


Ingredients

Wet Ingredients

  • 1 cup plain Greek yogurt (room temperature)

  • 3 large eggs (room temperature)

  • ¾ cup granulated sugar

  • ½ cup vegetable oil (or light olive oil)

  • 1 teaspoon vanilla extract

Dry Ingredients

  • 1½ cups all-purpose flour

  • 2 teaspoons baking powder

  • 1 pinch salt

Fruit Topping

  • 1 medium apple, peeled if desired and thinly sliced

  • ½ cup fresh blueberries (washed and dried)

Optional

  • Powdered sugar, for light dusting before serving


Step-by-Step Instructions

1. Prepare the Pan and Oven

  • Preheat your oven to 350°F (175°C).

  • Line the bottom of an 8-inch round cake pan with parchment paper.

  • Lightly grease the sides to prevent sticking.


2. Mix the Wet Ingredients

  • In a large mixing bowl, add the yogurt, eggs, sugar, oil, and vanilla extract.

  • Whisk until the mixture is smooth, pale, and well blended.

  • Make sure there are no visible egg streaks.


3. Combine the Dry Ingredients

  • In a separate bowl, sift together the flour, baking powder, and salt.

  • This helps keep the cake light and evenly textured.


4. Make the Batter

  • Gradually add the dry ingredients to the wet mixture.

  • Gently fold using a spatula or whisk just until combined.

  • Do not overmix; stop as soon as the batter is smooth.


5. Assemble the Cake

  • Pour the batter evenly into the prepared pan.

  • Arrange the apple slices neatly on top in a circular or fan pattern.

  • Scatter the blueberries evenly over the surface, pressing them slightly into the batter.


6. Bake

  • Place the pan in the center of the oven.

  • Bake for 40–45 minutes, or until:

    • The top is lightly golden

    • A toothpick inserted in the center comes out clean or with a few moist crumbs


7. Cool and Serve

  • Remove from the oven and allow the cake to cool in the pan for 15 minutes.

  • Transfer to a wire rack and cool completely before slicing.

  • Dust lightly with powdered sugar if desired.


Tips & Variations

  • Flavor boost: Add lemon zest or a small pinch of cinnamon to the batter.

  • Fruit options: Replace blueberries with raspberries, pears, peaches, or plums.

  • Texture choice:

    • Greek yogurt gives a richer, denser crumb

    • Regular plain yogurt makes the cake lighter and softer

  • Serving idea: Serve slightly chilled or at room temperature with fresh fruit or cream.

Classic Homemade Artisan Bread

🍞 Classic Homemade Artisan Bread

Crisp Crust • Soft Interior • Simple Ingredients

This Classic Homemade Artisan Bread is perfect for everyday baking. It uses basic pantry ingredients and simple techniques to create two beautiful loaves with a golden crust and light, airy inside. The dough is easy to work with, making it ideal for both beginners and experienced home bakers.


🧾 Yield & Timing

  • Makes: 2 loaves

  • Preparation Time: 20 minutes

  • Rising Time: 1½–2 hours

  • Baking Time: 30–35 minutes


🧺 Ingredients

  • Warm Water: 600 ml total (about 3 glasses)

    • 200 ml for starting the yeast

    • 400 ml added later

  • Dry Yeast: 10 grams (1 standard packet)

  • All-Purpose Flour: 840 grams total (7 cups)

    • 120 g (1 cup) for the yeast mixture

    • 720 g (6 cups) for the dough

  • Sugar: 1 tablespoon (helps awaken the yeast)

  • Salt: 2 teaspoons

  • Olive Oil: 1 tablespoon (optional, for lightly coating the bowl)


🥣 Step-by-Step Instructions

1️⃣ Prepare the Yeast Mixture

In a large mixing bowl, add:

  • 200 ml warm water

  • Dry yeast

  • Sugar

  • 120 g (1 cup) flour

Whisk gently until smooth. Cover the bowl with a clean cloth and let it rest for 10–15 minutes.

What to look for:
The surface should become foamy and slightly bubbly, showing the yeast is active and ready.


2️⃣ Build the Dough

Once the yeast mixture is ready, pour in the remaining 400 ml warm water and add the salt.

Gradually add the remaining 720 g (6 cups) flour, one cup at a time, mixing with a wooden spoon or dough hook until a soft, rough dough forms.


3️⃣ Knead Until Smooth

Transfer the dough to a lightly floured surface. Using gentle, steady motions, knead for 8–10 minutes.

As you work:

  • The dough will become smoother

  • It should feel elastic and slightly springy

Tip: If the dough sticks too much, sprinkle in small amounts of flour—just enough to handle comfortably. A soft dough creates lighter bread.


4️⃣ First Rise

Lightly coat a clean bowl with olive oil. Place the dough inside and turn it once so the surface is lightly coated.

Cover and place in a warm, draft-free area. Allow the dough to rest until it has doubled in size, about 1 to 1½ hours.


5️⃣ Divide and Shape

Gently press the dough to release excess air. Divide it evenly into two portions.

Shape each portion into a smooth, round loaf by tucking the edges underneath. Place both loaves on a parchment-lined baking sheet, leaving space between them.


6️⃣ Second Rise & Surface Design

Cover the loaves and let them rest again for 30 minutes.

While resting:

  • Preheat your oven to 200°C (400°F)

Just before baking, use a sharp knife to gently make a shallow “X” or cross on top of each loaf. This helps the bread expand evenly while baking.


7️⃣ Bake

Place the baking sheet in the oven and bake for 30–35 minutes, until:

  • The crust turns deep golden

  • The loaf sounds hollow when lightly tapped underneath

Optional Bakery-Style Finish:
Place a small oven-safe pan with 1 cup of water on the lower rack during the first 15 minutes to create steam, giving the bread a crisp, professional crust.


8️⃣ Cool Before Slicing

Transfer the baked loaves to a wire rack. Allow them to cool for at least 20 minutes before slicing. This helps the interior texture finish setting properly.


⭐ Helpful Tips

  • Warm water should feel pleasantly warm, not hot

  • Letting the bread cool improves slicing and texture

  • Store cooled bread wrapped in cloth or paper for best freshness

ABC Drink (Apple, Beetroot, Carrot)

ABC Drink (Apple, Beetroot, Carrot)

A fresh, colorful homemade juice made with simple fruits and vegetables

The ABC Drink is a naturally sweet and refreshing juice made from apples, beetroot, and carrots. It can be prepared easily at home using either a juicer or a blender. This drink is popular for its vibrant color, balanced flavor, and simplicity.


Ingredients

  • 2 medium apples (red or green), washed and cored

  • 1 medium beetroot, peeled and washed

  • 3 large carrots, washed and trimmed

  • 1 tablespoon fresh lemon juice (optional, for brightness)

  • ½ inch fresh ginger, peeled (optional, for warmth)

  • ½ cup cold water (only if using a blender)


Equipment Needed

  • Juicer or blender

  • Knife and cutting board

  • Fine-mesh strainer or nut-milk bag (for blender method)

  • Glass or jug for serving


Method 1: Using a Juicer

Step 1: Prepare the Produce

  • Wash all fruits and vegetables thoroughly

  • Peel the beetroot

  • Core the apples

  • Cut ingredients into sizes suitable for your juicer

Step 2: Juice

  • Pass the carrots, beetroot, apples, and ginger (if using) through the juicer one at a time

Step 3: Finish and Serve

  • Stir in lemon juice if using

  • Serve immediately, plain or over ice


Method 2: Using a Blender

Step 1: Chop

  • Cut apples, beetroot, carrots, and ginger into small pieces

Step 2: Blend

  • Add chopped ingredients to the blender

  • Pour in ½ cup cold water

  • Blend on high speed until completely smooth

Step 3: Strain

  • Pour the mixture through a fine strainer or nut-milk bag

  • Press gently to extract the liquid

  • Transfer juice to a glass or jug

Step 4: Serve

  • Add lemon juice if desired

  • Serve chilled


Flavor Notes

  • Apples add natural sweetness

  • Carrots give a mild, smooth base

  • Beetroot contributes deep color and earthy notes

  • Lemon brightens the flavor

  • Ginger adds gentle warmth


Helpful Tips

  • Use fresh, firm produce for the best taste

  • If beetroot flavor feels strong, add one extra apple

  • Chill ingredients before blending for a cooler drink

  • Shake or stir before serving if stored briefly


Storage

  • Best enjoyed immediately after preparation

  • Can be stored in a tightly sealed glass container in the refrigerator for up to 24 hours

  • Stir well before drinking


Serving Ideas

  • Morning refreshment

  • Afternoon drink

  • Served cold with meals

  • Poured into small glasses for sharing

Mary Berry–Style Boiled Fruit Cake

Mary Berry–Style Boiled Fruit Cake

A classic, moist fruit loaf made with a simple boiling method

Why You’ll Love This Cake

This traditional boiled fruit cake is loved for its deep flavor, soft texture, and easy preparation. The gentle simmering step plumps the dried fruit and blends the flavors beautifully, resulting in a cake that improves with time.

  • Naturally moist from simmered fruit

  • Simple method — no mixer needed

  • Perfect for make-ahead baking

  • Great for tea time, gifting, or celebrations

  • Customizable with fruit, citrus, or nuts


Ingredients

For the Cake

  • 225 g (1 cup) unsalted butter

  • 225 g (1 cup) soft brown sugar

  • 225 g (1½ cups) mixed dried fruit
    (raisins, currants, sultanas, or chopped dates)

  • Zest and juice of 1 orange

  • 1 teaspoon ground cinnamon

  • 1 teaspoon mixed spice

  • 2 large eggs, lightly beaten

  • 225 g (1¾ cups) self-raising flour

Optional flavor boost (non-alcoholic):

  • 1 teaspoon orange extract or vanilla extract


Equipment Needed

  • Medium saucepan

  • Mixing spoon

  • 900 g (2 lb) loaf tin

  • Baking parchment


Step-by-Step Instructions

Step 1: Prepare the Oven and Tin

  • Preheat your oven to 160°C (325°F) or 140°C fan

  • Grease and line a 900 g loaf tin with parchment paper


Step 2: Boil the Fruit Mixture

  • Place the butter in a medium saucepan over low heat

  • Add the brown sugar, dried fruit, orange zest, orange juice, cinnamon, and mixed spice

  • Stir gently until the butter melts

  • Bring to a gentle simmer and cook for 5 minutes, stirring occasionally

  • Remove from heat and allow to cool for 10–15 minutes

This step softens the fruit and evenly distributes sweetness throughout the cake.


Step 3: Make the Batter

  • Once the mixture is warm (not hot), stir in the beaten eggs

  • Add the optional extract, if using

  • Sift in the self-raising flour

  • Fold gently until smooth and fully combined


Step 4: Bake

  • Spoon the batter into the prepared loaf tin

  • Smooth the top evenly

  • Bake for 1½ to 1¾ hours, or until a skewer inserted in the center comes out clean

  • If the top browns too quickly, loosely cover with foil during the final baking time


Step 5: Cool and Rest

  • Cool in the tin for 10 minutes

  • Transfer to a wire rack and cool completely

  • Wrap the cake in parchment and store in an airtight container

  • Resting the cake for 1–2 days improves flavor and texture


Tips for Best Results

  • Use fresh spices for the best aroma

  • Chop larger dried fruits for even distribution

  • Do not rush cooling — the structure sets as it cools

  • This cake slices best the next day


Variations

  • Nut version: Add ½ cup chopped walnuts or almonds

  • Fruit swap: Use dried apricots, cranberries, or figs

  • Citrus twist: Add lemon zest along with orange

  • Festive style: Add a small amount of candied peel


Storage

  • Room temperature (airtight): up to 7 days

  • Refrigerator: up to 2 weeks

  • Freezer: up to 3 months (wrap well)


Serving Suggestions

  • Enjoy with tea or coffee

  • Serve lightly warmed with butter

  • Pair with fresh fruit or mild cheese

  • Slice thinly for afternoon snacks

Sherry’s Blueberry Cream Cheese Crumb Cake

Sherry’s Blueberry Cream Cheese Crumb Cake

A soft vanilla cake layered with creamy filling, juicy berries, and a buttery crumb topping

Introduction

This Blueberry Cream Cheese Crumb Cake is a comforting, bakery-style dessert that’s perfect for sharing. A tender vanilla cake forms the base, topped with a smooth cream cheese layer, bursts of blueberries, and a golden cinnamon crumb topping. It’s ideal for brunch tables, afternoon coffee breaks, or as a make-ahead dessert for gatherings.


⏱️ Time & Yield

  • Preparation Time: 25 minutes

  • Baking Time: 35–50 minutes (depending on pan size)

  • Cooling Time: 1 hour

  • Total Time: About 2 hours

  • Servings: 12–15 slices


🧾 Ingredients

Cake Batter

(Fits a 9×13-inch pan or an 8-inch square dish)

  • ½ cup unsalted butter, softened

  • 1 cup granulated sugar

  • 2 large eggs

  • 1 teaspoon vanilla extract

  • 2 cups all-purpose flour

  • 2 teaspoons baking powder

  • ½ teaspoon salt

  • ½ cup milk

  • 1½ cups fresh or frozen blueberries


Cream Cheese Layer

  • 8 oz cream cheese, softened

  • ¼ cup granulated sugar

  • 1 egg

  • ½ teaspoon vanilla extract


Crumb Topping

  • ½ cup all-purpose flour

  • ¼ cup brown sugar

  • ¼ cup cold butter, cubed

  • ½ teaspoon ground cinnamon


👩‍🍳 Step-by-Step Instructions

1. Prepare the Pan and Oven

Preheat your oven to 350°F (175°C).
Grease and lightly flour a 9×13-inch baking pan or an 8-inch square dish. Set aside.


2. Make the Cake Batter

In a large mixing bowl, beat the softened butter and granulated sugar together until light and fluffy.

Add the eggs one at a time, mixing well after each addition. Stir in the vanilla extract.

In a separate bowl, whisk together the flour, baking powder, and salt.

Add the dry ingredients to the butter mixture in two additions, alternating with the milk. Mix gently just until combined.

Carefully fold in the blueberries, taking care not to crush them.

Spread the batter evenly into the prepared pan.


3. Prepare the Cream Cheese Layer

In a medium bowl, beat the cream cheese until smooth.

Add the sugar, egg, and vanilla extract. Mix until creamy and well blended.

Spoon the cream cheese mixture over the cake batter. Use a knife to gently swirl if desired, or leave it layered.


4. Make the Crumb Topping

In a small bowl, combine the flour, brown sugar, and cinnamon.

Add the cold butter cubes and work them into the mixture using your fingers or a pastry cutter until small clumps form.

Sprinkle the crumb topping evenly over the cream cheese layer.


5. Bake

Bake uncovered:

  • 45–50 minutes for a 9×13-inch pan

  • 35–40 minutes for an 8-inch square pan

The top should be lightly golden and set.

Remove from the oven and allow the cake to cool completely before slicing. This helps the layers set neatly.


🍽️ Serving Suggestions

  • Serve at room temperature or slightly chilled

  • Pair with tea or coffee

  • Dust lightly with powdered sugar before serving if desired


💡 Helpful Tips & Variations

  • Nutty crunch: Add chopped walnuts or pecans to the crumb topping

  • Citrus touch: Stir 1 teaspoon lemon zest into the batter for added brightness

  • Berry swap: Use raspberries or blackberries in place of blueberries

  • Gentle mixing: Stir just until combined for a soft, tender cake


🧊 Storage

  • Store covered in the refrigerator for up to 3 days

  • Individual slices may be wrapped and frozen for up to 3 months

  • Thaw overnight in the refrigerator before serving

Ginger & Turmeric Honey Tonic

Ginger & Turmeric Honey Tonic

A flavorful homemade concentrate perfect for stirring into warm water or tea

Introduction

This Ginger & Turmeric Honey Tonic is a vibrant, golden infusion made with fresh roots, citrus, and raw honey. The ingredients slowly blend together in the refrigerator, creating a fragrant syrup with a balanced mix of warmth, gentle spice, and natural sweetness. It’s easy to prepare, stores well, and can be enjoyed daily as a comforting addition to your routine.


Ingredients

  • Fresh Ginger Root: 3–4 inches, washed, peeled if desired, and thinly sliced

  • Fresh Turmeric Root: 2–3 inches, washed, peeled if desired, and thinly sliced

  • Lemons: 2–3 whole lemons, thinly sliced into rounds or freshly juiced

  • Black Peppercorns: ½ teaspoon, whole or lightly crushed

  • Raw Honey: About 1 cup, or enough to fully cover and submerge all ingredients

Tip: Black pepper adds depth of flavor and complements the turmeric beautifully.


Step-by-Step Instructions

1. Prepare the Fresh Roots

Rinse the ginger and turmeric thoroughly under cool water. If you prefer, peel them using the edge of a spoon. Slice both roots into thin, even coins to help release their natural flavors into the honey.

Note: Turmeric may stain hands and surfaces—using gloves or parchment paper can help.


2. Prepare the Lemons

Wash the lemons well. Slice them into thin rounds, removing any visible seeds.
Alternatively, you may juice the lemons if you prefer a smoother tonic without fruit slices.


3. Layer the Ingredients

In a clean, dry glass mason jar:

  • Add a layer of ginger slices

  • Follow with turmeric slices

  • Add lemon slices or a portion of lemon juice
    Repeat the layers until all ingredients are used.


4. Add Black Pepper

Sprinkle the black peppercorns evenly throughout the layers to distribute flavor.


5. Cover with Honey

Slowly pour the raw honey over the layered ingredients.
Use a spoon or butter knife to gently press the ingredients down, releasing air bubbles and ensuring everything is fully coated and submerged in honey.


6. Seal and Infuse

Close the jar tightly with a lid.
Place it in the refrigerator and allow it to rest for at least 24 hours. Over time, the honey will become thinner as it blends with the natural juices from the roots and lemon.


7. Storage

Store the jar in the refrigerator.
For best quality and flavor, use within 2–3 weeks. Always use a clean spoon when serving.


How to Enjoy

  • Warm Drink: Stir 1–2 tablespoons of the infused honey syrup into a mug of warm (not boiling) water.

  • Tea Booster: Add to herbal or green tea for extra warmth and aroma.

  • Flavor Add-In: Spoon a little over oatmeal, yogurt, or warm lemon water.

  • Optional: Add a few slices of the infused ginger or turmeric for a stronger taste.


Helpful Tips

  • Avoid boiling water to preserve the natural flavor of the honey

  • Adjust sweetness by adding more or less honey

  • Shake or gently stir the jar every few days to redistribute flavors

No-Sugar Healthy Oatmeal Cookies

No-Sugar Healthy Oatmeal Cookies

Naturally Sweet • Wholesome • Easy to Make

These no-sugar oatmeal cookies are gently sweetened with fruit and stevia, making them a great option for everyday snacking. They are soft, lightly chewy, and full of natural texture from oats, nuts, and dried fruit. No refined sugar, no butter, and no flour are needed.

Prep Time

10 minutes

Bake Time

15–20 minutes

Yield

8–10 cookies


Ingredients

  • 1 cup (90 g) rolled oats

  • 50 g oat flakes (for added texture)

  • 1 medium apple, peeled, cored, and finely diced

  • 1 ripe banana

  • 80 g nuts (almonds, walnuts, or pecans), roughly chopped

  • 50 g dried cranberries

  • 1 tablespoon stevia (adjust to taste)

  • 1 tablespoon sesame seeds

  • 1 teaspoon vanillin or vanilla powder (optional)


Instructions

1. Prepare the Oven

Preheat your oven to 350°F (180°C).
Line a baking sheet with parchment paper or lightly grease it.

2. Mash the Banana

Place the banana in a large mixing bowl and mash thoroughly with a fork until smooth and creamy. This will act as the main binder for the cookies.

3. Combine the Base

Add the diced apple, rolled oats, oat flakes, and vanillin (if using) to the mashed banana.
Stir well until everything is evenly coated and the mixture begins to hold together.

4. Add Texture and Flavor

Fold in the chopped nuts, dried cranberries, stevia, and sesame seeds.
Mix gently until fully combined. The mixture should be thick and slightly sticky. If it feels too dry, add 1–2 teaspoons of water.

5. Shape the Cookies

Scoop about 2 tablespoons of the mixture for each cookie.
Roll gently into a ball, then flatten slightly into a thick disc.
Place cookies on the prepared baking sheet, leaving a little space between each one.

6. Bake

Bake for 15–20 minutes, or until the edges turn lightly golden and the cookies feel set when touched.

7. Cool

Remove from the oven and let the cookies cool on the baking sheet for 5 minutes, then transfer to a plate or cooling rack.
They will firm up more as they cool.


Helpful Tips

  • For softer cookies, bake closer to 15 minutes.

  • For firmer, slightly crisp edges, bake closer to 20 minutes.

  • You can replace cranberries with raisins or chopped dates if preferred.

  • Store cookies in an airtight container at room temperature for up to 2 days, or refrigerate for up to 5 days.

Carrot Cake with Cream Cheese Frosting

Carrot Cake with Cream Cheese Frosting

Prep Time: 25 minutes
Bake Time: 25–35 minutes
Cooling & Assembly: 60 minutes
Yield: 1 two-layer 8-inch cake or one 9×13-inch cake

This carrot cake has a moist crumb, balanced spice flavor, and a smooth cream cheese frosting. It is suitable for gatherings, celebrations, or everyday desserts.


Ingredients

For the Carrot Cake

  • 2 cups (250 g) all-purpose flour

  • 1½ cups (300 g) granulated sugar or brown sugar

  • 1 teaspoon baking powder

  • 1 teaspoon baking soda

  • ½ teaspoon salt

  • 1 tablespoon ground cinnamon

  • ½ teaspoon ground nutmeg

  • ½ teaspoon ground ginger

  • ¼ teaspoon ground cloves (optional)

  • 3 large eggs, room temperature

  • ¾ cup (180 ml) vegetable oil

  • ½ cup (120 ml) buttermilk or milk

  • 1 teaspoon vanilla extract

  • 2½ cups (260 g) finely grated carrots

  • ½ cup chopped walnuts or pecans (optional)

  • ½ cup raisins, sultanas, or dried cranberries (optional)

  • Zest of 1 orange (optional)


For the Cream Cheese Frosting

  • 200 g cream cheese, softened

  • ½ cup (113 g) unsalted butter, softened

  • 2½ cups (300 g) powdered sugar

  • 1 teaspoon vanilla extract

  • ½ teaspoon orange zest (optional)


Detailed Instructions

1. Prepare the Oven and Pans

Preheat the oven to 350°F (175°C).

Grease and line:

  • Two 8-inch round cake pans, or

  • One 9×13-inch baking pan

Set aside.


2. Mix Dry Ingredients

In a large bowl, whisk together:

  • Flour

  • Sugar

  • Baking powder

  • Baking soda

  • Salt

  • Cinnamon

  • Nutmeg

  • Ginger

  • Cloves

Whisk until evenly combined and free of lumps.


3. Mix Wet Ingredients

In a separate bowl, whisk together:

  • Eggs

  • Vegetable oil

  • Buttermilk

  • Vanilla extract

Mix until smooth and fully combined.


4. Combine Batter

Pour the wet ingredients into the dry ingredients.

Using a spatula, gently fold until just combined.

Add:

  • Grated carrots

  • Nuts (if using)

  • Dried fruit (if using)

  • Orange zest

Fold gently. Do not overmix, as this can affect texture.


5. Bake

Divide the batter evenly between prepared pans.

Bake for 25–35 minutes, or until:

  • The center springs back lightly when touched

  • A toothpick inserted in the center comes out clean

Remove from the oven and allow cakes to cool in pans for 10 minutes. Transfer to a wire rack and cool completely before frosting.


Cream Cheese Frosting

6. Prepare the Frosting

In a large bowl, beat the softened cream cheese and butter until smooth and creamy.

Gradually add powdered sugar, mixing on low speed until incorporated.

Add vanilla extract and orange zest (if using).

Increase speed and beat until light and smooth.


7. Assemble the Cake

If using layered pans:

  • Place one cake layer on a serving plate

  • Spread frosting evenly on top

  • Place the second layer on top

Frost the top and sides evenly.

For a sheet cake:

  • Spread frosting evenly over the cooled cake


Optional Garnishes

  • Chopped nuts

  • Dried fruit

  • Thin carrot curls

  • Light dusting of powdered sugar


Storage

  • Store refrigerated in an airtight container for 3–4 days

  • Bring to room temperature before serving

  • Cake layers can be frozen (unfrosted) for up to 2 months

Homemade White Bread

Homemade White Bread

Soft, fluffy loaf with a tender golden crust

Prep Time: 20 minutes
Rise Time: 1½–2½ hours
Bake Time: 30–35 minutes
Total Time: About 3 hours
Yield: 1 standard loaf

This homemade white bread is light, soft, and versatile. It works well for sandwiches, toast, or serving warm with butter. The recipe uses simple pantry ingredients and straightforward techniques suitable for beginners.


Ingredients

For the Bread

  • 4 cups all-purpose flour

  • 2 teaspoons instant yeast

  • 2 teaspoons salt

  • 2 tablespoons sugar

  • 2 tablespoons unsalted butter, softened

  • 1½ cups warm water (about 105–110°F / 40–43°C)

Optional Topping

  • 1 tablespoon milk

  • 1 tablespoon unsalted butter, melted


Step-by-Step Instructions

1. Activate the Yeast

In a small bowl, combine the warm water, sugar, and yeast. Stir gently and let sit for 5–10 minutes, until the mixture becomes foamy. This indicates the yeast is active.


2. Prepare the Dough

In a large mixing bowl, add:

  • Flour

  • Salt

  • Softened butter

Pour in the yeast mixture. Mix until a shaggy dough forms.

Transfer the dough to a lightly floured surface and knead for 8–10 minutes, until smooth, elastic, and slightly tacky but not sticky.

(If using a stand mixer, knead with a dough hook on medium speed for 6–7 minutes.)


3. First Rise

Lightly grease a clean bowl and place the dough inside, turning once to coat. Cover with a clean kitchen towel or plastic wrap.

Let rise in a warm, draft-free place for 1–2 hours, or until doubled in size.


4. Shape the Loaf

Gently press the dough to release excess air. Shape it into a loaf by rolling it tightly and pinching the seam closed.

Place the shaped dough seam-side down into a greased 9 × 5-inch loaf pan.


5. Second Rise

Cover the pan and allow the dough to rise again for 30–45 minutes, until it rises slightly above the edge of the pan.


6. Preheat the Oven

Preheat oven to 375°F (190°C).

If using the topping, mix the milk and melted butter in a small bowl.


7. Bake

Brush the top of the loaf with the milk-butter mixture if desired.

Bake for 30–35 minutes, until:

  • The top is golden brown

  • The loaf sounds hollow when tapped

For accuracy, the internal temperature should reach 190–200°F (88–93°C).


8. Cool

Remove the bread from the pan and place it on a wire rack. Allow to cool completely before slicing to ensure the best texture.


Storage

  • Store at room temperature in an airtight container for 2–3 days

  • Refrigeration is not recommended

  • Freeze sliced bread for up to 2 months


Helpful Tips

  • Warm water should not be hot, as high heat can damage yeast.

  • For a softer crust, brush the loaf with butter after baking.

  • Measure flour accurately by spooning into the cup and leveling off.

Italian Lemon Yogurt Cake (Sugar-Free)

Italian Lemon Yogurt Cake (Sugar-Free)

Moist, fragrant, and naturally sweetened

Prep Time: 15 minutes
Bake Time: 45–50 minutes
Total Time: 1 hour
Yield: 1 loaf (8–10 slices)

This Italian-style lemon yogurt cake is light, moist, and full of bright citrus flavor. It’s sweetened with stevia instead of refined sugar, making it a better option for those reducing sugar intake while still enjoying a classic homemade cake.


Ingredients

Dry Ingredients

  • 1½ cups all-purpose flour

  • 2 teaspoons baking powder

  • ½ teaspoon kosher salt

Wet Ingredients

  • 1 cup plain coconut yogurt (or whole milk yogurt)

  • Stevia powder, to taste
    (use the amount equivalent to ¾–1 cup sugar, depending on brand strength)

  • 3 large eggs

  • 2 teaspoons finely grated lemon zest (from about 2 lemons)

  • ⅓ cup freshly squeezed lemon juice

  • ½ teaspoon pure vanilla extract

  • ½ cup olive oil

Lemon Soaking Syrup (Sugar-Free)

  • ¼ cup lemon juice

  • Stevia powder, equivalent to ¼ cup sugar

Sugar-Free Lemon Glaze (Optional)

  • Juice of 1 lemon

  • Powdered stevia sweetener, to taste
    (or sugar-free confectioner’s sweetener blend)


Step-by-Step Instructions

1. Prepare the Pan

Preheat oven to 350°F (180°C).
Grease an 8½ × 4¼ × 2½-inch loaf pan and line the bottom with parchment paper, or lightly coat with baking spray.


2. Mix Dry Ingredients

In a large bowl, sift together:

  • Flour

  • Baking powder

  • Salt

Set aside.


3. Mix Wet Ingredients

In a separate bowl, whisk together:

  • Yogurt

  • Stevia powder

  • Eggs

  • Lemon zest

  • Lemon juice

  • Vanilla extract

Whisk until smooth and well combined.


4. Combine Batter

Gradually whisk the dry ingredients into the wet mixture until just combined.
Do not overmix.


5. Add Oil

Gently fold in the olive oil using a spatula until fully incorporated.
The batter should be smooth and slightly thick.


6. Bake

Pour the batter into the prepared loaf pan and smooth the top.

Bake for 45–50 minutes, or until a toothpick inserted into the center comes out clean.


7. Prepare the Lemon Syrup

While the cake bakes, combine:

  • ¼ cup lemon juice

  • Stevia powder

Heat gently in a small saucepan just until dissolved. Do not boil. Set aside.


8. Soak the Cake

Allow the cake to cool in the pan for 10 minutes.
While still warm, slowly pour the lemon syrup over the cake so it absorbs evenly.

Let the cake cool completely.


9. Prepare the Sugar-Free Glaze (Optional)

Mix powdered stevia with lemon juice until a pourable glaze forms.
Drizzle over the cooled cake.

Allow glaze to set for about 1 hour before slicing.


Tips for Best Results

  • Use fine powdered stevia for smooth texture.

  • Olive oil gives authentic Italian flavor; use light olive oil if preferred.

  • For extra moisture, wrap the cooled cake and rest overnight before serving.

  • Skip the glaze for a lighter, breakfast-style cake.


Storage

  • Store covered at room temperature for 2 days

  • Refrigerate for up to 5 days

  • Freeze slices for up to 2 months

Egg Muffins – Quick & Nutritious Breakfast

Egg Muffins – Quick & Nutritious Breakfast

High in protein, low in carbs, and fully customizable

Prep Time: 10 minutes
Cook Time: 18–22 minutes
Total Time: 30 minutes
Yield: 6 muffins

Egg muffins are a versatile breakfast or snack option. You can add your favorite vegetables, meats, or cheeses, making them ideal for low-carb, keto, or meal-prep-friendly diets.


Ingredients

  • 6 large eggs

  • ¼ cup (60 ml) milk (or unsweetened almond/oat milk for dairy-free)

  • ½ cup shredded cheese (cheddar, feta, or your choice; optional for dairy-free)

  • ½ cup chopped vegetables (bell peppers, spinach, green onions, mushrooms, zucchini, etc.)

  • ¼ cup cooked bacon or ham (optional)

  • Salt and pepper to taste

  • ½ teaspoon garlic powder (optional)

  • ½ teaspoon paprika (optional)


Step-by-Step Instructions

1. Preheat the Oven

Preheat your oven to 375°F (190°C).
Lightly grease a 6-cup muffin tin with cooking spray, oil, or butter. Silicone muffin cups can also be used.


2. Prepare Ingredients

  • Chop your vegetables into small pieces.

  • Dice cooked bacon or ham if using.

  • Pre-sauté watery vegetables (like mushrooms or spinach) for 2–3 minutes to prevent soggy muffins.


3. Whisk the Eggs

In a large bowl, whisk together the eggs, milk, salt, pepper, garlic powder, and paprika until smooth and slightly frothy.
This ensures fluffy muffins with evenly distributed seasoning.


4. Assemble the Muffins

  • Divide the chopped vegetables and cooked meat evenly among the muffin cups.

  • Pour the egg mixture over the fillings, filling each cup about ¾ full.

  • Top each with shredded cheese, if using.


5. Bake

Place the muffin tin in the preheated oven.
Bake for 18–22 minutes, or until the egg muffins are set and lightly golden on top.
A toothpick inserted in the center should come out clean.


6. Cool and Serve

  • Allow the muffins to cool for a few minutes before removing them from the tin.

  • Serve warm, or store for meal prep.


Tips for Perfect Egg Muffins

  • Grease Well: Prevents sticking; silicone cups work best.

  • Whisk Thoroughly: Ensures light, fluffy muffins.

  • Do Not Overfill: Fill ¾ full to prevent overflow.

  • Cool Slightly Before Removing: Prevents breaking.

  • Storage & Reheating: Refrigerate in an airtight container for up to 5 days; microwave for 30–45 seconds to reheat.

  • Freezing: Let muffins cool completely, then freeze in airtight containers or freezer bags for up to 3 months. Reheat 1–2 minutes in the microwave.

Garlic, Lemon, and Honey Drink for Respiratory Comfort

Garlic, Lemon, and Honey Drink for Respiratory Comfort

A natural remedy to soothe the throat, reduce coughing, and support lung health

Prep Time: 5 minutes
Cook/Steep Time: 5 minutes
Yield: 1–2 servings

This simple drink combines garlic, lemon, and honey to create a soothing beverage that may help reduce coughing, clear mucus, and support respiratory wellness. It is a gentle, natural option that can be prepared easily at home.


Ingredients

  • 2 cloves garlic, peeled and crushed
    Garlic has natural antibacterial and antiviral properties that may support respiratory health.

  • 1 lemon, juiced
    Rich in vitamin C and antioxidants to support the immune system.

  • 1 tablespoon honey (preferably raw or organic)
    Soothes the throat and adds mild antimicrobial properties.

  • 2 cups water


Step-by-Step Instructions

1. Prepare the Ingredients

  • Peel and crush the garlic cloves to release their natural oils.

  • Juice the lemon carefully, removing any seeds.


2. Boil the Water

  • In a small pot, bring 2 cups of water to a gentle boil.


3. Steep Garlic and Lemon

  • Add the crushed garlic and lemon juice to the boiling water.

  • Reduce the heat to low and let it simmer for 5 minutes to extract the beneficial compounds from the garlic and lemon.


4. Strain and Sweeten

  • Pour the liquid through a strainer into a cup to remove the garlic pieces (optional: you may leave them in for a stronger flavor).

  • Stir in 1 tablespoon of honey while the liquid is still warm until fully dissolved.


5. Serve

  • Drink the beverage warm.

  • Recommended intake: 1–2 cups per day, for up to three days.


Notes and Tips

  • Gentle on the Stomach: If you have a sensitive stomach, reduce the garlic to 1 clove or drink the mixture with food.

  • Stronger Flavor: Leaving the garlic in the drink will intensify the flavor and medicinal potency.

  • Adjust Sweetness: You can add extra honey if desired, but keep in mind it increases sugar content.

  • Storage: Best consumed fresh. Any leftovers can be stored in the refrigerator for up to 24 hours and warmed before drinking.


Benefits

  • Respiratory Support: Helps soothe the throat, reduce coughing, and may loosen mucus.

  • Immune Boosting: Garlic and lemon provide antioxidants and compounds that support the immune system.

  • Natural Relief: Offers a simple, chemical-free way to ease mild bronchial discomfort.


Safety and Considerations

  • Not a Cure: This drink helps relieve symptoms but does not cure bronchitis. Consult a healthcare professional if symptoms are severe or persistent.

  • Allergies: Ensure you are not allergic to garlic, honey, or citrus before consuming.

  • Children: Honey should not be given to children under 1 year old.

Homemade 3-Ingredient Strawberry Ice Cream

Homemade 3-Ingredient Strawberry Ice Cream

No gelatin, no ice cream machine—just creamy, fruity goodness

Prep Time: 10 minutes
Freeze Time: 4–6 hours
Yield: About 4–6 servings

This recipe is simple, naturally creamy, and customizable. You can swap strawberries for other fruits, chocolate chips, or even cookie pieces.


Ingredients

  • 500 ml (2 cups) whipping cream
    Use full-fat cream for best results; it creates a rich, creamy texture.

  • 150 g (2/3 cup) sweetened condensed milk
    Provides sweetness and helps the ice cream hold its shape without gelatin.

  • 100 g (3/4 cup) fresh strawberries, diced
    Adds natural fruit flavor. You can substitute raspberries, blueberries, or mango if desired.


Step-by-Step Instructions

1. Whip the Cream

Pour the cold whipping cream into a large mixing bowl.
Using an electric mixer, whip on medium-high speed until stiff peaks form.

  • Stiff peaks mean the cream holds its shape when the beaters are lifted.

  • Do not overwhip, or the cream may turn into butter.


2. Fold in the Condensed Milk

Gently add the sweetened condensed milk to the whipped cream.
Use a spatula to fold it in carefully, preserving the air in the whipped cream.
The mixture should become smooth and slightly glossy.


3. Add the Fruit

Fold in the diced strawberries (or your chosen fruit) until evenly distributed.
Be gentle to keep the whipped cream light and airy.


4. Transfer and Freeze

Pour the mixture into a freezer-safe container.
Smooth the top with a spatula and cover the container with a lid or plastic wrap.

Freeze for at least 4 hours, or until firm.
For best flavor, you can refrigerate the mixture for 1–2 hours before freezing to let the flavors meld, but this step is optional.


5. Serve

Scoop the ice cream into bowls and enjoy immediately.
Optional toppings: fresh berries, chocolate shavings, or a drizzle of fruit syrup.


Tips & Variations

  • Fruit Variations: Mango, banana, or mixed berries all work well.

  • Chocolate Strawberry: Fold in 50 g of finely chopped chocolate with the fruit.

  • Nutty Option: Add 2–3 tablespoons chopped nuts for texture.

  • Storage: Keep covered in the freezer for up to 7 days. For softer scooping, let ice cream sit at room temperature for 5 minutes before serving.

Lemon Crinkle Cookies

Lemon Crinkle Cookies

Soft, bright cookies with a delicate citrus flavor and a classic cracked sugar finish

Prep Time: 15 minutes
Chill Time: 30–60 minutes
Bake Time: 10–12 minutes
Yield: About 20–24 cookies

These Lemon Crinkle Cookies are tender on the inside with lightly crisp edges. Fresh lemon zest and juice give them a refreshing citrus taste, while the powdered sugar coating creates the signature crinkled appearance as they bake.


Ingredients

Cookie Dough

  • 1½ cups (180 g) all-purpose flour
    Provides structure for the cookies.

  • 1 teaspoon baking soda
    Helps the cookies spread slightly and crack on top.

  • ½ teaspoon baking powder
    Adds lightness to the texture.

  • ¼ teaspoon salt
    Balances the sweetness and enhances flavor.

  • 1 cup (227 g) unsalted butter, softened
    Creates a rich, tender cookie.

  • 1 cup (200 g) granulated sugar
    Sweetens and helps create a soft crumb.

  • 1 large egg
    Binds the dough and adds moisture.

  • 1 tablespoon fresh lemon zest
    Provides bright lemon aroma.

  • 2 tablespoons fresh lemon juice
    Adds natural citrus flavor.


For Coating

  • ½ cup powdered sugar
    Creates the classic crinkle finish.

  • Optional: 2–3 tablespoons granulated sugar
    Helps form a slight crust before rolling in powdered sugar.


Step-by-Step Instructions

1. Prepare the Dough

In a large bowl, beat the softened butter and granulated sugar together until pale, light, and fluffy. This usually takes 2–3 minutes with an electric mixer.

Add the egg and mix until fully incorporated.
Stir in the lemon zest and lemon juice until evenly combined.


2. Mix the Dry Ingredients

In a separate bowl, whisk together the flour, baking soda, baking powder, and salt.

Gradually add the dry ingredients to the wet mixture. Mix just until a soft, smooth dough forms. Avoid overmixing.


3. Chill the Dough

Cover the bowl and refrigerate the dough for 30–60 minutes.
This step firms the dough, improves texture, and helps prevent excessive spreading.


4. Shape and Coat

Preheat the oven to 175°C (350°F).
Line baking sheets with parchment paper.

Scoop the dough into tablespoon-sized portions and roll into balls.

For best results:

  1. Roll each dough ball lightly in granulated sugar (optional).

  2. Roll generously in powdered sugar, completely coating the surface.

Place the coated dough balls on the baking sheet, spacing them about 2 inches apart.


5. Bake

Bake for 10–12 minutes, until:

  • The edges are set

  • The tops are cracked and puffed

  • The centers remain soft

Do not overbake; the cookies will continue to set as they cool.


6. Cool

Let the cookies rest on the baking sheet for 5 minutes, then transfer them to a wire rack to cool completely.


Tips for Perfect Crinkle Cookies

  • Extra Cracks: Roll the dough in powdered sugar twice for a thicker white coating.

  • Strong Lemon Flavor: Add a drop of lemon extract if desired.

  • Soft Centers: Remove cookies when the centers still look slightly underbaked.

  • Storage: Store in an airtight container at room temperature for up to 4 days.