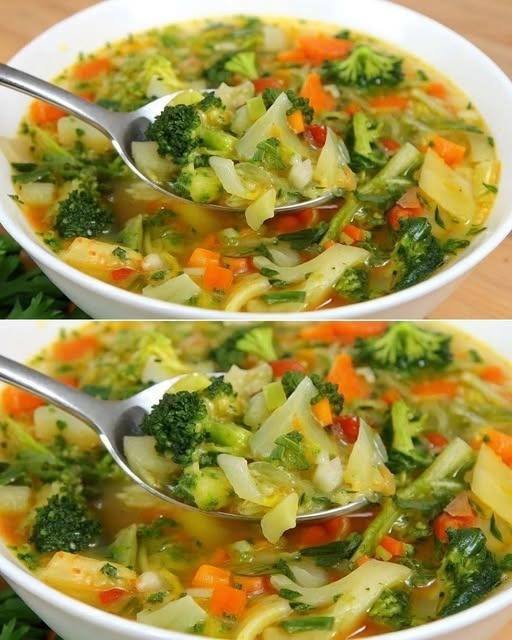
Apple & Banana Oatmeal Breakfast Loaf

Apple & Banana Oatmeal Breakfast Loaf

A moist, naturally sweet loaf perfect for breakfast or a snack

This wholesome breakfast loaf combines the fiber of oats with the natural sweetness of apples and banana. Raisins, cherries, and a crunchy nut topping make it a satisfying treat for mornings or anytime you want a nutritious snack.


Recipe Overview

  • Prep Time: 15 minutes

  • Bake Time: 45–50 minutes

  • Total Time: About 1 hour 5 minutes

  • Yield: 1 loaf


Ingredients

  • 1 cup (100 g) rolled oats or oatmeal

  • 2 medium apples, peeled and grated

  • 1 ripe banana, mashed

  • 2 large eggs

  • 100–120 ml water

  • 100 g raisins (or sultanas)

  • 100 g pitted cherries

  • 1 teaspoon baking powder

  • 50 g Brazil nuts, chopped (for topping)

  • Vegetable oil (for greasing the pan)


Step-by-Step Instructions

1. Hydrate the Oats

  • In a large mixing bowl, combine the oats with 100–120 ml of water.

  • Let the mixture sit for about 10 minutes so the oats soften and absorb moisture.


2. Prepare the Fruit

  • Peel and grate the apples.

  • In a small bowl, mash the banana with a fork until smooth.


3. Mix the Batter

  • Add the mashed banana and eggs to the soaked oatmeal. Whisk together until fully incorporated.

  • Stir in the grated apples, raisins, and cherries. Mix gently to combine.


4. Add Baking Powder

  • Sprinkle the baking powder over the mixture.

  • Fold everything together carefully with a spatula until evenly distributed. Avoid overmixing, which can make the loaf dense.


5. Prepare the Pan

  • Preheat your oven to 350°F (180°C).

  • Grease a loaf pan with vegetable oil.

  • Optional: Line a standard metal pan with parchment paper for easier removal.


6. Top and Bake

  • Pour the batter into the prepared pan and smooth the surface.

  • Evenly sprinkle the chopped Brazil nuts on top.

  • Bake for 45–50 minutes, or until the loaf is golden brown and a toothpick inserted into the center comes out clean.


7. Cool and Serve

  • Allow the loaf to cool in the pan for at least 10 minutes.

  • Remove from the pan and slice.

  • Serve warm or at room temperature.


Tips for Success

  • Smoother texture: Pulse the oats in a blender for a few seconds before hydrating to create a finer, cake-like crumb.

  • Storage: Store leftovers in an airtight container in the refrigerator for 3–4 days.

  • Nut swaps: Use walnuts, almonds, or pecans instead of Brazil nuts for a different flavor.

  • Optional additions: Add a pinch of cinnamon or nutmeg for extra warmth, or a handful of sunflower seeds for extra texture.

Baked Pasta with Minced Meat and Cheese

Baked Pasta with Minced Meat and Cheese

A comforting oven-baked pasta dish made with seasoned minced meat, a light egg-and-cream mixture, and a melted cheese topping.


Preparation Overview

  • Preparation time: 15 minutes

  • Cooking time: 30 minutes

  • Resting time: 5 minutes

  • Total time: About 50 minutes

Yield

  • Serves 4 people


Ingredients

Pasta

  • 250 g short pasta (penne, macaroni, or fusilli)

  • 1 teaspoon salt (for boiling water)

Meat Mixture

  • 300 g minced meat (beef, turkey, or chicken)

  • 1 shallot, finely chopped

  • 1–2 tablespoons vegetable oil or olive oil

  • 1 teaspoon paprika

  • 1 teaspoon dried oregano

  • Ground black pepper, to taste

Egg & Cheese Topping

  • 3 large eggs

  • 3 tablespoons cream (or half-and-half)

  • 100 g cheese (mozzarella, cheddar, or Gruyère), shredded


Step-by-Step Instructions

1. Cook the Pasta

Bring a large pot of water to a rolling boil. Add the salt, then add the pasta.

Cook according to the package instructions until just tender. Drain well and set aside.


2. Prepare the Meat Mixture

Heat the oil in a large skillet over medium heat.

Add the chopped shallot and cook for 2–3 minutes, stirring occasionally, until softened.

Add the minced meat. Cook, stirring and breaking it up, until it is evenly cooked through and no longer pink.

Sprinkle in the paprika, oregano, and black pepper. Stir well and cook for 1 minute more to blend the flavors.

Remove the pan from the heat.


3. Prepare the Egg and Cream Mixture

In a bowl, whisk together the eggs and cream until smooth.

Stir in half of the shredded cheese. This mixture helps hold the pasta together as it bakes.


4. Assemble the Dish

Preheat the oven to 190°C (375°F).

Lightly grease a medium baking dish.

Add the cooked pasta and meat mixture to the dish and mix gently until evenly combined.

Pour the egg and cream mixture evenly over the pasta.

Sprinkle the remaining cheese evenly on top.


5. Bake

Place the baking dish on the center rack of the oven.

Bake for 20–25 minutes, until the top is lightly golden and the egg mixture has set.


6. Rest and Serve

Remove from the oven and allow the dish to rest for 5 minutes before serving. This helps the layers hold together when sliced.

Serve warm with a simple green salad or cooked vegetables on the side.


Storage

  • Store leftovers covered in the refrigerator for up to 2 days

  • Reheat gently in the oven or microwave until warmed through


Optional Notes

  • You may add cooked vegetables such as peas or bell peppers

  • Cheese types can be mixed for varied flavor

  • For a softer texture, add 1–2 tablespoons of milk to the egg mixture

Oatmeal & Cocoa Breakfast Cake

Oatmeal & Cocoa Breakfast Cake

A soft, lightly sweet breakfast-style cake made with oats, banana, and cocoa. Suitable for a quick morning meal or a light snack.


Preparation Overview

  • Preparation time: 10 minutes

  • Soaking time: 10 minutes

  • Cooking time: 20–25 minutes (oven) or 2–3 minutes (microwave)

  • Total time: About 40 minutes

Yield

  • Makes 1 large serving or 2 small portions


Ingredients

  • 40 g oatmeal (about ½ cup rolled oats or quick oats)

  • 120 ml milk (dairy or plant-based)

  • 1 large egg

  • 1 ripe banana

  • 8 g cocoa powder (about 1 tablespoon, unsweetened)

  • 5 g baking powder (about 1 teaspoon)

Optional

  • A small pinch of ground cinnamon

  • A few dark chocolate chips or fresh fruit for topping


Step-by-Step Instructions

1. Soak the Oats

Place the oatmeal in a mixing bowl. Pour in the milk and stir gently.

Let the mixture rest for 10 minutes so the oats absorb the liquid and soften evenly.


2. Prepare the Banana

Peel the banana and place it in a separate bowl.

Mash thoroughly with a fork until smooth and free of large lumps.


3. Mix the Batter

Add the mashed banana and the egg to the soaked oats.

Whisk until the mixture is evenly combined.

Sift in the cocoa powder and baking powder. Add cinnamon if using.

Stir gently until the batter looks smooth and evenly colored, with no dry patches.


4. Prepare the Cooking Dish

Lightly grease two small oven-safe ramekins or one microwave-safe mug or bowl.

Pour the batter into the container(s), filling no more than three-quarters full.


5. Cook

Oven Method

  • Preheat the oven to 180°C (350°F)

  • Place the ramekins on a baking tray

  • Bake for 20–25 minutes, until the center is set

Microwave Method

  • Cook on high for 2–3 minutes

  • Let stand for 1 minute before serving


6. Serve

Enjoy warm directly from the dish or turn out onto a plate.

Optional toppings include yogurt, fruit, or a light drizzle of honey.


Storage

  • Best enjoyed fresh

  • Can be stored covered in the refrigerator for up to 24 hours

  • Reheat gently before serving


Helpful Notes

  • Riper bananas provide more natural sweetness

  • Texture will be soft and moist, similar to a baked oatmeal

  • Cooking time may vary slightly depending on dish size and appliance

Simple No-Knead Homemade Bread

Simple No-Knead Homemade Bread

A soft, everyday loaf made with basic pantry ingredients and minimal handling.


Preparation Overview

  • Preparation time: 10 minutes

  • First resting time: 1½–2 hours

  • Second resting time: 30–45 minutes

  • Baking time: 25–30 minutes

  • Cooling time: 20 minutes

  • Total time: About 3 hours

Yield

  • Makes 1 standard loaf


Ingredients

  • 200 ml warm water (comfortably warm, not hot)

  • 25 g sugar (about 2 tablespoons)

  • 3 g active dry yeast (about 1 teaspoon)

  • 300 g bread flour or all-purpose wheat flour (about 2 cups)

  • 3 g salt (about ½ teaspoon)

  • 20 g olive oil (about 2 tablespoons)


Step-by-Step Instructions

1. Prepare the Yeast Mixture

Pour the warm water into a large mixing bowl. Add the sugar and yeast, then stir gently until dissolved.

Let the mixture stand for about 5 minutes. A light foam on the surface indicates the yeast is ready to use.


2. Mix the Dough

Add the olive oil and salt to the yeast mixture and stir briefly.

Gradually add the flour, mixing with a spoon or spatula until all the flour is evenly moistened.

The dough will look soft and sticky, which is expected. Ensure there are no dry patches of flour.


3. First Resting Period

Cover the bowl with a clean kitchen towel or lid.

Place it in a warm, draft-free area and let the dough rest for 1½ to 2 hours, or until it has noticeably increased in volume.


4. Shape the Dough

Lightly coat your hands with a small amount of oil.

Gently press down the dough to release excess air.

Divide the dough into three equal portions and shape each portion into a smooth ball or short log.

Place the pieces side by side into a lightly greased loaf pan.


5. Second Resting Period

Cover the loaf pan and let the dough rest for 30–45 minutes.

During this time, the dough should rise and fill the pan evenly.


6. Bake

Preheat the oven to 180°C (350°F).

If desired, lightly brush the surface of the dough with a little milk or water for an even finish.

Bake for 25–30 minutes, until the top is lightly browned and the loaf is fully baked.


7. Cool

Remove the bread from the pan and place it on a wire rack.

For a softer surface, you may lightly brush the top with a small amount of olive oil while the bread is warm.

Allow the bread to cool for at least 20 minutes before slicing. This helps maintain the structure of the loaf.


Serving Suggestions

  • Slice and serve with butter, jam, or cheese

  • Suitable for sandwiches or toast

  • Enjoy warm or at room temperature


Storage

  • Store wrapped at room temperature for up to 2 days

  • Refrigeration is not recommended, as it may affect texture

  • Can be frozen once cooled and sliced


Helpful Notes

  • Longer resting times help improve texture

  • Avoid adding extra flour, as the dough should remain soft

  • Suitable for loaf pans or free-form shaping

Cheese-Stuffed Flatbread (Quick Yeast Dough)

Cheese-Stuffed Flatbread (Quick Yeast Dough)

Soft baked flatbreads filled with melted cheese, prepared with a simple yeast dough and baked until lightly golden.


Preparation Overview

  • Preparation time: 15 minutes

  • Resting time: 40 minutes

  • Baking time: 15–20 minutes

  • Total time: About 1 hour 15 minutes

Yield

  • Makes 4 large flatbreads


Ingredients

For the Dough

  • 480 g wheat flour (about 4 cups)

  • 400 ml milk, warm (comfortably warm, not hot)

  • 10 g dry yeast

  • 15 g sugar

  • 20 g olive oil

  • 8 g salt

For the Filling & Topping

  • 200 g mozzarella or cheddar cheese, shredded

  • 1 egg yolk (for brushing)

  • Optional: sesame seeds or nigella seeds

For Handling

  • A small amount of vegetable oil (for greasing the bowl and hands)


Step-by-Step Instructions

1. Prepare the Yeast Mixture

Pour the warm milk into a large mixing bowl. Add the sugar and dry yeast, then stir gently to combine.

Set the bowl aside for 5–10 minutes, until the surface shows light bubbles. This indicates the yeast has activated properly.


2. Form the Dough

Add the olive oil and salt to the milk mixture. Stir briefly.

Gradually add the flour, mixing with a spoon or spatula until a rough dough forms.

Transfer the dough to a clean work surface and knead gently for about 5 minutes, until smooth and flexible.

If the dough feels sticky, lightly oil your hands instead of adding extra flour to maintain a soft texture.


3. Rest the Dough

Lightly grease a bowl with vegetable oil. Place the dough inside and turn it once so the surface is lightly coated.

Cover with a clean cloth and place in a warm, draft-free area. Let it rest for about 30 minutes, or until it has increased in volume.


4. Divide and Fill

Turn the rested dough onto a lightly floured surface and divide it into 4 equal portions. Shape each portion into a smooth ball.

Flatten each ball into a small round disc using your hands or a rolling pin.

Place a portion of shredded cheese in the center of each disc.

Bring the edges of the dough up and over the filling, pinching them together to seal completely.

Gently flatten each filled ball into a thick disc, taking care not to tear the dough.


5. Final Rest and Topping

Line a baking tray with parchment paper and place the shaped flatbreads on it.

Using your fingertips, gently press small indentations across the surface of each disc. This helps maintain an even shape during baking.

Cover and let rest for 10 minutes.

Brush the tops lightly with egg yolk and sprinkle with seeds if desired.


6. Bake

Preheat the oven to 200°C (400°F).

Bake the flatbreads for 15–20 minutes, until evenly baked and lightly golden on top.

Remove from the oven and allow them to cool slightly before serving.


Serving Suggestions

  • Serve warm as a snack or alongside soups and salads

  • Optional: lightly brush with melted butter and sprinkle with chopped parsley before serving


Storage

  • Best enjoyed fresh

  • Leftovers can be stored covered at room temperature for up to 1 day or refrigerated for 2 days

  • Reheat gently in the oven or on a pan before serving


Optional Notes

  • Cheese can be mixed (mozzarella and cheddar together) for balanced flavor

  • Dough can be divided into smaller portions for mini flatbreads

Yeast-Free Savory Cheese & Herb Triangles

Yeast-Free Savory Cheese & Herb Triangles

Soft, pan-cooked or baked cheese-filled bread triangles made without yeast. Ideal for breakfast, tea time, or a light savory snack.

Preparation Time

  • Prep: 15 minutes

  • Resting: 5 minutes

  • Cooking: 10–12 minutes (pan) or 20–25 minutes (oven)

  • Total: About 30–35 minutes

Yield

  • Makes 8 medium triangles


Ingredients

Dairy & Eggs

  • 2 large eggs (room temperature)

  • 90 ml milk (about 1 tea glass)

  • 80 g feta cheese or white cheese, crumbled

  • 80 g cheddar or mozzarella cheese, grated

Fresh Herbs

  • 3 green onions, finely chopped

  • 5–6 sprigs fresh parsley, finely chopped

Dry Ingredients

  • 3 cups all-purpose flour (approximately 360 g)

  • 1 packet baking powder (10 g)

  • 1 teaspoon salt (adjust depending on cheese saltiness)

For Cooking

  • 1–2 tablespoons olive oil or vegetable oil (for greasing the pan or tray)


Step-by-Step Instructions

1. Prepare the Wet Mixture

In a large mixing bowl, crack the eggs and whisk lightly until the yolks and whites are combined. Add the milk and mix until smooth.

Add the crumbled white cheese and grated cheese. Stir gently so the cheeses are evenly distributed throughout the mixture.


2. Add Herbs and Seasoning

Add the finely chopped green onions and parsley to the bowl. Sprinkle in the salt. Mix well to ensure the herbs are spread evenly.


3. Form the Dough

Sift the baking powder into the flour. Add the flour gradually to the bowl, one cup at a time, mixing with a spoon or your hand.

Once the mixture begins to come together, knead gently until a soft, smooth dough forms.

Dough texture guide:

  • If the dough feels sticky, add 1 tablespoon of flour at a time.

  • If the dough feels dry or crumbly, add 1–2 teaspoons of milk.

The dough should be soft and easy to handle, not stiff.


4. Shape the Dough

Lightly flour your work surface. Place the dough on it and gently press or roll it into a round shape about 1 cm (½ inch) thick.

Using a knife or pizza cutter, divide the dough into 8 equal triangles, similar to slicing a pizza.


5. Cooking Options

Pan Method

  • Lightly grease a non-stick pan with oil.

  • Place the triangles in the pan, leaving a little space between them.

  • Cover with a lid and cook over medium-low heat for about 5 minutes.

  • Turn the triangles carefully and cook the other side for another 4–5 minutes until both sides are evenly cooked.

Keep the heat moderate so the inside cooks properly without browning too quickly.

Oven Method

  • Preheat the oven to 180°C (350°F).

  • Line a baking tray with parchment paper or lightly grease it.

  • Arrange the triangles on the tray.

  • Bake for 20–25 minutes, turning once if needed, until cooked through.


6. Serving

Serve warm for the best texture and flavor. These cheese and herb triangles pair well with:

  • Fresh tomatoes or cucumbers

  • Olives

  • Yogurt or labneh

  • A light salad


Helpful Tips

  • You may replace parsley with dill or cilantro if preferred.

  • A small pinch of black pepper or mild paprika can be added for extra flavor.

  • These can be prepared ahead and reheated gently in a pan or oven.


Storage

  • Store leftovers in an airtight container in the refrigerator for up to 2 days.

  • Reheat on a pan over low heat or in the oven until warm.

Nut and Date Bars

Nut and Date Bars

These bars are made from dates, nuts, and seeds. The dates provide binding and mild sweetness, while the nuts and seeds add texture. The mixture is pressed into a pan and chilled until firm before slicing.

Preparation Time

15 minutes

Cooking Time

10 minutes

Chilling Time

1 hour

Total Time

Approximately 1 hour 25 minutes

Yield

About 10–12 bars (depending on size)


Ingredients

  • 150 g dates, pitted and soaked in cold water for 15 minutes

  • 70 g cashews

  • 70 g walnuts

  • 70 g almonds

  • 70 g hazelnuts

  • 70 g pumpkin seeds

  • 40 g pine nuts


Instructions

1. Prepare the Dates

Drain the soaked dates thoroughly.
Place them in a blender or food processor and blend until a thick, smooth paste forms. Set aside.


2. Toast the Nuts and Seeds

Place the cashews, walnuts, almonds, hazelnuts, pumpkin seeds, and pine nuts into a large dry skillet.
Heat over medium heat and toast for 5–8 minutes, stirring frequently to prevent burning, until lightly browned and aromatic.

Remove from the heat and allow to cool slightly. If desired, roughly chop the larger nuts for a more even texture.


3. Combine the Mixture

Transfer the toasted nuts and seeds to a large mixing bowl.
Add the date paste and mix thoroughly using a sturdy spatula or lightly oiled hands until all components are evenly combined.


4. Press Into a Pan

Line a small rectangular pan or loaf tin with parchment paper, leaving excess paper over the edges for easy removal.

Transfer the mixture into the pan and press it down firmly using the back of a spoon or a flat-bottomed glass to create a compact, even layer.


5. Chill and Slice

Place the pan in the refrigerator for at least 1 hour, or until the mixture is firm.
Once set, lift the mixture out using the parchment paper and place it on a cutting board.

Slice into bars or squares using a sharp knife.


Storage Notes

  • Store the bars in an airtight container in the refrigerator for up to 2 weeks.

  • For longer storage, they may be frozen for up to 3 months and thawed as needed.

Lemon Crinkle Biscuits

Lemon Crinkle Biscuits

These lemon-flavored biscuits have a soft interior and a lightly crisp exterior. They are coated in powdered sugar before baking, which creates a cracked surface as they expand in the oven.

Preparation Time

15 minutes

Chilling Time (Optional)

30 minutes

Baking Time

12–15 minutes

Yield

Approximately 20–24 biscuits


Ingredients

Biscuit Dough

  • 2 large eggs, at room temperature

  • 100 g granulated sugar

  • 80 ml neutral vegetable oil (such as sunflower oil)

  • Zest of 1 lemon, finely grated

  • 50 ml freshly squeezed lemon juice

  • 380 g all-purpose flour, sifted

  • 12 g baking powder

  • A small pinch of salt

Coating

  • 80 g powdered sugar, for rolling


Instructions

1. Mix the Wet Ingredients

Place the eggs and granulated sugar in a large mixing bowl. Whisk until the mixture becomes pale and slightly thickened.
Add the oil, lemon juice, and lemon zest. Whisk again until fully combined.


2. Combine the Dry Ingredients

In a separate bowl, mix the flour, baking powder, and salt until evenly distributed.


3. Form the Dough

Gradually add the dry ingredients to the wet mixture. Stir with a spatula or wooden spoon until a soft, slightly sticky dough forms.

If the dough is difficult to handle, cover the bowl and refrigerate for 30 minutes to firm it slightly.


4. Shape and Coat

Preheat the oven to 180°C (350°F). Line a baking tray with parchment paper.

Scoop approximately 1 tablespoon of dough and roll it gently into a ball.
Roll each ball in powdered sugar until fully coated.

Arrange the coated dough balls on the prepared baking tray, leaving space between them.


5. Bake

Bake for 12–15 minutes, or until the biscuits have spread and developed a cracked surface.
The tops should remain light in color, while the bottoms may show slight browning.

Remove from the oven and allow the biscuits to cool on the tray for 5 minutes before transferring to a wire rack.


Storage Notes

  • Store cooled biscuits in an airtight container at room temperature for up to 5 days.

  • The texture remains soft as long as the container is well sealed.

Apple and Cinnamon Oat Breakfast Bake

Apple and Cinnamon Oat Breakfast Bake

This baked oat dish combines apples, cinnamon, eggs, milk, and nuts to create a soft, lightly spiced breakfast option that can be served warm or at room temperature.

Preparation Time

15 minutes

Baking Time

30–35 minutes

Servings

4–6


Ingredients

  • 1 cup (90 g) rolled oats or quick oats

  • 240 ml milk (dairy or unsweetened plant-based milk)

  • 3 medium apples (about 400 g), peeled and cored

  • 2 large eggs

  • 30 g butter, divided

  • 1 teaspoon ground cinnamon

  • 1 teaspoon vanilla extract or a small pinch of vanillin

  • 1 cup (100 g) chopped nuts (walnuts, almonds, or pecans)

  • ½ cup (75 g) blueberries (optional)

  • A small pinch of salt


Instructions

1. Soak the Oats

Place the oats in a mixing bowl and pour in the milk. Stir until evenly combined.
Allow the mixture to rest for 10 minutes so the oats absorb the liquid and soften.


2. Prepare the Apples

Cut the peeled and cored apples into small pieces.
Transfer them to a blender or food processor and pulse until a thick, slightly textured puree forms. Do not overblend; a small amount of texture is desirable.


3. Mix the Batter

Melt 1 tablespoon of the butter and allow it to cool slightly.
Add the apple puree, eggs, vanilla extract, cinnamon, salt, and melted butter to the soaked oats.
Stir until all ingredients are evenly incorporated.


4. Add Nuts and Fruit

Fold in the chopped nuts and blueberries, if using. Mix gently to distribute them evenly throughout the batter.


5. Prepare the Baking Dish

Preheat the oven to 180°C (350°F).
Use the remaining 1 tablespoon of butter to grease a medium-sized baking dish.

Pour the batter into the prepared dish and smooth the surface.


6. Bake

Bake for 30–35 minutes, or until the center is set and the top is lightly browned.
Remove from the oven and allow to rest for 5–10 minutes before serving.


Helpful Notes

  • For a smoother texture, the apples can be grated instead of blended.

  • The bake firms up as it cools, making it easier to slice.

  • Store leftovers in an airtight container in the refrigerator for up to 3 days.

Orange Oat Muffins

Orange Oat Muffins

These muffins are made with oats, fresh orange juice, and eggs, resulting in a moist and lightly citrus-flavored baked product. They are suitable for breakfast or as a small snack.

Preparation Time

10 minutes

Baking Time

20–25 minutes

Yield

6–8 muffins


Ingredients

  • 1 large orange (zest and juice)

  • 1½ cups (120 g) oat flakes (quick oats or rolled oats)

  • 1 cup (240 ml) water or unsweetened plant-based milk

  • 2 large eggs

  • 1 teaspoon baking powder

  • 1 teaspoon vanilla extract (optional)

  • A small pinch of salt

Optional Add-ins

  • Raisins

  • Chopped nuts


Instructions

1. Prepare the Orange

Wash the orange thoroughly. Finely grate approximately 1 tablespoon of the outer zest, avoiding the white pith underneath.
Cut the orange in half and squeeze out the juice. Remove any seeds.


2. Soak the Oats

Place the oat flakes in a large mixing bowl.
Add the freshly squeezed orange juice and the water (or plant-based milk).
Stir well and let the mixture rest for 10 minutes, allowing the oats to absorb liquid and soften.


3. Mix the Batter

Add the eggs, orange zest, baking powder, vanilla extract (if using), and salt to the soaked oats.
Stir until the eggs are fully incorporated and the batter is evenly mixed.
If using raisins or nuts, fold them in gently at this stage.


4. Prepare the Muffin Pan

Preheat the oven to 180°C (350°F).
Line a muffin tin with paper or silicone liners, or lightly grease the cups.

Divide the batter evenly among the muffin cups, filling them almost to the top.


5. Bake

Place the muffin tin in the preheated oven and bake for 20–25 minutes, or until the tops are set and lightly colored.
Allow the muffins to cool in the pan for a few minutes before transferring them to a wire rack.


Helpful Notes

  • For a finer texture, the oats can be blended briefly before soaking.

  • The flavor depends on the natural sweetness of the orange used.

  • Store baked muffins in an airtight container in the refrigerator for up to 3 days.

Banana Chocolate Oat Cake

Banana Chocolate Oat Cake

This baked oat-based cake combines bananas, yogurt, cocoa, and chocolate for a soft, dense texture. It is suitable for a small baking dish and can be served warm or at room temperature.

Preparation Time

10 minutes

Baking Time

35–40 minutes

Yield

1 small square or rectangular cake (8–10 slices)


Ingredients

  • 2 ripe bananas, mashed

  • ¾ cup (70 g) oat flakes

  • ½ cup (150 g) plain or Greek yogurt

  • ¼ cup (50 g) condensed milk

  • 3 tablespoons unsweetened cocoa powder

  • 1 teaspoon baking powder

  • 40 g (1.4 oz) chocolate, chopped or chocolate chips

  • Walnuts, roughly chopped (optional)


Instructions

1. Prepare the Wet Mixture

Place the bananas in a medium mixing bowl and mash thoroughly with a fork until mostly smooth.
Add the yogurt and condensed milk. Stir until the mixture is evenly combined and creamy in consistency.


2. Add the Dry Ingredients

Add the oat flakes, cocoa powder, and baking powder to the bowl.
Mix gently with a spatula until the batter is evenly blended and no dry cocoa remains.


3. Incorporate the Chocolate and Nuts

Fold in about half of the chopped chocolate and walnuts, if using.
Mix just until distributed to avoid overworking the batter.


4. Prepare the Baking Dish

Preheat the oven to 180°C (350°F).
Line a small square or rectangular baking dish with parchment paper or lightly grease it.

Pour the batter into the prepared dish and spread it evenly.
Scatter the remaining chocolate and walnuts over the surface.


5. Bake

Place the dish in the preheated oven and bake for 35–40 minutes, or until the edges are set and a toothpick inserted into the center comes out mostly clean with a few moist crumbs.


6. Cool and Serve

Remove the cake from the oven and allow it to cool in the pan for at least 15 minutes before slicing. This resting time helps the oats firm up and improves the final texture.


Helpful Notes

  • For a smoother texture, the oats can be blended briefly before mixing.

  • The cake will become firmer as it cools.

  • Store leftovers in an airtight container in the refrigerator for up to 3 days.

Classic Sponge Cake

Classic Sponge Cake

A light, airy cake made with whipped eggs and minimal fat

This sponge cake relies on properly beaten eggs to create structure and volume. The result is a soft, fine-crumb cake that can be served plain or paired with fruit, cream, or light glazes.

Prep Time: 15 minutes
Bake Time: 30–35 minutes
Cooling Time: 15 minutes
Servings: 8–10
Pan Size: 8-inch (20 cm) square or round pan
Oven Temperature: 325°F (165°C)


Ingredients

  • 4 large eggs, room temperature

  • ¾ cup (150 g) granulated sugar

  • ¾ cup (90 g) cake flour, sifted

  • ¼ teaspoon salt

  • 1 teaspoon vanilla extract

  • 2 tablespoons milk, warm (optional, for extra moisture)


Step-by-Step Instructions

1. Prepare the Pan and Oven

  • Preheat the oven to 325°F (165°C).

  • Line the bottom of the baking pan with parchment paper.

  • Do not grease the sides; this helps the cake rise evenly.


2. Whip the Eggs and Sugar

  • In a large heat-safe bowl, combine the eggs and granulated sugar.

  • Place the bowl over a pot of gently simmering water.

  • Whisk constantly until the mixture is warm to the touch (about 100–105°F / 38–40°C).
    This helps the eggs whip to a higher volume.

  • Remove from heat and beat with an electric mixer on high speed for 5–7 minutes, until:

    • The mixture becomes pale

    • It triples in volume

    • It forms thick ribbons when lifted


3. Add Flavoring

  • Gently mix in the vanilla extract.

  • If using milk, stir it in carefully at this stage.


4. Fold in Dry Ingredients

  • Sift the cake flour and salt together.

  • Add the dry ingredients in 2–3 additions, folding gently with a spatula.

  • Use a light hand and a folding motion to avoid deflating the batter.


5. Transfer to Pan

  • Pour the batter into the prepared pan.

  • Smooth the top gently.

  • Tap the pan lightly once to release large air bubbles.


6. Bake

  • Bake in the center of the oven for 30–35 minutes, or until:

    • The top is lightly golden

    • The cake springs back when touched

    • A toothpick inserted in the center comes out clean


7. Cool

  • Remove the cake from the oven.

  • Let it cool in the pan for 10–15 minutes.

  • Run a knife around the edges and turn out onto a wire rack to cool completely.


Serving Suggestions

  • Slice and serve plain with tea or coffee

  • Dust lightly with powdered sugar

  • Serve with fruit and whipped cream

  • Use as a base for layered or filled cakes


Helpful Tips

  • Room-Temperature Eggs: Essential for proper volume.

  • Gentle Folding: Prevents the batter from losing air.

  • Accurate Measuring: Use spoon-and-level method for flour.

  • Pan Size: A deeper pan may require a slightly longer bake time.

Hash Brown Breakfast Casserole

Hash Brown Breakfast Casserole

A make-ahead baked dish with potatoes, sausage, eggs, and cheese

This baked breakfast casserole combines shredded potatoes, cooked sausage, eggs, and cheese into a single dish that can be assembled ahead of time and baked when needed. It works well for family breakfasts, guests, or occasions where advance preparation is helpful.

Prep Time: 20 minutes
Bake Time: 45–55 minutes
Optional Chill Time: Up to 24 hours
Servings: 8–10
Pan Size: 9 × 13 inch (23 × 33 cm)


Ingredients

Main Ingredients

  • 1 lb (450 g) frozen hash browns, thawed
    (shredded or diced both work)

  • 1 lb (450 g) breakfast sausage

  • 8 large eggs

  • 1½ cups milk (whole or 2%)

  • 2 cups shredded cheese
    (cheddar, Colby-Jack, or a blend)

Seasonings

  • 1 teaspoon salt

  • ½ teaspoon black pepper

  • ½ teaspoon garlic powder (optional)

  • ½ teaspoon onion powder (optional)

Optional Add-Ins

  • ½ cup chopped bell peppers

  • ¼ cup finely chopped onion

  • ½ cup cooked mushrooms

  • ¼ teaspoon paprika or dried herbs


Step-by-Step Instructions

1. Prepare the Pan

  • Lightly grease a 9×13 inch baking dish with oil or butter.

  • Set aside.


2. Cook the Sausage

  • Heat a skillet over medium heat.

  • Add the sausage and cook, breaking it into small pieces.

  • Cook until fully browned and no longer pink.

  • Drain excess fat and let cool slightly.


3. Layer the Hash Browns

  • Spread the thawed hash browns evenly across the bottom of the prepared baking dish.

  • Press lightly to form an even layer.


4. Add Sausage and Cheese

  • Sprinkle the cooked sausage evenly over the potatoes.

  • Spread 1½ cups of the shredded cheese over the sausage layer.


5. Mix the Egg Custard

  • In a large bowl, whisk together:

    • Eggs

    • Milk

    • Salt

    • Pepper

    • Optional seasonings

  • Whisk until fully blended and smooth.


6. Assemble the Casserole

  • Pour the egg mixture evenly over the layered ingredients.

  • Gently tap the dish on the counter to help the mixture settle.

  • Sprinkle the remaining ½ cup cheese evenly over the top.


7. Bake or Chill

To bake immediately:

  • Preheat oven to 350°F (175°C).

  • Bake uncovered for 45–55 minutes, until:

    • Center is set

    • Top is lightly golden

    • A knife inserted in the center comes out clean

To prepare ahead:

  • Cover tightly and refrigerate for up to 24 hours.

  • When ready to bake, remove from the refrigerator 15–20 minutes before baking.

  • Bake as directed, adding 5–10 minutes if needed.


8. Rest and Serve

  • Let the casserole rest for 10 minutes before slicing.

  • Cut into squares and serve warm.


Helpful Tips

  • Even Cooking: Thaw and drain hash browns well to avoid excess moisture.

  • Cheese Choices: A mix of sharp and mild cheese adds balanced flavor.

  • Clean Slices: Use a sharp knife and wipe between cuts.

  • Pan Depth: A deeper dish may need slightly longer baking time.


Storage

  • Refrigerate leftovers in a covered container for up to 3 days.

  • Reheat individual portions in the oven or microwave.

  • Freezing is possible, though texture may soften slightly after reheating.

Soft & Thick Chocolate Chip Cookies

Soft & Thick Chocolate Chip Cookies

These cookies are designed to bake up thick with soft centers and lightly crisp edges. The method of dissolving baking soda in warm water helps control spread and improves texture, while the full amount of brown sugar supports moisture and structure.

Prep Time: 15 minutes
Bake Time: 10–12 minutes
Yield: About 24 cookies
Oven Temperature: 350°F (175°C)


Ingredients

  • 1 cup (226 g) unsalted butter, softened

  • 1 cup granulated sugar

  • 1 cup packed brown sugar

  • 2 large eggs, room temperature

  • 2 teaspoons vanilla extract

  • 1 teaspoon baking soda

  • 2 teaspoons hot water

  • ½ teaspoon salt

  • 3 cups all-purpose flour, spooned and leveled

  • 2 cups semi-sweet chocolate chips

  • 1 cup chopped walnuts (optional)


Step-by-Step Instructions

1. Prepare the Oven and Pans

  • Preheat the oven to 350°F (175°C).

  • Line baking sheets with parchment paper or silicone baking mats.

  • Set aside.


2. Cream Butter and Sugars

  • In a large mixing bowl, add the softened butter, granulated sugar, and brown sugar.

  • Beat with a hand mixer or stand mixer on medium speed until the mixture is light, smooth, and evenly blended (about 2–3 minutes).


3. Add Eggs and Vanilla

  • Add the eggs one at a time, mixing well after each addition.

  • Stir in the vanilla extract until fully combined.


4. Prepare the Baking Soda Mixture

  • In a small bowl, dissolve the baking soda completely in the hot water.

  • Add this mixture to the dough along with the salt.

  • Mix gently until incorporated.


5. Add the Flour

  • Gradually add the flour to the bowl.

  • Mix on low speed or by hand just until no dry flour remains.

  • Avoid overmixing to maintain a soft texture.


6. Fold in Add-Ins

  • Gently fold in the chocolate chips and walnuts (if using) using a spatula.


7. Portion the Dough

  • Scoop dough in portions of about 2 tablespoons.

  • Place cookies about 2½ inches apart on the prepared baking sheets.


8. Bake

  • Bake for 10–12 minutes, or until:

    • Edges are lightly golden

    • Centers appear soft but set


9. Cool

  • Allow cookies to rest on the baking sheet for 5 minutes.

  • Transfer to a wire rack to cool completely.


Storage Tips

  • Store in an airtight container at room temperature for up to 4 days.

  • Dough may be refrigerated for up to 48 hours before baking.

Cherry Cheesecake Lush (No-Bake Layered Dessert)

Cherry Cheesecake Lush (No-Bake Layered Dessert)

A classic no-bake layered dessert made with a buttery graham cracker base, a smooth cream cheese filling, a fruit layer, and a light whipped topping. This dessert is easy to assemble, sets beautifully in the refrigerator, and is ideal for gatherings or make-ahead occasions.

Preparation Time: 20 minutes
Chilling Time: Minimum 4 hours (overnight recommended)
Servings: 12–15 portions
Pan Size: 9 × 13 inch (23 × 33 cm)


Ingredients

For the Crust

  • 1½ cups graham cracker crumbs (about 10–12 full sheets, finely crushed)

  • ⅓ cup granulated sugar

  • 6 tablespoons unsalted butter, melted and slightly cooled

For the Cream Cheese Layer

  • 8 oz (225 g) cream cheese, fully softened to room temperature

  • 1 cup powdered sugar, sifted

  • 1 cup whipped topping or freshly whipped cream (stiff peaks)

For the Fruit Layer

  • 21 oz (about 600 g) cherry pie filling (1 standard can)

For the Top Layer

  • 2 cups whipped topping or lightly sweetened whipped cream

Optional Garnish

  • Extra graham cracker crumbs

  • Finely chopped nuts (such as pecans or walnuts)


Step-by-Step Instructions

1. Prepare the Crust

  1. Place the graham cracker crumbs into a medium mixing bowl.

  2. Add the granulated sugar and stir until evenly mixed.

  3. Pour in the melted butter and mix until all crumbs are evenly coated and the mixture holds together when pressed.

  4. Transfer the mixture to a 9×13 inch glass or ceramic baking dish.

  5. Press firmly and evenly into the bottom of the dish using the back of a spoon or the bottom of a measuring cup.

  6. Place the dish in the freezer for 10 minutes to help the crust firm while preparing the filling.


2. Make the Cream Cheese Layer

  1. In a large bowl, add the softened cream cheese.

  2. Beat using a hand mixer or stand mixer on medium speed until completely smooth and free of lumps.

  3. Gradually add the powdered sugar and continue mixing until fully combined and creamy.

  4. Gently fold in 1 cup of whipped topping (or whipped cream) using a spatula.

    • Use slow, gentle motions to keep the mixture light and smooth.


3. Assemble the Layers

  1. Remove the crust from the freezer.

  2. Spoon the cream cheese mixture evenly over the crust.

  3. Spread carefully to the edges using an offset spatula or the back of a spoon.

  4. Add the cherry filling on top of the cream layer.

  5. Spread gently so the fruit is evenly distributed without pressing down.

  6. Add the remaining 2 cups of whipped topping over the cherry layer.

  7. Smooth the surface or create light swirls for a neat finish.


4. Chill

  1. Cover the dish tightly with plastic wrap or a lid.

  2. Refrigerate for at least 4 hours.

    • Overnight chilling is recommended for the cleanest slices and best texture.


5. Garnish and Serve

  1. Just before serving, sprinkle with extra graham cracker crumbs or chopped nuts if desired.

  2. Slice into squares using a sharp knife.

  3. For neat layers, wipe the knife clean between cuts.


Helpful Tips

  • Room-Temperature Cream Cheese: This ensures a smooth filling with no lumps.

  • Homemade Whipped Cream Option:
    Beat 1½ cups cold heavy cream with 3 tablespoons powdered sugar until stiff peaks form.

  • Even Layers: Chill briefly between layers if your kitchen is warm.

  • Serving Temperature: Serve well-chilled for best structure.

Baked Oatmeal Apple Circles

Baked Oatmeal Apple Circles

Naturally Sweet • Soft-Baked • Simple Ingredients

These apple oatmeal circles are lightly sweet, tender, and satisfying. Made with oats, almonds, and fresh apples, they’re ideal as a breakfast bite, snack, or light dessert—and they store well for easy planning ahead.

Prep Time: 15 minutes
Bake Time: 20–25 minutes
Yield: 6–8 circles


Ingredients

  • 1 cup (90 g) rolled oats or quick oats

  • 50 g raw almonds (about ½ cup)

  • 2 large apples, peeled and cut into chunks

  • 50 ml water (about 3 tablespoons)

  • ½ teaspoon vanilla extract (or a small pinch of vanillin)

  • Optional: a light sprinkle of cinnamon


Step-by-Step Instructions

1. Make the Dry Base

Add the oats and almonds to a blender or food processor.

Blend until the mixture becomes fine and flour-like, with no large pieces remaining.

Transfer this dry mixture to a mixing bowl and set aside.


2. Prepare the Apple Purée

Without washing the blender, add the apple chunks, water, and vanilla extract.

Blend until the mixture becomes smooth and pourable, similar to applesauce.

This purée provides natural sweetness and moisture.


3. Combine and Rest

Pour the apple purée into the bowl with the oat–almond mixture.

Stir until a thick, soft dough forms.

Let the mixture rest for about 5 minutes.
This allows the oats to absorb moisture and makes the dough easier to shape.


4. Shape the Circles

Preheat the oven to 180°C (350°F).

Line a baking tray with parchment paper.

Scoop about 2 tablespoons of dough onto the tray for each piece.

Gently flatten into a round disc about ½ inch (1–1.5 cm) thick.

Using your finger or the handle of a wooden spoon, press a small hole into the center to form a ring shape.

If using cinnamon, lightly sprinkle it over the tops.


5. Bake

Place the tray in the preheated oven.

Bake for 20–25 minutes, until:

  • The circles feel set to the touch

  • The bottoms are lightly golden

Remove from the oven and let them cool completely on the tray.
They will become firmer as they cool.


Helpful Tips for Best Results

  • Apple Variety: Naturally sweet apples (such as Gala or Fuji) give the best flavor without added sweeteners.

  • Optional Sweetness: If you prefer a sweeter treat, add 1 tablespoon honey or maple syrup to the apple purée before mixing.

  • Texture Choice: For extra texture, sprinkle a few chopped almonds on top before baking.

  • Cooling Time: Allow full cooling for the best structure and easy handling.

Homemade Mussel-Shaped Butter Bread

Homemade Mussel-Shaped Butter Bread

Soft Crumb • Rich Buttery Flavor • Beautiful Golden Finish

This tender bread is light, fluffy, and delicately shaped to resemble a shell. It’s perfect for breakfast, sandwiches, or serving warm with butter and tea.

Prep Time: 20 minutes
Rising Time: About 1½ hours
Bake Time: 20–30 minutes
Yield: 2 small loaves or 10–12 rolls


Ingredients

  • 80 g butter, melted and slightly cooled

  • 500 g bread flour (about 4 cups)

  • 250 ml warm milk (comfortably warm to the touch)

  • 1 large egg, at room temperature

  • 2 tablespoons granulated sugar

  • 7 g dry yeast (1 standard packet)

  • 1 teaspoon salt

For the Topping

  • 1 egg yolk

  • 1 tablespoon milk


Step-by-Step Instructions

1. Activate the Yeast

Pour the warm milk into a large mixing bowl.

Add the sugar and dry yeast, then whisk gently to combine.

Let the mixture rest for 5–10 minutes, until it looks foamy and slightly bubbly.
This shows the yeast is active and ready.


2. Mix the Dough

Add the melted butter, egg, and salt to the yeast mixture. Stir until well blended.

Gradually add the bread flour, mixing with a spoon or spatula until a soft, shaggy dough forms.

Once the dough begins to come together, it’s ready for kneading.


3. Knead and First Rise

Transfer the dough to a lightly floured surface.

Knead for 8–10 minutes, pushing the dough away with the heel of your hand, then folding it back over itself.

The dough should become smooth, stretchy, and pleasant to handle.

Place the dough in a lightly greased bowl, turning once to coat the surface.

Cover with a clean cloth and let it rest in a warm place for about 1 hour, or until it has noticeably increased in size.


4. Shape the Bread

Gently press the dough to release excess air.

Divide it into 2 equal portions for small loaves, or into smaller pieces if making rolls.

For the mussel (shell) shape:

  • Roll each piece into a ball

  • Flatten gently into an oval

  • Fold one side over the other to create a layered shell look

Place the shaped dough on a lined baking tray or into greased pans.

Cover lightly and let rest for 30 minutes, allowing the shapes to puff slightly.


5. Bake

Preheat your oven to 180°C (350°F).

Mix the egg yolk with 1 tablespoon of milk.

Brush the tops of the bread gently with this mixture to give a glossy, golden finish.

Bake:

  • 25–30 minutes for loaves

  • 15–20 minutes for rolls

The bread is ready when the tops are golden and the loaf feels light when lifted.


6. Cool and Serve

Remove the bread from the pans promptly and place on a wire rack.

Allow it to cool slightly before slicing to keep the texture soft and even.


Helpful Tips for Best Results

  • Milk Temperature: Milk should feel warm but comfortable to the touch to support yeast activity.

  • Butter Choice: A good-quality butter adds extra richness and softness to the crumb.

  • Even Baking: If the top browns too quickly, loosely cover with foil for the final minutes.

  • Storage: Store at room temperature in a sealed container for up to 2 days, or freeze once fully cooled.


Serving Ideas

This bread is delicious:

  • Warm with butter or honey

  • As sandwich bread

  • Served alongside soups or stews

  • Lightly toasted the next day

Baked Banana, Apple & Cinnamon Oatmeal

Baked Banana, Apple & Cinnamon Oatmeal

Soft • Naturally Sweet • Comforting & Filling

This baked oatmeal brings together ripe bananas, tender apples, and warming cinnamon for a simple breakfast you can prepare ahead and enjoy throughout the week.

Prep Time: 10 minutes
Bake Time: 30–35 minutes
Servings: 2–3


Ingredients

  • 1 cup (90 g) rolled oats

  • 200 ml (¾ cup) milk (dairy or plant-based)

  • 2 eggs, at room temperature

  • 2 ripe bananas (about 200 g), mashed

  • 1 apple (about 150 g), peeled and thinly sliced

  • ½ teaspoon ground cinnamon

  • ½ teaspoon vanillin (or 1 teaspoon vanilla extract)


Step-by-Step Instructions

1. Prepare the Base

Preheat your oven to 180°C (350°F).

In a large mixing bowl, mash the ripe bananas with a fork until smooth and creamy, with few or no lumps.

Add the eggs, milk, and vanillin (or vanilla extract).
Whisk gently until the mixture looks smooth and evenly blended.


2. Add the Oats and Spice

Stir the rolled oats into the banana mixture.

Sprinkle in the cinnamon and mix again so the oats and spice are evenly distributed throughout the batter.

The mixture should look pourable but thick, similar to loose porridge.


3. Add the Apples

Lightly grease a small baking dish.

Pour the oatmeal mixture into the dish and spread it evenly.

Arrange the apple slices over the top in a neat, overlapping pattern.
If you enjoy extra warmth, lightly sprinkle a pinch of cinnamon over the apples.


4. Bake

Place the dish in the preheated oven.

Bake for 30–35 minutes, until:

  • The center feels set when gently pressed

  • The apples are soft

  • The edges turn lightly golden


5. Cool and Serve

Remove from the oven and allow the oatmeal to cool slightly.

Slice into portions and serve warm on its own, or with:

  • A spoon of yogurt

  • A light drizzle of honey

  • Extra fruit on the side


Helpful Tips for Best Results

  • Banana Choice: Bananas with brown spots are naturally sweeter and blend more smoothly.

  • Texture Preference: Rolled oats give a hearty, chewy bite. For a softer, cake-like texture, briefly blend the oats before mixing.

  • Make Ahead: This oatmeal stores well in the refrigerator for up to 4 days.

  • Reheating: Warm individual portions gently until heated through.


Why You’ll Love This Recipe

  • Naturally sweet with no added sugar

  • Easy to prepare and bake all at once

  • Great for busy mornings or meal prep

  • Comforting and satisfying without being heavy

Banana Oatmeal Pancakes

Banana Oatmeal Pancakes

Naturally Sweet • Soft & Filling • Simple Ingredients

Prep Time: 5 minutes
Cooking Time: 10 minutes
Servings: 2–3


Ingredients

  • 1 cup rolled oats or quick oats

  • 2 ripe bananas

  • 2 eggs, at room temperature

  • 100 ml water (or milk, if preferred)

  • 4 tablespoons yogurt (2 for batter, 2 for serving)

  • ¼ teaspoon baking soda

  • Oil for cooking (neutral oil or coconut oil)


Step-by-Step Instructions

1. Prepare the Oat Flour

Add the oats to a blender or food processor.

Blend until the oats turn into a fine, powder-like flour. This helps create a smooth and tender pancake texture.


2. Make the Batter

Add the bananas, eggs, water, baking soda, and 2 tablespoons of the yogurt to the blender with the oat flour.

Blend until the mixture becomes smooth, creamy, and evenly mixed.

Let the batter rest for 2–3 minutes.
This short rest allows the oats to absorb liquid, giving the pancakes a softer and fluffier texture.


3. Heat the Pan

Place a non-stick pan or griddle over medium-low heat.

Lightly grease the surface with a small amount of oil, spreading it evenly.

Allow the pan to warm gently before cooking.


4. Cook the Pancakes

Pour about ¼ cup of batter onto the pan for each pancake.

Cook for 2–3 minutes, until:

  • Small bubbles appear on the surface

  • The edges look set and no longer shiny

Carefully turn the pancake over.

Cook the second side for 1–2 minutes, until lightly golden and cooked through.

Repeat with the remaining batter, adding a little more oil if needed.


5. Serve and Enjoy

Serve the pancakes warm.

Top with the remaining yogurt and add fresh fruit, chopped nuts, or a light drizzle of honey if desired.


Helpful Tips for Best Results

  • Banana Choice: Very ripe bananas add natural sweetness and a pleasant aroma.

  • Gentle Heat: Cooking over medium-low heat helps the pancakes cook evenly.

  • Batter Consistency: If the batter thickens after resting, add a small splash of water or milk to loosen it.

  • Pan Size: Smaller pancakes are easier to flip and cook more evenly.


Serving Ideas

These pancakes pair beautifully with:

  • Sliced strawberries or berries

  • Chopped almonds or walnuts

  • A spoon of nut butter

  • Extra yogurt and banana slices

Creamy Cheesy Broccoli and Potato Bake

Creamy Cheesy Broccoli and Potato Bake

Soft vegetables baked in a smooth, savory sauce with a golden cheese topping

This comforting broccoli and potato bake combines tender vegetables with a creamy, well-seasoned sauce and a lightly golden cheese layer. It works beautifully as a main dish with a salad or as a satisfying side for family meals. Every step is simple, and the result is rich, balanced, and comforting without being heavy.


Ingredients

For the Vegetable Base

  • Broccoli – 1 large head, cut into small florets
    Provides freshness, color, and a mild earthy flavor.

  • Potatoes – 2 to 3 medium, peeled and thinly sliced
    Create structure and softness once baked.

  • Onion – 1 medium, finely diced
    Adds gentle sweetness and depth.

  • Olive oil or butter – 2 tablespoons
    Used for sautéing and flavor.

  • Salt and black pepper – to taste


For the Creamy Sauce

  • Large eggs – 3
    Help the bake set into neat slices once cooked.

  • Heavy cream or Greek yogurt – 200 ml (about ¾ cup)
    Cream gives richness; yogurt gives a lighter, slightly tangy finish.

  • Garlic powder – ½ teaspoon
    or fresh garlic – 2 cloves, finely minced

  • Paprika – ½ teaspoon
    Adds gentle warmth and color.

  • Dried herbs – 1 teaspoon
    Thyme or oregano work especially well.


For the Topping

  • Shredded cheese – 150 g (about 1½ cups)
    Mozzarella for stretch, cheddar for flavor, or a mix of both.


Equipment Needed

  • Saucepan

  • Frying pan

  • Mixing bowl

  • Whisk

  • Baking dish (round or rectangular)


Step-by-Step Instructions


1. Prepare the Oven and Vegetables

  • Preheat your oven to 375°F (190°C).

  • Bring a large pot of lightly salted water to a gentle boil.


2. Pre-Cook the Potatoes and Broccoli

  • Add the sliced potatoes to the boiling water and cook for about 5 minutes until just tender.

  • Add the broccoli florets to the same pot during the last 2 minutes.

  • Drain everything thoroughly and set aside.

This step ensures the vegetables finish cooking evenly in the oven.


3. Cook the Onion

  • Heat the olive oil or butter in a pan over medium heat.

  • Add the diced onion and cook gently for 4–5 minutes, stirring occasionally, until soft and lightly golden.

  • Remove from heat.


4. Layer the Vegetables

  • Lightly grease your baking dish.

  • Arrange the potatoes and broccoli evenly in the dish.

  • Scatter the cooked onions throughout the layers.

  • Season lightly with salt and black pepper.


5. Make the Creamy Sauce

  • In a medium bowl, add the eggs, cream (or yogurt), garlic, paprika, and dried herbs.

  • Whisk until smooth, well blended, and lightly airy.


6. Bake the Dish

  • Pour the sauce evenly over the vegetables.

  • Gently tap the dish on the counter to help the sauce settle.

  • Cover with foil and bake for 20 minutes.


7. Add the Cheese Topping

  • Remove the foil.

  • Sprinkle the shredded cheese evenly over the surface.

  • Return to the oven uncovered and bake for 10–15 minutes, until the cheese is melted and lightly golden.


8. Rest and Serve

  • Remove from the oven and let the bake rest for 5 minutes.

  • This helps the layers settle and makes slicing easier.

  • Cut into portions and serve warm.


Serving Suggestions

  • Serve with a fresh green salad

  • Pair with roasted vegetables or crusty bread

  • Enjoy as a main dish or hearty side


Storage Tips

  • Store covered in the refrigerator for up to 3 days

  • Reheat gently in the oven or microwave until warmed through

Pan-Cooked Cheese and Potato Bread

Pan-Cooked Cheese and Potato Bread

Soft flatbread filled with creamy potato and melted cheese, cooked gently in a frying pan

This cheese and potato bread is made with a simple milk-based dough and cooked slowly in a frying pan until soft inside and lightly golden outside. The filling is smooth, comforting, and stretchy, making this bread perfect for breakfast, snacks, or a light meal.


Ingredients

For the Soft Bread Dough

  • Strong (bread) flour – 90 g
    Gives the bread structure while keeping it tender.

  • Milk – 55 g (about 4 tablespoons)
    Adds moisture and softness.

  • Unsalted butter – 10 g, melted
    Adds richness and flavor.

  • Salt – a small pinch
    Balances the taste.


For the Filling

  • Boiled potato – 1 medium, mashed until smooth
    Creates a soft, creamy center.

  • Shredded cheese – 80–100 g
    Mozzarella, mild cheddar, or a melting cheese works best.

  • Salt – a small pinch (optional)

  • Black pepper – optional, to taste


Equipment Needed

  • Mixing bowl

  • Spoon or spatula

  • Rolling pin or bottle

  • Non-stick frying pan with lid


Step-by-Step Instructions


1. Prepare the Dough

  1. In a bowl, add the flour and salt.

  2. Pour in the milk and melted butter.

  3. Mix with a spoon until a soft dough forms.

  4. Transfer to a clean surface and knead gently for 2–3 minutes until smooth.

The dough should feel soft, pliable, and not sticky.


2. Rest the Dough

  • Cover the dough and let it rest for 10 minutes.

  • This relaxes the dough and makes it easier to roll.


3. Prepare the Filling

  1. Mash the boiled potato until completely smooth.

  2. Add the shredded cheese and mix gently.

  3. Season lightly with salt and pepper if desired.

The filling should be thick and creamy, not runny.


4. Shape the Bread

  1. Roll the dough into a thin circle (about 18–20 cm wide).

  2. Spread the potato and cheese mixture evenly over the surface.

  3. Fold the dough inward from the edges to enclose the filling, forming a flat round shape.

  4. Gently flatten with your hands.


5. Cook in the Frying Pan

  1. Heat a non-stick frying pan over low to medium heat.

  2. Place the filled bread into the pan.

  3. Cover with a lid and cook for 4–5 minutes until the bottom is lightly golden.

  4. Flip carefully, cover again, and cook the other side for another 4–5 minutes.

Cooking slowly allows the cheese to melt fully and the bread to cook evenly.


6. Serve

  • Remove from the pan and let rest for 1–2 minutes.

  • Cut into wedges and serve warm.


Serving Ideas

  • Enjoy plain as a comforting snack

  • Serve with yogurt, sour cream, or a fresh salad

  • Pair with soup or tea for a simple meal


Storage Tips

  • Best enjoyed fresh and warm

  • Can be refrigerated for 1 day

  • Reheat gently in a frying pan for best texture

Crispy Potato and Tuna Tortilla Pockets

Crispy Potato and Tuna Tortilla Pockets

Warm, comforting tortilla pockets with a creamy filling and golden exterior

These tortilla pockets are filled with a smooth potato and tuna mixture, folded with melted cheese, and cooked until lightly golden on the outside. They are easy to prepare, satisfying, and perfect for lunch, snacks, or a simple dinner. The filling is soft and flavorful, while the tortillas provide a pleasant contrast in texture.


Ingredients

For the Filling

  • 1 large potato, boiled and mashed until smooth
    Forms the soft, comforting base of the filling.

  • Cream cheese – 1 tablespoon
    Adds creaminess and helps the filling blend smoothly.

  • Canned tuna – 1 can, well drained
    Provides protein and mild flavor.

  • Hard-boiled egg – 1, finely chopped
    Adds richness and texture.

  • Canned corn – 2 to 3 tablespoons, drained
    Brings gentle sweetness and color.

  • Fresh parsley – 2 tablespoons, chopped
    Adds freshness and aroma.

  • Chopped olives and gherkins (pickles) – a small handful
    Give balance and mild tang.

  • Salt and black pepper – optional, to taste


For Assembly and Cooking

  • Small tortillas – 4 to 6 (flour or corn)
    Soft tortillas work best for folding.

  • Shredded cheese – 1 cup (mozzarella or cheddar)
    Melts smoothly and adds richness.

  • Melted butter or olive oil – 2 tablespoons
    Helps the tortillas turn golden when cooked.

  • Optional seasoning:
    A small pinch of paprika or garlic powder for added flavor.


Equipment Needed

  • Mixing bowl

  • Spoon or spatula

  • Skillet, oven, or air fryer

  • Pastry brush (or spoon)


Step-by-Step Instructions


1. Prepare the Filling

  • While the potato is still warm, place it in a medium bowl.

  • Add the cream cheese and mix until completely smooth and well combined.

  • Add the tuna, chopped egg, corn, parsley, olives, and gherkins.

  • Stir gently until everything is evenly mixed.

  • Season lightly with salt and black pepper if desired.

The filling should be creamy, soft, and easy to spread.


2. Assemble the Tortilla Pockets

  • Place a tortilla flat on a clean surface.

  • Spoon 2–3 tablespoons of the filling onto one half of the tortilla.

  • Sprinkle a generous layer of shredded cheese over the filling.


3. Fold the Tortillas

  • Fold the tortilla over to form a half-moon shape.

  • Press gently along the edges to help it stay closed during cooking.

  • Repeat with the remaining tortillas.


4. Prepare the Exterior

  • In a small bowl, mix the melted butter or olive oil with the optional paprika or garlic powder.

  • Lightly brush both sides of each folded tortilla.

  • This helps the outside cook evenly and develop a light golden color.


5. Cook the Tortilla Pockets

Stovetop Method

  • Heat a dry skillet over medium heat.

  • Place the tortillas in the pan and cook for 2–3 minutes per side, until the cheese has melted and the outside is lightly golden.

Oven or Air Fryer Method

  • Preheat oven or air fryer to 400°F (200°C).

  • Arrange tortillas in a single layer.

  • Air fry for 5–7 minutes or bake for 10 minutes, turning once halfway through.


6. Serve

  • Remove from heat and let rest for a minute before serving.

  • Serve warm with sour cream, yogurt, salsa, or a fresh green salad on the side.


Storage and Reheating Tips

  • Best enjoyed fresh and warm

  • Refrigerate leftovers in a covered container for up to 2 days

  • Reheat in a skillet or air fryer to restore texture

Creamy Caramel and Nut Chocolate Domes

Creamy Caramel and Nut Chocolate Domes

Smooth chocolate shells filled with rich caramel and crunchy nuts

These elegant chocolate domes combine a silky chocolate shell with a creamy caramel center and finely chopped nuts. They are perfect for special occasions, gifting, or whenever you want a dessert that looks impressive but is made with simple ingredients and thoughtful steps.


Ingredients

For the Caramel Filling

  • Granulated sugar – 250 g (about 1¼ cups)
    Forms the base of the caramel with deep sweetness.

  • Unsalted butter – 65 g (about 4½ tablespoons)
    Adds richness and smooth texture.

  • Heavy cream – 200 ml (about ¾ cup + 2 tablespoons)
    Creates a creamy, soft caramel consistency.


For the Chocolate Shells

  • Semi-sweet or milk chocolate – 160 g (5.6 oz)
    Choose good-quality chocolate for smooth shells and clean flavor.

  • Sunflower oil – 30 g (about 2 tablespoons)
    Helps the chocolate remain glossy and easy to bite.


For the Filling Add-in

  • Chopped nuts – 60 g (2 oz)
    Peanuts, hazelnuts, or walnuts work especially well. Chop finely for even texture.


Equipment Needed

  • Heavy-bottomed saucepan

  • Silicone dome mold

  • Heat-safe bowls

  • Whisk or spatula

  • Spoon or pastry brush


Step-by-Step Instructions


1. Make the Caramel Filling

  1. Place the sugar in a heavy-bottomed saucepan.

  2. Heat over medium heat and allow the sugar to melt naturally.

  3. As the sugar liquefies, gently swirl the pan occasionally to help it melt evenly.

  4. Continue heating until the sugar becomes a smooth amber-colored liquid.

  5. Add the butter and whisk until fully blended and smooth.

  6. Slowly pour in the cream while whisking continuously until the mixture becomes unified and glossy.

  7. Allow the caramel to cook gently for 2–3 minutes, stirring occasionally, until it thickens slightly.

  8. Remove from heat and stir in the chopped nuts until evenly distributed.

  9. Transfer the caramel to a bowl and let it cool completely.

    • The finished caramel should be thick, smooth, and easy to spoon or pipe.


2. Prepare the Chocolate Coating

  1. Place the chocolate in a heat-safe bowl.

  2. Melt it gently using a double boiler or microwave in 30-second intervals, stirring between each interval until smooth.

  3. Stir in the sunflower oil until fully combined.

    • This step ensures a smooth finish, soft bite, and professional shine.


3. Form the Chocolate Domes

  1. Spoon a small amount of melted chocolate into each cavity of the silicone mold.

  2. Use the back of a spoon or a pastry brush to spread the chocolate evenly across the base and up the sides.

  3. Place the mold in the freezer for 5–10 minutes until the chocolate firms up.

  4. If desired, apply a second thin layer of chocolate for extra strength.

  5. Chill again until set.


4. Fill and Seal the Domes

  1. Spoon or pipe the cooled caramel into each chocolate shell.

  2. Leave a small space at the top so the domes can be sealed neatly.

  3. Cover the caramel with the remaining melted chocolate, smoothing the surface with a spatula.

  4. Place the mold in the refrigerator or freezer for at least 30 minutes, until completely firm.


5. Unmold and Finish

  1. Gently release the domes from the silicone mold.

  2. Arrange on a serving plate.

Optional finishing touches:

  • Drizzle with extra melted chocolate

  • Sprinkle with finely crushed nuts

  • Dust lightly with cocoa powder


Storage Tips

  • Store in an airtight container

  • Keep refrigerated for up to 7 days

  • Bring to room temperature before serving for best texture and flavor

Cheesy Baked Potato Casserole

Cheesy Baked Potato Casserole

Creamy • Comforting • Oven-Baked

Servings: 6–8
Prep Time: 15 minutes
Bake Time: 25–30 minutes

Ingredients

Potatoes

  • 2 lbs (about 1 kg) Yukon Gold or Russet potatoes

  • Peeled and sliced into rounds or cut into cubes

Cream Sauce

  • 1½ cups heavy cream

  • 2 garlic cloves, finely minced

  • 1 teaspoon salt

  • ½ teaspoon black pepper

Cheese

  • 2 cups shredded cheddar or mozzarella cheese

Topping

  • ½ cup cooked and crumbled bacon

  • ¼ cup freshly chopped dill or chives


Instructions

1. Boil the Potatoes

  1. Place the sliced or cubed potatoes into a large pot.

  2. Cover with salted water.

  3. Bring to a boil and cook for 8–10 minutes, just until slightly tender.

  4. Drain well and set aside.


2. Prepare the Baking Dish

  1. Preheat oven to 375°F (190°C).

  2. Lightly grease a baking dish.


3. Layer the Casserole

  1. Arrange half of the potatoes evenly in the baking dish.

  2. Sprinkle with half of the cheese and half of the bacon.

  3. Add the remaining potatoes on top.


4. Add the Cream Sauce

  1. In a bowl, whisk together the cream, garlic, salt, and black pepper.

  2. Pour evenly over the layered potatoes.


5. Bake

  1. Sprinkle the remaining cheese over the top.

  2. Bake uncovered for 25–30 minutes, until the sauce is bubbling and the top is golden.


6. Garnish and Serve

  • Sprinkle with fresh dill or chives before serving.

  • Serve warm as a side dish or main course.

Homemade Flaky Green Onion & Spinach Flatbread

Homemade Flaky Green Onion & Spinach Flatbread

This recipe creates a beautiful, multi-layered bread similar to a scallion pancake or paratha.

Ingredients

  • Dough:

    • 550g (4 1/5 cups) Flour

    • 300ml (1 1/2 cups) Warm water

    • 1 Egg

    • 1 tsp (7g) Salt

  • Filling:

    • 40g Green onions, chopped

    • 50g Fresh spinach, chopped

    • 1/2 tsp Salt

    • 1/2 tsp Red pepper flakes

    • Oil or melted butter (for brushing between layers)

Instructions

  1. Make the Dough: In a large bowl, whisk the egg into the warm water and salt. Gradually add the flour and knead until a smooth, soft dough forms. Cover and let it rest for 20 minutes to relax the gluten.

  2. Prepare Filling: Mix the chopped onions, spinach, salt, and red pepper in a small bowl.

  3. Shape & Layer: Divide the dough into equal portions. Roll one piece out into a very thin rectangle. Brush the surface lightly with oil or butter and sprinkle a generous amount of the green filling over it.

  4. Create Flakiness: Roll the dough up tightly into a long rope, then coil that rope into a spiral (like a snail shell). Flatten the spiral gently with your hand or a rolling pin. This creates the “swirled” layers seen in the photo.

  5. Cook: Heat a lightly oiled skillet over medium heat. Fry each flatbread for 3–4 minutes per side until golden brown and crispy on the outside.


Lemon, Ginger & Turmeric Immune Tonic

A refreshing and simple infusion to support your daily hydration.

Ingredients

  • 3 slices Fresh lemon

  • 2–3 slices Raw ginger

  • 1 pinch Ground turmeric or fresh root

  • 1 dash Black pepper (optional, helps with turmeric absorption)

  • Warm water

Instructions

  1. Place the lemon, ginger, and turmeric into a mug.

  2. Pour warm water over the ingredients.

  3. Let steep for 5 minutes and sip slowly.


Simple Clove Water

Ingredients

  • 3–5 Whole cloves

  • 1 cup Water

Instructions

  1. Cold Method: Place cloves in water and let sit overnight in the fridge.

  2. Hot Method: Steep cloves in hot water for 10 minutes, then remove the cloves before drinking.