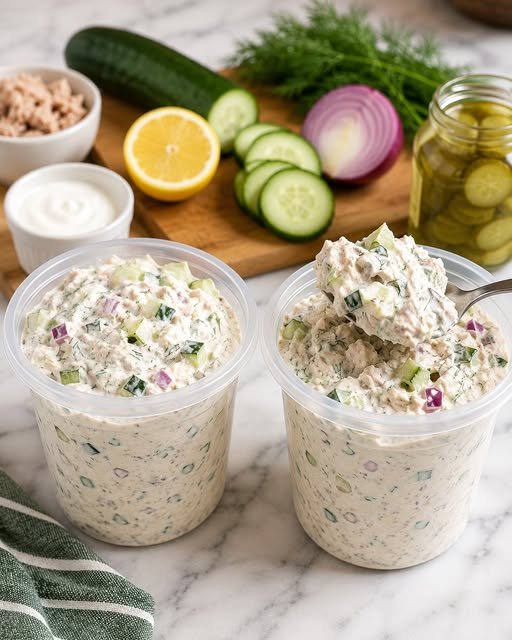
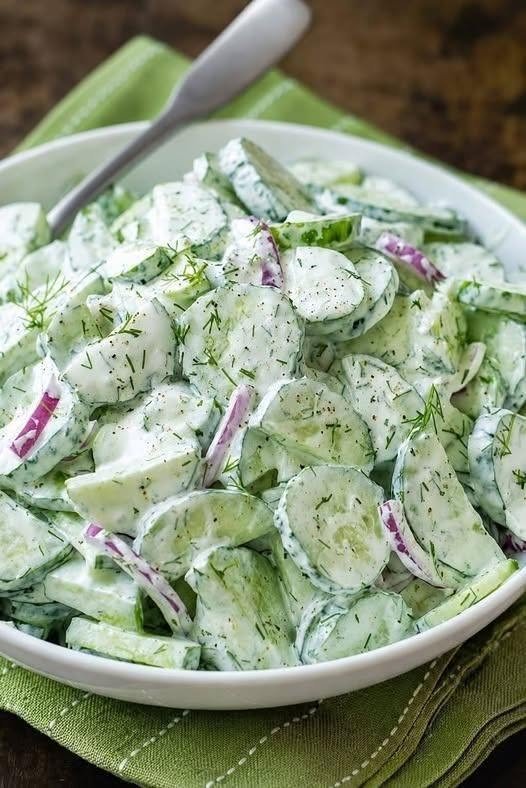
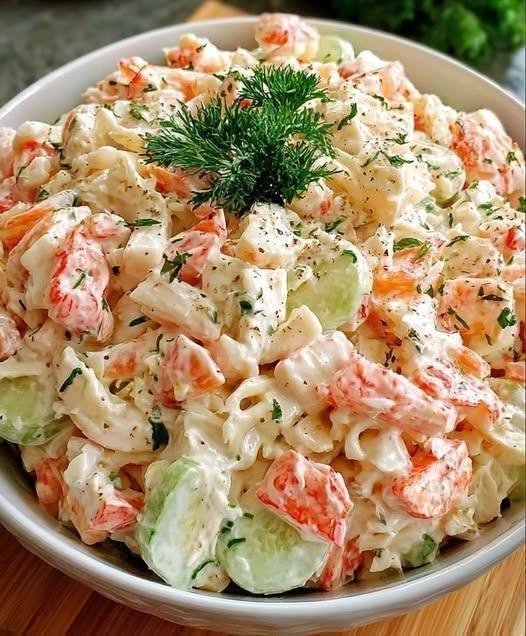
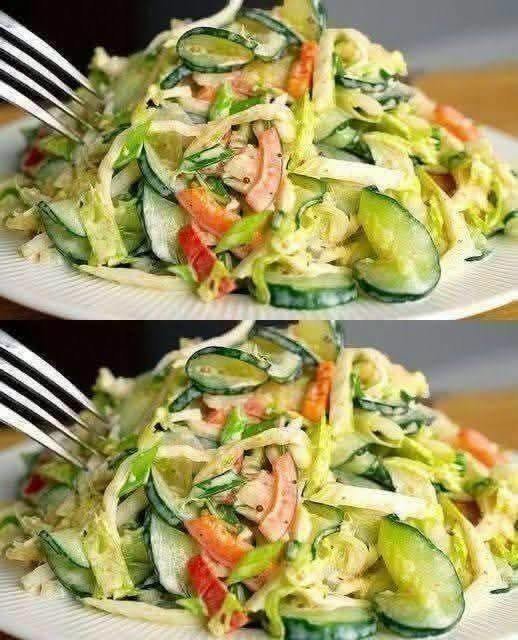
Creamy Pea & Bacon Salad

Creamy Pea & Bacon Salad

Ingredients

  • 4 cups green peas (thawed)
  • 1 cup shredded cheddar cheese
  • 1/2 cup red onion, diced
  • 6 slices bacon, cooked and crumbled
  • 2 hard-boiled eggs, chopped
  • 3/4 cup mayonnaise
  • 1/4 cup sour cream
  • 1 tablespoon apple cider vinegar
  • Salt and black pepper to taste

Instructions

Step 1: Prepare the Peas

  • Thaw the peas if frozen.
  • Drain any excess water and pat dry.

Step 2: Cook the Bacon

  • Cook bacon in a skillet until crispy.
  • Allow it to cool, then crumble into small pieces.

Step 3: Mix the Salad

  • In a large bowl, combine peas, cheddar cheese, red onion, chopped eggs, and bacon.

Step 4: Make the Dressing

  • In a small bowl, whisk together mayonnaise, sour cream, apple cider vinegar, salt, and black pepper until smooth.

Step 5: Combine Everything

  • Pour the dressing over the pea mixture.
  • Stir gently until all ingredients are evenly coated.

Step 6: Chill

  • Cover the bowl and refrigerate for at least 1 hour.

Step 7: Serve

  • Garnish with extra bacon and cheese if desired.
  • Serve cold.

Q & A

Can I make this salad ahead of time?
Yes, it can be prepared a day in advance and stored in the refrigerator.

How long will it keep?
It stays fresh for up to 3 days in an airtight container in the refrigerator.

Can I use turkey bacon instead?
Yes, turkey bacon is a good substitute.

Nutritional Benefits

  • Peas are a good source of fiber and plant-based protein.
  • Eggs provide high-quality protein and essential nutrients.
  • Cheddar cheese adds calcium and protein.
  • This salad is filling and suitable as a side dish or light meal.

Loaded Ranch Pasta Salad

Loaded Ranch Pasta Salad

Ingredients

Salad

  • 16 oz rotini pasta
  • 1 cup cheddar cheese, cubed
  • 1 cup salami or ham, diced
  • 1 cup cherry tomatoes, halved
  • 1/2 cup red onion, finely diced
  • 1 cup dill pickles, chopped
  • 1/2 cup banana pepper rings
  • 6 slices bacon, cooked and crumbled

Dressing

  • 1 cup mayonnaise
  • 1 cup sour cream
  • 1 packet ranch seasoning mix
  • 1/4 cup pickle juice

Instructions

1. Cook the Pasta

Cook the rotini according to package directions until al dente.

Drain and rinse under cold water.

Allow the pasta to cool completely.

2. Make the Dressing

In a large bowl, whisk together:

  • Mayonnaise
  • Sour cream
  • Ranch seasoning
  • Pickle juice

Mix until smooth and creamy.

3. Add the Ingredients

Add to the bowl:

  • Cooked pasta
  • Cheddar cheese
  • Salami or ham
  • Cherry tomatoes
  • Red onion
  • Pickles
  • Banana peppers

Mix until everything is evenly coated.

4. Chill

Cover and refrigerate for at least 1 hour.

This allows the flavors to blend together.

5. Finish and Serve

Sprinkle the crumbled bacon over the top just before serving.

Serve cold.


Q&A

Can I make it ahead of time?
Yes. It tastes even better after chilling overnight.

Can I use a different cheese?
Yes. Colby Jack, Monterey Jack, or mozzarella work well.

How long does it last?
Store covered in the refrigerator for up to 4 days.


Nutritional Benefits

  • Good source of protein from cheese and meat
  • Contains calcium from dairy products
  • Provides energy from pasta
  • Great for potlucks, picnics, and meal prep

Creamy Hawaiian Fruit Salad

Ingredients

  • 2 cups whipped topping
  • 8 oz cream cheese, softened
  • 2 cups pineapple chunks
  • 1 cup strawberries, chopped
  • 1 cup green grapes
  • 1 cup mandarin oranges
  • 1 cup mini marshmallows
  • 1 cup shredded coconut

Instructions

➡️ In a large bowl, beat the cream cheese until smooth and creamy.

➡️ Fold in the whipped topping and mix until well combined.

➡️ Add the pineapple chunks, strawberries, grapes, and mandarin oranges.

➡️ Stir in the mini marshmallows and shredded coconut.

➡️ Gently fold everything together until all the fruit is coated in the creamy mixture.

➡️ Cover the bowl and chill in the refrigerator for at least 1 hour.

➡️ Give the salad a gentle stir before serving.

➡️ Garnish with extra fruit and coconut if desired.

Q&A

Q: Can I make this ahead of time?
A: Yes, it can be made up to 24 hours in advance.

Q: Can I use different fruits?
A: Absolutely! Kiwi, blueberries, and mango work great.

Q: How long will it stay fresh?
A: Up to 2 days in the refrigerator. 🍍🍓🍇🥥🍨

Creamy Cucumber Salad

Creamy Cucumber Salad

Ingredients

  • 2 large cucumbers, thinly sliced
  • ¼ red onion, finely diced
  • ½ cup sour cream or Greek yogurt
  • 1 tbsp fresh dill, chopped
  • 1 tbsp lemon juice
  • Salt, to taste
  • Black pepper, to taste

Instructions

🥒 Step 1:

Wash the cucumbers thoroughly and slice them into thin rounds.

🔪 Step 2:

Finely dice the red onion and set aside.

🥣 Step 3:

In a large mixing bowl, combine the sour cream (or Greek yogurt), lemon juice, salt, and black pepper.

🌿 Step 4:

Add the chopped fresh dill and stir until the dressing is smooth and well mixed.

🥒 Step 5:

Add the sliced cucumbers and diced onion to the bowl.

🥄 Step 6:

Gently toss everything together until all the cucumber slices are evenly coated with the creamy dressing.

❄️ Step 7:

Cover and refrigerate for 15–20 minutes to allow the flavors to blend.

🌿 Step 8:

Before serving, sprinkle a little extra dill on top for freshness.

🍽️ Step 9:

Serve chilled as a refreshing side dish with grilled chicken, fish, or your favorite meal.

Q & A

Q: Can I make this salad ahead of time?
A: Yes, but it is best enjoyed within 24 hours for maximum freshness.

Q: Can I use dried dill instead of fresh?
A: Yes, use about 1 teaspoon of dried dill in place of fresh dill.

Q: How do I keep the salad from becoming watery?
A: Lightly salt the cucumber slices and let them sit for 10 minutes, then pat dry before mixing.

Avocado Cucumber Salad

Ingredients

  • 2 ripe avocados, diced
  • 2 cucumbers, chopped
  • ¼ red onion, thinly sliced
  • 2 tbsp fresh parsley or cilantro, chopped
  • 2 tbsp olive oil
  • 1 tbsp lemon juice
  • ½ tsp salt
  • ¼ tsp black pepper

👩‍🍳 Step-by-Step Instructions

1️⃣ Prepare the Vegetables

  • Wash the cucumbers and herbs.
  • Dice the avocados into bite-sized cubes.
  • Chop the cucumbers.
  • Thinly slice the red onion.

2️⃣ Make the Dressing

  • In a small bowl, mix olive oil, lemon juice, salt, and black pepper.
  • Stir until combined.

3️⃣ Assemble the Salad

  • Add cucumbers, avocado, onion, and herbs to a large bowl.
  • Pour the dressing over the salad.

4️⃣ Toss Gently

  • Mix carefully so the avocado stays in chunks.
  • Coat everything evenly with the dressing.

5️⃣ Serve

  • Serve immediately while fresh.
  • Enjoy as a side dish or light lunch.

🌟 Nutritional Benefits

  • Rich in healthy fats from avocado.
  • Good source of fiber.
  • Contains vitamins C, K, and potassium.
  • Naturally low in added sugar.
  • Fresh and hydrating.

Classic Creamy Coleslaw

Ingredients

  • 1 small green cabbage, shredded
  • 1 cup carrots, shredded
  • ½ cup purple cabbage, shredded
  • 2 celery stalks, finely chopped
  • ¾ cup mayonnaise
  • 1 tbsp apple cider vinegar
  • 1 tbsp sugar
  • ½ tsp salt
  • ½ tsp black pepper

👩‍🍳 Step-by-Step Instructions

1️⃣ Prepare the Vegetables

  • Shred the green cabbage into thin strips.
  • Shred the carrots.
  • Slice the purple cabbage.
  • Finely chop the celery.

2️⃣ Make the Dressing

  • In a bowl, combine mayonnaise, vinegar, sugar, salt, and black pepper.
  • Whisk until smooth and creamy.

3️⃣ Combine Everything

  • Add all vegetables to a large mixing bowl.
  • Pour the dressing over the vegetables.
  • Toss well until everything is evenly coated.

4️⃣ Chill

  • Cover and refrigerate for at least 1 hour.
  • This allows the flavors to blend and the cabbage to soften slightly.

5️⃣ Serve

  • Stir before serving.
  • Enjoy cold as a side dish.

🌟 Why You’ll Love It

  • Crunchy and creamy
  • Easy to make
  • Perfect for BBQs and picnics
  • Fresh and flavorful
  • Great make-ahead side dish

❓Q&A

Q: Can I make it ahead of time?
✅ Yes! It’s even better after chilling for a few hours.

Q: How long does it last?
✅ Up to 3 days in the refrigerator.

Q: Can I use Greek yogurt instead of mayonnaise?
✅ Yes, for a lighter version.

⏱️ Prep Time: 15 minutes
❄️ Chill Time: 1 hour
🍽️ Servings: 6–8

🥕 Nutritional Benefits

  • Rich in fiber from cabbage and carrots.
  • Contains vitamins C and K.
  • Low-cost and budget-friendly.
  • A fresh side dish that pairs well with grilled meats, sandwiches, and burgers. 🥗✨

Creamy Bacon Pea Salad

This Creamy Bacon Pea Salad is a rich, refreshing, and crowd-pleasing side dish packed with vibrant flavors and satisfying textures. Sweet green peas are combined with crispy bacon, sharp cheddar cheese, and crunchy red onions, all tossed in a creamy, tangy dressing. It’s the perfect balance of creamy, savory, and slightly sweet, making it ideal for picnics, potlucks, or quick family meals. This no-cook recipe comes together in minutes and gets even better as it chills, allowing the flavors to blend beautifully. It’s a classic comfort salad that’s both simple and incredibly delicious.

Ingredients

Main Ingredients:

  • 4 cups frozen green peas (thawed)
  • 6 slices bacon, cooked and crumbled
  • 1 cup shredded cheddar cheese
  • ½ cup red onion, finely chopped

Creamy Dressing:

  • ¾ cup mayonnaise
  • 2 tbsp sour cream
  • 1 tbsp apple cider vinegar or lemon juice
  • 1 tsp sugar

Seasoning:

  • ½ tsp salt
  • ½ tsp black pepper

Optional Add-ins:

  • 2 hard-boiled eggs, chopped
  • 1 tbsp fresh dill or parsley

Instructions

  1. Prepare peas: Thaw frozen peas completely and pat dry to remove excess moisture.
  2. Cook bacon: Fry bacon until crispy, then crumble into small pieces.
  3. Mix dressing: In a bowl, whisk together mayonnaise, sour cream, vinegar, sugar, salt, and pepper until smooth.
  4. Combine ingredients: In a large bowl, add peas, bacon, shredded cheese, and chopped red onion.
  5. Add dressing: Pour the creamy dressing over the mixture and gently stir until evenly coated.
  6. Chill: Cover and refrigerate for at least 1 hour to enhance flavor.
  7. Serve: Stir before serving and garnish with extra bacon or herbs if desired.

Tips, Notes & Q&A

  • Make sure peas are fully thawed and dry to avoid watery salad.
  • For extra crunch, add chopped celery or nuts.
  • Use Greek yogurt instead of sour cream for a lighter version.
  • Adjust sweetness by adding more or less sugar based on taste.

Q: Can I make it ahead of time?
A: Yes, it tastes even better after a few hours in the fridge.

Q: How long does it last?
A: Store in an airtight container in the refrigerator for up to 3 days.

Q: Can I use fresh peas?
A: Yes, just blanch them briefly and cool before using.

Q: Is it keto-friendly?
A: It can be with reduced peas and full-fat dressing adjustments.

Servings & Nutrition (Approx.)

  • Servings: 6
  • Calories: ~320 kcal per serving
  • Protein: 10 g
  • Fat: 24 g
  • Carbohydrates: 14 g

Creamy Crab & Cucumber Salad

Creamy Crab & Cucumber Salad

🛒 Ingredients

  • 250 g imitation crab sticks, shredded
  • 2 cucumbers, diced
  • ½ cup mayonnaise
  • 1 tbsp lemon juice
  • 1 tbsp fresh dill, chopped
  • Salt, to taste
  • Black pepper, to taste

👩‍🍳 Step-by-Step Instructions

🥒 Step 1:
Wash the cucumbers thoroughly and cut them into small bite-sized cubes.

🦀 Step 2:
Shred the crab sticks into thin strips using your hands or a fork.

🥣 Step 3:
Place the shredded crab and diced cucumbers into a large mixing bowl.

🌿 Step 4:
Add the chopped fresh dill and gently mix to distribute evenly.

🥄 Step 5:
In a separate bowl, combine mayonnaise, lemon juice, salt, and black pepper. Stir until smooth and creamy.

➡️ Step 6:
Pour the dressing over the crab and cucumber mixture.

🥗 Step 7:
Gently toss everything together until all ingredients are evenly coated with the dressing.

❄️ Step 8:
Cover and refrigerate for 15–20 minutes to allow the flavors to blend.

🍽️ Step 9:
Serve chilled and garnish with extra dill and a sprinkle of black pepper.

❓Q & A

Q: Can I use real crab meat instead of imitation crab?
A: Yes! Real crab meat adds a richer seafood flavor and works wonderfully.

Q: How long can I store this salad?
A: Store in an airtight container in the refrigerator for up to 2 days.

Q: Can I prepare it in advance?
A: Yes, making it a few hours ahead actually helps the flavors develop even more.

Creamy Crab & Cucumber Salad

Creamy Crab & Cucumber Salad

Ingredients

  • 250 g imitation crab sticks, shredded
  • 2 cucumbers, diced
  • ½ cup mayonnaise
  • 1 tbsp lemon juice
  • 1 tbsp fresh dill, chopped
  • Salt, to taste
  • Black pepper, to taste

Instructions

🥒 Step 1:
Wash and dice the cucumbers into small bite-sized pieces.

🦀 Step 2:
Shred the crab sticks into thin strips and place them in a large mixing bowl.

🥒 Step 3:
Add the diced cucumbers and fresh dill to the bowl.

🥣 Step 4:
In a small bowl, mix mayonnaise, lemon juice, salt, and black pepper until smooth.

➡️ Step 5:
Pour the dressing over the crab and cucumber mixture.

🥄 Step 6:
Gently toss everything together until evenly coated.

❄️ Step 7:
Refrigerate for 15–20 minutes before serving for the best flavor.

🍽️ Step 8:
Serve chilled and garnish with extra dill and black pepper if desired.

Q & A

Q: Can I use real crab meat?
A: Yes, real crab meat works perfectly in this recipe.

Q: How long does it last in the refrigerator?
A: Up to 2 days in an airtight container.

Q: Can I make it ahead of time?
A: Yes, prepare it a few hours ahead and keep it chilled until serving.

Crunchy Romaine Parmesan Salad

Crunchy Romaine Parmesan Salad

A fresh, crisp, and flavorful salad loaded with crunchy romaine lettuce, juicy tomatoes, savory Parmesan cheese, and toasted nuts, all tossed in a light lemon-honey dressing. Perfect as a side dish or a light meal!

⏱️ Prep Time

10 minutes

🍽️ Servings

4 servings


🛒 Ingredients

For the Salad

  • 4 cups romaine lettuce, chopped 🥬
  • ½ cup Parmesan cheese, shaved or grated 🧀
  • ½ cup almonds or walnuts, roughly chopped 🌰
  • ½ cup cherry tomatoes, halved 🍅
  • 2 tbsp red onion, thinly sliced 🧅

For the Dressing

  • 2 tbsp olive oil
  • 1 tbsp fresh lemon juice 🍋
  • 1 tsp honey 🍯
  • ½ tsp black pepper
  • Salt, to taste

👩‍🍳 Instructions

1. Prepare the Lettuce

Wash the romaine lettuce thoroughly under cold water. Dry completely using a salad spinner or clean kitchen towel. Crisp, dry lettuce helps the dressing cling better.

2. Prepare the Vegetables

Slice the cherry tomatoes in half and thinly slice the red onion. Set aside.

3. Toast the Nuts (Optional)

For extra flavor, lightly toast the almonds or walnuts in a dry skillet over medium heat for 2–3 minutes until fragrant. Allow them to cool.

4. Make the Dressing

In a small bowl, whisk together the olive oil, lemon juice, honey, black pepper, and salt until smooth and well combined.

5. Assemble the Salad

In a large salad bowl, combine the romaine lettuce, cherry tomatoes, red onion, Parmesan cheese, and nuts.

6. Toss and Serve

Drizzle the dressing over the salad and toss gently until everything is evenly coated.

7. Garnish

Top with extra Parmesan cheese and a few additional nuts for added crunch and presentation.

Serve immediately and enjoy!


🌿 Nutritional Benefits

  • 🥬 Romaine Lettuce: Rich in vitamins A, K, and folate while being low in calories.
  • 🧀 Parmesan Cheese: Provides protein and calcium for bone health.
  • 🌰 Almonds/Walnuts: Packed with healthy fats, fiber, and antioxidants.
  • 🍅 Cherry Tomatoes: A great source of vitamin C and lycopene.
  • 🫒 Olive Oil: Contains heart-healthy monounsaturated fats.

💡 Variations

  • Add grilled chicken, shrimp, or salmon for a complete meal.
  • Replace Parmesan with feta or goat cheese for a different flavor.
  • Add croutons for extra crunch.
  • Include cucumber slices or avocado for more freshness.

❓ Frequently Asked Questions

Q: Can I add chicken?
A: Absolutely! Grilled chicken turns this salad into a satisfying main course.

Q: Can I use feta instead of Parmesan?
A: Yes. Feta adds a creamy, tangy flavor that pairs beautifully with the lemon dressing.

Q: Can I make it ahead of time?
A: Yes. Prepare all ingredients in advance, but keep the dressing separate and toss just before serving.

Q: What can I serve it with?
A: It pairs wonderfully with pasta, grilled chicken, fish, soup, or sandwiches.

Fresh, crunchy, and bursting with flavor, this Romaine Parmesan Salad is an easy way to elevate any meal! 🥗💚

Southern Green Beans with Bacon

Southern Green Beans with Bacon

Ingredients 🛒

  • 4 cups green beans (fresh, frozen, or canned)
  • 6 slices bacon, chopped
  • 1 small onion, diced
  • 1 cup chicken broth
  • Salt and black pepper, to taste

Detailed Steps 👩‍🍳

1️⃣ Cook the Bacon

  • Place a large skillet or pot over medium heat.
  • Add the chopped bacon.
  • Cook for 6–8 minutes, stirring occasionally, until crispy.
  • Remove half of the bacon and set aside for garnish.

2️⃣ Sauté the Onion

  • Add the diced onion to the bacon drippings.
  • Cook for 3–4 minutes until soft and lightly golden.
  • Stir frequently so the onion doesn’t burn.

3️⃣ Add the Green Beans

  • Add the green beans to the pot.
  • Stir well so they are coated with the bacon and onion mixture.

4️⃣ Pour in the Broth

  • Add the chicken broth.
  • Season with a little salt and black pepper.
  • Stir everything together.

5️⃣ Simmer

  • Bring the mixture to a gentle simmer.
  • Cover with a lid and cook for 20–25 minutes.
  • Stir occasionally.
  • The beans should become tender and absorb the smoky bacon flavor.

6️⃣ Finish the Dish

  • Remove the lid.
  • Let any excess liquid reduce for 2–3 minutes if needed.
  • Stir in the reserved crispy bacon.

7️⃣ Serve

  • Transfer to a serving bowl.
  • Spoon a little of the flavorful broth over the top.
  • Serve warm as a side dish with chicken, beef, or your favorite comfort-food meal.

Nutrition Benefits 💪

Good Source of Protein

  • Bacon and green beans provide protein to help keep you satisfied.

Rich in Fiber

  • Green beans contain fiber that supports healthy digestion.

Low-Carb Side Dish

  • Naturally lower in carbohydrates than many traditional side dishes.

Approximate Protein Content

  • Per Serving: 8–10g protein
  • Whole Recipe: 30–40g protein

Quick Q/A ❓

Can I use canned green beans?
➡️ Yes, drain them well before adding.

Can I use frozen green beans?
➡️ Yes, no need to thaw first.

Can I make this ahead of time?
➡️ Yes, it tastes even better the next day after the flavors have blended.

Zesty Cucumber & Pepper Garden Salad

Zesty Cucumber & Pepper Garden Salad

Ingredients 🛒

  • 2 large cucumbers, thinly sliced
  • 1 red bell pepper, thinly sliced
  • ½ red onion, thinly sliced
  • 2 tbsp olive oil
  • 1 tbsp fresh lemon juice
  • 1 tsp honey
  • ½ tsp salt
  • ¼ tsp black pepper
  • ½ tsp chili flakes (optional)
  • 1 tbsp fresh parsley, chopped

Detailed Steps 👩‍🍳

1️⃣ Prepare the Vegetables

  • Wash the cucumbers, bell pepper, and onion thoroughly.
  • Slice the cucumbers into thin rounds.
  • Cut the bell pepper into thin strips.
  • Slice the red onion into thin half-rings.
  • Chop the parsley finely.

2️⃣ Make the Dressing

  • In a small bowl, add olive oil, lemon juice, honey, salt, and black pepper.
  • Whisk well until the dressing looks smooth and fully combined.

3️⃣ Combine the Salad

  • Place the sliced cucumbers, bell pepper, and onion into a large mixing bowl.
  • Sprinkle the chopped parsley over the vegetables.
  • Pour the prepared dressing evenly over the top.

4️⃣ Toss Well

  • Using salad tongs or a large spoon, gently toss everything together.
  • Continue mixing for 1–2 minutes so every vegetable slice is coated with the dressing.

5️⃣ Chill for Better Flavor

  • Cover the bowl or transfer the salad to a glass container.
  • Refrigerate for 20–30 minutes.
  • Chilling helps the vegetables absorb the dressing and become more flavorful.

6️⃣ Serve

  • Give the salad one final toss before serving.
  • Serve cold as a refreshing side dish, light lunch, or healthy snack.

Quick Q/A ❓

Can I make it ahead of time?
➡️ Yes, it can be prepared up to 24 hours in advance.

Can I add cheese?
➡️ Yes, crumbled feta cheese pairs perfectly with this salad.

How long does it stay fresh?
➡️ Store in the refrigerator for up to 2 days.

Creamy Chicken Apple Salad

Ingredients

  • 3 cups cooked chicken, shredded
  • 1 red apple, diced
  • 2 celery stalks, finely chopped
  • ½ cup mayonnaise
  • 2 tbsp sour cream
  • 1 tbsp lemon juice
  • ½ tsp garlic powder
  • Salt, to taste
  • Black pepper, to taste

Instructions

Step 1

Cook and shred the chicken. Let it cool completely.

Step 2

Dice the apple into small cubes and finely chop the celery.

Step 3

In a large bowl, combine mayonnaise, sour cream, lemon juice, garlic powder, salt, and black pepper. Mix until smooth.

Step 4

Add the shredded chicken, diced apple, and celery to the bowl.

Step 5

Stir everything together until the chicken is evenly coated with the creamy dressing.

Step 6

Cover and refrigerate for 30 minutes to allow the flavors to blend.

Step 7

Serve chilled on sandwiches, croissants, lettuce wraps, crackers, or by itself.

Q&A

Can I make it ahead of time?
Yes, it can be stored in the refrigerator for up to 3 days.

Can I use rotisserie chicken?
Yes, rotisserie chicken works perfectly and saves time.

Can I add nuts?
Yes, chopped pecans or walnuts add a nice crunch.

Creamy Seafood Salad

Ingredients

  • 1 lb imitation crab meat, shredded or chopped
  • 2 celery stalks, finely diced
  • ½ cup mayonnaise
  • 1 tbsp lemon juice
  • 1 tbsp fresh dill, chopped
  • ½ tsp garlic powder
  • ½ tsp salt
  • ¼ tsp black pepper

Instructions

Step 1

  • Chop the imitation crab meat into bite-sized pieces.

Step 2

  • Finely dice the celery.

Step 3

  • In a large bowl, combine mayonnaise, lemon juice, dill, garlic powder, salt, and black pepper.

Step 4

  • Mix until smooth and creamy.

Step 5

  • Add the crab meat and celery.

Step 6

  • Stir gently until everything is evenly coated.

Step 7

  • Cover and refrigerate for at least 1 hour.

Step 8

  • Serve chilled as a salad, sandwich filling, or with crackers.

Q & A

Q: Can I use real crab meat?
A: Yes, real crab meat works perfectly in this recipe.

Q: How long does it last?
A: Store in an airtight container in the refrigerator for up to 3 days.

Q: Can I make it ahead of time?
A: Yes, it tastes even better after chilling for a few hours.

Zero-Point Cucumber “Bang Bang”

This dish is a lighter, plant-based riff on the classic “Bang Bang” flavor profile. Traditionally made with fried shrimp and mayo-heavy sauce, we’ve swapped the fats for a vinegar-based kick that highlights the crispness of the cucumber.

  • Prep time: 10 minutes

  • Servings: 2

  • Calories: ~35 kcal per serving

Ingredients

  • 2 Large English Cucumbers (hothouse cucumbers work best as they have thinner skin and fewer seeds).

  • 2 tbsp Rice Vinegar (unseasoned to keep sugar low).

  • 1 tbsp Soy Sauce (or Coconut Aminos for a gluten-free option).

  • 1 tsp Sriracha (add more if you like it hot).

  • 1 tsp Garlic, minced.

  • 1 tsp Fresh Ginger, grated.

  • Optional Garnish: Chopped scallions, red pepper flakes, or a dash of Everything Bagel seasoning.

Instructions

  1. Prep the Veg: Wash the cucumbers. You can peel them in “stripes” for a fancy look, or leave the skin on for extra fiber.

  2. The “Smash”: Place the cucumbers in a large Ziploc bag or under a piece of parchment paper. Gently whack them with a rolling pin or the flat side of a knife until they split. This creates crannies for the sauce to hide in!

  3. Chop: Cut the smashed cucumbers into bite-sized, irregular chunks.

  4. Whisk the Sauce: In a small bowl, combine the rice vinegar, soy sauce, Sriracha, garlic, and ginger.

  5. Toss: Pour the dressing over the cucumbers and toss well. Let it sit for at least 5 minutes before serving to allow the flavors to penetrate.

Nutrition Information (Per Serving)

Metric Amount
Calories 35 kcal
Protein 1.5g
Total Fat 0.2g
Carbohydrates 7g
Fiber 1.5g
Sodium ~350mg (Variable based on soy sauce)

Benefits

  • Hydration: Cucumbers are about 95% water, making this a great snack for skin health and recovery.

  • Metabolism Boost: The capsaicin in Sriracha and the thermogenic properties of ginger provide a tiny metabolic nudge.

  • Volume Eating: You can eat a massive portion of this for very few calories, helping you feel full and satisfied.

Tips for Success

  • Salt First: If you have time, salt the cucumber chunks and let them sit in a colander for 10 minutes, then rinse and pat dry. This draws out excess water so your sauce doesn’t get diluted.

  • Cold is Gold: Keep your cucumbers in the fridge until the very second you are ready to prep. This dish is best served ice-cold.

  • Add “Weight”: If you aren’t worried about the “Zero Point” status, adding a teaspoon of toasted sesame oil adds a massive depth of flavor.

Q&A

Q: Can I make this ahead of time?

A: You can, but it’s best within the first hour. Cucumbers release water over time, so if it sits overnight, it will become “Cucumber Soup.”

Q: Is this keto-friendly?

A: Yes! It is very low-carb. Just ensure your Sriracha doesn’t have added sugar (or use hot sauce/chili flakes instead).

Q: Can I use regular cucumbers?

A: You can, but I recommend peeling them and scooping out the seeds with a spoon first, as regular garden cucumbers can be bitter and watery.

Marinated Cucumber Onion Salad

Ingredients

  • 2 large cucumbers, thinly sliced
  • 1 medium white onion, thinly sliced
  • 1 cup cold water
  • ½ cup white vinegar
  • 2 tbsp sugar
  • 1 tsp salt
  • ½ tsp black pepper

Instructions

Step 1

  • Wash the cucumbers and slice them into thin rounds.
  • Slice the onion into thin rings.

Step 2

  • Place the cucumbers and onions in a large container or bowl.

Step 3

  • In a separate bowl, whisk together water, vinegar, sugar, salt, and black pepper until the sugar dissolves.

Step 4

  • Pour the mixture over the cucumbers and onions.

Step 5

  • Cover and refrigerate for at least 2 hours.

Step 6

  • Stir gently before serving.

Step 7

  • Serve chilled as a refreshing side dish.

Q & A

Q: Can I make this ahead of time?
A: Yes, it tastes even better after chilling overnight.

Q: How long will it keep?
A: Store covered in the refrigerator for up to 5 days.

Q: Can I add fresh herbs?
A: Yes, dill or parsley adds extra flavor.

Creamy Celery Salad

Creamy Celery Salad

Ingredients

  • 6 cups celery, thinly sliced
  • ½ cup mayonnaise
  • 2 tbsp lemon juice
  • 1 tsp salt
  • Black pepper (optional)

Instructions

Step 1

  • Wash and dry the celery.
  • Trim the ends and slice into thin pieces.

Step 2

  • In a medium bowl, combine mayonnaise, lemon juice, and salt.
  • Mix until smooth.

Step 3

  • Add the sliced celery to the bowl.
  • Stir gently until all the celery is evenly coated.

Step 4

  • Cover and refrigerate for at least 30 minutes.

Step 5

  • Stir gently before serving.
  • Sprinkle with black pepper if desired.

Q & A

Q: Can I make this ahead of time?
A: Yes, it tastes even better after chilling for a few hours.

Q: How long does it last?
A: Store covered in the refrigerator for up to 2 days.

Q: What can I serve with it?
A: It pairs well with grilled chicken, sandwiches, steak, pork chops, or fresh vegetables.

Cucumber Tea Sandwiches

Ingredients

  • 8 slices soft white bread
  • 1 cucumber, thinly sliced
  • 4 oz (115 g) cream cheese, softened
  • 1 tbsp fresh dill, finely chopped
  • 1 tbsp mayonnaise
  • Salt and black pepper to taste

Instructions

Step 1: Prepare the Filling

  • In a bowl, mix cream cheese, mayonnaise, dill, salt, and pepper until smooth.

Step 2: Prepare the Bread

  • Remove the crusts from the bread slices.
  • Flatten slightly with a rolling pin if desired.

Step 3: Assemble the Sandwiches

  • Spread the cream cheese mixture evenly on 4 bread slices.
  • Arrange cucumber slices in a single layer over the filling.
  • Top with the remaining bread slices.

Step 4: Cut and Serve

  • Gently press the sandwiches together.
  • Cut each sandwich into neat squares or rectangles.
  • Serve immediately or chill for 15–20 minutes before serving.

Q & A

Q: Can I make these ahead of time?
A: Yes, prepare them up to 4 hours ahead and keep covered in the refrigerator.

Q: Can I use another herb?
A: Yes, chives or parsley work well instead of dill.

Q: How do I keep the sandwiches fresh?
A: Cover with plastic wrap and refrigerate until ready to serve.

Creamy Cucumber Salad

Creamy Cucumber Salad

Ingredients

  • 3 medium cucumbers, thinly sliced
  • 1 cup sour cream
  • 2 tbsp fresh dill, chopped
  • 1 tbsp lemon juice
  • 1 garlic clove, minced
  • Salt and black pepper, to taste

Instructions

Step 1: Prepare the Cucumbers

Wash and thinly slice the cucumbers.

Place them in a bowl and lightly sprinkle with salt.

Let sit for 10 minutes, then drain any excess liquid.

Step 2: Make the Dressing

In a separate bowl, combine:

  • Sour cream
  • Dill
  • Lemon juice
  • Garlic
  • Salt and black pepper

Mix until smooth and creamy.

Step 3: Combine

Add the sliced cucumbers to the dressing.

Gently toss until all cucumber slices are evenly coated.

Step 4: Chill

Cover and refrigerate for 20–30 minutes to allow the flavors to blend.

Step 5: Serve

Stir gently before serving.

Garnish with extra dill if desired.

Serve chilled.

Quick Q&A

Can I make this ahead of time?
Yes, it can be made up to 1 day in advance.

Can I use Greek yogurt instead of sour cream?
Yes, Greek yogurt is a lighter alternative.

How long does it last?
Store in the refrigerator for up to 2 days.

Prep Time: 15 minutes
Chill Time: 30 minutes
Total Time: 45 minutes
Servings: 4–6

Cucumber Salad Recipe

Ingredients

  • 1 cucumber, thinly sliced
  • 1/2 teaspoon salt
  • 1 small onion, thinly sliced
  • 1/2 head cabbage, finely shredded
  • 1 carrot, grated
  • 2 garlic cloves, minced
  • 1 tablespoon olive oil
  • 1 tablespoon lemon juice
  • Black pepper to taste

Instructions

Step 1

Place the sliced cucumber in a colander and sprinkle with salt. Let sit for 10 minutes to remove excess moisture. Rinse and pat dry.

Step 2

Add the cucumber, onion, cabbage, carrot, and garlic to a large mixing bowl.

Step 3

In a small bowl, whisk together the olive oil, lemon juice, and black pepper.

Step 4

Pour the dressing over the vegetables and toss until everything is evenly coated.

Step 5

Cover the bowl and refrigerate for at least 30 minutes to allow the flavors to blend.

Step 6

Serve chilled as a side dish or light lunch.

Nutrition Information

  • Servings: 4
  • Calories: 80 kcal per serving
  • Protein: 2g
  • Carbohydrates: 10g
  • Fat: 4g
  • Fiber: 3g

Q&A

Can I make this salad ahead of time?
Yes. Store it in the refrigerator for up to 2 days.

Can I add other vegetables?
Yes. Bell peppers, tomatoes, and radishes work well.

Can I use a different dressing?
Yes. A light vinaigrette or Greek yogurt dressing is a great alternative.

Classic Creamy Egg Salad

A simple, creamy, and protein-packed egg salad that’s perfect for sandwiches, wraps, or as a side dish! 😋

🛒 Ingredients

  • 🥚 8 hard-boiled eggs
  • 🥄 ½ cup mayonnaise
  • 🟡 1 tsp yellow mustard
  • 🧂 Salt and black pepper to taste
  • 🌿 1 tbsp chopped green onions (optional)
  • 🌶️ Paprika for garnish

👩‍🍳 Step-by-Step Recipe

🔹 Step 1: Boil the Eggs

  • 🥚 Place eggs in a pot and cover with water.
  • 🔥 Bring to a boil, then cook for 10–12 minutes.
  • ❄️ Transfer eggs to ice water and let cool completely.

🔹 Step 2: Prepare the Eggs

  • 🥚 Peel the eggs carefully.
  • 🔪 Chop 6 eggs into small pieces.
  • 🍳 Slice the remaining 2 eggs for garnish.

🔹 Step 3: Make the Dressing

  • 🥣 In a large bowl, combine mayonnaise and mustard.
  • 🧂 Add salt and black pepper.
  • 🥄 Mix until smooth and creamy.

🔹 Step 4: Combine Everything

  • 🥚 Add chopped eggs to the dressing.
  • 🌿 Stir in green onions if using.
  • 🥄 Gently mix until all eggs are coated.

🔹 Step 5: Garnish & Chill

  • 🍳 Arrange sliced eggs on top.
  • 🌶️ Sprinkle with paprika.
  • ❄️ Refrigerate for 30 minutes before serving for the best flavor.

❓ Quick Q&A

Q: Can I make it ahead of time?

✅ Yes! Store in the refrigerator for up to 3 days.

Q: Can I use Greek yogurt instead of mayonnaise?

✅ Absolutely! It makes the salad lighter and adds extra protein.

Q: What can I serve it with?

✅ Sandwiches, crackers, lettuce wraps, or as a side dish.

🥚✨ Creamy, comforting, and incredibly easy to make! Perfect for lunch, picnics, or meal prep. 😍🍴

Chickpea Broccoli Rice Salad

Chickpea Broccoli Rice Salad

A healthy, protein-packed salad made with tender rice, roasted chickpeas, broccoli, feta cheese, and a simple lemon dressing. Perfect for meal prep, lunch, or a light dinner!

🛒 Ingredients

  • 3 cups cooked brown rice
  • 2 cups broccoli florets
  • 1 can (15 oz) chickpeas, drained
  • ½ cup feta cheese, crumbled
  • ¼ red onion, finely diced
  • 2 tbsp olive oil
  • 1 tbsp lemon juice
  • ½ tsp garlic powder
  • Salt and black pepper to taste

👩‍🍳 Step-by-Step Recipe

1️⃣ Roast the Chickpeas

🔥 Preheat oven to 400°F (200°C).

➡️ Pat chickpeas dry with a paper towel.

➡️ Toss with 1 tablespoon olive oil, garlic powder, salt, and pepper.

➡️ Spread on a baking tray.

➡️ Roast for 20–25 minutes until lightly crispy.


2️⃣ Cook the Broccoli

🥦 Bring a pot of water to a boil.

➡️ Add broccoli florets.

➡️ Cook for 2–3 minutes until bright green and slightly tender.

➡️ Drain and rinse with cold water.


3️⃣ Prepare the Rice

🍚 Cook brown rice according to package directions.

➡️ Allow it to cool slightly.


4️⃣ Make the Dressing

🥣 In a small bowl, whisk together:

➡️ 1 tablespoon olive oil

➡️ Lemon juice

➡️ Salt

➡️ Black pepper

Mix well.


5️⃣ Assemble the Salad

🥗 In a large bowl, combine:

➡️ Brown rice

➡️ Roasted chickpeas

➡️ Broccoli

➡️ Red onion

➡️ Feta cheese


6️⃣ Add Dressing

✨ Pour dressing over the salad.

➡️ Toss gently until everything is evenly coated.


7️⃣ Serve

🍽️ Serve immediately or chill for 30 minutes before serving.

➡️ Garnish with extra feta and black pepper if desired.

Creamy Southwest Chicken Salad

Creamy Southwest Chicken Salad
🛒 Necessary Ingredients
2 cups cooked shredded chicken
1 cup corn
1 cup black beans
½ cup red bell pepper
¼ cup red onion
¼ cup fresh cilantro
½ cup mayonnaise
2 tbsp lime juice
1 tsp taco seasoning
Salt & black pepper
Tortilla chips
👩‍🍳 Step-by-Step Recipe
Step 1: Prepare chicken
Add cooked shredded chicken to a large bowl.
Break any big pieces with a fork.
Step 2: Add vegetables
Add corn, black beans, red bell pepper, red onion, and cilantro.
Mix gently so everything spreads evenly.
Step 3: Make dressing
In a small bowl, mix mayonnaise, lime juice, taco seasoning, salt, and black pepper.
Stir until creamy.
Step 4: Combine
Pour dressing over the chicken mixture.
Mix well until creamy and coated.
Step 5: Chill
Cover and refrigerate for 20–30 minutes.
This helps the flavors blend.
Step 6: Serve
Serve with tortilla chips.
Enjoy as a dip, sandwich filling, or salad bowl. 😋
Quick Q/A

Q: Can I use Greek yogurt instead of mayonnaise?
A: Yes, it makes the salad lighter.

Q: Can I make it ahead?
A: Yes, keep it in the fridge for up to 2 days.

Creamy Chicken Apple Cranberry Salad

Creamy Chicken Apple Cranberry Salad

A refreshing salad packed with tender chicken, crisp apples, juicy cranberries, and a creamy dressing.

🛒 Ingredients

  • 2 cups cooked chicken, diced
  • 1 apple, diced
  • 1 cup celery, chopped
  • ½ cup red grapes or dried cranberries
  • ½ cup mayonnaise
  • 1 tbsp lemon juice
  • Salt & black pepper

👩‍🍳 Step-by-Step Recipe

1️⃣ Prepare the Ingredients

➡️ Dice the cooked chicken into bite-sized pieces.

➡️ Wash and dice the apple into small cubes.

➡️ Chop the celery into thin slices.

➡️ Halve the grapes if using fresh grapes.

2️⃣ Make the Dressing

➡️ In a large bowl, combine mayonnaise and lemon juice.

➡️ Add a pinch of salt and black pepper.

➡️ Stir until smooth and creamy.

3️⃣ Mix the Salad

➡️ Add the chicken, apples, celery, and grapes/cranberries to the bowl.

➡️ Gently toss until everything is evenly coated with the dressing.

4️⃣ Chill

➡️ Cover and refrigerate for at least 30 minutes.

➡️ This helps the flavors blend together beautifully.

5️⃣ Serve

➡️ Spoon onto a serving plate.

➡️ Enjoy on its own, in lettuce cups, or as a sandwich filling.

❓ Quick Q&A

Q: Can I use Greek yogurt instead of mayonnaise?
✅ Yes! Greek yogurt makes a lighter version.

Q: How long does it keep in the fridge?
✅ Up to 3 days in an airtight container.

Q: Can I add nuts?
✅ Absolutely! Chopped pecans or walnuts add a delicious crunch.

🍽️ Creamy, crunchy, sweet, and savory—perfect for lunch, picnics, or meal prep! 😋

Creamy Fruit Custard Salad

A refreshing, creamy dessert loaded with fresh fruit and silky vanilla custard. Perfect for parties, potlucks, or a light summer treat!

🛒 Ingredients

  • 2 cups strawberries, sliced
  • 2 kiwis, diced
  • 1 cup grapes, halved
  • 1 mango, diced
  • 2 cups milk
  • 3 tbsp custard powder (vanilla)
  • 3 tbsp sugar

👩‍🍳 Step-by-Step Instructions

1️⃣ Prepare the Fruits

➡️ Wash all fruits thoroughly.

➡️ Slice strawberries, dice kiwi and mango, and halve the grapes.

➡️ Place all fruit in a large mixing bowl.

2️⃣ Make the Custard

🥣 Mix custard powder with ¼ cup cold milk until smooth.

➡️ Heat the remaining milk in a saucepan.

➡️ Add sugar and stir until dissolved.

➡️ Slowly pour in the custard mixture while stirring continuously.

➡️ Cook for 3–5 minutes until thick and creamy.

3️⃣ Cool the Custard

❄️ Remove from heat and let it cool completely.

➡️ Refrigerate for 30 minutes for best results.

4️⃣ Combine Everything

🥄 Pour the chilled custard over the prepared fruits.

➡️ Gently mix until all fruit is coated.

5️⃣ Chill and Serve

❄️ Refrigerate for at least 1 hour.

➡️ Garnish with extra strawberries before serving.

➡️ Serve cold and enjoy!


❓ Quick Q&A

Can I make it ahead of time?

✅ Yes! Prepare it up to 24 hours in advance and keep refrigerated.

What other fruits can I use?

✅ Apples, peaches, pineapple, blueberries, and bananas work great.

Can I use ready-made custard?

✅ Absolutely! It saves time and tastes delicious.


🌟 Nutritional Benefits

🍓 Strawberries provide vitamin C and antioxidants.

🥝 Kiwi adds fiber and vitamin K.

🥭 Mango offers vitamin A and natural sweetness.

🍇 Grapes contain beneficial antioxidants.

🥛 Milk provides calcium and protein.

This creamy fruit custard salad is colorful, refreshing, and always a crowd-pleaser! 🍓🥝🥭✨