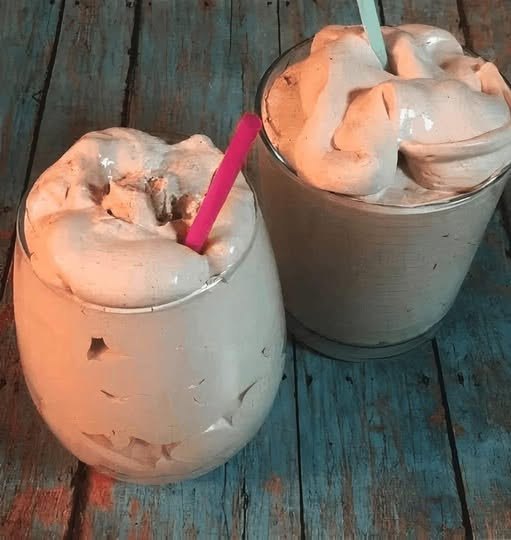
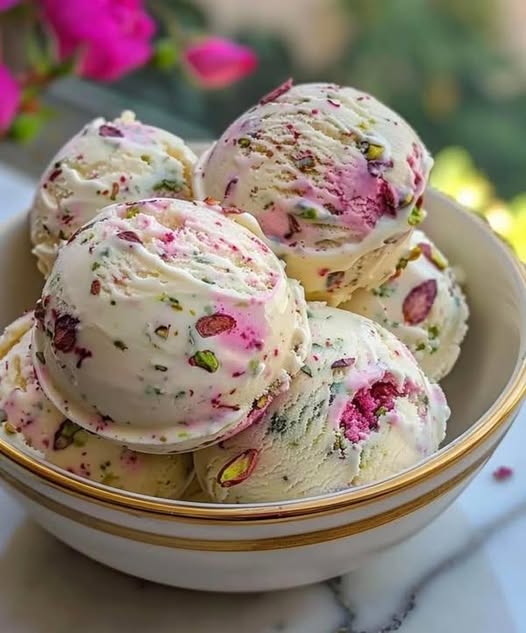
Healthy Tips
Crustless Coconut Pie Recipe
This Crustless Coconut Pie is a simple, fuss-free custard dessert brimming with sweet shredded coconut and creamy vanilla flavor. Perfect for coconut lovers, this easy recipe creates its own light crust while baking.
Ingredients
- ½ cup all-purpose flour
- ½ cup sugar
- ½ teaspoon kosher salt
- 2 cups milk
- 4 eggs
- 2 teaspoons vanilla extract
- 2 cups shredded sweetened coconut
Instructions
- Preheat the oven to 350°F. Lightly grease a pie plate and set aside.
- In a mixing bowl, combine the flour, sugar, and salt. Whisk to blend.
- Slowly add the milk, whisking until smooth.
- Add the eggs and vanilla extract, then whisk again until fully incorporated.
- Stir in the shredded coconut.
- Pour the mixture into the prepared pie plate.
- Bake for 55–60 minutes, or until the top is golden brown and a knife inserted in the center comes out clean.
Notes
- This pie forms its own light crust while baking—no crust needed!
- Let cool slightly before serving for best texture.
- Great served warm or chilled.
- Prep Time: 10 minutes
- Cook Time: 55 minutes
- Category: Dessert
- Method: Baking
- Cuisine: American
Nutrition
- Serving Size: 1 slice
- Calories: 302
- Sugar: 17g
- Sodium: 212mg
- Fat: 19g
- Saturated Fat: 15g
- Unsaturated Fat: 3g
- Trans Fat: 1g
- Carbohydrates: 27g
- Fiber: 4g
- Protein: 7g
- Cholesterol: 88mg
Keto Mozzarella Sticks Recipe
Ingredients
- 200g each of six mozzarella sticks, cut in half
- 1 big, beaten egg
- 2 teaspoons of seasoning mix
- Garlic powder, 1/4 teaspoon
- 1/4 teaspoon of sea salt, fine
- 1 to 2 teaspoons (7–14g) of coconut flour
- grated parmesan cheese, 1/2 cup (45g)
- almond flour, 1/2 cup (56g)
Instructions
-
One little egg should be beaten in a bowl until the whites and yolk are blended.
-
Take another bowl and mix sea salt, garlic powder, Italian seasoning, parmesan cheese, and almond flour.
-
After that, add only the coconut flour to a third bowl.
-
If you haven’t done so before, divide your six mozzarella sticks in half to create 12 smaller sticks.
-
A piece of mozzarella should first be dusted with coconut flour, then dipped in beaten egg, and last rolled in the almond flour mixture to coat. Continue until each of the 12 mozzarella sticks is completely covered.
-
Put sticks on a parchment-lined baking sheet. Freeze an hour.
-
Then, fill the frying pan with oil until it is at least half an inch above the bottom.
-
It will only take a few minutes to cook the mozzarella sticks after the oil reaches 350°F and is golden brown on all sides.
-
To drain the extra oil from the fried mozzarella sticks, place them on a wire rack or dish lined with paper towels.
Notes
Size of Serving: One mozzarella stick 83 calories Fat: 23 Protein: 4 Carbohydrates: 1.5 Fiber:.7
Carnivore Casserole Recipe
Carnivore diet Chili recipe
Table of Contents
Carnivore diet Chili recipe (Beanless, No Tomato)
Ingredients:
-
2 lbs ground beef (80/20 works great)
-
1/2 lb ground pork or beef heart/liver (optional, for nutrient density)
-
4–6 strips bacon, chopped
-
1 tbsp beef tallow or butter
-
1 tsp salt (or to taste)
-
1/2 tsp black pepper (optional if you’re relaxed carnivore)
-
1/2 tsp smoked paprika or chili powder (optional for keto/carnivore crossover)
-
1/4 cup bone broth or water (for moisture)
Instructions:
-
Fry the bacon in a large pot or Dutch oven over medium heat until crispy. Remove and set aside, leaving the fat.
-
Add the ground beef and pork to the pot. Brown the meat well, breaking it up with a spatula.
-
Add beef tallow or butter if needed for extra fat and flavor.
-
Stir in salt, and if using, pepper and spices. Add bone broth to keep it moist and let it simmer gently for 20–30 minutes, stirring occasionally.
-
Add the crispy bacon back into the pot. Simmer 5 more minutes.
-
Taste, adjust salt/fat levels, and serve hot.
Optional Carnivore Add-ins:
-
Shredded beef, brisket, or short ribs (for texture and slow-cooked flavor)
-
Beef liver or heart, finely chopped (nutrient boost)
-
Heavy cream (dash added at the end for richness)
-
Egg yolks stirred in off heat for creaminess
Serving Ideas:
-
Top with a fried or poached egg
-
Serve with pork rind “chips” or carnivore bread
-
Add shredded cheese (if dairy is okay for you)
Keto Cheese Salami & Pickles
This Keto Cheese Salami & Pickles is the perfect low-carb marinated cheese appetizer for anyone following a ketogenic or gluten-free diet. Cubes of firm cheese are soaked in a flavorful marinade of olive oil, apple cider vinegar, garlic, and herbs, allowing them to absorb a tangy and savory punch. Paired with slices of rich, savory salami and crunchy dill pickles, this appetizer delivers a satisfying balance of textures and bold flavors. Keto Cheese Salami & Pickles is easy to assemble, store, and customize with your favorite cheeses or spices. Whether you’re hosting a gathering or craving a nutritious bite, this appetizer hits all the right notes — rich, tangy, savory, and perfectly keto.
STATS:
- Serving: 4
- Total time: Ten mints.
- Calories: 250 kcal
- Serving size: 1 appetizer portion
- Prep time: Ten mints.
- Cuisine: American-Italian fusion
- Cook time: Nil
- Course: Appetizer
- Diet: Keto & Gluten-free
EQUIPMENT:
- Mixing bowl
- Airtight container or jar for marinating
- Knife and cutting board
- Serving platter
INGREDIENTS:
- Pickles slices: ½ cup
- Olive oil: ¼ cup
- Cheese cubes: 1 cup
- Apple cider vinegar: 2 tbsp.
- Salami slices: ½ cup
- Garlic powder: ½ tsp.
- Black pepper
- Dried oregano: 1 tsp.
- Red pepper flakes: ¼ tsp.
- Salt
- Fresh parsley: 1 tbsp.
INGREDIENT NOTES:
CHEESE:
- We use Gouda or Cheddar cheese to prepare this dish and it is firm and also holds its shape properly.
SALAMI:
- We have to use best quality salami slices, which should be nitrate-free and keto-friendly.
PICKLES:
- We have to use dill or gherkin pickles to add the tangy and crunchy taste to the appetizer.
OILVE OIL:
- We have to use olive oil in this dish to include the rich flavors and healthy fats.
APPLE CIDER VINEGAR:
- It is used in this dish to provide the tangy and mild acidity in the marinade.
GARLIC POWDER:
- It is used in this appetizer to provide a subtle taste and make it more flavorful.
OREGANO:
- We use dried oregano to add the flavor and aroma of herbs in the marinade.
RED PEPPER FLAKES:
- It is used to add spice to this appetizer.
PARSLEY:
- We use parsley to garnish this appetizer.
SALT & PEPPER:
- It is added in this appetizer as it is necessary to develop the taste of the dish.
INSTRUCTIONS:
- Take a mixing dish and add apple cider vinegar, garlic powder, salt, red pepper flakes, black pepper, olive oil, and oregano.
- Mix all these components.
- Now we can add cubes of cheese to the marinade.
- Softly coat the cheese cubes in the marinade.
- We can add the marinated cheese cubes to a jar.
- Put them in the fridge for around two hours or for the whole night.
- Then we can place the marinated cheese cubes on the plate along with pickles and salami slices inside.
- We can garnish the platter with parsley and red pepper flakes and serve.
SERVING SUGGESTIONS:
- We can pair this platter with a glass of keto dry white wine or cocktail
- Serve this platter with keto crackers or celery sticks
- We can also add olives or cherry tomatoes on the side of the plate for variation.
- You can also utilize this appetizer platter as a topping on keto flatbread or crackers.
- We can serve this platter chilled at a party.
TIPS:
- We can marinate he cheese cubes for the whole night for the best taste.
- You can also use the combination of two or three different cheeses for the taste variation.
- We can add pickles in last so that the pickles stay crispy.
- You can alter the spice level as you can tolerate.
STORAGE INFORMATION:
Fridge:
- We would store marinated cheese in a closed box for five days.
Freezer:
- The texture of marinated cheese will get ruined, so we wouldn’t have to freeze the marinated cheese.
FAQs:
Can I use any other meat in this appetizer?
- We can use some prosciutto or pepperoni in this appetizer for the best taste.
Will the vegetarian have this appetizer?
- No, it includes salami, so if we use marinated vegetables or exclude the meat from this appetizer, vegetarians will have this appetizer.
How long is it required to marinate the cheese cubes?
- We can soak the cheese cubes for 2 to 12 hours to make them flavorful.
NUTRITIONAL INFORMATION:
Calories: 250 kcal
Total Carbs: 2 g
Net Carbs: 1.5 g
Fiber: 0.5 g
Protein: 15 g
Fat: 20 g
Calcium: 200 mg
Iron: 0.5 mg
Vitamin A: 150 IU
Sodium: 600 mg
Potassium: 150 mg
INSTANT POT CHICKEN TACO SOUP
Ingredients
- 1 Vidalia sweet onion diced
- 3 cups chicken broth
- 2-3 chicken breasts
- 1 can black beans drained (14.5 oz)
- 1 can pinto beans drained (14.5 oz)
- 1 can corn drained (14.5 oz)
- 1 can tomato sauce 15 oz
- 1 can diced tomatoes with green chilies AKA Rotel (14.5 oz)
- 1 packet taco seasoning
- 1 teaspoon cumin
- 1/2 teaspoon garlic powder
- sea salt and pepper to taste
- Fresh parsley roughly chopped (garnish)
Instructions
-
Add all ingredients in this order: broth, chicken breasts, corn, tomato sauce, diced tomatoes, taco seasoning, garlic powder, cumin, sea salt, pepper, pinto beans, and black beans.
-
Close lid in sealing position, and lock vent. Cook on high manual pressure for 8 minutes, and then 10 minutes NPR. Once done with NPR, you can Quick Release the remaining pressure.
-
Remove chicken, and shred with forks. Replace back to pot and stir. Serve and garnish with fresh parsley.
Notes
Weight Watchers Chocolate Frosty Recipe
Pumpkin Cinnamon and Sugar Donuts
Lasagna Cups, 3 SmartPoints
WW Lasagna Cups are the perfect way to indulge in the classic comfort food of lasagna without derailing your Weight Watchers points. These individual servings are packed with flavor, from the lean ground turkey or chicken to the rich tomato sauce and melty cheeses. By using whole wheat lasagna noodles and part-skim cheese, these cups keep the calories and SmartPoints low, making them an ideal choice for anyone following a healthy eating plan. Each cup is only 3 SmartPoints, allowing you to enjoy the taste of lasagna in a way that’s both satisfying and guilt-free.
What makes these WW Lasagna Cups so appealing is how easily they can be customized to suit different tastes and dietary needs. If you prefer a vegetarian version, you can substitute the ground meat with lentils, mushrooms, or even tofu. You can also add extra vegetables like spinach or zucchini to the sauce to increase the fiber and nutritional value. The layers of cheese—ricotta, mozzarella, and Parmesan—create that signature lasagna flavor while still keeping the dish lighter than the traditional version. The individual serving sizes are perfect for portion control, ensuring you get a filling meal without overeating.
These lasagna cups are also incredibly convenient for meal prep. You can make a batch at the start of the week, store them in the fridge for a few days, or even freeze them for later use. When you need a quick, satisfying meal, you can simply pop one in the microwave or oven, and it’s ready to go. The fact that they hold up well in the fridge or freezer makes them a great choice for busy individuals or families looking for easy, nutritious meals that are ready when you are. Plus, they’re a hit with kids and adults alike, so you can feel good serving them to the whole family.
Not only do these WW Lasagna Cups offer a healthier alternative to traditional lasagna, but they also deliver on taste and texture. The combination of tender whole wheat noodles, savory meat sauce, and creamy cheese creates a comforting, satisfying meal that will leave you feeling full without overindulging. Whether you’re craving comfort food or need a quick, delicious dinner for the week, these lasagna cups are the perfect solution. Plus, with only 3 SmartPoints per cup, they’re an easy and tasty way to stick to your WW goals without feeling deprived.
WW Lasagna Cups Recipe
Ingredients:
- 8 whole wheat lasagna noodles (cooked and cut into halves or thirds)
- 1 lb lean ground turkey or chicken
- 1 small onion, chopped
- 2 cloves garlic, minced
- 1 (14.5 oz) can crushed tomatoes (low-sodium, if preferred)
- 1/2 tsp dried oregano
- 1/2 tsp dried basil
- 1/4 tsp red pepper flakes (optional for a little heat)
- 1/2 cup low-fat ricotta cheese
- 1/2 cup shredded part-skim mozzarella cheese
- 1/4 cup grated Parmesan cheese
- Salt and pepper to taste
- Fresh basil or parsley for garnish (optional)
Instructions:
- Preheat Oven and Prepare Muffin Tin: Preheat your oven to 375°F (190°C). Spray a muffin tin with non-stick cooking spray or use silicone muffin cups for easy removal. This recipe makes 12 individual lasagna cups.
- Cook the Noodles: Boil the lasagna noodles according to the package instructions. Once cooked, drain and set aside to cool slightly. Once they’re cool enough to handle, cut them into halves or thirds to fit into the muffin tin.
- Make the Meat Sauce: In a large skillet, cook the ground turkey or chicken over medium heat, breaking it apart as it cooks. Add the chopped onion and garlic and sauté for about 3-4 minutes until the onion is soft. Stir in the crushed tomatoes, oregano, basil, red pepper flakes (if using), and salt and pepper to taste. Simmer the sauce for about 10 minutes to let the flavors meld together.
- Assemble the Lasagna Cups: Layer each muffin tin with a piece of the cooked lasagna noodle. Then spoon a small amount of the meat sauce over the noodle. Add a dollop of ricotta cheese, a sprinkle of mozzarella, and a little Parmesan on top. Repeat this layering process until all the muffin cups are filled, ending with a sprinkle of mozzarella and Parmesan on top.
- Bake: Place the muffin tin in the preheated oven and bake for 20-25 minutes or until the cheese is melted and bubbly. The lasagna cups should be lightly browned on top.
- Garnish and Serve: Let the lasagna cups cool slightly before removing them from the muffin tin. Garnish with fresh basil or parsley, if desired, and serve hot.
Nutrition Information (per serving – makes 12 cups):
- Calories: 150
- Fat: 7g
- Saturated Fat: 3g
- Carbohydrates: 12g
- Fiber: 2g
- Net Carbs: 10g
- Protein: 12g
- WW Points: 3 SmartPoints per cup
Why These WW Lasagna Cups Work:
- Low in SmartPoints: At just 3 SmartPoints per cup, these lasagna cups are a fantastic way to enjoy a hearty and comforting meal without using up too many points. The combination of lean turkey, whole wheat noodles, and part-skim cheese makes these cups filling and flavorful, without being heavy on calories or points.
- High in Protein: With the lean turkey or chicken and cheese, each lasagna cup provides a good amount of protein to keep you full. Protein also helps to support muscle recovery and helps curb cravings, making these a satisfying and nutritious meal option.
- Customizable: These lasagna cups are highly customizable. You can swap the ground turkey or chicken for lean beef or even go meatless by using a vegetarian substitute like lentils or tofu. You can also add extra veggies, such as spinach, mushrooms, or zucchini, to the sauce for more fiber and nutrients.
- Perfect for Meal Prep: These individual servings are easy to make ahead and store for later. You can prep a batch of WW Lasagna Cups at the beginning of the week and keep them in the fridge for up to 3 days or freeze them for longer storage. This makes them an excellent option for meal prepping, ensuring you have a healthy, filling meal ready to go when you need it.
- Satisfies Lasagna Cravings: If you’ve been missing the comfort of traditional lasagna, these WW Lasagna Cups are a great alternative. They pack all the flavors of the classic dish—rich tomato sauce, creamy cheese, and hearty noodles—into a portion-controlled, lighter format that still feels indulgent.
Tips for Success:
- Make Ahead: These lasagna cups are perfect for meal prep. Simply assemble them in advance, cover them, and refrigerate for up to 3 days. They can also be frozen and reheated, making them an excellent option for busy weeks.
- Veggie Add-Ins: For more fiber and added nutrition, try sneaking in some finely chopped vegetables, like spinach, zucchini, or mushrooms, into the meat sauce. They’ll blend right in with the flavors and add more texture to the cups.
- Freezer-Friendly: If you want to make a larger batch, these cups freeze beautifully. After baking, let them cool completely, then wrap each cup individually in plastic wrap or foil and store them in a freezer-safe container. When you’re ready to eat, simply reheat them in the microwave or oven.
Carnivore Zero Carb Pancakes Recipe
These Carnivore Zero Carb Pancakes are a perfect breakfast option for anyone on a strict carnivore diet. Made with animal-based ingredients only, these pancakes are fluffy, rich, and packed with protein, while containing zero carbs. They’re ideal for those who want to indulge in a breakfast classic without breaking their diet.
Table of Contents
Ingredients:
- 4 large eggs (pasture-raised if possible)
- 2 oz cream cheese (softened)
- 1/4 cup heavy cream (for a creamier texture)
- 2 tbsp beef tallow or butter (for cooking)
- 1/4 tsp salt
- 1/4 tsp vanilla extract (optional, for flavor)
- 1/2 tsp baking powder (optional, for fluffiness)
- 1 tbsp collagen peptides (optional, for added protein and texture)
- 2 tbsp shredded mozzarella cheese (optional, for extra fluffiness and richness)
Instructions:
- Prepare the Pancake Batter:
- In a medium bowl, crack the eggs and whisk them together until fully combined.
- Add the softened cream cheese to the eggs and mix until smooth. If the cream cheese is too firm, you can microwave it for a few seconds to soften it up.
- Stir in the heavy cream and vanilla extract (if using) to add moisture and flavor. Add the salt and mix everything well.
- If you want fluffier pancakes, add the baking powder. You can also add the collagen peptides for extra protein and a smooth texture. Lastly, mix in the shredded mozzarella cheese if using for added fluffiness and richness.
- Heat the Pan:
- Place a skillet or griddle on medium heat and add the beef tallow or butter. Let it melt and coat the bottom of the pan evenly. You want a non-stick surface, so make sure the fat is spread out.
- Cook the Pancakes:
- Pour a small amount of the pancake batter (about 1/4 cup) into the hot skillet. Use a spoon or spatula to gently spread the batter into a round shape.
- Cook the pancakes for about 2-3 minutes on the first side until bubbles form on top and the edges start to set. Flip the pancakes gently using a spatula and cook for another 2-3 minutes on the other side, until golden brown and cooked through.
- Serve:
- Once the pancakes are cooked, transfer them to a plate. You can stack them up and serve them as is, or drizzle with more melted butter if you like.
- For a savory twist, top with crispy bacon or a dollop of whipped cream cheese.
Optional Toppings and Variations:
- If you tolerate dairy, you can top your pancakes with a little extra cheese or serve them with cooked bacon for a more filling breakfast.
- For a slight sweetness (if you follow a less strict carnivore approach), consider adding a few drops of stevia or erythritol to the batter, though this is optional.
These Carnivore Zero Carb Pancakes are easy to make, rich in flavor, and will keep you satisfied without straying from your carnivore lifestyle. Enjoy them as a protein-packed breakfast or even a quick meal during the day!
🍋 Creamy Garlic Butter Chicken Linguine
This creamy, buttery chicken linguine is bursting with flavor from fresh parsley, zesty lemon, and Parmesan cheese — all tied together with a rich, velvety sauce. A quick and satisfying one-pan meal!
🕒 Time & Servings
-
Prep Time: 10 minutes
-
Cook Time: 20 minutes
-
Total Time: 30 minutes
-
Servings: 4
🛒 Ingredients
🔹 Main Ingredients
-
2 boneless, skinless chicken breasts, cubed
-
8 oz linguine pasta
-
1 tbsp olive oil
-
1 tbsp butter
🔹 Seasonings
-
1 tsp garlic powder
-
1 tsp onion powder
-
½ tsp smoked paprika
-
¼ tsp cayenne pepper (optional)
-
½ tsp crushed red pepper flakes (optional)
-
Salt and black pepper, to taste
🔹 Sauce Ingredients
-
½ cup unsalted butter (softened)
-
2 tbsp fresh parsley, chopped
-
1 tbsp lemon juice
-
¼ cup grated Parmesan cheese
-
¼ cup chicken broth
-
¼ cup heavy cream
-
1 tbsp Dijon mustard
👩🍳 Instructions
1. Cook the Pasta
Bring a large pot of salted water to a boil. Cook the linguine until al dente according to package instructions.
Reserve ¼ cup of the pasta water, then drain and set aside.
2. Cook the Chicken
Season the cubed chicken with:
→ Garlic powder, onion powder, paprika, cayenne (if using), salt, and pepper.
In a large skillet over medium heat, heat 1 tbsp olive oil and 1 tbsp butter.
Add chicken and sauté until golden brown and fully cooked through (about 6–8 minutes).
Remove from skillet and set aside.
3. Make the Sauce
In the same skillet, melt the ½ cup butter over medium heat.
Stir in:
→ Garlic, chicken broth, heavy cream, Dijon mustard, and red pepper flakes (if using).
Let the sauce simmer for 3–4 minutes until slightly thickened.
4. Combine Everything
Add the cooked chicken and linguine to the skillet.
Toss everything together until well coated in sauce.
Mix in the Parmesan, parsley, and lemon juice.
If the sauce is too thick, add a splash of the reserved pasta water to loosen it.
5. Serve & Garnish
Garnish with extra parsley and grated Parmesan.
Serve warm and enjoy your restaurant-quality pasta at home! 🍝
💡 Tips & Variations
-
For extra flavor, use grilled chicken or shrimp instead.
-
Lemon zest can add an even brighter citrus note.
-
Add veggies like spinach or sun-dried tomatoes for a more colorful plate.
-
Want it spicier? Crank up the cayenne or add hot sauce to taste.
🍑 Fresh Peach Fritters with Vanilla Glaze
Golden, crispy on the outside, fluffy and peach-packed on the inside — these fresh peach fritters are the ultimate summer treat.
Prep Time: 15 minutes
Cook Time: 15 minutes
Total Time: 30 minutes
Yield: 12 fritters
Calories: ~210 per fritter
🛒 Ingredients
Fritter Batter:
-
1½ cups all-purpose flour
-
¼ cup granulated sugar
-
2 tsp baking powder
-
½ tsp salt
-
½ tsp ground cinnamon
-
⅔ cup milk
-
2 large eggs
-
1 tsp vanilla extract
-
2 tbsp melted butter
-
1½ cups fresh peaches, peeled and diced
-
Vegetable oil for frying
Vanilla Glaze:
-
1 cup powdered sugar
-
2 tbsp milk
-
½ tsp vanilla extract
👩🍳 Instructions
1. Mix Dry Ingredients
In a large bowl, whisk together the flour, sugar, baking powder, salt, and cinnamon. Set aside.
2. Mix Wet Ingredients
In a separate bowl, beat together the milk, eggs, vanilla extract, and melted butter until well combined.
3. Combine Wet & Dry
Add the wet mixture to the dry ingredients. Stir until just combined — don’t overmix to keep the fritters light and airy.
4. Fold in Peaches
Gently fold in the diced fresh peaches. The batter will be thick and chunky.
5. Heat Oil for Frying
In a deep skillet or pot, heat oil to 350°F (175°C). Use a thermometer for accuracy.
6. Fry the Fritters
Using a large spoon or cookie scoop, drop dollops of batter into the hot oil, a few at a time. Avoid overcrowding the pan. Fry each side for 2–3 minutes or until golden brown and cooked through.
7. Drain and Cool
Remove fritters with a slotted spoon and place on a paper towel-lined plate to drain.
8. Make the Glaze
Whisk together powdered sugar, milk, and vanilla until smooth. Adjust the milk for desired consistency.
9. Glaze and Serve
Drizzle glaze over warm fritters or dip them directly into the glaze. Let sit briefly to allow the glaze to set.
💡 Tips for Perfect Fritters
-
Use firm-ripe peaches for best texture — overly soft ones can make the batter too wet.
-
Don’t overcrowd the frying pan. Too many fritters at once will lower the oil temperature and affect crispiness.
-
If you prefer less sweetness, dust with powdered sugar instead of glazing.
-
Add a dash of nutmeg or cardamom for a spiced twist!
📦 Storage & Reheating
-
Store: Keep in an airtight container at room temp for 1 day or refrigerate for up to 3 days.
-
Reheat: Warm in a 300°F oven for 5–7 minutes or air fry briefly for that fresh-out-of-the-fryer crisp.
🌟 Make It Your Own
-
Swap peaches for nectarines, apples, or blueberries depending on the season.
-
Add chopped pecans or walnuts to the batter for extra crunch.
-
Serve with whipped cream or a scoop of vanilla ice cream for an indulgent dessert.
Pineapple Sour Cream Bundt Cake
A moist, tropical Bundt cake loaded with crushed pineapple and topped with a sweet pineapple glaze — perfect for holidays, potlucks, or just because.
Prep Time: 20 minutes
Cook Time: 60–70 minutes
Total Time: 1 hour 30 minutes
Servings: 12
Ingredients
For the Cake:
-
Unsalted butter – 1 cup (2 sticks), softened
-
Granulated sugar – 2 cups
-
Eggs – 4 large
-
Vanilla extract – 1 tsp
-
Almond extract – 1 tsp (optional for extra depth)
-
All-purpose flour – 3 cups
-
Baking powder – ½ tsp
-
Salt – ½ tsp
-
Sour cream – 1 cup
-
Crushed pineapple – 1 can (20 oz), well-drained
-
Pineapple juice – ¼ cup (reserved from can or added separately)
For the Glaze:
-
Powdered sugar – 1 cup
-
Pineapple juice – 2–3 tbsp (adjust for drizzling consistency)
-
Melted butter – 1 tbsp
-
Vanilla extract – ½ tsp
Instructions
-
Prep the oven & pan:
Preheat to 325°F (163°C). Grease and flour a 10-inch Bundt or tube pan thoroughly, making sure every crevice is coated. -
Cream the butter & sugar:
In a large bowl, cream together softened butter and sugar until light and fluffy, about 4–5 minutes. -
Add eggs & extracts:
Beat in eggs one at a time, mixing well after each. Stir in vanilla and almond extract. -
Mix dry ingredients:
In a separate bowl, whisk together flour, baking powder, and salt. -
Combine wet & dry:
Gradually add the dry mixture to the creamed butter mixture, alternating with sour cream. Begin and end with the dry mixture. Fold in drained crushed pineapple and pineapple juice gently. -
Bake:
Pour batter into the prepared pan, tapping lightly to remove air bubbles. Bake for 60–70 minutes, or until a toothpick inserted in the center comes out clean. -
Cool & glaze:
Let the cake cool in the pan for 10–15 minutes before inverting onto a wire rack. Cool completely. Whisk glaze ingredients until smooth, then drizzle over the cooled cake.
Quick Notes & Pro Tips
-
Avoid soggy cake: Be sure to drain pineapple well before adding.
-
Extra flavor: Toasted coconut or chopped macadamia nuts make a fantastic addition to the batter or glaze topping.
-
Bundt pan tip: Grease and flour thoroughly to prevent sticking, especially around intricate designs.
Why You’ll Love It
This cake is moist, fluffy, and tropical with a subtle tang from sour cream and the perfect amount of sweetness from the pineapple glaze.
Serving Suggestions
-
Serve as-is for a sweet treat with coffee or tea.
-
Add a dollop of whipped cream or a scoop of vanilla ice cream for a decadent dessert.
Storage & Make-Ahead
-
Room temp: Store covered for up to 3 days.
-
Refrigerate: Keeps up to 1 week in an airtight container.
-
Freeze: Wrap in plastic and foil for up to 3 months. Thaw in the fridge overnight before serving.
FAQs
Q: Can I use fresh pineapple instead of canned?
A: Yes! Finely chop fresh pineapple and use with ¼ cup added juice.
Q: Can I make this without sour cream?
A: Substitute with plain Greek yogurt for a similar texture and tang.
Q: How do I prevent the glaze from soaking in?
A: Make sure the cake is fully cooled before glazing.
Would you like me to create a “pina colada version” with coconut and rum glaze or a “cream cheese swirl version” for a richer twist?
Cherry Banana Fruit Salad
A sweet, colorful fruit salad featuring juicy cherry pie filling, tropical pineapple, and fresh bananas — perfect for potlucks, barbecues, or a simple make-ahead dessert.
Prep Time: 10 minutes
Chill Time: 30 minutes
Total Time: 40 minutes
Servings: 8
Ingredients
Main Fruit Mix:
-
Mixed fruit cocktail – 1 can (15 oz), well drained
-
Crushed pineapple – 1 can (8 oz), thoroughly drained
-
Cherry pie filling – 1 can (21 oz)
-
Bananas – 2 medium, freshly sliced
Optional Add-ins:
-
Mini marshmallows – to taste
-
Shredded coconut flakes – as desired
-
Fresh whipped cream – for extra richness
Instructions
-
Mix the fruit:
In a large mixing bowl, combine drained fruit cocktail, crushed pineapple, and cherry pie filling. Stir gently until evenly blended. -
Add bananas:
Just before serving, fold in freshly sliced bananas to keep them from browning or getting mushy. -
Customize:
Toss in mini marshmallows for sweetness or sprinkle in coconut flakes for a tropical flair. -
Chill & serve:
Cover the bowl and refrigerate for at least 30 minutes to let the flavors meld together. Serve cold.
Quick Notes & Pro Tips
-
Banana timing: Add bananas last to preserve their freshness and texture.
-
Make it creamy: Fold in whipped cream or a dollop of Cool Whip for a fluffier dessert-like salad.
-
Texture boost: Chopped nuts like pecans or walnuts add a nice crunch.
Why You’ll Love It
This no-fuss fruit salad is vibrant, refreshing, and easy to throw together in minutes — perfect for any gathering.
Serving Suggestions
-
Serve as a light dessert after a barbecue or holiday meal.
-
Pair with pound cake or angel food cake for a fun twist.
Storage & Make-Ahead
-
Refrigerate: Store covered for up to 2 days.
-
Bananas: If making ahead, add bananas right before serving to keep them fresh.
FAQs
Q: Can I make this ahead of time?
A: Yes, but wait to add the bananas until serving time to prevent browning.
Q: Can I use fresh fruit instead of canned?
A: Absolutely! Fresh pineapple, cherries, or seasonal fruits work wonderfully.
Q: Can I make it less sweet?
A: Use unsweetened fruit and swap cherry pie filling for fresh cherries with a light glaze.
Would you like me to create a “creamy ambrosia-style version” with Cool Whip and nuts or a “holiday version” with red and green cherries for a festive look?
One Pan Sausage, Green Beans, and Potatoes
A simple, hearty sheet pan dinner featuring tender baby potatoes, crisp green beans, and smoky sausage — ready in one pan with minimal cleanup.
Prep Time: 10 minutes
Cook Time: 35–40 minutes
Total Time: ~50 minutes
Servings: 4
Ingredients
-
Baby potatoes – 1 lb, halved or quartered
-
Green beans – 8 oz, washed & trimmed
-
Yellow onion – 1 small (about 1 cup), cut into wedges or slices
-
Pre-cooked andouille sausage or kielbasa – 1 lb, sliced into 1-inch pieces
-
Olive oil – ¼ cup
-
Garlic powder – 1 tsp
-
Salt – 1 tsp
-
Italian seasoning – 1 tsp
-
Black pepper – ½ tsp
Instructions
-
Preheat the oven:
Set to 400°F (200°C). Line a large sheet pan with parchment paper or lightly grease it. -
Prep the ingredients:
Halve or quarter baby potatoes for even roasting. Slice sausage on the bias (angled cuts) into 1-inch pieces. -
Season everything:
In a large bowl, toss potatoes, green beans, onion, and sausage with olive oil, garlic powder, Italian seasoning, salt, and pepper until evenly coated. -
Arrange on the pan:
Spread mixture in a single layer on the sheet pan. Place potatoes cut-side down for crispier edges. -
Bake:
Roast for 35–40 minutes, stirring halfway through, until potatoes are tender and slightly golden. -
Serve:
Remove from the oven and serve hot.
Quick Notes & Pro Tips
-
Par-cook potatoes: If you like extra crispy edges, microwave or boil potatoes for 5 minutes before roasting.
-
Add a kick: Sprinkle with crushed red pepper or drizzle with hot sauce before serving.
-
Mix up the veggies: Swap in bell peppers, carrots, or broccoli for variety.
Why You’ll Love It
This dish delivers bold flavor with minimal prep and cleanup. It’s a complete meal on one pan — perfect for weeknights when time is short.
Serving Suggestions
-
Serve with crusty bread or a side salad for a full meal.
-
Drizzle with balsamic glaze or honey mustard for an extra layer of flavor.
Storage & Make-Ahead
-
Refrigerate: Store leftovers in an airtight container for up to 4 days.
-
Reheat: Warm in the oven at 350°F for 10–12 minutes or in an air fryer for extra crispiness.
FAQs
Q: Can I use raw sausage instead of pre-cooked?
A: Yes, but add 5–10 minutes to the cook time and ensure the sausage reaches a safe internal temperature (160°F for pork).
Q: Can I make this ahead of time?
A: Absolutely! Prep everything in the morning, cover, and refrigerate. Roast when ready.
Q: Can I double the recipe?
A: Yes — use two sheet pans to avoid overcrowding, which can prevent proper roasting.
Hearty Pinto Bean, Green Chile & Beef Soup
A rich, comforting soup loaded with seasoned ground beef, tender pinto beans, and zesty green chilies — the perfect bowl for chilly evenings or busy weeknights.
Prep Time: 10 minutes
Cook Time: 30 minutes
Total Time: ~40 minutes
Servings: 6
Ingredients
-
Ground beef – 1 lb
-
Onion – 1 medium, chopped
-
Garlic – 2 cloves, minced
-
Pinto beans – 2 cans (15 oz each), drained & rinsed
-
Beef broth – 2 cups
-
Green chilies – 1 can (4 oz), diced
-
Cumin – 1 tsp
-
Chili powder – 1 tsp
-
Olive oil – 1 tbsp
-
Salt & black pepper – to taste
-
Fresh cilantro – chopped, for garnish
Instructions
-
Brown the beef:
In a large pot, heat olive oil over medium heat. Add ground beef and cook until browned, breaking it apart with a spoon. -
Sauté aromatics:
Add onion and garlic. Sauté for about 5 minutes until the onion becomes soft and fragrant. -
Season:
Stir in green chilies, cumin, chili powder, salt, and pepper. -
Build the soup:
Add pinto beans and beef broth. Stir to combine and bring to a simmer. -
Simmer:
Cook for 20–25 minutes, allowing the flavors to meld together. -
Serve:
Ladle into bowls, garnish with fresh cilantro, and enjoy hot.
Quick Notes & Pro Tips
-
Spice it up: Add a pinch of cayenne or a chopped jalapeño for more heat.
-
Make it thicker: Mash some of the beans in the pot for a creamier texture.
-
Stretch it: Add corn or diced tomatoes for more volume and flavor.
Why You’ll Love It
This soup is hearty, quick to make, and packed with protein and fiber. It’s a one-pot wonder that’s perfect for meal prepping or serving a crowd.
Serving Suggestions
-
Serve with warm cornbread or flour tortillas for dipping.
-
Top with sour cream, shredded cheese, or diced avocado for extra richness.
Storage & Make-Ahead
-
Refrigerate: Store in an airtight container for up to 4 days.
-
Freeze: Cool completely and freeze for up to 3 months.
-
Reheat: Warm on the stovetop or microwave until hot.
FAQs
Q: Can I use fresh green chilies?
A: Yes! Roast and dice them for extra flavor.
Q: Can I make it vegetarian?
A: Swap the beef for plant-based crumbles or add extra beans and veggies.
Q: Can I cook this in a slow cooker?
A: Yes — brown the beef first, then combine everything in the slow cooker on low for 4–6 hours.
Personal Note
This recipe was born on a cold night when I needed something hearty with pantry staples — it’s been on repeat ever since. The green chilies add just the right kick without overpowering the savory, beefy base.
Longhorn Steakhouse Parmesan Crusted Chicken
Golden, crispy chicken breasts topped with melty mozzarella and marinara — this homemade version brings that restaurant-quality flavor straight to your kitchen.
Prep Time: 15 minutes
Cook Time: 30 minutes
Total Time: ~45 minutes
Servings: 4
Ingredients
-
Chicken breasts – 4 boneless, skinless
-
All-purpose flour – 1 cup
-
Eggs – 2 large, beaten
-
Parmesan cheese – 1 cup, grated
-
Panko breadcrumbs – 1 cup
-
Garlic powder – ½ tsp
-
Onion powder – ½ tsp
-
Dried basil – ½ tsp
-
Dried oregano – ½ tsp
-
Salt – ½ tsp
-
Black pepper – ¼ tsp
-
Olive oil – ¼ cup
-
Marinara sauce – 1 cup
-
Mozzarella cheese – 1 cup, shredded
-
Fresh parsley – chopped, for garnish
Instructions
-
Preheat & prep:
Preheat oven to 375°F (190°C). Lightly grease a baking dish. -
Set up breading station:
-
Dish 1: All-purpose flour.
-
Dish 2: Beaten eggs.
-
Dish 3: Parmesan, panko, garlic powder, onion powder, basil, oregano, salt, and pepper.
-
-
Bread the chicken:
Dredge each chicken breast in flour, dip into eggs, then coat thoroughly with the Parmesan-panko mixture. -
Pan-fry:
Heat olive oil in a skillet over medium heat. Cook chicken 3–4 minutes per side until golden brown (don’t fully cook through). -
Assemble & bake:
Transfer chicken to the prepared baking dish. Top with marinara sauce and shredded mozzarella. Bake for 20–25 minutes, or until chicken reaches 165°F internally and cheese is bubbly. -
Garnish & serve:
Sprinkle with fresh parsley and serve immediately with pasta or a side salad.
Quick Notes & Pro Tips
-
Crispier coating: Use a wire rack on the baking sheet so the chicken stays crunchy on all sides.
-
Cheese swap: Try provolone or an Italian blend for more flavor depth.
-
Pound the chicken: Even thickness ensures faster, more even cooking.
Why You’ll Love It
This dish combines the best of chicken parmesan and Longhorn’s famous crispy-crusted chicken — hearty, cheesy, and perfect for an elevated weeknight dinner or entertaining guests.
Serving Suggestions
-
Serve with buttered spaghetti or garlic bread for a complete Italian-inspired meal.
-
Pair with roasted vegetables or a Caesar salad for a lighter option.
Storage & Make-Ahead
-
Refrigerate: Store in an airtight container for up to 3 days.
-
Freeze: Bread and pan-fry chicken, then freeze. Add sauce and cheese just before baking.
-
Reheat: Bake at 350°F for 10–15 minutes or until warmed through.
FAQs
Q: Can I use chicken thighs instead of breasts?
A: Yes! Adjust baking time by a few minutes for bone-in or thicker cuts.
Q: Can I skip the pan-frying step?
A: Yes, but the crust will be less crispy. Bake directly for 30–35 minutes instead.
Q: Can I make this low-carb?
A: Swap breadcrumbs for almond flour or crushed pork rinds.
Personal Note
This is one of my go-to “fancy but easy” dinners. It’s indulgent enough for company but simple enough for a weeknight — and tastes just like the restaurant favorite.
Grilled Chicken Bites
Juicy, flavorful chicken bites marinated in a smoky-sweet blend of honey, Dijon, and spices — perfect for barbecues, parties, or a quick weeknight dinner.
Prep Time: 10 minutes
Marinating Time: 30–120 minutes
Cook Time: 12 minutes
Total Time: 22 minutes (plus marinating)
Servings: 4
Calories: ~220 kcal
Ingredients
-
Boneless, skinless chicken breasts – 1 lb, cut into bite-sized pieces
-
Olive oil – 2 tbsp
-
Soy sauce – 2 tbsp
-
Honey – 1 tbsp
-
Dijon mustard – 1 tbsp
-
Garlic – 2 cloves, minced
-
Smoked paprika – 1 tsp
-
Salt & black pepper – to taste
-
Fresh parsley – chopped, for garnish
Instructions
-
Make the marinade:
In a large bowl, whisk together olive oil, soy sauce, honey, Dijon mustard, garlic, smoked paprika, salt, and pepper. -
Marinate the chicken:
Add chicken pieces, tossing until fully coated. Cover and refrigerate for at least 30 minutes (or up to 2 hours for maximum flavor). -
Preheat the grill:
Heat a grill or grill pan over medium-high. If using wooden skewers, soak them in water for 30 minutes to prevent burning. -
Assemble:
Thread marinated chicken onto skewers, leaving slight space between each piece for even cooking. -
Grill:
Cook skewers for 10–12 minutes, turning occasionally, until chicken is fully cooked (internal temp: 165°F) and grill marks appear. -
Rest & serve:
Let chicken rest for a few minutes, then garnish with chopped parsley before serving.
Quick Notes & Pro Tips
-
Don’t overcook: Bite-sized pieces cook quickly — pull them off the grill as soon as they reach 165°F.
-
No skewers? Grill chicken directly or use a grill basket.
-
Marinate longer: For even deeper flavor, marinate up to 4 hours.
Why You’ll Love It
These grilled chicken bites are quick, versatile, and packed with flavor — ideal as an appetizer, main course, or protein for salads and wraps.
Variations & Serving Suggestions
-
Make it spicy: Add a pinch of cayenne or chili flakes.
-
Switch the protein: Try chicken thighs for extra juiciness.
-
Pair with: Fresh salads, grilled veggies, or pita bread with tzatziki.
Storage & Make-Ahead
-
Refrigerate: Store leftovers in an airtight container for up to 3 days.
-
Freeze: Freeze marinated raw chicken in a sealed bag for up to 3 months.
-
Reheat: Warm gently in a skillet or microwave to avoid drying out.
FAQs
Q: Can I cook these without a grill?
A: Yes! Use a grill pan or bake at 400°F for 15–18 minutes.
Q: Can I prep these ahead?
A: Absolutely — marinate the chicken the night before for a quick cook the next day.
Q: What skewers work best?
A: Metal skewers are reusable and won’t burn, but pre-soaked wooden skewers are a budget-friendly option.
Personal Note
These are my go-to for summer cookouts — quick to make, easy to customize, and always a crowd-pleaser. They’re also great for meal prep since they reheat well and pair with nearly anything.
Cheesy Ham & Hash Brown Casserole
This hearty, cheesy casserole combines tender hash browns, diced ham, and sharp cheddar in a creamy base — perfect for breakfast, brunch, or a cozy dinner.
Prep Time: 10 minutes
Cook Time: 35–40 minutes
Total Time: ~50 minutes
Servings: 8
Ingredients
-
Frozen hash browns – 1 bag (32 oz)
-
Cream of chicken soup – 1 can (10.5 oz)
-
Sour cream – 1 cup
-
Butter – ½ cup, melted
-
Sharp cheddar cheese – 2 cups, shredded
-
Onion – 1 small, diced
-
Ham – 2 cups, diced
-
Salt & black pepper – to taste
Optional: Chopped fresh chives for garnish
Instructions
-
Preheat the oven: Set to 375°F (190°C). Grease a 9×13-inch baking dish.
-
Mix the casserole: In a large mixing bowl, combine hash browns, cream of chicken soup, sour cream, melted butter, shredded cheese, diced onion, diced ham, salt, and pepper. Stir until everything is evenly coated.
-
Assemble: Spread the mixture evenly into the prepared baking dish.
-
Bake: Cook uncovered for 35–40 minutes, or until bubbly and golden on top.
-
Cool & serve: Let rest for a few minutes before serving. Garnish with chives if desired.
Quick Notes & Pro Tips
-
Use frozen hash browns straight from the freezer — they hold their shape better while baking.
-
Grate your own cheese for a smoother, creamier melt.
-
Holiday ham hack: Leftover baked ham works perfectly here.
-
Make-ahead: Assemble the casserole a day in advance. If baking cold, add 5–10 minutes to the cook time.
Why You’ll Love It
This casserole is the ultimate comfort food — cheesy, creamy, and hearty enough to serve any time of day. It’s perfect for family dinners, holiday brunches, or potlucks.
Variations & Serving Suggestions
-
Switch the protein: Substitute ham with cooked sausage, bacon, or turkey.
-
Add veggies: Stir in bell peppers, broccoli, or spinach for extra flavor and color.
-
Top it off: Add a crunchy topping of crushed Ritz crackers or cornflakes mixed with melted butter for texture.
Storage & Make-Ahead
-
Refrigerate: Store leftovers in an airtight container for up to 4 days.
-
Freeze: Wrap tightly and freeze for up to 2 months. Thaw overnight before reheating.
-
Reheat: Warm in the oven at 350°F until heated through or in the microwave for quick servings.
FAQs
Q: Can I make this gluten-free?
A: Yes — use gluten-free cream soup and verify the hash browns are GF.
Q: Can I use fresh potatoes instead of frozen hash browns?
A: Yes, but shred them and squeeze out excess moisture before mixing.
Q: Can I double the recipe?
A: Absolutely! Use a deeper casserole dish or two 9×13 pans and extend baking time as needed.
Personal Note
This recipe has been a lifesaver for using up leftover holiday ham — and my family requests it year-round. It’s the kind of dish that disappears fast at any gathering.
French Onion Roasted Potatoes
Golden, crispy potatoes tossed with French onion soup mix and garlic, then topped with melty cheese — the ultimate side dish for any meal.
Prep Time: 10 minutes
Cook Time: 30–35 minutes
Total Time: ~45 minutes
Servings: 6
Ingredients
Potatoes:
-
2 lbs baby potatoes or Yukon gold potatoes, halved or quartered
-
2 tbsp olive oil
Seasonings:
-
1 packet (1 oz) French onion soup mix
-
½ tsp garlic powder
-
Salt & pepper – to taste
Toppings:
-
1 cup shredded mozzarella or Swiss cheese
-
2 tbsp fresh parsley, chopped (for garnish)
Other:
-
Nonstick cooking spray
Instructions
-
Preheat the oven: Set to 425°F (220°C). Spray a large baking sheet or 9×13-inch baking dish with nonstick cooking spray.
-
Prep the potatoes: Wash and scrub thoroughly. Leave skins on for texture and nutrition. Halve baby potatoes (or quarter larger ones) into 1–2-inch pieces for even cooking.
-
Season: In a large bowl, toss potatoes with olive oil. Sprinkle with French onion soup mix, garlic powder, salt, and pepper. Toss until evenly coated.
-
Roast: Arrange potatoes in a single layer on the prepared sheet, cut-side down. Roast for 25–30 minutes until golden and tender.
-
Add cheese: Remove from oven, sprinkle evenly with cheese, and return to the oven for 5–7 minutes until melted and lightly golden.
-
Finish & serve: Garnish with fresh parsley and serve hot.
Quick Notes & Pro Tips
-
Don’t overcrowd the pan: Spread potatoes out to ensure crisp, caramelized edges. Use two pans if needed.
-
Extra crispiness: Pat potatoes completely dry after washing, or soak in cold water for 30 minutes to remove excess starch (dry well before roasting).
-
Cheese swap: Try Gruyère for a nutty twist or sharp cheddar for a tangy bite.
Why You’ll Love It
These potatoes are creamy on the inside, crispy on the outside, and packed with French onion flavor. With melted cheese on top, they’re irresistible — and they pair well with almost anything!
Variations & Serving Suggestions
-
Make it loaded: Add crumbled bacon, sour cream, and green onions for a “loaded baked potato” feel.
-
Turn it into a full meal: Mix in cooked sausage or chicken before topping with cheese.
-
Pair with: Steak, roasted chicken, or grilled veggies for a complete dinner.
Storage & Make-Ahead
-
Refrigerate: Store in an airtight container for up to 3 days.
-
Reheat: Bake at 375°F for 10–15 minutes or air fry at 400°F for 5 minutes to re-crisp.
-
Make-ahead: Chop and season potatoes a day ahead; roast and top with cheese just before serving.
FAQs
Q: Can I use frozen potatoes?
A: Yes, but thaw and pat them dry before seasoning for best results.
Q: Can I skip the cheese?
A: Absolutely — they’re flavorful enough to enjoy without it.
Q: Can I use sweet potatoes instead?
A: Yes, but adjust baking time slightly since sweet potatoes cook faster.
Personal Note
This dish is my go-to when I want a side that’s simple yet a little extra special. It’s perfect for weeknight dinners or holiday tables — and the cheesy topping always wins over picky eaters.
Cabbage Beef Bake
A hearty, low-carb casserole with ground beef, tender cabbage, and melty cheese — a simple, family-friendly comfort dish that comes together in under an hour.
Prep Time: 15 minutes
Cook Time: 30 minutes
Total Time: ~45 minutes
Servings: 6
Calories per serving: 290 kcal | Net Carbs: 5g | Protein: 22g | Fat: 20g
Ingredients
-
Ground beef – 1 lb
-
Cabbage – 1 small head, chopped
-
Onion – 1 medium, diced
-
Garlic – 2 cloves, minced
-
Diced tomatoes – 1 can (14.5 oz), undrained
-
Italian seasoning – 1 tsp
-
Paprika – 1 tsp
-
Salt & black pepper – to taste
-
Mozzarella cheese – 1 cup, shredded
-
Olive oil – 2 tbsp
Instructions
-
Preheat the oven: Set to 350°F (175°C). Grease a 9×13-inch baking dish.
-
Cook the aromatics & beef: In a large skillet, heat olive oil over medium heat. Sauté onion and garlic until translucent. Add ground beef and cook until browned, breaking it apart with a spoon. Drain excess fat.
-
Add cabbage & seasonings: Stir in chopped cabbage, diced tomatoes, Italian seasoning, paprika, salt, and pepper. Cook for 5–7 minutes, until the cabbage softens slightly.
-
Assemble: Transfer the mixture to the prepared baking dish. Sprinkle shredded mozzarella evenly over the top.
-
Bake: Cook uncovered for 25–30 minutes, or until the cheese is melted, bubbly, and golden.
-
Cool & serve: Let rest for a few minutes before slicing and serving.
Quick Notes & Pro Tips
-
Veggie boost: Add chopped bell peppers or mushrooms for extra flavor and nutrition.
-
Cheese options: Swap mozzarella for cheddar, Monterey Jack, or an Italian blend.
-
Make it spicy: Add a pinch of red pepper flakes or diced jalapeños.
Why You’ll Love It
This dish is satisfying, budget-friendly, and naturally low in carbs. It’s also a great way to incorporate more veggies into your dinner without sacrificing flavor.
Variations & Serving Suggestions
-
Keto-friendly: Serve as is for a low-carb meal.
-
Make it a full dinner: Pair with a side salad or roasted veggies.
-
Turn it into a one-pan meal: Skip baking and melt cheese directly in the skillet for a stovetop version.
Storage & Make-Ahead
-
Refrigerate: Store leftovers in an airtight container for up to 4 days.
-
Freeze: Cool completely, wrap tightly, and freeze for up to 3 months. Thaw overnight before reheating.
-
Reheat: Warm in the oven at 350°F until heated through, or microwave individual portions.
FAQs
Q: Can I use ground turkey or chicken instead?
A: Yes — ground turkey or chicken works well as a leaner alternative.
Q: Can I make it ahead?
A: Absolutely! Assemble up to a day in advance, refrigerate, then bake when ready.
Q: Can I skip the cheese?
A: Yes, but the melty cheese adds a great texture and flavor.
Personal Note
This recipe reminds me of a rustic stuffed cabbage roll but in casserole form — all the flavor with half the effort. It’s been a lifesaver for busy weeknights and a hit at family dinners.