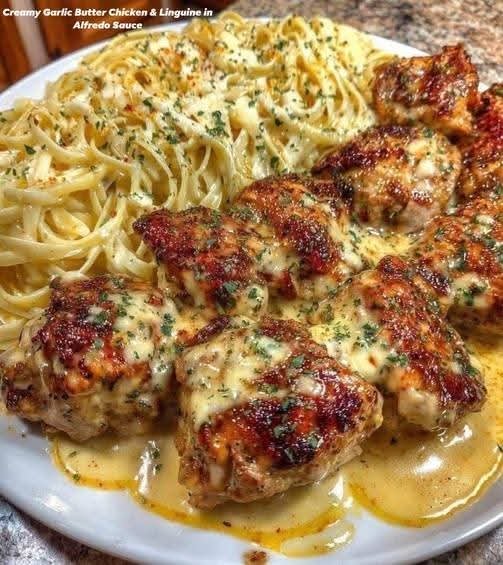
Cheesy Garlic Chicken Wraps Recipe

Ingredients

2 large chicken breasts (diced)

1 tbsp olive oil

2 tsp garlic powder

1 tsp onion powder

1 tsp paprika

Salt and pepper (to taste)

1 cup shredded cheddar cheese

½ cup shredded mozzarella cheese

4 large flour tortillas

½ cup creamy garlic sauce (store-bought or homemade)

Fresh parsley (optional for garnish)

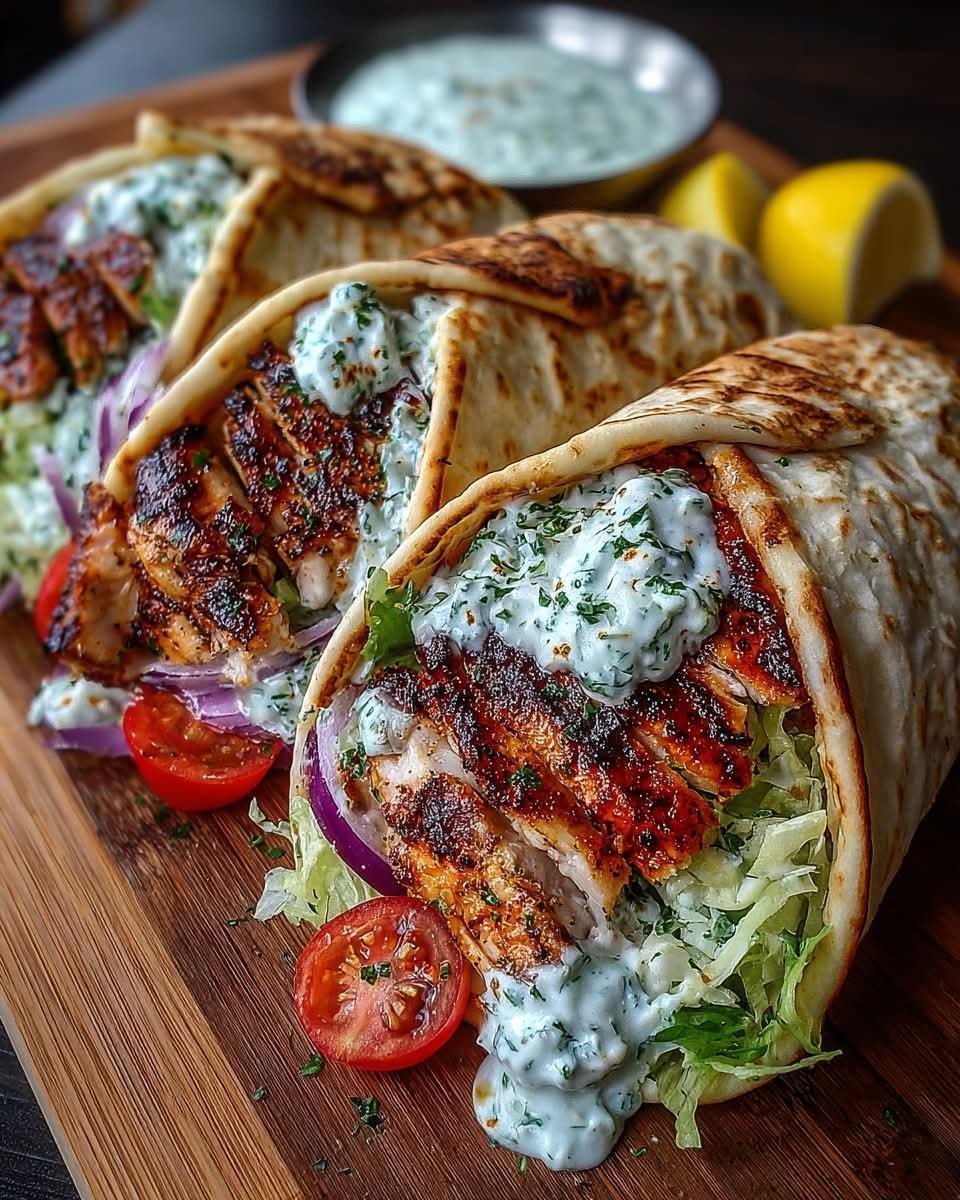
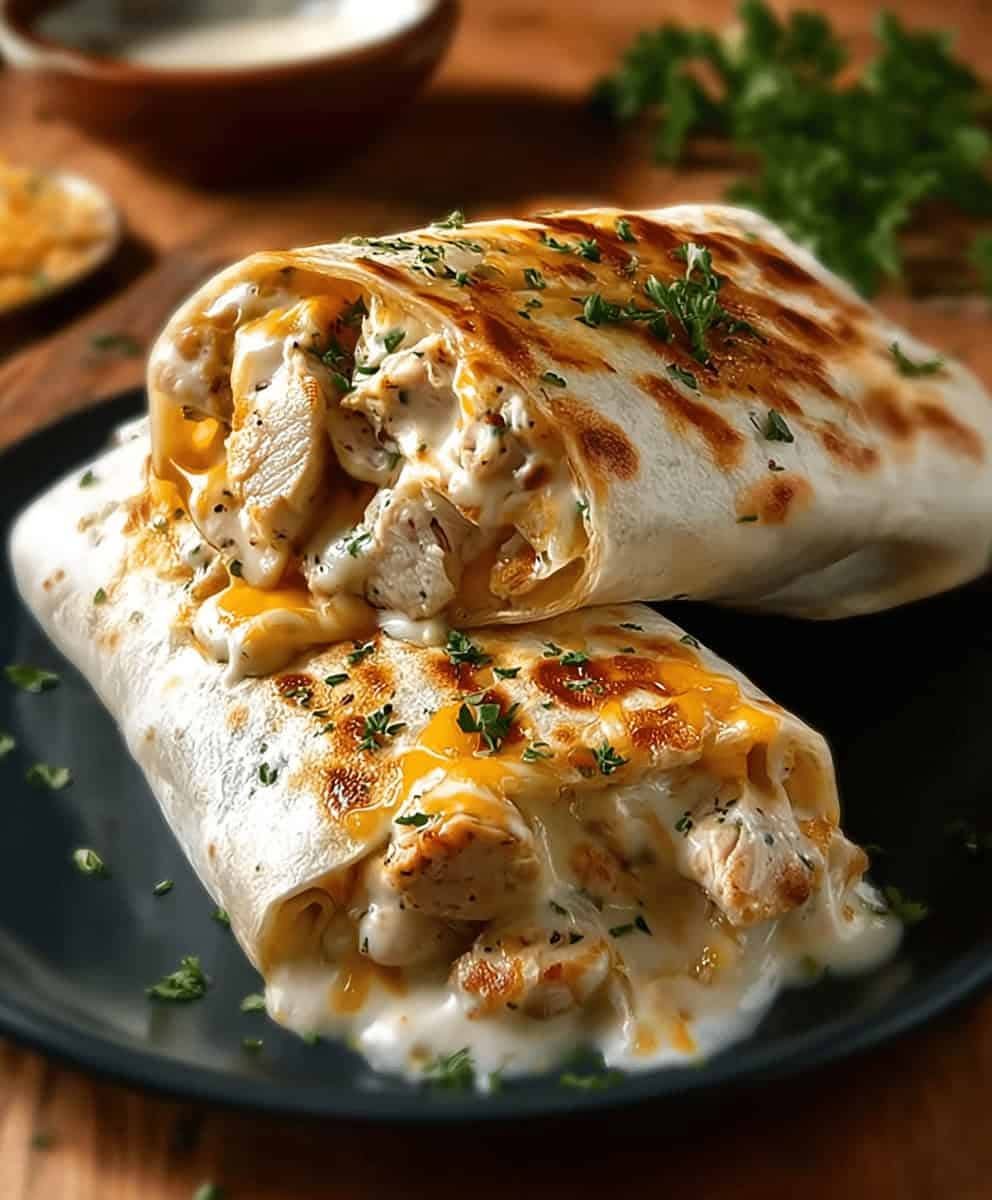
How to Make Cheesy Garlic Chicken Wraps:

Step-by-Step Instructions:

Step 1: Prepare the Chicken Start by dicing your chicken breasts into bite-sized pieces, approximately ¾-inch cubes. This ensures even cooking and makes the wraps easier to eat. Pat the chicken dry with paper towels and season generously with garlic powder, onion powder, paprika, salt, and pepper.

Step 2: Cook the Chicken Heat olive oil in a large skillet over medium-high heat. Once the oil is shimmering, add the seasoned chicken pieces in a single layer. Cook for 6-8 minutes, stirring occasionally, until the chicken is golden brown on all sides and cooked through (internal temperature should reach 165°F).

Step 3: Warm the Tortillas While the chicken is cooking, warm your flour tortillas. You can do this by wrapping them in a damp paper towel and microwaving for 30 seconds, or by heating them individually in a dry skillet for 30 seconds per side.

Step 4: Assemble the Wraps Place each warm tortilla on a clean surface. Spread 2 tablespoons of creamy garlic sauce down the center of each tortilla, leaving about 2 inches from the edges. Divide the cooked chicken evenly among the tortillas, then top with the cheddar and mozzarella cheese blend.

Step 5: Wrap and Serve Fold the bottom edge of each tortilla up over the filling, then fold in the sides and roll tightly from bottom to top. Cut each wrap in half diagonally and serve immediately while the cheese is still melted and the chicken is warm.

Sweet Heat Blackberry Jalapeño Stuffed Chicken

Sweet Heat Blackberry Jalapeño Stuffed Chicken

Ingredients

For the Chicken

  • 2 large boneless skinless chicken breasts
  • Salt & black pepper to taste
  • 1 tsp smoked paprika
  • 1 tbsp olive oil

For the Filling

  • ½ cup fresh or frozen blackberries
  • 1 small jalapeño, seeds removed and finely chopped
  • 2 oz cream cheese or goat cheese
  • 1 tbsp honey
  • 1 tsp fresh thyme leaves

Optional Garnish

Fresh thyme or parsley

Extra blackberrie

Directions

Preheat oven to 375°F (190°C).

Carefully slice a pocket into each chicken breast without cutting all the way through. Season with salt, pepper, and smoked paprika.

In a small bowl, mix blackberries, jalapeño, cream cheese, honey, and thyme until well combined.

Stuff each chicken breast with the blackberry-jalapeño mixture and secure with toothpicks if needed.

Heat olive oil in an oven-safe skillet over medium-high heat. Sear chicken 3–4 minutes per side until golden.

Transfer skillet to the oven and bake 15–20 minutes until chicken is fully cooked (internal temperature 165°F / 74°C).

Remove toothpicks, drizzle with any pan juices, and garnish with fresh thyme and extra blackberries. Serve warm.

Nutritional Info (Approx. per serving – serves 2)

Calories: 370 kcal

Protein: 36 g

Carbohydrates: 12 g

Fat: 20 g

Fiber: 3 g

Sugar: 8 g

Crispy Flatbread with Brie, Cranberries & Walnuts with Maple Chili Drizzle

Crispy Flatbread with Brie, Cranberries & Walnuts with Maple Chili Drizzle

Ingredients

  • 2 flatbreads or naan
  • 4 oz (115g) brie cheese, sliced
  • 1/4 cup dried cranberries
  • 2 tbsp walnuts, roughly chopped
  • 1 tbsp olive oil
  • Salt and pepper, to taste

Maple Chili Drizzle:

  • 2 tbsp maple syrup
  • 1/2 tsp chili flakes (adjust to taste)
  • 1/2 tsp apple cider vinegar or lemon juice

Directions

Preheat oven to 400°F (200°C). Lightly brush flatbreads with olive oil.

Arrange brie slices evenly over each flatbread. Top with cranberries and walnuts. Season lightly with salt and pepper.

Bake for 8–10 minutes, until brie is melted and flatbread edges are crisp.

In a small bowl, mix maple syrup, chili flakes, and vinegar or lemon juice. Drizzle over baked flatbreads.

Slice and serve immediately while warm and melt

Nutritional Info (per flatbread)

Calories: ~350 kcal

Protein: 10g

Carbs: 30g

Fat: 22g

Golden Cauliflower Skillet with Melted Brie, Garlic Butter Drizzle & Herb Crunch

Golden Cauliflower Skillet with Melted Brie, Garlic Butter Drizzle & Herb Crunch

Ingredients

  • 1 large head cauliflower, cut into florets
  • 2 tbsp olive oil
  • 1/2 tsp smoked paprika
  • 1/2 tsp garlic powder
  • Salt and black pepper, to taste
  • 6 oz (170g) brie cheese, sliced (rind on)

Garlic Butter Drizzle:

  • 3 tbsp unsalted butter
  • 2 cloves garlic, finely minced

Herb Crunch:

  • 1/3 cup panko breadcrumbs
  • 2 tbsp olive oil
  • 2 tbsp fresh parsley, finely chopped
  • 1 tbsp fresh thyme or rosemary, chopped

Directions

Heat olive oil in a large skillet over medium-high heat. Add cauliflower florets, smoked paprika, garlic powder, salt, and pepper.

Cook for 10–12 minutes, stirring occasionally, until cauliflower is golden brown and tender with crispy edges.

Reduce heat to medium-low. Arrange brie slices over the cauliflower, cover the skillet, and let melt for 2–3 minutes until soft and creamy.

Meanwhile, melt butter in a small pan over low heat. Add garlic and cook gently for 30–60 seconds until fragrant. Remove from heat.

In another small pan, heat olive oil and toast panko breadcrumbs until golden and crisp. Stir in chopped herbs and remove from heat.

Drizzle garlic butter over the melted brie cauliflower and finish with the herb crunch. Serve immediately while warm and gooey.

Nutritional Info (per serving)

Calories: ~390 kcal

Protein: 14g

Carbs: 22g

Fat: 28g

Greek Chicken Gyro Wraps with Spicy Cucumber Yogurt

Greek Chicken Gyro Wraps with Spicy Cucumber Yogurt

Ingredients

  • 2 chicken breasts, thinly sliced
  • 2 tbsp olive oil
  • Zest and juice of 1 lemon
  • 2 cloves garlic, minced
  • 1 tsp dried oregano
  • 1/2 tsp smoked paprika
  • Salt and pepper, to taste
  • 4 pita breads or flatbreads
  • 1 cup shredded lettuce
  • 1/2 cup cherry tomatoes, halved
  • 1/4 cup red onion, thinly sliced

Spicy Cucumber Yogurt Sauce:

  • 1 cup plain Greek yogurt
  • 1/2 cup cucumber, finely grated and squeezed dry
  • 1 tsp chili flakes or 1/2 tsp chili paste (adjust to taste)
  • 1 tbsp lemon juice
  • 1 tbsp olive oil
  • Salt, to taste

Directions

In a bowl, mix olive oil, lemon zest, lemon juice, garlic, oregano, paprika, salt, and pepper. Add chicken and marinate for at least 20 minutes.

Heat a skillet or grill pan over medium-high heat. Cook chicken for 5–7 minutes until fully cooked and lightly charred.

Prepare the spicy cucumber yogurt sauce by combining Greek yogurt, grated cucumber, chili flakes or paste, lemon juice, olive oil, and salt. Mix until smooth.

Warm pita breads until soft and pliable.

Assemble wraps by layering lettuce, tomatoes, red onion, and cooked chicken. Drizzle generously with the spicy cucumber yogurt sauce, wrap, and serve immediately.

Nutritional Info (per wrap)

Calories: ~400 kcal

Protein: 32g

Carbs: 34g

Fat: 16g

🫐 Frozen Blueberry Yogurt Clusters


🫐 Frozen Blueberry Yogurt Clusters

Ingredients

Fresh Blueberries: 1 to 2 cups (washed and dried thoroughly).


Greek Yogurt: 1 cup (plain or vanilla).


Sweetener: 1-2 tablespoons of honey or maple syrup (or the powdered sweetener shown in your image).


Vanilla Extract: 1 teaspoon.


Optional: A pinch of salt to enhance the flavor.


Instructions

Prep the Mix: In a medium bowl, whisk together the Greek yogurt, sweetener, and vanilla extract until smooth.


Coat the Berries: Fold the fresh blueberries into the yogurt mixture. Gently stir until every berry is generously coated.


Scoop & Cluster: Line a baking sheet or large plate with parchment paper. Use a spoon to scoop small “clusters” (about 5-8 berries each) onto the paper.


Freeze: Place the tray in the freezer for at least 2 to 3 hours, or until the clusters are completely firm and frozen.


Serve: Once frozen, peel them off the parchment paper. Eat them immediately or store them in a freezer-safe bag for a quick snack later.


💡 Pro-Tips for Success

Dry the Berries: Make sure your blueberries are completely dry after washing. If they are wet, the yogurt won’t stick well and you’ll get icy crystals.


Yogurt Choice: Using Full-Fat Greek Yogurt results in a creamier texture that is less likely to turn into a “hard ice” block.


Chocolate Version: For an extra treat, you can melt some dark chocolate with a teaspoon of coconut oil and drizzle it over the frozen clusters before a final 10-minute chill.

Creamy Garlic Butter Chicken & Linguine in Alfredo Sauce 🍝🧄

Full recipe >>>Creamy Garlic Butter Chicken & Linguine in Alfredo Sauce 🍝🧄

Ingredients

For the Chicken

2 boneless, skinless chicken breasts (sliced)

Salt & black pepper – to taste

1 tsp paprika

1 tsp Italian seasoning

2 tbsp butter

1 tbsp olive oil

For the Pasta

250 g linguine (or fettuccine)

Water + salt (for boiling)

For the Alfredo Sauce

3 tbsp butter

4–5 garlic cloves (minced)

1 cup heavy cream

1 cup milk

¾ cup grated Parmesan cheese

½ tsp black pepper

Salt – to taste

½ tsp chili flakes (optional)

1 tsp Italian seasoning

Garnish (optional)

Fresh parsley

Extra Parmesan cheese

Instructions

1. Cook the Pasta

Boil linguine in salted water according to package instructions.

Drain and set aside (reserve ¼ cup pasta water).

2. Cook the Chicken

Season chicken with salt, pepper, paprika, and Italian seasoning.

Heat butter + olive oil in a pan over medium heat.

Cook chicken 4–5 minutes per side until golden and fully cooked.

Remove chicken from pan and set aside.

3. Make the Garlic Alfredo Sauce

In the same pan, add butter.

Add minced garlic and sauté for 30 seconds (don’t burn).

Pour in cream and milk, stir well.

Add salt, black pepper, chili flakes, and Italian seasoning.

Simmer on low heat for 3–4 minutes.

Add Parmesan cheese slowly, stirring until smooth and creamy.

4. Combine Everything

Add cooked pasta to the sauce.

Slice chicken and add it back to the pan.

Toss everything together.

(Add a little pasta water if sauce is too thick.)

5. Serve

Garnish with parsley and extra Parmesan.

Serve hot and creamy

🍋 Lemon Ginger Water

Full recipe>>> 🍋 Lemon Ginger Water

Ingredients:

1 fresh lemon

1-inch piece fresh ginger

1–2 cups water (hot or warm)

Optional: a few mint leaves

Method:

Wash and thinly slice the ginger (no need to peel if clean).

Boil the water.

Add ginger slices and simmer for 5–10 minutes.

Turn off heat and let it cool slightly.

Squeeze in ½ to 1 lemon (don’t add lemon to boiling water).

Strain if you like, or drink as is.

How to drink:

Best first thing in the morning on an empty stomach

Can also drink warm or cold during the day

Benefits:

Boosts digestion

Helps with bloating

Supports immunity

Refreshing and detox-friendly

Soft Homemade Oatmeal Muffins Recipe

Soft Homemade Oatmeal Muffins Recipe

These oatmeal muffins are warm, comforting, and perfect for breakfast, tea time, or a light snack. They have a golden top, a gentle oat texture, and a naturally satisfying taste. Made with simple pantry ingredients, these muffins are easy to prepare and fill your kitchen with a lovely aroma while baking. They are enjoyable on their own or with a little butter, honey, or fruit spread.


Ingredients (Makes 10–12 muffins)

1½ cups rolled oats


1 cup milk (warm, not hot)


1½ cups all-purpose flour


¾ cup sugar (white or light brown)


2 teaspoons baking powder


½ teaspoon baking soda


½ teaspoon salt


1 teaspoon ground cinnamon (optional but nice)


2 large eggs (room temperature)


½ cup cooking oil or melted butter


1 teaspoon vanilla essence


Preparation Steps

Soak the oats:

Place the rolled oats in a bowl and pour the warm milk over them. Stir gently and let them rest for about 15–20 minutes. This step softens the oats and helps create moist muffins.


Prepare the oven and pan:

Preheat your oven to 180°C (350°F). Line a muffin tray with paper liners or lightly grease each cup.


Mix dry ingredients:

In a large bowl, combine the flour, sugar, baking powder, baking soda, salt, and cinnamon. Stir well so everything is evenly mixed.


Mix wet ingredients:

In another bowl, whisk the eggs, oil (or melted butter), and vanilla essence until smooth. Add the soaked oats along with any remaining milk and mix gently.


Combine everything:

Pour the wet mixture into the bowl of dry ingredients. Fold gently using a spatula or spoon. Mix just until combined. Do not overmix, as this keeps the muffins soft.


Fill the muffin cups:

Spoon the batter evenly into the prepared muffin cups, filling each about ¾ full.


Bake:

Place the tray in the preheated oven and bake for 18–22 minutes, or until the tops are golden and a toothpick inserted in the center comes out clean.


Cool and enjoy:

Remove the muffins from the oven and let them cool in the tray for 5 minutes, then transfer to a wire rack.


Serving Tips

These oatmeal muffins taste wonderful warm or at room temperature. You can enjoy them plain or pair them with fresh fruit, yogurt, or a warm drink. They also store well in an airtight container for a few days.


If you’d like, I can also share variations such as banana oat muffins, apple oat muffins, or a honey-sweetened version.

Mixed Fruit Oat Breakfast Cups

These vibrant, layered breakfast cups are made with oats, bananas, assorted fruits, and optional toppings like nuts or cocoa. They are healthy, quick, and perfect for meal-prep.

Ingredients (for 6 Cups)

Base Layer (all cups):

1½ cups rolled oats (¼ cup per cup)


3–4 bananas, sliced (used in all cups)


Fruit Toppings:

Strawberry Cup – ½ cup sliced strawberries


Blueberry Cup – ½ cup fresh blueberries


Mango Cup – ½ cup diced mango


Grape & Kiwi Cup – 6–8 green grapes + ½ kiwi sliced


Walnut & Cocoa Cup – 1 tbsp cocoa powder + 2 tbsp chopped walnuts


Raspberry Cup – ½ cup fresh raspberries

Optional Add-ins:

Honey or maple syrup


Greek yogurt


Chia seeds


Almond milk or any milk


Cinnamon or vanilla


🥣 Instructions

Prepare the Base:

Fill each glass with ¼ cup rolled oats. You may keep them dry (as shown) or lightly moisten them with 1–2 tablespoons milk or yogurt for softer texture.


Add Banana Layer:

Add an even layer of sliced bananas over the oats. Bananas add natural sweetness and creaminess.


Add Fruit Toppings:


Cup 1: Add sliced strawberries.


Cup 2: Add blueberries.


Cup 3: Add diced mango.


Cup 4: Add grapes and kiwi slices.


Cup 5: Spoon in cocoa powder over bananas, then add chopped walnuts.


Cup 6: Add fresh raspberries.


Optional:

Drizzle honey, add yogurt, or pour a bit of milk if you prefer a soaked-oat texture similar to overnight oats.


Serve Immediately or refrigerate for 1–2 hours for a chilled parfait.

Q&A Section

Q1: Are these breakfast cups healthy?

Yes! They contain whole grains, fiber-rich fruits, potassium-rich bananas, and healthy fats from nuts.


Q2: Can I prepare them in advance?

Yes—prepare up to 24 hours early, but sprinkle lemon juice on bananas to prevent browning.


Q3: Can I replace bananas?

Absolutely. Substitute pears, apples, yogurt, or berries.

Q4: Are these suitable for weight loss?

Yes. They are low-fat, high-fiber, and very filling, making them excellent for weight control.


Q5: Can I turn these into overnight oats?

Yes. Add ½ cup milk or yogurt to each cup, mix lightly, cover, and refrigerate overnight.

Creamy Peanut Butter Banana Smoothie

Creamy Peanut Butter Banana Smoothie

Prep time: 5 minutes | Servings: 1


Ingredients

1 large banana (frozen is best for that thick, creamy texture)


1 cup milk of choice (dairy, almond, oat, or soy)


2 tablespoons creamy peanut butter


1/4 cup Greek yogurt (plain or vanilla for extra thickness and protein)


1/2 teaspoon ground cinnamon (to match the dusting on top)


1 teaspoon honey or maple syrup (optional, for extra sweetness)


A handful of ice (only if using a fresh banana instead of frozen)


Instructions

Prep the Fruit: If you have time, peel and slice your banana and freeze it for at least 2 hours. If you’re in a hurry, a fresh banana works too!


Combine: Add the milk, peanut butter, yogurt, banana, and cinnamon into a high-speed blender.


Blend: Start on low speed and gradually increase to high. Blend for about 45–60 seconds until the mixture is completely smooth and no lumps remain.


Check Consistency: If it’s too thick, add a splash more milk. If it’s too thin, add a couple more ice cubes or a piece of frozen fruit.


Garnish: Pour into a tall glass. Drizzle a small amount of melted peanut butter on top, sprinkle with extra cinnamon, and finish with a fresh banana slice on the rim, just like in the photo.

Oven-Baked Chicken Mushroom Cheese Casserole

Oven-Baked Chicken Mushroom Cheese Casserole

Description


This Oven-Baked Chicken Mushroom Cheese Casserole is a rich and savory dish with deep, comforting flavors. The mushrooms bring an earthy taste that pairs beautifully with tender chicken and melted cheese. Baked to perfection, this crustless casserole has a soft interior and a lightly golden top. It’s perfect for family dinners and pairs well with rice, salad, or steamed vegetables.


Ingredients


2 cups cooked chicken, diced


1½ cups mushrooms, sliced


1 small onion, chopped


1 cup shredded mozzarella cheese


½ cup shredded cheddar cheese


4 large eggs


1 cup milk


2 tablespoons butter or olive oil


1 teaspoon salt


½ teaspoon black pepper


½ teaspoon garlic powder


Directions


Preheat oven to 180°C (350°F). Grease a casserole dish.


Heat butter in a pan and sauté onion until soft.


Add mushrooms and cook until moisture evaporates.


In a bowl, whisk eggs, milk, salt, pepper, and garlic powder.


Add chicken, mushroom mixture, and half of the cheese. Stir well.


Transfer mixture to the baking dish.


Sprinkle remaining cheese evenly on top.


Bake for 35–40 minutes until firm and golden.

Lentil Salad with Roasted Vegetables

Lentil Salad with Roasted Vegetables

Ingredients

Roasted Vegetables:

1 sweet potato, diced

(250 g)

1 red bell pepper, chopped

(150 g)

1 zucchini, sliced

(150 g)

1 red onion, cut into wedges

(120 g)

2 tablespoons olive oil

(30 ml)

½ teaspoon salt

(3 g)

¼ teaspoon black pepper

(1 g)

½ teaspoon smoked paprika or cumin

(1 g)

Lentil Salad:

1 cup dry green or brown lentils

(200 g)

3 cups water or vegetable broth

(720 ml)

½ teaspoon salt

(3 g)

Fresh Add-Ins:

½ cup cherry tomatoes, halved

(75 g)

¼ cup chopped parsley or cilantro

(10 g)

¼ cup crumbled feta (optional)

(35 g)

Lemon Dressing:

3 tablespoons olive oil

(45 ml)

1½ tablespoons lemon juice

(22 ml)

1 teaspoon Dijon mustard

(5 g)

1 small garlic clove, grated

Salt and pepper, to taste

Directions

Preheat oven to 425°F / 220°C.

Toss sweet potato, bell pepper, zucchini, and red onion with olive oil, salt, pepper, and smoked paprika. Spread on a baking tray and roast for 30–35 minutes, flipping once, until tender and caramelized.

Meanwhile, rinse lentils and simmer in water or broth with salt for 18–22 minutes until just tender but not mushy. Drain and cool slightly.

Whisk together olive oil, lemon juice, Dijon, garlic, salt, and pepper to make the dressing.

In a large bowl, combine lentils, roasted vegetables, cherry tomatoes, and herbs. Toss gently with dressing.

Finish with feta if using. Serve warm or at room temperature.

Prep Time: 15 minutes

Cooking Time: 35 minutes

Total Time: 50 mi

nutes

Calories: ~380 kcal per serving

Servings: 4


Authentic Homemade Focaccia Italian Bread

Full recipe>>> Servings


Makes: 1 large focaccia (9×13 in / 23×33 cm)


Serves: 8–10 slices


🧾 Ingredients

Dough


4 cups (500 g) all-purpose flour (or bread flour for extra chew)


2¼ tsp (7 g) active dry yeast


2 tsp sugar or honey


1¾ cups (415 ml) warm water (105–110°F / 40–43°C)


2 tsp fine sea salt


¼ cup (60 ml) extra-virgin olive oil


Topping


3 tbsp extra-virgin olive oil


2–3 sprigs fresh rosemary, needles removed


Flaky sea salt, to taste


👩‍🍳 Instructions

1. Activate the Yeast


In a large bowl, combine warm water, yeast, and sugar. Stir gently and let sit 5–10 minutes until foamy.


2. Make the Dough


Add flour, salt, and olive oil. Mix until a sticky dough forms. No kneading needed—just mix until combined.


3. First Rise


Cover the bowl with plastic wrap or a damp towel. Let rise in a warm place 1–1½ hours, until doubled.


4. Shape the Focaccia


Generously oil a baking pan. Transfer dough to the pan and gently stretch it to fit. If it resists, rest 10 minutes and continue.


5. Second Rise


Cover and let rise 30–45 minutes until puffy.


6. Dimple & Top


Preheat oven to 425°F (220°C). Drizzle olive oil over dough. Press deep dimples with your fingertips. Sprinkle rosemary and flaky salt.


7. Bake


Bake 20–25 minutes until deeply golden. Cool slightly before slicing.

Time Breakdown


Prep Time: 5 minutes


Rest Time: Optional 10 minutes


Bake Time: 25–30 minutes


Total Time: 30–40 minutes


🍞 Servings


Makes: 2 medium loaves


Serves: 8–10 people


🧾 Ingredients


3 ½ cups (440g) all-purpose flour


1 ½ cups (360ml) warm water


1 packet (2¼ tsp) instant yeast


1 ½ tsp salt


1 tbsp sugar or honey


2 tbsp olive oil or vegetable oil


1 tsp seeds (optional – black sesame, cumin, flax, or chia)


👩‍🍳 Instructions


Preheat oven to 375°F (190°C). Line a baking tray with parchment paper.


Mix dry ingredients:

In a large bowl, combine flour, yeast, sugar, salt, and seeds.


Add liquids:

Pour in warm water and oil. Mix using a spoon or spatula until a sticky dough forms.


Shape loaves:

Divide dough into two portions. Shape into round or oval loaves. Place on baking tray.


Optional rest:

Let dough rest 10 minutes for slightly better texture (optional).


Bake:

Bake for 25–30 minutes until golden brown and hollow-sounding when tapped.


Cool slightly, slice, and enjoy!


📝 Notes


Dough should be soft and sticky, not dry.


You can bake in a loaf pan, round pan, or free-form.


Brushing tops with olive oil gives extra softness.


💡 Tips for Perfect Bread


For crustier bread, place a small oven-safe bowl of hot water in the oven.


Add garlic powder, herbs, cheese, or olives for flavor variations.


For softer bread, cover with towel while cooling.


Freeze leftovers up to 2 months.


🍽 Serving Ideas


Sandwich bread


Toast with butter & honey


Garlic bread


Soup & stew side


Breakfast toast


🥗 Nutritional Information (Per Slice – Approximate)


Calories: 140


Carbohydrates: 26g


Protein: 4g


Fat: 3g


Fiber: 1g


Sodium: 210mg

Ice cream dessert with 4 ingredients: Very creamy, refreshing recipe with an irresistible flavor

Hello, everyone, today we’re going to learn how to make Ice cream dessert using simple ingredients. So grab your pen and paper to jot down the ingredients, then follow the complete preparation method.

How to Make Ice cream dessert with 4 ingredients

This lemon dessert is perfect for hot days. Simple and delicious, it combines the lightness of lemon  mousse with the refreshing taste of  gelatin, using just four main ingredients. See below the list of all ingredients and required quantities. And then, a very complete preparation method with details of the recipe.

Recipe Ingredients:

  • Lemon-flavored gelatin: 2 packets
  • Boiling water: 1 ¾ cups (400 ml)
  • Heavy cream: ¾ cup (6.8 fl oz or 200 ml)
  • Sweetened condensed milk: 1 can (14 oz or 395 g)
  • Cold water: 1 ¾ cups (400 ml)
  • Lemon juice: ⅓ cup (3.4 fl oz or 100 ml, approximately 3 to 4 lemons)
  • Lemon zest: for garnish

Instructions:

Preparing the Lemon Gelatin:
First, dissolve the gelatin: In a bowl, mix two packets of lemon gelatin with 1 ¾ cups (400 ml) of boiling water. Stir well until completely dissolved.

Then, add cold water: Gradually add 1 ¾ cups (400 ml) of cold water to the mixture and stir again.

After that, chill: Pour the gelatin mixture into two separate containers to speed up the setting process. Then, place them in the refrigerator for about 2 hours, or until fully set.

Preparing the Lemon Mousse:
First, combine the creams: In a large bowl, mix the heavy cream with the sweetened condensed milk. Stir well until smooth.

Next, add the lemon juice: Slowly pour in the lemon juice while stirring constantly. The mixture will begin to thicken due to the reaction between the lemon juice and the condensed milk.

Finally, adjust the texture: Continue stirring until the mousse is creamy and smooth.

Assembling the Dessert:
First, prepare the gelatin: Once the gelatin is firm, cut it into medium-sized cubes.

Then, arrange in the glass dish: In a small glass dish, arrange the gelatin cubes, placing some along the edges for a more visually appealing presentation.

Next, add the mousse: Spread the lemon mousse over the gelatin cubes, ensuring all gaps are filled.

Finish with decoration: Sprinkle lemon zest over the mousse for an extra touch of flavor and elegance.

Refrigerating and Serving:
Then, refrigerate: Place the dessert back in the refrigerator and let it chill for at least 2 more hours until fully firm.

Finally, serve: Before serving, ensure the dessert is firm to the touch.

Tips and Suggestions:

  • Fruit variations: Try substituting lemon with orange or tangerine for a different flavor.
  • Additional decorations: Besides lemon zest, consider garnishing with mint leaves or small lemon slices.

Sour Cream Beef Noodle Casserole

Growing up, my mom made something that we just called “casserole” because it was the only casserole we ever had in our house. I LOVED it. (Still do.) It was made up of pasta shells, cottage cheese, cream cheese, sour cream, tomato sauce, ground beef, and sometimes some green onion if she was feeling fancy. I saw this and immediately thought of that beloved casserole — it has a lot of the same delicious stuff going on. My mom’s casserole is one that makes some people raise an eyebrow… Cottage cheese with pasta and red sauce? This Sour Cream Beef Noodle Casserole might raise the same concerns. But not for me! I know enough to know that this combo is just comfort food through and through.

INGREDIENTS

  • 1 lb lean ground beef
  • 1/2 yellow onion, chopped
  • 2 cloves garlic, minced
  • 2 (15 oz each) cans tomato sauce
  • 1 teaspoon Italian seasoning
  • 8 oz egg noodles
  • 1 cup sour cream
  • 1 cup cottage cheese
  • 1 cup cheddar cheese, grated
  • Kosher salt and freshly ground black pepper, to taste

PREPARATION

Preheat oven to 350°F and grease a 9×13-inch baking dish with nonstick spray.

In a large skillet over medium-high heat, brown the ground beef and onion until beef is cooked through, about 10 minutes. Add garlic and cook 1 minute more.

Stir in tomato sauce and Italian seasoning and bring to a simmer. Let simmer for 5 minutes, stirring frequently. Season to taste with salt and pepper. Remove from heat and set aside.

While you’re making the sauce, cook egg noodles according to package directions in a large pot of salted boiling water. Drain and set aside.

In a large bowl, stir together the sour cream and cottage cheese. Add egg noodles and season with salt and pepper to taste. Stir to combine.

Transfer half of the egg noodle mixture to the prepared baking dish. Top with half of the meat sauce. Top with remaining egg noodle mixture, followed by remaining meat sauce.

Top with cheese and bake until sauce is bubbly and cheese has melted, about 30 minutes.

Let cool 10 minutes before serving. Enjoy!

Parisian Apple Cake

Ingredients

3 large apples, peeled and diced

1 teaspoons apple cider vinegar

1 cup all-purpose flour

1 teaspoon baking powder

1 teaspoon kosher salt

½ teaspoon cinnamon

¼ teaspoon cardamom

½ cup butter, room temperature

1/2 cup granulated sugar

2 tablespoons brown sugar

2eggs

1 1/2 tablespoons dark rum

1/2 teaspoon vanilla extract

2 tablespoons granulated sugar, for topping

How To Make Parisian Apple Cake

Preheat oven to 350 degrees F and grease an 8×8-inch baking dish.

Place diced apples in a medium-sized mixing bowl and pour apple cider vinegar over the top, then toss to coat.

In another large bowl, sift together flour, baking powder, salt, cinnamon, and cardamom.

In a separate large mixing bowl, add butter, ½ cup granulated sugar, and brown sugar until light and airy. Mix in eggs one at a time, followed by the rum and vanilla.

Slowly mix in flour mixture until just combined, then fold in the diced apples.

Transfer to the prepared baking dish and sprinkle remaining granulated sugar over the top.

Bake for 40-45 minutes or until an inserted toothpick comes out clean.

Allow cake to cool before slicing for best results.

Best Ever Crock Pot Chicken and Dumplings

Ingredients

1 Onion, diced

6 Boneless skinless chicken thighs

1can Cream of chicken soup

1can Cream of celery soup

2 tbsp.Fresh parsley, chopped

1tsp.Poultry seasoning

2c.Chicken broth

1can Buttermilk refrigerated biscuits

2c.Frozen mixed vegetables, defrosted

Black pepper to taste

How To Make Best Ever Crock Pot Chicken and Dumplings

  1. Layer the chopped onion on the bottom of your crockpot.
  2. Place the chicken thighs on top of the chopped onion in a single layer.
  3. In a mixing bowl, place 1 can of cream of chicken soup.
  4. Pour a can of cream of celery soup into the mixing bowl.
  5. Add 1 tsp of poultry seasoning to the mixing bowl.
  6. Sprinkle in 2 tablespoons of chopped fresh parsley.
  7. Add black pepper to taste.
  8. Stir all of the ingredients in the mixing bowl, and pour over top of the chicken thighs in the crockpot.
  9. Pour 2 cups of chicken broth over top of the chicken.
  10. Set the crockpot to high for 5 hours and close the lid.
  11. Do not open the lid until you have just 1 hour of cook time left on the crockpot’s display. With 1 hour left, open the lid and pour in 2 cups of mixed vegetables that have been defrosted. Mix them into the crockpot well, shredding the chicken thighs as you stir.
  12. Open a can of refrigerated biscuits, and flatten each one. Cut each biscuits into 4 long slices.
  13. Layer the biscuits on the top of the chicken mixture in the crockpot.
  14. Let the biscuits cook for the remaining hour of cook time, and then stir the mixture together well to incorporate the dumplings into the chicken mixture.
  15. Serve topped with freshly chopped parsley.

Lemon Soufflé Cakes


Lemon Soufflé Cakes

Prep time: 20 mins | Bake time: 15–20 mins | Yields: 12 cupcakes


Ingredients

4 large eggs (separated into whites and yolks)


1 cup Granulated sugar (divided into two halves)


1 ½ cups All-purpose flour


1 tsp Baking powder


½ cup Unsalted butter (melted and cooled)


½ cup Whole milk


2 tbsp Fresh lemon juice


1 tbsp Lemon zest


¼ tsp Salt


Powdered sugar (for dusting)


Instructions

Prep the Oven & Pan: Preheat your oven to 175°C (350°F). Line a muffin tin with paper liners or grease ramekins with butter and a light coating of sugar.


Mix the Yolks: In a large bowl, whisk the egg yolks with ½ cup of sugar until the mixture is pale and thick. Stir in the melted butter, milk, lemon juice, and zest.


Add Dry Ingredients: Sift the flour, baking powder, and salt into the yolk mixture. Fold gently until just combined. Don’t overmix!


Whip the Egg Whites: In a separate, very clean bowl, beat the egg whites until soft peaks form. Gradually add the remaining ½ cup of sugar while continuing to beat until you reach stiff, glossy peaks.


The Gentle Fold: This is the secret to the “soufflé” lift! Take a third of the egg whites and stir them into the batter to lighten it. Then, very gently fold in the remaining egg whites using a spatula. You want to keep as much air in the batter as possible.


Bake: Fill the liners about ¾ full. Bake for 15–20 minutes or until the tops are golden and spring back when lightly touched.


Finish: Let them cool for 5 minutes (they may sink slightly, which is normal for a soufflé style). Dust generously with powdered sugar before serving.


Tips for Success

Room Temp Eggs: Egg whites whip much better and hold more air when they aren’t cold.


No Grease: Ensure the bowl and whisk used for the egg whites are completely free of oil or yolk, or they won’t stiffen.

Ultimate Patty Melt with Secret Sauce

Ultimate Patty Melt with Secret Sauce

Ingredients:


1 lb ground beef

8 slices of rye bread

8 slices of Swiss cheese

1 large onion, thinly sliced

4 tbsp butter, plus more for spreading

Salt and pepper to taste

For the Secret Sauce:

1/2 cup mayonnaise

2 tbsp ketchup

1 tbsp relish

1 tsp Worcestershire sauce

1/2 tsp garlic powder

1/2 tsp onion powder

Salt and pepper to taste


Directions:


Begin by mixing the secret sauce ingredients in a small bowl. Adjust seasoning to taste, then set aside.

In a skillet over medium heat, melt 1 tbsp of butter. Add the thinly sliced onions, season with salt and pepper, and cook until caramelized, about 10-15 minutes. Transfer to a plate.

Form the ground beef into 4 patties, slightly larger than your bread slices. Season both sides with salt and pepper.

In the same skillet, cook the patties to your desired doneness, about 4 minutes per side for medium. Remove and set aside.

Butter one side of each bread slice. To assemble, spread the secret sauce on the non-buttered side of 4 slices, add a slice of cheese, a patty, caramelized onions, another slice of cheese, and top with another bread slice, buttered side up.

In a clean skillet over medium heat, grill the sandwiches until golden brown and the cheese is melted, about 3-4 minutes per side.

Prep Time: 15 minutes | Cooking Time: 30 minutes | Total Time: 45 minutes

Kcal: 650 kcal | Servings: 4 servings

@tout le monde

🥤 Classic Blueberry Banana Oatmeal Smoothie

🥤 Classic Blueberry Banana Oatmeal Smoothie

A light, antioxidant-rich breakfast that tastes like blueberry pie.

Ingredients

  • Oats: $1/4$ cup rolled oats (old-fashioned)

  • Fruit: 1 ripe banana (frozen is best for creaminess)

  • Berries: $1/2$ cup fresh or frozen blueberries

  • Liquid: 1 cup unsweetened almond milk (or soy/skim milk)

  • Spice: $1/2$ teaspoon ground cinnamon

  • Sweetener (Optional): 1 teaspoon honey or 1 pitted date (only if your fruit isn’t ripe enough)


💪 Protein-Packed Weight Loss Version

Higher protein content to help preserve muscle and curb hunger longer.

Ingredients

  • Oats: $1/4$ cup rolled oats

  • Fruit: $1/2$ frozen banana

  • Berries: $1/2$ cup frozen blueberries

  • Liquid: $1/2$ cup unsweetened almond milk + $1/4$ cup water

  • Protein: $1/2$ cup plain Greek yogurt OR 1 scoop vanilla protein powder

  • Healthy Fat: 1 tablespoon chia seeds or ground flaxseed


📋 Instructions (For Both Recipes)

  1. Prep the Oats: For the smoothest texture, place the dry oats in the blender first and pulse until they become a fine flour. This prevents a “gritty” drink.

  2. Layer Ingredients: Add the liquid first, followed by the yogurt (if using), then the fruit and spices.

  3. Blend: Start on a low speed and gradually increase to high. Blend for 45–60 seconds until completely smooth.

  4. Adjust Consistency: If it’s too thick, add a splash more milk. If you prefer it colder/thicker, add a handful of ice cubes and blend again.

  5. Serve: Pour into a tall glass and top with a few extra blueberries or a sprinkle of dry oats for crunch.


💡 Pro-Tips for Weight Loss

  • Use Frozen Bananas: Peel and slice your overripe bananas before freezing. They act like “healthy ice cream” and give the smoothie a thick, milkshake-like texture.

  • Watch the Toppings: Granola and nut butters are delicious but high in calories. Stick to fresh berries or a dash of cinnamon if you are strictly tracking.

  • Don’t skip the Fiber: Using whole rolled oats instead of “instant” packets ensures you get the full benefit of the beta-glucan fiber, which is what actually helps with hunger control.

Banana Blueberry Baked Pancake (Oven Pancake)


Banana Blueberry Baked Pancake (Oven Pancake)

This banana blueberry baked pancake is a warm, comforting dish that combines the softness of a pancake with the ease of oven baking. It is lightly sweet, naturally flavored by ripe bananas and juicy blueberries, and perfect for breakfast, brunch, or a cozy snack. The texture is fluffy in the center with lightly golden edges, and every bite offers a gentle balance of fruit and batter. This recipe is simple to prepare and does not require special equipment, making it ideal for home cooking.


Ingredients

1 cup all-purpose flour


2 ripe bananas, sliced


½ cup blueberries (fresh or frozen)


2 large eggs


¾ cup milk (regular or plant-based)


2 tablespoons melted butter or neutral oil


2 tablespoons honey or maple syrup


1 teaspoon vanilla extract


1 teaspoon baking powder


¼ teaspoon baking soda


A pinch of salt


Extra butter or oil for greasing the pan


Preparation Method

Start by preheating your oven to 180°C (350°F). Lightly grease a baking dish or oven-safe skillet with butter or oil so the pancake lifts easily after baking.


In a mixing bowl, crack the eggs and whisk them until smooth. Add the milk, melted butter, honey, and vanilla extract, then whisk again until everything blends nicely. This mixture forms the soft and creamy base of the pancake.


In a separate bowl, combine the flour, baking powder, baking soda, and salt. Stir gently to distribute the ingredients evenly. Slowly add the dry mixture into the wet mixture, whisking as you go to avoid lumps. The batter should be smooth and slightly thick but still pourable.


Pour the batter into the prepared baking dish, spreading it evenly. Arrange the banana slices on top, gently pressing them into the batter. Scatter the blueberries evenly across the surface so each slice gets fruit in every bite.


Place the dish in the preheated oven and bake for 25 to 30 minutes, or until the top turns a beautiful golden color and the center feels set when lightly touched. The pancake will puff slightly while baking and settle as it cools.


Serving Suggestions

Remove the baked pancake from the oven and allow it to rest for a few minutes. Slice it into squares or wedges and serve warm. You can enjoy it as is, or add a drizzle of honey, maple syrup, or a spoon of yogurt for extra comfort. A light dusting of powdered sugar also works beautifully for presentation.


Tips and Variations

Add a pinch of cinnamon for a warm aroma


Replace blueberries with strawberries or apples if desired


Use whole-wheat flour for a heartier texture


Serve with nuts for a pleasant crunch


This banana blueberry baked pancake is simple, nourishing, and satisfying, making it a wonderful addition to your recipe collection

Salty One-Pot Creamy Beef and Garlic Butter Pasta

Creamy Beef Pasta Skillet

Ingredients

  • 1 lb ground beef

  • 8 oz pasta (penne or rotini)

  • 4 cups beef broth

  • 1 tablespoon olive oil

  • 3 tablespoons butter

  • 4 cloves garlic, minced

  • 1 teaspoon Italian seasoning

  • ½ teaspoon crushed red pepper flakes (optional)

  • ½ teaspoon paprika

  • Salt and black pepper, to taste

  • ½ cup grated Parmesan cheese

  • ½ cup heavy cream

  • ½ cup shredded mozzarella cheese

  • 2 tablespoons chopped parsley (for garnish)


Instructions

  1. Cook the Beef
    Heat olive oil in a large deep skillet or Dutch oven over medium heat. Add ground beef and cook until browned, breaking it apart as it cooks. Drain excess fat if needed.

  2. Add Seasonings
    Add butter, garlic, Italian seasoning, red pepper flakes, paprika, salt, and pepper. Cook for 1–2 minutes until garlic becomes fragrant.

  3. Cook Pasta
    Pour in beef broth and add uncooked pasta. Stir well and bring to a boil. Reduce heat to medium-low, cover, and simmer for 12–15 minutes, stirring occasionally, until pasta is tender and most liquid is absorbed.

  4. Make It Creamy
    Stir in heavy cream, Parmesan, and mozzarella. Mix until cheese is melted and sauce becomes creamy.

  5. Rest & Serve
    Remove from heat and let sit for 3–5 minutes to thicken slightly. Garnish with parsley before serving.


Time & Nutrition

  • Prep Time: 10 minutes

  • Cook Time: 20 minutes

  • Total Time: 30 minutes

  • Servings: 4

  • Calories: ~640 kcal per serving

Soft & Fluffy Homemade Dinner Rolls

Soft & Fluffy Homemade Dinner Rolls

These homemade dinner rolls are soft, fluffy, and lightly sweet with a buttery finish. Perfect as a side dish for soups, roasts, or tea-time, they are easy to prepare and freezer-friendly.


Ingredients

Dough

  • 4 cups all-purpose flour

  • 2 teaspoons yeast (instant or active dry)

  • 3 tablespoons sugar

  • 1¼ cups warm milk or water (110°F / 43°C)

  • ¼ cup vegetable or sunflower oil

  • 2 eggs

  • ½ teaspoon salt

For Brushing

  • 1 egg white + 2 tablespoons water

  • 2 tablespoons melted butter


Instructions

1. Activate Yeast

In a bowl, mix yeast and sugar. Add warm milk or water and let stand 5–7 minutes until foamy.

2. Mix Wet Ingredients

Add oil, eggs, and salt. Mix well.

3. Add Flour

Add flour gradually and mix until dough forms. Knead 5–7 minutes until smooth and elastic.

4. First Rise

Place dough in a greased bowl. Cover and let rise 1 hour or until doubled.

5. Shape Rolls

Divide dough into 24 equal pieces. Shape into balls and place in a greased pan.

6. Second Rise

Cover and let rise 30–40 minutes.

7. Bake

Brush tops with egg wash.
Bake at 350°F (180°C) for 20–25 minutes until golden.

8. Finish

Brush immediately with melted butter after baking.


Optional Flavor Ideas

  • Cheese-filled (mozzarella or cheddar inside)

  • Garlic butter topping

  • Honey butter glaze

  • Sesame or poppy seed topping


Storage

  • Room temperature: up to 3 days

  • Freeze baked rolls: up to 2 months

  • Reheat before serving


Nutrition (per roll, approx.)

  • Calories: 160

  • Carbs: 24g

  • Protein: 4g

  • Fat: 5g

  • Sugar: 3g