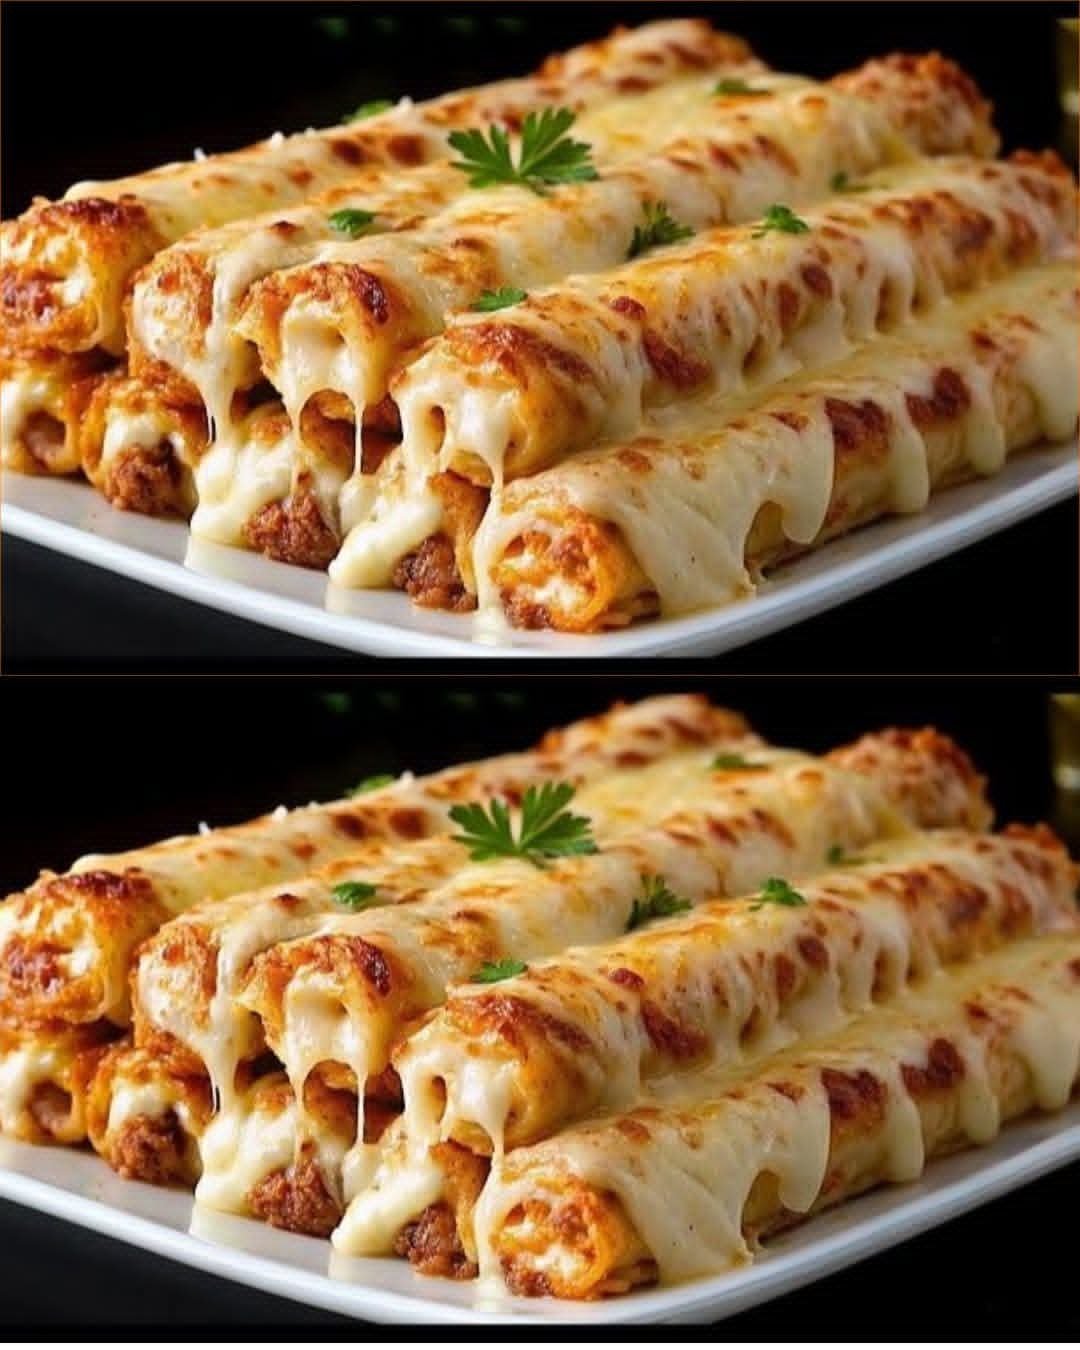
CLASSIC GREEK SALAD

CLASSIC GREEK SALAD
A Refreshing Taste of Greece
Ingredients you will need :
2 cups cucumber, sliced
1 cup cherry tomatoes, halved
1/2 red onion, sliced
1/4 cup Kalamata olives
1/4 cup green olives
1/2 cup feta cheese, cubed
1 tbsp fresh parsley, chopped
1/4 tsp dried oregano
Salt & pepper, to taste
2 tbsp olive oil
1 tbsp red wine vinegar
Instructions:
Prep the Vegetables:
Slice the cucumbers and red onion.
Halve the cherry tomatoes.
Cube the feta cheese.
Assemble the Salad:
In a large bowl, combine the cucumber, cherry tomatoes, red onion, Kalamata olives, and green olives.
Add the cubed feta cheese.
Season and Dress:
Sprinkle the salad with dried oregano, chopped parsley, salt, and pepper.
Drizzle with olive oil and red wine vinegar.

Baked Potato (Classic & Easy) 🥔

Baked Potato (Classic & Easy) 🥔
Ingredients
4 large russet potatoes
2 tbsp olive oil
Salt (to taste)
Optional Toppings
Butter
Sour cream
Shredded cheddar cheese
Chopped green onions or chives
Crispy bacon bits
Black pepper
Instructions
Preheat oven to 425°F (220°C).
Wash and scrub the potatoes well; pat dry.
Pierce each potato 4–5 times with a fork.
Rub with olive oil and sprinkle generously with salt.
Place directly on the oven rack or on a baking tray.
Bake for 45–60 minutes, until the skin is crispy and a knife slides in easily.
Slice open, fluff the inside with a fork, add your favorite toppings, and serve hot.
Tips
For extra crispy skin, place potatoes directly on the rack.
Short on time? Microwave 5–7 minutes first, then bake 20 minutes to finish.
Want softer skin? Wrap in foil (skin won’t be crispy).

Fresh Mint & Ginger Lemonade

Fresh Mint & Ginger Lemonade

Ingredients

  • Fresh Mint: 1 large handful (stems removed).

  • Lemon: 1 to 2 large lemons (juiced).

  • Ginger: A 1-inch piece (peeled and sliced).

  • Water: 2 to 3 cups of chilled water (or coconut water for extra electrolytes).

  • Sweetener (Optional): 1 tablespoon of honey, maple syrup, or a few drops of stevia.

  • Ice: For serving.

Instructions

  1. Prep the Ingredients: Wash the mint leaves thoroughly and peel the ginger skin using the edge of a spoon or a peeler.

  2. Blend: Place the mint leaves, ginger slices, lemon juice, and sweetener (if using) into a high-speed blender. Add 1 cup of water.

  3. Liquefy: Blend on high until the mint and ginger are completely broken down and the liquid is a bright, frothy green.

  4. Dilute: Add the remaining water and pulse briefly to combine.

  5. Strain (Optional): If you prefer a very smooth juice (like the one in the bottom-right photo), pour the mixture through a fine-mesh strainer or nut milk bag into a pitcher. If you like the extra fiber, you can skip this step.

  6. Serve: Pour into glasses over ice. Garnish with a fresh mint sprig and a lemon slice.


Quick Tips

  • For a Fizz: Replace the still water with sparkling water or club soda just before serving.

  • Spice Level: Ginger can be quite strong! If you aren’t used to it, start with a smaller half-inch piece and add more to taste.

  • Temperature: This drink is best served ice-cold.

Homemade Chocolate Hazelnut Truffles


Homemade Chocolate Hazelnut Truffles

Prep time: 30 minutes | Chill time: 1 hour | Yields: Approx. 20–24 truffles

Ingredients

The Filling:

  • 1 cup Chocolate hazelnut spread (like Nutella)

  • 1 cup Toasted hazelnuts, finely chopped (plus 20–24 whole toasted hazelnuts for the centers)

  • 1 cup Crushed wafer cookies (vanilla or hazelnut flavored work best)

The Coating:

  • 1 ½ cups Semi-sweet or milk chocolate chips

  • 1 tsp Coconut oil (helps the chocolate flow smoothly)

  • ½ cup Hazelnuts, very finely chopped (for that signature bumpy texture)


Detailed Instructions

  1. Prepare the Base: In a medium mixing bowl, combine the chocolate hazelnut spread, the 1 cup of finely chopped hazelnuts, and the crushed wafer cookies. Stir until the mixture is uniform and holds its shape when pressed.

  2. Chill to Set: Place the mixture in the refrigerator for about 20–30 minutes. This makes it much easier to roll into balls without it sticking to your hands.

  3. Form the Truffles: Scoop about a tablespoon of the chilled mixture. Press one whole toasted hazelnut into the center, then roll the mixture between your palms to form a smooth ball.

  4. Second Chill: Place the rolled balls on a parchment-lined tray and freeze for 15 minutes. This ensures they don’t melt when you dip them in the warm chocolate.

  5. Melt the Coating: In a microwave-safe bowl, combine the chocolate chips and coconut oil. Microwave in 30-second intervals, stirring in between, until completely smooth. Stir in the remaining ½ cup of finely chopped hazelnuts.

  6. The Dip: Using a fork or a dipping tool, submerge each chilled truffle into the chocolate-nut mixture. Tap the fork against the side of the bowl to let excess chocolate drip off.

  7. Final Set: Place the truffles back on the parchment paper. Let them sit at room temperature until firm, or pop them in the fridge for 10 minutes for a quick set.


Tips for Success

  • Toast Your Nuts: Even if you buy pre-roasted hazelnuts, giving them a quick 5-minute toast in a dry pan over medium heat brings out the oils and makes them much more fragrant.

  • Wafer Texture: Don’t pulverize the wafers into a powder; leave some tiny shards for that authentic “crunch” when you bite into the center.

Golden Glow Citrus Juice

Golden Glow Citrus Juice

Prep time: 10 minutes | Servings: 2


Ingredients

  • 4 large Oranges: Peeled (keep as much of the white pith as possible for nutrients).

  • 2 medium Golden Beets: Scrubbed well and trimmed (peeling is optional if organic).

  • 1-inch knob Fresh Turmeric: Roughly the size of your thumb tip.

  • 1/2-inch knob Fresh Ginger: (Optional, for an extra zing).

  • 1 small Lemon: Peeled, to balance the sweetness.

  • A pinch of Black Pepper: Just a tiny bit helps your body absorb the benefits of the turmeric.


Instructions

  1. Prepare the Produce: Wash all vegetables and fruits thoroughly. Cut the oranges, beets, and lemon into sizes that will fit your juicer’s chute.

  2. Juice the Hard Roots: Start by running the turmeric and golden beets through the juicer. These are denser and provide that deep earthy orange color.

  3. Add the Citrus: Follow with the oranges and lemon. The high water content of the citrus helps flush out any remaining beet or turmeric juice from the machine.

  4. Stir and Serve: Once finished, stir the juice well to combine the layers. Add a tiny pinch of black pepper if desired.

  5. Enjoy: Serve immediately over ice for the freshest taste.


Quick Tips

  • No Juicer? You can use a high-speed blender. Blend all ingredients with 1/2 cup of water until smooth, then strain the mixture through a nut milk bag or a fine-mesh sieve.

  • Stain Warning: Fresh turmeric can stain hands and countertops yellow. You might want to wear gloves or wash your cutting board immediately after prep.

  • Substitutions: If you cannot find golden beets, you can use extra carrots to maintain that bright orange color without the “earthy” flavor of red beets.

Bay Leaf & Clove Herbal Tea

Bay Leaf & Clove Herbal Tea

A warm, aromatic, caffeine-free beverage

Bay Leaf and Clove Herbal Tea is a simple, comforting drink made by gently simmering dried bay leaves and whole cloves in water. The result is a lightly golden infusion with a warm, earthy aroma and subtle spice. This tea is appreciated for its soothing character, pleasant fragrance, and ease of preparation.

Bay leaves bring a mild herbal depth with hints of eucalyptus and mint, while cloves add a gentle warmth and soft spice. Together, they create a balanced cup that can be enjoyed plain or customized with natural flavor additions like lemon, honey, ginger, or cinnamon.

This herbal tea contains no caffeine and can be enjoyed at any time of day. It is especially comforting during cool weather or quiet moments when a warm, aromatic drink is desired.


🧺 Ingredients

Base Ingredients

  • 3 dried bay leaves (whole)

  • 5–6 whole cloves

  • 2 cups water

Optional Flavor Add-Ins (choose as desired)

  • 1 teaspoon honey (for gentle sweetness)

  • 1 slice fresh ginger

  • 1 small cinnamon stick

  • 1 teaspoon lemon juice or a lemon wedge

  • 1 mint leaf


🧑‍🍳 Instructions

Step 1: Prepare Ingredients

Ensure the bay leaves and cloves are clean and free of dust.
If using ginger or cinnamon, prepare them by slicing or breaking them into small pieces.

Step 2: Heat the Water

Pour 2 cups of water into a small saucepan.
Place over medium heat and bring to a gentle boil.

Step 3: Add Spices

Once the water begins to boil, add the bay leaves and cloves.
Add any optional ingredients at this stage if using.

Step 4: Simmer

Reduce the heat to low and allow the mixture to simmer gently for 7–10 minutes.
The liquid will gradually take on a light golden color and release a pleasant aroma.

Step 5: Strain

Remove the saucepan from heat and let it rest for 1–2 minutes.
Strain the tea into a cup using a fine mesh strainer, removing all solids.

Step 6: Serve

Serve warm. Stir in honey or lemon juice if desired.
Garnish with a mint leaf or lemon slice for presentation.


🍽️ Servings

Makes 1 large mug or 2 small cups.
The recipe can be doubled or tripled as needed.


📝 Helpful Notes

  • Bay Leaves: Dried whole bay leaves are best. Avoid crushed or powdered leaves, which are difficult to strain.

  • Cloves: Use whole, aromatic cloves for best flavor.

  • Simmering: Gentle simmering preserves aroma and prevents bitterness.

  • Flavor Strength: Adjust steeping time to taste—shorter for mild, longer for stronger flavor.

  • Sweeteners: Honey complements the spice naturally without overpowering.

  • Serving: Best enjoyed warm, but may also be served chilled.

  • Storage: Prepared tea can be refrigerated for up to 24 hours and reheated gently.


🌿 Serving Ideas

  • Enjoy on its own as a calming beverage

  • Pair with light snacks or fruit

  • Serve in a clear glass mug to highlight the golden color

  • Add cinnamon and ginger for a richer, spiced version


Bay Leaf and Clove Herbal Tea is a simple drink made with care and intention. Its warm aroma, gentle flavor, and minimal ingredients make it a pleasant addition to any daily routine. Whether enjoyed alone or shared, this tea celebrates simplicity, tradition, and mindful preparation.

Egg Muffins – Quick & Nutritious Breakfast

Egg Muffins – Quick & Nutritious Breakfast

High in protein, low in carbs, and fully customizable

Prep Time: 10 minutes
Cook Time: 18–22 minutes
Total Time: 30 minutes
Yield: 6 muffins

Egg muffins are a versatile breakfast or snack option. You can add your favorite vegetables, meats, or cheeses, making them ideal for low-carb, keto, or meal-prep-friendly diets.


Ingredients

  • 6 large eggs

  • ¼ cup (60 ml) milk (or unsweetened almond/oat milk for dairy-free)

  • ½ cup shredded cheese (cheddar, feta, or your choice; optional for dairy-free)

  • ½ cup chopped vegetables (bell peppers, spinach, green onions, mushrooms, zucchini, etc.)

  • ¼ cup cooked bacon or ham (optional)

  • Salt and pepper to taste

  • ½ teaspoon garlic powder (optional)

  • ½ teaspoon paprika (optional)


Step-by-Step Instructions

1. Preheat the Oven

Preheat your oven to 375°F (190°C).
Lightly grease a 6-cup muffin tin with cooking spray, oil, or butter. Silicone muffin cups can also be used.


2. Prepare Ingredients

  • Chop your vegetables into small pieces.

  • Dice cooked bacon or ham if using.

  • Pre-sauté watery vegetables (like mushrooms or spinach) for 2–3 minutes to prevent soggy muffins.


3. Whisk the Eggs

In a large bowl, whisk together the eggs, milk, salt, pepper, garlic powder, and paprika until smooth and slightly frothy.
This ensures fluffy muffins with evenly distributed seasoning.


4. Assemble the Muffins

  • Divide the chopped vegetables and cooked meat evenly among the muffin cups.

  • Pour the egg mixture over the fillings, filling each cup about ¾ full.

  • Top each with shredded cheese, if using.


5. Bake

Place the muffin tin in the preheated oven.
Bake for 18–22 minutes, or until the egg muffins are set and lightly golden on top.
A toothpick inserted in the center should come out clean.


6. Cool and Serve

  • Allow the muffins to cool for a few minutes before removing them from the tin.

  • Serve warm, or store for meal prep.


Tips for Perfect Egg Muffins

  • Grease Well: Prevents sticking; silicone cups work best.

  • Whisk Thoroughly: Ensures light, fluffy muffins.

  • Do Not Overfill: Fill ¾ full to prevent overflow.

  • Cool Slightly Before Removing: Prevents breaking.

  • Storage & Reheating: Refrigerate in an airtight container for up to 5 days; microwave for 30–45 seconds to reheat.

  • Freezing: Let muffins cool completely, then freeze in airtight containers or freezer bags for up to 3 months. Reheat 1–2 minutes in the microwave.

Homemade Garden Vegetable Spread

Homemade Garden Vegetable Spread

This creamy, tangy spread is packed with crunchy carrots, celery, and zesty green onions. It’s the perfect companion for toasted bagels, crackers, or even as a dip for fresh bell pepper strips.

  • Prep time: 15 minutes

  • Inactive time: 1–2 hours (chilling)

  • Yields: Serves 8

  • Dietary Info: Vegetarian, Contains Milk

Ingredients

  • 2 (8 oz) packages cream cheese, softened to room temperature

  • ¼ cup carrots, chopped

  • ½ cup celery, chopped

  • 2 green onions, chopped

  • ½ tsp salt

  • ½ tsp garlic powder

  • ¼ tsp onion powder

Preparation

  1. Prep the Veggies: Place the chopped carrots, celery, and green onions into a food processor. Pulse several times until the vegetables are broken down into very small bits.

    Tip: Be careful not to over-process; you want distinct texture, not a watery paste.

  2. Mix: In a medium-sized mixing bowl, combine the softened cream cheese, the pulsed vegetable mixture, salt, garlic powder, and onion powder. Stir vigorously until the vegetables and seasonings are evenly distributed throughout the cream cheese.

  3. Chill: Spoon the spread into an airtight container or a glass jar. Place it in the refrigerator for at least 1 to 2 hours. This allows the cream cheese to firm back up and the flavors from the onion and garlic to meld.

  4. Serve: Spread generously on toasted bagels or crusty bread.

Storage

Keep the spread refrigerated in an airtight container. It will stay fresh and delicious for 7–10 days.

Tropical Delight: Fruity Tapioca Jelly Drink

Tropical Delight: Fruity Tapioca Jelly Drink

A colorful, creamy chilled drink with fruit, jelly cubes, and soft tapioca pearls

Introduction

Tropical Delight is a vibrant and refreshing dessert-style drink made with creamy milk, tender tapioca pearls, fruity jelly cubes, and mixed fruit. It’s visually beautiful, lightly sweet, and wonderfully textured—perfect for warm days, gatherings, or as a fun treat for the whole family.


🧾 Ingredients

For the Jelly

  • 4 cups water

  • ¼ cup white sugar

  • 25 grams white unflavored jelly powder

  • Red food coloring

  • Yellow food coloring

  • Green food coloring

For the Drink Base

  • 835 grams fruit cocktail, well-drained
    (or an equal amount of chopped fresh fruits such as mango, pineapple, papaya, grapes, or strawberries)

  • 250 ml all-purpose cream or heavy cream

  • 300 ml condensed milk

  • 2 cups evaporated milk or fresh milk

  • 1 cup cooked small tapioca pearls


⏱️ Time Breakdown

  • Preparation Time: 20 minutes

  • Cooking Time: 15 minutes

  • Chilling Time: 1 hour

  • Total Time: 1 hour 35 minutes


👩‍🍳 Step-by-Step Instructions

1. Prepare the Jelly

In a medium pot, bring 4 cups of water to a full boil.
Add the ¼ cup white sugar and 25 grams jelly powder, stirring continuously until fully dissolved and clear.

Remove from heat and carefully divide the hot jelly mixture evenly into three separate heat-safe bowls.

Add:

  • Red food coloring to the first bowl

  • Yellow food coloring to the second bowl

  • Green food coloring to the third bowl

Stir each bowl until the color is evenly mixed.

Pour each colored mixture into separate shallow containers.
Allow them to cool at room temperature, then refrigerate until completely set.

Once firm, cut the jelly into small, even cubes. Set aside.


2. Prepare the Creamy Milk Base

In a large mixing bowl, combine:

  • All-purpose cream (or heavy cream)

  • Condensed milk

  • Evaporated milk (or fresh milk)

Whisk gently until smooth and well blended.


3. Assemble the Drink

Add the drained fruit cocktail (or fresh fruit mixture) into the milk base. Stir gently.

Fold in:

  • Cooked tapioca pearls

  • Colored jelly cubes

Mix carefully to avoid breaking the jelly pieces.


4. Chill and Serve

Transfer the mixture into serving glasses or a large pitcher.

Refrigerate for at least 1 hour to allow the flavors and textures to come together.

Serve well chilled.


🍹 Serving Suggestions

  • Serve as a cold dessert drink or sweet snack

  • Garnish with fresh fruit pieces or mint leaves for presentation

  • Best enjoyed cold with a spoon or wide straw


💡 Helpful Tips

  • Ensure the jelly is fully set before cutting for clean cubes

  • Drain canned fruits well to prevent excess liquid

  • Adjust sweetness by adding more or less condensed milk

  • Stir gently to keep the jelly cubes intact


🥛 Dietary Notes

  • Contains dairy

  • Can be prepared gluten-free by using certified gluten-free ingredients


🧊 Storage

Store leftovers in a covered container in the refrigerator and enjoy within 2 days. Stir gently before serving again.

Mediterranean Moonlight Blueberry Clusters

no-bake, naturally sweet snack inspired by Mediterranean flavors—fresh, creamy, and lightly indulgent.
⏱ Prep Time
10 minutes
❄️ Chill Time
20–30 minutes
🍽 Servings
4–6 clusters
🛒 Ingredients
1 cup fresh blueberries (washed & completely dry)
½ cup Greek yogurt (plain or honey-flavored)
2 tbsp honey (adjust to taste)
¼ tsp vanilla extract
¼ tsp cinnamon (optional but lovely)
⅓ cup chopped nuts (pistachios or almonds work best)
½ cup dark chocolate, melted (optional drizzle or coating)
👩‍🍳 Instructions
Mix the base
In a bowl, combine Greek yogurt, honey, vanilla, and cinnamon until smooth.
Add blueberries
Gently fold in the blueberries so they’re well coated but not crushed.
Form clusters
Spoon small mounds onto a parchment-lined tray. Sprinkle chopped nuts on top.
Optional chocolate touch
Drizzle or dip each cluster with melted dark chocolate for extra richness.
Chill
Place in the freezer for 20–30 minutes until firm.
Serve & enjoy
Let sit for 2–3 minutes before eating for the perfect creamy bite.

Apple & Banana Oatmeal Breakfast Loaf

Apple & Banana Oatmeal Breakfast Loaf

A moist, naturally sweet loaf perfect for breakfast or a snack

This wholesome breakfast loaf combines the fiber of oats with the natural sweetness of apples and banana. Raisins, cherries, and a crunchy nut topping make it a satisfying treat for mornings or anytime you want a nutritious snack.


Recipe Overview

  • Prep Time: 15 minutes

  • Bake Time: 45–50 minutes

  • Total Time: About 1 hour 5 minutes

  • Yield: 1 loaf


Ingredients

  • 1 cup (100 g) rolled oats or oatmeal

  • 2 medium apples, peeled and grated

  • 1 ripe banana, mashed

  • 2 large eggs

  • 100–120 ml water

  • 100 g raisins (or sultanas)

  • 100 g pitted cherries

  • 1 teaspoon baking powder

  • 50 g Brazil nuts, chopped (for topping)

  • Vegetable oil (for greasing the pan)


Step-by-Step Instructions

1. Hydrate the Oats

  • In a large mixing bowl, combine the oats with 100–120 ml of water.

  • Let the mixture sit for about 10 minutes so the oats soften and absorb moisture.


2. Prepare the Fruit

  • Peel and grate the apples.

  • In a small bowl, mash the banana with a fork until smooth.


3. Mix the Batter

  • Add the mashed banana and eggs to the soaked oatmeal. Whisk together until fully incorporated.

  • Stir in the grated apples, raisins, and cherries. Mix gently to combine.


4. Add Baking Powder

  • Sprinkle the baking powder over the mixture.

  • Fold everything together carefully with a spatula until evenly distributed. Avoid overmixing, which can make the loaf dense.


5. Prepare the Pan

  • Preheat your oven to 350°F (180°C).

  • Grease a loaf pan with vegetable oil.

  • Optional: Line a standard metal pan with parchment paper for easier removal.


6. Top and Bake

  • Pour the batter into the prepared pan and smooth the surface.

  • Evenly sprinkle the chopped Brazil nuts on top.

  • Bake for 45–50 minutes, or until the loaf is golden brown and a toothpick inserted into the center comes out clean.


7. Cool and Serve

  • Allow the loaf to cool in the pan for at least 10 minutes.

  • Remove from the pan and slice.

  • Serve warm or at room temperature.


Tips for Success

  • Smoother texture: Pulse the oats in a blender for a few seconds before hydrating to create a finer, cake-like crumb.

  • Storage: Store leftovers in an airtight container in the refrigerator for 3–4 days.

  • Nut swaps: Use walnuts, almonds, or pecans instead of Brazil nuts for a different flavor.

  • Optional additions: Add a pinch of cinnamon or nutmeg for extra warmth, or a handful of sunflower seeds for extra texture.

Golden-Brown Roasted Chicken Breasts with Mediterranean Stuffing

🍗 Golden-Brown Roasted Chicken Breasts with Mediterranean Stuffing

🌿 Description

These Golden-Brown Roasted Chicken Breasts are tender, juicy, and generously stuffed with a bold Mediterranean filling of feta, sun-dried tomatoes, Kalamata olives, pine nuts, and fresh herbs. Roasted to perfection, this dish delivers restaurant-quality flavor while staying simple, wholesome, and naturally satisfying.

📝 Ingredients

For the Chicken

  • 4 boneless, skinless chicken breasts
  • 2 tbsp olive oil
  • Salt and freshly ground black pepper, to taste
  • 1 tsp smoked paprika
  • 1 tsp garlic powder

For the Mediterranean Stuffing

  • ½ cup feta cheese, crumbled
  • ¼ cup sun-dried tomatoes, finely chopped
  • ¼ cup Kalamata olives, chopped
  • 2 tbsp pine nuts, toasted
  • 2 tbsp fresh parsley, chopped
  • 1 small garlic clove, minced

👩‍🍳 Instructions

  1. Preheat oven to 400°F (200°C). Lightly grease a baking dish.
  2. Prepare stuffing: In a bowl, mix feta, sun-dried tomatoes, olives, pine nuts, parsley, and minced garlic. Set aside.
  3. Prepare chicken: Using a sharp knife, carefully slice a pocket into the side of each chicken breast.
  4. Stuff chicken: Fill each pocket with the Mediterranean mixture, pressing gently to seal.
  5. Season: Brush chicken with olive oil, then season with salt, pepper, smoked paprika, and garlic powder.
  6. Roast: Place chicken in the baking dish and roast for 25–30 minutes, or until golden brown and internal temperature reaches 165°F (74°C).
  7. Rest & serve: Let rest for 5 minutes before serving.

⭐ Notes

  • Secure stuffed chicken with toothpicks if needed.
  • Use oil-packed sun-dried tomatoes for extra moisture.
  • Internal temperature is key for juicy chicken.

💡 Tips for Best Results

  • Pound chicken slightly for even thickness before stuffing.
  • Add lemon zest to the stuffing for extra brightness.
  • Broil for 2–3 minutes at the end for a crisp golden finish.
  • Serve with roasted vegetables, couscous, or a Greek salad.

🍽 Servings

Serves: 4
Serving Size: 1 stuffed chicken breast

🧮 Nutritional Information (Approx. per serving)

  • Calories: ~360 kcal
  • Protein: ~38 g
  • Fat: ~22 g
  • Carbohydrates: ~4 g
  • Fiber: ~1 g
  • Calcium: ~15% DV

(Values may vary depending on brands used)

🌟 Health Benefits

  • High-protein: Supports muscle strength and satiety
  • Mediterranean fats: Heart-healthy olive oil, olives, and pine nuts
  • Low-carb & gluten-free: Great for balanced eating
  • Calcium-rich: Thanks to feta cheese

❓ Q & A

Q: Can I make this ahead of time?
A: Yes! Stuff the chicken up to 24 hours ahead and refrigerate until ready to roast.

Q: Can I use chicken thighs instead?
A: Yes, boneless thighs work well but may need a slightly longer cook time.

Q: What can I substitute for feta?
A: Goat cheese or ricotta salata are great alternatives.

Q: Is this keto-friendly?
A: Yes, it’s naturally low-carb and keto-approved.

This vegetable soup saved my life!

 Ingredients (Serves 6)
Vegetables
2 tablespoons olive oil
1 large yellow onion, diced
3 cloves garlic, minced
2 carrots, sliced
2 celery stalks, sliced
1 zucchini, diced
1 cup green beans, chopped
1 red bell pepper, diced
1½ cups chopped tomatoes (fresh or canned, no sugar added)
2 cups leafy greens (spinach, kale, or Swiss chard)
Broth & Seasoning
6 cups low-sodium vegetable broth
1 teaspoon sea salt (adjust to taste)
½ teaspoon black pepper
1 teaspoon dried thyme
1 teaspoon dried oregano
½ teaspoon turmeric
¼ teaspoon red pepper flakes (optional)
1 bay leaf
Optional Add-ins
1 cup cooked beans (white beans or chickpeas)
½ cup quinoa or brown rice (cooked)
Juice of ½ lemon (for brightness)
Instructions
Sauté the aromatics
Heat olive oil in a large pot over medium heat. Add onion and cook for 4–5 minutes until translucent. Stir in garlic and cook for 30 seconds until fragrant.
Build the vegetable base
Add carrots, celery, zucchini, green beans, and bell pepper. Sauté for 5 minutes, stirring occasionally.
Add broth and seasoning
Pour in vegetable broth. Add tomatoes, salt, pepper, thyme, oregano, turmeric, red pepper flakes, and bay leaf. Stir well.
Simmer
Bring to a gentle boil, then reduce heat and simmer uncovered for 20–25 minutes, until vegetables are tender.
Finish with greens
Stir in leafy greens and optional beans or grains. Simmer 5 more minutes until greens are wilted.
Brighten and serve
Remove bay leaf. Add lemon juice if using. Taste and adjust seasoning. Serve warm.

Baked Pasta with Minced Meat and Cheese

Baked Pasta with Minced Meat and Cheese

A comforting oven-baked pasta dish made with seasoned minced meat, a light egg-and-cream mixture, and a melted cheese topping.


Preparation Overview

  • Preparation time: 15 minutes

  • Cooking time: 30 minutes

  • Resting time: 5 minutes

  • Total time: About 50 minutes

Yield

  • Serves 4 people


Ingredients

Pasta

  • 250 g short pasta (penne, macaroni, or fusilli)

  • 1 teaspoon salt (for boiling water)

Meat Mixture

  • 300 g minced meat (beef, turkey, or chicken)

  • 1 shallot, finely chopped

  • 1–2 tablespoons vegetable oil or olive oil

  • 1 teaspoon paprika

  • 1 teaspoon dried oregano

  • Ground black pepper, to taste

Egg & Cheese Topping

  • 3 large eggs

  • 3 tablespoons cream (or half-and-half)

  • 100 g cheese (mozzarella, cheddar, or Gruyère), shredded


Step-by-Step Instructions

1. Cook the Pasta

Bring a large pot of water to a rolling boil. Add the salt, then add the pasta.

Cook according to the package instructions until just tender. Drain well and set aside.


2. Prepare the Meat Mixture

Heat the oil in a large skillet over medium heat.

Add the chopped shallot and cook for 2–3 minutes, stirring occasionally, until softened.

Add the minced meat. Cook, stirring and breaking it up, until it is evenly cooked through and no longer pink.

Sprinkle in the paprika, oregano, and black pepper. Stir well and cook for 1 minute more to blend the flavors.

Remove the pan from the heat.


3. Prepare the Egg and Cream Mixture

In a bowl, whisk together the eggs and cream until smooth.

Stir in half of the shredded cheese. This mixture helps hold the pasta together as it bakes.


4. Assemble the Dish

Preheat the oven to 190°C (375°F).

Lightly grease a medium baking dish.

Add the cooked pasta and meat mixture to the dish and mix gently until evenly combined.

Pour the egg and cream mixture evenly over the pasta.

Sprinkle the remaining cheese evenly on top.


5. Bake

Place the baking dish on the center rack of the oven.

Bake for 20–25 minutes, until the top is lightly golden and the egg mixture has set.


6. Rest and Serve

Remove from the oven and allow the dish to rest for 5 minutes before serving. This helps the layers hold together when sliced.

Serve warm with a simple green salad or cooked vegetables on the side.


Storage

  • Store leftovers covered in the refrigerator for up to 2 days

  • Reheat gently in the oven or microwave until warmed through


Optional Notes

  • You may add cooked vegetables such as peas or bell peppers

  • Cheese types can be mixed for varied flavor

  • For a softer texture, add 1–2 tablespoons of milk to the egg mixture

Oatmeal & Cocoa Breakfast Cake

Oatmeal & Cocoa Breakfast Cake

A soft, lightly sweet breakfast-style cake made with oats, banana, and cocoa. Suitable for a quick morning meal or a light snack.


Preparation Overview

  • Preparation time: 10 minutes

  • Soaking time: 10 minutes

  • Cooking time: 20–25 minutes (oven) or 2–3 minutes (microwave)

  • Total time: About 40 minutes

Yield

  • Makes 1 large serving or 2 small portions


Ingredients

  • 40 g oatmeal (about ½ cup rolled oats or quick oats)

  • 120 ml milk (dairy or plant-based)

  • 1 large egg

  • 1 ripe banana

  • 8 g cocoa powder (about 1 tablespoon, unsweetened)

  • 5 g baking powder (about 1 teaspoon)

Optional

  • A small pinch of ground cinnamon

  • A few dark chocolate chips or fresh fruit for topping


Step-by-Step Instructions

1. Soak the Oats

Place the oatmeal in a mixing bowl. Pour in the milk and stir gently.

Let the mixture rest for 10 minutes so the oats absorb the liquid and soften evenly.


2. Prepare the Banana

Peel the banana and place it in a separate bowl.

Mash thoroughly with a fork until smooth and free of large lumps.


3. Mix the Batter

Add the mashed banana and the egg to the soaked oats.

Whisk until the mixture is evenly combined.

Sift in the cocoa powder and baking powder. Add cinnamon if using.

Stir gently until the batter looks smooth and evenly colored, with no dry patches.


4. Prepare the Cooking Dish

Lightly grease two small oven-safe ramekins or one microwave-safe mug or bowl.

Pour the batter into the container(s), filling no more than three-quarters full.


5. Cook

Oven Method

  • Preheat the oven to 180°C (350°F)

  • Place the ramekins on a baking tray

  • Bake for 20–25 minutes, until the center is set

Microwave Method

  • Cook on high for 2–3 minutes

  • Let stand for 1 minute before serving


6. Serve

Enjoy warm directly from the dish or turn out onto a plate.

Optional toppings include yogurt, fruit, or a light drizzle of honey.


Storage

  • Best enjoyed fresh

  • Can be stored covered in the refrigerator for up to 24 hours

  • Reheat gently before serving


Helpful Notes

  • Riper bananas provide more natural sweetness

  • Texture will be soft and moist, similar to a baked oatmeal

  • Cooking time may vary slightly depending on dish size and appliance

Prep & Cook Time

 Prep & Cook Time
Prep Time: 25 minutes
Cook Time: 40–45 minutes
Total Time: ~1 hour 10 minutes
🍽️ Servings
Serves: 4–6 people
🛒 Ingredients
For the Potatoes
1 kg (2.2 lbs) potatoes, peeled
Salt, for boiling
For the Meatballs
500 g (1 lb) ground beef (or beef & pork mix)
1 small onion, finely chopped
2 cloves garlic, minced
2 tbsp fresh parsley, chopped
1 tsp salt
½ tsp black pepper
½ tsp paprika
1 egg
2 tbsp breadcrumbs
For the Bake
200–250 g (7–9 oz) mozzarella or Gruyère cheese, shredded
½ cup heavy cream or milk
1 tbsp olive oil or butter (for greasing dish)
👩‍🍳 Instructions
Boil the Potatoes
Place peeled potatoes in salted water.
Boil until just fork-tender (not mushy), about 12–15 minutes.
Drain and let cool slightly, then slice into thick rounds.
Prepare the Meatballs
In a bowl, combine ground meat, onion, garlic, parsley, salt, pepper, paprika, egg, and breadcrumbs.
Mix gently until combined.
Shape into medium-sized meatballs.
Assemble the Dish
Preheat oven to 190°C (375°F).
Grease a round or oval baking dish.
Arrange potato slices vertically or layered along the edges.
Nestle meatballs evenly between the potato slices.
Add Cheese & Cream
Pour cream or milk evenly over the dish.
Sprinkle generously with shredded cheese.
Bake
Cover loosely with foil and bake for 25 minutes.
Remove foil and bake an additional 15–20 minutes until golden and bubbling.
Rest & Serve
Let rest for 5 minutes before serving.

Simple No-Knead Homemade Bread

Simple No-Knead Homemade Bread

A soft, everyday loaf made with basic pantry ingredients and minimal handling.


Preparation Overview

  • Preparation time: 10 minutes

  • First resting time: 1½–2 hours

  • Second resting time: 30–45 minutes

  • Baking time: 25–30 minutes

  • Cooling time: 20 minutes

  • Total time: About 3 hours

Yield

  • Makes 1 standard loaf


Ingredients

  • 200 ml warm water (comfortably warm, not hot)

  • 25 g sugar (about 2 tablespoons)

  • 3 g active dry yeast (about 1 teaspoon)

  • 300 g bread flour or all-purpose wheat flour (about 2 cups)

  • 3 g salt (about ½ teaspoon)

  • 20 g olive oil (about 2 tablespoons)


Step-by-Step Instructions

1. Prepare the Yeast Mixture

Pour the warm water into a large mixing bowl. Add the sugar and yeast, then stir gently until dissolved.

Let the mixture stand for about 5 minutes. A light foam on the surface indicates the yeast is ready to use.


2. Mix the Dough

Add the olive oil and salt to the yeast mixture and stir briefly.

Gradually add the flour, mixing with a spoon or spatula until all the flour is evenly moistened.

The dough will look soft and sticky, which is expected. Ensure there are no dry patches of flour.


3. First Resting Period

Cover the bowl with a clean kitchen towel or lid.

Place it in a warm, draft-free area and let the dough rest for 1½ to 2 hours, or until it has noticeably increased in volume.


4. Shape the Dough

Lightly coat your hands with a small amount of oil.

Gently press down the dough to release excess air.

Divide the dough into three equal portions and shape each portion into a smooth ball or short log.

Place the pieces side by side into a lightly greased loaf pan.


5. Second Resting Period

Cover the loaf pan and let the dough rest for 30–45 minutes.

During this time, the dough should rise and fill the pan evenly.


6. Bake

Preheat the oven to 180°C (350°F).

If desired, lightly brush the surface of the dough with a little milk or water for an even finish.

Bake for 25–30 minutes, until the top is lightly browned and the loaf is fully baked.


7. Cool

Remove the bread from the pan and place it on a wire rack.

For a softer surface, you may lightly brush the top with a small amount of olive oil while the bread is warm.

Allow the bread to cool for at least 20 minutes before slicing. This helps maintain the structure of the loaf.


Serving Suggestions

  • Slice and serve with butter, jam, or cheese

  • Suitable for sandwiches or toast

  • Enjoy warm or at room temperature


Storage

  • Store wrapped at room temperature for up to 2 days

  • Refrigeration is not recommended, as it may affect texture

  • Can be frozen once cooled and sliced


Helpful Notes

  • Longer resting times help improve texture

  • Avoid adding extra flour, as the dough should remain soft

  • Suitable for loaf pans or free-form shaping

Cheese-Stuffed Flatbread (Quick Yeast Dough)

Cheese-Stuffed Flatbread (Quick Yeast Dough)

Soft baked flatbreads filled with melted cheese, prepared with a simple yeast dough and baked until lightly golden.


Preparation Overview

  • Preparation time: 15 minutes

  • Resting time: 40 minutes

  • Baking time: 15–20 minutes

  • Total time: About 1 hour 15 minutes

Yield

  • Makes 4 large flatbreads


Ingredients

For the Dough

  • 480 g wheat flour (about 4 cups)

  • 400 ml milk, warm (comfortably warm, not hot)

  • 10 g dry yeast

  • 15 g sugar

  • 20 g olive oil

  • 8 g salt

For the Filling & Topping

  • 200 g mozzarella or cheddar cheese, shredded

  • 1 egg yolk (for brushing)

  • Optional: sesame seeds or nigella seeds

For Handling

  • A small amount of vegetable oil (for greasing the bowl and hands)


Step-by-Step Instructions

1. Prepare the Yeast Mixture

Pour the warm milk into a large mixing bowl. Add the sugar and dry yeast, then stir gently to combine.

Set the bowl aside for 5–10 minutes, until the surface shows light bubbles. This indicates the yeast has activated properly.


2. Form the Dough

Add the olive oil and salt to the milk mixture. Stir briefly.

Gradually add the flour, mixing with a spoon or spatula until a rough dough forms.

Transfer the dough to a clean work surface and knead gently for about 5 minutes, until smooth and flexible.

If the dough feels sticky, lightly oil your hands instead of adding extra flour to maintain a soft texture.


3. Rest the Dough

Lightly grease a bowl with vegetable oil. Place the dough inside and turn it once so the surface is lightly coated.

Cover with a clean cloth and place in a warm, draft-free area. Let it rest for about 30 minutes, or until it has increased in volume.


4. Divide and Fill

Turn the rested dough onto a lightly floured surface and divide it into 4 equal portions. Shape each portion into a smooth ball.

Flatten each ball into a small round disc using your hands or a rolling pin.

Place a portion of shredded cheese in the center of each disc.

Bring the edges of the dough up and over the filling, pinching them together to seal completely.

Gently flatten each filled ball into a thick disc, taking care not to tear the dough.


5. Final Rest and Topping

Line a baking tray with parchment paper and place the shaped flatbreads on it.

Using your fingertips, gently press small indentations across the surface of each disc. This helps maintain an even shape during baking.

Cover and let rest for 10 minutes.

Brush the tops lightly with egg yolk and sprinkle with seeds if desired.


6. Bake

Preheat the oven to 200°C (400°F).

Bake the flatbreads for 15–20 minutes, until evenly baked and lightly golden on top.

Remove from the oven and allow them to cool slightly before serving.


Serving Suggestions

  • Serve warm as a snack or alongside soups and salads

  • Optional: lightly brush with melted butter and sprinkle with chopped parsley before serving


Storage

  • Best enjoyed fresh

  • Leftovers can be stored covered at room temperature for up to 1 day or refrigerated for 2 days

  • Reheat gently in the oven or on a pan before serving


Optional Notes

  • Cheese can be mixed (mozzarella and cheddar together) for balanced flavor

  • Dough can be divided into smaller portions for mini flatbreads

Flourless Almond Carrot Cake (Low-Carb Style)

Flourless Almond Carrot Cake (Low-Carb Style)

A naturally sweetened cake made without wheat flour, using ground almonds and fresh carrots for a moist, gently textured result.


Preparation Overview

  • Preparation time: 15 minutes

  • Baking time: 30–35 minutes

  • Cooling time: 30 minutes

  • Total time: About 1 hour 20 minutes

Yield

  • Makes 8–10 small slices


Ingredients

Base Ingredients

  • 200 g carrots, peeled and finely grated

  • 200 g ground almonds (almond flour)

Wet Ingredients

  • 2 large eggs (room temperature)

  • 2–3 tablespoons honey (adjust to taste)

Leavening & Flavoring

  • 1 teaspoon baking soda

  • 2–3 drops mild vinegar (such as wine or apple vinegar)

  • A small pinch of ground cinnamon

  • A small pinch of salt

Optional Topping

  • Low-fat Greek yogurt or cream cheese, lightly sweetened with honey

  • A light dusting of cocoa powder or finely grated dark chocolate


Step-by-Step Instructions

1. Prepare the Carrots

Peel and finely grate the carrots using a fine grater.

If the carrots release a lot of liquid, gently press them with a paper towel or clean cloth to remove excess moisture. This helps maintain a balanced texture in the finished cake.

Set aside.


2. Mix the Wet Ingredients

In a large mixing bowl, crack in the eggs. Add the honey and salt.

Whisk until the mixture looks smooth and slightly airy. This helps distribute the sweetness evenly throughout the batter.


3. Prepare the Leavening

In a small spoon or cup, combine the baking soda with the vinegar. The mixture will foam briefly.

Immediately add this mixture to the egg mixture and stir gently until combined.


4. Combine All Ingredients

Add the grated carrots and cinnamon to the bowl with the egg mixture. Stir gently.

Gradually fold in the ground almonds, mixing slowly until everything is evenly combined.

The batter should be thick but spreadable. The almonds will absorb moisture as the mixture rests.


5. Prepare for Baking

Preheat the oven to 180°C (350°F).

Line a small square or rectangular baking dish with parchment paper, or lightly grease it.

Transfer the batter into the prepared dish and smooth the surface with a spatula.


6. Bake

Place the dish on the middle rack of the oven.

Bake for 30–35 minutes, or until:

  • The top looks lightly golden

  • A wooden skewer inserted into the center comes out clean

If the top browns too quickly, loosely cover with parchment paper for the remaining baking time.


7. Cooling and Finishing

Remove the cake from the oven and allow it to cool completely in the pan.

Once cooled, spread a thin layer of sweetened Greek yogurt or cream cheese on top, if desired.

Finish with a light sprinkle of cocoa powder, cinnamon, or finely grated dark chocolate.


Serving Suggestions

  • Slice and serve at room temperature or chilled

  • Pairs well with herbal tea, coffee, or almond milk

  • Suitable as a light dessert or afternoon snack


Storage

  • Store covered in the refrigerator for up to 3 days

  • Bring to room temperature before serving for best texture


Optional Notes

  • Honey can be adjusted based on preference

  • Cinnamon may be replaced or combined with nutmeg

  • The cake has a naturally dense texture due to the almond base

Cottage Cheese Tart with Sour Cream Filling

Cottage Cheese Tart with Sour Cream Filling

A gently baked dessert with a soft, buttery crust and a smooth cottage cheese–sour cream filling. Suitable for dessert, tea time, or light gatherings.


Preparation Overview

  • Preparation time: 20 minutes

  • Resting time (dough): 20 minutes

  • Baking time: 35–45 minutes

  • Cooling & chilling: 2 hours (recommended)

  • Total time: About 3 hours

Yield

  • Serves 8–10 slices


Ingredients

For the Crust

  • 1 large egg (room temperature)

  • 40 g sugar

  • 80 g butter, softened at room temperature

  • 200 g all-purpose flour (about 1½ cups)

  • 1 teaspoon baking powder

  • A small pinch of salt

For the Creamy Filling

  • 400 g cottage cheese (smooth or pressed through a sieve)

  • 200 g sour cream (Greek yogurt may be used as an alternative)

  • 2 large eggs

  • 60 g sugar (adjust to taste)

  • 1 teaspoon vanilla extract

  • 1 tablespoon cornstarch


Step-by-Step Instructions

1. Prepare the Crust Dough

In a medium mixing bowl, add the egg, sugar, and salt. Whisk gently until the mixture becomes pale and well combined.

Add the softened butter and mix until smooth and evenly incorporated. The mixture should look creamy without visible butter pieces.

In a separate bowl, combine the flour and baking powder. Gradually add this to the wet mixture, mixing gently with a spoon or your hands.

Knead lightly just until a soft dough forms. Avoid overmixing, as this helps keep the crust tender rather than firm.

Shape the dough into a flat disc, wrap it, and place it in the refrigerator for 20 minutes. This resting step helps the dough hold its shape during baking.


2. Prepare the Filling

If the cottage cheese has a coarse texture, blend it briefly or press it through a fine sieve until smooth. This step is important for achieving a uniform filling.

In a large bowl, combine the cottage cheese, sour cream, eggs, sugar, vanilla extract, and cornstarch.

Whisk or blend until the mixture is smooth and evenly mixed. The filling should be pourable and free of lumps.


3. Assemble the Tart

Lightly grease a 9-inch (22 cm) springform pan or tart tin.

Remove the chilled dough from the refrigerator. Press it evenly into the bottom of the pan and gently up the sides, forming an edge about 3–4 cm high.

Make sure the base and sides are even in thickness to ensure uniform baking.

Carefully pour the prepared filling into the crust and gently level the surface.


4. Bake the Tart

Preheat the oven to 180°C (350°F).

Place the tart on the center rack and bake for 35–45 minutes.

The crust should turn lightly golden, and the filling should appear set around the edges with a slight softness in the center.


5. Cooling and Setting

Once baked, remove the tart from the oven and allow it to cool completely in the pan at room temperature.

After cooling, refrigerate the tart for at least 2 hours before slicing. This step helps the filling achieve its best texture and makes cutting cleaner and easier.


Serving Suggestions

  • Serve chilled or lightly cool

  • Pairs well with fresh fruit, fruit compote, or a light dusting of powdered sugar

  • Can be served plain or with tea or coffee


Optional Variation

For added flavor, gently place a small handful of blueberries, raspberries, or sliced strawberries over the filling before baking. Press them lightly into the surface without stirring.


Storage

  • Store covered in the refrigerator for up to 3 days

  • Best enjoyed within the first 48 hours for optimal texture

Yeast-Free Savory Cheese & Herb Triangles

Yeast-Free Savory Cheese & Herb Triangles

Soft, pan-cooked or baked cheese-filled bread triangles made without yeast. Ideal for breakfast, tea time, or a light savory snack.

Preparation Time

  • Prep: 15 minutes

  • Resting: 5 minutes

  • Cooking: 10–12 minutes (pan) or 20–25 minutes (oven)

  • Total: About 30–35 minutes

Yield

  • Makes 8 medium triangles


Ingredients

Dairy & Eggs

  • 2 large eggs (room temperature)

  • 90 ml milk (about 1 tea glass)

  • 80 g feta cheese or white cheese, crumbled

  • 80 g cheddar or mozzarella cheese, grated

Fresh Herbs

  • 3 green onions, finely chopped

  • 5–6 sprigs fresh parsley, finely chopped

Dry Ingredients

  • 3 cups all-purpose flour (approximately 360 g)

  • 1 packet baking powder (10 g)

  • 1 teaspoon salt (adjust depending on cheese saltiness)

For Cooking

  • 1–2 tablespoons olive oil or vegetable oil (for greasing the pan or tray)


Step-by-Step Instructions

1. Prepare the Wet Mixture

In a large mixing bowl, crack the eggs and whisk lightly until the yolks and whites are combined. Add the milk and mix until smooth.

Add the crumbled white cheese and grated cheese. Stir gently so the cheeses are evenly distributed throughout the mixture.


2. Add Herbs and Seasoning

Add the finely chopped green onions and parsley to the bowl. Sprinkle in the salt. Mix well to ensure the herbs are spread evenly.


3. Form the Dough

Sift the baking powder into the flour. Add the flour gradually to the bowl, one cup at a time, mixing with a spoon or your hand.

Once the mixture begins to come together, knead gently until a soft, smooth dough forms.

Dough texture guide:

  • If the dough feels sticky, add 1 tablespoon of flour at a time.

  • If the dough feels dry or crumbly, add 1–2 teaspoons of milk.

The dough should be soft and easy to handle, not stiff.


4. Shape the Dough

Lightly flour your work surface. Place the dough on it and gently press or roll it into a round shape about 1 cm (½ inch) thick.

Using a knife or pizza cutter, divide the dough into 8 equal triangles, similar to slicing a pizza.


5. Cooking Options

Pan Method

  • Lightly grease a non-stick pan with oil.

  • Place the triangles in the pan, leaving a little space between them.

  • Cover with a lid and cook over medium-low heat for about 5 minutes.

  • Turn the triangles carefully and cook the other side for another 4–5 minutes until both sides are evenly cooked.

Keep the heat moderate so the inside cooks properly without browning too quickly.

Oven Method

  • Preheat the oven to 180°C (350°F).

  • Line a baking tray with parchment paper or lightly grease it.

  • Arrange the triangles on the tray.

  • Bake for 20–25 minutes, turning once if needed, until cooked through.


6. Serving

Serve warm for the best texture and flavor. These cheese and herb triangles pair well with:

  • Fresh tomatoes or cucumbers

  • Olives

  • Yogurt or labneh

  • A light salad


Helpful Tips

  • You may replace parsley with dill or cilantro if preferred.

  • A small pinch of black pepper or mild paprika can be added for extra flavor.

  • These can be prepared ahead and reheated gently in a pan or oven.


Storage

  • Store leftovers in an airtight container in the refrigerator for up to 2 days.

  • Reheat on a pan over low heat or in the oven until warm.

Fresh Lemon Infused Water Recipe

Fresh Lemon Infused Water Recipe

Lemon infused water is a simple, refreshing drink that is easy to prepare and pleasant to enjoy throughout the day. It combines clean drinking water with fresh lemon slices to create a lightly flavored beverage that feels bright and uplifting. This recipe is perfect for keeping in the refrigerator so you always have something cool and refreshing ready to enjoy.

Ingredients

  • 6 to 8 fresh lemons

  • 2 to 3 liters clean drinking water

  • A large glass jug or several clean bottles with lids

  • Optional additions: fresh mint leaves, cucumber slices, or a small piece of ginger for extra aroma

Preparation Steps

  1. Wash the lemons well
    Start by washing the lemons thoroughly under running water. This step is important because the lemons will be sliced with the peel on, and you want them clean and fresh.

  2. Slice the lemons
    Place the lemons on a cutting board and slice them into thin rounds or wedges. Thin slices allow the lemon flavor to gently mix with the water without becoming overpowering.

  3. Prepare the container
    Choose a large glass jug or several reusable bottles. Glass is preferred because it keeps the flavor fresh and clean. Make sure the container is washed and completely dry before use.

  4. Add lemons and water
    Place the lemon slices into the jug or bottles. Slowly pour in the drinking water, covering the lemon slices fully. If you enjoy extra freshness, add a few mint leaves or cucumber slices at this stage.

  5. Chill and rest
    Close the container and place it in the refrigerator for at least 2 to 4 hours. This resting time allows the lemon aroma to gently blend into the water, creating a balanced and refreshing taste.

  6. Serve and enjoy
    Once chilled, pour the lemon infused water into a glass and enjoy it cold. You can refill the container with more water once or twice before replacing the lemon slices.

Helpful Tips

  • Use fresh lemons for the best aroma and flavor.

  • Replace lemon slices every 24 hours for a clean taste.

  • Keep the water refrigerated to maintain freshness.

  • Adjust the number of lemon slices based on how light or strong you prefer the flavor.

This lemon infused water is a pleasant and simple drink that fits easily into daily routines. It looks beautiful in clear bottles, tastes refreshing, and is easy to prepare with minimal effort.

Lemon Blueberry Baked Oatmeal

Lemon Blueberry Baked Oatmeal
Ingredients (Serves 6)
Dry Ingredients:
2 cups old-fashioned rolled oats
1 teaspoon baking powder
1/2 teaspoon salt
1/2 teaspoon ground cinnamon (optional)
Wet Ingredients:
2 large eggs
1 1/2 cups milk (dairy or non-dairy)
1/3 cup plain Greek yogurt or plant-based yogurt
1/4 cup honey or maple syrup
2 teaspoons vanilla extract
Zest of 1 large lemon
2 tablespoons fresh lemon juice
Add-ins:
1 1/2 cups fresh or frozen blueberries
Optional Topping:
2 tablespoons sliced almonds or chopped walnuts
Extra drizzle of honey or maple syrup before serving
Instructions
Preheat oven: 350°F (175°C) and lightly grease an 8×8-inch baking dish.
Mix dry ingredients: In a medium bowl, combine oats, baking powder, salt, and cinnamon.
Mix wet ingredients: In a separate bowl, whisk eggs, milk, yogurt, honey/maple syrup, vanilla, lemon zest, and lemon juice.
Combine: Stir wet ingredients into dry ingredients until well combined. Gently fold in blueberries.
Transfer to baking dish: Pour mixture into prepared baking dish and spread evenly. Sprinkle optional nuts on top.
Bake: 35–40 minutes, until the top is golden brown and the center is set.
Cool slightly: Let it cool for 5–10 minutes before slicing. Serve warm, optionally with more yogurt or a drizzle of honey.

Garlic Parmesan Roasted Potatoes

🧄🧀 Garlic Parmesan Roasted Potatoes

Description

Garlic Parmesan Roasted Potatoes are crispy on the outside, fluffy on the inside, and packed with savory flavor. Roasted to golden perfection with olive oil, fresh garlic, and herbs, then finished with nutty Parmesan cheese, this dish makes an irresistible side for almost any meal—from weeknight dinners to holiday spreads.

⏱️ Prep & Cook Time

  • Prep Time: 10 minutes

  • Cook Time: 35–40 minutes

  • Total Time: 45–50 minutes

🍽️ Servings

4 servings

📝 Ingredients

  • 2 lbs (900 g) baby potatoes or Yukon Gold potatoes, halved

  • 3 tbsp olive oil

  • 4 cloves garlic, minced

  • ½ tsp salt (adjust to taste)

  • ½ tsp black pepper

  • 1 tsp Italian seasoning (or dried rosemary & thyme)

  • ½ tsp paprika (optional, for extra flavor)

  • ½ cup freshly grated Parmesan cheese

  • 2 tbsp fresh parsley, finely chopped (optional garnish)

👩‍🍳 Instructions

  1. Preheat oven to 400°F (200°C). Line a baking sheet with parchment paper or lightly grease it.

  2. Prepare potatoes: Wash and dry the potatoes thoroughly. Cut them into even halves for uniform cooking.

  3. Season: In a large bowl, toss potatoes with olive oil, minced garlic, salt, pepper, Italian seasoning, and paprika until evenly coated.

  4. Roast: Spread potatoes cut-side down in a single layer on the baking sheet.

  5. Bake: Roast for 30–35 minutes, flipping once halfway, until golden brown and fork-tender.

  6. Add Parmesan: Remove from oven, sprinkle Parmesan cheese evenly over the potatoes, and return to the oven for 5 more minutes until melted and lightly crisp.

  7. Garnish & serve: Sprinkle with fresh parsley and serve hot.

💡 Recipe Notes

  • Freshly grated Parmesan melts better and tastes richer than pre-shredded cheese.

  • Baby potatoes give the crispiest results, but any waxy potato works well.

  • For extra crispiness, soak potatoes in cold water for 20 minutes, then dry thoroughly before roasting.

🔥 Tips for Best Results

  • Don’t overcrowd the pan – space allows browning instead of steaming.

  • Cut-side down roasting helps achieve a crispy texture.

  • Add cheese near the end to prevent burning.

  • Use a hot oven (400°F or higher) for maximum crisp.

🥗 Nutritional Information (Per Serving – Approximate)

  • Calories: 260 kcal

  • Carbohydrates: 32 g

  • Protein: 7 g

  • Fat: 12 g

  • Saturated Fat: 3 g

  • Fiber: 4 g

  • Sodium: 420 mg

  • Calcium: 150 mg

🌿 Health Benefits

  • Potatoes provide potassium, vitamin C, and fiber for digestion and heart health.

  • Garlic supports immune function and has anti-inflammatory properties.

  • Olive oil contains healthy monounsaturated fats.

  • Parmesan cheese adds calcium and protein for bone strength.

❓ Q & A

Q: Can I make this recipe vegan?
A: Yes! Replace Parmesan with nutritional yeast or a dairy-free cheese alternative.

Q: Can I air-fry these potatoes?
A: Absolutely. Cook at 380°F (190°C) for 18–22 minutes, shaking halfway.

Q: Can I prepare these ahead of time?
A: You can parboil and season the potatoes ahead, then roast fresh for best texture.

Q: What dishes pair well with this recipe?
A: Grilled chicken, steak, baked fish, roasted vegetables, or a fresh green salad.

Q: How do I store leftovers?
A: Store in an airtight container in the refrigerator for up to 3 days. Reheat in the oven or air fryer for crispiness.

Pickled Beets

Ingredients

-10 pounds fresh small beets, stems removed
-2 cups white sugar
-1 tablespoon pickling salt
-1 quart white vinegar
-¼ cup whole cloves

Directions

Step 1: Put enough water in a large stockpot to cover the beets.
Bring to a boil and cook until the beets are soft, which should take about 15 minutes depending on how big they are.
If your beets are big, cut them in half.
Drain the beets, keeping 2 cups of the water, let them cool, and peel them.

Step 2: Boil the jars and lids for at least 10 minutes to make sure they are clean.
Put beets in each jar and a few whole cloves in each jar.

Step 3: Mix the sugar, beet water, vinegar, and pickling salt in a large pot.
Bring quickly to a boil.
Pour the hot brine over the beets in the jars and make sure the lids are on tight.

Step 4: Put a rack in the bottom of a large stockpot and fill it halfway with water.
Bring to a boil over high heat, then use a holder to carefully place the jars in the pot.
Leave a space of 2 inches between each jar.
If you need to, add more boiling water until the level of water is at least 1 inch above the tops of the jars.
Bring the water to a boil, put the lid on the pot, and let it cook for 10 minutes.