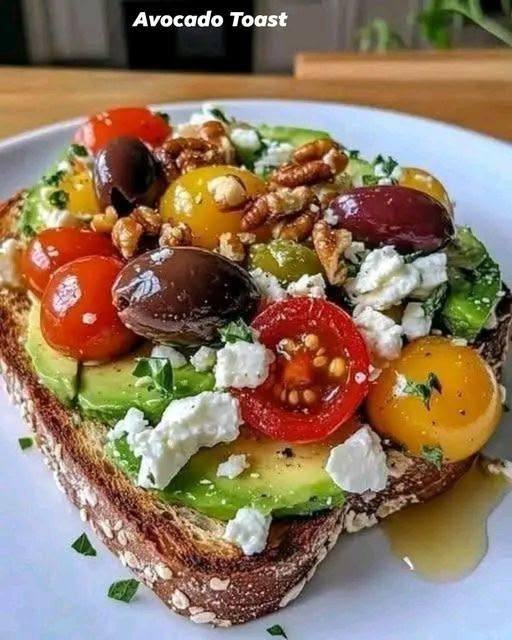
Loaded Avocado Toast with Cherry Tomatoes Goat Cheese and Balsamic Drizzle
This is not your average avocado toast — it is a flavor-packed gourmet version that is perfect for breakfast brunch or a light lunch. Creamy avocado meets juicy cherry tomatoes tangy goat cheese crunchy walnuts sweet dried cranberries and a luscious balsamic glaze all piled on crispy rustic sourdough bread. Fresh herbs top it off for a bright fresh finish. Each bite is a delicious mix of creamy crunchy sweet tangy and savory. It is quick to make beautiful to serve and totally satisfying!
Prep and Cook Time:
Prep time: 10 minutes
Cook time (to toast bread): 5 minutes
Total time: 15 minutes
Ingredients:
1 slice rustic sourdough bread
1 ripe avocado
Handful of cherry tomatoes (red and yellow)
2 tablespoons goat cheese crumbles
1 tablespoon chopped walnuts
1 tablespoon dried cranberries
1 tablespoon balsamic glaze
Fresh basil or parsley leaves
Salt and pepper to taste
Instructions:
Toast the sourdough bread until golden and crisp
Slice the avocado thinly and lay the slices evenly over the toast
Cut the cherry tomatoes in halves and scatter them over the avocado
Sprinkle the goat cheese crumbles over the top
Add chopped walnuts and dried cranberries
Drizzle generously with balsamic glaze
Tear some fresh basil or parsley and sprinkle over the toast
Season lightly with salt and pepper if desired
Serve immediately and enjoy
Tips:
Use a perfectly ripe avocado for the creamiest texture
Toast the bread well so it holds up under all the toppings
Cut ingredients small for easier biting and better flavor balance
Add balsamic glaze just before serving to avoid sogginess
Use a serrated knife to slice the toast cleanly without smashing the toppings
Variations:
Swap goat cheese with feta blue cheese or ricotta
Add a fried or poached egg on top for extra protein
Use mixed seeds instead of walnuts for a nut-free option
Try sun-dried tomatoes instead of fresh for deeper flavor
Drizzle with hot honey instead of balsamic for a spicy kick
Add microgreens or arugula for more freshness
Rub the toast with a garlic clove before adding avocado for extra flavor
Q&A:
Can I make this ahead of time?
It is best made fresh because the avocado can brown and the toast can get soggy
What bread is best for this recipe?
Thick rustic breads like sourdough multigrain or artisan white work best
Can I skip the cheese?
Yes you can leave it out or replace it with a dairy-free alternative
Nutrition (per serving estimate):
Calories 350 to 400
Protein 8 grams
Fat 25 grams
Carbohydrates 28 grams
Fiber 7 grams
Sugar 8 grams
Note Nutrition values can vary based on specific ingredients and portion sizes
Conclusion:
This loaded avocado toast is the perfect combination of creamy fresh sweet savory and crunchy. It is quick beautiful and totally satisfying whether you are making it for a busy morning a weekend brunch or a healthy snack. Customize it with your favorite toppings and enjoy every bite.

 Comforting Chicken Soup with Potatoes
 Ingredients
 Instructions
 Q & A
Q & A
 Servings
 Ingredients


 Tips & Variations
 Why This Dessert Is Healthy
 No refined sugar

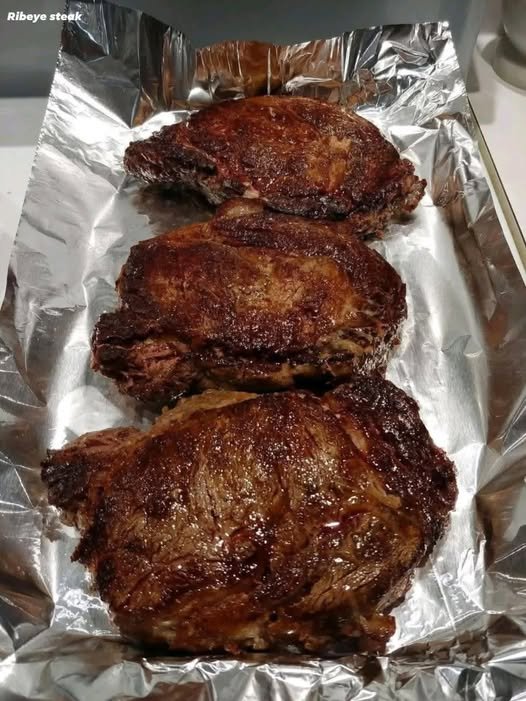
 Ribeye Steak (Perfectly Seared & Juicy)
 Description
 Bring to Room Temperature
 Season Generously
 Heat the Pan
 Sear
Sear Add Butter & Baste
 Check Doneness
 Rest
Rest Pro Tips
 Nutritional Information (Per Serving Approx.)
 Benefits