No-Knead, No-Egg, No-Butter Bread
A soft, beginner-friendly bread that can be pan-seared or baked for a pillowy finish.
-
Prep time: 10 minutes
-
Rise time: 1 hour 20 minutes
-
Cook time: 6 minutes (pan) or 15 minutes (oven)
-
Yields: 8–10 small breads
Ingredients
-
3 cups (360g) all-purpose flour
-
1 tsp salt
-
1 tbsp sugar
-
1 tbsp instant yeast
-
1 cup (240ml) warm milk (approx. 110°F)
-
½–¾ cup (120–180ml) warm water
-
2 tbsp vegetable oil
Detailed Directions
-
Combine Dry Ingredients: In a large mixing bowl, whisk together the flour, salt, sugar, and instant yeast until well-combined.
-
Incorporate Liquids: Make a well in the center of the flour. Pour in the warm milk and vegetable oil. Gradually add the warm water, starting with ½ cup.
-
Mix: Use a sturdy spoon or spatula to stir the mixture until a soft, slightly shaggy dough forms. If the dough feels too dry or stiff, add the remaining ¼ cup of water a tablespoon at a time. No kneading is required—just ensure there are no pockets of dry flour left.
-
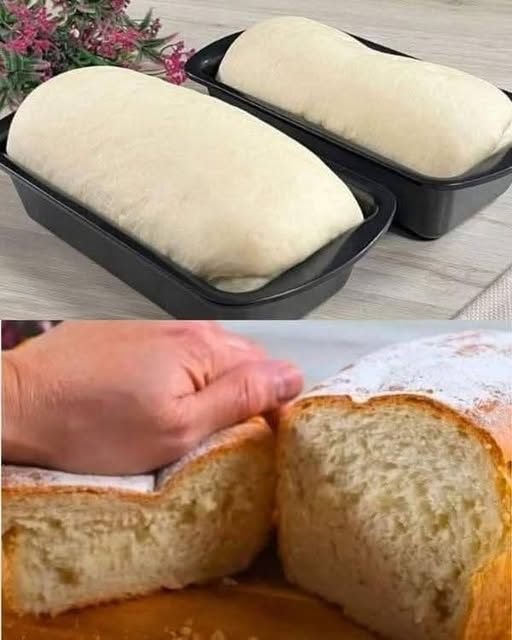
First Rest: Cover the bowl with a clean kitchen towel or plastic wrap. Place it in a warm, draft-free spot for 1 hour, or until the dough has doubled in size.
-
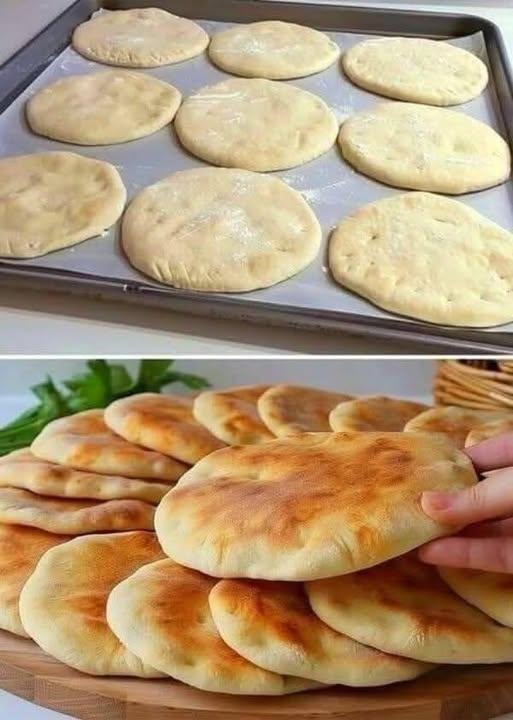
Shape: Lightly flour your work surface and your hands. Gently deflate the dough and divide it into 8 to 10 equal pieces. Roll each into a ball, then flatten with your palm into a round disc about ½ inch thick.
-
Second Rest: For the fluffiest texture, let the shaped rounds rest on the counter for 15–20 minutes. This allows the yeast to relax and create a lighter crumb.
-
Cook – Two Options:
-
Stovetop (Flatbread Style): Heat a non-stick skillet over medium heat. Place a disc in the pan (no oil is necessary). Cook for 2–3 minutes per side until golden brown spots appear and the bread is puffed.
-
Oven (Roll Style): Preheat oven to 375°F (190°C). Place the rounds on a parchment-lined baking sheet. Bake for 15–18 minutes until the tops are lightly golden.
-
Recipe Tips
-
Milk Choice: For a richer flavor, use whole milk. If you are watching your points, skim milk or unsweetened almond milk works perfectly well.
-
Yeast Check: Ensure your milk and water are “warm” (like a baby’s bath) and not “hot.” Liquid that is too hot will kill the yeast and prevent the bread from rising.
-
Serving: These are delicious when brushed with a little garlic-infused olive oil right after cooking.