Ingredients:
Instructions:
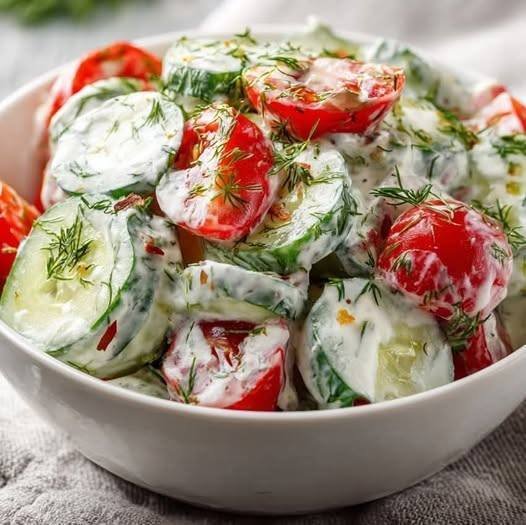
In a bowl, mix Greek yogurt, garlic, lemon juice, salt, and pepper.
Add sliced cucumbers and halved tomatoes.
Toss gently to coat everything evenly.
Sprinkle fresh dill on top and chill before serving

2 chicken breasts (sliced thin)
1 cup mushrooms (sliced)
2 tbsp honey
2 tbsp soy sauce
3 cloves garlic (minced)
1 tbsp olive oil
1 tbsp butter
Salt and pepper to taste
Prep the Chicken and Mushrooms: Slice the chicken breasts into thin pieces and slice the mushrooms. Mince the garlic cloves.
Cook the Chicken: In a large skillet, heat the olive oil and butter over medium heat. Add the chicken slices and season with salt and pepper. Cook the chicken until it’s golden brown and fully cooked (about 4-5 minutes per side).
Prepare the Sauce: Once the chicken is cooked, remove it from the skillet and set it aside. In the same skillet, add the minced garlic and sauté for about 30 seconds until fragrant. Then, add the honey and soy sauce, stirring to combine.
Add the Mushrooms: Add the sliced mushrooms to the skillet with the sauce and cook for about 3-4 minutes, until the mushrooms soften.
Combine: Return the cooked chicken to the skillet and stir it in with the mushrooms and sauce. Let everything simmer together for another 2-3 minutes so the flavors meld.
Serve: Once the chicken is coated with the sauce and everything is heated through, taste and adjust seasoning if needed. Serve hot!
This Honey Garlic Chicken with Mushrooms recipe is a flavorful and simple dish that combines tender chicken with a savory honey-garlic sauce. The mushrooms add an earthy richness that complements the sweet and salty sauce. It’s a quick and delicious meal that pairs well with rice, noodles, or a fresh green salad.
Sweetness Adjustments: You can adjust the sweetness by adding more or less honey, depending on your preference.
Low-Sodium Option: If you’re watching your sodium intake, use low-sodium soy sauce for a healthier alternative.
Add Vegetables: For more flavor and nutrition, consider adding vegetables like bell peppers or spinach to the dish.
This recipe serves 2-3 people, depending on portion size.
Calories: ~300 kcal
Protein: 30g
Carbs: 18g
Fat: 15g
Fiber: 2g
Sodium: ~600mg (can vary depending on soy sauce used)
Chicken: A great source of lean protein, which supports muscle growth and repair.
Garlic: Known for its immune-boosting properties and potential to reduce blood pressure.
Honey: Provides natural sweetness along with antioxidants.
Mushrooms: Rich in vitamins, fiber, and minerals, contributing to immune health and digestion.
Q: Can I use boneless, skinless chicken thighs instead of breasts?
A: Yes, boneless, skinless chicken thighs can be used for a juicier and slightly more flavorful option.
Q: Can I make this recipe ahead of time?
A: This dish is best served fresh. However, you can prep the chicken and sauce in advance and store them separately in the fridge for up to 1 day. Reheat before serving.
Q: Can I use a different type of oil?
A: Yes, you can use any cooking oil you prefer, such as avocado oil or canola oil, instead of olive oil.

Ingredients
To prepare this Savory Zucchini and Cheddar Cheese Bread, gather the following ingredients:
2 large eggs: Eggs give the bread structure and moisture. They also help bind the ingredients together.
80 ml (about 1/3 cup) milk: This adds moisture to the batter and helps create a soft texture. You can use any type of milk, including dairy or plant-based options.
80 ml (about 1/3 cup) olive oil: Olive oil contributes to the bread’s moistness and richness. You can also use melted butter if preferred.
300 g (about 2 1/2 cups) all-purpose flour: Flour is the foundation of the bread, providing structure.
120 g (about 1 cup) grated cheddar cheese: Cheddar adds a sharp flavor and creaminess to the bread. You can use other cheese varieties for different tastes.
2 tsp baking powder: This leavening agent helps the bread rise and become fluffy.
200 g (about 1 3/4 cups) grated zucchini: Zucchini adds moisture and a subtle flavor, while also boosting the nutritional value of the bread.
Olive oil (for greasing the pan): Essential for preventing the bread from sticking to the pan during baking.
Instructions
Step 1: Prepare the Zucchini
Begin by washing and grating the zucchini using a box grater. After grating, place the zucchini in a colander and sprinkle it lightly with salt. This will help draw out excess moisture. Let it sit for about 10 minutes before squeezing it gently with your hands or using a clean dish towel to remove as much water as possible. Properly draining the zucchini is crucial to ensure the bread doesn’t become soggy.
Step 2: Mix the Wet Ingredients
In a large mixing bowl, crack the eggs and whisk them lightly until well combined. Then add the milk and olive oil, mixing until the ingredients meld into a smooth mixture. This wet base will help create moisture in the final bread.
Step 3: Combine the Dry Ingredients
In a separate bowl, whisk together the all-purpose flour and baking powder until they are fully combined. This step is important to ensure that the baking powder is evenly distributed through the flour, which will help the bread rise uniformly.
Step 4: Make the Batter
Gradually incorporate the dry ingredients into the wet mixture, stirring continuously. Mix until a thick, smooth batter forms. Unlike cakes, you can afford to mix this batter well since it contains no eggs that could cause it to become tough.
Step 5: Add the Cheese and Zucchini
Now, gently fold in the grated cheddar cheese and the drained zucchini into the batter. Ensure they are evenly distributed throughout the mixture for consistent flavor in each slice. The cheese should melt beautifully during baking, creating a savory and creamy texture.
Step 6: Prepare the Baking Pan
Preheat your oven to 180°C (356°F). While the oven is heating, grease a standard loaf pan with olive oil, or line it with parchment paper for easy removal after baking. This step is vital for ensuring that your bread does not stick to the pan.
Step 7: Bake the Bread
Pour the prepared batter into the loaf pan, smoothing the top with a spatula for an even surface. Place the pan in the preheated oven and bake for 60-70 minutes. Check for doneness by inserting a toothpick into the center of the bread; it should come out clean or with just a few crumbs attached. The top should be golden brown and firm to the touch.
Step 8: Cool and Serve
Once baked, remove the bread from the oven and let it cool in the pan for 10-15 minutes. After that, carefully transfer the loaf to a wire rack to cool completely before slicing. This cooling time allows the bread to set properly, making it easier to slice without crumbling.
You can serve this savory bread warm or at room temperature. It pairs wonderfully with butter, cream cheese, or your favorite savory spreads.
Cooking Tips
Zucchini Drainage: Make sure to remove as much moisture as possible from the zucchini to prevent the bread from being too wet. Squeezing out the liquid is key to achieving the right texture.
Cheese Variations: Feel free to experiment with different types of cheese such as feta or mozzarella to customize the flavor of your bread.
Mixing: When combining the dry and wet ingredients, be careful not to overmix. Just stir until everything is combined to keep the bread light and fluffy.
Baking Pan: A standard loaf pan works best for this recipe. If you use a smaller pan, keep in mind that you may need to adjust the baking time.
Serving Suggestions: This bread is excellent on its own but can also be served alongside soups, salads, or as part of a brunch spread.
Nutritional Facts
Approximate nutritional information per slice (based on a loaf that yields about 10 slices):
Calories: 220
Protein: 8g
Carbohydrates: 25g
Fats: 10g
Fiber: 2g
Calcium: 12% of daily value
Iron: 6% of daily value
Variations
Herb-Infused: Add dried or fresh herbs such as oregano, basil, or thyme for additional flavor.
Spicy Twist: Incorporate chopped jalapeños or red pepper flakes for a spicy kick.
Additions: Mix in chopped sun-dried tomatoes or olives for extra flavor and texture.
Gluten-Free Option: Use a gluten-free flour blend instead of all-purpose flour for a gluten-free version of this bread.
FAQs
Can I substitute the eggs?
Yes, you can substitute the eggs with a flaxseed meal or chia seed mixture (1 tablespoon of ground flax or chia mixed with 2.5 tablespoons of water equals one egg) to make it egg-free.
Is it possible to prepare this in advance?
Yes, you can prepare the batter ahead of time and bake it just before serving. Alternatively, you can bake the bread and store it in an airtight container for up to 3 days.
Can I freeze the bread?
Absolutely! Once the bread has cooled, you can slice it and freeze the slices in an airtight bag or container. To enjoy, simply toast or microwave a slice straight from frozen.
What can I serve with the bread?
This savory bread pairs well with soups, salads, or as a base for open-faced sandwiches. It’s also delicious with a spread of butter or cream cheese.
Conclusion
This Savory Zucchini and Cheddar Cheese Bread is not only easy to make but also delicious and nutritious. Packed with flavors and perfect for any occasion, it’s an excellent way to enjoy zucchini while also indulging in the richness of cheese. Whether you enjoy it fresh from the oven or as leftovers, this bread is sure to satisfy and please your palate. Happy baking!

Prep time: 5 minutes | Servings: 2
Freeze your fruit: For that thick, soft-serve texture shown in the photo, ensure your pineapple chunks are completely frozen before starting.
Combine: Add the frozen pineapple, coconut milk, and lime juice into a high-speed blender.
Blend: Start on a low speed and gradually increase. You may need to use a tamper or stop and scrape down the sides to help the frozen fruit break down.
Adjust: If it’s too thick, add a splash more coconut milk. Taste it—if the pineapple is tart, blend in your sweetener of choice.
Serve: Pour into mason jars.
Style: Replicate the photo by placing a pineapple wedge on the rim, dropping two cherries on top of the drink, and serving with a glass straw.
The “Swirl”: If you want the defined ridges of a Dole Whip, put the blended mixture into a piping bag with a large star tip and pipe it into the jars.
Keep it Cold: If the blender friction melts the mix too much, pop the jars in the freezer for 10 minutes before serving to firm them back up.
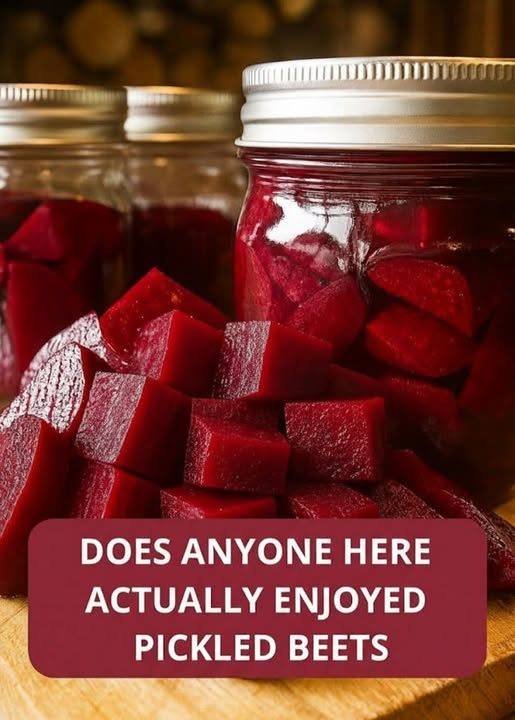
 Recipe: Easy Refrigerator Pickled Beets
Prep time: 15 minutes
Cook time: 30–45 minutes (to boil beets)
Total time: 1 hour + 24 hours chilling
Servings: 8 (approx. 2 quart-sized jars)
6–8 medium beets (stems removed, scrubbed clean)
1 cup apple cider vinegar (for that fruity tang)
1 cup water
½ cup granulated sugar (adjust to your sweetness preference)
1 tsp salt
1 tsp whole black peppercorns
1 small red onion, thinly sliced (optional, but highly recommended)
Optional Aromatics: 2 cloves garlic, 1 cinnamon stick, or 2 sprigs of fresh dill.
Boil the Beets: Place cleaned beets in a large pot and cover with water. Bring to a boil, then reduce heat and simmer for 30–45 minutes until fork-tender.
The “Slip” Method: Drain the beets and immediately plunge them into an ice-water bath. Once cool enough to touch, the skins should slip right off with your fingers. Slice or wedge the peeled beets.
Prepare the Brine: In a small saucepan, combine vinegar, water, sugar, salt, and peppercorns. Bring to a simmer over medium heat, stirring until sugar and salt dissolve.
Jar it Up: Pack the sliced beets and onions into clean glass jars. Pour the hot brine over the beets, ensuring they are completely submerged.
Chill: Let the jars cool to room temperature. Seal the lids and refrigerate for at least 24 hours before eating to let the flavors develop.
 Notes & Tips
Uniformity: Slice your beets to a consistent thickness (about ¼ inch) so they pickle evenly.
The Golden Option: Use golden beets if you want the flavor without the “crime scene” red stains on your cutting board.
Don’t Toss the Greens: If your beets came with leaves, sauté them with garlic and olive oil—they taste like a sweeter version of Swiss chard.
 Nutritional Info (Per Serving)
Estimate based on 1/2 cup serving:
| Nutrient | Amount |
| Calories | 75 kcal |
| Carbohydrates | 16g |
| Fiber | 2g |
| Sugars | 13g |
| Sodium | 310mg |
| Protein | 1g |
 Benefits
Nitrate Rich: Beets are famous for natural nitrates, which can help improve blood flow and lower blood pressure.
Digestive Aid: The vinegar in the brine acts as a mild digestive stimulant.
Antioxidant Powerhouse: The deep red pigment (betalains) has anti-inflammatory properties.
 Common Q&A
Q: How long do these last in the fridge?
A: Since these are “quick pickles” and not processed in a water bath, they should be eaten within 3–4 weeks.
Q: Can I use canned beets instead?
A: You can, but the texture will be much softer. If using canned, skip the boiling step and go straight to making the brine.
Q: Why did my brine turn cloudy?
A: This usually happens if you use table salt with anti-caking agents. It’s safe to eat, but for a crystal-clear brine, use pickling salt or sea salt.
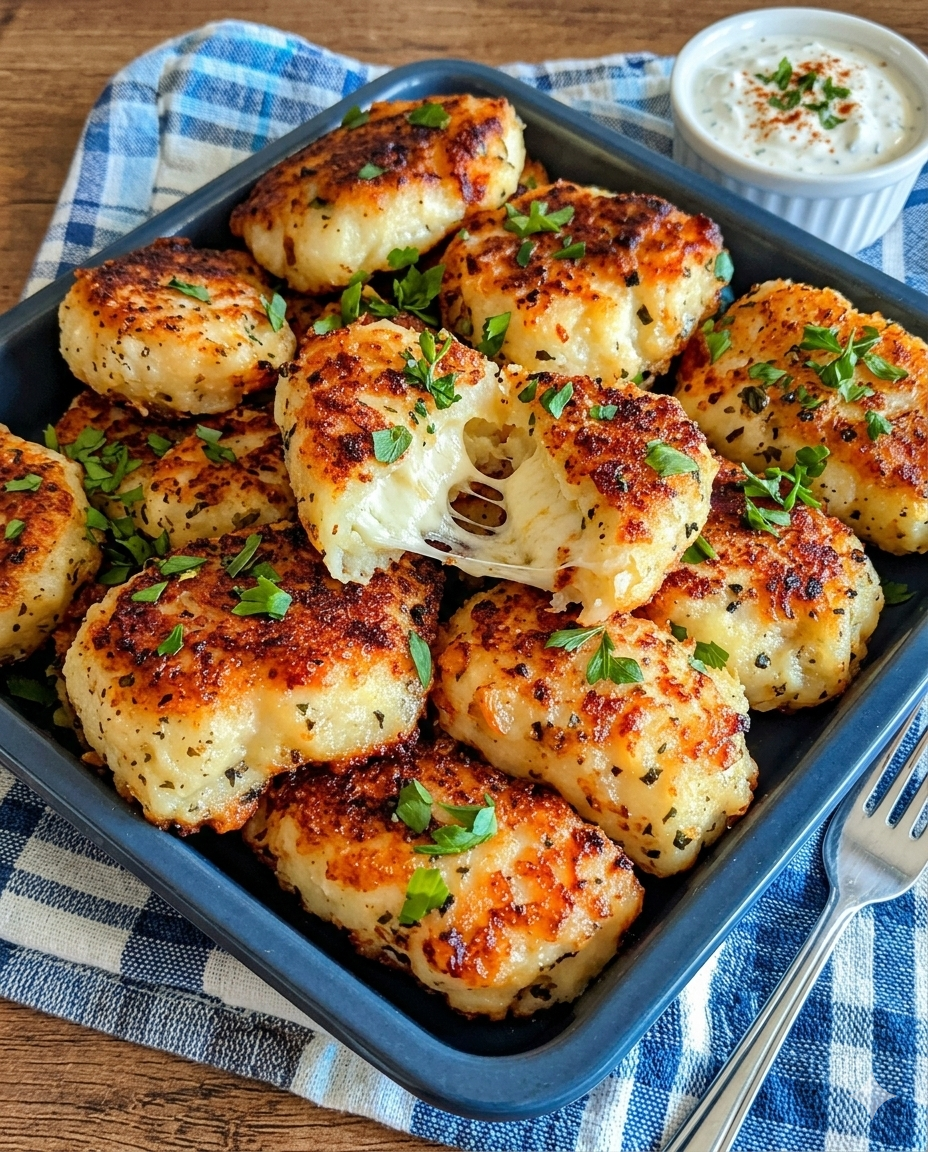
4 Large potatoes
1 teaspoon salt (for boiling)
1 to 1½ cups all-purpose flour (added gradually)
1 cup Shredded cheese (Mozzarella is recommended for a great “cheese stretch”)
2 tablespoons Fresh parsley, finely chopped (for garnish)
Vegetable oil for pan-frying
Peel the potatoes and cut them into even chunks. Place them in a large pot, cover with water, and add 1 teaspoon of salt. Bring to a boil and cook until the potatoes are tender (about 15–20 minutes). Drain the water completely.
Mash the hot potatoes until they are completely smooth with no lumps. Gradually add the all-purpose flour, about 1/2 cup at a time. Stir and then knead gently until a soft, non-sticky dough forms.
Note: The exact amount of flour needed may vary depending on the moisture in your potatoes.
Divide the potato dough into equal-sized balls (roughly the size of a golf ball). Flatten a ball in the palm of your hand to create a small disk. Place a generous pinch of shredded cheese in the center. Fold the edges of the dough over the cheese and pinch to seal, then gently flatten into a patty or parcel shape.
Heat a thin layer of vegetable oil in a large non-stick skillet over medium heat. Carefully place the parcels in the hot pan. Fry for about 3–4 minutes per side. You are looking for a deep, golden-brown, crispy exterior on both sides.
Once crispy, remove the parcels from the pan and place them on a paper towel-lined plate to drain any excess oil. Sprinkle with freshly chopped parsley while they are still hot.
As seen in your photo, these are delicious when served with a creamy garlic or herb dip on the side. They pair beautifully with a fresh garden salad for a complete light meal.

1 cup Fresh or frozen mango chunks
1 cup Fresh or frozen pineapple chunks
1 large Orange, peeled (or 1/2 cup fresh orange juice)
1 inch Fresh ginger root, peeled and roughly chopped
1/2 cup Coconut water or plain Greek yogurt (for creaminess)
1/2 cup Ice (only if using fresh fruit instead of frozen)
Optional: A squeeze of lime or a teaspoon of honey if you prefer it sweeter.
Prep the Ginger: Peel the ginger skin using the edge of a spoon. Chop it into small pieces to ensure it blends smoothly without leaving spicy “chunks.”
Layer the Blender: Place your liquid (coconut water or orange juice) in first. This helps the blades move more efficiently.
Add Solids: Add the mango, pineapple, orange segments, and ginger.
Blend: Start on a low speed and gradually increase to high. Blend for about 45–60 seconds until the texture is completely velvety and vibrant yellow.
Serve: Pour into tall glasses and add a straw.
The Ginger Kick: Ginger is potent! If you aren’t used to it, start with a 1/2-inch piece and taste-test before adding the rest.
Texture: For that thick, “frosty” look in the photo, using frozen mango and pineapple is the secret. It gives it a sorbet-like consistency without watering it down with extra ice.
Zest it up: If you want an even brighter color, add a tiny pinch of ground turmeric.

Prep time: 10 minutes | Bake time: 15–20 minutes
1 cup Low-sugar marinara sauce (check labels for 0 or low-point options)
1 cup Shredded part-skim mozzarella cheese
1/2 cup Lean cooked protein (options include cooked ground turkey sausage, Canadian bacon, or turkey pepperoni)
1/2 cup Mixed vegetables (chopped bell peppers, mushrooms, onions, or olives)
Optional: Red pepper flakes, dried oregano, or fresh basil for garnish.
Preheat your oven to 400°F (200°C). Prepare individual oven-safe bowls or small aluminum tins (as seen in your photo) by lightly spraying them with non-stick cooking spray.
Spoon a generous layer of marinara sauce into the bottom of each bowl. This acts as the “crust” replacement and keeps everything moist.
Layer your cooked lean protein and raw chopped vegetables over the sauce.
Pro Tip: If you are using vegetables that release a lot of water (like mushrooms or zucchini), you may want to sauté them briefly first to keep the bowl from getting watery.
Cover the toppings with a layer of shredded mozzarella cheese. If you like a little extra flavor, sprinkle some dried oregano or Italian seasoning over the cheese now.
Place the bowls on a baking sheet for easy handling and bake for 15–20 minutes. You are looking for the sauce to be bubbling and the cheese to be completely melted and starting to turn golden brown.
If you want that extra-crispy, browned cheese look seen in your photo, turn the oven to Broil for the last 1–2 minutes. Watch closely so they don’t burn!
To keep the points as low as possible, prioritize lean turkey sausage or lots of zero-point vegetables like spinach and peppers. This allows you to be more generous with the cheese!

Heaven In A Bowl
Cuisine: American
Category: Dessert
Prep Time:
Cook Time:
Total Time:
Yield: 12–14 servings
Table of Contents
Heaven In A Bowl lives up to its name—a luscious, layered dessert that combines the best of chocolate and peanut butter in every bite.
With fudgy brownies, creamy peanut butter filling, rich pudding, and fluffy whipped topping, it’s the perfect indulgence from Tinsuf for any occasion.
Each layer in this dessert adds a unique texture—fudgy brownies, silky pudding, creamy peanut butter filling, and airy whipped topping.
Together, they create a sweet-and-salty masterpiece that’s easy to make and always a crowd favorite.
Tinsuf keeps it simple yet indulgent—the perfect no-fail dessert for gatherings.

Crispy outside, creamy inside, filled with savory beef and melty cheese
3–5 large potatoes
3.5 tbsp (50 g) unsalted butter
Fresh dill, finely chopped
Salt, smoked paprika, black pepper, oregano (to taste)
1.1 lb (500 g) ground beef
1 medium onion, finely diced
2 garlic cloves, minced
1 red bell pepper, chopped
1 large tomato, diced
2.5 oz (70 g) tomato paste
Fresh parsley, finely chopped
3.5 oz (100 g) mozzarella cheese, shredded
Peel and cut potatoes into cubes.
Place them in a pot of salted water.
Boil for 15–20 minutes until fork-tender.
Drain well and let them cool slightly.
Put cooked potatoes into a bowl.
Add butter and mash until smooth.
Stir in:
Chopped dill
Smoked paprika
Black pepper
Oregano
Salt
Taste and adjust seasoning.
Set aside.
Heat a skillet over medium heat.
Add ground beef and cook until fully browned.
Add onion and garlic.
Cook until the onion becomes soft and clear.
Add chopped bell pepper and tomato.
Cook for 5 minutes until softened.
Add tomato paste and mix well.
Cook until everything is evenly combined.
Turn off heat.
Stir in chopped parsley.
Preheat oven to 375°F (190°C).
Line a baking tray with parchment paper.
Spoon mashed potatoes onto the tray.
Shape into round nests with a small hollow in the center.
💡 Tip: Slightly wet your spoon so the potatoes don’t stick.
Spoon beef mixture into each potato nest.
Sprinkle shredded mozzarella on top.
Bake for 15 minutes until cheese melts.
Turn on broiler for 2–3 minutes for golden tops.
Watch closely so they don’t overcook.
Chill mashed potatoes 15 minutes before shaping = cleaner nests
Don’t overfill or the nests may spill
Use a ring mold for perfect shapes
Fresh herbs make a big difference
Fresh cucumber salad
Soft bread or naan
Roasted vegetables
Garlic yogurt dip
Chicken & spinach instead of beef
Spicy version: add chili flakes
Cheese surprise: hide a cube of mozzarella inside
Vegetarian: mushrooms, zucchini, corn
Mini nests: party appetizer size
Can I make ahead?
Yes. Prep mash and filling separately and refrigerate.
Best potatoes?
Russet or Yukon Gold.
Can I freeze them?
Yes, freeze before baking. Thaw and bake later.
No beef?
Use turkey, chicken, or mushrooms.
Extra crispy?
Brush edges with oil and broil briefly.
Kid-friendly?
Yes! Let them help fill the nests.
Storage?
Fridge for up to 3 days. Reheat in oven or air fryer.

Recipe Introduction: These fluffy and golden pancakes are perfect for a sweet breakfast or a satisfying snack. With a slight citrusy twist from the fresh oranges on the side, this recipe brings a delightful balance of texture and taste. Easy to make and incredibly delicious, these pancakes will quickly become a favorite in your home!
Ingredients:
1 cup all-purpose flour
1/2 cup milk
2 large eggs
1 tablespoon sugar
1 tablespoon baking powder
1/2 teaspoon vanilla extract
1/4 teaspoon salt
2 tablespoons melted butter
1 tablespoon orange zest (optional)
1/2 cup fresh orange juice
Extra butter or oil for frying
Instructions:
In a large bowl, whisk together the flour, sugar, baking powder, and salt.
In a separate bowl, beat the eggs and then add the milk, vanilla extract, melted butter, and orange juice. Mix well.
Gradually combine the wet ingredients with the dry ingredients, stirring until just combined. If you want extra flavor, fold in the orange zest.
Heat a non-stick skillet over medium heat and lightly grease it with butter or oil.
Pour about 1/4 cup of batter onto the skillet for each pancake. Cook for 2-3 minutes, or until bubbles form on the surface and the edges start to set.
Flip the pancakes and cook for another 1-2 minutes until golden brown on both sides.
Remove from the skillet and serve warm with a drizzle of syrup or a fresh slice of orange on the side.
Enjoy your freshly made pancakes with a side of citrusy goodness!
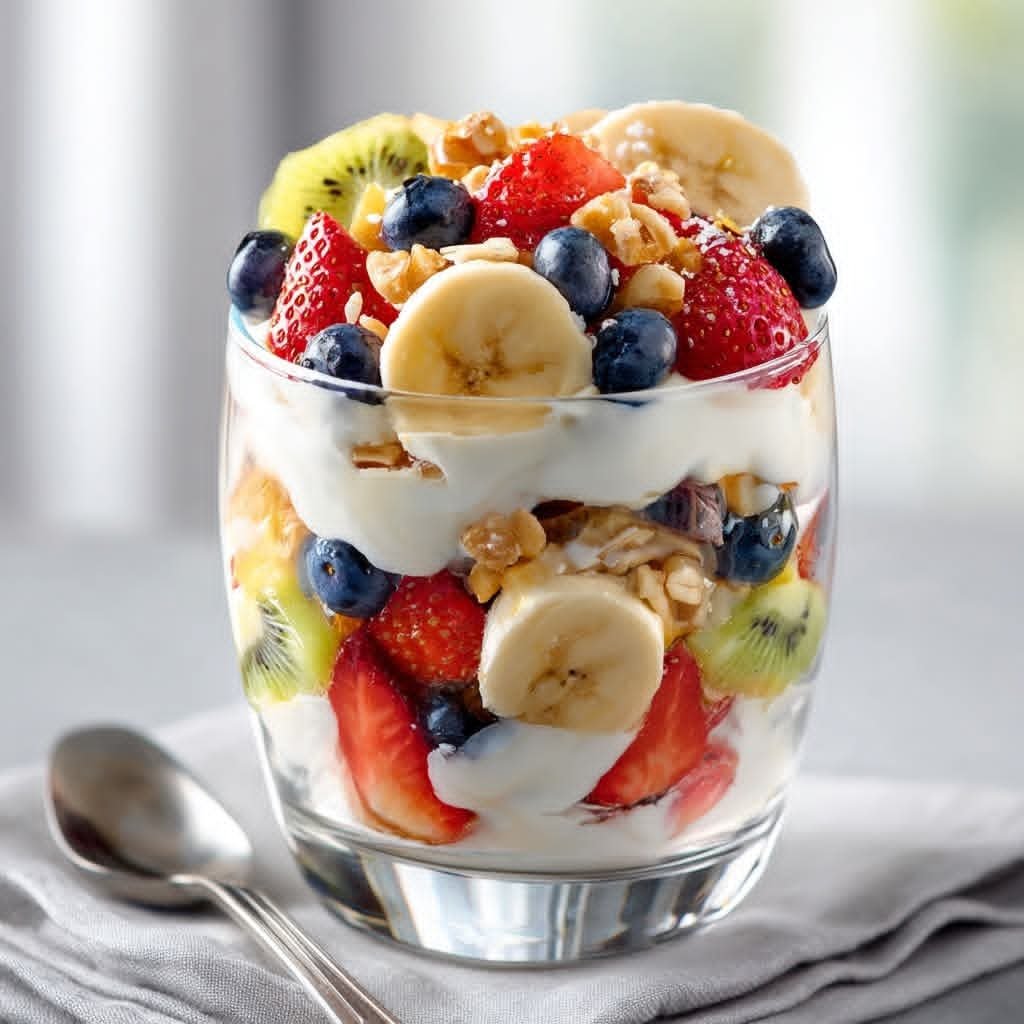
🍓🥝🍌 Greek Yogurt Fruit Parfait 🫐🥣
A fresh, creamy, and crunchy layered parfait made with yogurt, juicy fruits, and granola — perfect for breakfast or a healthy dessert! 💛
🛒 Ingredients
🥣 1 cup Greek yogurt (plain or vanilla)
🍓 ½ cup strawberries, sliced
🍌 1 banana, sliced
🥝 1 kiwi, diced
🫐 ¼ cup blueberries
🌾 ¼ cup granola
🍯 1 tbsp honey (optional)
🥜 1 tbsp chopped nuts (optional)
👩🍳 Instructions
1️⃣ Add a layer of Greek yogurt to the bottom of a glass.
2️⃣ Add a layer of mixed fruits (strawberries, banana, kiwi, blueberries).
3️⃣ Sprinkle granola and nuts for crunch.
4️⃣ Repeat layers until the glass is full.
5️⃣ Drizzle honey on top and garnish with extra fruit.
6️⃣ Serve immediately and enjoy the creamy-crunchy goodness! 😍

Japanese Cotton Cheesecake Soufflé (Fluffy Mini Version)
These light, airy, cloud-like cheesecakes are inspired by the famous Japanese soufflé-style cheesecake. They’re less dense than traditional cheesecake and have a soft, jiggly texture with a delicate sweetness.
Description
Japanese Cotton Cheesecake is a cross between a cheesecake and a sponge cake. It’s made by folding whipped egg whites (meringue) into a cream cheese batter, then baking gently in a water bath to create its signature fluffy texture.
The result:
✔ Ultra-light
✔ Slightly sweet
✔ Melt-in-your-mouth soft
✔ Beautifully risen tops
Perfect for tea time, brunch, or light dessert.
Ingredients (12 Mini Cheesecakes)
Cream Cheese Base
8 oz (225g) cream cheese, softened
3 tbsp unsalted butter
½ cup (120ml) milk
¼ cup (50g) sugar (for yolk mixture)
4 large eggs, separated
½ cup (60g) cake flour (or all-purpose flour sifted twice)
2 tbsp cornstarch
1 tsp vanilla extract
1 tsp lemon juice (optional)
Meringue
¼ cup (50g) sugar (for egg whites)
Optional Topping
Powdered sugar
Fresh berries
Instructions
Step 1: Prepare
Preheat oven to 320°F (160°C).
Line a muffin pan with cupcake liners.
Prepare a larger baking pan for water bath.
Step 2: Make Cream Cheese Batter
Melt cream cheese, butter, and milk together over low heat or double boiler. Stir until smooth.
Remove from heat. Let cool slightly.
Whisk in egg yolks one at a time.
Add sugar, vanilla, lemon juice.
Sift in flour and cornstarch. Mix until smooth.
Step 3: Make Meringue
Beat egg whites until foamy.
Gradually add sugar.
Beat until soft-medium peaks form (not stiff).
Step 4: Fold
Gently fold ⅓ of meringue into batter.
Fold remaining meringue carefully to keep air inside.
Step 5: Bake (Water Bath Method)
Fill cupcake liners ¾ full.
Place muffin pan into larger pan.
Pour hot water into outer pan halfway up muffin tray.
Bake 20–25 minutes.
Reduce heat to 280°F (140°C) and bake another 10 minutes.
Turn off oven and leave inside 10 minutes with door slightly open.
Step 6: Cool
Remove and cool completely. Dust with powdered sugar before serving.
Servings
Makes 12 mini cheesecakes
Serving size: 1 mini cake
Nutritional Information (Per Serving Approx.)
Calories: 140–160 kcal
Protein: 4g
Carbohydrates: 12g
Fat: 9g
Sugar: 8g
Calcium: 6% DV
Benefits
✔ Lighter than traditional cheesecake
✔ Lower sugar compared to regular cheesecake
✔ High in protein from eggs
✔ Portion-controlled minis
✔ Elegant presentation
Important Tips
🔹 Use room temperature ingredients
🔹 Do not overbeat egg whites (stiff peaks = cracking)
🔹 Always bake in water bath for soft texture
🔹 Avoid opening oven early
🔹 Let cool gradually to prevent collapsing
Q & A
Q1: Why did my cheesecake collapse?
A: Overbeaten meringue or sudden temperature change. Cool slowly.
Q2: Can I make this as one large cake?
Yes! Bake in 8-inch pan for 50–60 minutes.
Q3: Can I skip water bath?
Not recommended — texture will be dense and may crack.
Q4: How to store?
Refrigerate up to 3 days in airtight container.
Q5: Can I freeze it?
Yes, wrap tightly. Freeze up to 1 month.

Recipe: Cheesy Zucchini Breadsticks
This recipe swaps traditional flour dough for a nutrient-dense zucchini base. It’s a low-carb, gluten-free alternative that actually tastes like comfort food.
Prep time: 20 minutes
Cook time: 25 minutes
Total time: 45 minutes
Servings: 4 (approx. 3 sticks per serving)
Ingredients
Category Ingredient Quantity
The Base Fresh zucchini, shredded 2 cups (packed)
The Binder Large egg, lightly beaten 1
Cheese Shredded Mozzarella (divided) 1.5 cups
Flavor Grated Parmesan cheese 1/4 cup
Aromatics Garlic powder 1/2 tsp
Herbs Dried oregano or Italian seasoning 1 tsp
Seasoning Salt and Black pepper To taste
Instructions
Prep the Zucchini: Preheat your oven to 425°F (220°C). Shred the zucchini using a box grater.
The “Squeeze” (Crucial Step): Place the shredded zucchini in a clean kitchen towel or cheesecloth. Wring it out over the sink with all your might. You want to remove as much liquid as possible until the zucchini feels dry.
Mix: In a medium bowl, combine the squeezed zucchini, egg, Parmesan, 1/2 cup of the Mozzarella, garlic powder, and herbs. Mix until a “dough” forms.
Shape: Line a baking sheet with parchment paper. Transfer the mixture to the sheet and pat it into a rectangle about 1/4 inch thick.
Initial Bake: Bake for 15–20 minutes or until the top looks dry and the edges are starting to brown.
The Topping: Remove from the oven. Sprinkle the remaining 1 cup of Mozzarella over the top.
Final Melt: Return to the oven for 5–7 minutes, or until the cheese is bubbly and golden.
Slice: Let it cool for 5 minutes (this helps it set) before slicing into “sticks” with a pizza cutter.
Tips for Success
Dryness is Key: If your breadsticks are soggy, it’s because the zucchini was too wet. If you think you’ve squeezed enough, squeeze one more time.
Parchment, Not Foil: These can be sticky. Use high-quality parchment paper or a silicone baking mat.
Broil for Color: If you like those brown “pizza bubbles” on your cheese, pop the oven to broil for the last 60 seconds.
Nutritional Info (Per Serving)
Calories: 165 kcal
Net Carbs: 4g
Protein: 12g
Fat: 11g
Fiber: 1g
Health Benefits
Low Carb/Keto Friendly: Perfect for managing blood sugar or staying in ketosis.
High Volume: Zucchini is low in calories but high in water and fiber, helping you feel full.
Vitamin Boost: You’re getting a solid dose of Vitamin A, C, and Potassium hidden inside a “breadstick.”
Q&A
Q: Can I use frozen zucchini?
A: Yes, but thaw it completely and squeeze it even more thoroughly than fresh, as freezing breaks down the cell walls and releases more water.
Q: Can I make these vegan?
A: It’s tricky because the egg and cheese are the structural “glue.” You can try a flax egg and vegan cheese, but the texture will be much softer and may require a fork to eat.
Q: Do they save well?
A: They are best fresh. However, you can reheat leftovers in an air fryer or toaster oven to bring back the crispiness. Avoid the microwave, or they will turn mushy.
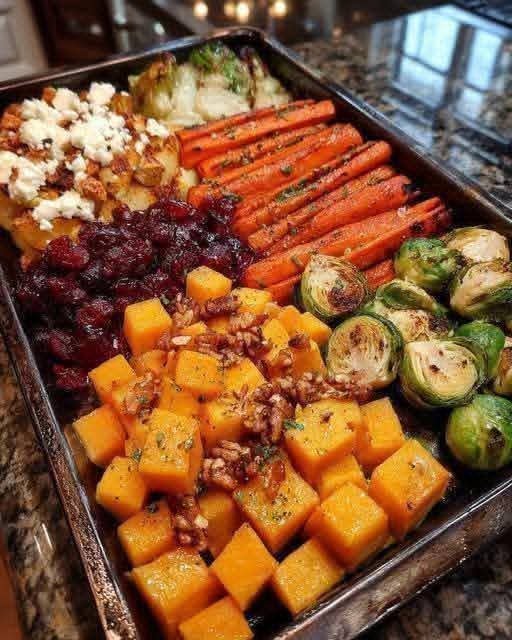
🍂 Recipe: Caramelized Roasted Harvest Tray
Prep time: 15 minutes
Cook time: 30–40 minutes
Servings: 4–6 people
Ingredients
The Veggie Base: 1 medium butternut squash (cubed), 1 lb carrots (peeled/halved), 1 lb Brussels sprouts (halved).
The Glaze: 3 tbsp olive oil, 2 tbsp maple syrup (or honey), 1 tsp dried thyme, salt, and cracked black pepper.
The Toppings: ½ cup dried cranberries, ½ cup toasted pecans or walnuts, ¼ cup crumbled feta cheese.
Instructions
Preheat & Prep: Heat your oven to 200°C (400°F). Line a large sheet pan with parchment paper for easy cleanup.
Arrange: Place the squash, carrots, and Brussels sprouts on the tray. Pro-tip: Keep them in “sections” like the photo for a beautiful presentation, or toss them together for a rustic mix.
Whisk & Coat: Mix the olive oil, maple syrup, thyme, salt, and pepper. Drizzle over the vegetables and toss until every piece is glistening.
Roast: Bake for 30–35 minutes. About halfway through, give the veggies a gentle stir. You’re looking for charred edges on the sprouts and fork-tender squash.
Finish: Remove from the oven. While still hot, sprinkle the dried cranberries, nuts, and feta over the top. The residual heat will slightly soften the cheese and plump the berries.
💡 Pro Tips for Success
Size Matters: Try to cut the butternut squash cubes to roughly the same size as the halved Brussels sprouts. This ensures everything cooks at the same rate.
Don’t Overcrowd: If the veggies are piled on top of each other, they will steam instead of roast. Use two trays if you have to!
The “Sizzle” Factor: For extra crispy Brussels sprouts, place them flat-side down on the tray.
📊 Nutritional Info (Per Serving)
Calories: 245 kcal
Fiber: 7g (High)
Protein: 5g
Key Vitamins: Exceptionally high in Vitamin A and Vitamin C.
✨ Health Benefits
Anti-Inflammatory: Butternut squash and carrots are loaded with beta-carotene, which supports eye health and immune function.
Heart Healthy: Pecans provide healthy fats, while the high fiber content helps manage cholesterol levels.
❓ Common Questions (Q&A)
Q: Can I make this vegan? A: Absolutely! Just swap the feta for a vegan almond-based “feta” or simply omit it. The maple syrup provides plenty of flavor on its own.
Q: My carrots are still hard but the sprouts are burning. What happened? A: Carrots take longer to cook than sprouts. If your carrots are very thick, slice them into smaller sticks (batonnet) or give them a 10-minute head start in the oven before adding the other veggies.
Q: Can I use frozen vegetables? A: I wouldn’t recommend it for this tray. Frozen veggies release too much moisture, preventing that beautiful caramelization you see in the photo. Stick to fresh for the best crunch!

Creamy, naturally sweet, and packed with protein, this Triple Berry Protein Bake is the perfect balance between a wholesome breakfast and a light dessert. Made with cottage cheese, almond flour, and vibrant mixed berries, it’s gluten-free, nourishing, and incredibly satisfying. Each slice delivers a soft, cheesecake-like texture with bursts of juicy berries in every bite.
1. Prepare the Oven & Dish
Preheat your oven to 175°C (350°F). Lightly grease an 8×8 or 9×9-inch baking dish with butter or cooking spray to prevent sticking.
2. Blend the Base
In a food processor or blender, combine the cottage cheese and eggs. Blend until completely smooth and creamy. This step is key for achieving a soft, custard-like texture without visible curds.
3. Mix the Batter
Transfer the smooth mixture to a mixing bowl. Add almond flour, your chosen sweetener, vanilla extract, lemon zest, and baking powder. Stir gently until everything is fully incorporated. The almond flour gives structure while keeping the bake naturally gluten-free.
4. Fold in the Berries
Gently fold in the mixed berries, being careful not to overmix. This helps keep the berries whole and prevents the batter from turning purple. If using frozen berries, no need to thaw — just fold them in straight from the freezer.
5. Bake
Pour the batter into the prepared baking dish and spread evenly. Bake for 35–40 minutes, or until the top is lightly golden and the center is just set. A slight jiggle is okay; it will firm up as it cools.
6. Cool & Serve
Allow the bake to cool for at least 20–30 minutes before slicing. This helps it fully set and makes cleaner slices.
Serve warm or chilled. Top with Greek yogurt, a drizzle of honey, or extra fresh berries. It stores well in the refrigerator for up to 4 days, making it ideal for meal prep breakfasts.
Enjoy a protein-packed treat that feels indulgent but fuels your day beautifully! 

Discover the joy of turning a simple head of cauliflower into a crispy, golden delight with this easy-to-follow recipe. Perfect as a healthy snack, a savory side dish, or a tasty appetizer, this crispy oven-baked cauliflower is sure to impress with its delicious flavor and satisfying crunch. If you find yourself loving this recipe, don’t hesitate to share your thoughts in the comments!
1 head of cauliflower
Salt, to taste
A pinch of nutmeg
For the Batter:
50g wheat flour
A dash of sweet paprika powder
2 eggs
40g butter, melted
2 cloves garlic, minced
A bit of grated nutmeg
A pinch of salt
Prep the Cauliflower:
Rinse the cauliflower head thoroughly under cold water.
Carefully break it down into florets.
In a large pot of boiling water seasoned with salt and a pinch of nutmeg, cook the cauliflower florets until al dente. This should take about 5-7 minutes.
Remove the florets with a slotted spoon and let them steam dry or pat dry with a kitchen towel to remove excess moisture.
In a mixing bowl, whisk together the eggs and melted butter until frothy.
Add in the minced garlic, salt, paprika, a touch of nutmeg, and gradually sift in the wheat flour. Stir everything together until you achieve a smooth, consistent batter.
Once the cauliflower florets have cooled slightly and are manageable to touch, dip and roll them in the prepared batter. Make sure each floret is evenly coated.
Preheat your oven to 190°C (375°F) with the setting on both upper and lower heat.
Arrange the batter-coated cauliflower florets on a greased baking tray, ensuring they are spaced out evenly.
Bake in the preheated oven on the middle rack for about 20 minutes, or until the florets are golden brown and crispy.
Once done, remove the tray from the oven and let the cauliflower cool for a few minutes before serving. This allows the florets to crisp up even further.
Enjoy your crispy oven-baked cauliflower as is, or pair it with your favorite dipping sauce for an extra flavor kick. Whether you’re serving this to guests, enjoying it as a nutritious snack, or adding it as a side to your main meal, this cauliflower recipe is a delicious way to incorporate more veggies into your diet. Don’t forget to share your experience and any personal twists you added to the recipe in the comments below

If you’re looking for an irresistibly creamy and easy dessert, this No-Bake Biscuit Pudding is the answer. With its smooth layers of velvety custard and the crunch of biscuit crumbs, this dessert offers a beautiful balance between textures. It’s an ideal sweet treat for any occasion—especially when you’re short on time but still want something impressive.
Let’s walk through how you can create this mouthwatering dessert at home!
This no-bake dessert requires minimal ingredients and effort, but it packs a punch in flavor. The combination of creamy, custard-like layers with the subtle sweetness and crunch of biscuits makes it a satisfying treat for everyone. Plus, it doesn’t require an oven, making it the perfect go-to recipe for hot summer days or any time you want a quick dessert fix.
Ingredients You’ll Need:
3 cups (700ml) whole milk
1 can (14 oz) sweetened condensed milk
4 tablespoons cornstarch
1 teaspoon vanilla extract
2 packets of digestive or graham crackers (or any plain biscuits you prefer)
1/4 cup butter (optional, for extra richness)
Crushed biscuits or graham crackers (for topping)
INSTRUCTIONS:
Instructions:
Step 1: Prepare the Creamy Custard Base
In a medium saucepan, combine the whole milk, sweetened condensed milk, and cornstarch. Whisk them together until the cornstarch is fully dissolved, ensuring no lumps remain. This mixture will form the base of the pudding.
Turn on the heat to medium and stir the mixture continuously. As it heats up, the mixture will thicken. This usually takes about 5 to 7 minutes. Once the pudding thickens to a creamy, custard-like consistency, remove it from the heat. Stir in the vanilla extract for a touch of flavor and richness. If you prefer a slightly richer custard, add the butter at this point and stir until melted.
Step 2: Layer the Biscuits
While the custard is cooling slightly, crush half of your biscuits or graham crackers into fine crumbs. You can do this by placing them in a ziplock bag and gently crushing them with a rolling pin, or by pulsing them in a food processor.
Take a deep dish or baking dish (preferably glass for presenation), and spread a thin layer of crushed biscuits on the bottom. This forms the crispy foundation for the pudding layers.
Step 3: Layer the Custard
Once your biscuits are in place, pour half of the custard mixture over the biscuit layer. Spread it evenly using a spatula or the back of a spoon. The smooth, creamy custard contrasts beautifully with the crunch of the biscuits.
Step 4: Add Another Biscuit Layer
Now, crush more biscuits and sprinkle a second layer over the custard. Be generous—this adds extra texture and flavor!
Step 5: Top with the Remaining Custard
Pour the remaining custard over the top biscuit layer. Gently spread it out, ensuring that the biscuit layer is fully covered and sealed in by the rich custard.
Step 6: Finish with Crushed Biscuits
To add the finishing touch, sprinkle the top with more crushed biscuits. This gives the dessert a lovely crunchy texture that complements the creamy filling.
Step 7: Chill and Serve
Place the dish in the refrigerator for at least 2 hours, or until fully set. Chilling allows the flavors to meld together and gives the pudding a more cohesive texture. For best results, you can even leave it to chill overnight.
Tips for Success:
Cornstarch consistency: Make sure to whisk constantly while heating the milk mixture to avoid lumps.
Layer variation: You can add more layers of biscuits and custard if desired for extra height and texture.
Flavored twist: Feel free to add a dash of cinnamon or cocoa powder to the biscuit layers for an extra flavor boost.
Serving Suggestions:
Once the pudding has set, it’s ready to be served! You can cut it into slices for a neat presentation or scoop it out with a large spoon for a more rustic look. The combination of the cool, creamy custard and the crumbly biscuit layers is sure to be a hit with anyone who tries it.
Why You’ll Love This Recipe:
No-bake: This is a perfect dessert when you don’t want to use the oven.
Minimal ingredients: With only a few pantry staples, you can whip this up in no time.
Customizable: You can experiment with different biscuits, toppings, or even flavors in the custard.
Make-ahead: This pudding can be made the night before, making it ideal for parties or gatherings.

Creamy Lemon Bliss Dessert Cups
This creamy lemon dessert is light, smooth, and wonderfully refreshing. It combines the bright taste of fresh lemon with soft, fluffy cream to create a spoonable treat that feels both comforting and elegant. Served in individual glasses, it looks beautiful and tastes even better, making it perfect for gatherings or a quiet moment of enjoyment at home.
Ingredients
1 cup fresh whipping cream, well chilled
½ cup thick cream cheese, softened
½ cup sweetened condensed milk
⅓ cup fresh lemon juice (strained)
1 tablespoon lemon zest (finely grated)
1 teaspoon pure vanilla essence
1 cup plain crushed biscuits or cookies
2 tablespoons melted butter
Extra lemon zest or small lemon jelly cubes for topping (optional)
Preparation Method
Start by preparing the base. In a bowl, combine the crushed biscuits with melted butter. Mix until the texture resembles soft crumbs that hold together when pressed. Spoon this mixture evenly into serving glasses and gently press it down using the back of a spoon. Place the glasses in the refrigerator while you prepare the creamy layer.
In a separate large bowl, whip the chilled cream until soft peaks form. Take care to whip slowly at first, then increase speed, stopping as soon as the cream becomes fluffy and smooth.
In another bowl, beat the softened cream cheese until silky and lump-free. Add the condensed milk gradually, mixing until fully combined. Pour in the fresh lemon juice, vanilla essence, and lemon zest. Stir gently; the mixture will naturally thicken and become creamy with a lovely pale yellow color.
Now, fold the whipped cream into the lemon mixture in batches. Use a light hand and gentle strokes to keep the texture airy. This step gives the dessert its cloud-like softness.
Remove the glasses from the refrigerator and spoon the creamy lemon mixture over the biscuit base. Smooth the tops neatly. If desired, add a few lemon jelly cubes or a sprinkle of zest on top for a bright finish.
Cover and chill the dessert for at least 3–4 hours, or overnight for the best texture and flavor.
Serving Tips
Serve cold straight from the refrigerator. This dessert pairs beautifully with fresh fruit or a simple cup of tea. The balance of creamy richness and fresh citrus makes every bite feel light, smooth, and satisfying.
If you’d like, I can also share variations, storage tips, or a no-bake version using different flavors. 🍋✨

Soft, naturally sweet, and packed with protein and fiber, these healthy oat pancakes come together in minutes using simple pantry ingredients. No refined sugar, no flour — just wholesome goodness that keeps you full and energized.
These oat pancakes are a nutritious alternative to traditional pancakes. Sweetened naturally with banana and made with oats instead of flour, they’re ideal for breakfast, post-workout meals, or a light dinner. The texture is tender and slightly nutty, similar to crepes or thin pancakes.
1 ripe banana
100 g Greek yogurt (plain, unsweetened)
2 large eggs
1 cup old-fashioned oats
A pinch of salt
Blend Batter
Add banana, Greek yogurt, eggs, oats, and salt to a blender or food processor.
Blend until smooth.
Heat Pan
Heat a non-stick pan over medium heat. Lightly grease if needed.
Cook Pancakes
Pour small ladles of batter into the pan.
Cook 1–2 minutes per side until golden and set.
Serve Warm
Stack and enjoy immediately.
Use a very ripe banana for natural sweetness
Let batter rest 1–2 minutes if too thick
Cook on medium-low heat to avoid burning
Blend oats fully for smoother pancakes
Works well as thin pancakes or crepes
Makes: 6–8 small pancakes
Serves: 2
Calories: 220
Protein: 14 g
Carbohydrates: 26 g
Fiber: 4 g
Fat: 7 g
Sugar: 6 g (from banana only)
(Values may vary depending on yogurt brand)
 No refined sugar
No white flour
High in protein & fiber
Supports digestion
Keeps you full longer
Kid-friendly & diabetic-friendly (in moderation)
Q: Can I make these without a blender?
A: Yes—use oat flour and mash the banana very well.
Q: Can I make them dairy-free?
A: Replace Greek yogurt with coconut or almond yogurt.
Q: Are these gluten-free?
A: Yes, if you use certified gluten-free oats.
Q: Can I store leftovers?
A: Refrigerate up to 3 days or freeze up to 2 months.
Q: What toppings go well with these?
A: Fresh berries, nut butter, honey, yogurt, or cinnamon.

A warm anti-inflammatory bedtime drink that may improve insulin sensitivity and reduce overnight glucose spikes.
1 cup unsweetened almond milk (or low-fat milk)
½ tsp Ceylon cinnamon
¼ tsp turmeric
Pinch black pepper
Optional: stevia
Heat milk gently (do not boil).
Whisk in spices.
Simmer 2–3 minutes.
Drink warm 30–60 minutes before bed.
Calories: 40–80
Carbs: 2–10g
Sugar: 0–8g
Fat: 2–3g
Cinnamon may improve insulin sensitivity.
Turmeric reduces inflammation.
Promotes relaxation before sleep.
Use Ceylon cinnamon (safer long term).
Avoid adding honey or sugar.
Q: Can I drink daily? Yes, in moderation.
Q: Is it safe with medication? Usually yes, but monitor glucose.
Fenugreek seeds contain soluble fiber that may help lower fasting glucose.
1 tsp fenugreek seeds
1 cup warm water
Soak seeds overnight.
Drink water (you may chew seeds).
Very low calorie
Small amount of fiber if seeds consumed
May reduce fasting blood sugar.
Supports digestion.
Start with small amounts to avoid bloating.
Avoid during pregnancy.
Q: Best time? Before bed or early morning.
 Chamomile Tea
A calming herbal tea that supports sleep and may reduce blood sugar levels.
1 chamomile tea bag
1 cup hot water
Steep 5–7 minutes.
0 calories (unsweetened)
Improves sleep quality.
May reduce oxidative stress.
Supports overnight glucose balance.
Do not add sugar.
Can combine with cinnamon stick.
 Apple Cider Vinegar Drink
Some studies suggest vinegar before bed may reduce morning blood sugar.
1 tbsp raw apple cider vinegar
1 cup warm water
Mix and drink before bed.
3 calories
0 carbs
May improve insulin sensitivity.
May reduce fasting glucose levels.
Always dilute.
Use a straw to protect teeth.
Avoid if you have acid reflux or ulcers.
Q: Can I take 2 tbsp? Start with 1 tbsp only.
 Aloe Vera Water
Food-grade aloe vera juice may help improve fasting blood sugar.
1–2 tbsp pure aloe vera juice
1 cup water
5–10 calories
1–2g carbs
Anti-inflammatory.
May support glucose regulation.
Use only food-grade aloe.
Avoid high doses (may cause diarrhea).
 Cucumber Mint Infused Water
A refreshing, ultra-low-carb hydration drink perfect for nighttime.
½ cucumber sliced
Few fresh mint leaves
2 cups water
Infuse 2–4 hours in refrigerator.
5 calories
1g carbs
Supports hydration.
Zero added sugar.
Helps reduce late-night cravings.
Add lemon slice for flavor (optional).
 Low-Carb Protein Bedtime Shake
Protein before bed may prevent overnight glucose spikes and reduce hunger.
1 scoop unsweetened protein powder
1 cup unsweetened almond milk
Ice cubes
Blend and drink 30 minutes before bed.
100–150 calories
15–25g protein
2–5g carbs
Stabilizes overnight blood sugar.
Reduces dawn phenomenon impact.
Supports muscle health.
Choose low-carb, no-sugar protein powder.
Avoid flavored sugary blends.
A light, moist, and chocolatey treat powered by fruit.
4 Medium Sweet Apples (Gala, Fuji, or Honeycrisp work best for natural sweetness)
4 Large Eggs
5 Tablespoons Unsweetened Cocoa Powder
1 Teaspoon Baking Powder
Olive Oil (specifically for greasing the mold)
Wash, peel, and core your four apples. Cut them into small chunks.
Pro Tip: To get that incredibly smooth, cake-like texture seen in your photo, you will want to steam or boil the apple chunks for about 10 minutes until they are very soft. Drain any excess water.
Place the softened apples into a blender or food processor. Pulse until you have a completely smooth apple purée.
Add the 4 large eggs to the blender with the apple purée. Blend again for about 30 seconds until the mixture is light and well-combined.
Add the 5 tablespoons of cocoa powder and the 1 teaspoon of baking powder to the blender.
Important: Use a high-quality unsweetened cocoa powder to ensure a deep chocolate flavor without any hidden sugars.
Pulse the blender until the batter is a uniform chocolate color and completely smooth.
Lightly grease a silicone mold or a small baking tin with a little olive oil. This ensures the cake releases perfectly without sticking to the sides.
Oven Method: Preheat your oven to 350°F (175°C). Pour the batter into the mold and bake for 40–45 minutes, or until a toothpick comes out clean.
Alternative: Some versions of this recipe can be “set” in the fridge if using a setting agent, but for the spongy texture in your photo, baking is the best route.
Allow the cake to cool completely in the mold before flipping it onto a plate. As seen in your image, you can top it with a thin layer of melted sugar-free chocolate or a dusting of extra cocoa powder if you like.
By using apples as the base, you are getting natural fiber and sweetness without the need for refined flours or sugars. It keeps the calorie count low while providing a dense, satisfying texture.

Prep time: 10 minutes | Bake time: 30 minutes
For the Cake:
1 box (15.25 oz) Yellow Cake Mix
4 Large eggs
1/2 cup Vegetable oil
1 can (8 oz) Crushed pineapple with juice (do not drain)
For the Whipped Topping:
1 can (20 oz) Crushed pineapple with juice (do not drain)
1 box (3.4 oz) Vanilla instant pudding mix
1 container (8 oz) Whipped topping (like Cool Whip), thawed
Optional: 1/2 cup toasted shredded coconut (as seen in your photo) or maraschino cherries for garnish.
Preheat your oven to 350°F (175°C). In a large mixing bowl, combine the yellow cake mix, eggs, vegetable oil, and the small (8 oz) can of crushed pineapple. Mix by hand or with an electric mixer for about 2 minutes until well combined.
Grease a 9×13-inch baking dish. Pour the batter in and spread it evenly. Bake for 30–35 minutes, or until a toothpick inserted into the center comes out clean.
Crucial Step: Allow the cake to cool completely before adding the topping, otherwise the whipped cream will melt.
In a medium bowl, stir together the large (20 oz) can of crushed pineapple and the dry vanilla pudding mix. Once the pudding mix has dissolved into the pineapple juice and thickened slightly, gently fold in the thawed whipped topping until the mixture is light and fluffy.
Spread the pineapple-pudding mixture evenly over the cooled cake.
If you want to match the photo exactly, sprinkle the top generously with toasted coconut. For the best flavor and texture, refrigerate the cake for at least 2 hours before serving. This allows the flavors to meld and the cake to become extra moist.
The Juice: Using the pineapple juice directly in the batter replaces the water usually called for in box mixes, creating a much deeper flavor.
The Pudding: Mixing the pudding directly with fruit juice creates a stable, flavorful “mousse” that stays fluffy in the fridge.