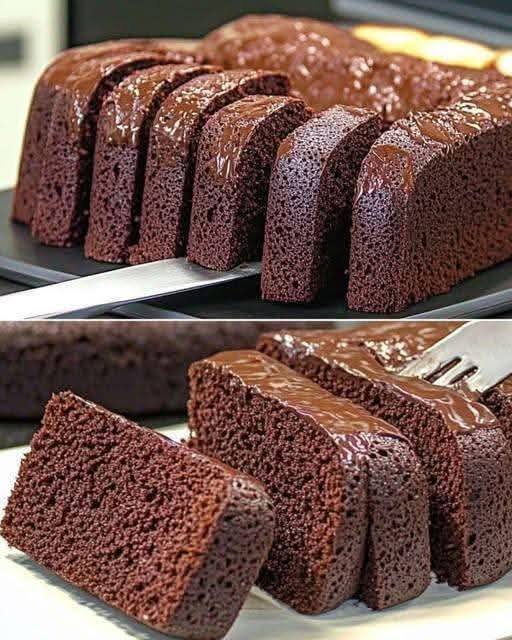
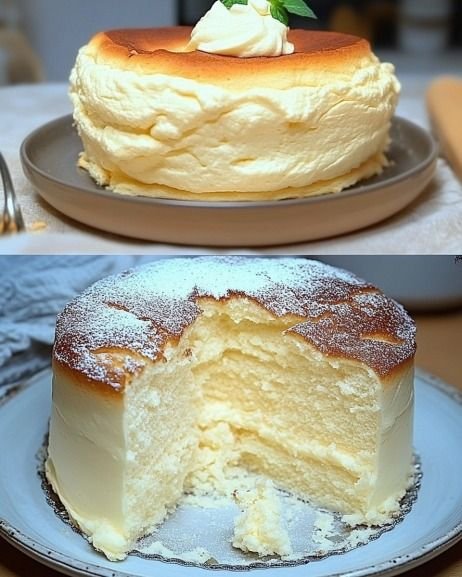
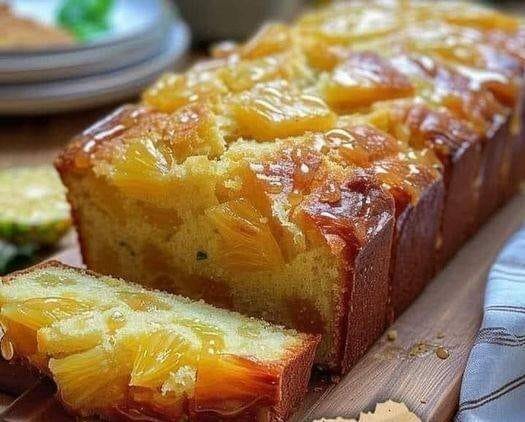
Wholesome Banana Oat Muffins


Wholesome Banana Oat Muffins

Prep time: 10 minutes


Cook time: 20–25 minutes


Yield: 12 muffins


Ingredients

3 ripe bananas, mashed (the riper, the better!)


2 large eggs


2 cups rolled oats (use certified gluten-free if needed)


1 tsp baking powder


1 tsp cinnamon


1 tsp vanilla extract


Optional: A handful of sugar-free chocolate chips or fresh blueberries for extra flavor.


Instructions

Preheat: Set your oven to 350°F (175°C) and line a muffin tin with silicone liners or lightly grease the wells.


Mix: In a large bowl, mash the bananas well with a fork. Add the eggs, vanilla, and cinnamon, and mix until well combined.


Combine: Stir in the oats and baking powder until everything is incorporated. If you are adding berries or chocolate chips, gently fold them in now.


Fill: Divide the mixture evenly into your prepared muffin tin.


Bake: Bake for 20–25 minutes, or until the tops are set and a toothpick inserted into the center comes out clean.


Cool: Let them cool in the pan for a few minutes before transferring them to a wire rack.

Hamburger Potato Casserole

Hamburger Potato Casserole

🕒 The Basics

Prep time: 20 minutes


Cook time: 60 minutes


Servings: 6 people


Difficulty: Easy


🛒 Ingredients

The Base

Ground Beef: 1.5 lbs (80/20 or 90/10 lean)


Potatoes: 5–6 medium Russet or Yukon Gold potatoes (peeled and sliced into 1/8-inch rounds)


Onion: 1 medium yellow onion, diced


Garlic: 3 cloves, minced


The Sauce

Cream of Mushroom Soup: 1 can (10.5 oz)


Milk: 3/4 cup (whole or 2%)


Sour Cream: 1/2 cup (adds tang and creaminess)


Cheddar Cheese: 2 cups, shredded (divided)


Seasonings: 1 tsp salt, 1/2 tsp black pepper, 1 tsp paprika, 1/2 tsp dried thyme


👩‍🍳 Instructions

Prep the Oven: Preheat your oven to 375°F (190°C). Grease a 9×13 inch baking dish.


Brown the Beef: In a large skillet, cook the ground beef and diced onions over medium-high heat until the meat is no longer pink. Drain the excess grease. Stir in the minced garlic and cook for 1 minute until fragrant. Season with half of the salt and pepper.


Mix the Sauce: In a medium bowl, whisk together the cream of mushroom soup, milk, sour cream, paprika, thyme, and the remaining salt and pepper.


Layer it Up: * Place half of the sliced potatoes in the bottom of the baking dish.


Spread the beef mixture evenly over the potatoes.


Pour half of the sauce over the beef.


Add the remaining potatoes in a final layer.


Pour the rest of the sauce over the top.


Bake: Cover the dish tightly with aluminum foil. Bake for 45 minutes.


Cheese it Up: Remove the foil. Sprinkle the 2 cups of shredded cheddar cheese over the top. Bake uncovered for another 15 minutes, or until the potatoes are fork-tender and the cheese is bubbly and golden.

Rest: Let the casserole sit for 5–10 minutes before serving. This allows the sauce to thicken.


💡 Pro Tips & Notes

Slice Thin: Use a mandoline slicer for the potatoes if you have one. Consistent thickness ensures every potato is cooked through at the same time.


The Potato Choice: Russets soak up the sauce beautifully, while Yukon Golds hold their shape better and offer a buttery flavor.


Vegetable Boost: Feel free to add a layer of frozen peas, corn, or canned green beans between the beef and potatoes for a complete one-dish meal.


🥗 Nutritional Info (Per Serving)

Calories Total Fat Carbs Protein Sodium

485 kcal 28g 32g 26g 840mg

✅ Benefits

Meal Prep Friendly: This tastes even better the next day as the flavors meld.


Kid-Approved: It features familiar, mild flavors that even picky eaters enjoy.


Budget-Friendly: Uses pantry staples and affordable cuts of meat.


❓ Common Questions (Q&A)

Q: Can I use ground turkey instead?


A: Absolutely! It’s a great way to lean out the recipe. Just add a teaspoon of Worcestershire sauce to the turkey to boost the “beefy” umami flavor.


Q: Why are my potatoes still hard?


A: This usually happens if the slices are too thick or the dish wasn’t covered tightly enough. The steam trapped by the foil is what cooks the potatoes.


Q: Can I freeze this?


A: Yes. You can freeze it after baking. Thaw it in the fridge overnight and reheat in the oven at 350°F until warmed through. Note that potatoes can sometimes change texture slightly after freezing.

BREAKFAST TOASTS – 9 EASY RECIPES

🥑🍓 BREAKFAST TOASTS – 9 EASY RECIPES

1️⃣ Avocado & Egg Toast

Ingredients:

  • 1 slice bread (toasted)
  • ½ ripe avocado
  • 1 egg
  • Salt & black pepper

Method:

  1. Toast the bread until golden.
  2. Mash avocado with salt & pepper.
  3. Fry or poach the egg.
  4. Spread avocado on toast and place egg on top.
  5. Sprinkle pepper and serve.

2️⃣ Berry & Cream Cheese Toast

Ingredients:

  • 1 slice toasted bread
  • 2 tbsp cream cheese
  • Sliced strawberries
  • Blueberries

Method:

  1. Toast bread.
  2. Spread cream cheese evenly.
  3. Add berries on top.
  4. Drizzle honey (optional).

3️⃣ Peanut Butter & Banana Toast

Ingredients:

  • 1 slice toasted bread
  • 1–2 tbsp peanut butter
  • 1 banana (sliced)

Method:

  1. Toast bread.
  2. Spread peanut butter.
  3. Arrange banana slices on top.
  4. Sprinkle chia seeds (optional).

4️⃣ Mushroom & Spinach Toast

Ingredients:

  • 1 slice bread
  • ½ cup sliced mushrooms
  • ½ cup spinach
  • 1 tbsp butter or oil
  • Salt & pepper

Method:

  1. Sauté mushrooms in butter until soft.
  2. Add spinach and cook until wilted.
  3. Season with salt & pepper.
  4. Place mixture on toasted bread.

5️⃣ Ricotta & Tomato Toast

Ingredients:

  • 1 slice toasted bread
  • 2 tbsp ricotta cheese
  • Fresh tomato slices
  • Salt, pepper, oregano

Method:

  1. Spread ricotta on toast.
  2. Add tomato slices.
  3. Sprinkle seasoning and serve.

6️⃣ Smoked Salmon & Cucumber Toast

Ingredients:

  • 1 slice toasted bread
  • 2 tbsp cream cheese
  • Smoked salmon slices
  • Cucumber slices

Method:

  1. Spread cream cheese on toast.
  2. Add salmon.
  3. Top with cucumber slices.
  4. Add lemon juice if desired.

7️⃣ Hummus & Roasted Red Pepper Toast

Ingredients:

  • 1 slice toasted bread
  • 2 tbsp hummus
  • Roasted red pepper strips

Method:

  1. Spread hummus on toast.
  2. Add roasted red peppers.
  3. Sprinkle chili flakes (optional).

8️⃣ Bacon & Egg Toast

Ingredients:

  • 1 slice toasted bread
  • 2 strips bacon
  • 1 fried egg

Method:

  1. Cook bacon until crispy.
  2. Fry egg to your liking.
  3. Place bacon on toast.
  4. Top with egg and serve.

9️⃣ Almond Butter & Apple Toast

Ingredients:

  • 1 slice toasted bread
  • 1–2 tbsp almond butter
  • Thin apple slices
  • Cinnamon (optional)

Method:

  1. Spread almond butter on toast.
  2. Arrange apple slices.
  3. Sprinkle cinnamon for extra flavor.

Easy Potato Patties

Easy Potato Patties

If you’re craving a deliciously crispy snack, look no further than this easy homemade potato patties recipe! These golden, crunchy treats are made with tender mashed potatoes, sautéed veggies, and smoky cheese, creating a delightful blend of flavors and textures. People adore these potato patties because they are simple to make, serve as a versatile side dish, or stand alone as a hearty snack. You’ll find them to be a delightful addition to any meal or a great afternoon nibble!


Recipe Summary

Prep Time: 15 minutes

Cook Time: 15 minutes

Total Time: 30 minutes

Servings: 4

Estimated Calories: 220 per serving

Ingredients

1 kg (2 lb) potatoes, peeled

1 shallot or small onion, finely chopped

1 carrot, grated

Fresh parsley, chopped to taste

Smoked cheese (scamorza), cut into small cubes

2 eggs

125 ml (1/2 cup) plain yogurt

4–5 tbsp (30–40 g) wheat flour

Salt and black pepper to taste

Vegetable oil for frying

Instructions

Boil the peeled potatoes in salted water until fork-tender. Drain and let them cool slightly.

In a pan, heat a little oil over medium heat. Sauté the finely chopped shallot and grated carrot for 5–7 minutes until softened and lightly golden.

Mash the cooled potatoes until smooth in a large bowl.

Add the sautéed vegetables, chopped parsley, salt, and pepper to the mashed potatoes. Mix well.

Stir in the smoked cheese cubes, eggs, and yogurt until combined.

Gradually add flour until a thick, moldable mixture forms.

Heat vegetable oil in a frying pan over medium heat.

Shape the mixture into thick patties and fry them on both sides until deep golden brown and cooked through.

Drain the patties on paper towels and serve warm.

Why This Recipe is Popular

Easy homemade potato patties are a beloved dish for many reasons. They’re not only a great way to use up leftover potatoes but also evoke feelings of nostalgia and comfort. Their simplicity and versatility make them a great choice for busy weeknights or casual gatherings, and they cater to both kids and adults alike.


Serving Suggestions

These crispy potato patties make a fantastic side dish with a variety of main courses or a delightful snack on their own. Pair them with a fresh salad or some dipping sauce like garlic aioli for an extra flavor boost. They also work well at barbecues, parties, or family dinners!


Tips and Variations

Storage: Store any leftover potato patties in an airtight container in the refrigerator for up to 3 days. Reheat them in a skillet for best results.

Texture: For extra crispiness, make sure the oil is hot enough before adding the patties. This helps achieve a perfect golden crust.

Flavor Ideas: Feel free to mix in other herbs or spices such as dill or paprika to enhance the flavor.

Cheese Swap: Try using different types of cheese, like cheddar or feta, for a unique twist.

Vegetable Add-ins: You can add in finely diced bell peppers or spinach for added nutrition and flavor.

FAQs

1. Can I freeze these potato patties?

Yes, you can freeze the uncooked patties. Just layer them between parchment paper and store in an airtight container for up to 2 months.


2. What can I serve with potato patties?

They pair perfectly with simple salads, yogurt dips, or your favorite sauces.


3. How long do the patties take to fry?

Each side typically takes about 3–4 minutes in hot oil until golden brown.


4. Can I make these potato patties gluten-free?

Absolutely! Substitute the regular flour with a gluten-free all-purpose flour to suit your dietary needs.


Give this easy homemade potato patties recipe a try! They’re bound to become a new family favorite that you’ll want to make again and again. Happy cooking!

Crispy Spiced Roasted Chickpeas

Crispy Spiced Roasted Chickpeas

A crunchy, fiber-rich snack that can help support steady blood sugar

Description

These crispy roasted chickpeas are seasoned with olive oil, cumin, and smoked paprika, then baked until golden and crunchy. They’re a simple, affordable, plant-based snack that’s high in fiber and protein—both of which help slow digestion and reduce blood sugar spikes when eaten as part of a balanced diet.

Using a muffin tin (as shown in the image) helps keep the chickpeas evenly spread, so they roast instead of steaming.

 Ingredients

  • 1 can (15 oz / 425 g) chickpeas, drained and rinsed

  • 2 tablespoons olive oil

  • 1 teaspoon ground cumin

  • ½ teaspoon smoked paprika

  • Salt and black pepper, to taste

Optional add-ins: garlic powder, chili flakes, turmeric, or lemon zest

Instructions

  1. Preheat oven to 400°F (200°C).

  2. Drain and rinse chickpeas well. Pat completely dry with a clean towel (very important for crispiness).

  3. Place chickpeas in a bowl and toss with olive oil, cumin, smoked paprika, salt, and pepper.

  4. Spoon chickpeas into a muffin tin, dividing them evenly between cups (or spread on a baking sheet).

  5. Roast for 25–30 minutes, shaking halfway through, until golden and crispy.

  6. Let cool for 5 minutes—they crisp up more as they cool.

  7. Taste and adjust seasoning if needed.

 Tips for Best Results

  • Dry chickpeas thoroughly to avoid sogginess

  • Don’t overcrowd—airflow = crunch

  • For extra crispiness, roast an additional 5 minutes at 425°F (220°C)

  • Store loosely covered; airtight containers soften them

 Servings

  • 4 servings

  • Serving size: ~½ cup roasted chickpeas

Nutritional Information (per serving – approx.)

  • Calories: ~180

  • Protein: 6–7 g

  • Fiber: 6 g

  • Healthy fats: 7 g

  • Net carbs: ~14 g

(Values may vary based on oil and portion size)

 Health Benefits

  • High fiber helps slow glucose absorption

  • Plant protein supports satiety and muscle health

  • Low glycemic load compared to refined snacks

  • Heart-healthy fats from olive oil

  • Naturally gluten-free and vegan

⚠️ Note: This recipe does not “instantly lower blood sugar,” but it can help prevent sharp spikes when eaten instead of sugary or refined snacks.

Recipe Q&A

Q: Can people with diabetes eat this?
A: Yes, in moderate portions. Chickpeas are a low-GI food and generally blood-sugar friendly.

Q: Can I make this in an air fryer?
A: Yes! Cook at 375°F (190°C) for 12–15 minutes, shaking halfway.

Q: Why use a muffin tin?
A: It keeps chickpeas separated so they roast evenly and get crisp on all sides.

Q: How long do they keep?
A: Best same day. They’ll keep 2–3 days at room temperature but lose crunch.

Q: Can I use dried chickpeas?
A: Yes—soak and fully cook them first, then proceed with the recipe.

Greek Feta and Cucumber Bite Skewers

Greek Feta and Cucumber Bite Skewers

Ingredients

Skewers

1 large cucumber, cut into thick half-moon slices or cubes

8 oz feta cheese, cut into small cubes

1 cup cherry tomatoes

½ cup pitted Kalamata olives

Small fresh oregano or mint leaves (optional)

16–20 small toothpicks or mini skewers

Lemon-Olive Oil Drizzle

2 tbsp extra-virgin olive oil

1 tbsp lemon juice

½ tsp dried oregano

1 small garlic clove, grated (optional)

Pinch of salt & black pepper

Directions

Prepare your ingredients by cutting cucumber and feta into similar-sized bite pieces.

Assemble each skewer: cucumber → feta → cherry tomato → olive.

Add a small oregano or mint leaf if desired for extra Greek flair.

In a small bowl, whisk together olive oil, lemon juice, oregano, garlic, salt, and pepper.

Drizzle the finished skewers lightly with the lemon-olive oil dressing.

Arrange on a platter and serve immediately or refrigerate for up to 1 hour before serving.

Nutritional Info (per 2 skewers, approx.)

Calories: 80

Protein: 3g

Carbs: 4g

Fat: 6g

Fiber: 1g

Sugar: 1g

Refreshing Green Apple & Bitter Gourd Tonic

Refreshing Green Apple & Bitter Gourd Tonic

Prep time: 10 minutes | Servings: 1

Ingredients

  • 1 Green Apple: Deseeded.

  • 1 Small Bitter Gourd: Peeled and seeds removed.

  • ½ Cucumber.

  • 2 Sticks Celery.

  • Juice of ½ Lemon.

  • Optional: A pinch of black salt and a fresh tulsi (holy basil) leaf for added flavor.


Instructions

  1. Prepare the Produce: Wash the green apple, bitter gourd, cucumber, and celery thoroughly under cold water.

  2. Prep the Bitter Gourd: Peel the bitter gourd and slice it lengthwise to scoop out and discard all the seeds. Tip: If you find the taste too intense, soak the pieces in salt water for 10 minutes and rinse before juicing.

  3. Core the Apple: Remove the core and seeds from the green apple.

  4. Blend or Juice:

    • If using a juicer: Feed all ingredients through the machine and stir in the fresh lemon juice at the end.

    • If using a blender: Chop all ingredients into small pieces and blend with ½ cup of water until smooth.

  5. Strain: If you blended the ingredients, pour the mixture through a fine-mesh strainer or a nut milk bag to remove the pulp.

  6. Season and Serve: Stir in the lemon juice and the optional pinch of black salt. Serve immediately over ice if desired.


Why This Recipe is a Nutritious Choice

  • Hydration: With cucumber and celery as a base, this drink is exceptionally hydrating.

  • Low Calorie: At approximately 90 kcal, it provides a concentrated burst of nutrients without added sugars.

  • Vitamin C: The green apple and lemon juice provide a healthy dose of antioxidants.

⚠️ Important Safety Note

Consult your doctor before adding this to your routine if you are pregnant, have low blood pressure, or are currently taking medication for blood sugar, as the natural properties of bitter gourd may interact with your treatment.

Savory Green Onion & Egg Breakfast Muffins


🍳 Savory Green Onion & Egg Breakfast Muffins

Prep time: 10 minutes | Bake time: 20–25 minutes | Yield: 6 Muffins

Ingredients

  • 6 Large Eggs

  • ¼ cup Milk or heavy cream (for extra fluffiness)

  • ½ cup Green onions (scallions), finely chopped

  • ½ cup Shredded cheese (Cheddar or Mozzarella works great)

  • ¼ tsp Salt and black pepper to taste

  • Optional: Cooked turkey bacon bits or diced bell peppers for extra flavor


Instructions

  1. Preheat and Prep: Preheat your oven to 350°F (175°C). Thoroughly grease a standard 6-slot muffin tin with olive oil or non-stick spray to ensure easy removal.

  2. Layer the Fillings: Divide the chopped green onions and shredded cheese equally into the bottom of the muffin cups. (Adding the solids first ensures they are evenly distributed rather than sinking to the bottom).

  3. Whisk the Base: In a medium bowl or large measuring pitcher, whisk the eggs together with the milk, salt, and pepper until the mixture is frothy and well-combined.

  4. Pour: Carefully pour the egg mixture into each muffin cup, filling them about ¾ of the way to the top.

  5. Bake: Place in the oven and bake for 20 to 25 minutes, or until the muffins are puffed up, golden brown on top, and the centers are set (not jiggly).

  6. Cool and Serve: Let them sit in the pan for 5 minutes before using a butter knife to gently loosen the edges. Serve warm.


Why This Recipe is a Game-Changer

  • Protein-Forward: Eggs provide high-quality protein to keep you full and focused throughout the morning.

  • Meal Prep King: You can make a large batch on Sunday and keep them in the fridge for up to 4 days. Just pop them in the microwave for 30 seconds to reheat.

  • Zero Flour: Naturally gluten-free and low-carb, making them an excellent choice for a variety of nutritional needs.

5-Minute Prep Coconut “Cloud” Cake

5-Minute Prep Coconut “Cloud” Cake

Prep time: 5 minutes | Bake time: 30–35 minutes | Servings: 6

Ingredients

  • 2 cups Unsweetened shredded coconut (fine desiccated works best)

  • 4 large Eggs (at room temperature)

  • 1 cup Full-fat coconut milk (from a can, shaken well)

  • 1 tsp Vanilla extract

  • A pinch of salt

  • Optional: 2–3 tbsp of monk fruit or erythritol if you prefer a sweeter cake.


Instructions

  1. Preheat and Prep: Preheat your oven to 350°F (175°C). Lightly grease a small baking dish (about 7 or 8 inches) with coconut oil or butter.

  2. Blend the Batter: In a blender or large bowl, combine the eggs, coconut milk, vanilla, and sweetener (if using). Whisk or blend until the mixture is frothy and well-combined.

  3. Incorporate Coconut: Fold in the shredded coconut and salt. Stir gently until all the coconut is moistened. Let the batter sit for 2 minutes so the coconut can absorb some of the liquid.

  4. Bake: Pour the batter into the prepared dish. Bake for 30 to 35 minutes, or until the top is a beautiful golden brown and the center feels set to the touch.

  5. Cool and Set: For the best “melt-in-your-mouth” experience, let the cake cool completely. Like the blueberry yogurt cake we discussed, this cake sets beautifully if chilled in the refrigerator for an hour before serving.


Why This Recipe Works

  • Simple & Fast: The active prep takes only about 5 minutes of mixing.

  • Naturally Healthy: By avoiding flour and sugar, this cake is high in healthy fats and protein, keeping you satisfied without a sugar crash.

  • Texture: The combination of shredded coconut and eggs creates a texture that is a cross between a traditional cake and a rich custard.

3-Ingredient Base “Morning” Fruit Cake

3-Ingredient Base “Morning” Fruit Cake

Prep time: 10 minutes | Bake time: 35–40 minutes | Servings: 6 slices

Ingredients

  • 2 cups Rolled oats (blended into a coarse flour)

  • 3 large Ripe bananas (mashed well—these provide the moisture and sweetness)

  • 1 cup Mixed dried fruits and nuts (such as raisins, dried cranberries, and chopped walnuts for that jeweled look)

  • Optional for better texture: 2 eggs and 1 tsp baking powder.


Instructions

  1. Prepare the “Flour”: Place your oats into a blender or food processor and pulse until they reach a coarse, flour-like consistency.

  2. Mash the Base: In a large bowl, mash the ripe bananas until they are liquid and smooth. This acts as your sugar and oil replacement.

  3. Combine: Stir the oat flour into the mashed bananas until a thick batter forms. Fold in your mixed dried fruits and nuts.

    • Note: If you are using eggs and baking powder for a fluffier rise, whisk them into the bananas before adding the oats.

  4. Bake: Pour the mixture into a greased or parchment-lined small cake pan or loaf tin. Smooth the top with a spatula.

  5. Cook: Bake at 350°F (175°C) for 35 to 40 minutes. The cake is done when the top is golden brown and a toothpick comes out clean.

  6. Cool: Let it cool completely in the pan before slicing. This type of flourless cake needs time to “set” so it doesn’t crumble when cut.


Why This is a Great Breakfast

  • Sustained Energy: The complex carbohydrates in the oats provide slow-releasing energy to keep you full longer.

  • Naturally Sweet: The ripeness of the bananas provides all the sweetness needed, eliminating the need for refined sugar.

  • Fiber-Rich: Between the oats, bananas, and dried fruits, this cake is excellent for digestive health.

2-Ingredient Fluffy Cream Biscuits

2-Ingredient Fluffy Cream Biscuits

Prep time: 5 minutes | Bake time: 10–12 minutes | Yield: 8–10 biscuits

Ingredients

  • 2 cups White Lily self-rising flour (This specific brand is low-protein, which is the secret to that light, airy texture)

  • 1 cup Heavy whipping cream (The high fat content replaces both the butter and the liquid found in traditional recipes)

  • Optional: 1 tbsp melted butter (for brushing the tops)


Instructions

  1. Preheat and Prep: Preheat your oven to 450°F (230°C). Lightly grease a baking sheet or line it with parchment paper.

  2. Mix the Dough: Place the self-rising flour in a large bowl. Make a small well in the center and pour in the heavy whipping cream. Stir gently with a wooden spoon or spatula just until the flour is moistened and a dough forms.

    • Tip: Do not over-mix! Over-working the dough makes the biscuits tough rather than fluffy.

  3. Knead Lightly: Turn the dough out onto a lightly floured surface. Fold the dough over on itself 3 or 4 times very gently.

  4. Cut the Biscuits: Pat the dough out to a ¾-inch thickness. Use a floured biscuit cutter to press straight down—don’t twist the cutter, as twisting “seals” the edges and prevents them from rising high.

  5. Bake: Place the biscuits on the baking sheet so they are just touching (this helps them climb upward as they bake). Bake for 10 to 12 minutes or until the tops are a beautiful light golden brown.

  6. Finishing Touch: If desired, brush the tops with a little melted butter immediately after taking them out of the oven.


Why This Recipe Works

  • Simplicity: By using self-rising flour, you eliminate the need for measuring out baking powder and salt separately.

  • Richness: Heavy cream provides the fat needed for a “buttery” flavor without the labor-intensive process of cutting cold butter into flour.

  • Texture: These biscuits are famous for having a crisp exterior and a cloud-like interior.

Golden Garlic & Herb Butter Spread

Golden Garlic & Herb Butter Spread

Description

This rich, creamy butter spread is whipped with fresh herbs, garlic, and a hint of sweetness for balance. It’s soft enough to spread straight from the fridge and melts beautifully over warm bread, vegetables, or meats. Simple ingredients, huge flavor—this is the kind of recipe you pass down.

 Ingredients

  • 1 cup (225 g) unsalted butter, softened

  • 2–3 cloves garlic, finely minced or grated

  • 2 tbsp fresh parsley, finely chopped

  • 1 tbsp fresh chives or green onions, chopped

  • 1 tbsp fresh dill or cilantro (optional but lovely)

  • 1 tbsp olive oil (for extra smoothness)

  • ½ tsp salt (adjust to taste)

  • ¼ tsp black pepper

  • Optional flavor boosts:

    • ½ tsp paprika or chili flakes

    • 1 tsp lemon juice or zest

    • 1 tsp honey (very subtle sweetness)

 Instructions

  1. Place softened butter in a mixing bowl.

  2. Add garlic, herbs, olive oil, salt, and pepper.

  3. Mix with a spoon or hand mixer until fluffy and fully combined.

  4. Taste and adjust seasoning.

  5. Spoon into a jar or shape into a log using parchment paper.

  6. Chill for 30 minutes to firm up—or enjoy immediately.

Tips for Best Results

  • Use room-temperature butter for the creamiest texture

  • Finely chop herbs to avoid chunky bites

  • Roasted garlic = sweeter, milder flavor

  • Add a splash of cream if you want ultra-whipped butter

  • Keeps beautifully in the freezer—slice as needed

 Servings

  • Makes about 1 cup

  • Serves 8–10 as a spread

 Nutritional Info (per tablespoon, approx.)

  • Calories: ~100

  • Fat: 11 g

  • Saturated Fat: 7 g

  • Carbs: 0–1 g

  • Protein: 0 g

  • Sodium: varies by salt used

 Benefits

  • Fresh herbs provide antioxidants

  • Garlic supports heart and immune health

  • Homemade = no preservatives or additives

  • Small amount adds big flavor (less need for excess sauces)

Q & A

Q: Can I use salted butter?
Yes—just reduce or skip added salt.

Q: How long does it last?

  • Fridge: up to 2 weeks

  • Freezer: 3 months

Q: What can I use it on?
Bread, toast, corn, potatoes, pasta, steak, fish, eggs, rice, roasted veggies—anything.

Q: Can I make it vegan?
Absolutely. Use a high-quality plant-based butter.

Bacon-Wrapped Cream Cheese Stuffed Chicken Rolls

🛒 Ingredients:
• 3–4 large chicken breasts
• 8 oz (1 block) cream cheese, softened
• 1 cup shredded mozzarella (or cheddar – works great!)
• 2 cloves garlic, minced
• 1 tsp Italian seasoning
• ½ tsp black pepper
• ½ tsp paprika
• Salt to taste
• 10–12 strips bacon
• Fresh parsley (optional, for garnish)

👩‍🍳 Step-by-Step Instructions:

Step 1: Prep the Chicken
1. Preheat oven to 375°F (190°C).
2. Slice each chicken breast in half lengthwise (or pound thin).
3. Lightly season both sides with salt, pepper, and paprika.

Step 2: Make the Creamy Filling
1. In a bowl, mix:
• Cream cheese
• Mozzarella (or cheddar)
• Garlic
• Italian seasoning
2. Stir until smooth and well combined.

Step 3: Stuff & Roll
1. Spread 2–3 tablespoons of the cheese mixture onto each chicken piece.
2. Roll the chicken tightly into a log shape.
3. Wrap each roll with 1–2 slices of bacon (overlapping slightly).
4. Place seam-side down on a greased baking sheet.

Step 4: Bake
1. Bake uncovered for 30–35 minutes.
2. Then broil for 3–5 minutes to crisp up the bacon (watch carefully so it doesn’t burn!).

Internal temperature should reach 165°F (75°C).

Step 5: Rest & Serve
1. Let rest for 5 minutes.
2. Garnish with fresh parsley.
3. Serve warm and watch them disappear 😍

🔥 Optional Flavor Twists:
• Add chopped spinach to the filling
• Mix in crispy cooked bacon bits
• Use sharp cheddar for stronger flavor
• Brush bacon with BBQ sauce before baking

Classic Chocolate Mousse

Classic Chocolate Mousse

Yields: 4 servings Prep time: 20 minutes (plus 2–4 hours chilling)


Ingredients

  • Dark Chocolate: 150g (use high-quality chocolate, 60–70% cocoa solids for the best flavor).

  • Heavy Whipping Cream: 300ml (must be well-chilled).

  • Eggs: 3 large, separated into yolks and whites.

  • Sugar: 2 tablespoons (granulated).

  • Optional: A pinch of salt or a teaspoon of vanilla extract.

  • For Topping: Freshly whipped cream and chocolate shavings (as seen in the photo).


Instructions

  1. Melt the Chocolate: Break the chocolate into pieces and place them in a heatproof bowl. Set the bowl over a saucepan of simmering water (do not let the bottom of the bowl touch the water). Stir occasionally until smooth. Once melted, remove from heat and let it cool slightly until it is warm, not hot.

  2. Incorporate Yolks: Whisk the egg yolks into the melted chocolate one by one until fully combined.

  3. Whip the Whites: In a separate clean bowl, whisk the egg whites (with a tiny pinch of salt) until they form stiff peaks. Add the sugar and whisk for another 30 seconds until glossy.

  4. Whip the Cream: In a third bowl, whip the heavy cream until it forms soft peaks.

  5. The Fold:

    • Take about a third of the egg whites and stir them into the chocolate mixture to lighten it.

    • Gently fold in the remaining egg whites, followed by the whipped cream. Use a spatula to fold gently in a circular motion so you don’t deflate the air bubbles—this is what keeps it light!

  6. Chill: Spoon the mixture into serving glasses. Refrigerate for at least 2–4 hours until set.

  7. Serve: Top with a dollop of whipped cream and finish with chocolate shavings just before serving.


Pro-Tips for Success

  • Temperature Matters: Ensure your melted chocolate isn’t too hot when adding the yolks, otherwise they might scramble.

  • Gentle Folding: The secret to the texture is patience during the folding process. Over-mixing will result in a denser dessert.

  • Safety Note: This recipe uses raw egg whites. If you prefer, you can use pasteurized egg whites from a carton to eliminate any concerns.

Blueberry Almond & Oat Smoothie

Blueberry Almond & Oat Smoothie

Yields: 1 serving


Ingredients

  • 1 cup frozen blueberries: Using frozen fruit ensures a thick, frosty texture without needing extra ice.

  • 1 ripe banana: Frozen works best for creaminess, but fresh is fine too.

  • 1/2 cup rolled oats: These provide a lovely, hearty texture and fiber.

  • 1 cup almond milk: Adjust the amount depending on how thick you prefer your smoothie.

  • Optional additions: A dash of vanilla extract, a teaspoon of chia seeds, or a scoop of your favorite protein powder can be added for extra flavor or nutrition.


Instructions

  1. Prep the Oats: If you prefer an extra smooth consistency, place the oats in the blender first and pulse them until they form a fine powder before adding the other ingredients.

  2. Combine: Add the blueberries, banana, and almond milk to the blender.

  3. Blend: Start the blender on a low speed and gradually increase to high. Blend until the mixture is completely smooth and no large fruit or oat pieces remain.

  4. Adjust: If the smoothie is too thick, add a little more almond milk, a tablespoon at a time, until it reaches your desired consistency.

  5. Serve: Pour into a glass and enjoy immediately.

Pro Tip: To get the look from your photo, reserve a few slices of banana and a sprinkle of raw oats to place on top as a garnish right before serving.

Mediterranean Grilled Chicken & Broccoli Bowls with Creamy Garlic Sauce

Mediterranean Grilled Chicken & Broccoli Bowls with Creamy Garlic Sauce

These bowls are a wholesome and flavorful way to enjoy a balanced meal. Juicy grilled chicken and tender-crisp broccoli are paired with a tangy, garlicky yogurt sauce that ties everything together. Served over rice or quinoa, it’s simple enough for a weeknight dinner but tasty enough to feel special. The Mediterranean flavors come through with lemon, parsley, and paprika, making each bite bright and satisfying.

Time

Prep time: 15 minutes

Cook time: 20 minutes

Total time: 35 minutes

Ingredients

2 boneless, skinless chicken breasts

2 cups (200 g) broccoli florets

2 tbsp olive oil, divided

Salt & black pepper, to taste

½ cup (120 ml) Greek yogurt

2 garlic cloves, minced

1 tbsp lemon juice

1 tbsp chopped fresh parsley

¼ tsp paprika

Cooked rice or quinoa, for serving

Instructions

Prep the chicken: Season chicken breasts with salt, pepper, paprika, and 1 tbsp olive oil. Let sit for 10 minutes while prepping the other ingredients.

Make the sauce: In a small bowl, combine Greek yogurt, minced garlic, lemon juice, parsley, a pinch of salt, and a drizzle of olive oil. Mix until smooth. Chill in the fridge until ready to serve.

Cook broccoli: Toss broccoli florets with 1 tbsp olive oil, salt, and pepper. Grill or roast at 400°F (200°C) for 10–12 minutes until tender-crisp and lightly charred.

Grill chicken: Heat a grill pan or outdoor grill to medium-high. Cook chicken for 5–6 minutes per side, or until cooked through (internal temp 165°F/74°C). Let rest for 5 minutes before slicing.

Assemble bowls: Divide rice or quinoa into bowls. Top with sliced grilled chicken and roasted broccoli. Drizzle generously with creamy garlic sauce. Garnish with extra parsley if desired.

Tips

Rest the chicken: Let the grilled chicken rest a few minutes before slicing so it stays juicy.

Char for flavor: A slight char on the broccoli adds a smoky note that pairs nicely with the creamy sauce.

Double the sauce: It keeps well in the fridge for up to 3 days and works as a dip for veggies or spread for wraps.

Meal prep friendly: Cook the chicken, broccoli, and grains ahead of time and store separately. Add sauce just before serving.

Variations

Protein swap: Use grilled salmon, shrimp, or chickpeas instead of chicken for a twist.

Veggie boost: Add roasted peppers, zucchini, or cherry tomatoes for more color and nutrition.

Grain options: Try farro, couscous, or cauliflower rice if you want something different from rice or quinoa.

Spice it up: Add a pinch of chili flakes or cayenne to the chicken seasoning for heat.

Herby touch: Mix in fresh dill, mint, or basil with the yogurt sauce for a different Mediterranean profile.

Q&A

Q: Can I make this recipe ahead of time?
A: Yes. Cook the chicken, broccoli, and grains in advance, then store them in the fridge for up to 4 days. Add the garlic sauce just before serving to keep it fresh.

Q: Can I bake the chicken instead of grilling?
A: Definitely. Bake seasoned chicken breasts at 400°F (200°C) for about 20–25 minutes, or until fully cooked.

Q: Is there a dairy-free option for the sauce?
A: You can use a dairy-free yogurt alternative, such as coconut or almond-based yogurt, to make the sauce lactose-free.

Q: How can I make it low-carb?
A: Swap the rice or quinoa with cauliflower rice or a big salad base for a lighter, low-carb option.

Q: Can I use frozen broccoli?
A: Yes, just thaw and pat dry before roasting or grilling to avoid excess moisture.

Nutrition

(per serving, based on 2 servings)

Calories: ~420

Protein: 38 g

Carbohydrates: 28 g

Fat: 16 g

Fiber: 5 g

Sugar: 4 g

Sodium: 480 mg

(Values vary depending on portion sizes and grain choice.)

Conclusion

These Mediterranean Grilled Chicken & Broccoli Bowls are balanced, satisfying, and packed with flavor. The smoky grilled chicken and broccoli pair perfectly with the cool, garlicky yogurt sauce, while the grains make it a complete meal. It’s a versatile recipe that works for meal prep, family dinners, or a healthy lunch. With a few simple swaps, you can adapt it to suit your taste, making it a dish you’ll come back to again and again.

Garlic Parmesan Chicken Tenders

Garlic Parmesan Chicken Tenders


Ingredients

The Chicken:

2 lbs chicken breast cut into strips

Salt to taste

1 tablespoon garlic powder

1 teaspoon black pepper powder

Oil for frying

Dry Batter:

2 cups all-purpose flour

Salt to taste

1 tablespoon garlic powder

1 teaspoon black pepper

For the Egg Mixture:

3 eggs beaten

For the Breadcrumb Coating:

2 cups panko breadcrumbs

Garlic Parmesan Butter:

½ cup butter

4-5 cloves fresh garlic finely chopped

2 tablespoons freshly chopped parsley

1 cup Parmesan cheese freshly grated

The Sauce:

½ cup mayonnaise

2 tablespoons ketchup

1-2 tablespoons chili sauce

½ tablespoon Dijon mustard

Salt to taste

1 teaspoon smoked paprika

1 tablespoon garlic powder

1 teaspoon black pepper powder

Instructions

Cut chicken breasts into 1-inch strips. Season with salt, garlic powder, and black pepper. Mix well and set aside.

Set up breading station with three dishes: seasoned flour (flour, salt, garlic powder, pepper), beaten eggs, and panko breadcrumbs.

Dredge each chicken strip in flour, then egg, then panko. Press panko firmly to coat completely. Let rest 5-10 minutes.

Heat 2-3 inches of oil in heavy pot to 350°F. Maintain this temperature throughout frying.

Fry chicken in batches of 3-4 pieces for 6-8 minutes, turning once, until golden brown and internal temperature reaches 165°F. Drain briefly on paper towels.

Make garlic Parmesan butter by melting butter, cooking garlic until fragrant, then stirring in parsley and Parmesan. Pour into large bowl.

Toss hot fried chicken in garlic Parmesan butter immediately until completely coated.

Make dipping sauce by whisking together mayo, ketchup, chili sauce, Dijon, and seasonings. Serve chicken hot with sauce on the side.

Notes

Use fresh panko for maximum crispiness. Keep one hand dry and one wet during breading. Don’t overcrowd the fryer – oil temperature drops and chicken gets soggy. Toss in garlic butter while chicken is hot. Freshly grated Parmesan is essential.

Chocolate Peanut Butter Trifle

Chocolate Peanut Butter Trifle


🍨 Chocolate Peanut Butter Trifle

📝 Ingredients


For the Cake Layer:


1 chocolate cake (baked and cooled – box mix or homemade)


Crumbled into chunks


For the Peanut Butter Layer:


1 cup creamy peanut butter


1 cup powdered sugar


1 cup cream cheese, softened


1 cup cold milk


1 packet (3.4 oz / 100 g) instant vanilla pudding mix


For the Whipped Layer:


2 cups heavy whipping cream


3 tbsp powdered sugar


1 tsp vanilla extract


For Topping:


1 cup chocolate chips


½ cup chopped peanut butter cups (or caramel chocolates)


½ cup crushed cookies or brownie crumbs


🧁 Instructions

Step 1: Make the Peanut Butter Cream


In a large bowl:


Beat peanut butter, cream cheese, and powdered sugar until smooth


Add milk and pudding mix


Beat again until thick and creamy

Set aside.


Step 2: Make the Whipped Cream


Beat heavy cream with powdered sugar and vanilla until stiff peaks form


Chill in refrigerator until ready to use


Step 3: Assemble the Trifle


In a glass bowl or trifle dish:


1️⃣ First Layer:

Spread peanut butter cream at the bottom


2️⃣ Second Layer:

Add crumbled chocolate cake


3️⃣ Third Layer:

Spread whipped cream


👉 Repeat layers until bowl is full

(Finish with whipped cream on top)


Step 4: Decorate


Top with:


Chocolate chips


Chopped peanut butter cups


Cookie crumbs


Step 5: Chill


Refrigerate at least 3–4 hours (overnight is best)

This helps flavors blend beautifully.


🍽 Serving Tips


Serve cold


Use a big spoon to scoop all layers


Keep refrigerated

Creamy Tropical Green Smoothie

Creamy Tropical Green Smoothie


Ingredients

To get that vibrant green color and thick, velvety texture, you will need:


The Base: 1 cup unsweetened almond milk (or coconut milk for extra tropical flavor).


The Creaminess: ½ ripe avocado, pitted and peeled.


The Sweetness: 1 ripe banana (frozen is best for a thicker, chilled consistency).


The Tropical Kick: 1 cup frozen mango chunks.

The Freshness: ½ cup baby spinach (this enhances the green color without changing the flavor).


Optional Boosters: 1 tbsp honey or maple syrup (if you prefer it sweeter) and a squeeze of lime juice to brighten the flavors.


Preparation Instructions

Layer the Liquid: Pour your milk of choice into the blender first. Adding liquids first helps the blades spin freely and prevents the fruit from getting stuck.

Add the Greens: Add the spinach and avocado. Blend these with the liquid for 20 seconds until completely smooth. This ensures you don’t have any leafy “bits” in your smoothie.


Add the Frozen Fruit: Add the frozen banana and mango chunks.


The Final Blend: Start the blender on a low speed and gradually increase to high. Blend for 45–60 seconds until the mixture is thick and looks like soft-serve ice cream.


Adjust Consistency: If it’s too thick, add a splash more milk. If you want it colder/thicker, add 3–4 ice cubes and pulse.

Garnishing (As seen in the image)

To achieve that professional “Instagram-ready” look:


Mango Topping: Dice a few fresh mango cubes and place them gently on the surface.


Avocado Dice: Add 2–3 small cubes of firm avocado.


The Banana Slice: Cut a thick slice of banana and notch it slightly so it can sit on the rim of the glass.

Nutritional Highlight

This smoothie is a powerhouse of healthy fats (from the avocado) and potassium (from the banana), making it excellent for sustained energy and heart health.

🍌 Classic Oat & Banana Smoothie

🍌 Classic Oat & Banana Smoothie

Prep time: 5 minutes | Servings: 2


Ingredients

Base: 2 ripe bananas (frozen slices work best for a creamy texture)


Oats: 1/2 cup rolled oats (provides that “cookie dough” heartiness)


Protein/Creaminess: 1 cup Greek yogurt (plain or vanilla)


Liquid: 1 to 1.5 cups of your preferred milk (dairy, almond, or oat milk)

Flavor Boosts: * 1 tsp vanilla extract


1/2 tsp ground cinnamon (plus extra for the swirl on top)


1 tbsp maple syrup or honey (optional, for extra sweetness)


Texture: A handful of ice cubes (if using fresh bananas)

Instructions

Pulse the Oats: For a smoother texture, put the dry oats in the blender first and pulse until they are finely ground.


Combine: Add the bananas, yogurt, milk, vanilla, and cinnamon into the blender.


Blend: Start on a low speed and gradually increase to high. Blend until the mixture is completely smooth and creamy.

Adjust: If it’s too thick, add a splash more milk. If you want it colder, add a few more ice cubes and blend again.


The Finish: Pour into tall glasses. To match the image, sprinkle a pinch of cinnamon on top and use a toothpick or spoon to gently swirl it into the surface.

Tips for the Best Result

The Brown Bananas: Use bananas with brown spots; they have a much higher natural sugar content and better flavor for smoothies.


Add-ins: Looking at the jars in the background of your photo, you could also add a tablespoon of almond butter or flax seeds for extra healthy fats.

Mocha Coffee Smoothie Recipe

Mocha Coffee Smoothie Recipe

Prep time: 5 minutes | Servings: 1


Ingredients

1 cup Brewed coffee (chilled or frozen into ice cubes for a thicker texture)


½ cup Milk of your choice (dairy, almond, or oat work great)

1 scoop Chocolate protein powder (or 1 tbsp unsweetened cocoa powder + a sweetener)


½ Frozen banana (adds natural sweetness and creaminess)


1 handful Ice cubes (adjust based on desired thickness)


Optional: 1 tbsp Almond butter for extra richness


Instructions

Prep the Coffee: If you have time, freeze your coffee in an ice cube tray ahead of time. This prevents the smoothie from getting “watered down” by regular ice.


Combine: Add the liquid (coffee and milk) to your blender first, followed by the protein powder, frozen banana, and ice.


Blend: Start on a low speed and gradually increase to high. Blend for about 45–60 seconds until completely smooth and frothy.


Serve: Pour into a tall glass. Garnish with a few whole coffee beans (like in your photo) or a sprinkle of cinnamon.

Quick Tips for Success

Sweetness: If it’s not sweet enough, add a teaspoon of honey or a pitted date before blending.


Consistency: If the smoothie is too thick, splash in a little more milk. If it’s too thin, add more frozen banana or ice.


Energy Boost: Add a teaspoon of chia seeds or flax seeds for extra fiber and healthy fats.

Creamy Raisin Rice Pudding (Slow Cooker Style)

Creamy Raisin Rice Pudding (Slow Cooker Style)

Description

This rich and comforting Creamy Raisin Rice Pudding is a classic dessert made with tender rice, warm cinnamon, sweet plump raisins, and a velvety milk custard. Slow-cooked to perfection, it develops a creamy texture with deep, cozy flavors. Perfect as a dessert or sweet breakfast treat.

 Ingredients

  • 1 cup uncooked white rice (or 3 cups cooked rice)

  • 2 cups water (if cooking rice first)

  • 4 cups whole milk

  • 1 cup heavy cream (optional for extra richness)

  • ¾ cup granulated sugar

  • 1 cup raisins

  • 2 large eggs (room temperature)

  • 2 teaspoons vanilla extract

  • 1 teaspoon ground cinnamon

  • ¼ teaspoon salt

  • 1 tablespoon butter

Instructions

Step 1: Cook the Rice

  • If using uncooked rice, cook with 2 cups water until tender (about 15 minutes).

  • Fluff and set aside.

Step 2: Prepare the Custard Mixture

  • In a bowl, whisk together milk, cream, sugar, eggs, vanilla, cinnamon, and salt.

Step 3: Combine in Slow Cooker

  • Add cooked rice and raisins to the slow cooker.

  • Pour custard mixture over rice.

  • Stir gently to combine.

  • Add butter on top.

Step 4: Cook

  • Cook on LOW for 2–3 hours, stirring once or twice, until thick and creamy.

  • It will thicken more as it cools.

Step 5: Serve

  • Serve warm for comfort or chilled for a firmer texture.

  • Sprinkle extra cinnamon on top if desired.

 Tips for Best Results

✔ Use whole milk for creaminess (low-fat works but less rich).
✔ Soak raisins in warm water for 10 minutes to make them extra plump.
✔ Stir gently to avoid breaking the rice grains.
✔ If too thick, add a splash of warm milk before serving.
✔ Add nutmeg for deeper flavor.

 Servings

Serves: 6–8 portions

Nutritional Information (Approx. per serving)

  • Calories: 320–380 kcal

  • Carbohydrates: 55g

  • Protein: 8g

  • Fat: 12g

  • Saturated Fat: 7g

  • Fiber: 2g

  • Sugar: 28g

(Values vary depending on ingredients used.)

Benefits

  • Provides energy from carbohydrates

  • Contains calcium from milk

  • Raisins add natural sweetness and antioxidants

  • Comfort food that supports satiety

Frequently Asked Questions

Q: Can I use brown rice?
Yes, but it will require longer cooking and slightly more liquid.

Q: Can I make this dairy-free?
Yes. Substitute almond milk or coconut milk and use dairy-free butter.

Q: How long does it last?
Store in an airtight container in the refrigerator for up to 4 days.

Q: Can I freeze rice pudding?
It can be frozen, but texture may change slightly. Stir well after thawing.

Q: Can I make it without eggs?
Yes, simply omit eggs; the pudding will be less custard-like but still creamy.

Ginger Water: The Secret to Burning Fat from Your Belly, Neck, Arms, Back, and Thighs!

Ready to kickstart your fat loss journey?

Ginger water is not just refreshing — it’s a powerhouse drink known to boost metabolism, improve digestion, and help burn fat, especially in stubborn areas like the abdomen, arms, back, and thighs. It’s the perfect drink to add to your daily routine for a natural, healthy way to shed those extra pounds.

Ingredients:

Fresh ginger (2-3 slices)

1-2 cups water

Optional: Lemon or honey for taste

How to Prepare:

Slice the Ginger: Cut fresh ginger into thin slices or grate it for stronger flavor.

Boil: Add ginger slices to boiling water and simmer for 5–10 minutes.

Strain: Strain the ginger pieces out, pour into a glass, and add lemon or honey if desired for flavor.

Drink: Enjoy it hot or cold throughout the day for maximum fat-burning benefits.

Why It Works:

Ginger is known for its thermogenic properties, meaning it helps boost your body’s temperature, leading to more calories burned. Its anti-inflammatory properties also aid in reducing belly fat and improving digestion. Drink this regularly to help target those stubborn areas and promote overall fat loss.


Call-to-Action:

Ready to give ginger water a try? Drink it every day and watch how it transforms your body!

Tag a friend who needs to try this detox drink, and share your experience below!

Hibiscus Clove Cinnamon Wellness Drink (Iced or Hot)

Hibiscus Clove Cinnamon Wellness Drink (Iced or Hot)

A refreshing, immune-boosting herbal drink made with dried hibiscus petals, whole cloves, and cinnamon sticks. This vibrant ruby beverage is tangy, lightly spiced, and naturally caffeine-free. It can be enjoyed hot as a soothing tea or chilled as a refreshing wellness drink.

 Description

This traditional-style herbal infusion combines:

  • Hibiscus – Tart, cranberry-like flavor

  • Cloves – Warm, slightly sweet and spicy

  • Cinnamon – Comforting and aromatic

It’s popular in many cultures as a cooling drink in warm weather and as a soothing remedy during cold seasons.

 Ingredients (4 Servings)

  • 4 cups (1 liter) water

  • 2 tablespoons dried hibiscus petals

  • 4–5 whole cloves

  • 1 cinnamon stick

  • 2–3 tablespoons honey or preferred sweetener (optional)

  • 1 tablespoon fresh lime or lemon juice (optional)

  • Ice cubes (if serving cold)

 Instructions

  1. Boil Water
    Bring 4 cups of water to a boil.

  2. Add Spices
    Add hibiscus petals, cloves, and cinnamon stick.

  3. Simmer
    Reduce heat and simmer for 10–15 minutes.

  4. Steep
    Turn off heat and let steep another 5–10 minutes for deeper flavor.

  5. Strain
    Strain into a pitcher or teapot.

  6. Sweeten & Adjust
    Add honey and lime/lemon juice if desired.

  7. Serve

    • Serve hot

    • Or chill for 1–2 hours and serve over ice

 Tips

✔ For stronger flavor: Use more hibiscus or simmer longer
✔ For a smoother taste: Add a slice of fresh ginger
✔ For weight management: Drink without sweetener
✔ For parties: Add sparkling water for a fizzy version
✔ Store in refrigerator up to 3 days

Servings

  • Makes: 4 cups

  • Serving Size: 1 cup

 Nutritional Information (Per 1 Cup, Unsweetened Approx.)

  • Calories: 5

  • Carbohydrates: 1g

  • Sugar: 0g (without sweetener)

  • Fat: 0g

  • Protein: 0g

  • Caffeine: 0mg

(Calories increase if sweetener is added.)

 Health Benefits

  • Rich in antioxidants

  • May support heart health

  • May help lower blood pressure

  • Supports digestion

  • Anti-inflammatory properties

  • Immune-supportive spices

  • Hydrating and caffeine-free

Q & A

Q: Can I drink this daily?
Yes, in moderate amounts (1–2 cups daily) unless you have low blood pressure or are advised otherwise by a doctor.

Q: Can pregnant women drink this?
Hibiscus is sometimes not recommended during pregnancy. Consult your healthcare provider first.

Q: Can I use hibiscus tea bags instead?
Yes. Use 2 tea bags in place of dried petals.

Q: How do I make it stronger?
Increase hibiscus to 3 tablespoons or simmer longer.

Q: Can I drink it for weight loss?
It may support metabolism and reduce sugar cravings when consumed unsweetened, but it’s not a magic solution.

Golden Banana and Turmeric Smoothie Recipe

This smoothie is a vibrant blend of bananas, turmeric, and a touch of onion for depth, creating a drink that is both nourishing and energizing. Bananas provide natural sweetness and creaminess, making them the perfect base for a smoothie. Turmeric, with its golden hue, adds warmth and is celebrated in traditional practices for its supportive qualities. The inclusion of onion may seem unusual, but in small amounts it contributes a subtle savory note that balances the sweetness of the banana and the earthiness of turmeric.

The drink is thick, frothy, and visually appealing, with a rich yellow color that reflects its wholesome ingredients. It’s ideal for mornings when you want a refreshing start, or afternoons when you need a natural energy boost. Beyond its taste, this smoothie highlights the beauty of combining everyday kitchen staples into something extraordinary.


INGREDIENTS:

2 ripe bananas

1 teaspoon fresh turmeric root (grated) or ½ teaspoon turmeric powder

1 small piece of red onion (about 1 tablespoon, finely chopped)

1 cup milk (dairy or plant-based)

½ cup plain yogurt (optional, for creaminess)

1 teaspoon honey (optional, for sweetness)

3–4 ice cubes

INSTRUCTION:

Prepare the ingredients: Peel the bananas and slice them into chunks. Grate the turmeric root if using fresh, and finely chop the onion.

Blend the base: Place bananas, turmeric, onion, milk, and yogurt into a blender. Blend until smooth and creamy.

Adjust flavor: Taste the mixture. If you prefer more sweetness, add honey and blend again.

Add ice: Drop in the ice cubes and blend until the smoothie is frothy and chilled.

Serve fresh: Pour into a tall glass and enjoy immediately while the flavors are vibrant and the texture is thick.

SERVINGS:

This recipe yields 2 servings of golden banana and turmeric smoothie. It can be scaled up for larger batches or reduced for a single serving.


NOTE:

Flavor balance: The banana provides natural sweetness, turmeric adds warmth, and onion contributes a subtle savory undertone. Together, they create a unique and balanced flavor profile.

Optional additions: Honey enhances sweetness, while yogurt adds creaminess. Adjust according to preference.

Storage tip: This smoothie is best enjoyed fresh. If stored, keep it refrigerated and consume within 12 hours.

Mindful preparation: Use ripe bananas for maximum sweetness and smooth texture. Fresh turmeric root gives a more vibrant flavor than powdered turmeric.

Serving ritual: Pouring into a clear glass highlights the golden color, making the drink visually appealing as well as delicious.

Wellness connection: Bananas, turmeric, and onion have all been celebrated in traditional practices for their supportive qualities. This recipe emphasizes their culinary charm while offering a nourishing beverage.

Final Thoughts

The Golden Banana and Turmeric Smoothie is more than just a drink—it’s a celebration of natural ingredients and mindful preparation. By combining the sweetness of bananas, the warmth of turmeric, and the subtle depth of onion, you create a beverage that is flavorful, nourishing, and deeply satisfying. It’s simple to prepare, visually striking, and versatile enough to enjoy at any time of day. Whether you’re seeking a refreshing start to your morning or a revitalizing afternoon boost, this smoothie invites you to savor the moment and connect with the wholesome power of nature.