Green Pineapple Coconut Smoothie Recipe

Tropical flavors from pineapple, coconut, banana, and lime get a nutritional punch from baby spinach. It’s a health-packed cup for any time of day that’ll feel like a vacay on an island.

Start your day with tropical fruits and plenty of citrus.

YIELDS: 2 serving(s)

TOTAL TIME: 10 mins

CAL/SERVINGS: 192

Ingredients:

  • 2 c. baby spinach
  • 1 c. frozen pineapple chunks
  • 1 c. light coconut milk
  • 1 banana, sliced and frozen
  • 1 tsp. grated lime zest
  • 1 tbsp. lime juice

Directions:

  1. In blender, puree all ingredients until smooth.
  2. Divide between two glasses.

Nutritional Info:

Nutrition per serving: 192 cal, 4 g pro, 30 g carb, 4 g fiber, 11.5 g sugars (0 g added sugars), 7 g fat (7 g sat fat), 0 mg chol, 43 mg sodium


Berry Chia and Mint Smoothie Recipe

Red is our favorite color in this ruby smoothie packed with strawberries, raspberries, and beets. It’ll give you a ton of gut-friendly fiber, and a refreshing sip from the surprising addition of mint.

YIELDS: 2 serving(s)

TOTAL TIME: 10 mins

CAL/SERVINGS: 105

INGREDIENTS:

  • 1 c. sliced strawberries

  • 1/2 c. raspberries
  • 1/2 c. grated beet (from 1 medium beet)
  • 1/3 c. mint leaves
  • 1 tbsp. chia seeds
  • 1 c. unsweetened almond milk

Directions:

Step 1

Place berries, beet, mint, and chia seeds in resealable plastic bag or freezer-safe jar. Freeze overnight or longer.

Step 2

When ready to prepare, add almond milk to blender, then add frozen ingredients. Blend until smooth. Serve in two tall glasses.

Nutritional Info:

Nutrition per serving: 105 cal, 3 g pro, 17 g carb, 8 g fiber, 7 g sugars (0 g added sugars), 3.5 g fat (0.5 g sat fat), 0 mg cholesterol, 115 mg sodium


Syn Free Chicken Fajita Pasta Recipe

You can’t go wrong with fajitas for dinner, can you?

Well actually, sadly, you can.

One of those off-the-shelf kits can set you back up to 10 Syns per fajita when you’re following Slimming World, and I don’t know many self-respecting hungry people who would be happy to draw the line at just one.

But bear with me, because it’s not all doom and gloom here.

In fact, it’s quite the opposite.

After much faffing about with various ingredients, I came up with an alternative that ticks all the right boxes, will leave you feeling satisfied, and shakes things up just enough to keep you excited. Without sacrificing any of those gorgeous Mexican flavours.

This Slimming World chicken fajita pasta is Syn free, has a very reasonable 471 calories per portion, I hope you’ll love it as much as I do…

Slimming World chicken fajita pasta recipe

This creamy chicken fajita pasta is Syn free, and full of authentic Mexican flavour.

Prep Time: 5mins

Cook Time: 25mins

Course: Main Course

Cuisine: Mexican

Servings: 2

INGREDIENTS:

  • 2 large chicken breasts chopped into thin slices/chunks
  • 140 g dried pasta shapes I used farfalle, but feel free to use your favourite or whatever you have in the cupboard
  • 1 small onion sliced
  • 1 red pepper sliced
  • 1 red chilli sliced, optional
  • 100 g plain quark
  • 1 chicken stock cube made up with 100ml boiling water
  • 1 tbsp Schwartz Fajita Seasoning
  • Low calorie cooking spray

INSTRUCTIONS:

  • Heat a heavy based pan over a medium-high heat and spritz with low calorie cooking spray.
  • Add the chicken and stir fry for 5 minutes, or until sealed.
  • Add the onion and red chilli (if using) to the pan, and continue to fry for 2 minutes.
  • Add the red pepper, and fry for a further 5 minutes, or until the chicken is cooked through and the vegetables have softened but still retain their crunch.
  • Add the Schwartz Fajita Seasoning for the last minute.
  • Meanwhile, cook the pasta according to packet instructions. Drain and set to one side.
  • Add the chicken stock and quark to a jug, and mix thoroughly until a sauce is formed.
  • Continue to simmer for 10 minutes, or until a thick and creamy sauce is formed.
  • Add the pasta to the pan and stir well, ensuring that everything is piping hot.
  • Serve and enjoy!
HOW TO SERVE YOUR CHICKEN FAJITA PASTA
  • With pasta, chicken, and vegetables all included in the recipe, this is pretty much a complete meal in its own right.
  • To make sure that you’re getting enough Speed Foods though, add a big leafy green salad on the side.
  • I also love adding a few wedges of lime, a little guacamole, and a small scoop of quark, in place of sour cream.
  • If you are adding your own extras, just make sure that you account for the Syns or calories, in line with your diet plan.

Notes:

The nutritional and Syn values provided are carefully calculated and correct at time of publication but may not always be completely accurate.

If you’re serious about sticking rigidly to your plan, it’s always worth doing your own calculations for extra peace of mind – and remember, we may be using different brands or variations of ingredients which can significantly impact the nutritional and Syn values!

Nutritional Info:

Calories: 471kcal

Yellow Cake Recipe

This is the BEST Basic Yellow Cake Recipe! It’s perfect for a layer cake, a sheet cake or cupcakes! This easy cake recipe is homemade – you’ll never need to buy a box cake mix again.

Prep Time: 30mins

Cook Time: 30 mins

Assembling Time: 30mins

Total Time: 1hr 30mins

Ingredients

For the Cake:

½ teaspoon salt

3 teaspoons baking powder

2 ½ cups (310g) all-purpose flour

1 cup (227g) unsalted butter, melted

1 ½ cups (297g) granulated sugar

4 large eggs

1 teaspoon (5 ml) vanilla extract

1 ¼ cups (296) ml buttermilk

For the frosting:

1 cup (227g) unsalted butter, softened

4 cups (452g) powdered sugar

½ teaspoon salt

1 teaspoon (5 ml) vanilla extract

2-3 tablespoons (30-45 ml) heavy whipping cream

Instructions:

For the cake:

Preheat oven to 350°F. Prepare cupcake pans with liners or grease and flour cake pan(s).

Whisk salt, baking powder, and flour in a medium sized bowl. Set aside.

Using a hand mixer, cream sugar into melted butter until smooth. Beat in eggs, one at a time, then mix in vanilla extract.

Add dry ingredients alternately with the buttermilk, starting and ending with the flour, mixing gently between each addition. Mix until just combined. Be sure to scrape the sides of the bowl.

Pour batter into prepared pans and bake as directed. Cool completely before removing and frosting.

Bake Time: 24 cupcakes: 14-17 minutes // Two 9-inch round pans: 24-27 minutes // Two 8-inch round pans: 25-33 minutes // 9×13-inch pan: 30-40 minutes

For the frosting:

Beat butter until smooth with a hand or a stand mixer. Note: if you’re using a hand mixer be sure to use a very large bowl to avoid wearing the powdered sugar.

Add powdered sugar, one cup at a time, and beat on medium speed until crumbly. Mix in salt and vanilla.

Add 1 tablespoon of heavy whipping cream at a time, mixing between each addition, until the frosting is smooth and the desirable consistency.

Frost cake or cupcakes as desired.

Notes

You can use a 9×13-inch pan, two 8-inch or 9-inch rounds, or make 24 cupcakes.

This is also great with chocolate frosting!

Store cake on counter for up to 3 days. Cake can be frozen (with or without frosting) for up to 2 months. Be sure to wrap it well in plastic wrap or an airtight container.

Nutritional Info.:

Serving: 1serving | Calories: 334kcal | Carbohydrates: 42g | Protein: 3g | Fat: 17g | Saturated Fat: 10g | Cholesterol: 74mg | Sodium: 175mg | Fiber: 1g | Sugar: 30g

Chicago Style Deep Dish Pizza Recipe

Here’s how to make authentic-tasting Chicago deep dish pizza. Complete with the buttery crust, slightly sweet tomato sauce, and a thick layer of cheese.

Prep Time: 4 hours

Cook Time: 30 minutes

Total Time: 4 hours, 30 minutes

Yield: 2 deep dish 9-inch pizzas

Ingredients:

PIZZA CRUST (MAKES 2)

3 and 1/4 cups (406g) all-purpose flour (spoon & leveled)

1/2 cup (60g) yellow cornmeal

1 and 1/4 teaspoons salt

1 Tablespoon (12g) granulated sugar

2 and 1/4 teaspoons (7g) Platinum Yeast from Red Star instant yeast (1 standard packet)*

1 and 1/4 cups (300ml) slightly warm water

1/2 cup (115g) unsalted butter, divided (1/4 cup melted, 1/4 cup softened to room temperature)

olive oil for coating

TOMATO SAUCE FOR BOTH PIZZAS

2 Tablespoons (30g) unsalted butter

1 small onion, grated (about 1/3 cup)*

3/4 teaspoon salt

1 teaspoon dried oregano

1/2 teaspoon crushed red pepper flakes (optional, but recommended)

3 garlic cloves, minced

one 28-ounce can (794g) crushed tomatoes*

1/4 teaspoon granulated sugar

TOPPINGS FOR BOTH PIZZAS

4 cups (about 16 oz) shredded mozzarella cheese*

1/2 cup (45g) grated parmesan cheese

optional: 1/2 cup sliced pepperoni

optional: 4 slices bacon, cooked and crumbled

Instructions:

Please use my step-by-step photos below this written out recipe as a guide to making the pizza. For best results and ease of mind, read through the recipe completely before beginning. You will need two deep dish 9×2 inch round cake pans if you are making both pizzas at the same time. You can also use 9 inch springform pans.

For the crust: Combine the flour, cornmeal, salt, sugar, and yeast in the bowl of your stand mixer fitted with a dough hook attachment. If you do not have a stand mixer, use your hand mixer and a very very large bowl. If you do not have any mixer, you will do this all by hand. Again, use a very large bowl. Give those ingredients a quick toss with your mixer on low or with a large wooden spoon. Add the warm water and 1/4 cup of melted butter. The warm water should be around 90°F (32°C). Make sure it is not very, very hot or it will kill the yeast. Likewise, make sure the butter isn’t boiling hot. If you melt it in the microwave, let it sit for 5 minutes before adding. On low speed, beat (or stir) the dough ingredients until everything begins to be moistened. Continuing on low speed (or remove from the bowl and knead by hand if you do not own a mixer), beat the dough until it is soft and supple and gently pulls away from the sides of the bowl and falls off of the dough hook- about 4-5 minutes. If the dough is too hard (it will be textured from the cornmeal), but if it feels too tough, beat in 1 teaspoon of warm water. Alternatively, if it feels too soft, beat in 1 Tablespoon of flour.

Remove the dough from the bowl and form into a ball. Lightly grease a large mixing bowl with olive oil and place the dough inside, turning it around so that all sides of the dough are coated in the oil. Cover the bowl tightly with aluminum foil and allow to rise in a warm environment for 1-2 hours or until double in size.

Once the dough is ready, lightly flour a large work surface. Remove dough from the bowl, set the bowl and aluminum foil aside (to use later). Gently punch down the dough to remove any air bubbles and roll the dough into a large 15×12 inch rectangle. Spread 1/4 cup of softened butter on top of the dough. Roll it up lengthwise per the photos below. Cut the dough log in half. Form the two pieces of dough into balls and place back into your greased bowl. Cover with aluminum foil and allow to rise in the refrigerator (not in a warm place) for 1 hour until they are puffy as you make the sauce.

For the sauce: Place butter in a medium saucepan over medium heat and allow it to melt. Once melted, add the grated onion, salt, oregano, and red pepper flakes. Once the onion has slightly browned after about 5 minutes, add the garlic, tomatoes, and sugar. Turn the heat down to low-medium and allow it to simmer until it’s hearty, fragrant, and thick- about 30 minutes. You’ll have about 2 and 1/2 cups of sauce at this point. If you have more than that, keep simmering until the amount has reduced. Remove from heat and set aside until ready to be used. You may store the sauce in a tightly covered container in the refrigerator for up to 2 days if planning to make the pizza another day. You may freeze this sauce for up to 2 months as well.

Preheat oven to 425°F (218°C).

Assemble the pizzas: After the dough balls have risen in the refrigerator, they should be puffy. Keep one ball of dough in the refrigerator as you work with the first one. Roll it out on a lightly floured work surface, working it into a 12-inch circle. Using your rolling pin as a guide (see photos below), place over a 9×2 inch deep dish cake pan. Using your fingers, press the dough into the cake pan. Make sure it is nice and tight fitting inside the pan. Trim any excess dough off the edges with a small knife. Repeat with 2nd dough. Brush the top edges of the dough with a little olive oil, which gives the crust a beautiful sheen. Fill each pizza with 1/2 of the cheese (about 2 cups/8 oz per pizza), then the pepperoni and bacon or your desired toppings. Pour about 1 and 1/4 cups (300ml) of sauce evenly on top of each. If you do not like that much sauce, you can reduce to 3/4 cup (180ml) per pizza and have leftover sauce. Sprinkle each with 1/4 cup (22g) of grated parmesan cheese.

Place the cake pans on top of a large baking sheet, which will catch anything potentially spilling over the sides of the pans. (Nothing usually does.) Bake for 20-28 minutes or until the crust is golden brown. Feel free to loosely cover the pizzas with aluminum foil after the 15 minute mark to prevent any heavy browning and uneven baking. Remove the pizzas from the oven and allow to cool in the pans placed on a wire rack for 10 minutes. After 10 minutes, slice, serve, and enjoy. Place any leftover pizza in an airtight container and refrigerate for up to 5 days. Reheat leftovers in a 300°F (149°C) oven for 15-20 minutes or until hot.

Notes:

Make Ahead & Freezing Instructions: Dough may be prepared through step 4. In the last part of this step, the dough needs to rise in the refrigerator for 1 hour. You may leave it in the refrigerator for up to 1 full day, making sure to punch it down to remove any air bubbles before rolling out as directed in step 7. You may freeze the pizza doughs after preparing them through step 4, and instead of allowing to rise in the refrigerator, simply freeze for up to 2 months. Then, allow the doughs to thaw overnight in the refrigerator and allow to rise at room temperature for 1 hour before continuing with step 7. Make-ahead and freezing instructions for the sauce are written in step 5.

Yeast: Platinum Yeast from Red Star is an instant yeast. You can use any quick rise or instant yeast in this recipe. You can also use active dry yeast in this recipe with zero changes. The rise time may be slightly longer if using active dry yeast.

Onion & Tomatoes: Please see notes below the recipe in the step-by-step photos for details about the grated onion and the can of crushed tomatoes.

Cheese: You can use sliced mozzarella or shredded mozzarella cheese.

Toppings: Feel free to swap the pepperoni and bacon with cooked and crumbled sausage, thinly sliced green peppers and/or onions, sliced mushrooms, etc. Add enough toppings to suit your tastes.

Nutritional Info:

Serving Size:1 of 8 servingsCalories848Total Fat 58g Saturated Fat 18g Carbohydrates 48 g Dietary Fiber 3g Sugar 4g Protein 32 g Cholesterol 104mg Sodium 1184mg

Strawberry Cheesecake Triffle

This Strawberry Cheesecake Trifle features layers of sweetened berries doused with Amaretto, angel food cake cubes and luscious cheesecake filling, lightened with whipped cream.

I was hosting brunch at my house, and that called for a lovely fruit-filled dessert recipe. Adding a homemade cheesecake twist to a strawberry trifle recipe was brilliant.

A fruit and cream dessert is perfect for a mid-day treat, especially when company is invited. I love sweets featuring berries, like this stunning Strawberry Shortcake Roulade, but sometimes it’s nice not to turn on the oven! Sliced berries were sweetened and then dosed with a bit of Amaretto. The cheesecake layer was composed of cream cheese and sour cream, then a billowy cloud of whipped cream was folded in. Not a classic English trifle by any means, but utterly delicious!

A store-bought angel food cake made quick work of the preparation. Since this is a no-bake trifle recipe, it’s perfect for hot summer days when you don’t want to turn on the oven as well as holidays when the oven is often filled with turkey and casseroles!

Not exactly health food, but this strawberry cheesecake trifle is definitely lighter fare than so many other dessert options! You know it’s a hit when the men at the table start inquiring about the ingredients. They do combine beautifully for a delicious party in your mouth with every bite.

INGREDIENTS:

  • 1 package (8 ounces) cream cheese, softened
  • 1 cup (8 ounces) sour cream
  • 1/2 cup cold milk
  • 1 package (3.4 ounces) instant vanilla pudding mix
  • 1 carton (12 ounces) frozen whipped topping, thawed
  • 1-1/2 cups crushed butter-flavored crackers (about 38 crackers)
  • 1/4 cup butter, melted
  • 2 cans (21 ounces each) strawberry pie filling

INSTRUCTIONS:

  1. In a large bowl, beat the cream cheese until smooth.
  2. Beat in the sour cream; mix well.
  3. In a small bowl, beat milk and pudding mix on low speed for 2 minutes.
  4. Stir into cream cheese mixture.
  5. Fold in whipped topping.
  6. In a small bowl, combine crackers and butter.
  7. In a 2-1/2-qt. trifle bowl, layer half of the cream cheese mixture, crumbs and pie filling.
  8. Repeat layers. Refrigerate until serving.

Yield: 12-16 servings.


Pastry Cream Filled Donuts Recipe

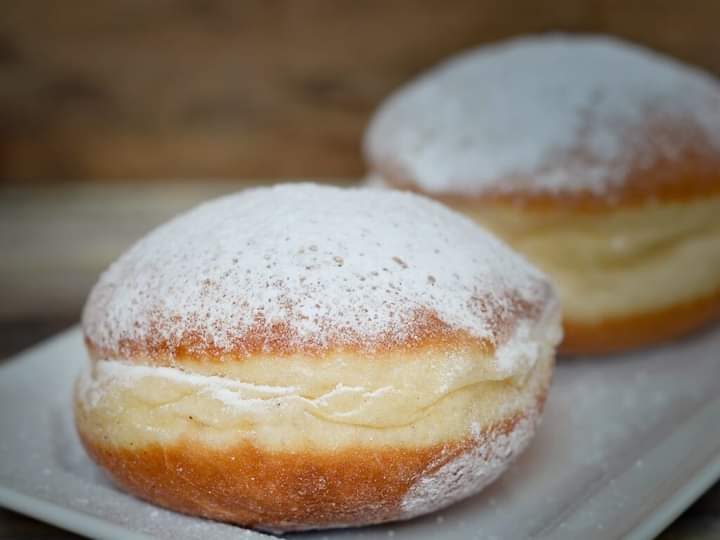
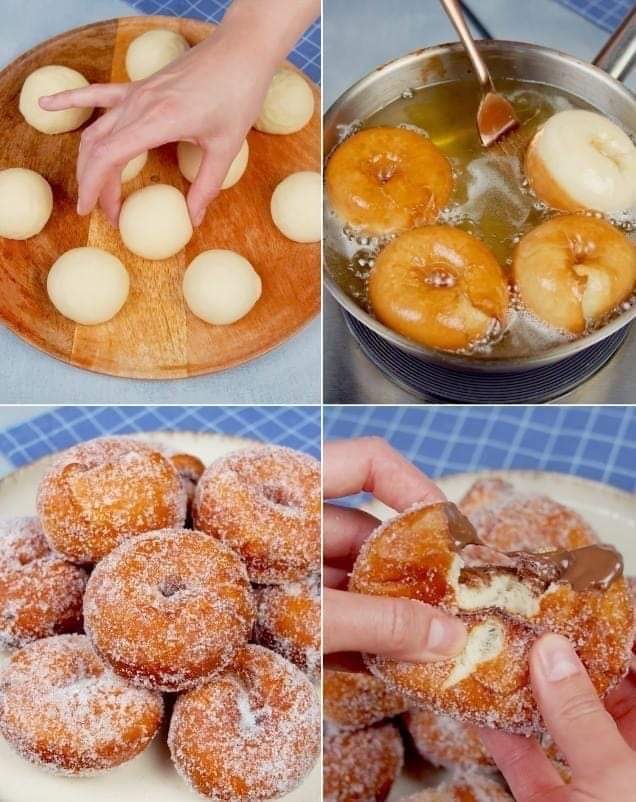
Super fluffy brioche donuts made extra large, rolled in vanilla sugar and filled with a super light vanilla Pastry cream filling. 

PREP TIME: 45 mins

COOK TIME: 30 mins

ADDITIONAL TIME: 4 hrs

TOTAL TIME: 5 hrs15mins

Ingredients

Brioche Donuts

4 1/2 cups (540g) all-purpose flour, spooned and leveled

2 1/4 tsp (7g) instant yeast

3 Tbsp (36g) granulated sugar

1 tsp salt

2 large eggs, room temperature

2 large egg yolks, room temperature

1/2 cup (113g) salted butter, softened

1 cup (8 oz) water

1 cup (200g) granulated sugar

1 tsp cinnamon and/or 1/2 tsp vanilla powder

48 oz canola, sunflower or vegetable oil

Custard

3 large egg yolks, room temperature

1/2 cup (100g) granulated sugar

⅛ tsp salt

3/4 cups (180 ml) whole milk

2 Tbsp (28g) salted butter, softened

Whipped Cream (OR 8oz Cool Whip)

1 1/3 cups (300 mL) heavy whipping cream, cold

1/4 cup (30g) powdered sugar, spooned and leveled

Instructions

Brioche Donuts

Place the flour, yeast, 3 tablespoons sugar, and salt in the bowl of a stand mixer fitted with the hook attachment. Turn the mixer to low speed, add in the eggs and egg yolks, followed by the softened butter and water.

Once they’re all combined, turn the mixer to medium-low speed and allow it to knead the dough for 10 to 15 minutes, or until the dough begins to peel itself away from the sides of the bowl and forms a ball around the hook attachment.

If this doesn’t happen within the kneading time, the dough is too sticky; add 1 to 2 tablespoons (7 to 14 g) of flour and continue to knead until the dough comes together.

Test the strength of the dough by stretching a piece of dough between your fingers. The dough should stretch thin enough to let light through before tearing.

Push the dough to one side of the bowl, grease the open side of the bowl, then repeat with the other side. Cover the bowl with plastic wrap.

Place the bowl in a warm environment, in the sunlight or on a stovetop warming zone, and allow it to proof until it’s doubled in size; this may take anywhere from 1 to 2 hours.

Line two baking sheets with 16-20 4×4” parchment paper squares, and lightly flour a work surface.

Once the dough has doubled in size and is really fluffy, punch it down and turn it over onto the prepared work surface,

Split the dough in half. Gently roll each half into a log, and cut each log into 8-10 chunks (you can weigh them to make sure they’re even if you want, I just cut the log in half, then each side in half and again in half).

Roll each chunk into a tight ball and place the chunks on the prepared baking sheets. Cover the baking sheets with plastic wrap, and place them in a warm environment to proof for 30ish minutes, until they puff up slightly more.

Prepare for frying the donuts by lining two cooling racks with paper towels and spreading the 1 cup of sugar and cinnamon and/or vanilla powder in a bowl.

Ten minutes before the donuts are done proofing, heat the oil in a large pot over high heat to about 360F (182C) on a candy thermometer*, then lower the heat to medium. Use the thermometer to keep the oil within 10 degrees of 360F (182C).

Depending on the size of your pot, place two to four donuts in the oil at a time, being sure to leave space around them. Fry the donuts on each side, turning the donuts with a slotted spoon, for 1 to 2 minutes, or until they are browned.

If it is taking longer than 2 minutes to brown one side of the donut, increase the heat just a little. Work quickly, and avoid having an empty pot, so the oil doesn’t burn.

Place the fried donuts on the prepared racks. While they’re still warm, toss the donuts in the sugar. Serve warm or let them cool completely to room temperature if filling the donuts.

Custard

In a small or medium saucepan, whisk together the egg yolks and sugar until they’re well combined. Add the salt and slowly pour in the milk while whisking.

When the mixture is smooth, cook it over medium-low heat while whisking continuously (but not super aggressively) for about 5 minutes, until it begins to thicken.

Once it begins to thicken, whisk aggressively for one more minute and then pour into a heat safe bowl. Stir in the butter until it’s well combined.

Cover the surface of the pastry cream with plastic wrap and allow it to cool to room temperature or refrigerate until it’s chilled.

Whipped Cream

Once the pastry cream has cooled, make the whipped cream.

Combine the cream and sugar in the bowl of a stand mixer, and use the whisk attachment to beat the mixture at medium speed until it thickens a bit, about 30 seconds.

Turn the speed up to medium-high, and whisk the cream until it reaches stiff peaks, about 1 minute.

Add the cooled custard to the whipped cream, and turn the mixer up to medium-high speed, beating just until the cream is fully combined.

Use a piping bag to pipe into the donuts and serve fresh.

Notes:

*you can replace the homemade whipped cream with an 8 ounces tub of full-fat Cool Whip. I recommend the brand name if you can find it as they’re not all made equally.

Nutrition Information:

YIELD: 18 SERVING SIZE: 1

Amount Per Serving: CALORIES: 396TOTAL FAT: 22gSATURATED FAT: 10gTRANS FAT: 1gUNSATURATED FAT: 11gCHOLESTEROL: 131mgSODIUM: 235mgCARBOHYDRATES: 43gFIBER: 1gSUGAR: 19gPROTEIN: 7g

Low-Carb Bacon Cheeseburger Casserole Recipe

This Keto Cheeseburger Casserole has all the flavors of a juicy burger without the carbs! Your whole family will love this low carb cheeseburger casserole and you’ll love how simple it is to make!

 This low carb cheeseburger casserole is a family and reader favorite. I’ve heard nothing but good reviews from everyone who’s tried this simple recipe. I think you’ll love it, too!

Course: Main Course

Cuisine: American

Keyword: low carb recipes

Prep Time: 30minutes 

Cook Time: 30minutes

Total Time: 1hour

Ingredients

1/2 pound bacon

1 pound ground beef

1/2 onion diced

1 clove garlic minced

4 tablespoons cream cheese

2 tablespoons no sugar added ketchup

1 tablespoon yellow mustard

1 tablespoon Worcestershire sauce

1 teaspoon seasoned salt

4 large eggs

1/4 cup heavy cream

1 teaspoon hot sauce

1 teaspoon ground pepper

8 ounces shredded cheddar

1 teaspoon fresh dill

INSTRUCTIONS

Dice the bacon into small pieces and place in a large skillet over medium heat. Cook, stirring often, until crisp. Remove bacon from pan and set aside on a paper towel lined plate. Drain grease from pan.

Add the ground beef, onion, and garlic to the skillet and cook until browned, crumbling as it cooks. Once beef is browned and cooked through, drain fat.

Add the cream cheese, ketchup, mustard, Worcestershire sauce, and seasoned salt to the skillet and cook over low heat, stirring constantly, until combined.

Spread the beef mixture into a greased 8×8 baking dish. Top with the cooked bacon.

Crack the eggs into a medium bowl and whisk together with the heavy cream, hot sauce, and pepper.

Pour the egg mixture over the beef and bacon.

Top with the cheddar cheese.

Bake at 350 degrees for 30-35 minutes or until set and golden on top. Let cool 15 minutes before sprinkling with dill and serving.

Notes

This recipe has been updated to make the instructions more clear. We also ran this through an updated nutrition calculator. This used to be calculated at 2 net carbs per serving, but we’re now seeing 3 net carbs per serving.

To reduce sodium, use lower sodium bacon and a salt-free seasoning in place of the seasoned salt.

Is ketchup keto friendly?

Most ketchup is loaded with sugar, so you’ll want to be sure to read the labels. We use Heinz No Sugar Added Ketchup. It’s low in carbs and uses sucralose as the sweetener.

Nutritional Info:

Calories: 631kcal | Carbohydrates: 4g | Protein: 32g | Fat: 53g | Saturated Fat: 23g | Polyunsaturated Fat: 4g | Monounsaturated Fat: 19g | Trans Fat: 1g | Cholesterol: 261mg | Sodium: 1165mg | Potassium: 424mg | Fiber: 1g | Sugar: 2g | Vitamin A: 857IU | Vitamin C: 2mg | Calcium: 327mg | Iron: 3mg

Low-Carb Turkey Taco Skillet

This low carb turkey taco skillet is a super easy meal full of wonderful Mexican flavors!

PREP TIME: 5 minutes

COOK TIME: 20 minutes

TOTAL TIME: 25 minutes

INGREDIENTS:

1 tbs olive oil

1 tsp onion powder

1 lb ground turkey

1 red bell pepper, deseeded and diced

1 tsp dried oregano

1 tsp paprika

1 tsp ground cumin

½ cup shredded Mexican blend cheese

Fresh cilantro, chopped

Sour cream, shredded lettuce and/or low carb wraps for serving

INSTRUCTIONS:

Heat the oil in a large skillet. Add ground turkey and onion powder. Sauté until the meat has browned.

Add paprika, ground cumin, dried oregano and chopped red bell pepper. Continue to cook until the pepper has softened.

Sprinkle over the shredded cheese and cook until the cheese has melted. Remove from the heat and scatter over some chopped fresh cilantro.

Serve with shredded lettuce, sour cream, and/or low carb wraps!

Notes:

4g net carbs per serving (based on two servings)

Lettuce, sour cream, and wraps not included.

NUTRITIONAL INFO:

Yield: 2

Serving Size

Half the recipe

Amount Per Serving

Calories446TotalFat20gSaturatedFat6gCholesterol151mgSodium316mgCarbohydrates6gNetCarbohydrates4gFiber2gSugar3gProtein61g

Pickle Beet Recipe

Pickled beets are one of the most requested preserves item at farmers’ markets. Here are directions for how to make your own home-canned pickled beets.

QUANTITIES OF BEETS NEEDED FOR PICKLED BEETS

As a rough rule of thumb:

expect to need about 3 medium sized beets per half-litre (US pint) jar;

about 1 ¾ lbs of beets (before prep) per quart jar;

about ¾ kg of beets (before prep) per litre jar

Your mileage will of course vary based on the size you cut them down into and how many fibrous parts you find that have to be cut off and discarded — they won’t soften up, get rid of them!

Course: Pickles

Cuisine: American

Prep Time: 1hour 

Cook Time: 40minutes 

Total Time1hour 40minutes

Servings8 x half-litre (US pint) jars or 4 litre (US quart) jars

Ingredients:

3 kg home-canned beets (about 7 lbs)

1 spice bag (see NOTES section below)

1 litre vinegar (5% acidity or higher. 4 cups / 32 oz )

500 ml water (2 cups / 16 oz)

400 g sugar (2 cups / 16 oz. Or 2 cups / 50 g of Splenda)

300 g onion (peeled and thinly sliced. Optional. 3 cups / about 3 medium)

½ teaspoon salt

¼ teaspoon Pickle Crisp (per jar. optional)

Instructions:

Cut off beet greens if still attached, leaving a small bit (2 to 3 cm / 1 inch), as well as any roots.

Wash and scrub well.

Boil the unpeeled beet roots just until they are tender. This should be about 20 to 25 minutes in boiling water (depending on size) or try pressure cooker (see Pressure Cooker section below). Don’t overcook. You won’t want mushy pickled beets.

Meanwhile make up and set aside your spice bag. (See NOTES section below.)

Let beets cool till you can handle them safely, then peel, then cut into slices about 1 cm (¼ inch) thick.

Mix vinegar, water and sugar in a large pot. Add spice bag. Bring to a boil. Add onion (if using) and beets, bring back to a boil then lower to a simmer for 5 minutes.

Remove and discard spice bag.

Use a slotted spoon to divvy the onion (if using) and beet out amongst the jars.

To each half-litre (1 US pint) jar add: ½ teaspoon salt and optionally, ¼ teaspoon Pickle Crisp. (Double those quantities for litre / US quart jars).

Top jars up with pickling liquid.

Leave 2 cm (½ inch) headspace for either size of jar.

Debubble, top up with more liquid as required to retain headspace.

Wipe jar rims.

Put lids on.

Process either size jar in a water bath or steam canner for 30 minutes; increase time as needed for your altitude.

Best after at least a month of jar time.

Nutritional Info:

Serving: 1g | Calories: 45kcal | Carbohydrates: 10.2g | Protein: 1.7g | Fat: 0.2g | Sodium: 73mg | Fiber: 2.1g | Sugar: 7.9g

STOVETOP STUFFING MEATLOAF

Making pan-fried meatloaf is quick, easy and delicious. It’s a family favorite for many reasons. All the herbs and spices added from a single can of Stove Top stuffing make all the difference when it comes to a perfectly seasoned meatloaf recipe.

As strange as it may sound, I prefer to use the chicken-flavored Stove Stop stuffing in this meatloaf recipe, but the savory herbs are also a perfect choice. There are many flavors to choose from and all will work great.

With just a few ingredients, this recipe is sure to become a family favorite!

I like to use a lean 85/15% hamburger for this skillet meatloaf recipe, but if you prefer a higher fat content in your burger, it will work just fine. I find that using a 93/7% fat burger doesn’t have enough fat or liquid to moisten all the breadcrumbs.

The 85/15% gives just enough fat to add to the flavor, keep the meatloaf moist and not be heavy on the fat when it’s all done.

INGREDIENTS:

  • 1 package Stove Top stuffing (use one of your favorite flavors, I prefer chicken, but herbed savory is good too!)
  • 1 cup of hot water
  • 2 packages of brown gravy mix (one for the inside of the meatloaf and one for the top)
  • 1.5 lbs ground beef
  • 1 cup cold water
  • 2 large eggs, beaten

INSTRUCTIONS:

  1. In a medium bowl, add the stuffing mix and 1 cup of hot water.
  2. Let stuffing sit for 5 minutes.
  3. Meanwhile, in another medium bowl, mix 1 package of brown gravy with 1 cup of cold water.
  4. Add ground beef and egg, mix well (easiest to do with your hands, it’s gross, I know).
  5. After the stuffing has rested for 5 minutes, stir the stuffing mixture into the ground beef mixture.
  6. Grease a bundt pan with non-stick spray, then press the ground beef mixture into the pan.
  7. Bake at 350 degrees for 45-55 minutes or until the inside is no longer pink.
  8. Once baked, let rest for about 5 minutes, then invert the pan onto a plate.
  9. Serve with mashed potatoes and brown gravy in the center of the meatloaf.
  10. Enjoy!

That’s it! It’s as easy as pie! If you’re not sure what to make for dinner, this pan stuffed meatloaf recipe is an easy one to make and everyone can enjoy it!

Dump And Baked Meatballs Recipe

Need an easy dinner idea? This simple dump and bake meatball casserole takes just a few minutes to prep and your oven does the rest. Just 5 ingredients are needed for this delicious and cheesy meatball casserole recipe!

PREP TIME: 5 minutes

COOK TIME: 45 minutes

TOTAL TIME: 50 minutes

INGREDIENTS:

1 (14 oz.) bag, frozen meatballs

1 (24 oz.) jar, marinara sauce

1 (16 oz.) box, penne rigate pasta, or similar medium sized pasta

3 cups water

1 (8 oz.) bag, shredded mozzarella cheese

INSTRUCTIONS:

Preheat your oven to 425 degrees. Lightly spray a casserole dish or 9 x 13” pan with

non-stick cooking spray.

In a large microwave safe bowl, add the frozen meatballs. Using the defrost

setting, defrost the meatballs for 5-7 minutes or until completely thawed.

To the prepared baking dish or pan, add the uncooked pasta, pasta sauce and water.

Using a rubber scraper, stir to combine. Add in the thawed meatballs.

Cover the baking dish with foil and bake the casserole at 425 degrees for 35 minutes,

stirring the casserole halfway through baking.

Remove from oven and top the casserole with the shredded cheese. Bake for another 5-10

minutes or until the cheese is completely melted and light golden brown.

Let the casserole cool for 5-10 minutes before serving.

FREQUENTLY ASKED QUESTIONS ABOUT MAKING MEATBALL CASSEROLE:

Do you have to brown meatballs before baking them?

When baking frozen meatballs, it is not necessary to sauté them before baking. Make sure the meatballs are thawed and no longer frozen before adding to the sauce. You can easily do this with the defrost setting on your microwave.

How long do I bake meatball casserole?

Meatball casserole will need approximately 40-45 minutes at 425 degrees to bake.

When do I add cheese to a meatball casserole recipe?

To ensure the cheese doesn’t over-brown or burn before the pasta is done cooking, it is best to add the cheese the last 5-10 minutes of baking.

How long will meatball casserole last?

When refrigerated in an airtight container, pasta and meatballs will keep for up to 5 days.

Why is it called dump and bake meatball casserole?

This recipe is so easy to make you literally ‘dump and bake’ to prepare the casserole. You dump the pasta, sauce, water and meatballs into a casserole dish and bake.

Nutrition Information:

YIELD: 6 SERVING SIZE: 1

Amount Per Serving: CALORIES: 147TOTAL FAT: 6gSATURATED FAT: 2gTRANS FAT: 0gUNSATURATED FAT: 2gCHOLESTEROL: 16mgSODIUM: 261mgCARBOHYDRATES: 16gFIBER: 1gSUGAR: 2gPROTEIN: 7g


Donuts Recipe

There’s nothing like a homemade donut to start your day.

Prep Time: 45 mins

Cook Time: 4 mins

Rise Time: 30 mins

Total Time: 1 hr 19 mins

INGREDIENTS:

1 package active dry yeast

3 tablespoon sugar

½ cup warm water (105 degrees F to 115 degrees F)

3 ½ cup all-purpose flour

½ cup warm milk or water (105 degrees F to 115 degrees F)

1 egg

1 egg yolk

¼ teaspoon salt

3 tablespoon butter or pareve margarine, cut up and softened

Cooking oil for deep-frying

⅓ cup sugar

¾ cup chocolate-hazelnut spread

INSTRUCTIONS:

In a small bowl, whisk together yeast, 1 tablespoon of the sugar, and 12 cup warm water until yeast is dissolved. Let stand for 10 minutes.

In a large food processor, combine flour, milk, egg, egg yolk, salt, yeast mixture, and remaining 2 tablespoons sugar. Cover and process until combined. Add butter; cover and process until combined (dough will be sticky).*

Place dough in lightly greased bowl; cover and chill in refrigerator overnight (8 to 12 hours).

On a well-floured surface, roll dough to 12-inch thickness. Using a 2-1/2-inch round cutter, cut dough. Reroll as necessary. Arrange dough rounds on a baking sheet dusted with all-purpose flour. Cover and let rise about 30 minutes or until nearly double in size.

Heat 2 inches of oil in a deep saucepan to 365 degrees F. In a bowl, place 1/3 cup sugar; set aside. Place chocolate-hazelnut spread in a decorating bag fitted with a large round tip; set aside.

Fry doughnuts, three at a time, in deep hot oil about 2 minutes on each side or until golden brown. Remove doughnuts using a slotted spoon; drain on paper towels. While warm, use tongs to dip each doughnut in sugar to coat. Holding each doughnut (use tongs if necessary), use a dowel, chopstick, or prong of an instant-read thermometer to poke a hole in one side of doughnut. Pipe chocolate-hazelnut spread through opening. Repeat on opposite side of doughnut. Serve warm. Makes about 16 doughnuts.

If you don’t have a food processor, in a large mixing bowl, combine flour, milk, egg, egg yolk, salt, yeast mixture, and 2 tablespoons sugar. Beat with an electric mixer until combined. Add butter and beat until combined

NUTRITIONAL INFO:

Calories298 total fat 17g saturated fat 3g cholesterol 33mg sodium 72mg total carbohydrate 33g total sugars 7g protein 4g calcium 20.2mg iron 1.3mg potassium 53mg folate, total 60.5mcg vitamin b-12 0.1mcg

French Dip Sliders Recipe

Tailgates, holiday parties, even easy dinners—there’s no wrong time to serve these mini sandwiches.

Active Time: 35 mins

Total Time: 55 mins

Ingredients:

Cooking spray

1 (12-oz.) pkg. savory butter rolls (such as King’s Hawaiian)

6 Tbsp. (3 oz.) unsalted butter, divided

1 large (13 oz.) sweet onion, thinly sliced (about 3 cups)

1 lb. thinly sliced deli roast beef

6 (3/4-oz.) sharp provolone cheese slices

1 1/2 tsp. light brown sugar

1 Tbsp. Dijon mustard

1/2 tsp. kosher salt

2 1/2 tsp. fresh thyme leaves, divided

1 tsp. minced garlic (from 1 medium garlic clove)

1 cup beef broth

1 Tbsp. Worcestershire sauce

INSTRUCTIONS:

Preheat oven to 350°F. Coat a 13- x 9-inch baking dish with cooking spray, and set aside.

Using a serrated bread knife, cut rolls in half horizontally, keeping top and bottom halves intact; place bottom half of rolls in prepared baking dish, and set aside.

Melt 1 tablespoon of the butter in a medium nonstick skillet over medium-high. Add onions, and cook, stirring often, until softened, about 2 minutes. Reduce heat to medium, and cook, stirring occasionally, until golden brown and soft, about 15 minutes. Remove from heat, and set aside.

Arrange roast beef slices evenly over bottom half of rolls. Top evenly with cheese and caramelized onions, and place top half of rolls over cheese and onions.

Melt brown sugar and 4 tablespoons of the butter in a small saucepan over low, stirring occasionally, until sugar is dissolved, about 5 minutes. Remove from heat, and whisk in mustard and salt. Brush top and sides of rolls with butter mixture, and sprinkle with 1 teaspoon of the thyme. Loosely cover baking dish with aluminum foil, and bake in preheated oven for 10 minutes. Remove foil, and bake in preheated oven until top buns are golden brown and cheese is melted, about 10 minutes.

Meanwhile, melt remaining 1 tablespoon butter in a small saucepan over medium. Add garlic, and cook, stirring constantly, until fragrant, about 30 seconds. Stir in beef broth, Worcestershire, and remaining 1 1/2 teaspoons thyme. Bring to a simmer over medium; cook, undisturbed, until reduced slightly, about 10 minutes. Serve hot sliders with au jus.

Cracker Barrel Meatloaf

This Cracker Barrel Meatloaf is easy, delicious, and a crowd-pleaser that feeds the whole family at a fraction of the price. Make this old fashioned comfort food at home and serve it with buttery biscuits or mashed potatoes! Meatloaf often gets a bad rap. Especially if you’ve ever had the “mystery meat” that’s often served … Read more

The Best Almond Cake Recipe

The Best Almond Cake is an easy one layer cake. It has a dense crumb and a crunchy toasted almond topping. This is rustic simplicity at it’s best. Perfect for Easter, Mother’s Day or just because!

WHY THIS IS THE BEST ITALIAN CAKE

  • Easy and quick to prepare!
  • Simple ingredients ~ made without almond paste.
  • Rustic appearance ~ this is a one layer cake that has a toasted almond top and needs no fussy decorating.
  • Texture ~ the almond cake has a dense and soft crumb with the best sweet and crunchy almond topping.
  • Perfect with a cup of coffee or tea!

TIPS FOR SUCCESS

  • Butter the baking pan and lightly dust with flour, which will help to make removing the cake from the springform pan easy.
  • Eggs yolks and egg whites separate best when they are cold.
  • Save one of the egg whites for the toasted almond topping.
  • Use the toothpick test to tell when the almond cake has finished baking; when just a few moist crumbs remain on the toothpick the cake is done.

PREP TIME: 15 minutes

BAKE TIME: 45 minutes

TOTAL TIME: 1 hour

INGREDIENTS:

Almond Cake 
  • 1 ¼ cups all-purpose flour (156g)
  • ¼ cup almond flour (28g) (I like Bob’s Red Mill)
  • ½ teaspoon kosher salt
  • ½ teaspoon baking powder
  • 1 teaspoon ground cinnamon
  • ½ cup unsalted butter, melted and cooled (113g)
  • 1 large egg
  • 4 large egg yolks (save at least one white for the topping)
  • 1 cup granulated sugar (200g)
  • 1 teaspoon pure vanilla extract
Almond topping
  • 1 ½ cups sliced blanched almonds
  • 1 large egg white
  • 3 tablespoons granulated sugar
  • confectioners’ sugar (optional for dusting over finished cake)

INSTRUCTIONS:

  1. Preheat oven to 325°F.
  2. Lightly butter 9 inch spring form pan and dust with flour and tap out any excess.
  3. In a medium bowl, whisk together the all-purpose flour (1 ¼ cups/156g), almond flour (¼ cup/28g), kosher salt (½ teaspoon), baking powder (½ teaspoon) and ground cinnamon (1 teaspoon). Set aside.
  4. Melt the unsalted butter (½ cup/113g) and set aside to cool.
  5. In a stand mixer with the paddle attachment, beat the egg (one large), egg yolks (4 large yolks) and sugar (1 cup/200g) on medium (speed 4 or 6 on a KitchenAid mixer) until thick and pale yellow, approximately 3 minutes.
  6. With the mixer on low, add the flour mixture; mixing until well combined. Scrape up and down the sides of the bowl, and then mix in vanilla extract (1 teaspoon) followed by the melted butter. The batter will be quite thick and a bit sticky.
  7. Adjust your mixer to medium speed and beat for 30 more seconds.
  8. Spread the batter evenly in your prepared pan. The batter is quite thick; I use an off-set spatula.
  9. Make the topping: Place the sliced almonds in a bowl. Lightly beat the one egg white in a small bowl until foamy and light.
  10. Pour half of the egg white over the almonds and stir to coat them evenly. Discard remaining egg white.
  11. Sprinkle the granulated sugar (3 tablespoons) over the almond and egg white mixture and toss to coat.
  12. Spread the almond mixture evenly over the surface of your cake batter.
  13. Bake 35-45 minutes until it’s golden brown on top and a cake tester come out mostly clean.
  14. Allow cake to cool 10 minutes in the pan, then remove the sides and allow to cool completely on a cooling rack.
  15. Once cool dust with confectioners’ sugar, if desired.
Notes:

To serve: remove cake from the bottom of the spring form pan with an offset spatula and transfer to a serving plate or cake stand.

Wrap any left over cake and store at room temperature for 2-3 days.

Nutritional Info:

YIELD: 12 SERVING SIZE: 1

Amount Per Serving: CALORIES: 389TOTAL FAT: 21gSATURATED FAT: 7gTRANS FAT: 0gUNSATURATED FAT: 13gCHOLESTEROL: 129mgSODIUM: 197mgCARBOHYDRATES: 44gFIBER: 3gSUGAR: 31gPROTEIN: 9g


Paula Deen’s 5 Min Fudge Recipe

The holidays are not the same unless there is fudge in the house. I admit that i had quit making fudge due to the time it takes to do so. However, there is now a fudge that can be made in % minutes.

This is a recipe you need to try and keep handy. You can make this at any time and have fudge when you want.

This recipe is insanely simple, even a child could pull this off! This 5-minute fudge is the perfect dessert for busy days. The best part about this recipe is this is easily customizable according to your mood!

Yield: 20

PREP TIME: 5 MINUTES

COOK Time: 15 MINUTES

TOTAL Time: 20 MINUTES

INGREDIENTS:

  • 1 and ⅔ cups white sugar
  • 2/3 cup evaporated milk
  • 1 tablespoon unsalted butter
  • ½ teaspoon salt
  • 1 (6 ounce) packages milk chocolate chips
  • 16 large marshmallows
  • 1 teaspoon pure vanilla extract
  • 1 cup chopped nuts
How To Make It

Step 1: Add the sugar, milk, butter and salt together in a saucepan. Then cook for 5 minutes, while stirring constantly.

Step 2: Add in chocolate chips while stirring and cook until it melts. Then remove from heat, add marshmallows, vanilla and nuts and stir well.

Step 3: Pour into an 8-inch pan, leave it to cool and cut into squares. Serve!

Grilled Cabbage Wraps

Grilled Cabbage Wraps These cabbage wraps are filled with flavorful sticky rice, then wrapped and grilled to achieve that smoky flavor. They are then paired with a simple sweet and spicy sauce for a perfect meal. Enjoy! PREP TIME20:minutes mins COOK TIME20: minutes mins RICE COOKING: TIME45minutes mins TOTAL TIME:  1hour hr 25minutes mins INGREDIENTS for Grilled Cabbage Wraps 3 cups cooked glutinous … Read more

Marinated Cucumber, Tomato, And Onion Salad


Active Time: 15 mins

Marinate Time: 12 hrs

Total Time: 14 hrs 15 mins

Ingredients:

2/3 cup extra-virgin olive oil

2 1/2 tablespoons sherry vinegar or red wine vinegar

1 tablespoon dried herbes de Provence or Italian herb blend

1 teaspoon kosher salt

1/2 teaspoon freshly ground black pepper

Pinch red pepper flakes (optional)

3 large ripe beefsteak-style tomatoes, cored and cubed into ¾-inch chunks

1 medium red onion, halved and sliced into thin half-moons

1 large English or seedless cucumber, peeled and quartered lengthwise, then diced in ½-inch chunks

Garnish: Minced fresh herbs to serve, such as parsley, basil, chives or chervil (optional)

Directions

Make dressing:

Mix oil, vinegar, dried herbs, salt, black pepper, and red pepper in a large bowl with a tight-fitting lid.

Add cucumbers, tomatoes, and onions:

Add the vegetables, and toss well to coat and combine.

Marinate:

Leave at room temperature for one hour. Toss again, and taste for salt and pepper. Adjust seasoning as needed. Cover with lid (or spoon into a zip-top bag), and store in the fridge for 12 to 24 hours, stirring occasionally.

Season and serve:

Let come to room temperature for 30 to 60 minutes before serving. Top with optional minced herbs.

Frequently Asked Questions

Should you eat cucumbers and tomatoes in a salad together?

Yes, absolutely. Cucumber and tomatoes are natural partners in a salad—and we like them even more with onions.

Should I leave the skin on a cucumber for a salad?

This is up to you and what you prefer. English cucumbers have softer skins, so they’re OK to leave on. Kirbys are a bit tougher, so you might prefer to run a vegetable peeler down them before you slice.


Beef and Bean Nacho Casserole

In this delicious Mexican dinner, layers of ground beef, black beans, cheddar cheese, and more cover tortilla chips. Pop it in the oven for 30 minutes and you’re done!

Prep Time: 20 mins

Cook Time: 30 mins

Servings: 8 as a main dish

Ingredients:

  • 1 lb. ground beef
  • 1 15-oz. can black beans, drained
  • 2 c. salsa
  • 1 1/2 Tbsp. taco seasoning
  • 1/2 c. frozen corn kernels, preferably fire-roasted
  • 5 c. tortilla chips, roughly crushed
  • 1 c. sour cream
  • 2 c. shredded cheddar
  • 1/2 c. cherry tomatoes, sliced in half
  • 1/4 c. green onions, sliced

Instructions:

  1. Preheat oven to 350 degrees. Spray a 9 x 13 inch baking dish with cooking spray.
  2. In a large skillet, brown ground beef. Drain, then add black beans, salsa, taco seasoning, and frozen corn. Cook until heated through.
  3. Spread half the crushed tortilla chips in a layer in the prepared pan. Top with half the beef-bean mixture. Dollop with half the sour cream and sprinkle with half the cheddar. Repeat these layers: chips, beef-bean mixture, sour cream, shredded cheddar. Distribute halved cherry tomatoes, cut side down, over the top of the casserole and sprinkle with slicedgreen onions.
  4. Bake 25-30 minutes or until heated through and cheese has melted.

Notes:

A Love Letter to Food Original Recipe.

Oven Barbeque Ribs Recipe

Oven Barbecue Ribs slathered in the most delicious sticky barbecue sauce with a kick of garlic and optional heat! Juicy melt-in-your-mouth oven baked Barbecue Pork Ribs are fall-off-the-bone delicious! Double up on incredible flavour with an easy to make dry rub first, then coat them in a seasoned barbecue sauce mixture so addictive you won’t stop at one! Finger licking good ribs right here! 

Prep Time: 10mins

Cook Time: 2hrs 15mins

Total Time: 2hrs 25mins

Course: Dinner

Cuisine: American

Keyword: Oven, Pork Ribs Servings: 4 – 6 people 

Ingredients

RIBS:

  • 4 pounds (2 kg) baby back pork ribs
  • 2 teaspoons garlic powder
  • 1 teaspoon onion powder
  • 2 teaspoons paprika
  • 2 teaspoons salt
  • 1 teaspoon cracked black pepper
  • 1/2 teaspoon cumin
  • 1 teaspoon chili or Cayenne powder (optional)
  • 2 tablespoons olive oil
  • SAUCE:
  • 2 cups (500ml) barbecue sauce
  • 3 tablespoons minced garlic
  • 2 tablespoons olive oil
  • 1 tablespoon Worcestershire sauce
  • 1/2 – 1 tablespoon cayenne pepper (optional for heat)
  • 1 teaspoon salt

Instructions:

  1. Preheat oven to 350°F (180°C).
  2. Peel off tough membrane that covers the underside/bony side of the ribs. Place on a baking sheet or tray lined with foil (or parchment paper).
  3. Combine together garlic powder, onion powder, paprika, salt, pepper, cumin and chili or Cayenne. Sprinkle seasoning over ribs and drizzle with oil. Rub the seasoning all over the ribs on both sides. Cover tray with foil and bake for 2 hours.
  4. During the last 5 minutes of cook time, mix together sauce ingredients.
  5. Remove ribs from the oven, remove foil and spread the tops of the ribs with the barbecue sauce mixture.
  6. Increase oven temperature to 460°F (240°C). Return ribs to the oven, uncovered, and bake for a further 10 minutes. Change oven settings to broil (or grill) on medium-high heat to lightly char and caramelise the edges (about 3 minutes).
  7. Rest for 10 minutes to allow the juices to recirculate back into the meat before slicing.
  8. Enjoy!
NUTRITIONAL INFO:

Calories: 630kcal | Carbohydrates: 32g | Protein: 45g | Fat: 34g | Saturated Fat: 6g | Cholesterol: 167mg | Sodium: 1776mg | Potassium: 951mg | Fiber: 1g | Sugar: 24g | Vitamin A: 500IU | Vitamin C: 2.5mg | Calcium: 86mg | Iron: 2.9mg

Chinese Pepper Steak with Onions

If you love restaurant-style Chinese Pepper Steak with onions, you’ll love this quick and easy stir-fry recipe! Featuring tender slices of beef stir-fried in a sticky, rich garlic pepper sauce with onions, bell peppers, and plenty of delicious flavor. It’s a simple 30-minute weeknight dinner that’s sure to impress!

If you love the popular Pepper Steak with Onions at your favorite Chinese restaurant, you’ll love this quick and easy recipe! Featuring tender steak stir-fried in a sticky, rich garlic pepper sauce with onions and peppers, this is a weeknight dinner that’s sure to impress.

Prep Time: 20 mins

Cook Time: 10 mins

Total Time: 30 mins

Course: entree, Main Course

Cuisine: Chinese

Keyword: black pepper beef, Pepper Steak, pepper steak with onions

Servings: 4 servings

INGREDIENTS:

Steak:

  • 1 TBS EACH: Low-Sodium Soy Sauce, Mirin & Cornstarch
  • 1 pound Steak(s) – excess fat trimmed & thinly sliced into ½ to ¼-inch thick strips (SEE NOTES)
  • Pepper Sauce
  • ½ Cup Low-Sodium Beef Broth (sub: chicken broth or ½ bouillon cube dissolved in water)
  • 3 TBS Low-Sodium Soy Sauce
  • 3 TBS Honey
  • 2 TBS Oyster Sauce
  • 2 TBS Chinese Cooking Wine or Mirin (sub: dry sherry)
  • 1 TBS Cornstarch
  • 1 ¼ tsp Coarsely-Ground Black Pepper (SEE NOTES)
  • ¼ tsp Kosher Salt

Stir-fry:

  • 3 TBS Peanut Oil – DIVIDED (sub: neutral oil, such as canola)
  • 1 medium White Onion – peeled & medium dice
  • 2 small Bell Peppers – seeded & medium dice
  • 2 cloves Garlic – peeled & minced
  • 1 ½ tsp Grated Ginger
  • Optional Garnishes: Sliced Scallions & Toasted Sesame Seeds
  • Serving Suggestions: Steamed Rice/Cauliflower Rice or Cooked Noodles

INSTRUCTIONS:

  1. Marinate steak: In a medium bowl, combine the soy sauce, mirin, and cornstarch. Pat the pieces of beef dry and add them to bowl. Gently stir to completely coat the beef in the marinade. Set aside for 10-15 minutes and continue with the recipe.
  2. Mix pepper sauce: In a glass measure or small bowl, add all the ingredients for the sauce. Whisk well to combine. Set aside.
  3. Cook steak: Heat 1 ½ tablespoons of oil in a wok or large heavy-bottom skillet over HIGH heat. When the oil is shimmering, add the steak to the pan in an even, single layer. Cook – undisturbed – for 30 to 45 seconds or until bottom side is lightly browned. Flip, and continue to cook, stir-frying, for an additional 30 seconds or until almost cooked to your liking. Immediately remove the beef from the pan and transfer to a plate. Set aside (Tip: Do not crowd the pan as that will cause the beef to steam, instead of stir-fry. If necessary to prevent over-crowding, cook the steak in two batching, adding more oil as needed.) (Note: Don’t overcook your steak! If anything, UNDERCOOK it during this step. You will be adding the steak back to the pan in the next steps.)
  4. Cook veggies, then aromatics: Return the pan to stove over MEDIUM heat. Add the remaining 1 ½ tablespoons of oil to the pan. When the oil is hot, add the onions and peppers to the pan. Season with a pinch of salt and pepper. Stir fry the vegetables for 3-4 minutes, or until they are starting to soften. Add the garlic and ginger to the pan. Stir-fry for 30 seconds.
  5. Add the sauce: Give your stir-fry sauce a good whisk to make sure everything is combined, and the cornstarch is fully dissolved. Add the stir fry sauce to the pan and immediately stir the mixture. Reduce the heat to maintain a simmer and cook, stirring occasionally, for 1 minute, or until the sauce resembles a thick syrup and coats the back of a spoon. (Note: The stir-fry garlic pepper sauce will simmer quickly when you add it to the pan, don’t be alarmed).
  6. Add beef: Add the cooked steak back to the pan, along with any juices pooled on the plate. Quickly stir-fry to coat the steak in the sauce, about 30 seconds. Immediately remove from heat.
  7. Serve: Transfer to a large serving platter or individual plates. Top with scallions and sesame seeds if using and serve with rice or noodles. Enjoy!

Notes:

  • Recipe: I recommend reading this recipe all the way through before cooking. Stir fry recipes are quick paced, so you’ll want to have everything prepared and ready to go *before* starting the recipe. Heads up – you need to marinate the steak for at least 10 minutes in step 1!
  • Steak: You can use any steak you love that’s suitable for stir-frying and quick stove-top cooking. For this recipe, I typically use sirloin as it’s the most economical option. However, tenderloin, NY strip and flank steak work well too! Just remember to the flank steak against the grain.
  • Cutting steaks: It’s easiest to cut cold meat. I like to transfer my steaks from the refrigerator to the freezer for 30-45 minutes before slicing to make my life easier. Just don’t forget the steaks in the freezer!!
  • Ground Pepper: The size of your pepper grinds matter in this recipe! If you are using regular ground black pepper (like from a tin), reduce the pepper by half (3/4 tsp). The measurement in the recipe is written for coarsely ground black pepper (like from a pepper mill).

Nutritional Info:

Calories: 440kcal | Carbohydrates: 27g | Protein: 25g | Fat: 27g | Saturated Fat: 9g | Polyunsaturated Fat: 4g | Monounsaturated Fat: 13g | Cholesterol: 69mg | Sodium: 1038mg | Potassium: 547mg | Fiber: 1g | Sugar: 19g | Vitamin A: 1176IU | Vitamin C: 50mg | Calcium: 27mg | Iron: 2mg

Cherry Cheesecake Chimichangas

Cherry Cheesecake Chimichangas are a quick and easy dessert – and perfect for all cheesecake lovers! These homemade chimichangas are irresistibly crispy, deep-fried burritos filled with sweet cherry cheesecake, and rolled in cinnamon-sugar – what could be better? Description Cherry Cheesecake Chimichangas are a quick and easy dessert – and perfect for all cheesecake lovers! These homemade … Read more

Keto Garlic Dinner Rolls

There is no doubt that the one thing everyone craves the most when doing keto is BREAD. Everyone loves the texture and taste of bread so much. So after a lot of experimenting with keto bread recipes, even we could not believe how good these rolls are. They’re fluffy and delicious and will satisfy your … Read more

STEAK WITH ONIONS AND GRAVY

Steak with onions and gravy is a classic comfort food dish that’s both hearty and delicious. Here’s a simple recipe to make it: Ingredients for STEAK WITH ONIONS AND GRAVY 2 boneless beef steaks (such as ribeye or sirloin) 2 large onions, thinly sliced 2 tablespoons olive oil 2 cloves garlic, minced 1 cup beef … Read more