Syn Free Slow Cooker Maxican Casserole

This is the first time I have tried quinoa in this type of dish and it’s ideal- it provides a filling bulk that cooks nicely but doesn’t go mushy or squishy, and actually quinoa itself is packed full of protein and high in fibre. If you feel a bit unsure about the quinoa I urge you to try it- it’s a common enough ingredient that you can buy it almost anywhere these days and it is such a useful ingredient! It’s great for bulking out a meal like this, but also as an alternative to breadcrumbs or pasta.

You may think it odd that I have used cup measures here when I usually use grams for my recipes, but this one is ideal for the easy of using a cup- if you don’t have an ‘official’ measuring cup, a regular sized teacup or coffee cup will do- one of the joys of this recipe is that there is no need to be precise- it’ll taste great even if you end up with a bit extra of one ingredient.

I use 2 chicken breasts in this (which feeds 4 people)- there is extra protein in both the black beans and the quinoa and once shredded this is plenty of chicken. It really does make a difference buying free-range fillets- they are more expensive (hence using less), but at least you know that they aren’t factory farmed, and they have the consistency and taste that chicken should have.

If you end up with leftovers of this, you can use it to fill wraps, cook into a quesadilla… it’s a great easy lunch to reheat too!

 Total Time: 5 minutes

Yield: 4 servings 

A tasty Mexican ‘dump dinner’

Syn-free

INGREDIENTS:

1 large onion (finely diced (or 1 cup of frozen pre-chopped onion))

2 chicken breasts

1 tin black beans (drained)

1 red pepper (1 green pepper, deseeded and diced)

1 cup frozen sweet corn

1 tin chopped tomatoes (refill with water, and also add 1 tin of water)

1 cup uncooked quinoa

Juice of 1 lime

1 tsp garlic granules

1 tsp paprika

1 tsp oregano

1 tsp cumin

1/2 cup pickled jalapenos (roughly chopped)

salt & pepper

Low calorie cooking spray (or spray oil if you prefer)

Coriander to serve

INSTRUCTIONS:

Into your slow-cooker pot add in the onion, whole chicken breasts, quinoa, black beans, sweet corn, pepper, chopped tomatoes, water, lime juice

Add in the garlic granules, paprika, oregano, cumin, jalapenos and salt and pepper

Give everything a little mix together, and put the slow-cooker on

Cook on high for 3 hours, or low for 7-8 hours.

Once cooking time is finished, shred the chicken breasts using 2 forks and mix everything together

Serve with fresh lime wedges and chopped coriander.

Notes:

If you want to take it to the next level then serve into portions, cover with grated cheddar, and pop under the grill to melt the cheese before serving.


Pecan Pie Cheesecake Bars Recipe

Pecan pie cheesecake bars are made with a graham cracker crust. Then, we top it with a smooth cream cheese filling. And finally, the top layer is a pecan pie caramel topping! These bars are DIVINE!

How far in advance can I make pecan pie cheesecake bars?

The thing I love most about this recipe is that you can make these pecan pie cheesecake bars up to 4 days in advance. I find that cheesecake most often tastes better the day after it was made, so this is the ideal make-ahead dessert recipe!

How long will these pecan cheesecake bars last?

I mean, if you have any left, you can store them covered in the refrigerator for up to one week. But I highly doubt you’ll have nay for that long!

How do I ensure I get clean cuts?

To make clean cuts, I suggest using a very sharp knife and wiping the blade on a piece of paper towel in between cuts.

Can I freeze these bars?

Yes, you can! We have a large batch stored in the freezer, and when you’re ready to eat, you can do a quick 15-20 second zap in the microwave or allow them to defrost in the refrigerator overnight! These pecan pie cheesecake bars are super low maintenance!

I really hope you won’t let this year go by without trying my favorite dessert – seriously though, and this is by far the best dessert I’ve ever made!

YIELD: 24 BARS

Pecan Pie Cheesecake Bars

prep time 20 MINUTES

cook time 50 MINUTES

total time 1 HOUR 10 MINUTES

Pecan pie cheesecake bars are made with a graham cracker crust. Then, we top it with a smooth cream cheese filling. And finally, the top layer is a pecan pie caramel topping! These bars are simply DIVINE!

INGREDIENTS:

Cheesecake:

1 (13.5-ounce) box graham cracker crumbs (or 3 ¼ cups)

1 ⅓ cup granulated sugar, divided

½ teaspoon ground cinnamon

1 cup (2 sticks) salted butter, melted

4 packets (2 pounds) softened cream cheese

2 large eggs + 2 egg yolks, room temperature

1 tablespoon vanilla extract

¼ cup sour cream, room temperature

Pecan Pie Topping:

½ cup EACH: diced salted butter, light corn syrup, AND heavy cream

1 cup light brown sugar, packed

1 teaspoon vanilla extract

2 cups of toasted pecans

INSTRUCTIONS:

PREP: Position a rack in the center of the oven and preheat the oven to 350ºF. Spray a 13×9 square baking pan with cooking spray and line with parchment paper, making sure it hangs over on all sides, so it’s easy to remove later, set aside.

CRUST: In a medium bowl, stir together the graham cracker crumbs, ⅓ cup sugar, and cinnamon. Add the melted butter and stir to combine. Make sure all the crumbs are moistened. Press the crumbs into the bottom of a baking pan in an even layer and bake for 10 minutes. Remove from oven and allow for it to cool while you prepare the filling.

FILLING: Beat the cream cheese and the remaining 1 cup of sugar together for a minute until smooth. Then, add the eggs + yolks, one at a time, waiting a few seconds, and allowing each egg/yolk to incorporate before adding the next. Add the sour cream, then add the vanilla extract and continue to mix for a few additional seconds. It’s okay if the batter has a few small lumps. When mixed, pour the cheesecake mixture over the graham cracker base and bake for 40-42 minutes or until the cheesecake is set and not wet. Mine was just barely jiggly in the center, and that’s perfect.

PECAN PIE LAYER: Add the butter, corn syrup, and brown sugar to a medium saucepan over medium-high heat and bring to boil while you stir it continuously. When boiling, whisk in the heavy cream and allow for the caramel mixture to cook for 4 minutes on medium-high while you whisk continuously. Remove the pot from the heat and pour in the vanilla extract and stir in the pecans. Then, continuously stir the pecan pie mixture for 5 minutes. Pour the prepared pecan pie layer over the cheesecake and let cool completely to room temperature. Allow the bars to cool in the refrigerator for several hours (ideally overnight), so they are completely set. Remove by gently lifting the parchment and place on a clean flat surface. Cut them into bars and serve!

Notes:

Bars are best when removed from the refrigerator about 15-20 minutes before serving. The pecan pie mixture softens a bit and is much easier to break with a fork!

Harissa Maple Glazed Pork Chops Recipe

These maple glazed pork chops are infused with flavorful harissa for the perfect blend of sweet and spicy. The easy recipe is perfect for a quick weeknight dinner and you only need 5 ingredients to make it.

spooning extra pork chop glaze onto maple glazed pork chops in a skillet

Why I love this spicy glazed pork chops recipe

When it comes to dinner, I tend to go for one of two categories. Easy one-pot-type meals like chicken and broccoli or a meat-starch-veggie combo plate, and I have honestly always found the latter to be boring.

Until I realized that a few simple ingredients can turn bland meat into a phenomenal dinner. I did it with my baked mahi mahi recipe and my favorite garlic baked chicken legs, and I think the possibilities are endless.

spicy glazed pork chops in a cast iron skillet with a serving bowl of mashed potatoes, fresh herbs and a blow of glaze to the side

These maple glazed pork chops combine super flavorful and spicy harissa with sweet maple syrup for the perfect sweet and savory recipe. The simple, seasoned pork chops only take 10 minutes to cook and then they’re drenched it a thick, beautiful glaze that packs so much flavor.

Serve them with creamy, dairy free mashed potatoes and your favorite vegetable or salad. If you’re not in the mood for mashed, try crispy roasted potatoes or wild rice pilaf, instead.

 Should you rinse pork chops before cooking?

No. Rinsing any raw meat increases the chances of contaminating your kitchen. Simply remove them from their packaging and blot any excess liquid with a paper towel before seasoning.

How long do you cook pork chops for?

1-inch thick pork chops will generally take about 4 – 5 minutes per side to cook (bone-in) or 3 – 4 minutes per side (boneless). If your chops are a different thickness, you will need to adjust your cooking time accordingly.

What temperature do you cook pork chops to?

Pork chops need to be cooked to an internal temperature of 145˚F to be considered safe to eat. I recommend using a meat thermometer to accurately check the temperature 

These maple glazed pork chops are infused with flavorful harissa for the perfect blend of sweet and spicy. The easy recipe is perfect for a quick weeknight dinner and you only need 5 ingredients to make it.

 Prep Time: 10 minutes

  Cook Time: 15 minutes

Total Time: 25 minutes

  Yield: 4 servings 

INGREDIENTS:

For the pork chop glaze:

6 tablespoons maple syrup

2 tablespoons tomato paste

1/2 tablespoon harissa powder

1 teaspoons minced garlic

1/4 teaspoon coarse salt

For the pork chops

4 bone-in pork chops

1/2 – 1 teaspoon coarse salt

1/4 teaspoon black pepper

1 teaspoon harissa powder

1 tablespoon olive oil

Cook Mode Prevent your screen from going dark

INSTRUCTIONS:

In a small saucepan, combine the glaze ingredients and whisk until smooth. Bring to a boil, then immediately reduce heat to low and simmer for about 10 minutes, until thickened. Once the glaze has thickened, remove from heat and set aside.

Season pork chops with salt, pepper and harissa.

Heat olive oil in a large skillet to medium-high. Add the pork chops and sear for 4 – 5 minutes per side, or until pork chops reach an internal temperature of 145˚F.

Remove from heat and add prepared glaze before serving.

NOTES

This recipe makes enough glaze for up to 8 pork chops. Feel free to double the amount of chops you’re cooking if you need more servings.

NUTRITIONAL INFO:

Serving Size:Calories: 167Sugar: 19.4 gSodium: 493.6 mgFat: 5.1 gSaturated Fat: 1 gCarbohydrates: 22.3 gFiber: 0.4 gProtein: 8.7 gCholesterol: 24.9 mg

Mac and Cheese Recipe

Low-Carb Mac and Cheese Recipe (keto, gluten-free)

This post may contain Amazon affiliate links. I earn a small commission (at no extra cost to you) when you purchase using one of those links. I only recommend products I use and love. Thanks for supporting Stem and Spoon.

This is the low carb mac and cheese recipe you’ve been waiting for. A creamy, white cheddar sauce and tender low-carb pasta (no cauliflower florets here!) bake until bubbly. Covered with a crispy topping, there’s incredible flavor and texture in every bite.

Heavy cream, white cheddar cheese and Parmesan come together to make a deliciously creamy cheese sauce. Combine that cheesy goodness with a low-carb pasta and you’ve got the ultimate comfort food that tastes just like the real thing!

Why this recipe works

Let’s be honest, keto cauliflower mac and cheese is just not mac and cheese.

Which is why I was so excited to be gifted Kaizen Food Company’s low-carb lupin bean pasta to try out. My mind immediately went to macaroni and cheese. One that doesn’t involve cauliflower. 😉

I’m thrilled to finally share a low carb mac and cheese recipe here on the blog that doesn’t taste like a compromise.

The main ingredient for a good keto mac and cheese is a superb low-carb pasta and in my honest opinion, none are comparable to the taste and texture of Kaizen’s lupin bean pasta.

Not only is it a plant-based and gluten-free pasta, but it also has an impressive nutritional profile: high in fiber, high in protein, low in carbs, only 6 grams of net carbs per serving (which blows other “low-carb” pastas out of the water).

It’s a healthy, keto diet friendly ingredient that will satisfy when those pasta cravings hit. And you can easily swap in Kaizen pasta for traditional pasta to make low-carb versions of your favorite recipes.

the perfect balance of creamy noodles with a crispy, pork rind topping

a baked mac and cheese recipe without flour which makes it gluten-free and keto-friendly!

Overhead shot of low-carb mac and cheese in a baking dish with crispy topping.

Three different cheeses, heavy cream and the perfect mix of savory seasonings mixed with keto macaroni is just irresistible and has every potential to become one of your favorite foods.

The crispy pork rind topping is similar to the keto “breadcrumbs” that I use in my meatloaf and air fryer cauliflower. You can certainly omit it but I think it makes this low-carb mac and cheese recipe a bit more elevated. Plus, creamy, cheesy noodles with a crispy topping is the combo for a wonderful mouthfeel.

This keto mac and cheese recipe really only requires three easy steps: boil the noodles, make the cream sauce, bake the mac and cheese. Simple, delicious and comforting.

YIELD: 4-6 servings

PREP TIME: 15 minutes

Cook Time: 25 minutes

Additional Time: 5 minutes

Total Time: 15 minutes

A creamy white cheddar sauce, tender low-carb noodles and a crispy pork rind topping bake until bubbly. This low-carb mac and cheese recipe is comfort food without compromises!

INGREDIENTS:

8 ounces Kaizen Food Company pasta

3 tablespoons butter

1-¼ cups whipping cream

¼ cup full-fat sour cream

1-½ cups grated white cheddar cheese

½ cup grated mild cheddar cheese

½ cup grated Gruyère or (more white cheddar)

½ teaspoon salt

¼ teaspoon dried thyme

¼ teaspoon pepper

¼ teaspoon ground nutmeg

½ cup crushed pork rinds

2 tablespoons grated parmesan

1 tablespoon almond flour

1 teaspoon olive oil

INSTRUCTIONS:

Preheat the oven to 375°F.

Fill a medium pot with water and bring it to a boil. Cook the Kaizen pasta for 7-8 minutes, or until al dente. Drain and transfer to a baking dish. Set aside.

In the same pot, melt the butter and add the cream and sour cream. Stir the mixture and heat for about 3-4 minutes over medium heat. Stir frequently.

Turn the heat to low and stir in the white cheddar, mild cheddar and Gruyére. Mix in the salt, pepper, thyme and nutmeg. Stir until the cheese is melted and the sauce thickens.

Pour the sauce over the pasta and mix until all of the pasta is well-coated in the cheese sauce.

Mix together the crushed pork rinds, grated parmesan, almond flour and olive oil (or pulse a few times in a food processor). Crumble the mixture on top of the pasta.

Transfer the baking dish to the oven and bake for 25-30 minutes or until the top is golden brown.

NOTES:

You can substitute the white cheddar and cheddar cheese with your favorite cheese varieties. For a sharper cheddar flavor, use 2 cups white cheddar and omit the mild cheddar. For a milder cheesy flavor, use half white cheddar and half mild cheddar. Grated mozzarella and Fontina are also a good swap for Gruyére.

If you’d like to mellow out the richness of the cheese sauce, youcan use ¾ cup heavy cream with ½ cup unsweetened almond milk.

The crispy topping is optional. If you feel like skipping that step, simply bake the low-carb mac and cheese until it is hot and bubbly, about 15 minutes.

To easily crush pork rinds, place several in a Ziploc bag, then use a rolling pin to break them down into crumbs. Save any extra in the pantry for another use!

Store leftovers in the refrigerator for up to 5 days. Reheat in the microwave or in the oven at 300°F until heated through.

Homemade Summer Sausage Recipe

Make the best flavored summer sausage right in your very own home with this easy homemade recipe that requires no casing.

Mmmm homemade summer sausage beats out store bought by 100% any day. You will enjoy reaping the many compliments. This recipe is sure to impress your friends and family. Wherever you take this scrumptious dish be sure to let everyone know that the summer sausage is “homemade”. A well worth recipe in my book for sure!

How To Serve Summer Sausage

Summer sausage can be a simple appetizer served on a tray with cheese and crackers at your next holiday gathering, party or potluck. This summer sausage is a must-have while watching sports at home or just serve as a simple snack. And if you want to add some dipping sauces why not try a sweet hot mustard or your favorite BBQ sauce. However you plan to serve it I’m sure it will be a big hit!

Make the best flavored summer sausage right in your very own home with this easy recipe that requires no casing.

 Course Appetizer, Snack

 Cuisine American

 Prep Time 15 minutes

 Cook Time 8 hours

 chill 1 day

 Total Time 1 day 8 hours 15 minutes

 Servings 4 logs

INGREDIENTS:

3 pounds ground beef (first choice 70/30 or second choice 80/20)

1 Tablespoon Morton Tender Quick Meat Cure (this is usually found in the grocer spice section near the salt)

1 Tablespoon garlic powder

2 teaspoons mustard seed (can use up to 1 Tablespoon)

1/2 Tablespoons liquid smoke flavoring

1/2 cup water

2 1/2 teaspoons coarse ground peppercorns (I use this pepper mill to get fresh course ground)

INSTRUCTIONS:

Combine Ingredients

Place all ingredients into a large mixing bowl. Kneading by hand for about 3-5 minutes or until the mixture has that real sticky look.

Chill

Cover mixture with foil, plastic wrap or lid and place mixture in refrigerator for 8 hours.

Shape and Chill

Remove mixture from refrigerator and knead by hand for about 3 minutes. Using a kitchen scale divide meat evenly into four pieces. Roll each piece into about a 9-inch log. Place prepared logs on a quarter baking pan with rack, cover and return to the refrigerator for 16 more hours.

Bake

Preheat oven to 200 degrees Fahrenheit. Remove baking pan with sausage from refrigerator and discard cover. To get that beautiful brown edge on the outside of the logs bake the sausage on the quarter baking pan with rack for 8 hours uncovered. Carefully remove pan from oven, wrap each log in a sheet of aluminum foil and refrigerate.

Slice and Serve

Slice chilled summer sausage thinly and serve with a variety of cheeses and crackers like pepper cracked water crackers. If desired, serve with some type of sauce (mustard or your favorite BBQ sauce). Oh, and to keep all the food from getting touched by everyone don’t forget to set out the frilly toothpicks in a small cup or container. TIP: if the cup or container is too deep just add a few dried beans and then add the toothpicks. Works perfect!

Old Fashioned Homemade Bologna Recipe

Old-Fashioned Homemade Bologna is thick, meaty, and full of deep flavors. No wonder Grandpa enjoyed it with a smear of mustard and a slab of cheese on homemade bread!

This Homemade Bologna Recipe shows how radically food manufacturers have changed our taste expectations. That greasy, mushy pink stuff we’ve all eaten between slices of flat white bread is nothing like bologna used to be. Now you can enjoy it, too, with none of the guilt for eating the fatty, flavorless stuff from the store.

How To Make Homemade Bologna

It starts off simply enough, using ingredients you can pick up at any grocery store: meat, garlic powder, onion powder, liquid smoke, salt and a bit of brown sugar if you want. For equipment, you can get away with using a food processor, but a stand mixer is even easier.

Tender Quick Is Optional…Sort Of.

One ingredient for this homemade bologna that you probably don’t have in the pantry (unless you cure a lot of meat at home) is Morton’s Tender Quick

I’ve made it both with and without Tender Quick, and the flavor is much deeper when it’s used. If you’re skipping it, you may want to double the amount of garlic and onion powder, and possibly add a bit more liquid smoke.

Emulsifying ground beef and seasonings in a stand mixer bowl

Emulsifying Is A MUST

Unlike the floppy pink slices from the store, old-fashioned homemade bologna is more like salami or summer sausage. That’s not to say it’s spicy, although you can certainly make it that way. The main difference is that homemade bologna is meaty.

That meatiness turned me off the first time because it seemed more like a burger than the smooth stuff of my childhood. A little research revealed the problem: I didn’t know to emulsify the meat by adding ice water before shaping and cooking it. That step has made a world of difference in the texture of my homemade bologna recipe.

Keep Things Chilled Throughout

Once you’ve combined the meat and ice water, you must transfer the bowl to the freezer. This step accomplishes two things:

It allows the meat to firm back up before shaping.

And it’s essential for food safety. Ten minutes should do it.

Wrap And Secure It

After chilling the emulsified mixture, take half of the meat out and shape it into a log. Wrap this tightly with plastic wrap and use a twist-tie to keep the ends shut, so the log maintains its shape.

Overhead view of beef bologna ingredients formed into logs and tightly wrapped in plastic before chiling

Overnight Rest To Meld Flavors

Proceed with the remainder of the meat, then transfer the logs to the refrigerator to chill and rest for 24 hours. This step improves the flavor and lets the moisture in the beef move through the entire product.

After that, unwrap and cook it in the oven on a baking rack propped over a rimmed baking sheet, so excess fat can drip out without making the outside of the bologna greasy.

Why The Cooking Temperature Changes

The initial cooking time of 30 minutes at 300°F dries the exterior which helps the bologna maintain its shape. The rest of the cooking at 250°F for 2 1/2 hours cooks it all the way through, which is vital to food safety. Once cooked, let it cool completely before refrigerating or freezing for future use.

The result? A smooth yet meaty homemade bologna with a hint of smoky garlic flavor that’s perfect on homemade hamburger buns or with cheese and crackers.

Storage

If you skip the Tender Quick and use sea salt, you need to eat or freeze this homemade bologna within three days, just as you’d need to eat anything made of ground meat in that time frame. With the Tender Quick, which acts as a curing preservative, it’ll stay good for at least a month in the refrigerator.

Old world-style bologna with a hint of smoky garlic flavor. Excellent on sandwiches, or served with cheese and crackers.

Prep Time: 1hr

Cook Time: 3 hrs

Chilling Time: 1d

Total Time: 1d 4hrs

Equipment

Food processor OR stand mixer

Plastic wrap and twist ties

Baking Rack

Rimmed baking sheet

INGREDIENTS:

3 pounds ground beef no leaner than 80/20

1 cup water ice cold

1.5 teaspoon Morton’s Tender Quick OR 1 tablespoon sea salt

1 tablespoon brown sugar

1 teaspoon all-natural liquid smoke flavor

½ teaspoon garlic powder May increase to 1 teaspoon if not using Tender Quick

½ teaspoon onion powder May increase to 1 teaspoon if not using Tender Quick

INSTRUCTIONS:

In the bowl of a food processor or stand mixer, combine all of the ingredients until smooth. Transfer the bowl to the freezer for 10 minutes before proceeding.

Remove the bowl of meat from the freezer and divide the mixture in half. Using damp hands, form each half into a log. Compress it tightly as you work. Wrap each log in plastic wrap and use twist-ties to secure the ends tightly. Refrigerate flat for 24 hours.

Preheat oven to 300° F / 150° C / gas mark 2.

Remove plastic wrap from meat and carefully transfer both logs to a baking rack propped over a rimmed baking sheet. Bake for 30 minutes, turning halfway through.

Reduce heat to 250° F / 125° C / gas mark 1 and cook an additional 2 to 2½ hours to an internal temperature of 160° F. Remove from oven and allow to cool completely. Refrigerate up to 3 days. May be frozen for longer storage.

Notes:

For easiest slicing, chill the cooked bologna for 20 minutes and use a sharp, non-serrated knife.

Nutritional Info:

Serving: 1serving | Calories: 110kcal | Carbohydrates: 1g | Protein: 7g | Fat: 9g | Saturated Fat: 3g | Cholesterol: 30mg | Sodium: 113mg | Potassium: 115mg | Sugar: 1g | Calcium: 8mg | Iron: 1mg

Best Kale Smoothie Recipe

Here’s how to make the very best kale smoothie, bright green with the most irresistible fruity flavor! It’s the tastiest way to eat your greens.
Why it’s the best kale smoothie

Really, this one’s the best kale smoothie…which is saying something, because we’ve made lots of kale smoothies that are too bitter, too thick, or too icy. This one has all the right ingredients to make an irresistibly tasty green puree. Why make this smoothie?

It’s got pure, sweet tart flavor. Really, you won’t be able to stop drinking it! No bitterness here.

It’s got a silky smooth, frosty texture. Just the right thickness for sipping!

It’s full of healthy ingredients. No sugary juices to make it taste good.

It’s plant-based. There’s no need to use milk or yogurt: it’s all fruit and leafy greens!

Baby kale vs Tuscan kale vs curly kale

There are several types of kale that you can use in this smoothie. Here’s a breakdown of each type:

Baby kale: Baby kale works well in a smoothie because it has a sweeter, mild flavor. It’s a young version of kale, harvested before it matures. You can find it sold in boxes at the grocery or bags at your local farmers market.

Tuscan kale: Tuscan kale is the next best option: it’s got a mild flavor and flat, dark green leaves. It’s also labeled as dinosaur kale or Lacinato kale.

Curly kale: Curly kale works too, but it has a pretty spicy flavor that’s more bitter than the other two. If you use this variety, you may want to start with less and add it to taste.

The trick to blending

Here’s a trick to blending this kale smoothie: first, blend the softer room temperature fruits and liquid. In this case, it’s the banana, apple, kale and water. Then add in the frozen ingredients: the frozen pineapple and ice. This helps it to blend easier: so you won’t need to endlessly stop, scrape, and start again!

Add-ins & variations

This kale smoothie is pretty perfect as is: but you can always mix it up with tasty additions! Here are a few options:

Ginger: Add ½ teaspoon grated ginger to the mix.

Mint or basil. Add a few fresh mint or basil leaves for an herbaceous spin.

Coconut. A handful of shredded coconut adds a tropical flair.

Smoothie storage

Smoothies are best eaten immediately. But this kale smoothie actually lasts 1 to 2 days refrigerated, stored in a sealed container or a mason jar with the lid on. It may separate, which is perfectly natural. Just shake it up and you’re good to go!

This kale smoothie recipe is…

Vegetarian, vegan, plant-based, dairy-free, and gluten-free.

Prep Time: 5 minutes

Cook Time: 0 minutes

Yield: 2 smoothies

INGREDIENTS:

1 large green apple

1 banana

2 cups baby kale leaves, loosely packed (or Tuscan or curly kale, roughly chopped)

1/2 cup water

10 ice cubes

2 cups frozen pineapple or mango

1 tablespoon fresh squeezed lemon juice

INSTRUCTIONS:

Chop the apple, leaving the skin on. Break the banana into pieces and place them both in the blender. Add the water and baby kale leaves. Blend until smooth.

Add the ice, frozen pineapple or mango, and lemon juice. Blend again until smooth.

Stress Less Smoothie Recipe

For maximum wellness in a single cup, you can’t do better than this delicious drink, all from Prevention’s new book, Smoothies & Juices. If you don’t have hemp seeds, add a tablespoon of almond butter for a comparable boost of magnesium, the key ingredient here for lowering stress.

YIELDS: 1 serving(s)

TOTAL TIME: 5 mins

CAL/SERV: 222

INGREDIENTS:

1 1/2 c. plain full-fat kefir, chilled

1/2 c. raspberries

1 tbsp. hemp seeds

1 peach, pitted and sliced

1/2 c. ice

Directions:

In blender, puree kefir, raspberries, hemp seeds, peach, and ice until smooth, about 30 sec.

NUTRITION (per serving): 222 cal, 9 g pro, 29 g carb, 6 g fiber, 21 g sugars (0 g added sugars), 9 g fat (3 g sat fat), 18 mg chol, 54 mg sodium

Easy Baked Parmesan Pork Chops Recipe

These Easy Baked Parmesan Pork Chops are a simple and delicious weeknight meal option. Ready in just 30-minutes, they make a great last-minute meal that is always a hit with the family. Simply seasoned and baked, it has a great crispy coating that is baked instead of fried for a healthier meal. 

INGREDIENTS:

▢1/2 cup Parmesan cheese

▢1 egg

▢1 tablespoon milk or skim milk

▢1 teaspoon salt

▢1/2 teaspoon black pepper

▢3/4 cup Italian seasoned bread crumbs

▢4 4-ounce lean, boneless pork chops

▢3/4 cup Panko bread crumbs

INSTRUCTIONS:

Preheat the oven to 400°F and coat a 9×13-inch baking dish with nonstick cooking spray.

In a shallow dish, whisk together the egg, and milk.

In a second shallow dish or plate, stir together the cheese, both bread crumbs, and the salt and black pepper.

Dip the pork chops in the egg, allowing excess to drip off, and then dip them in the breadcrumbs and cheese mixture. Transfer to prepared baking pan.

Spray the tops of the pork chops with cooking spray, and bake in the prepared baking dish uncovered for 14-16 minutes, or until cooked through and golden.

NOTES

How do I Know Pork is Done Cooking? 

The USDA says that a pork chop should be cooked to at least 145ºF internal temperature. Typically, the cooking time listed will be just right, ut if you have a thinner or thicker chop, you may need to adjust to prevent under or overcooked pork.

I also cannot say enough about getting a quality digital meat thermometer that has a longer probe you can put into the meat and leave in while cooking so it alerts you when it reaches temperature. If you are unsure about food safety, it’s a perfect addition to your kitchen gadgets.

What Sides Go with Pork Chops? 

Much like chicken, pork is versatile enough to add just about any side you wish. I have eaten them with many things including classics like pasta or potatoes, but below are a few of my favorite sides that work great alongside my parmesan pork chops recipe.

Easy Baked Parmesan Pork Chops

Pork is the other white meat. A lean cut that is often overlooked, I love adding pork chops to our menu. Not only are they lean and high in protein, but they are also so easy to make and with just a few ingredients you can add so much flavor. This Easy Baked Parmesan Pork Chops Recipe is a family favorite because I can have it ready from start to finish in just 30-minutes.

Don’t fear pork! It makes a great lean protein option in your menu plan!


For this recipe, you can use both boneless and bone-in, but I much prefer the ease of a boneless pork chop. The flavor and cooking method would remain the same no matter which you choose. Just make sure that your pork is cooked to a safe temperature before eating, no matter what cut you choose.

You can also pick up bone-in pork chops on sale and simply trim the bone off the outside and bake as a boneless pork chop if you prefer. There is no right or wrong when making this recipe.

Smart Points: 8

NUTRITIONAL INFO:

Serving: 1pork chop | Calories: 304kcal | Carbohydrates: 20g | Protein: 30g | Fat: 13g | Saturated Fat: 5g | Cholesterol: 99mg | Sodium: 1210mg | Fiber: 1g | Sugar: 2g

Corn Casserole Recipe

This stupid easy Creamed Corn Casserole recipe is made with a store bought Jiffy cornbread mix, and that’s not an apology. It is SO good! If you grew up with this Thanksgiving side dish you know what I’m talking about. It is creamy, corny, custardy, and sweet. It’s the perfect compliment to a holiday meal.

Prep Time: 10mins

Cook Time: 35mins

Total Time: 45mins

Course: Side Dish

Cuisine: American

Servings: 9

INGREDIENTS:

1/2 cup butter (1 stick)

1 (15-oz) can whole kernel corn drained

1 (15-oz) can creamed corn not drained

1 cup sour cream

3 tablespoons granulated sugar

1/2 teaspoon kosher salt

1 (8-oz) box Jiffy corn muffin mix

INSTRUCTIONS:

Preheat your oven to 350 degrees F.

In a 8×8 or 9×9 inch glass pan, add 1/2 cup butter. Put it in the microwave and melt it right in the pan. (If you only have a metal pan, melt it in a bowl and then transfer to the pan.*) Use a spatula or pastry brush to spread the butter up the sides of the pan, so that it doesn’t stick while baking.

Open the can of whole corn kernels and drain. I usually just press the lid down on the corn holding it upside down over the sink. Add the drained corn to the butter in the pan.

Open the can of creamed corn and dump the whole thing into the pan.

Add 1 cup sour cream.

Add 3 tablespoons sugar and 1/2 teaspoon kosher salt (add 1/4 teaspoon if using table salt).

Add an 8 ounce box of Jiffy corn muffin mix.

Use a spatula to stir it all together until well combined. Scrape down the edges.

Bake at 350 for about 35-40 minutes. The edges should be turning golden brown and pulling away from the sides. When you shake the pan, the center should not be jiggling more than the edges. You can also use the toothpick test, when a toothpick inserted in the center comes out with no wet batter, it’s done.

Let cool on a wire rack for a couple minutes before serving warm!

Variations

Sweet Corn Casserole: Add 1/2 cup or even 3/4 cup sugar instead of 3 tablespoons

For a cake-like texture, rather than custard texture: add 2 eggs. This makes the casserole a little more fluffy and taller. This is a VERY common addition to corn casserole, but I prefer it without the eggs. It’s good both ways though!

Add cheese: how can you go wrong? Omit the 3 tablespoons sugar and stir in 1 and 1/2 cups shredded cheddar cheese. Sprinkle another 1/2 cup cheese on top. You could even go wild and add in some chopped jalapenos…or some cooked bacon!

Make it in the slow cooker: You can make this recipe as written in a 4-quart slow cooker, or double the recipe and make it in a 6 quart slow cooker. Be sure to spray the edges. Cook on high for 2 hours, or low for 3-4 hours. Super handy for Thanksgiving when you need your oven for the turkey!

To make the second version I tried that you see in the photos: Follow the recipe as directed making these changes: reserve half of the sour cream. Add 2 eggs. Mix it all together, then dollop the remaining 1/2 cup sour cream on top and swirl in with a knife. It will take a couple minutes longer to bake.

Notes

*Corn casserole baked in a metal pan will cook a couple minutes faster than in a glass pan, so check it early if you’re using a metal pan.

You can double this recipe and bake in a 9×13 inch pan! It will probably take closer to 45 minutes to bake. A 9×13 inch pan will serve 16-20 people.

NUTRITIONAL INFO:

Calories: 330kcal | Carbohydrates: 37g | Protein: 4g | Fat: 19g | Saturated Fat: 10g | Polyunsaturated Fat: 1g | Monounsaturated Fat: 6g | Trans Fat: 1g | Cholesterol: 41mg | Sodium: 657mg | Potassium: 186mg | Fiber: 2g | Sugar: 11g | Vitamin A: 538IU | Vitamin C: 3mg | Calcium: 48mg | Iron: 1mg

Authentic Cornish Pasties Recipe

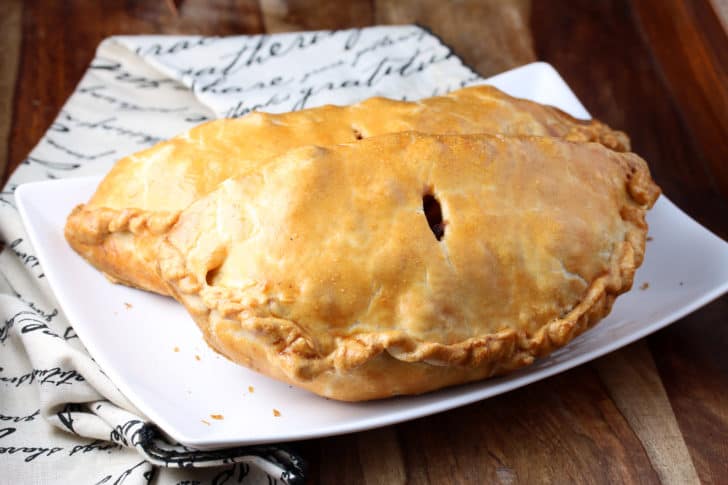
A flaky pastry crust filled with savory meat and vegetables, the Cornish Pasty is English comfort food at its best!

What are Cornish Pasties?

A Cornish pasty is a turnover-shaped baked shortcrust pastry filled with beef and vegetables. The edges are sealed by crimping them in characteristic Cornish fashion.

In 2011, Cornish pasties were given both a Protected Designation of Origin (PDO) and Protected Geographical Indication (PGI) status, which means that in order for these pasties to be made commercially and bear the name “Cornish pasty”, they have to meet very specific requirements. These requirements are as follows:

They have to be made in Cornwall.

They can only contain beef, potato, Swede (rutabaga), onion, salt and pepper. No other meat, no other vegetables, no other seasonings allowed.

The ingredients must be raw when the pasties are assembled and then slowly baked to produce the traditional Cornish pasty flavor and texture.

The edges of the pasties must be sealed by crimping them in traditional Cornish fashion.

PREP TIME: 30mins

COOK TIME: 45mins

CHILL TIME: 3hrs

TOTAL TIME: 4 hrs 15mins

COURSE: Main Course

CUISINE: British, Cornish, english

SERVINGS: 6 large pasties

INGREDIENTS:

For the Shortcrust Pastry:

3 1/2 cups (450 grams) all-purpose flour

1 teaspoon salt

5 ounces (140 grams) unsalted butter , very cold, diced

5 ounces (140 grams) lard , very cold

How to Render Lard (click link to learn how to make it yourself. It’s super easy and much cheaper than store-bought!)

2/3 cup (155 ml) ice cold water

For the Cornish Pasties:

1 pound (450 grams) beef skirt steak or sirloin , cut into small cubes

1 pound (450 grams) firm, waxy potato , peeled and diced in 1/4 inch cubes, or slice them according to personal preference (**starchy potatoes will disintegrate and turn mushy so be sure to use a firm, waxy potato that will hold its shape)

8 ounces (225 grams) rutabaga , peeled and diced in 1/4 inch cubes, or slice them according to personal preference

7 ounces (195 grams) yellow onion , chopped

salt and pepper to taste

unsalted butter (for cutting in slices to lay inside the pasties)

all-purpose flour (for sprinkling inside the pasties)

1 large egg , lightly beaten

INSTRUCTIONS:

To Make the Shortcrust Pastry: Place the flour and salt in a food processor and pulse a few times until combined. Add the cold butter and lard and pulse a few more times until the mixture resembles coarse crumbs. Add the water a little at a time, pulsing between additions, until the mixture begins to come together. DO NOT over-mix the dough or the pastry crust will be tough and won’t be flaky. Form the dough into a ball, wrap in plastic wrap, and refrigerate for at least 3 hours before using (this is crucial). (Can be refrigerated for a few days or frozen for up to 3 months.)

To Make the Cornish Pasties:

Preheat the oven to 350 degrees F.

Cut it into 6 equal pieces (rolling the dough into a log and then cutting makes this easier). Wrap and keep the other 5 pieces chilled in the fridge while you’re working on one at a time. Roll the dough out on a lightly floured work surface to a 8 inch circle that’s about 1/8 inch thick. You can use an 8-inch plate as your guide and cut the dough around it to form your circle.

Layer the filling (see note at end): Put layer of potatoes down the center of the pastry circle, leaving about 3/4 inch space on the top and bottom edges of the pastry dough. Lightly sprinkle with salt and pepper. Next add a layer of rutabagas, onions and finally the beef, adding a light sprinkling of salt and pepper between each layer. Lay a couple pats of butter on top of the beef and sprinkle a little flour over the filling.

Wet the tips of your fingers and lightly moisten the edges of the pastry dough. For this next part work gently so that the filling doesn’t puncture through the dough. If this happens, patch up the hole with some of the scrap pieces of pastry dough. Bring the sides up and seal the pasty down the middle. Turn the pasty onto its side and crimp the edges in traditional Cornish fashion (see blog post pictures as a visual).

Assemble the remaining pasties and lay them on a lined baking sheet. Use a sharp knife to cut a slit in the center of each pasty. Lightly brush each pasty with the beaten egg mixture.

Bake the Cornish pasties on the middle rack for 40-50 minutes until golden in color. Remove from the oven and let them sit for about 10 minutes (they will be very hot inside) before eating.

They can be reheated in the oven (recommended for a crispier crust) or microwave.

NOTE: Depending on how full you stuff the pasties you may have leftover filling. No worries, just fry it up together or add it to soup and enjoy it as a separate meal.

Tips for Making Cornish Pasties

Depending on how thin you roll out your shortcrust pastry you risk having the “hard” ingredients (the potatoes and rutabagas) pierce through the dough. If you prefer a thinner crust and you want to avoid that you can place the softer ingredients on the top and bottom with the harder ingredients sandwiched in the middle: Place the onions on the bottom followed by the potatoes and rutabagas and then the meat on top.

Use firm, waxy potatoes so they hold their shape. Starchy potatoes will disintegrate during baking and turn mushy.

Use a lean cut of beef. Traditional Cornish pasties use skirt steak from the underside belly of the cow because it’s lean and free of gristle.

Add a couple of pats of butter on top of the filling ingredients followed by a light sprinkling of flour. This will both form the gravy as well as absorb the liquids from the vegetables as their cooking to avoid a soggy pastry crust.

Can Cornish Pasties Be Frozen?

Yes. The shortcrust pastry holds up well to freezing and thawing and the filling has little liquid which means the pasties won’t get soggy. You can freeze them either baked or unbaked, whichever you prefer. Wrap each pasty individually in plastic wrap and then store the wrapped pasties in a heavy-duty freezer bag.

If you’re freezing them unbaked it’s best to cook them while frozen – don’t thaw them first. Baking time will take roughly 15-20 minutes longer.

NUTRITIONAL INFO:

Serving: 1large pasty | Calories: 697kcal | Carbohydrates: 63g | Protein: 28g | Fat: 48g | Saturated Fat: 23g | Cholesterol: 148mg | Sodium: 445mg | Potassium: 785mg | Fiber: 5g | Sugar: 3g | Vitamin A: 630IU | Vitamin C: 21mg | Calcium: 72mg | Iron: 8mg

Instant Pot Pork Chops in Creamy Mushroom Sauce

Instant Pot Pork Chops in Creamy Mushroom Sauce – The perfect meal for busy weeknights. These Instant Pot pork chops are an easy and delicious dinner recipe your whole family will love. Seasoned pork chops are seared directly in the Instant Pot with olive oil and butter then smothered with a creamy mushroom sauce. The pork chops come out perfectly juicy and have such great flavor. It’s so easy, you’ll be adding this Instant Pot pork chops recipe to your weeknight dinner rotation soon enough. Enjoy!

INGREDIENTS:

  • 2 pork chops, bone-in (at least 3/4-inch thick – ours make 1-inch )
  • 1 teaspoon paprika
  • 1 1/2 teaspoon kosher salt
  • 3/4 teaspoon black pepper
  • 1 teaspoon Cayenne pepper, optional
  • 1 teaspoon Italian seasoning
  • 1 teaspoon garlic powder
  • 2 tablespoons olive oil
  • 2 tablespoons unsalted butter
  • 1/2 medium yellow onion, diced
  • 8 oz fresh sliced mushrooms
  • 1 cup chicken broth
  • 1/4 cup cornstarch
  • 1/2 cup heavy cream
  • 1/4 cup parmesan, grated, optional
  • Fresh chopped parsley, for garnish

Directions:

1. To make the Instant Pot pork chops in creamy mushroom sauce: Season pork chops with paprika, garlic powder, salt, pepper, Italian seasoning, and Cayenne. Turn on your Instant Pot and select the “Saute” mode. Add olive oil and butter to the insert. Once butter is melted, brown each pork chop 2-3 minutes per side. Remove pork chops to a plate while browning onions and mushrooms.

2. Still using the “Saute” function, cook the onion for about 1 minute, scraping the brown bits from the bottom of the insert. Add mushrooms and cook about 3 minutes until tender. Add in chicken broth. Add pork chops to Instant Pot and secure the lid in place.

3. Select “Pressure Cook” on a high level for 10 minutes, depending on the thickness of pork chops (if very thick, you might need to cook for 12 – 15 minutes). When the cooking time ends, release pressure and do a quick release. Transfer pork chops to a serving dish.

4. Prepare the creamy mushroom sauce by turning the instant pot back on the “Saute” mode.

5. In a small bowl, whisk together cornstarch with about 1/4 cup of the hot broth from the instant pot. Pour the whisked mixture into the instant pot and continue whisking until the sauce bubbles and thickens. Stir in heavy cream, parmesan, and adjust seasoning with more salt and pepper to taste. Return the pork chops into the Instant pot to reheat quickly. Serve the Instant Pot pork chops in creamy mushroom sauce immediately, over cauliflower rice (rice, pasta, or mashed potatoes for non-keto) and garnish with fresh chopped parsley. Enjoy!

For maximum flavor, we suggest you cooking pork chops with the bone is. You can also make Instant Pot boneless pork chops using this same method.

Cream Cheese Cookies Recipe

Are you in the mood for a sweet and simple cookie with an incredibly soft melt-in-your-mouth bite? If you’re anything like me, the answer is always and good news – I have just the cookie for you. These Cream Cheese Cookies take your basic baking ingredients and add – spoiler alert – cream cheese to the mix for a soft and nearly creamy cookie that’s a hit any time of year, anywhere

I am partial to drop cookies, mostly because I tend to reserve cut-out and rolled cookies for more special occasions where I can justify the time that goes into them. These do have a chilling step, but it’s only an hour and once the dough is firm it’s just a matter of rolling it into small balls and gently pressing them down after placing them on a cookie sheet. (To me, that’s much easier than finding the rolling pin and the cookie cutters.)

The dough is pretty basic. You just cream together butter and cream cheese before you add in granulated sugar and then the egg, vanilla, baking powder, flour, etc. (You know the drill.) It only takes one bowl and there are no complicated techniques, just a basic cookie dough that the cream cheese brings to new heights.

What that cream cheese does is create a soft and cloudy texture – these are not chewy, not crisp in the slightest, just gentle and snowy and sweet. Because they have both butter and cream cheese, the flavor is buttery and just on the edge of richness but it’s straightforward and clean too, not gussied up with nuts or baking chips or fruit. Simple is often best and that’s definitely the case with these.

Yield 20 cookies

15m prep time

10m cook time

1h inactive

Allergens: Eggs, Milk, Gluten

INGREDIENT’S

1/2 cup (1 stick) unsalted butter, at room temperature

4 oz cream cheese, at room temperature

1 cup granulated sugar

1 egg

2 teaspoons vanilla extract

1/2 teaspoon baking powder

1 3/4 cup all-purpose flour

1/2 teaspoon salt

Powdered sugar, for dusting

PREPARATION

Preheat oven to 375°F and line a baking sheet with parchment paper.

In a large bowl, cream the butter and cream cheese with an electric mixer.

Add sugar and beat 1 minute. Add egg and vanilla and mix until combined.

In three additions, add baking powder, flour, and salt, and mix to combine.

Cover dough and chill 1 hour.

Once chilled, dust hands with flour and roll dough into balls between 1-2 inches.

Set out on prepared baking sheet 2-inches apart and flatten gently with your fingers.

Bake 9-11 minutes. The top should remain pale while the bottoms should be golden.

Transfer to a wire rack to cool, then dust with powdered sugar to serve. Enjoy!

Easy Low-Carb Keto Chicken Shawarma Recipe

THIS EASY KETO CHICKEN SHAWARMA IS JUICY AND LOADED WITH SO MANY BOLD FLAVORS THAT YOU’LL NEVER MISS THE TRADITIONAL BREAD! LOW CARB, ATKINS, PALEO, WHOLE 30, DAIRY FREE

This keto chicken shawarma recipe is only moderately spicy as is, but you can adjust the cayenne pepper amount in either direction to get the heat to your liking.

 Total Time: 20 minutes

Yield: 6 servings

INGREDIENTS:

For the chicken shawarma:

2 pounds boneless chicken breast or thighs

1 teaspoon ground coriander

1 teaspoon ground cumin

1 teaspoon ground cardamom

1 teaspoon ground turmeric

1/2 teaspoon ground cayenne pepper

1 tablespoon smoked paprika

1/2 teaspoon garlic powder

1/2 teaspoon onion powder

1.5 teaspoons kosher salt

1/4 teaspoon ground black pepper

2 tablespoons lemon juice

3 tablespoons olive oil

For the tahini sauce:

2 tablespoons tahini paste

2 tablespoons olive oil

3 tablespoons water

1 tablespoon lemon juice

1 clove garlic, minced

1/2 teaspoon kosher salt, more to taste if desired

INSTRUCTIONS:

For the chicken shawarma:

Combine all of the marinade ingredients in a large bowl.

Mix well.

Add the chicken to the marinade and turn to make sure it’s completely coated.

For most flavorful results, marinate overnight – otherwise 2 hours will do it.

Preheat the grill to 500 degrees F.

Cook the chicken on the grill over direct heat, for about 4 minutes per side, or until a thermometer inserted in the thickest part reads 160 degrees.

Remove the chicken from the grill and let rest for 10 minutes (it will continue to cook.)

Slice and serve with the tahini sauce and side dishes of your choice.

For the tahini sauce:

Combine all of the tahini sauce ingredients in a small bowl.

Stir well until smooth.

Notes:

ALTERNATIVE METHOD: AFTER MARINATING, PAN FRY THE SHAWARMA ON MEDIUM HIGH HEAT IN A NONSTICK PAN FOR ABOUT 4 MINUTES PER SIDE OR UNTIL COOKED THROUGH. OR ROAST IN A 400 DEGREE OVEN FOR 18 MINUTES, OR UNTIL THE CHICKEN IS COOKED THROUGH.

NET CARBS PER SERVING = 0G.

Nutritional Info 

Serving Size: 4 ounces chicken, 1 tablespoon tahini sauce Calories: 274Fat: 16gCarbohydrates: 0gFiber: 0gProtein: 35g


Baked Cabbage Steak Recipe

This Roasted Cabbage is the perfect healthy side dish! Ready in 30 minutes, requires very little effort and cleanup, and has under 4 net carbs per serving!

For a side dish this delicious, you’ll be amazed it’s so easy and healthy! This Roasted Cabbage is coated in seasoning and roasted at a high temperature for beautifully crispy edges. These cabbage steaks are perfectly tender and would be an amazing side dish for nearly any entrée!

This requires only four ingredients (plus salt, pepper, and red pepper flakes if you want them), so this can be thrown together easily! You can customize the seasonings based on your preference, making this a fantastic, simple dish on a busy weeknight. 

This dish will add a ton of flavor and nutrients without many calories or carbs! It’s great for keto meal prep and extremely versatile. You can even turn it into a sheet pan meal by cooking this ! Just pop it into the oven for 15-20 minutes, then add your cabbage and cook as directed. This makes a super impressive, healthy dish for just 4.5 net carbs total!

Can I make this ahead of time?

I enjoy this most fresh out of the oven because the crispy edges are my favorite part. After it has been stored in the fridge, you’ll lose a lot of this crispiness. However, if you reheat this in the air fryer, you can get some of that crispiness back without completely overcooking the cabbage. 

If you’d like to meal prep this but cook it fresh, you can easily cut and season the wedges, then store them in the fridge until ready to cook. I would not leave them in the fridge longer than a day or two as the cut pieces can dry out or brown a little over time.

How to Store & Reheat Roasted Cabbage Steaks

Once cooked, allow the roasted cabbage to completely cool before storing in an airtight container in the fridge. It will last up to 5 days in the fridge, but you can extend the life of the cabbage by freezing it up to 3-6 months. When freezing, it’s best to tightly wrap with foil or plastic wrap before storing in a freezer bag.

When reheating, there are several ways to warm up your cabbage. You can microwave it if you prefer soft cabbage, but here are the best ways to enjoy crispy edges:

Air Fryer: 400 degrees F for about 3 minutes

Oven: 450 degrees F 5-8 minutes (reheating on a rack in a pan might result in crispier edges)

Skillet: Medium high heat, about 2 minutes per side.

If you have frozen the cabbage, make sure to allow it to thaw before reheating. Keep in mind that there will be a lot of extra moisture after freezing, so you may not be able to get super crispy edges when reheating previously frozen cabbage.

What to Serve with Roasted Cabbage Wedges

I absolutely LOVED this roasted cabbage with the (as pictured above), but you could serve this with many different types of dishes! Consider serving with a for a great keto-friendly dinner, just 6.5 net carbs total. For a super kid-friendly meal, this would be fantastic with and … And you’d still stay under 10 net carbs! 

YIELD: 6

PREP TIME: 5 minutes

COOK TIME: 20 minutes

TOTAL TIME: 25 minutes

INGREDIENTS

1/2 medium head of cabbage, cut into 6 wedges

2 tablespoon olive oil

1 teaspoon worcestershire sauce

1 teaspoon minced garlic

salt and pepper to taste

crushed red pepper flakes (optional)

INSTRUCTIONS

Preheat the oven to 450 degrees F.

Slice half of a head of cabbage into 6 wedges

Lightly spray a casserole dish or rimmed baking sheet.

Combine the olive oil, worcestershire sauce and minced garlic. Brush generously onto the cabbage wedges.

Season with salt and pepper to taste.

Roast the cabbage 20-25 minutes until the edges are golden brown and it has reached your desired tenderness.

Notes

This recipe can be easily doubled.

Nutritional INFO:

YIELD: 6 SERVING SIZE: Nutrition calculated per cabbage wedge

Amount Per Serving: CALORIES: 67TOTAL FAT: 4.8gSODIUM: 28mgCARBOHYDRATES: 6.2gNET CARBOHYDRATES: 3.6gFIBER: 2.6gSUGAR: 3.4gPROTEIN: 1.3g

Lemon Honey Jam Recipe

Ingredients:

  • 12 cups chopped apples
  • 2 cups lemons juice I used a combination of freshly squeezed Meyer lemon juice and bottled
  • 2 cups honey
  • 3 cups sugar
  • 1 envelope of liquid pectin can be omitted if you use a few firm, green apples
  • zest of three lemons

Instructions:

  1. Prepare your canning pot, as well as seven pint jars, lids and rings.
  2. Combine the chopped apples and lemon juice in a large, heavy-bottomed pot (an enameled Dutch oven works well here) and cook over medium-low heat, stirring frequently, until the apples have broken down. When you’ve got a nice, chunky applesauce, add the honey and sugar and stir to incorporate.
  3. Bring the fruit to a boil and cook for at least five minutes at a roll (watch out though, it will bubble and depending on the size of your pot, can get a little splashy). Add pectin and boil for a few minutes more, to active the pectin. When it seems nice and jammy, turn off the heat and stir in the lemon zest.
  4. Fill jars, wipe rims (this jam is sticky, so you may need to add a bit of white vinegar to your towel, to help ensure a clean rim), apply lids and screw on bands.
  5. Process in a boiling water canner for ten minutes (if you are above 1,000 feet in altitude, adjust your processing time accordingly).
  6. Eat on toast, spoon on muffins or use to glaze roasted chicken pieces.

Fresh Asparagus-Tomato Salad

Topped with Parmesan cheese and pine nuts, this tasty green salad is perfect for any barbeque or picnic.

Prep Time: 20 mins

Total Time: 20 mins

Diabetes Appropriate Egg Free Gluten-Free Healthy Immunity Heart Healthy Low Carbohydrate Low Sodium Low-Calorie Soy-Free Vegetarian

Ingredients:

2 cups mixed salad greens or baby spinach

1 pound thin fresh asparagus, trimmed and cut diagonally into 1 1/2-inch pieces

1 cup cherry tomatoes, halved

½ cup fresh basil leaves, large leaves torn

2 tablespoons white wine vinegar

4 teaspoons olive oil

1 teaspoon honey

⅛ teaspoon salt

⅛ teaspoon black peppera

2 tablespoons shredded Parmesan cheese

2 tablespoons pine nuts or chopped walnuts, toasted

Directions:

In a large bowl combine salad greens, asparagus, tomatoes and basil.

For vinaigrette, in a small screw-top jar combine vinegar, oil, honey, salt and pepper. Cover and shake well.

Pour vinaigrette over greens mixture; toss gently to coat. Sprinkle with cheese and nuts.

Nutritional Info:

Serving Size 1 1/4 cups

calories 112 total carbohydrate 7g dietary fiber 2g total sugars 4g protein 4g total fat 8g saturated fat 1g cholesterol 2mg vitamin a 1387iu vitamin c 12mg folate 43mcg sodium 123mg calcium 72mg iron 2mg magnesium 33mg potassium 341mg

Kentucky Blueberry Cobbler Recipe

When I serve this wonderful dessert, memories flood back of blackberry picking, chiggers, and my grandmothers kitchen with the wood burning stove…and the wonderful smell of fresh baked blackberry cobbler.

Serves 8 | Prep Time 30 | Cook Time 45 minutes

INGREDIENTS YOU’LL NEED

2 1/2 c blackberries, washed

1 c sugar

1 c flour

2 t baking powder

1/2 t salt

1 c milk

1/2 c unsalted butter, melted

DIRECTIONS

Stir together just the berries and sugar in a large bowl and let it sit out for 25-30 minutes. Preheat oven to 375?. Stir together the flour, baking powder, salt, and milk with a wooden spoon. Next, stir in the melted butter and hand-mix it until the ingredients are well incorporated and you have few clumps. Pour batter into medium baking dish and smooth it out. You can choose to line it with parchment paper or not, but don’t grease the pan. Finally, pour the macerated blackberries on top with all the sugar included and evenly distribute it over the batter.

Bake for 45 minutes to an hour, depending on how golden you prefer it to be. Let it cool for 5 minutes so it will hold its shape.

Parmesan Meatloaf Recipe

This Meatloaf Parmesan is a delicious spin on that traditional meatloaf we all know and love. Bursting with flavor, three types of meat, and two types of cheese – this recipe will make your dinner a success. Spice up meatloaf night and give this rendition a whirl!

Cheesy and tender meatloaf. An amazing twist on classic meatloaf.

Prep Time: 5mins

Cook Time: 1hr

Total Time: 1hr 5mins

Servings: 6 servings 

INGREDIENTS:

  • 1 lb ground turkey
  • 1 lb ground beef
  • 2 eggs
  • 1/4 cup gluten free breadcrumbs
  • 1/2 teaspoon dried basil
  • 1/2 teaspoon dried thyme
  • 1/2 teaspoon dried oregano
  • 1-2 cloves garlic, finely minced
  • 1 small onion, grated
  • 1/2 teaspoon salt
  • 1/4 teaspoon ground black pepper
  • 1/2 cup grated Parmesan cheese
  • 1/2 cup marinara pasta sauce (homemade here, minus the meat)
  • 1/2 cup shredded Italian cheese blend
  • minced parsley for garnish

INSTRUCTIONS:

  1. Preheat the oven to 350 degrees. Lightly grease a loaf pan with cooking spray, set aside.
  2. In a large bowl, combine the ground turkey and beef, eggs, breadcrumbs, thyme, oregano, basil, garlic, onion, salt, pepper and Parmesan cheese.
  3. To not over handle the mixture otherwise it will get tough.
  4. Place the mixture in the greased loaf pan and form into a loaf.
  5. Top the meatloaf with pasta sauce.
  6. Place filled loaf pan on a baking sheet and bake in the preheated oven for 40-45 minutes.
  7. Remove the meatloaf from the oven and sprinkle the top with the remaining shredded cheese.
  8. Place the meatloaf back in the oven and bake until the cheese is melted.
  9. Remove the meatloaf from the oven and allow to rest for 5-10 minutes before serving/slicing. Garnish with parsley if desired.
  10. Serve immediately and enjoy!

Nutritional Info:

Calories: 234kcal | Carbohydrates: 5g | Protein: 16g | Fat: 15g | Saturated Fat: 7g | Cholesterol: 78mg | Sodium: 530mg | Potassium: 285mg | Sugar: 4g | Vitamin A: 585IU | Vitamin C: 4.7mg | Calcium: 248mg | Iron: 1.5mg

Chocolate Peanut Butter Cheesecake Recipe

If there’s nothing you love more in the world than the combination of chocolate and peanut butter, you must try this Chocolate Peanut Butter Cheesecake recipe! Oreo crust, creamy peanut butter cheesecake filling with chocolate chips, milk chocolate ganache, and a pile of chopped Reese’s cups on top, equals pure bliss!

Prep Time: 40 minutes

Cook Time: 1 hour 10 minutes

Yield: 16 slices

Category: Dessert

Method: Oven

Cuisine: American

Ingredients:

FOR OREO CRUST:

2 cups Oreo crumbs

4 Tbsp. unsalted butter-melted

PEANUT BUTTER CHEESECAKE FILLING:

32 oz. cream cheese- softened

1 and 1/3 cup sugar

4 large eggs

1 cup smooth peanut butter

2 tsp. vanilla

1/3 cup heavy cream

1 ¼ cups miniature chocolate chips

FOR MILK CHOCOLATE GANACHE:

½ cup heavy cream

1 ½ cups milk chocolate chips or 9.5 oz. milk chocolate-finely chopped

FOR GARNISH:

Chopped Reese’s cups

Crushed roasted peanuts

Instructions:

First, coat a 9-inch springform pan with cooking spray and line the bottom with parchment paper. Wrap pan with two layers of aluminum foil and bring the foil up the sides of the pan and make sure it is tight and secure so no water gets in during the baking in the water bath!!!!

TO MAKE THE CRUST:

In a food processor finely ground whole Oreo cookies with the filling to get fine crumbs. Combine the crumbs with melted butter and stir until evenly moistened.

Press the mixture into the bottom of the springform pan and set it in the fridge to firm while making the filling.

TO MAKE THE CHEESECAKE FILLING:

Preheat the oven to 350 F.

Beat softened cream cheese with sugar until smooth.

Mix in peanut butter, heavy cream, and vanilla.

Add eggs one at a time beating after each addition just to combine, do not over mix it.

Stir in chocolate chips and spread the mixture over chilled crust. Smooth the top and place the springform pan in a roasting pan. Pour hot water into a roasting pan (about a quarter of the way).

Bake for 55-70 minutes, until the cheesecake, is set around the edges and slightly loose in the center. Tent the top of the springform pan with aluminum foil if it starts browning too quickly.

Remove the cheesecake from the water bath and set it on a cooling rack to cool. Remove aluminum foil and refrigerate (at least 5 hours or overnight).

GANACHE:

When the cake is completely cooled run a thin knife around the edge and release the ring of the springform pan, then transfer the cake on a serving plate.

On medium heat bring heavy cream to boil. Place half of the milk chocolate chips (or chopped chocolate) in a heatproof bowl and pour the cream over the chocolate, stir until the chocolate is melted completely. Add the remaining chocolate and stir until it’s melted and smooth. Set aside to cool. The ganache should be pourable but not too thin.

Spread the ganache on top all over to the edges and let it drip down the sides. I suggest you do this in two layers to avoid the ganache run down too much and cover the whole edges of the cake. Also if the ganache won’t drip enough you can slightly reheat the second batch and drizzle it with the spoon. Let the ganache set slightly then sprinkle with chopped peanuts and pile with coarsely chopped Reese’s.

Set in the fridge until ready to serve.

Cool Whip Cookies Recipe

Cool Whip Cookies are one of the easiest cookie recipes you’ll ever make. Grab a box of your favorite cake mix, Cool Whip, an egg and powdered sugar and get started! Create a variety of flavors like lemon, strawberry, red velvet, funfetti, chocolate and more.

I can’t remember where I first heard of this Cool Whip Cookies recipe, but I’m so glad I did. Not only are they delicious, but they are also crazy simple. They are so easy you could make them in your sleep! Ok, maybe not in your sleep, but you get the idea.

I love them because they are so versatile. I wait for Cool Whip and cake mix to come on sale and I’ll grab a bunch so I can whip up a few batches. They never last long here

Want to learn how to make the easiest-ever holiday cookies? You’ve come to the right place. This crazy boxed-cake-mix hack makes super-fudgy crinkle cookies—with a third of the typical ingredients. 

Can you freeze these cookies?

Yes! You can freeze the baked cookies by letting them cool, then placing in freezer-safe plastic bags. You can also freeze the dough for up to 3 months. Freeze them as balls in freezer-safe plastic bags and let thaw before baking.

Having trouble rolling? Chill the dough.

Thanks to the Cool Whip, this is a very soft dough. If it’s too sticky in your hands to roll, chill the dough in the refrigerator for up to 30 minutes before rolling into balls and powdered sugar.

YIELDS: 20 serving(s)

PREP TIME: 5 mins

TOTAL TIME: 30 mins

CAL/SERV: 157

Ingredients:

1 box devil’s food cake mix

1 (8-oz.) container Cool Whip

1 large egg

1/2 c. powdered sugar

Directions:

Step 1

Preheat the oven to 350° with racks in the upper and lower thirds. Line two baking sheets with parchment paper.

Step 2

In a large bowl, using a hand mixer, beat cake mix with Cool Whip and egg until smooth and dough has a taffy-like consistency, about 1 minute.

Step 3

Place powdered sugar in a shallow bowl. Using a medium cookie scoop, scoop dough into the powdered sugar and roll to coat completely.

Step 4

Arrange each ball 2″ apart on prepared baking sheets and bake, rotating the trays halfway through, until cookies crackle and are set but still slightly soft in the center, 13 to 15 minutes.

Step 5

Transfer to a cooling rack and let cool completely.

Pineapple Dessert Recipe

This is the easiest pineapple dessert recipe you’ll find anywhere. Easy pineapple dessert has been one of the most popular desserts on my blog to date due to its simplicity and amazing taste. It’s 2023 and this is still the very top recipe year after year.

I can admit it, I’d eat dessert all day if I could pull it off. I’ve been in a fruity mood lately, so this is the perfect hack.

This easy pineapple dessert comes together with just three simple ingredients. Yes…just three.

easy pineapple dessert served in a vintage glass dish

Along with being so easy to throw together, it packs a yummy and surprising punch!

Last spring I made this Pineapple Lush Cake which blew my mind. So easy to make and the filling?

Well, that’s what completely inspired this dessert idea. Crushed pineapple is the star player in this simple treat.

The extra juices in this simple recipe soak up vanilla instant pudding mix and when combined with whipped topping (Cool Whip) comes together into a very tasty and satisfying dessert. Until I made this recipe, I never realized just how delicious a canned pineapple dessert could truly be. All of these flavors just work so well together and you get to skip the mess of cutting up a fresh pineapple.

angled down view of pineapple pudding served in individual dishes with whipped cream and a cherry on top

I served this up in mini parfait cups that are perfect for just that little sweet bite every once and awhile. Yum! Top with a little whipped cream and a cherry for a little added flair.

Pineapple Dessert with only 3 ingredients. Basically crack pineapple pudding. SO good.

This simple recipe is easily the best pineapple dessert with cool whip that I’ve ever made. So simple and easy but so delicious. 

YIELD: 6

PREP TIME: 5 MINUTES

Additional Time: 1 HOUR

Total Time: 1 HOUR 5 MINUTES

Ingredients:

  • 1 can (20 oz.) Crushed Pineapple in Juice, undrained
  • 1 pkg. (3.4 oz.) Vanilla Flavor Instant Pudding
  • 1 cup thawed Whipped Topping

Instructions:

  1. Mix pineapple and dry pudding mix.
  2. Gently stir in whipped topping.
  3. Refrigerate for an hour before serving.

Nutritional Info:

Yield: 6

Serving Size: 1

Amount Per Serving

Calories:100/TotalFat:4g/SaturatedFat:3g/TransFat:0g/UnsaturatedFat:0g/Cholesterol:1mg/Sodium:95mg/Carbohydrates:16g/Fiber:1g/Sugar:10g/Protein:1g


Quick Chile Lime Potato Tacos Recipe

This recipe is great for people who crave Mexican food but strive to consume fewer calories. The chili and lime flavors make this recipe so tasty and with all variations under 250 calories and 7 grams of fat per serving, this is a perfect recipe to include in a low-calorie diet. Adding potatoes to your taco increases the potassium and vitamin c, without adding fat or cholesterol.

Prep Time: 10minutes

Cook Time: 20minutes

Total Time: 30minutes 

Course: Main Course, Main Dish, Mains & Sides, Snacks

Cuisine: Mexican

Keyword: potato, potatoes, tacos

Servings: 4 

Equipment:

stovetop

microwave

INGREDIENTS:

  • 1/2 lb. yellow or red potatoes cut into bite-size cubes
  • Olive oil cooking spray
  • 1/2 cup chopped onion
  • 1/2 lb diced boneless skinless chicken breasts
  • 1/2 cup red chili enchilada sauce
  • 1/4 cup finely chopped poblano Anaheim or bell pepper
  • 1 teaspoon Mexican seasoning blend
  • 1/2 cup shredded reduced-fat Monterey Jack cheese
  • 8 small corn tortillas* warmed or crunchy taco shells
  • 8 lime wedges
  • Optional Ingredients
  • Shredded cabbage or romaine lettuce
  • Diced tomato
  • Diced avocado
  • Thinly sliced radishes
  • Fresh cilantro leaves

INSTRUCTIONS:

  1. Place potatoes in a microwave-safe bowl and cover with plastic wrap. Microwave on HIGH for 5 to 7 minutes.
  2. Spray a large skillet liberally with cooking spray.
  3. Add potatoes and onion; cook over medium-high heat for 5 minutes, stirring and coating with cooking spray occasionally.
  4. Stir in chicken, pepper and seasoning and cook for 5 minutes more.
  5. Add red chili enchilada sauce and simmer for 5 minutes.
  6. Place equal amounts of cheese on each tortilla and heat in a skillet until cheese is melted.
  7. Add potato mixture and any other desired toppings. Serve with lime wedge.

Notes:

Variations

Chicken Verde Potato Tacos

Cook potatoes, onion, chicken and peppers as directed above. Omit garlic salt, chili and lime seasoning and lime juice. Stir in 1 teaspoon Mexican seasoning blend and 1/2 cup green chile salsa.

Nutritional analysis per serving: Calories: 230, Fat: 5g, Saturated Fat: 2g, Trans Fat: 0g, Cholesterol: 40mg, Sodium: 340mg, Potassium: 397mg, Carbohydrates: 26g, Fiber: 1g, Sugar: 3g, Protein: 18g, Vitamin A: 6%, Vitamin C: 35%, Calcium: 10%, Iron: 6%

Turkey and Red Chili Potato Tacos

Sauté potatoes and onions as directed above. Omit chicken and add 1/2 lb. 99% lean ground turkey with peppers and Mexican seasoning; cook for 5 minutes more. Stir in 1/2 cup red chili enchilada sauce and simmer for 5 minutes over low heat.

Nutritional analysis per serving: Calories: 250, Fat: 7g, Saturated Fat: 2.5g, Trans Fat: 0g, Cholesterol: 40mg, Sodium: 500mg, Potassium: 303mg, Carbohydrates: 26g, Fiber: 1g, Sugar: 3g, Protein: 23g, Vitamin A: 15%, Vitamin C: 35%, Calcium: 15%, Iron: 8%

NUTRITIONAL INFO:

Calories: 220kcal | Carbohydrates: 25g | Protein: 19g | Fat: 5g | Cholesterol: 40mg | Sodium: 200mg | Fiber: 2g

Sweet Hawaiian Crock Pot Chicken Recipe

Three ingredients and a slow cooker is all you need to make this healthy Sweet Hawaiian Crock Pot Chicken. It’s sweetened naturally with pineapple and perfectly balanced with a smokey bbq kick! Simply add your ingredients and let it simmer away.

Why We Love It

Yup, you read that right. There are only 3 ingredients in this recipe! But don’t let that fool you into thinking it’s boring- It’s jam packed with flavor!

Sweet canned pineapple is paired with smokey, tangy bbq sauce to make the best ever Hawaiian inspired flavor combination.

The chicken comes out ultra tender and delicious. And because it’s made with all natural ingredients, it’s also Whole30 compatible and Paleo friendly.

But the real beauty of this dish is how little work is involved! You simply add your ingredients to your slow cooker, then turn it on. I call this “dump and start” cooking, and it’s one of my favorite things!

The chicken simmers away in the sauce until it’s fork tender, then just serve with cauliflower rice, purple cabbage slaw, or all by itself!

It’s also freezer friendly, so you can save leftovers or make a double batch for easy meals later on. And don’t forget to check out my Aloha Burgers, too!

Sweet Hawaiian Crock Pot Chicken

Three ingredients and a crock pot is all you need to make this healthy dinner. Sweet Hawaiian Chicken is sweetened with pineapple and perfectly balanced with a smokey bbq kick!

Prep Time: 5 mins

Cook Time: 3 hrs

Total Time: 3 hrs 5 mins

Course: Dinner, Main Course

Cuisine: American

Servings: 6 servings

Equipment:

1 Slow Cooker / Crock Pot

INGREDIENTS:

  • 2 lb. chicken breasts boneless & skinless
  • 1.5 cups bbq sauce
  • 15 oz. canned crushed pineapple

INSTRUCTIONS:

  1. Dice the chicken into about 1 inch cube pieces.
  2. Transfer the chicken to the slow cooker. Add the pineapple and bbq sauce. Stir to combine the ingredients.
  3. Cover and cook on low heat for 3.5 – 4 hours or high for 2 – 2.5 hours. If using frozen diced chicken, add an additional 30-45 minutes to the cook time.
  4. When it’s done cooking, the chicken should be at least 165°F (74°Ç) and fork tender, and the sauce should be simmering and thickened slightly.
  5. Carefully open the lid and spoon the chicken mixture onto plates. Garnish with lime and cilantro (optional).

Notes:

Ingredient Substitutions

Don’t like canned pineapple? Substitute diced fresh or frozen pineapple!

Don’t have chicken breasts? Use boneless, skinless thighs, and add about 20 minutes to cook time.

For extra veggies, add a diced bell pepper and/or red onion.

Instant Pot Instructions: Add all the ingredients to your Instant Pot inner pot. No additional liquid is necessary. Close the lid and turn High Pressure for 8 minutes. If using frozen diced chicken, adjust the time and cook for 12 minutes. Allow for a Natural Pressure Release (NPR), then carefully open the lid. Stir and serve!

To store leftovers: Transfer the leftover chicken and sauce to an airtight container. Store in the refrigerator for 3-4 days, per USDA.

To freeze leftovers: Allow the chicken and sauce to completely cool. Transfer to a freezer safe container or bag, squeezing out as much air as possible. Set flat in the freezer. For best taste, use within 6 months, per USDA. Defrost on plate overnight in the refrigerator.

NUTRITIONAL INFO:

Calories: 338kcal | Carbohydrates: 35g | Protein: 33g | Fat: 4g | Saturated Fat: 1g | Polyunsaturated Fat: 1g | Monounsaturated Fat: 1g | Trans Fat: 1g | Cholesterol: 97mg | Sodium: 910mg | Potassium: 813mg | Fiber: 2g | Sugar: 28g | Vitamin A: 241IU | Vitamin C: 9mg | Calcium: 42mg | Iron: 1mg

Butter Nut Cookies Recipe

These are my most requested cookie. I usually make at least 500 of these at Christmas. It’s a very simple recipe but packed with lots of flavor!

Cook time: 15 Min

  Prep time: 5 Min

  Serves: 3 dozen

INGREDIENTS:

  • 3/4 c butter, room temperature + 1 Tbsp
  • 1/2 c powdered sugar
  • 1/4 tsp salt
  • 1 3/4 c all-purpose flour
  • 1 pkg package butterscotch chips, 6 oz.
  • 1 c finely chopped pecans
RUM GLAZE
  • 3 c powdered sugar
  • 3 to 4 Tbsp milk or water
  • 1 tsp rum extract
TOPPING
  • 1/2 c chopped pecans

INSTRUCTIONS:

1. Cream butter with powdered sugar and salt until light and fluffy.

2. Blend in flour; mix well.

3. Add butterscotch chips and 1 cup finely chopped pecans.

4. Mix well by hand.

5. Shape dough, a scant teaspoonful at a time, into balls. Place 1-inch apart on ungreased cookie sheet.

6. Bake in 325 F oven for 15- 20 minutes or until firm but not brown. Let cool on wire racks.

7. Make rum glaze. Mix the powdered sugar, rum extract, and milk until smooth.

8. You can either dip the cookies in the glaze or use a spoon to pour over cookies.

9. Sprinkle with chopped pecans and allow the glaze to set up.

Final Step: Share!