Salisbury Steak with Onion Gravy Recipe

Salisbury Steak with Onion Gravy is an easy old-fashioned comfort food. Homemade from scratch with tender beef patties and rich brown onion gravy in only 40 minutes.

Prep Time: 10minutes

Cook Time: 30minutes

Total Time: 40minutes

INGREDIENTS:

▢1 pound ground beef

▢⅓ cup Panko bread crumbs

▢2 teaspoons ketchup

▢1 teaspoon mustard – regular yellow or dijon

▢1 teaspoon Worcestershire sauce

▢½ teaspoon garlic powder

▢½ teaspoon onion powder – optional, use if not doing onion in gravy

Gravy

▢1 onion – optional if not using mushrooms

▢½ cup sliced mushrooms – optional if not using onion

▢1 teaspoon oil

▢2 cups beef broth

▢4 tablespoons flour

▢1 teaspoon ketchup

▢½ teaspoons Worcestershire sauce

▢salt and pepper to taste

INSTRUCTIONS:

  1. If you want caramelized onions or mushrooms in your gravy, start by thin-slicing a small onion or about 5 oz of mushrooms. Cook with 1 teaspoon oil over medium-high heat until nicely brown onions or cooked mushrooms. About 7-8 minutes for the onion, or saute the mushrooms until cooked. Set aside in a bowl.
  2. In a large mixing bowl, combine 1 pound of ground beef with ⅓ cup Panko breadcrumbs, 2 teaspoons ketchup, 1 teaspoon mustard and Worcestershire sauce, and ½ teaspoon garlic powder. If not doing the onions, then add ½ teaspoon onion powder.
  3. Divide the hamburger mixture into 3-4 equal portions. A quarter-size indent in the middle of one side prevents puffing up of the patties and makes cooking evener.
  4. Place steak patties in a large frying pan with a teaspoon of oil over medium-high heat. Flip about every 5-6 minutes until an internal temperature of 165°. It takes about 15-20 minutes, depending on the thickness, the pan, and the burners.
  5. Place steak patties in a large frying pan with a teaspoon of oil over medium-high heat. Flip about every 5-6 minutes until an internal temperature of 165°. It takes about 15-20 minutes, depending on the thickness, the pan, and the burners.
  6. Slowly add the flour-broth mixture while continuing to whisk. Add 1 teaspoon ketchup and ½ teaspoon Worcestershire sauce. Add salt and pepper to taste.
  7. Whisk until nicely thickened, a few minutes. If using the caramelized onions or mushrooms, add them to the gravy and mix well.
  8. Whisk until nicely thickened, a few minutes. If using the caramelized onions or mushrooms, add them to the gravy and mix well.

Recipe Notes

Pro Tips

Use the ground meat you like. Make the patties ¼ to ⅓ pound. ½ pound will not cook well on the stovetop.

Don’t chop the onion. Cut into rings and maybe cut the larger ones in half.

You can easily use mushrooms in place of or in addition to the onions in the gravy. They will cook faster than the onion. Do not add either to the gravy raw.

Use the depression in the center of the patties. It will help prevent them from puffing up during cooking, and they will cook more evenly.

Be sure to cook the patties to 165° minimum.

NUTRITIONAL INFO:

Calories : 362.2 kcal (18%)

Carbohydrates : 16.7 g (6%)

Protein : 32.4 g (65%)

Fat : 17.5 g (27%)

Saturated Fat : 6.3 g (32%)

Polyunsaturated Fat : 1 g

Monounsaturated Fat : 7.6 g

Trans Fat : 1.1 g

Cholesterol : 97.5 mg (33%)

Sodium : 447.4 mg (19%)

Potassium : 740 mg (21%)

Fiber : 1.2 g (5%)

Sugar : 2.8 g (3%)

Vitamin A : 22.5 IU

Vitamin C : 2.6 mg (3%)

Calcium : 51.6 mg (5%)

Iron : 4.1 mg (23%)


Homemade Chicken Shawarma Recipe

 Here is how to make delicious chicken shawarma with a flavorful marinade and yogurt sauce, served with pita bread, vegetables, and optional hot sauce.

Course: dinner

Cuisine: middle eastern

Keyword: chicken, shawarma

Prep Time: 10minutes

Cook Time: 15minutes

Marinating time: 2hours 

Servings: 6 people

INGREDIENTS:

Chicken

  • 2lbs boneless boneless skinless chicken thighs

Marinade

  • 1/4 cup plain Greek yogurt
  • 1/4 cup olive oil
  • 1/4 cup lemon juice about 2 lemons
  • 6 cloves garlic minced
  • 1 tsp ground cumin
  • 2 tsp paprika
  • 1 tsp ground turmeric
  • 1 tsp ground coriander
  • 1/2 tsp ground cinnamon
  • 1/4 tsp cayenne pepper
  • salt and pepper to taste

Assembling:

Topping Ideas: sliced tomatoes cucumber, lettuce, pickles, tahini sauce, or garlic sauce

INSTRUCTIONS:

Marinate:

In a large bowl, combine the Greek yogurt, olive oil, lemon juice, minced garlic, cumin, paprika, turmeric, coriander, cinnamon, cayenne pepper, salt, and black pepper. Mix well to create the marinade.

Add the chicken thighs to the marinade, ensuring each piece is well coated. Cover the bowl with plastic wrap and refrigerate for at least 2 hours, preferably overnight for maximum flavor.

Cook:

Remove the chicken from the marinade, allowing any excess to drip off.

Stovetop: Heat a large non-stick skillet or cast-iron pan over medium-high heat. Add 2 tablespoons of olive oil to the pan, and let it heat up. Add the marinated chicken. Sauté the chicken for 6-8 minutes on each side, or until fully cooked and golden brown. If needed, cook the chicken in batches to avoid overcrowding the pan.

Oven method: Preheat your oven to 425°F (220°C). Line a large baking sheet with parchment paper. Arrange the chicken thighs on the prepared baking sheet. Bake for 25-30 minutes, or until the chicken is cooked through and the edges are slightly charred.

While the chicken is cooking, prepare your desired toppings and warm up your pita or flatbread.

Once the chicken is cooked, remove it from the oven and let it rest for 5 minutes. Chop into bite-size or slice the chicken into thin strips.

Assemble:

To assemble the shawarma, spread a layer of tahini or garlic sauce onto the warm pita or flatbread. Add the sliced chicken and your choice of toppings.

Wrap the filling with the flatbread, and enjoy your delicious homemade chicken shawarma.

Don’t forget napkins—this tasty dish can get a little messy!

Nutritional Info:

Calories: 358.9kcal | Carbohydrates: 3.1g | Protein: 30.1g | Fat: 24.8g | Saturated Fat: 7.8g | Polyunsaturated Fat: 1.6g | Monounsaturated Fat: 13.3g | Cholesterol: 89.6mg | Sodium: 103.4mg | Potassium: 610.3mg | Fiber: 0.7g | Sugar: 0.7g | Vitamin A: 369IU | Vitamin C: 5.1mg | Calcium: 36.9mg | Iron: 4mg

Caramelized Maple Walnuts Recipe

Caramelized Maple Walnuts are my latest addiction around here. Just pure maple syrup, walnuts and a few minutes of time in the skillet, and you’ve got delicious candied walnuts for a myriad of uses.

Caramelized Maple Walnuts: my newest addiction. Pure maple syrup makes a lovely candied walnut. Perfection in trail mix, salads, ice cream, oatmeal & more!

I’m already planning ahead for the holidays, and these Caramelized Maple Walnuts are the perfect fall treat. They make great nibbles at Thanksgiving and are perfect for mailing in holiday packages and tucking into Christmas stockings.

Pure maple syrup makes a lovely candied walnut. Perfection in trail mix, salads, ice cream, oatmeal & more! Perfect snack for your sweet tooth!

 Course: Nuts

 Prep Time: 5minutes

 Total Time: 5minutes

 Servings: 1 generous cup

INGREDIENTS:

  • 1 cup walnuts
  • 1/4 cup maple syrup

INSTRUCTIONS:

  1. Place walnuts in medium skillet.
  2. Pour maple syrup on top and gently stir to coat.
  3. Cook over medium heat until bubbling, stirring every few minutes.
  4. Syrup will begin to caramelize after about five minutes or so. Watch closely.
  5. When syrup is sticking to walnuts and there’s not so much liquid left in the skillet, remove from heat.
  6. Quickly (and carefully!) place separately on parchment paper to harden.
  7. Once dry and hardened, store in airtight container until needed.

The Best Crack Cake Recipe

Crack Cake is incredibly moist and dense, with delicious warm hints of cinnamon and a buttery wine sugar glaze that takes this cake to new levels of pure decadence!

 COURSE DESSERT

 CUISINE AMERICAN

 PREP TIME: 15minutes

 COOK TIME: 1hour 

INGREDIENTS:

CAKE INGREDIENTS

▢1 yellow cake mix

▢3.4 oz. vanilla pudding mix

▢¼ cup packed light brown sugar

▢¼ cup granulated sugar

▢2 teaspoons cinnamon

▢5 large eggs room temperature

▢½ cup whole milk

▢½ cup vegetable oil

▢1 cup sour cream

▢½ cup sweet white wine I used a Riesling

GLAZE INGREDIENTS

▢½ cup salted butter

▢¼ cup sweet white wine

▢1 cup granulated sugar

INSTRUCTIONS:

  1. Preheat the oven to 350°F. Grease a bundt pan with nonstick baking spray and set aside.
  2. In a medium mixing bowl, beat together all of the cake ingredients.
  3. Beat mixture until fully combined.
  4. Pour batter into prepared bundt pan.
  5. Bake for 50-60 minutes, or until a toothpick inserted into the cake comes out clean and the edges of the cake have pulled away from the pan.
  6. In a small saucepan, heat butter wine and sugar for the glaze. Heat and stir until sugar is dissolved, then remove from heat.
  7. Use a bamboo skewer or toothpick to poke holes all over the cake bottom (still in the pan).
  8. Pour glaze over the cake and allow it to soak up the glaze. This takes 15-20 minutes.
  9. Once the glaze is absorbed into the cake, loosen the sides of the pan with a spatula as much as possible. Turn the cake out of the pan onto a cake plate.
  10. Cut and serve cake.

NUTRITIONAL INFO:

Calories: 518kcal | Carbohydrates: 70g | Protein: 5g | Fat: 24g | Saturated Fat: 10g | Polyunsaturated Fat: 6g | Monounsaturated Fat: 6g | Trans Fat: 0.5g | Cholesterol: 101mg | Sodium: 464mg | Potassium: 107mg | Fiber: 1g | Sugar: 52g | Vitamin A: 472IU | Vitamin C: 0.2mg | Calcium: 144mg | Iron: 1mg


Butter Swim Biscuits Recipe

Butter Swim Biscuits

Butter Swim Biscuits are buttermilk biscuits that are baked drenched in butter for a biscuit that has a crispy crust with a soft and fluffy inside.

Butter Swim Biscuits are buttermilk biscuits that are baked drenched in butter for a biscuit that has a crispy crust with a soft and fluffy inside. If these biscuits sound amazing (which they are), be sure to also try my Buttermilk Biscuits!

Prep Time: 15mins

Cook Time: 28mins

Total Time: 43mins

Course: Side Dish

Cuisine: American

Keyword: Butter Swim Biscuits

Servings: 9

INGREDIENTS:

  • 2 ½ cups (312.5 g) all-purpose flour
  • 4 teaspoons baking powder
  • 1 tablespoon granulated sugar
  • 2 teaspoons kosher salt
  • 2 cups (490 g) buttermilk
  • ½ cup (1 stick / 113 g) unsalted butter, melted

INSTRUCTIONS:

  1. Preheat the oven to 450°F.
  2. Add flour, baking powder, sugar, and salt to a medium bowl. Use a whisk to sift ingredients.
  3. Pour in the buttermilk and stir until mostly combined, being careful not to overwork the batter.
  4. Pour the melted butter into an 8×8-inch baking dish*. Place the dough on top of the butter and use a spatula (or your hands) to evenly spread the dough out to the edges of the pan.
  5. Cut the unbaked dough into 9 squares (3×3 pattern). Bake for 28 minutes, or until the tops are golden brown.
  6. Allow the butter to be absorbed into the biscuits before cutting and serving.

NOTES:

You can place the baking dish on a baking sheet in case of spillover.

How to Freeze Biscuits

Wrap cooled biscuits tightly with foil or plastic wrap and then in a freezer-safe storage bag. If they are wrapped tight and air can’t get to them, they should remain fresh for a couple of months.

How to Store Biscuits

Biscuits are best eaten fresh, usually on the same day of baking. If you want to make them a day ahead of time:

  • Bake biscuits.
  • Allow biscuits to cool to room temperature.
  • Wrap tightly with foil (Only use plastic wrap if the biscuits are completely cooled; trapping in hot air could make the biscuits soggy.)
  • Place in refrigerator until ready to use. (You can also leave at room temperature if you prefer.)
  • Warm in the oven at the lowest temperature for up to 10 minutes when ready to serve.

Nutrition

Calories: 241kcal

Slow Cooker Green Chile Chicken and Rice Casserole Recipe

Slow Cooker Green Chile Chicken and Rice Casserole has the flavors of green chile enchiladas but with rice instead of tortillas.

This recipe has the flavors of green chile chicken enchiladas but I used rice instead of tortillas. One of my mom’s signature dishes was green chile enchiladas which was my inspiration for this.

Prep Time: 15mins

Cook Time: 2hrs

Total Time: 2hrs 15mins

Course: Main Course

Cuisine: American

Servings: 8

INGREDIENTS:

  • 1 1/2 lbs boneless skinless chicken breasts
  • 1/2 tsp. salt
  • 1/4 tsp. pepper
  • 2 tsp. chili powder
  • 1/2 tsp. garlic powder
  • 1/2 tsp. onion powder
  • 1 small white onion, diced
  • 1 poblano pepper, diced (about 1/2 cup)
  • 19 oz. can green enchilada sauce
  • Add these ingredients at the end:
  • 1 cup sour cream
  • 2 cups shredded cheddar cheese, divided
  • 1/4 cup sliced green onion
  • 3 cups hot cooked white rice

INSTRUCTIONS:

  1. Add the chicken breasts to the slow cooker.
  2. Sprinkle over the salt, pepper, garlic powder, onion powder and chili powder over the chicken. Add the onion, poblano pepper.
  3. Pour over the enchilada sauce.
  4. Cover and cook for 6-8 hours on the low setting.
  5. When the cooking time is done, shred the chicken with two forks.
  6. Add the sour cream, half cup of the cheese and the green onion.
  7. Stir. Add the cooked rice and stir. Sprinkle over the remaining cheese.
  8. Place the lid back on and cook for 15 more minutes or until the cheese is melted.
  9. If your rice has cooled and not hot, you will need to cook longer about 45 minutes on high.

Nutritional Info:

Calories: 382kcal | Carbohydrates: 26g | Protein: 28g | Fat: 17g | Saturated Fat: 9g | Cholesterol: 99mg | Sodium: 1002mg | Potassium: 458mg | Fiber: 2g | Sugar: 6g | Vitamin A: 1025IU | Vitamin C: 16.2mg | Calcium: 252mg | Iron: 1.2mg


Watermelon Salad with Feta Recipe

This delicious, refreshing watermelon salad recipe is meant for hot summer days. With feta, avocado, mint & lime, it’s the perfect mix of savory & sweet

Once summer rolls around, I can’t get enough of salads made with a mix of peak-season fruits and veggies. I love a good sweet & savory combination, and this watermelon salad with feta, mint, avocado, and a tangy lime dressing is exactly that.

Every year, as soon as I spot a good watermelon, I rush home to make this recipe. It takes minutes to throw together, and it’s incredibly refreshing. Try it once, and you’ll have it on repeat for the rest of watermelon season

What to Serve with Watermelon Salad

I love to make this salad for cookouts. It pairs well with whatever you’re grilling, whether that be portobello mushroom burgers or dogs, black bean burgers, veggie burgers, or corn on the cob.

It’s also good with picnic sandwiches like these chickpea shawarma wraps, these BBQ jackfruit sandwiches, this caprese sandwich, or this mushroom po’ boy.

If you have extra watermelon, make watermelon margaritas! If you don’t have extra watermelon, you can never go wrong with classic margaritas.

If you love this watermelon salad recipe…

Try more of my favorite fruity salads like this strawberry caprese salad, this watermelon tomato salad, this summer slaw, or this corn salad!

Watermelon Salad with Feta & Mint

Prep Time: 15mins

Total Time: 15mins

Serves 4

This refreshing watermelon salad is one of our favorite summer sides. Feta, mint & avocado are the perfect tangy, creamy, and fresh counterpoints to the juicy watermelon.

Ingredients:

Dressing
  • 2 tablespoons extra-virgin olive oil
  • 3 tablespoons lime juice
  • ½ garlic clove, minced
  • ¼ teaspoon sea salt
For the salad
  • 5 cups cubed watermelon
  • 1 heaping cup diced English cucumber
  • ¼ cup thinly sliced red onions
  • ⅓ cup crumbled feta cheese
  • 1 avocado, cubed
  • ⅓ cup torn mint or basil leaves
  • ½ jalapeño or serrano pepper, thinly sliced, optional
  • Sea salt

Instructions:

  • Make the dressing: In a small bowl, whisk together the olive oil, lime juice, garlic and salt.
  • Arrange the watermelon, cucumber, and red onions on a large plate or platter.
  • Drizzle with half the dressing.
  • Top with the feta, avocado, mint, and serrano pepper, if using, and drizzle with remaining dressing. Season to taste and serve.

Creamy Beef Roasted Red Pepper Pasta Bake Recipe

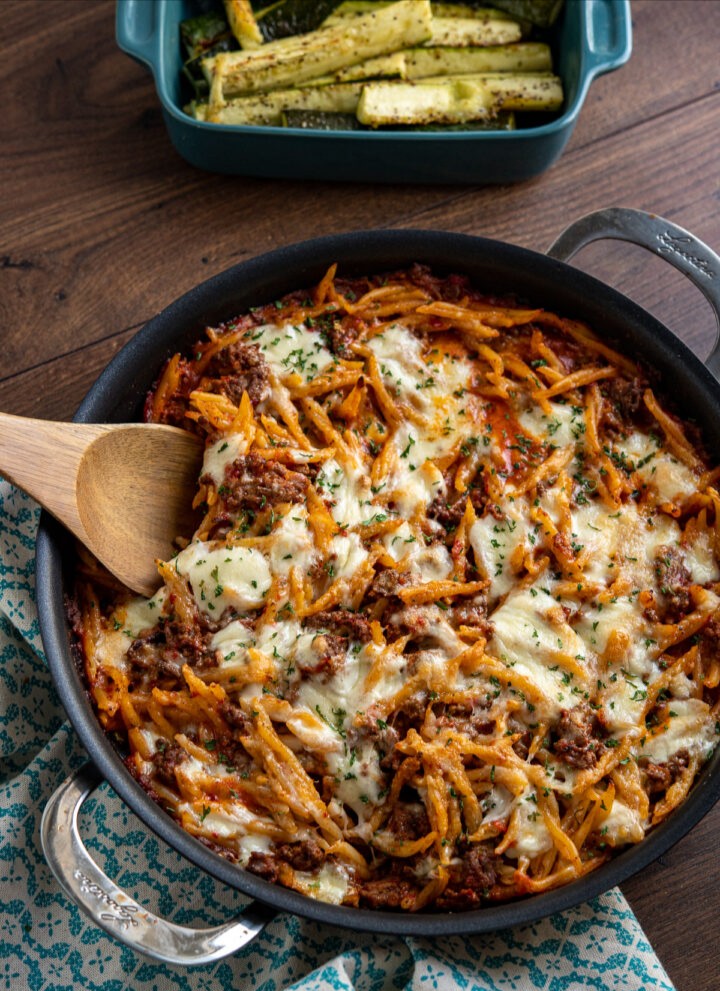
Creamy Beef Roasted Red Pepper Pasta Bake – Indulge in the ultimate comfort food with our creamy ground beef pasta recipe. This delectable dish features trofie pasta, roasted red peppers, and a heavenly blend of torn mozzarella and Parmesan. Baked to perfection, each bite is a symphony of flavors that will leave you craving more. Get ready to experience a mouthwatering culinary delight like no other.

There’s something undeniably irresistible about the combination of pasta and a hearty meat sauce turned into a delicious pasta bake. Imagine a bubbling casserole dish, brimming with layers of mouthwatering goodness, proudly displayed at the center of our table.

As a family, we value the time spent together at the dinner table, and I believe that enjoying a healthy, low-calorie meal doesn’t mean sacrificing the joy of sharing the same foods. That’s why I always make sure to include nutritious sides that encourage healthy eating habits for everyone. By incorporating wholesome ingredients and smart choices, we can all indulge in the same delicious spread while maintaining a balanced lifestyle.

Trust me, once you experience the magic of this dish, it will become an absolute favourite, and you’ll be inspired to recreate it again and again. So gather around the table, savour the delightful flavors, and revel in the knowledge that a healthy meal can be both satisfying and enjoyed by the whole family.

Variations on the the Recipe

Bring your own unique twist to the classic Creamy Beef Roasted Red Pepper Pasta Bake with these creative variations. Customize the dish to suit your preferences and add an exciting burst of flavor to your culinary creation. Here are a few ideas to get you started:

Vegetarian Option: Embrace a vegetarian lifestyle or simply explore meat-free alternatives by swapping the ground beef with plant-based ground meat. The plant-based version will provide a delicious and satisfying vegetarian option, without compromising on taste or texture.

Different Mince/Ground Meat: Experiment with various types of mince or ground meat to suit your preferences. Turkey, chicken, or pork mince can be excellent alternatives to beef, bringing their unique flavors and characteristics to the dish. Each variety will lend a distinct taste and create a delightful variation.

Additional Spicy Kick: For those who enjoy a fiery culinary adventure, amplify the heat level by adding a dash of hot sauce, such as Tabasco. This extra kick will infuse your pasta bake with an irresistible zing, tantalizing your taste buds with every bite.

Additional Flavor: Explore the depths of flavor by substituting sweet regular paprika with smoky paprika. The smoky variation will impart a rich, smoldering essence, adding complexity and a touch of intrigue to the dish. However, if you prefer a milder flavor, stick to sweet paprika for a more delicate taste.

Herbaceous Twist: Elevate the freshness of your pasta bake by incorporating fragrant herbs like basil, thyme, or oregano. The addition of these aromatic herbs will infuse the dish with a burst of natural flavors, enhancing its overall appeal and providing a delightful herbaceous twist.

Added Vegetables: Amp up the nutritional value and add vibrant colors to your dish by including additional vegetables. Choose vegetables that complement the flavors of the pasta bake, being mindful of their water content. Spinach, bell peppers, mushrooms, or any vegetable of your choice can be sautéed or lightly cooked before being added to the pasta bake, ensuring they retain their texture and flavor.

Unleash your culinary creativity with these variations, allowing you to personalize the Creamy Beef Roasted Red Pepper Pasta Bake to your liking. Whether you’re exploring different protein sources, enhancing the spice level, or infusing fresh herbs and vegetables, these modifications will elevate your dining experience and create a dish that truly reflects your unique tastes.

Tips for Freezing

To enjoy this scrumptious pasta bake on a busy weeknight or store leftovers for later, follow these freezing suggestions. Keep in mind that not everyone finds frozen, defrosted, and reheated pasta appealing due to its slightly overcooked texture. However, if you’re content with the outcome of frozen pasta dishes, you can confidently freeze this particular dish.

Creamy Beef Roasted Red Pepper Pasta Bake – This delectable dish features trofie pasta, roasted red peppers, and a heavenly blend of torn mozzarella and Parmesan. Baked to perfection, each bite is a symphony of flavors that will leave you craving more. Get ready to experience a mouthwatering culinary delight like no other.

PREP TIME: 15 mins

COOK TIME: 40 mins

TOTAL TIME: 55 mins

INGREDIENTS:

  • olive oil spray
  • 1 onion, finely diced
  • 3 cloves of garlic, crushed
  • 455g (1lb) of extra lean ground beef (mince)
  • 1 teaspoon of sweet paprika
  • salt and black pepper
  • pinch of red chilli flakes (optional)
  • 200g (7oz) of roasted red peppers (jarred in brine), drained
  • 1 cup (240ml) of chicken stock
  • 2 tablespoons of tomato paste (puree)
  • 1 tablespoon of granulated sweetener
  • 80ml of reduced fat single cream or half and half
  • 240g of trofie pasta, uncooked – or use your preferred pasta shape)
  • 90g (3oz) of fresh mozzarella, torn into pieces
  • 30g (1oz) of freshly finely grated parmesan
  • 2 teaspoons of dried parsley

INSTRUCTIONS:

  1. Spray a deep ovenproof frying pan with olive spray
  2. Add the onion and fry for a few minutes until softened.
  3. Add in the mince and garlic and fry until browned.
  4. Season well with salt and black pepper and stir in the paprika and pinch of chilli flakes if using.
  5. Add the drained roasted red peppers, tomato paste, stock and sweetener to a blend and pulse until sauce like.
  6. Pour this into the mince along with the cream , and simmer for 10 minutes.
  7. Taste the meat sauce and season as needed to your desired taste with salt and black pepper
  8. Cook the pasta in a pot of salted boiling water until al dente, reserve a 1/3 cup (80ml) of the cooked pasta water, then drain the pasta, spray with olive oil spray and toss to coat to prevent it from sticking together.
  9. Preheat oven to 170c fan, 190c, 375f or gas mark 5
  10. Add to the meat sauce, along with the reserved pasta water and stir until all combined and coated.
  11. Scatter with the torn fresh mozzarella and sprinkle inbetween with the parmesan.
  12. Bake in the oven for 20 minutes until cheese on top is melted and lightly golden
  13. Sprinkle with the dried parsley and enjoy!!

Notes:

WW Points and other Slimming or Weight Loss programs: due to plans regularly changing and updating, we recommend calculating with the official tools you get as a member to those plans to ensure accuracy of values

Gluten Free Friendly – use gluten free pasta and stock

Suitable for Freezing ❄️

If you wish to share this recipe, then please do so by using the share buttons provided at top of this post.

Nutritional Info:

Yield: 4

Serving Size

1 SERVING

Calories547TotalFat13gSaturatedFat7gTransFat0gUnsaturatedFat10gCholesterol66mgSodium521mgCarbohydrates54gFiber2gSugar4gProtein39g

Vegan Lebanese Potato Salad

Servings: 2 Lebanese Potato Salad, also known as batata salata, is a light and refreshing dish commonly found in the Middle East. Unlike American potato salads, this version has no mayonnaise—just bright lemon juice, fresh herbs, tangy olives, and, of course, olive oil! If you’re feeling ravenous, serve this alongside Mediterranean Roasted Chicken (page 148). … Read more

Chocolate Pound Cake Recipe

Look no further for the very best chocolate pound cake. This decadently delicious cake bakes up perfectly moist and full of rich chocolate flavor. It’s a chocolate lover’s dream come true! We’re putting the pause on pumpkin to bring you the best ever chocolate pound cake. Today’s recipe is one that is close to my … Read more

Broccoli Apple Salad Recipe

Broccoli, pecans, cranberries, carrots and apples come together to make an amazing salad with delicious flavors and textures. The creamy dressing on top makes this salad absolutely incredible!

Broccoli is amazing in salads, it adds crunch, nutrition and flavor. 

Broccoli in salads is my favorite. I especially love this Broccoli Cashew Salad that is on the blog. But this Broccoli Apple Salad became an instant favorite! As I was eating it, I just couldn’t get enough! I knew this salad would be amazing but I wasn’t expecting it to become a new favorite! SO many delicious new textures and flavors in this salad. The broccoli, carrots, and red onion, was followed by the sweetness of the apples and dried cranberries. The pecans added another yummy flavor and crunch. The creamy dressing on top was THEE best. It completed this fresh and delicious salad perfectly. I know that if you make this salad, it will become an instant favorite as well!

At first you might think that broccoli and apples don’t go together, but they do, trust me. This is truly one of the best salads out there. It’s healthy, full of flavor and the dressing is even light. I traded out some of the mayonnaise for greek yogurt, giving you a boost of calcium, protein and cutting the fat. All without compromising on taste and tang. It’s going to be a new go to salad for sure!

Why This Recipe Needs to be Made Today!

Besides being extremely delicious this broccoli apple salad has so many pros to it, you will truly want to keep this recipe close by.

Nutritious: Packed with vegetables and fruit and even nuts, this broccoli salad is an immune boosting, fiber enhancing delicious dish. This salad is high in vitamin C, K and A plus it’s high in fiber. Pecans add protein and a healthy fat. Even though you have mayonnaise in the dressing, it’s such a big salad that the amount you’ll actually ingest is just little. Unless you eat the whole thing, which I wouldn’t blame you. It’s extremely diet friendly.

Make Ahead: This broccoli apple salad actually tastes better if it sits for at least an hour. The flavors and the dressing all meld together in the most fantastic way. This non lettuce salad is full of hearty ingredients so this will stand up to being made ahead of time beautifully. It’s a great choice for packing in lunches, taking to potlucks, and having as leftovers. Make it ahead of time and free up time for making other dishes before dinner.

Colorful: It’s been said we should eat the rainbow! Well, this broccoli apple salad is definitely a rainbow of colors! It’s as fun to look at as it is too eat! Not only isn’t appealing to the eyes, but to the tastebuds too! It’ll be a salad that gets eaten first at your next picnic

Hearty and Satisfying: This salad is packed with nutritious ingredients that will not only taste good, but fill you up. The crunchiness satisfies your desire to chew and the high fiber will fill up your tummy!

Pour the dressing over the salad ingredients. 

Tips and Variations for Creamy Broccoli Apple Salad

This salad is delicious as a side dish for beef, fried chicken or even salmon. Or make it a highlight in a light meal served with a refreshing fruit salad and some bread sticks. Yummy!

Make it Easy: You can make the prep for this salad even easier by buying pre shredded carrots, and pre cut broccoli florets.

Substitute Dried Cranberries: Use raisins, golden raisins, or dried cherries instead of the cranberries if you wish.

Nuts: Try using walnuts or cashews instead of pecans. Also try toasting them in a pan on the stovetop till fragrant and slightly browned for added flavor.

Cheese: For a twist add blue cheese to the broccoli apple salad which adds incredible flavor.

Apples: I used gala apples in this recipe. You want an apple on the sweeter side. Try Fuji or Braeburn as well for excellent results.

Prep Time: 20mins

Total Time: 20mins

Course: Salad, Side Dish

Cuisine: American

Keyword: broccoli apple salad, broccoli salad

Servings: 6 Servings 

Ingredients:

  • 4 cups fresh broccoli florets (about 2 medium heads)
  • 1/2 cup shredded carrots
  • 1/4 cup diced red onion
  • 2 large apples finely chopped (I used gala apples)
  • 1/2 cup pecans coarsely chopped
  • 1/2 cup dried cranberries

Creamy dressing ingredients:

  • 1/2 cup lite mayonnaise
  • 1/2 cup low fat greek yogurt
  • 2 Tablespoons lemon juice
  • 1 Tablespoon sugar
  • 1/4 teaspoon salt
  • 1/8 teaspoon pepper

Instructions:

  1. In a large bowl combine broccoli, carrots, red onion, apples, pecans, and dried cranberries.
  2. Whisk together mayonnaise, greek yogurt, lemon juice, sugar, salt and pepper.
  3. Add the dressing to the salad and toss to coat. Chill until ready to serve.
How to Store Apple Broccoli Salad

Broccoli Apple Salad keeps great for up to 3 days before it will start to really get soggy. It’ll still be good for another 2-3 days after, but the quality of the vegetables and fruit will decrease rapidly. If you plan to eat it all week long, try dividing the salad in half and only add dressing to the half you are eating up first. It will help keep the sogginess at bay

Nutritional Info:

Calories: 215kcal | Carbohydrates: 28g | Protein: 5g | Fat: 11g | Saturated Fat: 1g | Cholesterol: 4mg | Sodium: 272mg | Potassium: 334mg | Fiber: 5g | Sugar: 19g | Vitamin A: 2217IU | Vitamin C: 60mg | Calcium: 63mg | Iron: 1mg

Snowball Cookies Recipe

These classic Snowball Cookies are little balls of buttery shortbread melt-in-your-mouth goodness with a powdered sugar coating. They are quick to fix, delicious, and freeze well. You may even have the ingredients to make them in your house right now. You might know them as Russian Tea Cakes, Italian Wedding cookies, butter balls, and Mexican Wedding Cookies but in our house, we just call them Snowballs They are the delectable cookies with a thousand names.

This is my absolute favorite Christmas cookie recipe! I love them!!! LOVE THEM!!! These Buttery Pecan Snowball Cookies will melt in your mouth. They are so easy! You will find that you have a full batch of cookies ready in under 45 minutes. How can you beat that!!

These delectable holiday cookies are so very easy to make. First, using an electric mixer or stand mixer with the paddle attachment on medium speed cream the butter and the powdered sugar until light and fluffy! Then turn the mixer to low speed and add the salt, vanilla, flour, and pecans. Roll into one 1-inch balls and place on parchment-covered baking sheets and bake.

Allow the cookies to cool just enough to handle them. Then gently roll them in the powdered sugar. Place them on a wire rack to cool. When they are fully cooled roll in the powdered sugar again.

CAN SNOWBALL COOKIES BE FROZEN?

They can be baked and frozen ahead of time. Pack the cookies in double Ziploc freezer bags and place them in a sturdy glad-ware freezer container. When defrosting take them out of the containers frozen and place them on serving trays or platters uncovered. Never allow them to defrost in the plastic and the containers. The condensation that builds in there will ruin the cookies. Once the cookies have defrosted place them in airtight containers and store them at room temperature for up to 5 days.

The dough can easily be frozen as well in a practice commonly known as flash freezing. Simply roll the dough and place it on parchment-covered baking sheets. Make sure the dough balls aren’t touching so they don’t freeze to each other. Place the whole sheet in the freezer until frozen and then transfer the balls to a freezer bag. Store that bag in a sturdy freezer container. When you are ready to bake simply place the cookies on a parchment-covered baking sheet and let them thaw just a tad while the oven preheats. Frozen cookies may require an additional one to two minutes of baking time.

RECIPE VARIATIONS

Roll the dough around an unwrapped chocolate kiss

Add 3/4 cup chopped Andes Peppermint Crunch Baking Chips to the cookie dough

Add 3/4 cup mini chocolate chips to the cookie dough

Mix 1/4 cup unsweetened cocoa powder at the same time as the butter and powdered sugar. Also, add 3/4 cup mini chocolate chips stirred in at the end to make Chocolate Snowball Cookies

Replace the vanilla with lemon juice, add 1-2 tablespoons lemon zest and use finely chopped sliced almonds instead of the pecans to make Almond Lemon Snowballs.

Substitute almonds coarsely ground in a food processor for the pecans and add 1/2 teaspoon almond extract. 

This snowball cookie recipe is a Christmas tradition and my favorite cookie! These melt in your mouth buttery pecan shortbread cookies are baked to perfection and rolled in powdered sugar.

Prep Time: 15 mins

Cook Time: 11 

Total Time: 26 mins Yield: 30-36 

Category: Cookies

Method: Bake Cuisine: American

INGREDIENTS:

  • 1 cup unsalted butter softened
  • 1/2 cup powdered sugar (confectioner’s sugar)
  • 1/4 teaspoon salt
  • 1 1/2 teaspoon vanilla extract
  • 2 1/4 cups all-purpose flour
  • 3/4 cup pecans or walnuts, finely chopped
  • 1 cup powdered sugar for dusting

INSTRUCTIONS:

  1. Preheat the oven to 350 degrees
  2. In a stand mixer using the paddle attachment on medium-speed cream the butter and powdered sugar.
  3. Turn the mixer to low and add the salt, vanilla, flour, and pecans. Roll the dough into one-inch balls.
  4. Place on parchment-covered baking sheets a few inches apart. Bake for 8-10 minutes or until very lightly browned. Do not over bake
  5. Remove them from the oven and allow them to cool just enough to handle them.
  6. Pour 1 cup powdered sugar into a medium bowl. Gently roll the cookies in the powdered sugar.
  7. Use a fork to scoop under each cookie and gently shake to remove excess powdered sugar. Place on cooling racks.
  8. Once completely cooled roll in the powdered sugar again.

NOTES:

  • Use real honest-to-goodness butter so they taste yummy. I personally use Land O Lakes butter for all my cookies.
  • Cream the butter and sugar until light and fluffy
  • Chop the pecans fairly fine. Remember you can use different nuts.
  • This a thick dough so roll the cookies with your hands because the warmth of your hands will help shape the cookies.
  • Preheat the oven and load the baking sheet in the middle of the oven.
  • Use parchment paper or silicone baking mats.
  • If you have time do a test run with one or two cookies. It really helps to establish baking time.
  • Do not over-bake the cookies. These are a type of shortbread cookies with a crumbly melt-in-your-mouth texture.
  • When measuring your flour spoon the flour into the measuring cups and level off with a table knife.
  • Store the cookies in an airtight container on the counter for up to 5 days.

NUTRITIONAL INFO: 

Serving: 1cookieCalories: 147kcal (7%)Carbohydrates: 16g (5%)Protein: 2g (4%)Fat: 9g (14%)Saturated Fat: 4g (25%)Cholesterol: 19mg (6%)Sodium: 46mg (2%)Potassium: 26mg (1%)Fiber: 1g (4%)Sugar: 9g (10%)Vitamin A: 165IU (3%)Vitamin C: 1mg (1%)Calcium: 13mg (1%)Iron: 1mg (6%)

Mexican Barbecue Chicken Skewers

Mexican Barbecue – tender chicken skewers marinated with a delicious Mexican blend of spices for the perfect barbecue meal.

Mexican Chicken Skewers

Barbecue food doesn’t need to be unhealthy and it doesn’t need to be the usual burger and sausages, there are so many possibilities for food you can cook on your grill. We had some lovely weather here over the weekend, so I decided to do a Mexican inspired Barbecue.

A simple seasoning blend to marinate some pieces of chicken thighs along with vegetables like mixed bell peppers and onion and these are cooked perfectly on the grill or barbecue

The marinade is for these skewers is so easy and uses ingredients most of us have on hand. It will also work well for shrimp, pork or beef.

PREP TIME: 20 minutes

COOK TIME: 15 minutes

TOTAL TIME: 35 minutes

Ingredients:

  • 8 small boneless chicken thighs, any visible fat removed (approx 650g/22.5oz)
  • 2 cloves of garlic
  • 1 jalapeño pepper, seeds removed
  • 3 tablespoons of tomato paste
  • 2 teaspoons of cumin
  • 2 teaspoons of paprika
  • 1/2 teaspoon of oregano
  • handful of fresh coriander
  • juice of half a lime
  • salt and black pepper
  • 1 red bell pepper, chopped into square pieces
  • 1 green bell pepper, chopped into square pieces
  • 1 yellow bell pepper, chopped into square pieces
  • 1 white onion, chopped, chopped into square pieces
  • cooking oil spray

Instructions:

  1. Add in the spices, jalapeno, lime juice, coriander and a good pinch of salt and black pepper to a mini food processor and pulse until a paste. Add in a little water at a time if needed to help it pulse.
  2. Dice the chicken thighs into bite sized pieces, add the marinade to the chicken and toss to thoroughly coat.
  3. Refrigerate overnight or for a few hours at least.
  4. If using wooden skewers soak this in warm water for at least 30 minutes before cooking.
  5. Then add the chicken to the skewers along with the peppers and onion (I alternate the pieces (so chicken, vegetable, chicken, vegetable on the skewer).
  6. Spray the skewers or chicken and vegetables with cooking oil spray
  7. Cook on a hot barbecue, turning frequently until chicken is cooked through (approx 15 minutes)
  8. Alternatively you can bake these in the oven for 25-30 minutes at 220c, fan 200c or 425f (gas mark 7) or on a grill pan (approx 7 minutes each side)
  9. Great served with Mexican Chopped Salad and Mexican Rice

Notes:

WW Points and other Slimming or Weight Loss programs – due to plans regularly changing and updating, we recommend calculating with the official tools you get as a member to those plans to ensure accuracy of values. 

Nutritional Info:

Yield: 4

Serving Size: 1 SKEWER

Amount Per Serving

Calories251TotalFat7.1gSaturatedFat1.7gTransFat0gCholesterol159mgSodium434mgCarbohydrates11.2gFiber3gSugar3.7gProtein34.6g

Peach Mango Smoothie Recipe

Reach for this tropical sipper as a supercharged breakfast or afternoon pick-me-up.

Yields: 2

Prep Time: 5 mins

Total Time: 5 mins

Cal/Serv: 155

INGREDIENTS

  • 1/3 c. coconut water
  • 1/2 c. plain Greek yogurt
  • 1 c. frozen sliced peaches
  • 1 c. frozen mango chunks

Directions:

Step 1

  1. Add coconut water and yogurt to blender, then top with peaches and mango.
  2. Puree until smooth.

NUTRITIONAL INFO:

About 155 calories, 3 g fat (1.5 g saturated), 7 g protein, 35 mg sodium, 26 g carbohydrates, 3 g fiber

Coconut Raspberry Smoothie Recipe

Ditch the bulky blender and whip up this easy smoothie recipe with an immersion blender! Coconut yogurt, frozen raspberries, and bananas create a creamy breakfast or snack treat.

Yields: 1 serving(s)

Total Time: 5 mins

Ingredients:

  • 1/2 c. low-fat milk
  • 1/2 c. low-fat coconut-flavored yogurt
  • 2 c. frozen raspberries
  • 2 bananas, peeled and cut into pieces
  • Toasted coconut and raspberries, for serving

Directions:

Step 1

Using immersion blender, blend together milk and coconut-flavored yogurt with frozen raspberries and bananas.

Step 2

Serve topped with toasted coconut and raspberries.

Nutritional information (per serving):

About 520 calories, 7 g fat (3.5 g saturated), 21 g protein, 95 mg sodium, 105 g carbohydrate, 25 g fiber


Easy Chocolate Eclair Recipe

While a trip to Paris may not always be a feasible option for satisfying your pastry cravings, this easy chocolate eclair recipe definitely will! Made with a simple pate a choux pastry dough and pastry cream filling, you’ll love how delicious and easy these chocolate eclairs are.

Easy Chocolate Eclair Recipe with Custard Filling

Cream puffs and eclairs are quite possibly some of France’s most popular pastries, excluding the macaron, of course. 

Unlike the crisp macaron cookie, cream puffs and eclairs are pillow-y and soft. I like to think of them as pastry clouds because they truly taste like a dream.

Filled with a silky smooth custard filling, these pastry clouds because a dreamy and indulgent dessert

But don’t let the appearance or fancy French name fool you into thinking that this chocolate eclair recipe is difficult or tricky. Even the pastry cream can be made by novice bakers

French pastry logs filled with pastry cream and topped with chocolate ganache and chopped hazelnuts. 

PREP TIME: 45 minutes

COOK TIME: 20 minutes

TOTAL TIME: 1 hour 5 minutes

Ingredients:

for the pate a choux pastry dough

  • 1/2 cup water
  • 1/4 cup unsalted butter
  • 1/2 tsp granulated sugar
  • 1/4 tsp salt
  • 1/2 cup all-purpose flour
  • 2 eggs

for the pastry cream filling

  • 2 cups whole milk
  • 2 tsp vanilla extract, or 1/2 tsp vanilla bean powder (heads up that the powder will darken the pastry cream a bit)
  • 3 whole eggs
  • 1 egg yolk
  • 2/3 cup sugar
  • 1/4 cup cornstarch
  • 1/4 cup all-purpose flour
  • 1/8 tsp salt

for the topping

  • 4 oz dark or semi-sweet chocolate
  • 1/3 cup heavy cream, heated
  • 1/4 cup hazelnuts, finely chopped (optional)

Instructions:

Crème Pâtissière

  1. To a large bowl, add the eggs, egg yolk, and sugar – whisk together until thick and pale. Add the cornstarch, flour and salt, and whisk again to combine.
  2. Warm the milk in a medium saucepan over low heat. Once the milk is hot and is beginning to barely simmer along the edges (but not boiling!), remove the milk from the heat.
  3. Slowly stream the hot milk into the egg batter in batches, whisking vigorously as you do. This will help temper your eggs so that they don’t curdle into scrambled eggs!
  4. Slowly pour the entire pastry cream batter into a clean, dry saucepan. Warm this mixture over medium-low heat, whisking the mixture the entire time.
  5. After about 5 minutes, you should see the cream really thicken up into a pudding-like consistency.
  6. This happens in the matter of a moment, so be careful and watchful of your pastry cream the entire time.
  7. Once you’ve achieved a pudding-like consistency with your pastry cream, remove the cream from the heat. Don’t fret over small lumps as you can whisk them out off the heat.
  8. The point is to not overcook your pastry cream so that it turns stiff like jello or gets way too lump.
  9. Add in the vanilla extract (or vanilla bean powder) and whisk to combine. If you have any small lumps, just whisk vigorously to remove them.
  10. Place a sheet of plastic wrap directly onto the pastry cream to prevent a filmy layer from forming. Refrigerate the pastry cream until chilled.
  11. After it’s chilled, if you feel like it’s thickened up too much, you can stream in a little bit of milk and whisk to thin out the consistency a bit.

Choux Pastry

  1. Preheat the oven to 425°F. Place the butter in a medium saucepan, then follow with the sugar, salt, and water. Heat this mixture over low heat, stirring to help melt the butter.
  2. Add in the flour and stir to combine. Over medium-low heat, stir the dough until it forms a wet sand-like appearance and clumps together.
  3. Continue stirring the dough in the saucepan for another minute to help get rid of some of the moisture in the dough.
  4. The dough should be stirred around in the saucepan without leaving any residue behind along the bottom or sides of the pot – that’s how you’ll know much of the moisture has been eliminated.
  5. Take the saucepan off the heat, and add in 1 egg at a time, stirring the egg in really well before adding another.
  6. You should end up with a sort of paste-like appearance with the dough. Let the dough rest for 5 minutes to slightly cool.
  7. Transfer the dough to a pastry bag that is either fitted with a large, plain tip or no tip at all, and pipe out 1″ wide logs (and about 5 to 6 inches long) onto a baking sheet lined with parchment paper or a silicone mat.
  8. Bake the pastry logs for 10 minutes at 425°F, then without opening the oven door, reduce the heat to 375°F and bake for another 15 to 20 minutes, or until the logs are golden throughout.
  9. Do not open the oven door at all during the baking process, or else your pastries will deflate. Once the logs are golden throughout, then your eclairs are ready.
  10. When they’re done, pierce them with the tip of a sharp knife to let out steam and leave them in the oven with the door slightly open for another 15 min. Then transfer to a wire rack to cool.

For the ganache

  1. Heat the heavy cream in the microwave for about 20 to 30 seconds until hot.
  2. Place the chocolate in a shallow bowl, then pour the hot cream over it. Let this mixture rest for one minute, then stir until the chocolate has melted and is smooth.

Assemble Éclairs

  1. Let the pastry logs cool entirely before filling. Once cool, use either a metal rod or skewer to poke three, spaced-out holes into the bottom of your pastries. Alternatively, you can use a sharp knife to make a horizontal cut along one side of the pastry logs (like a hot dog bun).
  2. Fit a pastry bag with a small plain tip and fill with the pastry cream. Pipe the cream into the pastries: if filling small holes, then fill until it begins to ooze out of each hole; if you made a horizontal cut along the side, then simply fill the pastry with enough cream to fill up the inside of the pastry log (or just use a spoon to scoop the cream into the pastry log opening).
  3. Use a butter knife to spread the chocolate ganache onto the top of the eclairs. If using chopped nuts, sprinkle the chopped hazelnuts onto the ganache-covered eclair.

Notes:

You will end up with extra pastry cream, so just keep refrigerated in an airtight container for use in another recipe, or double the choux pastry ingredients to get more eclairs.

Nutritional Info:

YIELD: 5 SERVING SIZE: 5 Servings

Amount Per Serving: CALORIES: 279

Easy Goulash Recipe

This super easy Goulash Recipe is a comfort food classic! It’s filled with hearty ground beef and tender pasta in a rich tomato-based sauce and comes together in about 30 minutes!

I’m always looking for new and exciting ways to turn ground beef into dinner, but sometimes I just love the good old classics that bring me right back to my childhood. This Goulash Recipe is just that. It’s super affordable, quick to make and tastes like a warm hug on a cool evening.

This Ground Beef Goulash Recipe is a quick and easy one pan dinner that’s pure comfort food.

Prep Time: 5mins

Cook Time: 30mins

Total Time: 35mins

Course: Main Dish

Cuisine: American

Servings: 10

Ingredients:

  • 1 tbsp olive oil
  • 1 cup onion, diced
  • 1 green bell pepper, diced
  • 2 lbs. ground beef, lean
  • 3 tsp garlic, minced
  • 2 15 oz cans tomato sauce
  • 2 15 oz cans petite diced tomatoes
  • 3 cups beef broth
  • 3 tbsp Worcestershire Sauce
  • 2 tsp seasoned salt
  • 2 tbsp Italian Seasoning
  • 3 bay leaves
  • 2 cups macaroni noodles, uncooked
  • 1 cup cheddar cheese, shredded

Instructions:

  1. Add olive oil to large pot over medium-high heat.
  2. Add in the onion, bell pepper and ground beef then cook until beef is no longer pink.
  3. Drain any excess fat and return pot to stove top.
  4. Add in garlic and stir until fragrant (about 30 seconds).
  5. Pour in the tomato sauce, diced tomatoes, beef broth, Worcestershire sauce, seasoned salt, Italian seasoning, bay leaves and dried macaroni noodles.
  6. Stir and bring mixture to a boil.
  7. Reduce heat to a light boil and stir occasionally until the pasta is tender, about 20 minutes.
  8. Remove the bay leaves and stir in the cheddar cheese just before serving. Enjoy!

Nutritional Info:

Calories: 388kcal | Carbohydrates: 20g | Protein: 22g | Fat: 24g | Saturated Fat: 10g | Cholesterol: 76mg | Sodium: 918mg | Potassium: 439mg | Fiber: 2g | Sugar: 2g | Vitamin A: 174IU | Vitamin C: 12mg | Calcium: 134mg | Iron: 3mg

Triple Chocolate Cheesecake Bars

These Triple Chocolate Cheesecake Bars feature a chocolate shortbread crust, dark chocolate cheesecake, and a rich chocolate ganache layer. Each decadent cheesecake bar has less than 4 net carbs and is sure to satisfy your sweet tooth! Ingredients Chocolate Crust 6 tablespoons butter, melted 1 1/4 cup almond flour 2 tablespoons cocoa powder 2 tablespoons … Read more

Strawberry Cream Cheese Icebox Cake

Strawberry Cream Cheese Icebox Cake This Strawberry Cream Cheese Icebox Cake is a no bake dessert that will delight your taste buds. With only 6 ingredients this easy dessert is a total win! It can be made gluten-free, dairy-free, and vegan. Ingredients 2 cups (8oz) dairy-free whipped cream/topping 8 oz dairy-free cream cheese ¼ cup (25g) organic powdered sugar ½ teaspoon pure vanilla … Read more

Summer Smoothies Recipe

As the weather heats up, we’re reaching for something refreshing to cool off on hot summer days. Enter: fruity, creamy summer smoothies. These blended bevs are not only easy to make, but celebrate the best of the season’s fruit in the most creative ways. Melting in that sweltering sun? Throw these fresh ingredients into the blender for easy-to-make healthy smoothie recipes you’ll be drinking all season long.

These recipes let summer flavors shine with bright citrus, strawberries and juicy peaches. Looking to get in more greens? Fruit may take the main stage, but hidden veggies also shine: Carrot blends seamlessly into a sweet mango smoothie, while spinach gives a nutrient boost to a delicious banana-honey option. Switch up your usual routine by making these slurpable drinks into smoothie bowls! Greek yogurt turns a tart raspberry smoothie into a thick, creamy mixture, perfect for topping with kiwi, coconut flakes, or chia seeds. The best thing about these summer drinks? They’re quick (less than 5 minutes!) and oh so simple to whip up, so you’ll be relaxing by the pool in no time.

Whether you’re looking for a more substantial summer drink recipe or a quick breakfast idea, blend up one of these fruity drinks for a new staple smoothie. Pick your favorite recipe (or try all four), pour it into your favorite fun glass and get to sippin’ in the sun!

Yields: 2 serving(s)

Total Time: 5 mins

INGREDIENTS:

MANGO MADNESS

1 c. orange juice

1/2 c. coconut yogurt

1 1/2 c. frozen mango

1 medium carrot, coarsely grated

STRAWBERRY FIELDS

1/2 c. coconut water

1/2 c. coconut yogurt

1 c. strawberries

1/2 c. frozen peaches

GREEN GODDESS

1/2 c. unsweetened almond milk

1/2 c. honey yogurt

2 bananas, cut into pieces and frozen

3 c. baby spinach

RAZZLE-DAZZLE

1/2 c. low-fat milk

1/2 c. nonfat Greek yogurt

2 c. frozen raspberries

2 bananas, peeled and cut into pieces

Directions:

Step 1

In blender, puree the ingredients until smooth.

Step 2

To make smoothie bowl: Make Razzle-Dazzle Smoothie and transfer to bowls. Top with kiwi slices, coconut flakes, and raspberries.

RAZZLE-DAZZLE SMOOTHIE

SERVES 1 About 430 cal, 2.5 g fat (1 g sat), 21 g pro, 100 mg sodium, 92 g carb, 16 g fiber

MANGO MADNESS SMOOTHIE

SERVES 1 About 445 cal, 4.5 g fat (4 g sat), 16 g pro, 100 mg sodium, 92 g carb, 8 g fiber

STRAWBERRY FIELDS SMOOTHIE

SERVES 1 About 225 cal, 4 g fat (4 g sat), 13 g pro, 85 mg sodium, 36 g carb, 4 g fiber 

GREEN MACHINE SMOOTHIE

SERVES 1 About 565 cal, 28 g fat (2.5 g sat), 17 g pro, 285 mg sodium, 73 g carb, 21 g fiber

Tropical Smoothie Bowl Recipe

Top this fruity smoothie with chopped almonds, shredded coconut, fresh kiwi, mango and blueberries.

Yields: 2 serving(s)

Total Time: 5 mins

Ingredients:

  • 1 banana, sliced and frozen
  • 1 c. frozen mango chunks
  • 1 c. frozen pineapple chunks
  • 1 c. almond milk

Directions:

  1. In blender, pulse banana, mango, and pineapple with almond milk until smooth but still thick, stopping and stirring occasionally.
  2. Add more liquid if needed.
  3. Pout into 2 bowls.
  4. Top as desired.

Nutritional Info:

Calories 180; Protein 3g; Carbohydrate 43g; Total Fat 2g; Dietary Fiber 5g; Sodium 90mg


Slimming World Hunter Chicken Recipe

Hunters Chicken – tender chicken breasts in a delicious homemade barbecue sauce with slices of smoky bacon, all topped with cheese and baked until melted and golden. 

PREP TIME: 15 minutes

COOK TIME: 40 minutes

TOTAL TIME: 55 minutes

INGREDIENTS:

  • 2 large uncooked boneless skinless chicken breasts (approx 250g/9oz each)
  • 8 slices of uncooked back bacon (trimmed of visible fat)
  • 100g (7oz) of mozzarella
  • 60g (2.1oz) of cheddar
  • pinch of black pepper
For the sauce:
  • 1 400ml can of crushed tomatoes (or use passata)
  • 1 cup (240ml) of water
  • 1 small onion, halved and sliced thinly
  • 2 cloves of garlic, minced
  • 3 tablespoon of 100% pure maple syrup (do not use sugar free)
  • 2 teaspoons of paprika
  • 2 teaspoons of smoked paprika (not the hot variety)
  • 1 tablespoon of balsamic vinegar
  • 1/2 tablespoon of apple cider vinegar
  • 1 tablespoon of light soy sauce
  • 1 tablespoon of dark soy sauce (ensure it says dark on the bottle)
  • 1 teaspoon of yellow mustard
  • 1 teaspoon onion powder
  • 1/2 teaspoon garlic powder
  • 2 tablespoon tomato paste (puree) – add four if using passata
  • optional: liquid smoke (I add 1/2 teaspoon)
  • low calorie spray

INSTRUCTIONS:

  1. Carefully Slice the two chicken breast into 4 cutlets, by using a sharp knife to cut the chicken breasts in half crosswise.
  2. Place the cutlet in a ziplock bag one at a time and use a meat tenderiser or rolling plan to flatten. Set aside.
  3. Spray a deep frying pan over a medium high heat with cooking oil spray.
  4. Add the onion and garlic and fry until softened.
  5. Add in all other ingredients for the sauce, bring to a boil, reduce heat slightly, cover and and let the sauce bubble to reduce down and really thicken (approx 10 minutes, don’t put the heat too low), ensure you let the sauce reduce down and thicken before proceeding to the next steps, or your sauce will be too runny.
  6. Preheat oven to 200c, 180c fan, 400f, gas mark 6
  7. Once the sauce has thickened, add the sauce in a even layer to baking tray or oven proof dish.
  8. Place the flattened chicken breasts into the sauce. Brush over the top with the barbecue sauce to ensure they are all fully coated.
  9. Place 2 slices of bacon on top of each chicken breast, and again brust over the top with the barbecue sauce, so that the bacon pieces are also fully covered.
  10. Top with the cheese and pinch of black pepper and bake in the oven for approx 20 minutes until chicken is cooked through and cheese is melted.
  11. You can then place under a medium heat on the grill (broil) until the top is golden.
  12. Serve with your choice of sides and enjoy!!

Notes:

This recipe is gluten free, Slimming World and Weight Watchers friendly

Slimming World – 1 HEa and 2 syns per serving

WW Green Smart Points – 8 per serving

WW Blue Smart Points – 6 per serving

WW Purple Smart Points – 6 per serving

Nutritional Info:

Serving Size

1 SERVING

Amount Per Serving

Calories436TotalFat14.6gSaturatedFat8.2gCholesterol45.6mgCarbohydrates25.2gFiber4gSugar15.8gProtein49.1g

Lemon Pound Cake

Ingredients For the Pound Cake: 2 ounces cream cheese, room temperature one brick 0.38 cups unsalted butter room temperature 0.25 teaspoon salt 0.63 cups granulated sugar 0.25 package lemon instant pudding (just use the mix/don’t cook this!) 3.4 ounce 1.5 large eggs room temperature 0.75 cups sifted cake flour 0.88 teaspoons fresh lemon zest For the Lemon Glaze: 0.33 cups powdered sugar sifted 0.75 tablespoons fresh lemon juice Optional: lemon zest for garnish US Customary – Metric Instructions For the Pound Cake: … Read more

Low-Carb Chicken Greek Bowl With Tzatziki

Combining all the benefits of the Mediterranean diet and Keto diet in one dish, these low-carb Greek Chicken Bowls are bursting with colours and flavours (plus, all the nutrients!). Skillet grilled seasoned chicken is paired with the Greek salad staples of tomatoes, cucumbers, onions, olives and feta cheese. Served with a side of refreshing, garlicky Tzatziki sauce or dressing, whichever way you want to roll with this gluten-free, low-carb chicken recipe.

Such a simple yet satiating and nutritious chicken salad bowl is great for lunch (at home or in the office) or as a quick and easy weeknight dinner.

If you’re looking for tasty low-carb chicken recipes, this Greek bowl of goodness is a must-try. It’s a type of meal I love to make: easy, quick and nutritious while delivering 100% flavour.

We’ve got protein, lots of healthy fats and just enough veg to give you that boost in vitamins, antioxidants and fibre while keeping the carb count low.

Plus, it’s great for meal prep: you can get every element ready ahead of time and store in the fridge for a few days.

Prep Time: 15 minutes

Cook Time: 10 minutes

Total Time: 30 minutes

Yield: 4 

Cuisine: Greek

Diet: Gluten Free

INGREDIENTS:

GREEK CHICKEN
  • 1 lb (455 g) boneless, skinless chicken breast, cut into 1-inch (2.5-cm) cubes
  • 3 tbsp (45 ml) olive oil
  • 2 tbsp (30 ml) lemon juice
  • 1 tbsp (15 ml) red wine vinegar
  • 1 tbsp (3 g) Greek seasoning (see notes below)
  • 1⁄4 tsp sea salt
TZATZIKI SAUCE
  • 8 oz (224 g) full-fat plain Greek yoghurt
  • 1⁄2 medium Persian cucumber, grated
  • 2 cloves garlic, grated
  • Zest of 1 medium lemon
  • 1 tbsp (15 ml) fresh lemon juice
  • 2 tbsp (8 g) minced fresh dill
  • Sea salt, as needed
  • Black pepper, as needed
RED WINE VINEGAR DRESSING
  • 3 tbsp (45 ml) olive oil
  • 1 tbsp (15 ml) red wine vinegar
  • 1 tsp minced fresh oregano
  • Sea salt, to taste
SALAD TOPPINGS
  • 1 large Persian cucumber, diced
  • 1 cup (150 g) cherry tomatoes, halved
  • 1⁄2 cup (58 g) thinly sliced red onion
  • 1⁄3 cup (33 g) pitted Kalamata olives
  • 4 oz (112 g) feta cheese, crumbled

INSTRUCTIONS:

  1. To make the chicken, combine the chicken, oil, lemon juice, vinegar, Greek seasoning, and salt in a sealable container.
  2. Marinate the chicken in the refrigerator for 30 minutes or up to overnight.
  3. To make the tzatziki, stir together the yoghurt, cucumber, garlic, lemon zest, lemon juice, dill, salt, and black pepper in a medium bowl.
  4. Refrigerate the tzatziki until you are ready to serve.
  5. Heat a 10-inch (25-cm) or larger cast-iron skillet over medium-high heat. Add the chicken and marinade to the skillet.
  6. Cook the chicken for 3 to 4 minutes per side, until it is brown and its internal temperature reaches 165°F (74°C).
  7. To make the red wine vinegar dressing, whisk together the oil, vinegar, oregano, and salt in a small bowl.
  8. To assemble the bowls, divide the chicken among four individual serving bowls. Top the chicken with the cucumber, tomatoes, onion, olives, and feta cheese.
  9. Pour the red wine vinegar dressing over the bowls and top each bowl with the tzatziki just before serving.

Notes:

You can buy ready-made Greek seasoning like this or this one (more exy but a nicer brand in my opinion). You can also make your own by mixing salt, pepper, dried oregano, dried thyme or rosemary, garlic powder, paprika and cinnamon.

Cooking times above don’t include the time for marinating the chicken which can be anywhere between 10-15 minutes and overnight. The longer you leave it, the more flavour it will have.

Nutritional Info:

Serving Size: 1 bowl with 100-120 g / 3-4 oz chickenCalories: 496Sugar: 6.5 gSodium: 1022.8 mgFat: 32.3 gSaturated Fat: 9.4 gCarbohydrates: 12.6 gFiber: 2.3 gProtein: 40.4 gCholesterol: 170 mg

Mexicorn and Rotel Dip Recipe

If you’re craving something that’s both delicious and easy to whip up, look no further than Mexicorn Dip. This Mexican-inspired delicacy is the ideal blend of creamy and crunchy, making it the perfect partner for your favorite corn chips.

Course: Side Dish, Snack

Cuisine: Mexican

Keyword: Mexican-Style Dip, Mexicorn Dip, Quick Snack

Prep Time: 10mins

Total Time: 10mins

Servings: 16

Ingredients:

  • 2 cans of Mexicorn
  • 1 can of Rotel either mild or spicy, as per your liking
  • 2 generous cups of shredded cheddar cheese
  • 8 spring onions finely chopped
  • A good handful of cilantro minced
  • 1 cup of smooth mayonnaise
  • 1 cup of tangy sour cream
  • Your chip of choice but Fritos Scoops are highly recommended

Instructions:

  1. Uncomplicated Steps for a Memorable Dip
  2. Combine All Elements: In a sizable mixing bowl, amalgamate Mexicorn, Rotel, shredded cheese, spring onions, and cilantro.
  3. Incorporate Creaminess: Fold in the mayonnaise and sour cream until your dip reaches a delightfully creamy consistency.
  4. Serve and Enjoy: Transfer the dip to a serving bowl and let the snacking commence! Fritos Scoops make an excellent dipping companion.