🍞 Classic Homemade Artisan Bread
Crisp Crust • Soft Interior • Simple Ingredients
This Classic Homemade Artisan Bread is perfect for everyday baking. It uses basic pantry ingredients and simple techniques to create two beautiful loaves with a golden crust and light, airy inside. The dough is easy to work with, making it ideal for both beginners and experienced home bakers.
🧾 Yield & Timing
-
Makes: 2 loaves
-
Preparation Time: 20 minutes
-
Rising Time: 1½–2 hours
-
Baking Time: 30–35 minutes
🧺 Ingredients
-
Warm Water: 600 ml total (about 3 glasses)
-
200 ml for starting the yeast
-
400 ml added later
-
-
Dry Yeast: 10 grams (1 standard packet)
-
All-Purpose Flour: 840 grams total (7 cups)
-
120 g (1 cup) for the yeast mixture
-
720 g (6 cups) for the dough
-
-
Sugar: 1 tablespoon (helps awaken the yeast)
-
Salt: 2 teaspoons
-
Olive Oil: 1 tablespoon (optional, for lightly coating the bowl)
🥣 Step-by-Step Instructions
1️⃣ Prepare the Yeast Mixture
In a large mixing bowl, add:
-
200 ml warm water
-
Dry yeast
-
Sugar
-
120 g (1 cup) flour
Whisk gently until smooth. Cover the bowl with a clean cloth and let it rest for 10–15 minutes.
What to look for:
The surface should become foamy and slightly bubbly, showing the yeast is active and ready.
2️⃣ Build the Dough
Once the yeast mixture is ready, pour in the remaining 400 ml warm water and add the salt.
Gradually add the remaining 720 g (6 cups) flour, one cup at a time, mixing with a wooden spoon or dough hook until a soft, rough dough forms.
3️⃣ Knead Until Smooth
Transfer the dough to a lightly floured surface. Using gentle, steady motions, knead for 8–10 minutes.
As you work:
-
The dough will become smoother
-
It should feel elastic and slightly springy
Tip: If the dough sticks too much, sprinkle in small amounts of flour—just enough to handle comfortably. A soft dough creates lighter bread.
4️⃣ First Rise
Lightly coat a clean bowl with olive oil. Place the dough inside and turn it once so the surface is lightly coated.
Cover and place in a warm, draft-free area. Allow the dough to rest until it has doubled in size, about 1 to 1½ hours.
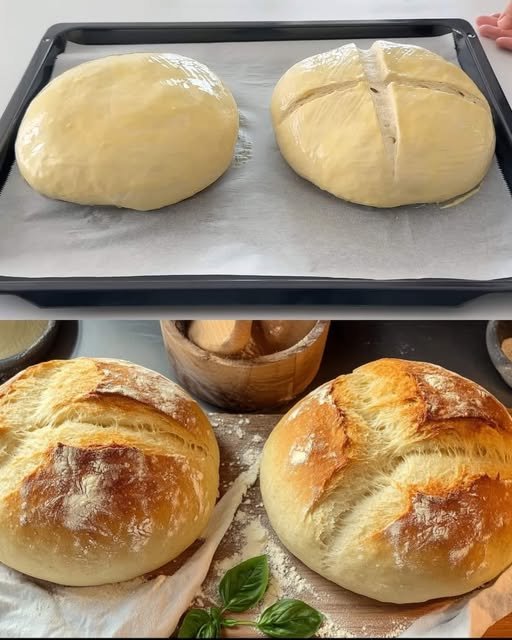
5️⃣ Divide and Shape
Gently press the dough to release excess air. Divide it evenly into two portions.
Shape each portion into a smooth, round loaf by tucking the edges underneath. Place both loaves on a parchment-lined baking sheet, leaving space between them.
6️⃣ Second Rise & Surface Design
Cover the loaves and let them rest again for 30 minutes.
While resting:
-
Preheat your oven to 200°C (400°F)
Just before baking, use a sharp knife to gently make a shallow “X” or cross on top of each loaf. This helps the bread expand evenly while baking.
7️⃣ Bake
Place the baking sheet in the oven and bake for 30–35 minutes, until:
-
The crust turns deep golden
-
The loaf sounds hollow when lightly tapped underneath
Optional Bakery-Style Finish:
Place a small oven-safe pan with 1 cup of water on the lower rack during the first 15 minutes to create steam, giving the bread a crisp, professional crust.
8️⃣ Cool Before Slicing
Transfer the baked loaves to a wire rack. Allow them to cool for at least 20 minutes before slicing. This helps the interior texture finish setting properly.
⭐ Helpful Tips
-
Warm water should feel pleasantly warm, not hot
-
Letting the bread cool improves slicing and texture
-
Store cooled bread wrapped in cloth or paper for best freshness