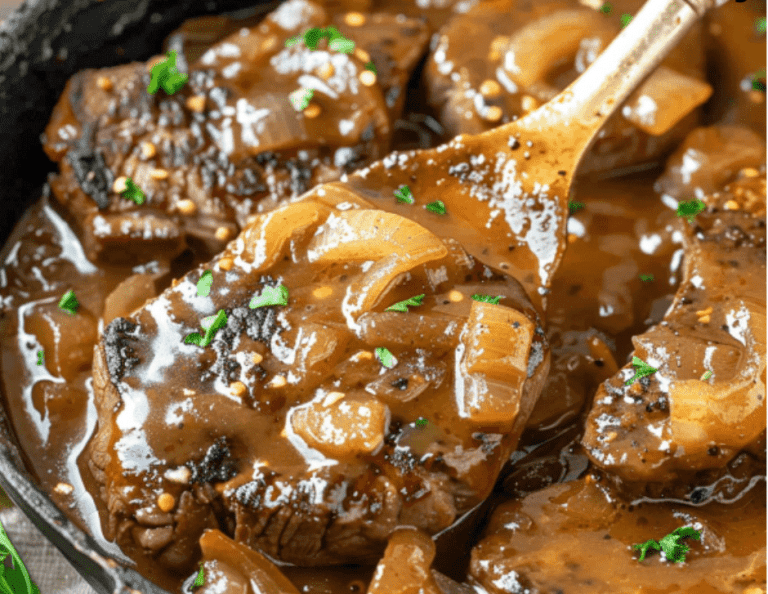
WW Zero-Point Banana Blueberry Bake

Light, naturally sweet, and surprisingly indulgent — like bread pudding without the bread!

Servings: 1
Prep Time: 3 minutes
Cook Time: 3½ minutes
Total Time: 6–7 minutes
Occasion: Breakfast, Snack, W-W Zero Point Treat

Ingredients

  • 2 ripe bananas, mashed

  • 2 large eggs, lightly beaten

  • A handful of fresh blueberries

Instructions

  1. Mash Bananas
    In a small mixing bowl, mash bananas until mostly smooth.

  2. Mix In Eggs
    Stir in beaten eggs until fully incorporated.

  3. Add Blueberries
    Gently fold in blueberries.

  4. Microwave & Cook
    Pour mixture into a greased 16 oz ramekin or soufflé cup. Microwave on high for about 3½ minutes, or until set to desired firmness.

  5. Serve & Enjoy
    Let cool slightly and enjoy warm — the texture is soft and custardy.

Tips & Notes

  • Try adding cinnamon or a drop of vanilla extract for extra flavor.

  • Frozen blueberries work, but add a few extra seconds to cooking time.

  • Great eaten hot or chilled for a make-ahead snack.

Tools You’ll Need

  • Mixing bowl

  • Fork or whisk

  • 16 oz ramekin or soufflé dish

  • Microwave

If you want, I can also create a “W-W Friendly Breakfasts” category so this one sits alongside other low-point recipes. That way, it’s easier to find all your healthy breakfast ideas in one place.

Bacon & Corn Griddle Cakes

Savory, cheesy, and slightly spicy cakes topped with crispy bacon and drizzled in warm maple syrup.

Servings: About 8 cakes
Prep Time: 10 minutes
Cook Time: 20 minutes
Total Time: 30 minutes
Occasion: Breakfast, Brunch, Comfort Food

Ingredients

  • 8 slices bacon, cut into ½-inch pieces

  • ⅓ cup finely chopped sweet onion

  • 1 cup all-purpose flour

  • 2 tablespoons fresh chives, chopped

  • 1 teaspoon baking powder

  • ½ teaspoon salt

  • ⅛ teaspoon cayenne pepper

  • ⅔ cup milk (plus more if needed for thinner cakes)

  • 1 large egg, beaten

  • 1 tablespoon canola or vegetable oil

  • 1 cup corn (frozen, canned, or fresh)

  • ½ cup Monterey Jack cheese, shredded

  • Warm maple syrup, for serving

Instructions

  1. Cook Bacon & Onion
    In a medium skillet, cook bacon until it begins to brown. Add onion and cook until bacon is crisp and onion is soft. Reserve 1 heaping tablespoon of the bacon-onion mixture for topping.

  2. Mix the Batter
    In a medium bowl, whisk together flour, chives, baking powder, salt, and cayenne. Stir in milk, egg, and oil until just moistened. Fold in bacon-onion mixture, corn, and cheese. The batter will be thick — add a splash more milk if you prefer thinner cakes.

  3. Cook the Griddle Cakes
    Heat and lightly grease a griddle or large skillet. Pour about ¼ cup batter per cake, cooking 3–4 minutes per side until golden brown.

  4. Serve
    Stack griddle cakes on plates, sprinkle with reserved bacon-onion mixture, and drizzle generously with warm maple syrup.

Tips & Notes

  • The cayenne adds a gentle heat — adjust or omit based on preference.

  • Try swapping Monterey Jack with pepper jack for extra spice.

  • Nutritional info does not include maple syrup.

Tools You’ll Need

  • Medium skillet

  • Griddle or large skillet

  • Mixing bowl

Do you want me to also create a “Savory Pancakes & Fritters” category so this recipe can be grouped with others like Bacon Pancakes Sweet Savory Bites? That would make your recipe collection more organized.

Copycat McDonald’s Sausage, Egg & Cheese McMuffin

Bring the golden arches to your kitchen with this easy, satisfying breakfast classic.

Servings: 4
Prep Time: 5 minutes
Cook Time: 15 minutes
Total Time: 20 minutes
Occasion: Breakfast, Brunch, On-the-Go

Ingredients

  • 4 English muffins, split and toasted

  • 4 sausage patties

  • 4 slices cheese (cheddar, American, or your choice)

  • 4 large eggs

  • Salt & pepper, to taste

  • Butter or oil, for cooking

Instructions

  1. Toast the Muffins
    Butter each half of the English muffins. Toast in a skillet until golden brown. Set aside.

  2. Cook the Sausage
    In the same skillet, cook sausage patties over medium heat for 3–4 minutes per side until browned and cooked through. Set aside.

  3. Cook the Eggs
    Grease a ring mold (or mason jar lid) and place it on the skillet. Crack one egg into each mold.
    Season with salt and pepper, cooking for 2–3 minutes or until whites are set and yolks reach your preferred doneness.

  4. Assemble the McMuffins
    On the bottom half of each muffin, place a slice of cheese, then a hot sausage patty, then the cooked egg.
    Top with the remaining muffin halves.

  5. Serve
    Enjoy immediately or wrap in foil for later reheating.

Tips & Variations

  • Slightly flatten sausage patties before cooking so they fit the muffins perfectly.

  • Use fresh eggs for the best texture and look.

  • Assembling in the order of cheese → sausage → egg helps the cheese melt from the heat of both layers.

  • Swap in turkey sausage, chicken sausage, or even plant-based patties for a lighter option.

Tools You’ll Need

  • Large skillet

  • Ring molds or mason jar lids

  • Spatula

If you want, I can also make a “Fast-Food Breakfast Copycat” section so this recipe can be grouped with others like your Breakfast Sliders and Breakfast Roll-Ups. Would you like me to do that?

Sausage, Egg & Cheese Breakfast Roll-Ups

Warm, cheesy, and perfectly portable—these roll-ups are your new go-to for quick mornings or hearty brunch spreads.

Servings: 4
Prep Time: 10 minutes
Cook Time: 15 minutes
Total Time: 25 minutes
Occasion: Breakfast, Brunch, On-the-Go

Ingredients

  • 1 lb breakfast sausage

  • 6 large eggs

  • ½ cup shredded cheddar cheese

  • ¼ cup milk

  • ½ tsp salt

  • ¼ tsp black pepper

  • 4 large flour tortillas

  • Butter or oil, for greasing

Instructions

  1. Cook the Sausage
    In a large skillet over medium heat, cook the breakfast sausage, breaking it into small pieces. Stir occasionally until browned and fully cooked. Remove and set aside.

  2. Scramble the Eggs
    In a mixing bowl, whisk together eggs, milk, salt, and pepper until smooth.
    Add a little butter or oil to the same skillet, pour in the egg mixture, and cook over medium-low heat until softly scrambled. Remove from the heat.

  3. Assemble the Roll-Ups
    Lay tortillas flat. Evenly divide sausage and scrambled eggs among them, then sprinkle with cheddar cheese.
    Roll each tortilla tightly to secure the filling.

  4. Pan-Crisp the Roll-Ups
    Heat butter or oil in the skillet over medium heat. Place roll-ups seam side down and cook for 2–3 minutes, turning to brown all sides and melt the cheese inside.

  5. Serve
    Slice into bite-sized pieces or serve whole while warm.

Tips & Variations

  • Swap in turkey sausage or plant-based sausage for a lighter option.

  • Add sautéed peppers, onions, or spinach for extra flavor and veggies.

  • Make ahead and freeze—reheat in a skillet or toaster oven for a fast breakfast.

Tools You’ll Need

  • Large skillet

  • Mixing bowl

  • Spatula

If you’d like, I can group this with your Breakfast Quesadillas, Breakfast Braid, and Croissant Casserole into a “Savory Breakfast Wraps & Roll-Ups” category so it’s easier to browse. Would you like me to do that?

Bacon Pancakes – Sweet & Savory Bites

Fluffy pancakes studded with smoky bacon—perfect for a breakfast that balances sweet and savory in every bite.

Servings: 4–6
Prep Time: 10 minutes
Cook Time: 20 minutes
Total Time: 30 minutes
Occasion: Breakfast, Brunch, Comfort Food

Ingredients

Dry Ingredients

  • 2 cups all-purpose flour

  • 1 tsp baking powder

  • 1 tsp baking soda

  • ¼ tsp salt

  • 2 tbsp brown sugar

Wet Ingredients

  • 1 cup milk (or non-dairy alternative)

  • 1 tsp vanilla extract

  • 2 small eggs

Other Ingredients

  • 8 oz bacon strips, diced and cooked

  • 3 tbsp butter for cooking

Instructions

  1. Prepare the Batter
    In a blender, combine milk, vanilla extract, eggs, baking powder, baking soda, salt, and brown sugar. Pulse until mixed.
    Add flour and blend briefly until smooth.
    If mixing by hand: Sift the flour first to avoid lumps. Stir just until combined—do not overmix.

  2. Cook the Bacon
    In a skillet over medium heat, cook diced bacon until browned and crispy. Remove bacon with a slotted spoon and set aside, leaving some bacon grease in the skillet for flavor.

  3. Cook the Pancakes
    Heat the skillet to medium-low. Add 1 tbsp butter if needed.
    Drop portions of batter into the skillet and sprinkle cooked bacon pieces over the top.
    Cook for 1–2 minutes, until edges start to set and bubbles form on the surface. Flip and cook the other side until golden. Repeat with remaining batter.

  4. Serve
    Enjoy warm, topped with maple syrup, extra butter, or additional bacon crumbles. For large batches, keep pancakes warm in a low oven until serving.

Tips & Variations

  • Keep a thin layer of bacon grease in the skillet for a smoky, savory base.

  • If the skillet becomes too greasy, drain excess before adding more butter.

  • Try using candied bacon for a sweet twist.

  • Swap in turkey bacon or plant-based bacon for a lighter option.

Tools You’ll Need

  • Blender or whisk

  • Mixing bowl

  • Skillet

Do you want me to also group this Bacon Pancakes recipe with your other sweet–savory breakfast combos like Breakfast Pigs in a Blanket and Bacon & Croissant Casserole so they form one brunch category?

Grilled Cheese Sausage Egg Bake

All the flavors of a diner-style breakfast—eggs, sausage, and gooey cheese—layered between thick Texas toast and baked to perfection.

Servings: 6
Prep Time: 15 minutes
Cook Time: 40 minutes
Total Time: 55 minutes
Occasion: Breakfast, Brunch, Meal Prep

Ingredients

Meats

  • 1 lb pork breakfast sausage

Dairy

  • 18 large eggs, divided

  • 4 tbsp butter, divided

  • 1 cup whole milk, divided

  • 12 slices American cheese

Baking & Spices

  • ¼ tsp kosher salt

  • ½ tsp coarse ground black pepper

  • ½ tsp ground mustard

Bread

  • 12 slices Texas toast

Instructions

  1. Preheat Oven
    Heat oven to 375°F (190°C).

  2. Cook the Sausage
    In a large skillet over medium-high heat, cook sausage 4–5 minutes, breaking it apart until browned. Drain excess fat.

  3. Scramble the Eggs
    Add 1 tbsp butter to the skillet over medium heat. Whisk together 10 eggs, ¼ cup milk, salt, and pepper. Pour into skillet and scramble until just set. Remove from heat.

  4. Assemble the Layers
    In a 9×13-inch baking dish, place 6 slices of Texas toast. Top each slice with 1 slice of American cheese.
    Add cooked sausage, scrambled eggs, and another layer of American cheese.

  5. Make the Custard
    In a medium bowl, whisk remaining 8 eggs, ¾ cup milk, and ground mustard. Pour evenly over the layered ingredients in the dish.

  6. Top and Butter
    Add the final 6 slices of Texas toast. Melt remaining 3 tbsp butter and brush over the bread tops.

  7. Bake
    Cover with foil and bake for 20 minutes.
    Remove foil and bake for another 20 minutes, until golden brown and cooked through.

  8. Serve
    Let rest for 5 minutes before slicing into squares. Serve hot.

Tips & Variations

  • Make Ahead: Assemble the night before, refrigerate, and bake in the morning.

  • Cheese Options: Swap American for cheddar, Colby Jack, or pepper jack for a different flavor profile.

  • Extra Veggies: Add sautéed peppers, onions, or spinach between the layers.

  • Storage: Refrigerate leftovers up to 3 days; reheat in the oven for crispier bread.

Tools You’ll Need

  • Large skillet

  • 9×13-inch baking dish

  • Medium mixing bowl

  • Whisk

  • Basting brush

If you want, I can group this with your Breakfast Braid, Breakfast Sliders, and Breakfast Quesadillas into a “Layered & Baked Breakfasts” collection so they’re easy to browse together. Would you like me to do that?

Breakfast Quesadillas with Eggs

Cheesy, savory, and loaded with bacon, sausage, peppers, and eggs — the ultimate handheld breakfast.

Servings: 4 (8 wedges)
Prep Time: 15 minutes
Cook Time: 20 minutes
Total Time: 35 minutes
Occasion: Breakfast, Brunch, Meal Prep

Ingredients

Filling

  • 6 large eggs

  • ¼ cup heavy cream or whole milk

  • 8 slices thin bacon

  • 6 sausage links or ¼ lb ground sausage

  • ½ cup onions, diced

  • ½ cup red bell pepper, diced

  • 2 jalapeños, seeded & diced

  • 2 cups shredded cheese (cheddar, Monterey Jack, or a blend)

Tortillas & Cooking

  • 8 (6-inch) flour tortillas

  • 2 tablespoons butter

  • Pico de gallo, for serving (optional)

Instructions

  1. Whisk the Eggs
    In a mixing bowl, whisk together the eggs and heavy cream until fully blended.

  2. Cook the Bacon
    In a large skillet, cook bacon until crisp. Transfer to a paper towel-lined plate to drain.

  3. Cook the Sausage
    Remove excess fat from the skillet. Cook sausage links (or ground sausage) until browned and cooked through. Transfer to a paper towel to drain.

  4. Sauté the Veggies
    Add onions and red bell pepper to the skillet. Sauté 3–4 minutes, until softened. Add jalapeños for the last minute of cooking. Remove and set aside.

  5. Scramble the Eggs
    Wipe the skillet clean. Over medium-low heat, melt 1 tablespoon butter. Add whisked eggs, stirring gently until fluffy and just set. Remove from heat.

  6. Assemble the Quesadillas
    Heat skillet over medium heat. Butter one side of a tortilla and place it butter-side down in the skillet. Sprinkle with ~½ cup cheese, then layer on scrambled eggs, bacon, sausage, and sautéed vegetables. Top with a small handful of cheese and another buttered tortilla (butter side up).

  7. Cook & Flip
    Cook 2–3 minutes per side, until golden brown and crispy.

  8. Slice & Serve
    Cut into fourths using a pizza cutter or chef’s knife. Serve warm with pico de gallo if desired.

Tips & Variations

  • Freezer-Friendly: After cooling, quarter quesadillas and place on a parchment-lined baking sheet. Freeze for 1–2 hours, then store in freezer bags.

  • Reheating: Warm in a toaster oven for crispness or microwave 30–45 seconds.

  • Cheese Swap: Pepper jack adds spice, mozzarella melts super smooth, or try a cheddar-Monterey blend for balanced flavor.

  • Veggie Boost: Add spinach, mushrooms, or zucchini for extra nutrition.

Tools You’ll Need

  • Large skillet

  • Mixing bowl

  • Paper towels

  • Metal spatula

  • Pizza cutter or chef’s knife

If you’d like, I can group this recipe with your Breakfast Braid, Sausage Breakfast Muffins, and Breakfast Sliders into a “Savory Handheld Breakfasts” collection so they’re all in one easy place. Would you like me to do that?

Breakfast Braid with Sausage & Eggs

A golden, flaky pizza dough braid filled with savory breakfast sausage, fluffy scrambled eggs, melty cheddar, and colorful bell pepper — perfect for brunch, holidays, or weekend mornings.

Servings: 6
Prep Time: 15 minutes
Cook Time: 20 minutes
Total Time: ~35 minutes
Occasion: Breakfast, Brunch, Holiday Morning

Ingredients

Dough

  • 1 (10-ounce) tube refrigerated pizza dough

Filling

  • 12 ounces ground breakfast sausage, cooked and crumbled

  • 4 eggs

  • 2 tablespoons milk

  • ½ teaspoon black pepper

  • ¼ cup diced red bell pepper

  • 1 cup shredded cheddar cheese

Topping

  • 2 tablespoons butter, melted

Instructions

  1. Prep the Dough
    Preheat oven to 350°F (175°C). Line a baking sheet with parchment paper. Unroll the pizza dough onto the prepared sheet and press it into a rectangle.

  2. Add the Sausage Layer
    Spread the cooked sausage evenly down the center third of the dough.

  3. Cook the Eggs
    In a small bowl, whisk together eggs, milk, black pepper, and diced red bell pepper. Scramble in a hot skillet until fully cooked.

  4. Layer the Filling
    Spoon the scrambled eggs over the sausage, then sprinkle with shredded cheddar cheese.

  5. Braid the Dough
    Using a pizza cutter, slice each long side of the dough into 12–15 strips. Fold strips over the filling, alternating sides to create a braid pattern.

  6. Bake
    Bake for 20 minutes, or until the top is golden brown.

  7. Finish & Serve
    Brush with melted butter and serve warm.

Tips & Variations

  • Time Saver: Use precooked sausage crumbles or precooked sliced sausage links.

  • Microwave Eggs: For quicker cooking, microwave whisked eggs in 30-second increments, stirring after each, until cooked.

  • Cheese Swap: Try pepper jack, mozzarella, or Colby Jack for a twist.

  • Veggie Add-In: Spinach, mushrooms, or jalapeños can be added for extra flavor.

Tools You’ll Need

  • Baking sheet

  • Parchment paper

  • Skillet

  • Small mixing bowl

  • Pizza cutter

  • Whisk

If you want, I can format this along with your Sausage Breakfast Muffins and Sausage Breakfast Hawaiian Sliders into a “Savory Sausage Breakfast Recipes” collection so they’re grouped for easy browsing. Would you like me to create that collection?

Twice Baked Breakfast Potatoes

Golden russet potatoes baked twice for the ultimate breakfast — creamy mashed potato filling, crispy beef bacon, gooey cheddar, and a perfectly baked egg on top.

Servings: 6 halves (3 whole potatoes)
Prep Time: 15 minutes
Cook Time: 1 hour 20 minutes
Total Time: ~1 hour 35 minutes
Occasion: Breakfast, Brunch, Weekend Comfort Food

Ingredients

Potatoes & Seasonings

  • 3 large russet potatoes

  • 1 tablespoon avocado oil

  • ½ teaspoon salt (for roasting)

  • ¼ teaspoon black pepper (for roasting)

Mashed Potato Filling

  • 3 tablespoons unsalted butter

  • ½ cup whole milk, hot

  • ½ teaspoon salt (for mashed potatoes), plus more to taste

  • ¼ teaspoon black pepper (for mashed potatoes)

Toppings

  • 6 slices beef bacon, each cut in half

  • ¾ cup shredded cheddar cheese

  • 6 large eggs

  • Salt & black pepper, to taste

Instructions

  1. Bake the Potatoes
    Preheat oven to 400°F (200°C). Scrub russet potatoes clean and poke holes all over with a fork. Rub with avocado oil, salt, and black pepper. Place directly on the oven rack and bake for 50–60 minutes, until fork-tender. Let cool slightly.

  2. Prepare the Filling
    Slice each potato in half lengthwise. Scoop out most of the flesh, leaving sturdy shells. Mash the scooped potatoes with butter, hot milk, salt, and black pepper until smooth and creamy.

  3. Assemble the Breakfast Potatoes
    Spoon most of the mashed potatoes back into the shells, pressing down in the center to create a well. Add 2 halved slices of beef bacon into each well, sprinkle with cheddar cheese, and carefully crack an egg on top. Season lightly with salt and pepper.

  4. Bake Again
    Reduce oven temperature to 350°F (190°C) and bake for 15–20 minutes, until egg whites are set but yolks are slightly runny.

  5. Serve & Enjoy
    Let cool for 2–3 minutes before serving warm.

Tips & Variations

  • For firmer eggs, bake an extra 3–4 minutes.

  • Swap beef bacon for turkey or pork bacon.

  • Add sautéed spinach, mushrooms, or caramelized onions for a veggie boost.

  • Serve with hot sauce for a little kick.

Tools You’ll Need

  • Oven

  • Fork

  • Large mixing bowl

  • Potato masher

  • Baking tray

If you’d like, I can group this with your Hissy Fit Hash Brown Casserole and Crack Croissant Breakfast Casserole into a “Baked Breakfast Comforts” collection so readers can browse them together. Would you like me to do that?

Breakfast Pigs in a Blanket — Cinnamon Roll & Sausage Edition

Sweet meets savory in this fun morning twist — juicy sausage links wrapped in warm cinnamon roll dough, baked to golden perfection, and drizzled with a buttery maple glaze.

Servings: 15–20 pieces
Prep Time: 10 minutes
Cook Time: 20–25 minutes
Total Time: 35 minutes
Occasion: Breakfast, Brunch, Holiday Mornings, Potlucks

Ingredients

  • 1 can refrigerated cinnamon rolls

  • 15–20 sausage links (regular or turkey, preferably pre-cooked)

  • 4 tablespoons butter

  • ¼ cup maple syrup

  • 1 cup powdered sugar

Instructions

  1. Preheat the Oven
    Set oven to 325°F (163°C). Line a baking sheet with parchment paper for easy cleanup.

  2. Wrap the Sausages
    Unravel each cinnamon roll and cut into 3–4 equal strips, depending on the number of sausages. Wrap each strip of dough around a sausage link and arrange on the prepared baking sheet.

  3. Bake
    Bake for 20–25 minutes, or until the cinnamon roll dough is puffed and golden brown.

  4. Make the Glaze
    In a bowl, combine melted butter and maple syrup. Gradually whisk in powdered sugar until smooth.

  5. Finish & Serve
    Drizzle the glaze generously over the warm sausage rolls. Serve immediately for the best texture and flavor.

Tips & Variations

  • Protein Swap: Try mini chicken apple sausages for a sweet and tangy version.

  • Extra Sweet: Sprinkle a pinch of cinnamon sugar on top after glazing.

  • Make Ahead: Wrap sausages in dough the night before, refrigerate, and bake in the morning.

  • Party Trick: Serve with small skewers for easy grabbing at brunch buffets.

Tools You’ll Need

  • Baking sheet

  • Parchment paper

  • Mixing bowl

  • Spoon or whisk

If you want, I can combine this with your Sausage Breakfast Hawaiian Sliders into a “Sweet & Savory Breakfast Sandwiches” blog post so they sit in one fun category. That way your readers can jump between recipes easily. Would you like me to do that?

Sausage Breakfast Hawaiian Sliders

Soft Hawaiian rolls layered with fluffy eggs, savory sausage, and melty cheddar — brushed with a maple butter glaze for the ultimate sweet-and-savory breakfast bite.

Servings: 12 sliders
Prep Time: 15 minutes
Cook Time: 20 minutes
Total Time: 35 minutes
Occasion: Breakfast, Brunch, Holidays, Make-Ahead

Ingredients

Main Ingredients

  • 8 large eggs

  • ¼ cup heavy cream

  • Salt and pepper, to taste

  • 1 tablespoon butter

  • 12 sausage patties

  • 2 cups shredded cheddar cheese, divided

  • 1 (12-ounce) package Hawaiian rolls

Glaze

  • 1 tablespoon maple syrup

  • 2 tablespoons melted butter

Instructions

  1. Prep the Dish
    Preheat oven to 350°F (175°C). Lightly grease a 9×13-inch baking dish with nonstick cooking spray.

  2. Scramble the Eggs
    In a large mixing bowl, whisk together eggs, heavy cream, salt, and pepper. Melt 1 tablespoon butter in a large skillet over medium heat, add egg mixture, and scramble until just set. Remove from heat and set aside.

  3. Cook the Sausage
    In the same skillet, cook sausage patties over medium-high heat until fully cooked. Drain on paper towels.

  4. Assemble the Sliders
    Without separating the rolls, slice the loaf horizontally. Place the bottom half of the rolls in the prepared baking dish. Sprinkle with 1 cup shredded cheddar. Layer with scrambled eggs, sausage patties, and remaining cheddar. Top with the top half of the rolls.

  5. Add the Glaze
    In a small bowl, whisk together melted butter and maple syrup. Brush evenly over the tops of the rolls.

  6. Bake
    Bake uncovered for 15–20 minutes, or until cheese is melted and sliders are heated through. Serve warm.

Tips & Variations

  • Make Ahead: Assemble the sliders, cover, and refrigerate overnight. Add glaze just before baking.

  • Cheese Options: Swap cheddar for pepper jack, Swiss, or Colby Jack for a flavor twist.

  • Protein Swap: Try bacon, ham, or plant-based sausage patties.

  • Serving Idea: Perfect for brunch boards alongside fresh fruit and mini pastries.

Tools You’ll Need

  • Large mixing bowls

  • 12-inch non-stick skillet

  • 9×13-inch baking dish

  • Rotary cheese grater or box grater

  • Serrated knife for slicing rolls

If you want, I can group this with your Crack Croissant Breakfast Casserole and Hissy Fit Hash Brown Casserole into a Breakfast Slider & Casserole Party post so it’s an all-in-one brunch guide for readers. That would make a strong themed article for your blog. Would you like me to do that next?

Crack Croissant Breakfast Casserole

Flaky, cheesy, and loaded with crispy bacon — this make-ahead croissant breakfast bake is perfect for holidays, brunch parties, and lazy weekend mornings.

Servings: 6–8
Prep Time: 20 minutes
Cook Time: 60 minutes
Chill Time: 8–24 hours
Total Time: 9–25 hours (including chilling)
Occasion: Breakfast, Brunch, Make-Ahead Meals

Ingredients

Main Ingredients

  • 3 large bakery-style croissants (about 5 inches each), chopped into 10–12 pieces

  • 1 lb bacon, cooked until crispy and crumbled

  • 1½ cups shredded cheddar cheese (or your choice — see tips)

  • 6 large eggs

  • 1 cup half-and-half (or heavy cream/whole milk)

  • 2 Tbsp ranch dressing mix

Instructions

  1. Prep the Croissants
    Chop each croissant into bite-sized pieces. Arrange evenly in a lightly greased 9×9-inch deep baking dish.

  2. Cook the Bacon
    In a skillet over medium-high heat, cook bacon until crispy. Drain excess fat and crumble into small pieces.

  3. Layer the Base
    Sprinkle cooked bacon and shredded cheddar cheese evenly over the chopped croissants.

  4. Make the Egg Mixture
    In a mixing bowl, whisk together eggs, half-and-half, and ranch dressing mix until smooth.

  5. Combine & Chill
    Pour the egg mixture evenly over the croissant mixture. Gently press down on the croissants so they’re fully submerged. Cover tightly with aluminum foil and refrigerate for at least 8 hours (up to 24 hours) to allow flavors to meld.

  6. Bake
    Preheat oven to 325°F (163°C). Bake covered for 35 minutes, then uncover and bake an additional 25 minutes, or until set and lightly golden on top.

  7. Rest & Serve
    Let the casserole rest for 10 minutes before slicing and serving warm.

Tips & Variations

  • Best Croissants: Use large, buttery bakery croissants — avoid refrigerated crescent rolls for best texture.

  • Cheese Swaps: Gouda, Swiss, Gruyere, or pepper jack all work well.

  • Lighter Option: Use turkey bacon for fewer calories.

  • Make-Ahead Friendly: Assemble up to 24 hours in advance and refrigerate until baking.

  • Freezer Option: Wrap tightly and freeze for up to 3 months. Thaw completely before baking.

  • Double It: For larger gatherings, double the recipe and bake in a 9×13-inch dish, adding 10–15 minutes to the cooking time.

Tools You’ll Need

  • 9×9-inch deep baking dish

  • 10-inch skillet

  • Rotary cheese grater or box grater

  • Whisk

  • Aluminum foil

If you’d like, I can also create a Holiday Brunch Casserole Collection post where this recipe is featured alongside your Hissy Fit Hash Brown Casserole and Crack Chicken Tater Tot Casserole so readers can pick from multiple crowd-pleasers in one article. That could make a strong seasonal blog entry. Would you like me to prepare that next?

Hissy Fit Hash Brown Casserole

Cheesy, hearty, and packed with savory breakfast sausage — this make-ahead friendly casserole is perfect for brunches, holidays, or busy mornings.

Servings: 8–10
Prep Time: 15 minutes
Cook Time: 45–60 minutes
Total Time: 1 hour–1 hour 15 minutes
Occasion: Breakfast, Brunch, Meal Prep

Ingredients

Casserole Base

  • 2 lb hot breakfast sausage

  • 1 (30–32 oz) bag frozen shredded hash browns, thawed

  • 1 tsp salt

  • ½ tsp pepper

  • ¼ tsp garlic powder

  • ¼ tsp onion powder

  • 1 cup shredded muenster cheese

  • 1 cup shredded Velveeta cheese (or see substitutions below)

Egg Mixture

  • 8 large eggs

  • 2 cups milk

  • 1 Tbsp Worcestershire sauce

Instructions

  1. Preheat & Prep
    Heat oven to 350°F (175°C). Lightly spray a 9×13-inch baking dish with non-stick cooking spray.

  2. Cook the Sausage
    In a large skillet, brown sausage over medium heat until fully cooked. Drain any excess fat and set aside.

  3. Brown the Hash Browns
    In the same skillet, cook thawed hash browns until lightly golden (add a drizzle of oil if needed). Transfer to the prepared baking dish, spreading evenly.

  4. Layer the Casserole
    Top the hash browns with cooked sausage, then sprinkle evenly with both cheeses.

  5. Mix the Egg Custard
    In a large bowl, whisk together eggs, milk, Worcestershire sauce, salt, pepper, garlic powder, and onion powder until well combined.

  6. Assemble & Bake
    Pour the egg mixture evenly over the casserole layers. Bake uncovered for 45–60 minutes, or until the center is set and the top is golden.

  7. Serve
    Let the casserole rest for 5–10 minutes before slicing and serving hot.

Tips & Variations

  • Thaw First: Always thaw frozen hash browns before browning for better texture.

  • Cheese Swap: Try cheddar, colby-jack, gouda, or mozzarella instead of Velveeta.

  • Extra Veggies: Add sautéed bell peppers, mushrooms, or onions for more flavor.

  • Make-Ahead: Assemble the night before, refrigerate, then bake in the morning (add 10–15 minutes to the bake time).

  • Freezer-Friendly: Assemble, wrap tightly, and freeze for up to 3 months. Thaw overnight before baking.

Tools You’ll Need

  • 12-inch non-stick skillet

  • Large mixing bowls

  • 9×13-inch baking dish

  • Whisk

If you want, I can also prepare a “Party Brunch Board” serving suggestion where this casserole is the centerpiece, paired with easy sides and garnishes so it’s presentation-ready for gatherings. That could make this recipe even more engaging for a blog audience. Would you like me to add that?

Delicious Ham and Cheese Quiche

Fluffy eggs, smoky ham, and melty cheese baked in a buttery crust — perfect for breakfast, brunch, or even dinner.

Servings: 6–8 slices
Prep Time: 10 minutes
Cook Time: 35–40 minutes
Total Time: 45–50 minutes
Occasion: Breakfast, Brunch, Easy Dinner

Ingredients

  • 1 store-bought pie crust

  • 4 large eggs

  • 1 cup whole milk

  • 1 cup diced ham (smoked or honey-baked)

  • 1 cup shredded cheddar cheese

  • Salt and pepper, to taste

  • Optional: 1 cup fresh spinach or ½ cup diced bell peppers

Instructions

  1. Preheat & Prep the Crust
    Heat oven to 375°F (190°C). Gently unroll the pie crust into a 9-inch pie plate, pressing it into place. Crimp the edges if desired.

  2. Make the Egg Mixture
    In a medium mixing bowl, whisk eggs and milk together until light and frothy. Season with salt and pepper.

  3. Add the Fillings
    Fold in the diced ham, shredded cheddar cheese, and optional vegetables.

  4. Assemble the Quiche
    Pour mixture into the prepared pie crust, spreading it evenly.

  5. Bake
    Bake for 35–40 minutes, or until the center is set and the top is golden brown.

  6. Cool & Serve
    Allow quiche to cool for about 10 minutes before slicing. Serve warm or at room temperature.

Chef’s Tips

  • For a richer flavor, swap half the milk for heavy cream.

  • Pre-sauté spinach or peppers to remove extra moisture before adding to the filling.

  • This quiche reheats well in the oven at 300°F for 10–15 minutes.

Storage

  • Refrigerate: Store covered in the fridge for up to 4 days.

  • Freeze: Wrap slices individually in foil and store up to 2 months. Reheat from frozen at 350°F for 20–25 minutes.

Serving Ideas

  • Pair with a light side salad for brunch.

  • Serve with roasted potatoes or fresh fruit for a complete breakfast spread.

If you’d like, I can also prepare 5 quiche flavor variations so your readers can easily adapt this recipe for different tastes and seasons. That would make this post more versatile for your blog. Would you like me to create that next?

Sausage Breakfast Muffins with Bisquick

Savory, cheesy, and protein-packed — the perfect make-ahead breakfast you can grab and go!

Servings: 12 muffins
Prep Time: 10 minutes
Cook Time: 18–20 minutes
Total Time: 30 minutes
Occasion: Quick Breakfast, Brunch, Meal Prep

Ingredients

Main Ingredients

  • 1 pound breakfast sausage

  • 4 large eggs

  • 1 cup shredded sharp Cheddar cheese

  • 1 cup Bisquick baking mix

Instructions

  1. Prep the Oven & Pan:
    Preheat oven to 175°C (350°F). Grease a 12-cup muffin pan with non-stick spray and set aside.

  2. Cook the Sausage:
    Crumble breakfast sausage into a skillet over medium-high heat. Cook until no longer pink, about 5–7 minutes. Drain excess fat and set aside to cool slightly.

  3. Mix the Batter:
    In a large mixing bowl, lightly beat the eggs. Add shredded cheese, Bisquick, and cooked sausage. Stir until fully combined.

  4. Fill & Bake:
    Divide the mixture evenly into muffin cups, filling each about ¾ full. Bake for 18–20 minutes, or until golden brown on top and set in the center.

  5. Cool & Serve:
    Let muffins cool slightly before removing from the pan. Serve warm or refrigerate for later.

Brief Introduction

These savory breakfast muffins are a busy-morning lifesaver. Packed with sausage, eggs, and cheese, they’re satisfying, portable, and perfect for meal prepping ahead of time.

Step-by-Step Cooking Guide

  • Step 1: Use a well-greased muffin pan to prevent sticking — sausage and cheese can release oils as they bake.

  • Step 2: Allow sausage to cool slightly before mixing with eggs to avoid scrambling them.

  • Step 3: Watch closely near the end of baking to prevent overbrowning.

Ingredient Details & Substitution Tips

  • Sausage: Use pork, turkey, or chicken breakfast sausage. For extra spice, choose hot sausage.

  • Cheese: Sharp cheddar gives the best flavor, but you can substitute with pepper jack, Swiss, or Colby.

  • Bisquick: Can be swapped for other all-purpose baking mixes.

Recipe Variations & Serving Suggestions

  • Veggie Boost: Stir in chopped spinach, bell peppers, or mushrooms.

  • Mini Version: Bake in a mini muffin tin for bite-sized snacks — reduce bake time to about 12 minutes.

  • Freezer-Friendly: Cool completely, freeze, and reheat in the microwave for quick breakfasts.

Storage & Make-Ahead Information

  • Refrigerate: Store in an airtight container for up to 4 days.

  • Freeze: Freeze up to 3 months; thaw overnight in the fridge before reheating.

Nutrition Facts (per muffin, approx.)

Calories: ~180 | Protein: 9g | Carbs: 6g | Fat: 13g | Fiber: 0g | Sugar: 1g

FAQs

Q: Can I make these without Bisquick?
A: Yes, replace with 1 cup flour, 1½ tsp baking powder, and ¼ tsp salt.

Q: How do I keep them from drying out?
A: Avoid overbaking and store in an airtight container once cooled.

Personal Story

I first made these for a Saturday brunch when I didn’t feel like flipping pancakes or frying bacon. My family devoured them before I even got a second cup of coffee — they’ve been a weekend staple ever since.

If you’d like, I can also prepare a “3-in-1 Breakfast Muffin Trio” section for your blog so readers get a sausage version, a veggie version, and a sweet muffin option all in one post. That would make this recipe even more appealing. Want me to put that together?

Pickled Pepper Onion

Bright, tangy, and lightly sweet with a pop of spice — this quick refrigerator pickle is the perfect topping for burgers, hot dogs, tacos, and sandwiches.

Servings: About 6 cups
Prep Time: 15 minutes
Cook Time: 5 minutes
Marinating Time: 24 hours (for best flavor)
Total Time: 24 hours 20 minutes
Occasion: Summer BBQs, Sandwich Night, Topping for Grilled Meats

Ingredients

Vegetables

  • 2 large onions, thinly sliced into half-moons

  • 4 cups mixed bell peppers, thinly sliced into strips (use multiple colors for a vibrant mix)

Pickling Liquid

  • 1 cup apple cider vinegar

  • 1 cup white vinegar

  • 1 cup granulated sugar

Spices & Seasonings

  • 1 tablespoon mustard seeds

  • 1 teaspoon celery seeds

  • 1 teaspoon ground turmeric

  • 1 teaspoon salt

  • ½ teaspoon cracked black pepper

  • ½ teaspoon red pepper flakes (optional, for heat)

Instructions

  1. Prep the Vegetables:

    • In a large mixing bowl, combine the sliced onions and bell peppers. Toss until evenly mixed.

  2. Make the Pickling Liquid:

    • In a medium saucepan, add apple cider vinegar, white vinegar, sugar, mustard seeds, celery seeds, turmeric, salt, black pepper, and red pepper flakes (if using).

    • Place over medium heat and bring just to a gentle boil, stirring occasionally until the sugar is completely dissolved.

  3. Combine & Cool:

    • Carefully pour the hot vinegar mixture over the onions and peppers in the bowl. Stir to ensure all vegetables are fully coated.

  4. Jar & Chill:

    • Let the mixture cool to room temperature, then transfer into clean jars or airtight containers.

    • Refrigerate for at least 24 hours before serving to let the flavors develop.

Brief Introduction

This quick and colorful pickled pepper onion mix is a fridge-friendly condiment that instantly upgrades sandwiches, grilled meats, or even salads. The sweet-tangy brine gets a gentle kick from spices and optional chili flakes, making it both versatile and addictive.

Step-by-Step Cooking Guide

1. Slicing the Veggies

Cut the onions and peppers evenly so they pickle at the same rate and look uniform in the jar.

2. Heating the Brine

Don’t skip dissolving the sugar completely — this ensures balanced flavor without grainy texture.

3. Marinating Time

While you can eat them after a couple of hours, letting them rest overnight deepens the flavor and brightens the color.

Ingredient Details & Substitution Tips

  • Bell Peppers: Use red, yellow, and orange for sweetness; green for a sharper bite.

  • Vinegar: Apple cider vinegar adds fruitiness, but you can swap for all white vinegar for a cleaner tang.

  • Sweetness: Adjust sugar to taste — for a more tart pickle, reduce to ¾ cup.

Recipe Variations & Serving Suggestions

  • Mexican-Inspired: Add a sliced jalapeño or two for extra heat.

  • Herbal Twist: Add a sprig of fresh dill or thyme to the jar.

  • Serving Ideas: On burgers, hot dogs, grilled chicken, or mixed into a cold pasta salad.

Storage & Make-Ahead Information

  • Store refrigerated for up to 2 weeks.

  • These are refrigerator pickles — do not store at room temperature unless processed in a water bath for canning.

Nutrition Facts (per ¼ cup serving)

Calories: ~25 | Carbs: 6g | Protein: 0g | Fat: 0g | Fiber: 1g | Sugar: 5g

FAQs

Q: Can I make these shelf-stable?
A: Yes — process jars in a boiling water bath for 10 minutes, but adjust vinegar/sugar ratios according to safe canning guidelines.

Q: Can I reuse the brine?
A: You can for another batch within a week, but the flavor will be milder.

Personal Story

I first made these for a backyard barbecue, thinking they’d be a small side condiment. They ended up being the star of the night — my friends piled them on everything from burgers to grilled corn. By the end of the evening, the jar was scraped clean.

If you want, I can also prepare a matching quick-pickle trio recipe card so it pairs with this one for your blog’s summer condiment section. That would give you a set of toppings for different meals. Would you like me to do that next?

Fresh Pumpkin Butter Pasta (Homemade Pumpkin Ravioli)

Delicate homemade pasta filled with creamy pumpkin and cheese, topped with a rich brown butter sage sauce — a seasonal comfort dish that feels straight out of an Italian countryside kitchen.

Servings: 4
Prep Time: 45 minutes (plus 30 minutes resting dough)
Cook Time: 10 minutes
Total Time: ~1 hour 25 minutes
Occasion: Fall & Winter Dinners, Holiday Meals, Special Date Nights

Ingredients

For the Pasta Dough

  • 1 cup (125g) plain white flour

  • 1 teaspoon coarse salt

  • 2 large egg yolks

  • 1 large egg

  • ½ teaspoon olive oil

For the Pumpkin Cheese Filling

  • 1 cup (245g) mashed pumpkin (cooked and cooled)

  • ¼ cup (28g) shredded mozzarella cheese

  • ¼ cup (25g) grated parmesan cheese

  • ½ cup (123g) creamy ricotta cheese

  • ½ teaspoon freshly ground black pepper

  • Pinch of salt

  • Pinch of nutmeg

  • 1 teaspoon minced garlic

For the Brown Butter Sage Sauce

  • ⅓ cup (75g) unsalted butter

  • ½ teaspoon minced garlic

  • ¼ teaspoon fresh sage leaves, finely diced

  • Freshly cracked black pepper & salt, to taste

Instructions

  1. Make the Pasta Dough:

    • In a large mixing bowl, whisk together flour and coarse salt.

    • Make a well in the center, add the egg yolks, whole egg, and olive oil.

    • Gradually mix flour into the eggs until a dough forms. Knead on a lightly floured surface for 7–10 minutes until smooth and elastic.

    • Wrap in plastic wrap and let rest at room temperature for 30 minutes.

  2. Prepare the Filling:

    • In a medium bowl, mix mashed pumpkin, mozzarella, parmesan, ricotta, pepper, salt, nutmeg, and garlic until smooth and creamy.

  3. Roll the Pasta:

    • Roll out the dough into thin sheets (about 1–2mm) using a rolling pin or pasta machine.

  4. Assemble the Ravioli:

    • Spoon small portions of filling evenly spaced on one pasta sheet. Lightly spray edges and spaces between filling with water.

    • Lay another pasta sheet over the top, pressing around filling to seal.

    • Cut into ravioli using a pastry cutter or knife, making sure edges are well sealed.

  5. Cook the Ravioli:

    • Bring a large pot of salted water to a boil.

    • Cook ravioli in batches for 3–4 minutes until they float to the top. Remove with a slotted spoon.

  6. Make the Sauce:

    • In a skillet over medium heat, melt butter until it begins to brown and smell nutty.

    • Add garlic, sage, salt, and pepper. Cook for 1–2 minutes until fragrant.

  7. Serve:

    • Drizzle the brown butter sage sauce over the hot ravioli. Garnish with extra parmesan if desired. Serve immediately.

Brief Introduction

This Fresh Pumpkin Butter Pasta is an autumn-inspired twist on classic Italian ravioli. The creamy pumpkin filling paired with nutty brown butter and fragrant sage creates a dish that’s rich, cozy, and perfect for special occasions or holiday gatherings.

Step-by-Step Cooking Guide

1. Kneading the Dough

The smoother and more elastic your dough, the easier it will be to roll thin without tearing. A pasta machine speeds things up, but a rolling pin works just fine.

2. Perfect Pumpkin Filling

Use roasted pumpkin for a deeper, sweeter flavor. If your pumpkin purée is watery, strain it before mixing with the cheeses.

3. Brown Butter Perfection

Cook butter gently until golden specks form and it smells nutty. Watch closely — it can burn fast.

Ingredient Details & Substitution Tips

  • Pumpkin: Butternut squash makes a great substitute.

  • Cheese: Swap mozzarella for fontina or asiago for a richer taste.

  • Sage: Fresh sage is best, but you can use ⅛ teaspoon dried if necessary.

Recipe Variations & Serving Suggestions

  • Crispy Topping: Add toasted breadcrumbs over the top for a bit of crunch.

  • Extra Indulgent: Stir a splash of cream into the brown butter sauce.

  • Family Style: Serve on a big platter with shaved parmesan and roasted walnuts.

Storage & Make-Ahead Information

  • Make Ahead: Assemble ravioli, freeze in a single layer, then transfer to a bag. Cook straight from frozen for 1–2 extra minutes.

  • Leftovers: Store cooked ravioli in an airtight container in the fridge for up to 2 days. Reheat gently with extra butter.

Nutrition Facts (per serving)

Calories: ~420 kcal | Carbs: 38g | Protein: 15g | Fat: 23g | Fiber: 3g | Sugar: 3g

FAQs

Q: Can I use store-bought pasta sheets?
A: Yes! Fresh lasagna sheets work well and cut down prep time significantly.

Q: My ravioli keep opening while boiling — what’s wrong?
A: Make sure the edges are moist before sealing and press firmly to close.

Personal Story

I first made this pumpkin ravioli for a cozy fall dinner with friends, and it was gone before I could get seconds. The brown butter sage sauce not only made the kitchen smell heavenly but also convinced my “pumpkin skeptic” friend to take home the leftovers.

If you want, I can now create a complete autumn-themed pasta spread for your recipe collection so this fits seamlessly with your other cozy fall dishes. Would you like me to do that next?

Christmas Fruit Salad

Fresh, colorful, and festive — this Christmas Fruit Salad combines seasonal fruits with a light honey-lime dressing for a holiday dish that’s as beautiful as it is delicious.

Servings: 6
Prep Time: 15 minutes
Total Time: 15 minutes
Occasion: Christmas, Holiday Parties, Winter Brunch

Ingredients

Fruit Mix

  • 1 cup red grapes

  • 1 cup green grapes

  • 1 pear, sliced

  • 1 red apple, sliced

  • 2 kiwis, peeled and sliced

  • 1 cup fresh raspberries

  • ¼ cup pomegranate seeds

Honey-Lime Dressing

  • 2 tbsp honey

  • 1 tbsp lime juice

  • 1 tbsp water

Instructions

  1. Prepare Fruit: Wash and dry all fruit. Slice the pear, apple, and kiwis into bite-sized pieces. Halve large grapes if desired.

  2. Mix Fruit: In a large glass bowl, gently combine grapes, pear, apple, kiwi slices, raspberries, and pomegranate seeds. Handle raspberries carefully so they stay intact.

  3. Make Dressing: In a small dish, whisk together honey, lime juice, and water until fully blended and smooth.

  4. Dress the Salad: Drizzle the honey-lime mixture over the fruit. Toss lightly to coat without crushing the softer fruits.

  5. Serve or Chill: Serve immediately or refrigerate covered for up to 6 hours before serving.

Brief Introduction

This salad is like Christmas in a bowl — the bright reds, greens, and golds give it a festive look, while the sweet-tart dressing ties everything together. Perfect for adding a healthy, refreshing touch to the holiday table.

Step-by-Step Cooking Guide

1. Preparing the Fruit

  • Use ripe but firm fruits to keep the salad fresh-looking for hours.

  • Soak apple and pear slices briefly in lemon water to prevent browning if making ahead.

2. Whisking the Dressing

  • The honey-lime combo gives a light glaze and a burst of flavor without overpowering the natural sweetness of the fruit.

3. Gentle Mixing

  • Add the raspberries last and fold them in gently to keep them whole.

Ingredient Details & Substitution Tips

  • Pears: Bosc or Anjou pears work best — they’re sweet yet firm.

  • Pomegranate Seeds: Can be swapped for dried cranberries if you prefer.

  • Kiwi: Golden kiwi adds a different color and a sweeter flavor.

Recipe Variations & Serving Suggestions

  • Minty Twist: Add finely chopped fresh mint for a cool finish.

  • Holiday Dessert Parfait: Layer the salad with vanilla yogurt and granola in glasses.

  • Tropical Upgrade: Toss in pineapple chunks for extra brightness.

Storage & Make-Ahead Information

  • Make Ahead: Prepare fruit and dressing separately. Combine just before serving.

  • Storage: Keep covered in the refrigerator for up to 6 hours. Best enjoyed fresh.

Nutrition Facts (per serving)

Calories: ~120 kcal | Carbs: 32g | Protein: 1g | Fat: 0.5g | Sugar: 24g | Fiber: 4g

FAQs

Q: Can I double this recipe for a big crowd?
A: Absolutely! Just keep the same dressing ratio to maintain flavor balance.

Q: How do I keep raspberries from getting mushy?
A: Add them right before serving and handle gently when tossing the salad.

Personal Story

The first time I made this salad for Christmas brunch, I didn’t expect it to disappear faster than the desserts — but it did. Everyone loved the fresh burst of flavor between heavier holiday dishes, and now it’s a must-have tradition on our table.

Do you want me to also make a matching winter salad photo inspiration guide so it looks perfect on a holiday spread? That could tie in beautifully with the rest of your recipe blog.


Delightful Hidden Surprise Easter Cakes

Mini bundt cakes filled with pastel candies and topped with colorful glaze — a fun, festive dessert that hides a sweet surprise inside!

Servings: 6 medium bundt cakes
Prep Time: 20 minutes
Cook Time: 20–25 minutes (depending on cake mix)
Cooling Time: 30–40 minutes
Total Time: ~1 hour 15 minutes
Occasion: Easter, Spring Celebrations, Baby Showers

Ingredients

For the Cakes

  • 1 box white cake mix (or homemade white cake batter), prepared as directed

  • Assorted Easter-themed candies (jelly beans, mini eggs, pastel M&Ms, etc.)

For the Glaze

  • 2 cups powdered sugar

  • 2 tbsp milk (add more if needed for consistency)

  • 1 tsp fresh lemon juice

  • ½ tsp vanilla extract

  • Pastel gel food coloring (pink, yellow, lavender, mint green, etc.)

Instructions

  1. Prepare Pan: Butter and flour a mini bundt cake pan with 6 slots. Preheat oven according to cake mix instructions.

  2. Make Cake Batter: Follow box instructions or your homemade recipe to prepare white cake batter. Pour evenly into prepared bundt pan, filling each mold about ⅔ full.

  3. Bake & Cool: Bake according to directions (usually 20–25 minutes) or until a toothpick inserted comes out clean. Let cool in pan for 10 minutes, then transfer to a wire rack to cool completely.

  4. Level Cakes: Once cooled, trim a small slice from the bottom of each cake so it stands upright without wobbling.

  5. Make Glaze: In a bowl, whisk powdered sugar, milk, vanilla, and lemon juice until smooth and thick but pourable. Adjust consistency with more milk (if too thick) or more sugar (if too thin). Divide glaze into small bowls and tint each with a different pastel gel food color.

  6. Add Hidden Candy: Fill the center hole of each bundt cake with Easter candies, mounding slightly if desired.

  7. Glaze & Decorate: Drizzle pastel glaze over cakes, keeping the center hole visible so candy peeks through. Top with extra candy for decoration.

  8. Serve & Surprise: Present whole for a “hidden treasure” effect — when sliced, the candy spills out for a delightful reveal.

Brief Introduction

These charming mini bundt cakes are a playful twist on the classic Easter dessert. Their pastel glaze and hidden candy center make them a perfect table centerpiece — and the big reveal when cutting into them is guaranteed to make both kids and adults smile.

Step-by-Step Cooking Guide

1. Baking the Cakes

Mini bundt cakes are the perfect size for individual servings, and the center hole makes an easy spot to hide candy.

2. Mixing Pastel Glaze

Use gel food coloring for bright yet soft spring shades without thinning the glaze.

3. Filling & Decorating

Pile candies high for maximum “wow” factor when the cakes are cut open.

Ingredient Details & Substitution Tips

  • Cake Mix: Use lemon, strawberry, or funfetti cake mix for extra color and flavor.

  • Candies: Choose ones that won’t melt easily at room temperature.

  • Glaze: You can replace lemon juice with orange juice for a softer citrus flavor.

Recipe Variations & Serving Suggestions

  • Chocolate Lover’s Version: Use chocolate cake mix and fill with mini chocolate eggs.

  • Kid’s Party Twist: Fill with rainbow sprinkles or gummy candies.

  • Extra Festive: Add edible glitter or gold leaf flakes on top.

Storage & Make-Ahead Information

  • Room Temperature: Store covered for up to 3 days.

  • Refrigeration: Not recommended as candies may become sticky.

  • Make Ahead: Bake cakes 1 day ahead, glaze and fill just before serving.

Nutrition Facts (per cake, based on 6 cakes)

Calories: ~380 kcal | Carbs: 65g | Protein: 4g | Fat: 12g | Sugar: 45g

FAQs

Q: Can I make these without a bundt pan?
A: Yes — bake cupcakes, then hollow out the center with a melon baller before filling with candy.

Q: How do I keep glaze from dripping too much?
A: Ensure the cakes are completely cool and glaze is slightly thick so it clings nicely.

Personal Story

The first time I made these was for an Easter brunch, and I underestimated how much excitement a little hidden candy could bring. When the first cake was cut open, everyone leaned in to see the surprise — and instantly grabbed a slice. It’s now a yearly tradition.

If you’d like, I can also create a spring brunch display idea showing how to arrange these cakes with flowers, eggs, and pastel decorations for maximum table impact. Would you like me to do that next?

Savory Stuffed Butternut Squash

Sweet roasted squash halves filled with a hearty sausage, spinach, cranberry, and pecan mixture — a perfect balance of savory, sweet, and nutty flavors.

Servings: 4 (as a main) or 8 (as a side)
Prep Time: 15 minutes
Cook Time: 40 minutes
Total Time: ~55 minutes
Dietary Badges: Gluten-Free, High-Protein

Ingredients

Butternut Squash Base

  • 2 large or medium butternut squash

  • 2 tbsp olive oil

  • Pinch of salt (adjust to taste)

  • Freshly cracked black pepper

Filling with Sausage

  • 1 tbsp olive oil

  • 1 small onion, finely chopped

  • 14 oz hot Italian sausage, casing removed and crumbled

  • 4 garlic cloves, finely chopped

  • 1 tbsp dried Italian herb mix

  • 4 oz fresh spinach leaves

  • ½ cup dried cranberries

  • ½ cup pecans, roughly chopped

Optional Toppings

  • Fresh thyme sprigs

  • Additional freshly ground black pepper

Instructions

  1. Prep Squash: Preheat oven to 400°F (200°C). Halve squash lengthwise and scoop out seeds and stringy bits.

  2. Season & Roast: Place squash halves cut-side up on a sheet pan. Drizzle with olive oil, rub into the flesh, and season with salt and pepper. Flip cut-side down (line pan with parchment for easy cleanup) and roast for 30–40 minutes, or until fork-tender.

  3. Cook Filling: While squash roasts, heat 1 tbsp olive oil in a large skillet over medium heat. Sauté onion for 2 minutes until soft and lightly golden. Add sausage, garlic, and Italian seasoning. Cook about 5 minutes, breaking sausage into crumbles until fully cooked.

  4. Add Greens & Mix-ins: Stir in spinach and cook until wilted, about 5 minutes. Add cranberries and pecans, stirring to combine. Taste and adjust seasoning.

  5. Hollow Squash: Once roasted, remove squash from oven and flip cut-side up. Let cool slightly, then scoop out some flesh to make a cavity for filling, leaving a 1-inch border.

  6. Fill & Serve: Reheat filling if needed, then spoon evenly into squash halves, mounding if necessary. Top with fresh thyme and extra pepper if desired. Serve warm as a main or side.

Brief Introduction

Stuffed butternut squash is the ultimate cold-weather comfort — soft, sweet squash cradles a rich, savory sausage filling dotted with tart cranberries and crunchy pecans. It’s festive enough for the holidays yet simple enough for a weeknight dinner.

Step-by-Step Cooking Guide

1. Roast the Squash

Roasting cut-side down helps the squash caramelize and stay moist.

2. Build the Filling

Cooking sausage with onion and garlic builds a flavorful base; spinach adds freshness and cranberries balance the richness.

3. Assemble & Serve

Fill the squash generously for an eye-catching presentation.

Ingredient Details & Substitution Tips

  • Sausage: Use mild Italian sausage for less spice or chicken sausage for a lighter option.

  • Cranberries: Swap for chopped dried apricots or golden raisins.

  • Pecans: Walnuts or almonds work well too.

Recipe Variations & Serving Suggestions

  • Vegetarian: Swap sausage for cooked lentils or quinoa and season with smoked paprika.

  • Cheesy Twist: Add shredded Gruyère or Parmesan to the filling before stuffing.

  • Holiday Centerpiece: Garnish with pomegranate seeds for extra color.

Storage & Make-Ahead Information

  • Make Ahead: Roast squash and prepare filling up to 2 days ahead. Reheat before assembling.

  • Refrigeration: Store assembled squash in an airtight container up to 3 days.

  • Freezing: Freeze filling separately for up to 2 months.

Nutrition Facts (per serving, based on 8 servings)

Calories: ~260 kcal | Protein: 11g | Carbs: 22g | Fat: 14g | Fiber: 5g | Sodium: 420mg

FAQs

Q: Can I eat the squash skin?
A: Butternut squash skin becomes softer when roasted, but it’s still a bit tough — most people scoop the flesh out when eating.

Q: How can I make this ahead for a party?
A: Assemble the stuffed squash, cover, and refrigerate. Bake at 350°F for 15–20 minutes before serving.

Personal Story

I first made this recipe for a Friendsgiving, and it disappeared before the turkey even got carved. The mix of sweet, savory, and nutty flavors feels fancy, but it’s surprisingly simple to pull together.

Do you want me to also create a vegetarian quinoa-stuffed butternut squash variation so you can list it as an alternative in the same post? That would make the recipe more versatile for different diets.

Sweet Brown Sugar Carrots

Perfectly tender carrots tossed in a glossy butter-brown sugar glaze with just a hint of seasoning — a classic side dish that’s as easy as it is irresistible.

Servings: 4–6
Prep Time: 5 minutes
Cook Time: 15 minutes
Total Time: 20 minutes
Dietary Badges: Vegetarian, Gluten-Free

Ingredients

  • Carrots (2 lbs / ~900g), peeled and sliced into even pieces

  • Butter (¼ cup / 56g)

  • Packed brown sugar (¼ cup / 50g)

  • Salt (¼ tsp)

  • White pepper (⅛ tsp)

  • Optional Garnish: Fresh parsley, chopped

Instructions

  1. Cook Carrots: Add sliced carrots to a large pot and cover with water by about 1 inch. Bring to a boil, reduce to a simmer, cover, and cook for 8–10 minutes until just tender with a slight bite.

  2. Drain & Set Aside: Pour off the water and set carrots aside temporarily.

  3. Make Glaze: In the same pot, melt butter with brown sugar, salt, and white pepper over low heat, stirring until smooth.

  4. Glaze Carrots: Return carrots to the pot and cook, stirring, for about 5 minutes until evenly coated and glossy.

  5. Serve: Transfer to a serving dish, sprinkle with parsley if using, and serve hot.

Notes:

  • White pepper gives a gentle heat without overpowering the sweetness. Black pepper can be substituted for a stronger flavor.

  • Baby carrots can be used instead — adjust cooking time as needed.

Brief Introduction

These sweet brown sugar carrots are a staple at holiday tables and Sunday dinners alike. The glaze balances buttery richness with caramel-like sweetness, making vegetables the star of the meal.

Step-by-Step Cooking Guide

Carrot Prep

  • Uniform slices ensure even cooking.

Boiling

  • Simmer just until tender to keep the carrots from becoming mushy.

Glazing

  • Keep the heat low so the sugar melts gently without burning.

Ingredient Details & Substitution Tips

  • Butter: Unsalted is best for controlling salt levels.

  • Brown Sugar: Light brown sugar offers milder sweetness; dark brown sugar has a stronger molasses note.

  • Pepper: White pepper keeps the color bright; black pepper adds more visible specks and bold flavor.

Recipe Variations & Serving Suggestions

  • Maple Carrots: Replace brown sugar with pure maple syrup for a warm, earthy sweetness.

  • Spiced Version: Add a pinch of cinnamon or nutmeg to the glaze.

  • Savory Twist: Replace sugar with honey and add fresh thyme leaves.

Storage & Make-Ahead Information

  • Refrigeration: Store in an airtight container for up to 4 days.

  • Reheating: Warm in a skillet over low heat to restore glaze consistency.

  • Make-Ahead: Cook carrots and prepare glaze separately, then combine and heat just before serving.

Nutrition Facts (per serving, based on 6 servings)

Calories: ~140 kcal | Carbs: 17g | Protein: 1g | Fat: 7g | Sodium: 210mg | Fiber: 3g

FAQs

Q: Can I roast the carrots instead of boiling them?
A: Yes — toss sliced carrots in oil, roast at 200°C (400°F) for 20–25 minutes, then toss with the glaze in a skillet.

Q: Is white pepper necessary?
A: Not at all — it just adds subtle warmth without the black specks of regular pepper.

Personal Story

I first made these for a Thanksgiving dinner when I was short on time, and they disappeared faster than the main course. They’ve since become a go-to “easy win” side dish for any family gathering.

Do you want me to also prepare a sheet-pan roasted version of this recipe so you can include two cooking methods in one post for more flexibility?

Honey Peach White Cheddar Sandwich

Sweet summer peaches meet creamy ricotta, sharp white cheddar, and golden buttery bread for a grilled sandwich that’s both decadent and refreshing.

Servings: 2 sandwiches
Prep Time: 10 minutes
Cook Time: 6–8 minutes
Total Time: 18 minutes
Dietary Badges: Vegetarian (without bacon)

Ingredients

Main Ingredients

  • Peaches, peeled and sliced (2)

  • Sourdough bread slices (4) — challah, multigrain, or thick white bread also work

  • Ricotta cheese (2–4 tbsp, optional)

  • Honey (1 tbsp)

  • White cheddar cheese slices (4)

  • Butter (2 tbsp)

Optional Ingredients

  • Crispy bacon slices (4)

  • Fresh basil leaves

  • Balsamic glaze drizzle

Instructions

  1. Prep Peaches: Peel and slice peaches; set aside.

  2. Assemble Base: Spread ricotta on one side of each bread slice. On two slices, layer peach slices and drizzle with honey. On the other two slices, place white cheddar cheese.

  3. Butter Bread: Spread butter on the outer side of each slice of bread.

  4. Grill Sandwich: Heat a panini press or skillet over medium-low. Cook sandwiches until cheese is melted and bread is golden (reduce to low if browning too fast).

  5. Optional Add-Ons: If desired, lift top bread slice and add bacon, basil, or balsamic glaze before serving.

  6. Serve: Enjoy immediately while the bread is crisp and cheese is perfectly melted.

Notes:

  • White cheddar provides a sharp contrast to the sweet peaches, but brie or Havarti make a creamier alternative.

  • Ricotta adds creaminess but can be omitted for a sharper flavor profile.

Brief Introduction

This honey peach white cheddar sandwich strikes the perfect balance between sweet, savory, and buttery crisp. It’s a quick gourmet lunch or light dinner option, especially when peaches are at their juiciest.

Step-by-Step Cooking Guide

Layering the Flavors

  1. Cheese & Fruit Harmony: Ricotta and cheddar create a creamy-sharp combo that pairs beautifully with ripe peaches.

  2. Sweet Drizzle: Honey enhances peach sweetness and caramelizes slightly during cooking.

Grilling to Perfection

  1. Gentle Heat: Medium-low ensures the cheese melts before bread over-browns.

  2. Final Flourish: Add bacon for smokiness, basil for freshness, or balsamic glaze for tangy depth.

Ingredient Details & Substitution Tips

  • Bread: Sourdough gives tang; challah is softer and sweeter; multigrain adds nuttiness.

  • Cheese: White cheddar for sharpness, brie for creaminess, or fontina for mild melt.

  • Peaches: Fresh and ripe are ideal, but grilled peaches add a smoky twist.

  • Sweetener: Maple syrup or agave can replace honey.

Recipe Variations & Serving Suggestions

  • Caprese-Inspired: Add tomato slices and mozzarella instead of cheddar.

  • Savory Spin: Swap peaches for grilled pears and add prosciutto.

  • Brunch Style: Serve with a fried egg on top.

Storage & Make-Ahead Information

  • Best Served Fresh: This sandwich is at peak flavor and texture right after cooking.

  • Short-Term Hold: Keep warm in a 90°C (200°F) oven for up to 15 minutes.

  • Make-Ahead Elements: Slice peaches and prepare add-ons ahead; assemble and grill when ready to serve.

Nutrition Facts (per serving, without optional ingredients)

Calories: ~420 kcal | Carbs: 38g | Protein: 15g | Fat: 22g | Sodium: 550mg | Sugar: 13g

FAQs

Q: Can I use canned peaches?
A: Yes, but drain and pat dry to avoid soggy bread.

Q: How do I make it less sweet?
A: Reduce or skip the honey, and use extra-sharp cheddar.

Q: Can I grill it without a panini press?
A: Absolutely — just use a skillet and press down with a spatula for even browning.

Personal Story

This sandwich was born during peach season when I had more ripe fruit than I could eat fresh. Pairing it with tangy white cheddar and golden buttery bread turned a simple lunch into a café-worthy treat.

If you want, I can also make short image captions for a photo guide so it’s blog-ready without extra editing. Would you like me to prepare those for this recipe?

Philly Steak Cheese Fries

All the flavors of a Philly cheesesteak piled high over crispy waffle fries and smothered in gooey melted cheese — the ultimate indulgent comfort food.

Servings: 4–6
Prep Time: 15 minutes
Cook Time: 25 minutes
Total Time: 40 minutes
Dietary Badges: Contains Dairy, Contains Gluten (from fries unless using GF), Contains Meat

Ingredients

Main Ingredients

  • Steak, thinly sliced (450g — ribeye or sirloin recommended)

  • Garlic salt (1 tsp)

  • Ground black pepper (½ tsp)

  • Green bell pepper, sliced

  • Large onion, sliced

  • White American cheese slices (8–10 slices)

  • Frozen waffle cut fries (567g bag)

  • Olive oil (1 tbsp)

Instructions

  1. Preheat Oven: Set oven to 220°C (425°F).

  2. Cook Steak: Heat an oven-safe skillet over medium-high heat with olive oil. Add steak, season with garlic salt and pepper, and sauté until browned. Remove and set aside.

  3. Sauté Veggies: Keep 1 tbsp of cooking juices in skillet; discard the rest. Add bell pepper and onion; cook until tender but still slightly crisp. Remove and set aside with steak.

  4. Layer Fries & Cheese: Remove skillet from heat. Spread frozen waffle fries evenly across bottom. Top with 4 cheese slices, then steak and vegetables. Add remaining cheese slices on top.

  5. Bake: Transfer skillet to oven; bake 8–10 minutes, until cheese is melted, bubbly, and golden.

  6. Serve: Let cool 1–2 minutes before serving hot and gooey.

Notes:

  • Waffle fries hold toppings well, but you can swap for curly fries, shoestring, or steak fries.

  • For extra indulgence, drizzle with garlic aioli or add chopped parsley before serving.

Brief Introduction

Philly cheesesteaks meet loaded fries in this skillet-baked masterpiece. Tender steak, sautéed peppers and onions, crispy waffle fries, and creamy white American cheese come together in a dish that’s perfect for sharing — or keeping all to yourself.

Step-by-Step Cooking Guide

Steak & Veggie Prep

  1. Sear Steak: Quick searing keeps steak juicy while adding flavor.

  2. Sauté Veggies: Cook peppers and onions until softened but still vibrant for texture.

Assembly

  1. Fries First: Lay fries flat for even crisping and coverage.

  2. Layered Cheese: Half the cheese under the toppings, half on top for maximum melt.

Oven Finish

  1. Melt & Brown: Baking ensures toppings heat through and cheese bubbles beautifully.

Ingredient Details & Substitution Tips

  • Steak: Ribeye for richness, sirloin for leaner option; thin slicing ensures quick cooking.

  • Cheese: White American melts smoothly; provolone or mozzarella also work.

  • Fries: Waffle fries give the best topping hold; sweet potato fries for a twist.

  • Peppers & Onions: Can be swapped with mushrooms for a classic “Philly” variation.

Recipe Variations & Serving Suggestions

  • Spicy Kick: Add pickled jalapeños or hot sauce drizzle.

  • BBQ Twist: Swap garlic salt for BBQ seasoning and drizzle with BBQ sauce before serving.

  • Party Platter: Serve in the skillet or transfer to a platter for easy sharing.

Storage & Make-Ahead Information

  • Refrigeration: Store leftovers in airtight container for up to 3 days.

  • Reheating: Bake at 180°C (350°F) until heated through; broil briefly to re-crisp fries.

  • Make-Ahead: Prep steak and veggies in advance; assemble and bake just before serving.

Nutrition Facts (per serving, 6 servings)

Calories: ~510 kcal | Carbs: 35g | Protein: 27g | Fat: 30g | Sodium: 890mg | Fiber: 3g

FAQs

Q: Can I make this without an oven-safe skillet?
A: Yes — cook steak and veggies in a regular pan, then transfer everything to a baking dish for layering and baking.

Q: Can I use a different cheese?
A: Absolutely — provolone is a more traditional Philly choice, and mozzarella gives extra stretch.

Q: How do I make it gluten-free?
A: Use certified GF frozen fries and check your cheese and seasonings.

Personal Story

I first made this for a game day gathering, thinking it would be a fun snack. It turned into the main event, with people hovering around the skillet until every last cheesy fry was gone. It’s indulgent, messy in the best way, and guaranteed to make you everyone’s favorite cook.

If you want, I can also create short, punchy captions for each cooking step so this post is ready for your blog’s step-by-step image section. Want me to prepare those next?

Garlic Butter Beef and Rice

A one-pan comfort classic — tender rice, savory beef, and a silky garlic butter cheese sauce come together for an easy, hearty dinner.

Servings: 4–6
Prep Time: 10 minutes
Cook Time: 30 minutes
Total Time: 40 minutes
Dietary Badges: Contains Dairy, Contains Gluten-Free Option (with GF broth)

Ingredients

Main Ingredients

  • Ground beef (450g)

  • Long-grain white rice, uncooked (200g)

  • Low-sodium beef broth (720ml)

  • Small onion, diced

  • Garlic cloves, minced

Dairy and Cheese

  • Butter, divided (45g total)

  • Sharp cheddar cheese, shredded (120g)

  • Parmesan cheese, freshly grated (50g)

  • Whole milk (120ml)

Seasoning and Garnish

  • Salt, to taste

  • Black pepper, to taste

  • Italian seasoning (1 tsp)

  • Fresh parsley, chopped (2 tbsp, optional garnish)

Instructions

  1. Sauté Onions: In a large skillet over medium heat, melt 15g butter. Add diced onion and cook 3–4 minutes until translucent.

  2. Brown Beef: Add ground beef and cook, breaking apart with a spoon, until browned. Drain excess fat if needed.

  3. Add Garlic: Stir in minced garlic; cook 1 minute until fragrant.

  4. Add Rice & Liquid: Stir in uncooked rice, beef broth, Italian seasoning, salt, and pepper. Mix well so rice is evenly coated.

  5. Simmer: Bring to a boil, then reduce heat to low, cover, and simmer 18–20 minutes until rice is tender and most liquid absorbed. Avoid lifting the lid too often.

  6. Make Cheese Sauce: While rice cooks, melt remaining 30g butter in a small saucepan over low heat. Add milk, cheddar, and Parmesan, stirring constantly until smooth.

  7. Combine: Pour cheese sauce into skillet with beef and rice; stir until creamy and fully combined.

  8. Finish & Serve: Cook uncovered 2–3 minutes for flavors to meld. Garnish with parsley and serve hot.

Notes:

  • For extra flavor, toast the uncooked rice in the skillet for 1–2 minutes before adding broth.

  • Add veggies like diced bell peppers, mushrooms, or peas for variety.

Brief Introduction

This garlic butter beef and rice is comfort food at its finest — one pan, simple steps, and flavors that hit all the right notes. The creamy cheese sauce elevates it from weeknight meal to irresistible family favorite.

Step-by-Step Cooking Guide

Building the Base

  1. Onion & Beef: Create a savory foundation with sautéed onions and browned beef.

  2. Garlic Boost: Add minced garlic for that warm, aromatic kick.

Cooking the Rice

  1. Simmer to Tender: Let rice absorb broth and seasonings for a flavorful, fluffy finish.

Cheese Sauce Magic

  1. Low & Slow: Melt butter, milk, cheddar, and Parmesan over low heat, whisking constantly until smooth.

Final Blend

  1. Creamy Finish: Stir the sauce into the beef-rice mix and serve while hot and melty.

Ingredient Details & Substitution Tips

  • Beef: Use lean beef for less grease; ground turkey or chicken works too.

  • Rice: Long-grain holds its shape best; jasmine adds a subtle floral note.

  • Cheddar & Parmesan: Freshly shredded melts smoother than pre-packaged.

  • Milk: Swap with half-and-half for richer sauce.

  • Italian Seasoning: Use fresh herbs for a brighter flavor.

Recipe Variations & Serving Suggestions

  • Veggie Boost: Stir in spinach or broccoli before adding cheese sauce.

  • Spicy Kick: Add red pepper flakes or diced jalapeños.

  • Serving Ideas: Serve with a simple side salad or garlic bread.

Storage & Make-Ahead Information

  • Refrigeration: Store in airtight container for up to 4 days.

  • Freezing: Freeze in portions up to 2 months; thaw before reheating.

  • Reheating: Microwave gently, stirring occasionally; add a splash of milk if needed.

  • Make-Ahead: Cook rice and beef mixture ahead; reheat with fresh cheese sauce.

Nutrition Facts (per serving, 6 servings)

Calories: ~430 kcal | Carbs: 32g | Protein: 22g | Fat: 24g | Sodium: 640mg

FAQs

Q: Can I use brown rice?
A: Yes, but increase broth to 900ml and simmer for 35–40 minutes.

Q: Can I skip the cheese sauce?
A: Yes — you’ll have a flavorful garlic butter beef and rice without the creamy element.

Q: How do I keep the sauce smooth?
A: Use low heat and constant stirring to prevent separation or graininess.

Personal Story

I first made this dish as a quick dinner after a busy workday. The cheesy garlic butter sauce was a last-minute addition — and it turned a simple beef and rice skillet into something that tasted like a hug in a bowl.

If you want, I can also create step-by-step photo captions so this is fully ready for the “visual guide” section of your blog posts. Would you like me to prepare those?

Chicken Bacon Crunch Casserole

Creamy, cheesy chicken and bacon casserole topped with golden, crispy tater tots — the perfect blend of comfort and crunch.

Servings: 8
Prep Time: 15 minutes
Cook Time: 40 minutes
Total Time: 55 minutes
Dietary Badges: Contains Dairy, Contains Gluten, Contains Meat

Ingredients

Casserole Base

  • Frozen tater tots (32 oz bag)

  • Sharp cheddar cheese, shredded

  • Ranch seasoning mix (1 packet)

  • Cream of chicken soup (1 can)

  • Sour cream

  • Bacon, cooked and crumbled (reserve 2 tbsp for garnish)

  • Cooked chicken, chopped or shredded

Fresh Garnish

  • Green onions, sliced

  • Reserved crumbled bacon

Instructions

  1. Preheat Oven: Set to 400°F (200°C). Grease a 9×13-inch baking dish.

  2. Mix Filling: In a large bowl, combine chicken, most of the bacon (reserve 2 tbsp for garnish), sour cream, cream of chicken soup, ranch mix, and shredded cheddar. Mix until fully combined.

  3. Assemble Casserole: Spread mixture evenly in the prepared baking dish. Arrange frozen tater tots in a single layer on top.

  4. Bake: Cook for about 40 minutes, until tater tots are golden and crispy and casserole is bubbling at the edges.

  5. Garnish & Serve: Sprinkle with reserved bacon and sliced green onions. Serve hot.

Notes:

  • Rotisserie chicken is a quick, flavorful shortcut.

  • Assemble ahead and refrigerate until baking, or freeze for up to 3 months.

Brief Introduction

This casserole is like a loaded baked potato in a dish — creamy chicken, smoky bacon, sharp cheddar, and crispy tater tots come together for the ultimate comfort food. It’s family-friendly, freezer-friendly, and weeknight-approved.

Step-by-Step Cooking Guide

Filling Prep

  1. Combine Base: Mix chicken, bacon, sour cream, cream soup, ranch seasoning, and cheddar until creamy and uniform.

Layering

  1. Spread & Top: Smooth mixture in baking dish, then neatly arrange tater tots on top for even crisping.

Baking & Serving

  1. Bake Until Golden: Watch for bubbling edges and crunchy, golden tater tots.

  2. Add Fresh Finish: Sprinkle with green onions and extra bacon right before serving.

Ingredient Details & Substitution Tips

  • Chicken: Rotisserie, baked, or leftover roasted chicken all work. Turkey is a great substitute.

  • Bacon: Thick-cut bacon gives bigger crunchy bits; turkey bacon for a lighter version.

  • Cheddar Cheese: Sharp cheddar for bold flavor; Colby Jack or mozzarella for a milder profile.

  • Tater Tots: Swap for seasoned potato wedges or hash brown patties for a twist.

Recipe Variations & Serving Suggestions

  • Spicy Kick: Add diced jalapeños or a pinch of cayenne to the filling.

  • Veggie Boost: Stir in broccoli florets or diced bell peppers.

  • Serving Ideas: Pair with a side salad or roasted vegetables for balance.

Storage & Make-Ahead Information

  • Refrigeration: Store leftovers in airtight container for up to 4 days.

  • Freezing: Freeze unbaked casserole up to 3 months; thaw before baking.

  • Reheating: Bake at 350°F covered with foil until heated through.

  • Make-Ahead: Assemble, cover, and refrigerate up to 24 hours before baking.

Nutrition Facts (per serving, 8 servings)

Calories: ~480 kcal | Carbs: 26g | Protein: 23g | Fat: 32g | Sodium: 950mg | Fiber: 2g

FAQs

Q: Can I use leftover turkey instead of chicken?
A: Yes — it works perfectly, especially after the holidays.

Q: Can I use Greek yogurt instead of sour cream?
A: Absolutely, for a lighter, tangier option.

Q: How do I keep the tater tots extra crispy?
A: Make sure they’re in a single layer and avoid overcrowding.

Personal Story

This casserole was born out of a craving for comfort food that still had texture and bite. The combination of creamy filling and crunchy tater tot topping hits every note — and the bacon-green onion garnish takes it over the top. It’s my go-to for potlucks and lazy Sunday dinners.

If you want, I can also create process photo captions so it’s completely ready for the “Hero Image & Step-by-Step Visual Guide” part of your outline. Would you like me to prepare those next?